Setting Up Row-Level Security
You can choose to set up row-level security in the repository, or in the database.
Implementing row-level security in the repository provides many benefits, including the following:
-
All users share the same database connection pool for better performance
-
All users share cache for better performance
-
You can define and maintain security rules that apply across many federated data sources
Implementing row-level security in the database, in contrast, is good for situations where multiple applications share the same database. Note that even when you design and implement row-level security in the database, you should still define and apply object permissions in the repository.
Although it is possible to set up row-level security in both the repository and in the database, you typically do not enforce row-level security in both places unless you have a particular need to do so.
This section contains the following topics:
Setting Up Row-Level Security (Data Filters) in the Repository
Data filters are a security feature that provide a way to enforce row-level security rules in the repository.
Data filters are set up in the repository using the Administration Tool and are applied for a particular application role.
You typically do not set up data filters if you have implemented row-level security in the database, because in this case, your row-level security policies are being enforced by the database rather than the Oracle BI Server.
Data filters can be set for objects in both the Business Model and Mapping layer and the Presentation layer. Applying a filter on a logical object impacts all Presentation layer objects that use the object. If you set a filter on a Presentation layer object, it is applied in addition to any filters that might be set on the underlying logical objects.
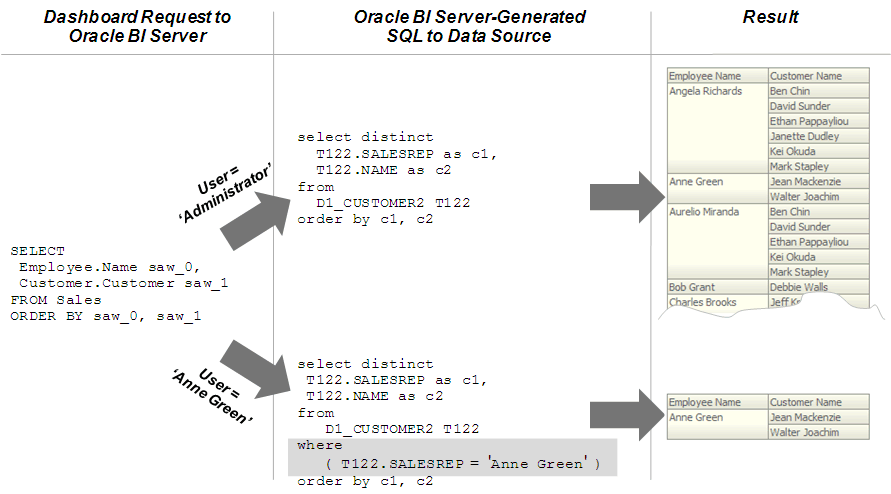
The image shows how data filter rules are enforced in the Oracle BI Server. The security rules are applied to all incoming clients and cannot be breached, even when the Logical SQL query is modified.
In this example, a filter has been applied to an application role. When Anne Green, who is a member of that role, sends a request, the return results are limited based on the filter. Because no filters have been applied to the application roles for the Administrator user, all results are returned. The Oracle BI Server-generated SQL takes into account any data filters that have been defined.
You should always set up data filters for particular application roles rather than for individual users.
To set up data filters to apply row-level authorization rules for queries:
Setting Up Row-Level Security in the Database
You must implement row-level security in the database to set up Oracle Business Intelligence. You can configure your connection pools so that the Oracle BI Server passes the credentials for each user to the database.
The database then uses the credentials to apply its own row-level security rules to user queries.
Row-level database security is different from database authentication. See About Authentication in the Security Guide for Oracle Business Intelligence Enterprise Edition. Rather, row-level database security provides database authorization. In other words, it applies access security to particular rows in the database.
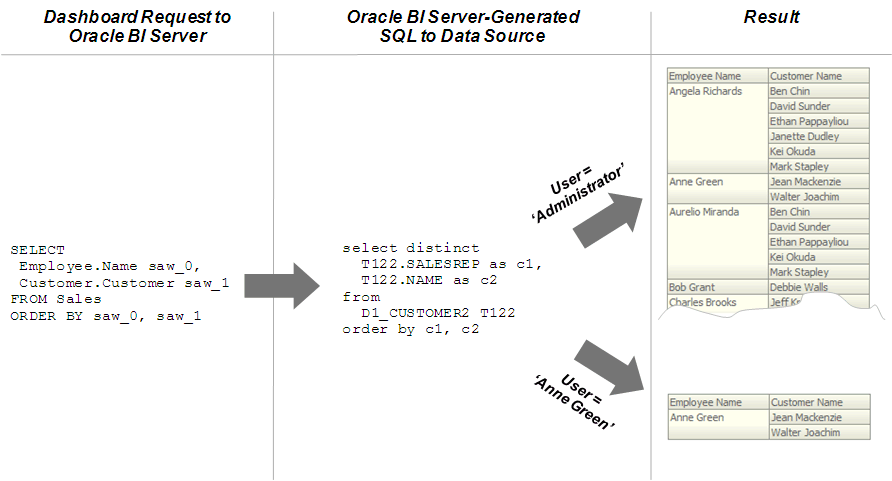
The image shows how row-level security is enforced in the database for Oracle Business Intelligence queries. The security rules are applied to all incoming clients and cannot be breached, even when the Logical SQL query is modified. In this example, the results returned are different depending on which user generated the query, even though the SQL query generated by the Oracle BI Server is the same. The returned results are based on rules created and enforced in the database.
In addition to setting up Oracle Business Intelligence for row-level security in the database, you must define your set of users, permissions, and security policies in the database itself. Refer to your database documentation for more information.
Consider the following about this configuration:
-
Row-level security does not work when SSO is used, or for any cases that involve impersonation such as Delivers, because the password for the end user is not available to the Oracle BI Server.
-
A connection script can be used to achieve the same functionality for Oracle Database data sources.
-
For Essbase or Hyperion Financial Management data sources, the connection pool displays an additional option to implement SSO.
To set up Oracle Business Intelligence for row-level access security in the database:
After you have set up row-level security in the database, you must set up object permissions in the repository for Presentation layer or other objects. You can also set query limits (governors). See Setting Up Object Permissions and Setting Query Limits for more information.

