Integrating with Microsoft Active Directory
Microsoft Active Directory supports the LDAP interface and therefore can be configured with BI Publisher using LDAP Security.
Configuring the Active Directory
Configure support for Active Directory by adding users and system groups.
To configure the active directory:
-
Add users who must access BI Publisher.
Add the users under "Users" or any other organization unit in the Domain Root.
-
Add the BI Publisher system groups. The Scope of the groups must be Domain Local.
The table below describes the BI Publisher system groups that must be added.
BI Publisher System Group Description XMLP_ADMIN
The administrator role for the BI Publisher server. You must assign the Administrator account used to access your LDAP server the XMLP_ADMIN group.
XMLP_DEVELOPER
Allows users to create and edit reports and data models.
XMLP_SCHEDULER
Allows users to schedule reports.
XMLP_TEMPLATE_DESIGNER
Allows users to connect to the BI Publisher server from the Template Builder for Word and to upload and download templates. Allows users to design layouts using the BI Publisher Layout Editor.
-
Grant BI Publisher system groups to global groups or users.
You can grant BI Publisher system groups directly to users or through global groups.
Example 1: Grant Users the BI Publisher Administrator Role
- Under the Active Directory User and Computers, open the XMLP_ADMIN group and click the Members tab.
- Click Add to add users who need to BI Publisher Administrator privileges.
Example 2: Grant Users Access to Scheduling Reports
The "HR Manager" global group is defined under "Users".
All users in this group need to schedule reports.
To achieve this, add HR Manager as a Member of the XMLP_SCHEDULER group.
Configuring BI Publisher
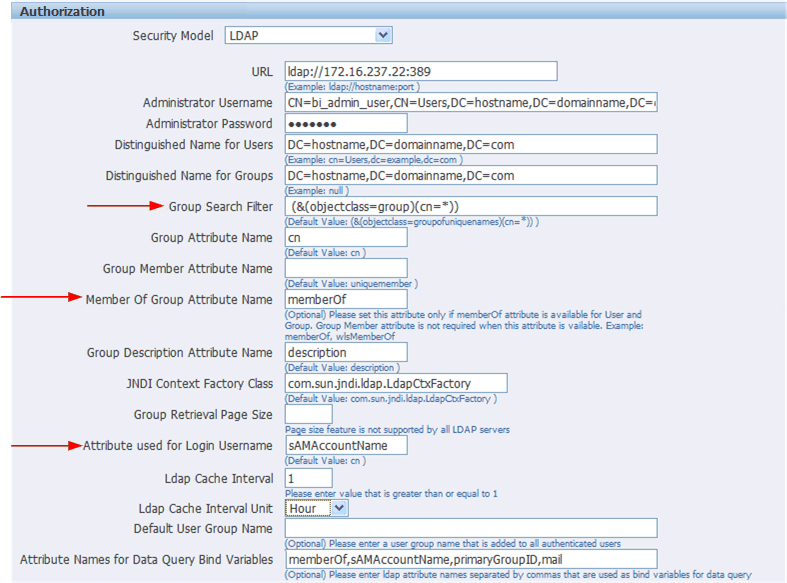
You configure BI Publisher on the Administration page.
To configure BI Publisher:
If you are configuring BI Publisher to use LDAP over SSL, then you must also configure Java keystore to add the server certificate to JVM. For more information, see Configuring BI Publisher for Secure Socket Layer (SSL) Communication.
Logging In to BI Publisher Using the Active Directory Credentials
The User login name defined in Active Directory Users and Computers >User Properties >Account is used for the BI Publisher login name.
Add the Domain to the user name to log in to BI Publisher. For example: "scott_tiger@domainname.com".
Note the following:
-
The Attribute used for Login Username can be sAMAccountName instead of userPrincipalName.
-
You must use sAMAccountName for the Attribute used for Login Username when the "User logon name (pre-Windows 2000)" is required to use for the BI Publisher login username.
-
User names must be unique across all organization units.
