Defining the Schedule for a Job
Use these steps to define a report job execution schedule for a specific report.
- From the Oracle BI Publisher Home page, under Create, select Report Job.
- In Schedule Report Job, on the General tab, click search next to the Report field.
- In Open, navigate to and select the report, and then click Open.
- In Schedule Report Job, click the Schedule tab.
- In the Frequency list, select the option to use for this report.
- Complete the options for the specified frequency.
- Click Submit.
- (Optional) In Submit, in the Report Job Name field, type a name, and click OK.
Defining a Recurrence Pattern
In the Schedule Report Job page’s Schedule tab, define the when the report is run from these recurrence pattern options.
| Option | Description |
|---|---|
| Frequency |
Defines when to execute the report job using the scheduler from the Frequency list. |
| Run Now |
The Run Now option depends on the selection made from the Frequency options. |
Once
Define a recurrence pattern and select Once option to execute the report job using the scheduler.
Select Run Now or use the date selector to enter the specific Start date and time.
Hourly/Minute
Select hours or minutes as a recurrence pattern option when you schedule a job using the Schedule tab to define when to execute the report job.
Every - Select Hour(s) or Minute(s) and enter the appropriate integer value for the increment.
Start - Use the date selector to enter the date and time to start running this job.
End - (optional) Use the date selector to enter an end date and time for this job.
Daily
One of the options to define a recurrence pattern is to use daily option.
Every - Enter the increment in days, for example, to run the report every day enter 1, or to run the report every other day, enter 2.
Start - Use the date selector to enter the date and time to start running this job. The time selected determines when (hour of the day) the job is executed each day that it runs.
End - (Optional) Use the date selector to enter an end date and time for this job.
Weekly
You can define a recurrence pattern selecting the weekly option, where you can run the report on a specific day of a week.
Every - Enter the increment in weeks and select the desired day or days of the week. For example, to run the report every Tuesday and Thursday, enter 1, and then select Tuesday and Thursday. To run the report every other Wednesday, enter 2, and select Wednesday.
Start - Use the date selector to enter the date and time to start running this job. The time selected determines the time that the job is executed for each run.
End - (optional) Use the date selector to enter an end date for this job.
Monthly
Define a recurrence pattern and select the monthly option to execute the report job monthly using the scheduler.
Every - Select each month that the job executes.
On - Select either a day of the week, for example, 1st Monday of every month; or select a specific day of the month, for example, 15.
Start - Use the date selector to enter the date and time to start running this job. The time selected determines the time that the job is executed for each run.
End - (Optional) Use the date selector to enter an end date for this job.
Annually
Use this annual recurrence pattern option to enter the increment in years.
- Every
- Enter the increment in years that the job executes.
- On
- Select either a day and a month, for example, Day 1 of January, or select a day of the week of the month, for example, First Monday of January.
- Start
- Use the date selector to enter the date and time to start running this job. The time selected determines the time that the job is executed for each run.
- End
- (Optional) Use the date selector to enter an end date for this job.
Enabling a Schedule Trigger
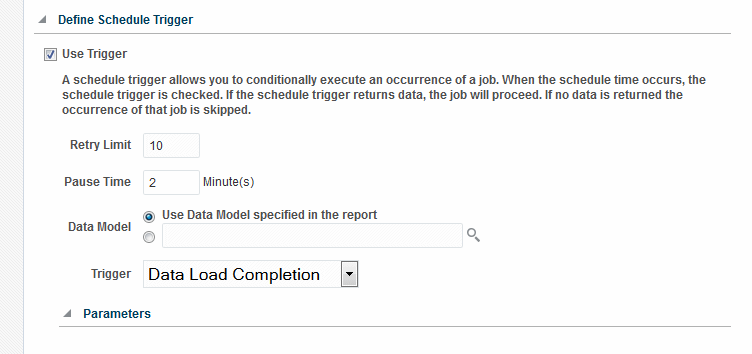
A schedule trigger tests for a condition. If the condition returns a result, the specified job executes.
If the trigger condition is not met, the job instance is skipped. You can also set up a repeat schedule for the trigger to keep checking for the condition. If the condition is not met, you can set the time interval, in minutes, to wait before the trigger is executed again.
You could use a schedule trigger when:
-
A report job should only run after the successful completion of an extract, transfer, and load process.
-
Account management wants a report triggered if any of the receipts from the previous day exceed a specified amount.
-
Human resources needs a report only when new hires entered the system in the previous week.
Triggers are set up in the data model and then they are available for selection from the Schedules tab. You can associate a schedule trigger that is defined in any data model. A report runs even if trigger in not defined in the report’s data model. One trigger per report job is supported.
For more information about setting up schedule triggers in a data model, see Adding Event Triggers in Data Modeling Guide for Oracle Business Intelligence Publisher.
The Schedule Trigger Enabled for a Report Job figure shows a schedule trigger with one parameter enabled for a report job.
