4 Modeling Your Organization
This chapter describes how to model your business organization using Oracle BPM. It shows you how to define roles in your BPMN processes and how to add organizations to your BPM project.
This chapter includes the following sections:
4.1 Introduction to Organizations
Using Oracle BPM, you can create a model that represents the people, roles, and other aspects of your real-world organization. During deployment of your project, the components of the modeled organization are mapped to your real-world organization.
Oracle BPM organizations include:
-
Roles
-
Organizational Chart
-
Business Parameters
-
Holidays
-
Calendars
Organizations are defined at the project level. You can export organizational information to be used within other projects.
Note:
You cannot create organizational charts, calendars, or holidays using Business Process Composer. You can define roles and assign them to swimlanes.
4.1.1 Introduction to the Organization Editor
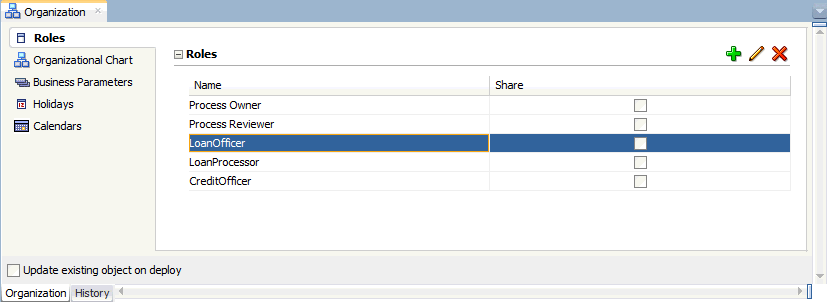
Use the Organization Editor to create and edit the components within an organization. It contains tabbed pains for each of these components. Figure 4-1shows an example of the Organization editor with the Roles tab selected.
4.2 Working with Organizations
Organizations have several kinds of components: organizational units, calendars, and holidays.
The following sections describe how to create and edit the components of an organization.
4.2.1 How to Create an Organizational Unit
You can create multiple organizational units within an organization.
To create an organizational unit:
4.2.2 How to Create a Calendar
You can create calendars that can be assigned to an organizational unit.
To create a calendar:
- In the Project Navigator, expand the project where you want to create a new role.
- Right-click Organization, then select Open.
- In the Organization Editor window, select the Calendar tab, then click the Add icon.
- Provide a name, then click OK.
- Select the calendar rule from the list.
- Select the check box next to each day of the week you want to include.
- Specify the start and end time for each day.
- If you want to include an optional holiday rule, select the appropriate holiday rule from the drop-down list.
- When you are finished, select Save from the File menu to save your organizational chart.
4.3 Introduction to Roles
Roles allow you to define areas of responsibility that represent job functions or responsibilities within your organization. If your process-based application requires human interaction, you will have to define at least one role within your project.
Roles are abstract and help define and mimic responsibilities of an individual in the Enterprise. They need to be mapped to Participants.
The Order demo example process defines several roles including: Approvers and Sales Rep. These represent the types of people that perform the work within your process rather than specific people within your organization. Roles are assigned to the vertical swimlanes that show graphically the roles responsible for completing activities and tasks within your process. Roles also contain members which correspond to the end users responsible for using the actual process-based business application.
4.4 Working with Roles
Roles define who is responsible for performing the activities and tasks in your process. Adding members to a role identifies the members of your real-world organization who are responsible for the activities and tasks.
The following sections describe how to create and edit roles.
4.4.1 How to Create a New Role
User tasks require you to define roles before you can add them to a process model.
To create a new role:
- In the Project Navigator, expand the project where you want to create a new role.
- Right-click Organization, then select Open.
- In the Organization Editor window, select the Roles tab.
- Click the Add icon, then supply a name for your role.
- Click OK.
4.4.2 How to Add Members to a Role
Before performing this task, you should ensure that you have configured a connection to your application server.
Note:
Before performing this task, you should ensure that you have created an Identity Service connection.
To add members to a role:
- In the Project Navigator, expand the project where you want to create a new role.
- Right-click Organization, then select Open.
- In the Organization Editor window, select the Roles tab.
- Click the Add Role icon.
- Select the type of application server and realm.
- Enter a search pattern, then click the search icon.
- Select the appropriate user from the search results, then click Select.
- Click OK.
4.5 Introduction to Organizational Charts
An organizational chart models the structure of your organization.
Each project contains one organizational chart that can be divided into multiple organizational units that reflect the structure and hierarchy of an organization.
4.5.1 Introduction to Organizational Units
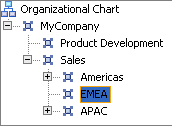
Organizational units define the structure of your organization An organizational chart contains one top level and may contain multiple levels of nested organizational units. Figure 4-2 shows how an organization can be structured using organizational units.
Figure 4-2 Example of Nested Organizational Units

Description of "Figure 4-2 Example of Nested Organizational Units"
In this example, MyCompany is the top-level organizational unit. Beneath MyCompany are various levels of nested organizational units.
For each organizational unit, you can assign members that represent the people within your organization. These are defined in Oracle WebLogic Server and are assigned using the Oracle Identity Service.
The following: members can be defined:
-
Users: The individual participants or users
-
Groups: Groups of participants. These are defined
-
Application Roles
4.5.2 Introduction to Calendars
Calendars specify when resources in your organization are available to work, when they are on holiday, and so on. Calendars include:
-
The working days within a week.
-
The start and finish times for each day.
-
The time zone.
-
An optional holiday rule.
You can specify a calendar rule for each organization unit. This allows you to model how your organization is structured across time zones and geographical regions.
4.5.3 Introduction to Holidays
Holidays specify the non-working days for a calendar rule. You can define an optional holiday rule for each calendar rule in your organization. These can be viewed as exceptions to the normal working days that you define in a calendar rule.
You can define two types of holidays:
-
Fixed: holidays that occur on the same date every year.
-
Common: holidays that do not occur on the same date every year.
4.6 Introduction to Business Parameters
Business parameters are global variables that specify information. Any process in a BPM project can use global variables.
For example, your company has a business process that requires approval for any employee to work more than 40 hours in a week. A business parameter MAX_WORKED_HOURS is defined and set to 40. The business parameter is used to drive your process flow. Suppose one month your the company has an unusual influx of work. You decide that all employees can work 45 hours in a week without requiring approval. The process owner monitoring the process changes the value of MAX_WORKED_HOURS to 45 to effect the change. You do not have to redeploy or modify the process.
4.7 Working with Business Parameters
Business parameters can be modified while a process is deployed and running, without changing the design of the process.
Changing the value of a business parameter affects the process behavior without having to change the process definition and without having to re-deploy the process.
4.7.1 How to Add a Business Parameter
Business parameters enable you to create variables to drive the process flow that you can modify while the process is running.
To add a business parameter:
4.7.2 How to Assign a Value to a Business Parameter
You can assign a value to a business parameter in the following ways:
-
Using data associations
The business parameter appears in the input and output arguments section of the data association. To view the business parameters, expand the Business Parameters node. For more information on how to use data associations, see Introduction to Data Associations.
-
Using BPM Scripts
You can use BPM scripts to assign a value to a business parameter. For more information, see How to Work with Business Parameters.
