6 Working with Data Connections

One of the key features of Oracle Real-Time Integration Business Insight is the ability to create models of running integrations and then monitor those models in real time for business activity. These integrations are hosted on various Middleware technologies such as SOA Suite and Service Bus.

To discover, model and monitor the applications running on these Middleware services, Insight maintains metadata describing how to connect and discover deployed applications. This metadata is maintained in structures called connections. Connections encapsulate details such as the URL and login information of a running Middleware service.

Only users with the role InsightConnectionCreator/InsightAdmin can create/test/delete connections.

6.1 Creating a Data Connection

Only users with the role InsightConnectionCreator/InsightAdmin can create connections.

To create a data connection:

  1. Click the Administration tab or the navigational shortcut on the Home page.
    The Data Connections page opens.
  2. Click Create Connection.
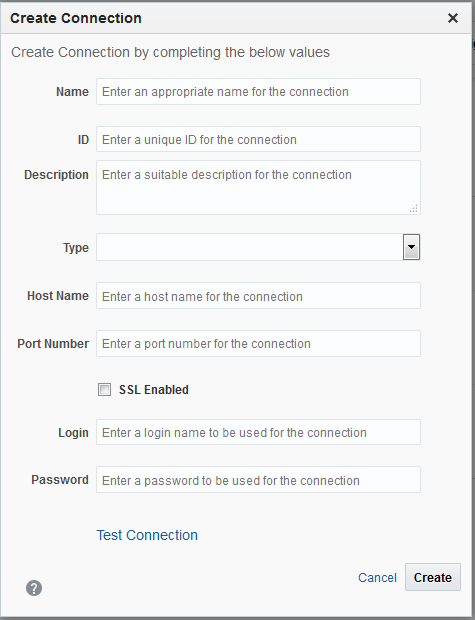
    The Create Connection dialog opens.
  3. Enter the following details:
    1. Name: an appropriate name for the connection
    2. ID: a unique identifier for the connection which gets generated automatically. You can modify this ID during creation.
    3. Description: enter a suitable description for the connection
    4. Type: select the type of connection, SOA or Service Bus
    5. Host Name: the host name for the connection

      Note:

      You can create a connection to a SOA Suite Server or Service Bus running within the same domain or on a different domain . The SOA Suite /Service bus Insight Agents should be running on the SOA Suite/Service bus servers for the insight data connections to connect to them .Also note that this version of Insight does not support multiple instances of Insight that are mapped to a single agent.
    6. Port Number: an appropriate port number for the connection
    7. Select SSL Enabled if you want the connection to be enabled with SSL.
    8. Login: the user name to be used for the connection
    9. Password: the password to be used for the connection
  4. Click Test Connection to test if a successful connection is established to the Server with the provided parameters.
    If the connection is established successfully, you see a Configured message.

    For more information, see Testing a Data Connection.

  5. Click Create.

    Figure 6-1 Create Connection Dialog

    Create Connection Dialog
After a connection is created, there are 3 states a connection can be in.
  • Draft state if the connection has not been tested yet

  • Configured state if the connection has been tested either while creating or editing it, and the test has passed

  • Disconnected state if the connection has been tested either while creating or editing it, and the test has failed.

6.2 Editing a Data Connection

Only users with the role InsightConnectionCreator/InsightAdmin can edit/update connections.

To edit a connection:

  1. Click the Administration tab or the navigational shortcut on the Home page.
    The Data Connections page opens.
  2. Click the Edit icon (the pencil icon) next to the connection you want to edit.

    Figure 6-2 Edit Connection

    Edit Connection
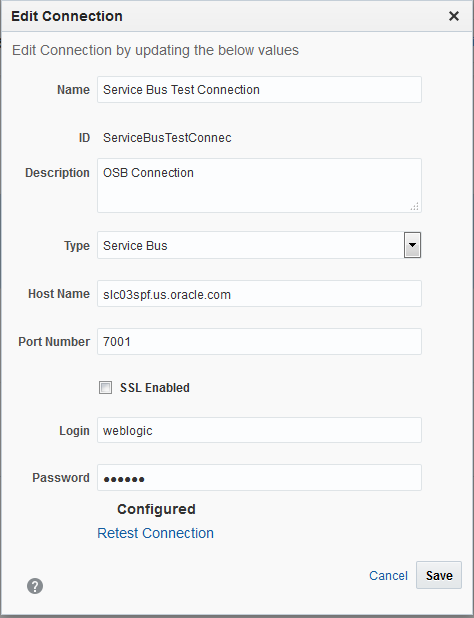
    The Edit Connection dialog opens.

    Figure 6-3 Edit Connection Dialog

    Edit Connection Dialog
  3. Modify the fields you need to update.
  4. Click Retest Connection to test the connection with the changes you have made.
    The connection state changes to Configured if the test passes or Disconnected if the test fails.
  5. Click Save to commit the changes you have made.
The data connection is updated with your changes.

6.3 Testing a Data Connection

Testing a data connection verifies that the credentials entered are valid and the connection can be used for implementation mappings in new models. Only users with the role InsightConnectionCreator/InsightAdmin can test connections.
To test a data connection:
  1. Click the Administration tab or the navigational shortcut on the Home page.
    The Data Connections page opens.
  2. Click the Test Connection icon against the connection you want to test.
    The state of the connection changes to Configured if the test passes. Else the state changes to Disconnected if the test fails. The test may fail because of either of the following reasons:
    • the provided credentials are incorrect

    • the Server referred to in the connection is unavailable.

    Figure 6-4 Connection Tested

    Connection Tested
  3. Click Test All on the Data Connections page to test all the connections at a time.

    Note:

    You cannot test the connections with the Test All button if the connections are in Draft state.