39 Oracle SOA Suite Templates and Reusable Subprocesses

This chapter describes how to create and use Oracle SOA Suite templates in SOA projects, service components, and BPEL scope activities and how to create and reuse standalone and inline BPEL subprocesses within other processes.

This chapter includes the following sections:

39.1 Introduction to Oracle SOA Suite Templates

A template is a reusable part of an Oracle SOA Suite project that you can use to create new projects. There are three types of templates, as described in Table 39-1.

Table 39-1 Template Types

Template Type Description

SOA project

A complete SOA project packaged and used to start new projects. You can create new SOA composite applications using this template.

Service component

A service component, such as a BPEL 2.0 process (including sensors) packaged for import into other projects. All dependent components and wires are also packaged. It appears as a custom service component in the SOA composite application's Components window.

Custom BPEL scope activity

A scope activity of a BPEL process packaged as a custom activity in the Components window and ready for import into other BPEL projects. This custom activity can potentially surface in the BPEL activity palette of the Components window.

Oracle SOA Suite templates provide the following benefits:

  • Share common code (subpart of a process or a scope) between applications, composites, and processes. You create once, then share with others. The template can be reused multiple times.

  • Store and reuse templates from the Oracle Metadata Services Repository (MDS Repository).

  • Fully editable upon consumption.

  • Automatically discover templates in Oracle JDeveloper. Once the template is saved, it is displayed in the Components window.

  • No inheritance, meaning that future changes to source templates are not visible to applications. If you make changes to the source template, a current user of the template does not see the change.

  • Custom icons are provided for component scope templates.

  • No versioning in templates. To differentiate between versions, you specify the version number in the template name.

  • Support for templates in both the BPEL versions 1.1 and 2.0.

Changes made to a specific template are not propagated to projects previously created using this template. This functionality is achievable through layered customization.

A new annotation is added to the composites/BPEL processes to identify the relationship to a template.

For information about using templates, see Creating and Using a SOA Project Template, Creating and Using a Service Component Template, and Creating and Using a BPEL Scope Activity Template.

39.2 Introduction to Standalone and Inline BPEL Subprocess Invocations

BPEL provides limited support for modularizing business process logic for reusability. The only method is to package reusable process logic as completely separate processes, which are utilized by the parent process (the process utilizing the reusable process logic) in a method identical to using a web service (through the invoke activity).

To address this challenge, Oracle SOA Suite provides a subprocess extension to BPEL. A subprocess is a fragment of BPEL code that can be reused within a particular processor by separate processes. The subprocess extension provides the following benefits:

  • BPEL process code reusability, which reduces the need to create the same activities multiple times to perform the same tasks.

  • Code modularity.

  • Code maintenance (changes are propagated, which eliminates the need to implement updates in multiple places every time a change is necessary).

  • Less overhead than invoke activities.

  • Memory footprint reduction, which can be considerable in a complex process.

Note:

  • Subprocesses are only supported with BPEL version 2.0. There is no support with BPEL version 1.1.

  • Correlation sets are not supported in subprocesses. If you create a correlation set in an inline or standalone subprocess, it fails during runtime.

  • Subprocesses cannot be shared between multiple composites.

  • Monitor view is not supported from inside a subprocess. Monitor view is accessible from a BPEL process by selecting the Change to Monitor view icon above Oracle BPEL Designer.

Oracle SOA Suite provides support for two types of subprocesses, as described in Table 39-2.

Table 39-2 Subprocess Types

Standalone Subprocess Inline Subprocess
  • A BPEL call activity invokes the subprocess.

  • A BPEL call activity invokes the subprocess.

  • Supports subprocesses in the same composite only.

  • Part of the parent BPEL process code and not visible in the composite view.

  • Visible in the Components window.

  • Visible in the Components window.

  • Does not have an interface and can only be called from another BPEL process. It can include partner links.

  • Subprocess code is re-entrant and reusable at runtime:. Only one copy is stored in memory, even if called many times.

  • A fragment of a BPEL process that includes a number of activities that are reused across other BPEL processes.

  • For groups of activities that are reused within one BPEL process.

  • In the composite view, the wire to a subprocess is shown as a dotted line to indicate that this is not a wire between actual components.

  • Can either define parameters to set or can use the process parameters.

Not Applicable.

  • Activities must be in a scope activity to be converted into a subprocess.

For information about creating a standalone subprocess, see How to Create a Standalone BPEL Subprocess.

For information about creating an inline subprocess, see How to Create an Inline Subprocess.

39.2.1 Introduction to a Standalone Subprocess

A standalone subprocess is defined, as shown in the following example, in a file with the extension .sbpel (subprocess BPEL extension).

<!-- A subprocess is defined in a SBPEL file, containing a bpelx:subProcess
 ! document
 ! The bpelx:subProcess is similar to a standard bpel:process, with
 ! differences asnoted below.
-->

<bpelx:subProcess name="NCName" targetNamespace="anyURI"
   xmlns="http://docs.oasis-open.org/wsbpel/2.0/process/executable"
   xmlns:bpelx="http://schemas.oracle.com/bpel/extension" ...>

   <!-- Partner links and variables serve as sub-process arguments -->
   <partnerLinks>?
      <partnerLink name="NCName" partnerLinkType="QName" myRole="NCName"?
         partnerRole="NCName"?
         bpelx:argumentRequired=["yes"|"no"]? />
   <partnerLinks>
   <variables>?
      <variable name="BPELVariableName"  messageType="QName"? type="QName"?
         element="QName"?
         bpelx:argumentRequired=["yes"|"no"]?>
         from-spec?
      </variable>
   </variables>

  <!-- Standard process definition here, except no <receive> or <pick> with -->
  <!--  createInstance="yes" -->
  /activity/
</bpelx:subProcess>

The <subProcess> element is an extension of the WS-BPEL 2.0 language. The <subProcess> element is the root element for a subprocess definition. The namespace for this element is as follows:

http://schemas.oracle.com/bpel/extension

The <subProcess> activity must be embedded in an <extensionActivity>, as specified in section 10.9 of the .

A subprocess is of type tProcess, as defined in the following WS-BPEL target namespace:

http://docs.oasis-open.org/wsbpel/2.0/process/executable

It differs from tProcess in the following ways:

  • Variables and partner links immediately under the <subProcess> element can serve as arguments for the subprocess. Required arguments are marked by setting the attribute argumentRequired to yes (the default value is no). The subprocess's required arguments are the minimum set of arguments the caller must pass to it.

  • A variable defined with an inline from-spec initializer serves as an optional argument with a default value. If the caller passes this argument, the caller-supplied value for the argument overrides the default value.

  • Validation reports an error if a variable is referenced prior to setting the value if it is not a required argument.

  • The first activity in the subprocess cannot be a receive or pick activity with createInstance set to yes. This is because no instance of a given subprocess type is created; the subprocess is logically part of an existing process instance.

The subprocess /@name attribute defines the name of the subprocess that is unique within the composite in which it is deployed.

The subprocess is self-contained. That is, all the variable and partner link references in the process snippet resolve to local definitions or arguments. This contrasts with the <inlineSubProcess> element, which allows unresolved references to variables and partner links that are in-scope at the call activity.

In a typical scenario, more than one variable is exchanged between the parent and a subprocess. If they are large documents, copying them is expensive. Because of this, passing by reference is an option.

A subprocess can converse with partners synchronously (InOut) or asynchronously (InOnly). The partner link for these interactions can be passed as an argument from a parent process or configured within the subprocess. For asynchronous requests, the conversation ID for WS-Addressing/normalized messages is set with the parent process instance ID. This enables routing of callback messages to the correct process instance.

Subprocesses in a SOA composite application are enumerated in the composite.xml file. The component element definition associates a subprocess's name with the sbpel file in which it is defined. During deployment, the subprocess components are delegated to the BPEL process service engine. The BPEL process service engine validates the process definition and builds a map with the subprocess target name as the key and the subprocess definition as the value. At most, only one instance of a subprocess exists in the service engine independent of consumer count. For optimizing memory, it may lazily load the process or unload the process if it is not actively used.

For information about creating a standalone subprocess, see How to Create a Standalone BPEL Subprocess.

39.2.2 Introduction to an Inline Subprocess

An inline subprocess can be defined as part of a BPEL 2.0 process at the <process> level. The syntax is shown in the following example:

<process name="NCName" targetNamespace="anyURI" 
         xmlns="http://docs.oasis-open.org/wsbpel/2.0/process/executable" ...>
    <!--
     ! All sub-process definitions must appear prior to the WS-BPEL artifacts of
     ! the process definition.
    -->

    <!-- Inline sub-process definition at process scope -->
    <bpelx:inlineSubProcess xmlns:bpelx="http://schemas.oracle.com/bpel/extension"
      name="NCName">*
      ...
      <!-- Partner links and variables serve as sub-process arguments -->
      <partnerLinks>?
        <partnerLink name="NCName" partnerLinkType="QName" myRole="NCName"?
          partnerRole="NCName"?
      bpelx:argumentRequired=["yes"|"no"]? />+
      <partnerLinks>
      ...
      <variables>?
        <variable name="BPELVariableName"  messageType="QName"? type="QName"?
          element="QName"?
                  bpelx:argumentRequired=["yes"|"no"]?>+
          from-spec?
        </variable>
      </variables>
      ...
      <!--
       ! Standard process activity graph here, except that no <receive> or <pick>
       ! activities with createInstance = "yes" are allowed.
      -->
      activity 
    </bpelx:inlineSubprocess>

    <!--
     ! BPEL code stripped for brevity
    -->
</process>

When a BPEL process instance is first created, all subprocess references are resolved. When the process executes a particular call activity, it uses the subprocess resolved at instance creation time. Therefore, two different instances of the same process may use different versions of subprocesses referenced if, for example, the default composite revision for a subprocess changes.

When the BPEL process instance executes the call activity, it is executed within the process's execution space, sharing its state. The call activity transfers control to the subprocess, at which time the subprocess scope is initialized with the argument variables:

  • Each parameter is copied (by reference or value, as specified) from the call activity to the subprocess's scope.

  • Optional parameters (those with default values) that are not referred to in the call activity's parameter list are initialized with their default values.

  • All required parameters must be supplied by the call activity.

  • All values supplied by the call activity's parameters must be type-compatible with the corresponding variable (or partner link) defined in the subprocess.

  • Each variable (or partner link) in the subprocess can be set only once in a call activity's parameter list.

On completion of the subprocess, control is returned to the parent process. In the normal case, execution continues with the next activity after the call activity. In the case of abnormal subprocess completion, the parent process evolves the process according to the standard life cycle rules of WS-BPEL.

From the monitoring and management view, there is no new process instance for the subprocess created. It is represented by a call activity in the parent process instance. Expanding the activity (navigate) shows subprocess execution details.

To minimize linking errors during runtime, upon deployment of the process and subprocess, references are resolved. Parameter lists are validated as a postdeployment activity. Preprocessing for creating a new process instance validates all subprocess references in the process. If any reference is not resolved, the instance is not created. Instead, an error message is returned, meaning essentially the following:

HTTP Status Code 503, "service not available

Upon a linking error, if the service consumer is waiting, an error message is sent to the consumer that is inline with exit activity handling. Otherwise, the instance is suspended with the reason set as linkage error. If a suitable subprocess is deployed and the reference is resolvable, suspended instances can then be recovered and resume normal execution by automatic recovery.

For information about creating an inline subprocess, see How to Create an Inline Subprocess.

39.3 Differences Between Oracle SOA Suite Templates and Reusable Subprocesses

When determining whether templates or reusable subprocesses are the best solution for your business use case, it is important to understand the differences:

  • Templates

    A template is a customizable, skeletal project, service component, or scope activity. You can drag and drop a template into a SOA composite application or a BPEL process and make additional changes. You essentially are copying and pasting a template. For example, if there are 50 lines of code in a template and you copy it twice to use, the code increases by 100 lines.

  • Reusable subprocesses

    A subprocess is a BPEL code snippet intended for a specific purpose. A subprocess that is defined earlier can be called and used as it is. An inline subprocess of 50 lines can be called twice and the parent process code remains at 50 lines, and not 100. Subprocesses perform better and have a smaller memory foot print than templates.

39.4 Creating Oracle SOA Suite Templates

You can create the following types of templates:

  • SOA project

  • Service component

  • Custom BPEL scope activity

For conceptual information about templates, see Introduction to Templates and Differences Between Oracle SOA Suite Templates and Reusable Subprocesses.

39.4.1 Creating and Using a SOA Project Template

This section describes how to create and use a SOA project as a template.

Note:

Use of templates is not supported in the Oracle JDeveloper Customization role.

39.4.1.1 How To Create a SOA Project Template

To create a SOA project template:

  1. Open a SOA composite application.
  2. In the Applications window, right-click either of the following:
    • The composite_name

    • The project name

  3. Select Create SOA Template.

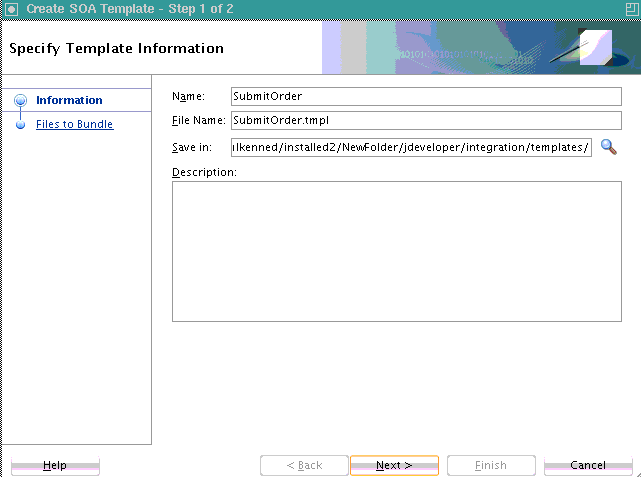
    This invokes the Create SOA Template wizard. Default names and the location for saving the template based on the composite name are automatically included. Figure 39-1 provides details.

    Figure 39-1 Create SOA Template Wizard - Specify Template Information Page

    Description of Figure 39-1 follows
    Description of "Figure 39-1 Create SOA Template Wizard - Specify Template Information Page"
  4. Change the default values and enter a description, as necessary, and click Next. The Browse icon for the Save in field enables you to save the template in the file system or the Oracle SOA Suite design time section of the MDS Repository.

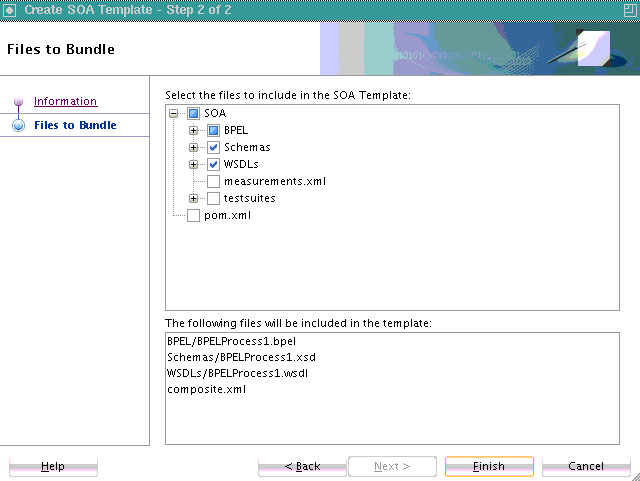
    The Create SOA Template Wizard - Files to Bundle page is displayed. Figure 39-2 provides details. This page shows all the files packaged as part of this template.

    You can also manually select measurements (business indicators) and test suites to include. If your composite includes domain value maps (DVMs) (for example, a DVM function is referenced in a BPEL scope activity), they are also included in the template.

    For information about business indicators, see Configuring BPEL Process Analytics. For information about test suites, see Introduction to the Composite Test Framework.

    Figure 39-2 Create SOA Template Wizard - Files to Bundle Page

    Description of Figure 39-2 follows
    Description of "Figure 39-2 Create SOA Template Wizard - Files to Bundle Page"
  5. View the files to package and select additional files, and click Finish.
  6. Click OK when prompted to acknowledge that the template was successfully created.

39.4.1.2 How to Use a Composite Template in Another SOA Composite

This section describes how to use the composite template created in How To Create a SOA Project Template in another SOA composite application.

To use a composite template in another SOA composite

  1. Create a new SOA composite application in Oracle JDeveloper.
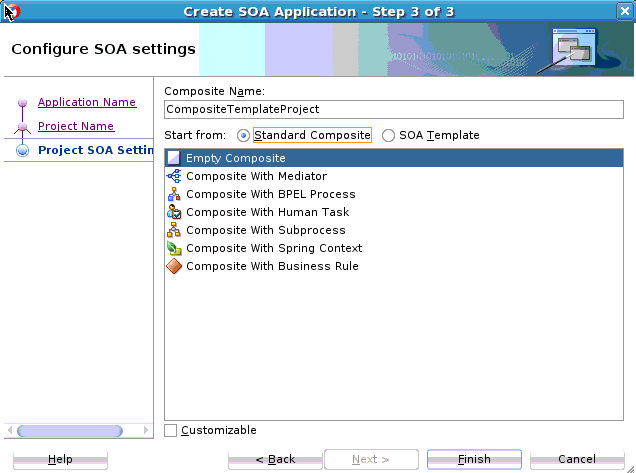
  2. On the Create SOA Application wizard - Configure SOA Settings page, select SOA Template. Figure 39-3 provides details.

    Figure 39-3 Custom Template Selection

    Description of Figure 39-3 follows
    Description of "Figure 39-3 Custom Template Selection"

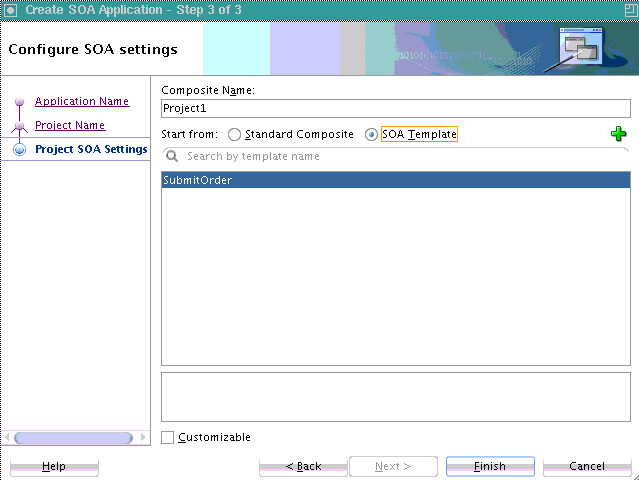
    The list of available templates is displayed. Figure 39-4 provides details.

    Figure 39-4 SOA Templates Available for Selection

    Description of Figure 39-4 follows
    Description of "Figure 39-4 SOA Templates Available for Selection"
  3. Select a template from the list, or click Add to select additional templates.
  4. Click Finish.

    The SOA Composite Editor is displayed with the custom template. The files of the template are displayed in the Applications window.

    You can rename components as necessary, such as renaming the binding components and process names.

  5. Right-click and select Rename.

39.4.2 Creating and Using a Service Component Template

This section describes how to create and use a service component template.

39.4.2.1 How to Create a Service Component Template

To create a service component template:

  1. From the Oracle JDeveloper main menu, select File > New.
  2. Select SOA Project, and click OK.
  3. Enter a project name, and click Next.
  4. Select a BPEL project, and click Finish.
  5. Design a SOA composite application.
  6. In the SOA Composite Editor, right-click the service component from which to create a template.
  7. Select Create Component Template.

    This launches the Create Component Template wizard.

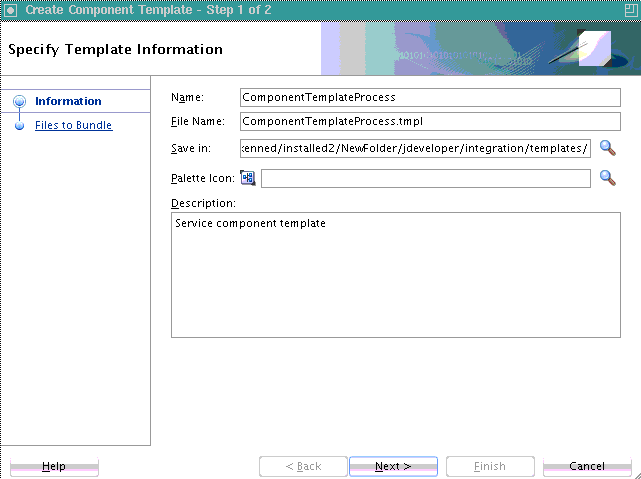
  8. Provide appropriate responses, including optionally selecting an icon for the partner link, and click Next. Figure 39-5 provides details.

    Figure 39-5 Create Component Template Wizard - Specify Template Information Page

    Description of Figure 39-5 follows
    Description of "Figure 39-5 Create Component Template Wizard - Specify Template Information Page"

    The Create Component Template wizard - Files to Bundle Page is displayed.

  9. View the files packaged and select additional files (such as adapters and measurements), as required, and click Finish.
  10. Click OK when prompted to acknowledge that the template was successfully created.

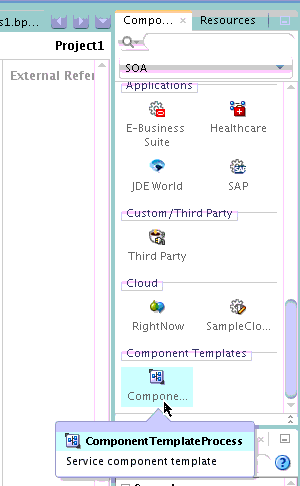
    The service component template is added to the Component Templates section of the Components window. Figure 39-6 provides details.

    Figure 39-6 Service Component Template in Component Templates Section of Components Window

    Description of Figure 39-6 follows
    Description of "Figure 39-6 Service Component Template in Component Templates Section of Components Window"

39.4.2.2 How to Use a Service Component Template in Another SOA Composite

This section describes how to use the packaged service component template created in How to Create a Service Component Template in another SOA composite application.

To use a service component template in another SOA composite:

  1. Create an empty SOA composite application in Oracle JDeveloper.
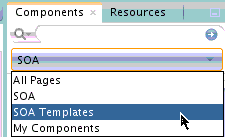
  2. In the SOA Composite Editor, select SOA Templates from the SOA list. Figure 39-7 provides details.

    Figure 39-7 SOA Templates Option in SOA Menu

    Description of Figure 39-7 follows
    Description of "Figure 39-7 SOA Templates Option in SOA Menu"
  3. Drag the service component template into the SOA Composite Editor.

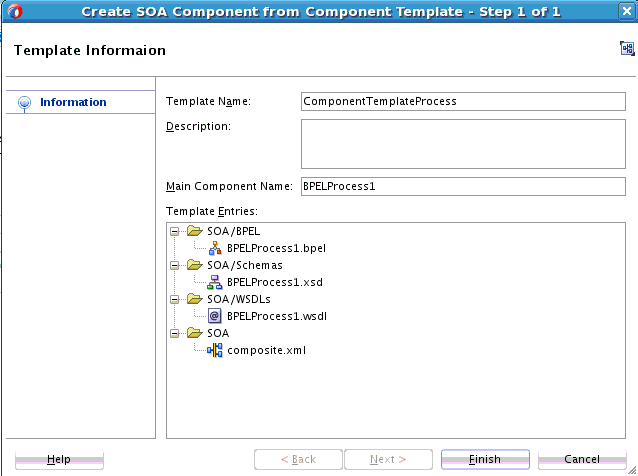
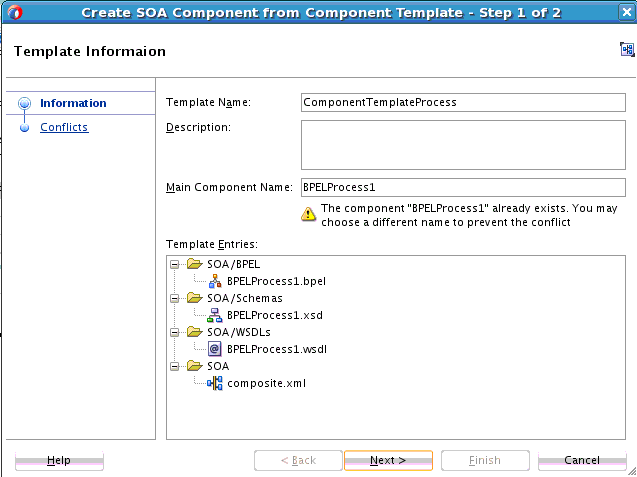
    This invokes the Create SOA Component from Component Template dialog, as shown in Figure 39-8. This dialog shows the template name, description, and files included in the template.

    Figure 39-8 Create SOA Component from Component Template Dialog

    Description of Figure 39-8 follows
    Description of "Figure 39-8 Create SOA Component from Component Template Dialog"
  4. Click OK.

    The service component template is displayed in the SOA composite application.

  5. View the Applications window and note that files such as schemas and WSDLs are displayed in the SOA composite application.
  6. If you attempt to apply the service component template a second time to the same SOA composite application, the Create SOA Component from Component Template dialog is displayed and indicates that there is a conflict because schema and BPEL files are already in the composite. Figure 39-9 provides details.

    Figure 39-9 Create SOA Component from Component Template Dialog

    Description of Figure 39-9 follows
    Description of "Figure 39-9 Create SOA Component from Component Template Dialog"
  7. Click Next.
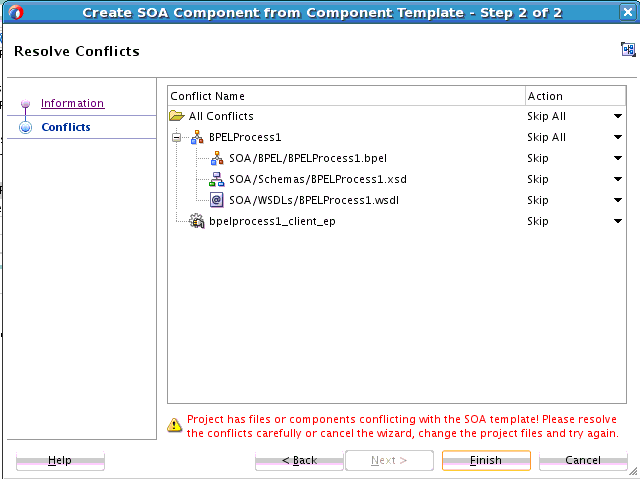
  8. In the Resolve Conflicts page, select to skip or overwrite all files or specific files that are in conflict. Figure 39-10 provides details.

    Figure 39-10 File Names in Conflict

    Description of Figure 39-10 follows
    Description of "Figure 39-10 File Names in Conflict"
  9. When complete, click Finish.

39.4.3 Creating and Using a BPEL Scope Activity Template

This section describes how to create and use a BPEL scope activity template.

39.4.3.1 How to Create a BPEL Scope Activity Template

To create a BPEL scope activity template:

  1. In Oracle BPEL Designer, drag a scope activity into a BPEL process.

  2. Design the contents of the scope activity to include activities, event handlers, and catch and catch all branches that include fault variables, as necessary.

  3. Create a template from the scope.

    1. Right-click the scope and select Create Custom Activity Template.

    or

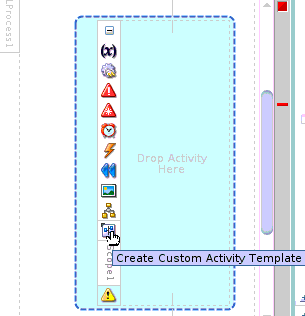
    1. Expand the scope and select Create Custom Activity Template, as shown in Figure 39-11.

      Figure 39-11 Scope Template Creation

      Description of Figure 39-11 follows
      Description of "Figure 39-11 Scope Template Creation"

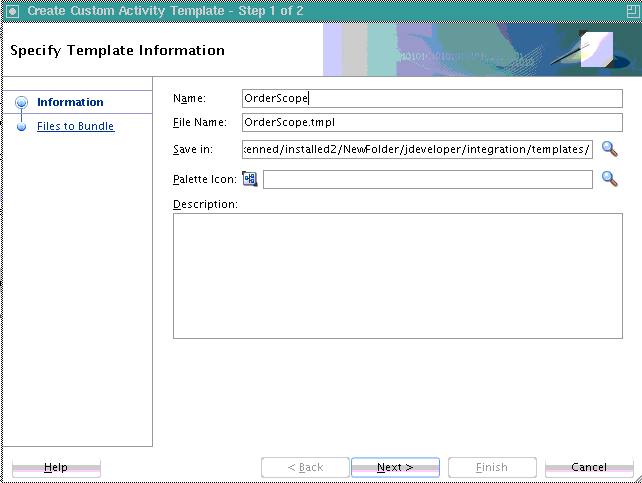
    The Create Custom Activity Template wizard - Specify Template Information page is displayed, as shown in Figure 39-12.

    Figure 39-12 Create Custom Activity Template Wizard - Specify Template Information Page
    Description of Figure 39-12 follows
    Description of "Figure 39-12 Create Custom Activity Template Wizard - Specify Template Information Page"
  4. Specify details, and click Next.

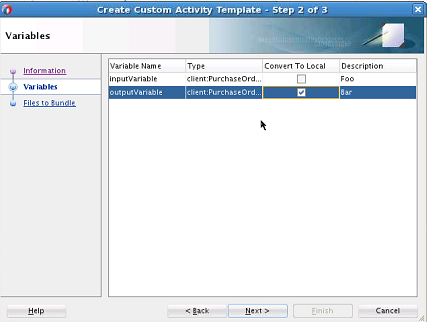
    The Create Custom Activity Template wizard - Variables page is displayed. Figure 39-13 provides details. This page is displayed if variables are used in the scope. This page is not displayed if you have an empty scope or a scope that does not use variables.

    Figure 39-13 Create Custom Activity Template Wizard - Variable Page
    Description of Figure 39-13 follows
    Description of "Figure 39-13 Create Custom Activity Template Wizard - Variable Page"
  5. Select to convert your variables to local variables. This conversion is not recommended if this variable is used outside of the scope activity in receive and reply activities. If the variables are used only inside this scope, the check boxes are selected by default.

  6. Enter an optional description of the variables, and click Next.

    The Create Custom Activity Template wizard - Files to Bundle page is displayed as shown previously in Figure 39-2. This page shows all the files packaged as part of this template. You can also manually select test suites to include.

  7. Select files, and click Finish.

39.4.3.2 How to Use a BPEL Scope Activity Template in Another BPEL Process

This section describes how to use a BPEL scope activity template in another BPEL process.

To use a BPEL scope activity template in another BPEL process

  1. Create a new or open an existing BPEL process.

  2. From the Custom Activity Templates section in the Components window, drag the scope activity template created in How to Create a BPEL Scope Activity Template into the BPEL process. Figure 39-14 provides details.

    Note:

    Only scope activity templates that are compatible with the BPEL service component version are available. For example, if this is a BPEL 2.0 service component, only scope activity templates for BPEL 2.0 are available for selection. No BPEL version 1.1 scope activity templates are displayed.

    Figure 39-14 Scope Activity Template

    Description of Figure 39-14 follows
    Description of "Figure 39-14 Scope Activity Template"

    Any error handling you designed such as catch and catch all activities and any scope variables you created are also copied into the BPEL process.

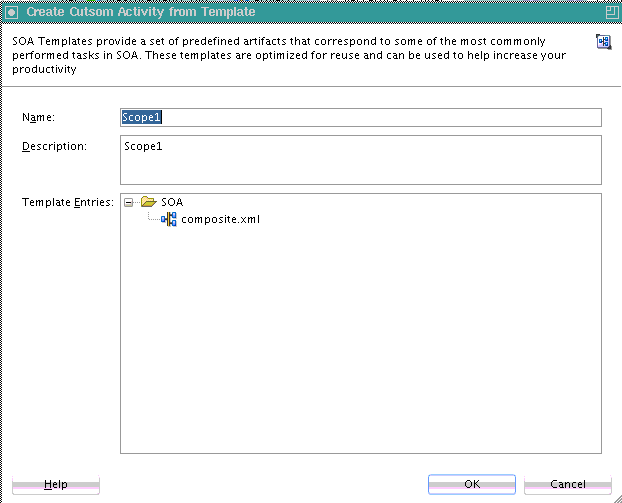
    The Create Custom Activity from Template page is displayed, as shown in Figure 39-15.

    Figure 39-15 Create Custom Activity from Template Wizard
    Description of Figure 39-15 follows
    Description of "Figure 39-15 Create Custom Activity from Template Wizard"
  3. Click Next.

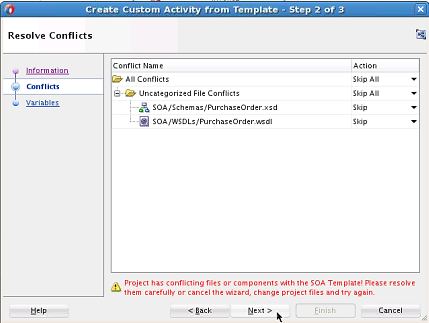
    If there are conflicts, the Create Custom Activity from Template wizard - Resolve Conflicts page is displayed, as shown in Figure 39-16.

    Figure 39-16 Create Custom Activity from Template Wizard - Resolve Conflicts Page
    Description of Figure 39-16 follows
    Description of "Figure 39-16 Create Custom Activity from Template Wizard - Resolve Conflicts Page"
  4. Select to skip all or individual file conflicts, and click Next.

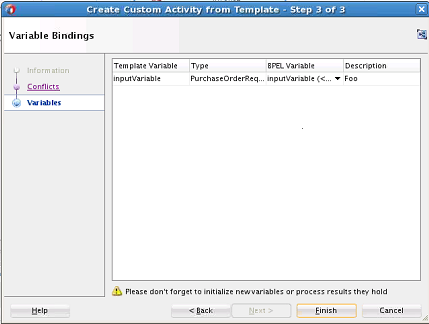
    The Create Custom Activity from Template wizard - Variables page is displayed, as shown in Figure 39-17.

    If you selected to convert your variables to local variables on the Create Custom Activity Template Wizard - Variable Page in Step 5 of How to Create a BPEL Scope Activity Template, they do not require special processing and are not displayed on this page. Only variables that were not converted to local variables are displayed on the Create Custom Activity from Template wizard - Variable Bindings page.

    Figure 39-17 Create Custom Activity from Template wizard - Variable Bindings Page
    Description of Figure 39-17 follows
    Description of "Figure 39-17 Create Custom Activity from Template wizard - Variable Bindings Page"
  5. If the template and the project both include this variable, you can choose to reuse the variable or bind to a new variable from the list in the BPEL Variable column.

    1. If you selected to bind to a new variable, enter a name and select whether to create the variable locally for the template scope or globally for the BPEL process, then click OK. Figure 39-18 provides details.

      Figure 39-18 Bind to New Variable Dialog

      Description of Figure 39-18 follows
      Description of "Figure 39-18 Bind to New Variable Dialog"

      If you drop an activity template inside of Scope A that is inside of Scope B, then Scope A and Scope B also are in the list. This enables you to select among all locations where variables can be declared.

  6. Click Next.

  7. If a scope uses partner links, the Create Custom Activity Template Wizard - Partner Links Page is displayed.

  8. Click Finish.

39.4.4 Managing Templates

You can manage all available template types from the Preferences dialog.

To manage templates:

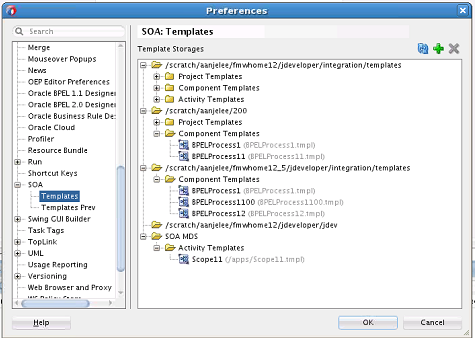
  1. From the Oracle JDeveloper main menu, select Tools > Preferences > SOA > Templates.

    The Preference dialog is displayed, as shown in Figure 39-19.

    Figure 39-19 SOA Template Preferences

    Description of Figure 39-19 follows
    Description of "Figure 39-19 SOA Template Preferences"

    Templates can be stored in two locations:

    • Folders: Templates are stored in the file system.

    • SOA-MDS: Templates are stored in the MDS Repository and can be shared.

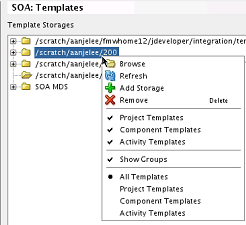
  2. Right-click a folder to display a list of management tasks, as shown in Figure 39-20.

    Figure 39-20 Management Tasks

    Description of Figure 39-20 follows
    Description of "Figure 39-20 Management Tasks"

    Table 39-3 describes the management tasks you can perform.

    Table 39-3 Template Management Tasks

    Element Description

    Browse

    Browses for a specific template name.

    The Browse option uses Windows Explorer on Windows or the file browser on Linux for the storage folder. Templates are stored as files, so you may want to operate with them as with files (that is, upload with FTP, send by email, copy to another folder to back up, and so on).

    Refresh

    Refreshes the list of templates.

    Add Storage

    Adds existing templates to the Preferences - SOA Templates dialog.

    Remove

    Deletes the folder and its templates only from the Preferences - SOA Templates dialog. The templates are not physically deleted from the file system or MDS Repository. You can add them to this dialog again by selecting Add Storage or clicking the Add icon. The template context menu contains a Delete option that physically deletes a template.

    All Templates

    Displays all templates.

    Project Templates

    Displays only SOA project templates.

    Component Templates

    Displays only service component templates.

    Activity Templates

    Displays only BPEL scope activity templates.

  3. If you want to import a template to the jdeveloper/integration/templates directory, select File > Import > SOA Template. The file can then be added to the Preferences dialog by clicking the Add icon or right-clicking a folder and selecting Add Storage.

39.5 Creating Standalone and Inline BPEL Subprocesses in a BPEL Process

You can create standalone subprocesses in a SOA composite and inline BPEL subprocesses in a BPEL process. A subprocess is a fragment of BPEL code that can be reused within a particular processor by separate processes.

For conceptual information about subprocesses, see Introduction to Standalone and Inline BPEL Subprocess Invocations and Differences Between Oracle SOA Suite Templates and Reusable Subprocesses.

Note:

  • There is no restriction on one BPEL subprocess calling itself recursively. You must determine if you want to recursively call the same BPEL subprocess and the number of times the subprocess calls occur.

  • You can create and successfully deploy a SOA composite application that contains only a standalone subprocess. For example, create a SOA composite application and add a standalone subprocess in which you define two parameters for the subprocess and define an assign activity in the subprocess to swap the values of both parameters. However, while a SOA composite application that contains only a standalone subprocess and no other components can be deployed, it has no practical purpose.

  • A standalone subprocess cannot be shared in the MDS Repository. However, a BPEL process with call activities for calling the subprocess can be shared in the MDS Repository

39.5.1 How to Create a Standalone BPEL Subprocess

This section provides an example of how to create a simple application that uses a standalone subprocess.

Note:

A standalone subprocess can include an inline subprocess.

To create a standalone BPEL subprocess:

  1. Create a SOA composite application that includes a BPEL 2.0 process. For this example, a synchronous BPEL 2.0 process is created.
  2. Design a BPEL 2.0 process. For this example, the following process is designed:
    • A variable of type string is created (for this example, named variable1) to pass in as a parameter.

    • An assign activity is created in which the client input string is mapped to variable1.

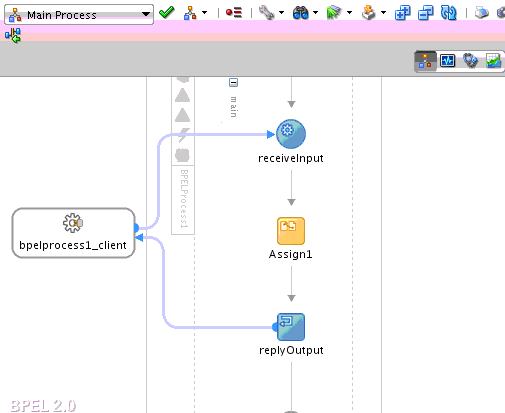
    Figure 39-21 shows the BPEL process design.

    Figure 39-21 BPEL 2.0 Process Design

    Description of Figure 39-21 follows
    Description of "Figure 39-21 BPEL 2.0 Process Design"
  3. Click the composite_name link above Oracle BPEL Designer to access the SOA Composite Editor.
  4. Right-click inside the SOA Composite Editor, and select Insert > Subprocess or drag a Subprocess icon from Components window into the composite.

    The Create Subprocess dialog is displayed.

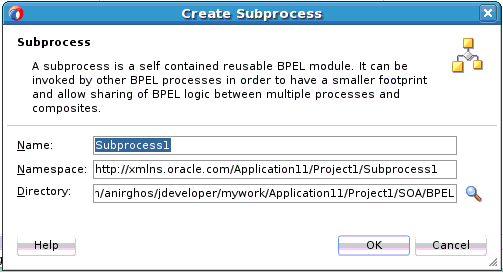
  5. Enter appropriate values or accept the default values, and click OK to create the standalone subprocess. Figure 39-22 provides details. For this example, the subprocess name provided is Subprocess1.

    Figure 39-22 Create Subprocess Dialog

    Description of Figure 39-22 follows
    Description of "Figure 39-22 Create Subprocess Dialog"
  6. Right-click the subprocess in the SOA Composite Editor, and select Edit.
  7. Create a variable of type string in the subprocess (for this example, the variable is named p1), and click OK,

    You now design simple process logic in the standalone subprocess.

  8. From the Components window, drag an Assign activity into the process.
  9. In the Target section of the Copy Rules tab of the assign activity, drag the Expression Builder icon onto the p1 variable.
  10. Create a concat expression to read the value out of the parameter in the subprocess and update variable p1 with that value.
    concat($p1,",from subprocess")
    
  11. Save the composite or select Save All, and exit the BPEL 2.0 process.
  12. In the SOA Composite Editor, right-click the BPEL process and select Edit.
  13. From the Oracle Extensions subsection, drag a call activity below the assign activity in Oracle BPEL Designer.
  14. Right-click the call activity and select Edit.

    This invokes the Edit Call dialog. Note that variable p1 is displayed in the Name column after the selected Subprocess1.

  15. Click inside the Value column to invoke the Variable Chooser dialog.
  16. Select variable1, and click OK. This maps variable p1 from the standalone subprocess to variable variable1 of the initial BPEL 2.0 process that you created.
  17. Leave the Copy By Value check box deselected.

    Leaving this check box deselected copies the variable by reference. Only variables or partner links are accepted for variables, not XPath function queries. Copy by reference supports both input and output variables. Copy by value supports only input values.

  18. From the Components window, drag a second Assign activity below the call activity.
  19. In the Copy Rules tab of the assign activity, update the output message with variable1, and click OK. Figure 39-23 provides details.

    Figure 39-23 Edit Assign Dialog

    Description of Figure 39-23 follows
    Description of "Figure 39-23 Edit Assign Dialog"

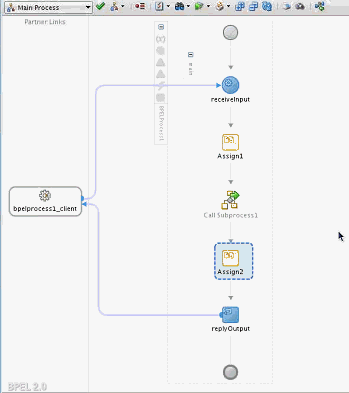
    Figure 39-24 shows the BPEL 2.0 process with the subprocess. In this BPEL 2.0 process, the following logic is designed:

    • The string value in the input message in Assign1 is taken and assigned to variable1 in the call activity, to be passed by reference.

    • assign2 takes variable1 and creates the response. The variable1 value is updated by the subprocess.

    Figure 39-24 BPEL 2.0 Process

    Description of Figure 39-24 follows
    Description of "Figure 39-24 BPEL 2.0 Process"
  20. Go to the SOA Composite Editor and note that the BPEL subprocess is now connected to the BPEL 2.0 process because of the call activity.

    You are now ready to deploy the SOA composite application and create a business flow instance in Oracle Enterprise Manager Fusion Middleware Control.

    When you access the audit trail for the created business flow instance in Oracle Enterprise Manager Fusion Middleware Control, note that the call activity and its contents are displayed.

    For more information about standalone BPEL subprocesses, see Section "Using Templates and Standalone Subprocesses to Update the Order Status in the Database" of Understanding Oracle SOA Suite.

39.5.2 How to Create an Inline Subprocess

An inline subprocess is similar to a standalone subprocess, except that the inline subprocess is embedded in the parent process. For example, you may have a BPEL 2.0 process that includes assign and invoke activities within a scope activity that update the status of a customer order. You may have a business need for repeating these same activities later in the same process. One method is to physically repeat the same assign and invoke activities of the scope activity later in the process, but this can be error prone. In addition, every time a change is necessary, it must be implemented in both scopes. As an alternative to repeating the activities, you can use an inline subprocess.

Note:

Creating an inline subprocess within an existing inline subprocess is not supported.

To create an inline subprocess:

  1. Go to the scope activity in the BPEL 2.0 process that includes the assign and invoke activities that update the status of a customer order.

    Note:

    Inline subprocesses can also be created in a BPEL process by selecting Inline Subprocesses from the Property Structure menu above Oracle BPEL Designer, selecting the Inline Subprocesses folder, and clicking Add.

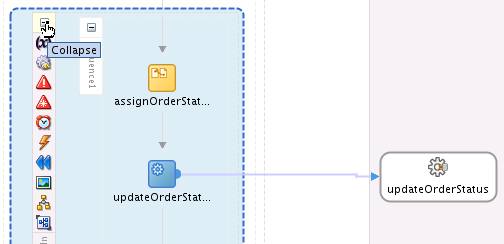
  2. Collapse the scope activity. Figure 39-25 provides details.
  3. Right-click the scope activity, and select Convert to a Subprocess.

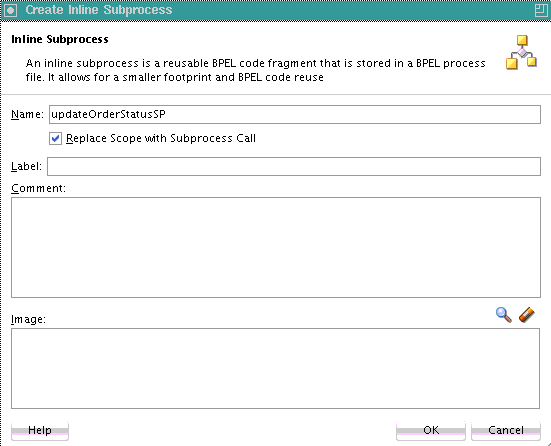
    The Create Inline Subprocess dialog is displayed, as shown in Figure 39-26.

    Figure 39-26 Create Inline Subprocess Dialog

    Description of Figure 39-26 follows
    Description of "Figure 39-26 Create Inline Subprocess Dialog"
  4. Enter values appropriate to your environment, then click OK.

    Table 39-4 Create Inline Subprocess Dialog

    Element Description

    Name

    Enter a name or accept the default value, which defaults to the scope name.

    Replace scope with subprocess call

    Select to automatically replace the scope with a BPEL call activity (the default selection). If you want to create an inline subprocess and keep the selected scope in the process, you can deselect this check box.

    Label

    Optionally enter a description.

    Comment

    Optimally enter a comment.

    Image

    Select to replace the standard call activity icon with a unique image.

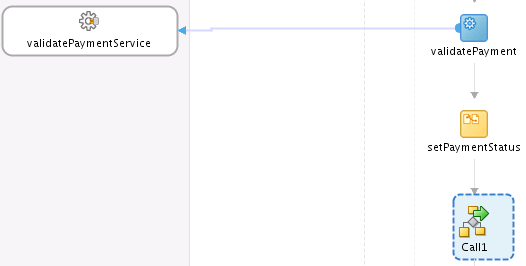
    The scope activity is converted to a call activity in the BPEL 2.0 process, as shown in Figure 39-27.

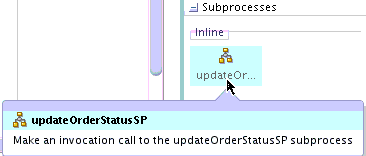
    The new inline subprocess is also displayed in the Subprocess section of the Components window. Figure 39-28 provides details.

    Figure 39-28 Inline Subprocess in Components Window

    Description of Figure 39-28 follows
    Description of "Figure 39-28 Inline Subprocess in Components Window"
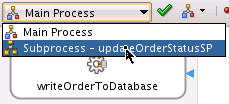
  5. Above Oracle BPEL Designer, select Subprocess - updateOrderStatusSP to display the contents of the subprocess (the same contents as the initial scope activity). Figure 39-29 provides details.

    Figure 39-29 Subprocess Selection Above Oracle BPEL Designer

    Description of Figure 39-29 follows
    Description of "Figure 39-29 Subprocess Selection Above Oracle BPEL Designer"

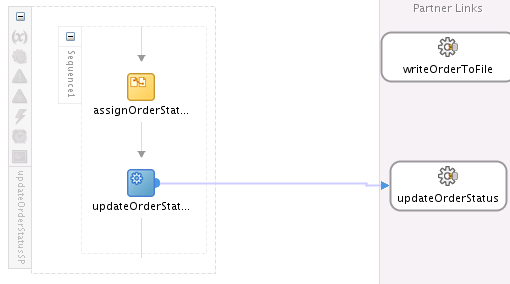
    The contents of the inline subprocess are displayed. Figure 39-30 provides details.

    Figure 39-30 Inline Subprocess Contents

    Description of Figure 39-30 follows
    Description of "Figure 39-30 Inline Subprocess Contents"
  6. Make changes to the subprocess, if required, such as adding additional invoke activities.

    You can add the subprocess to the same BPEL 2.0 process, as necessary.

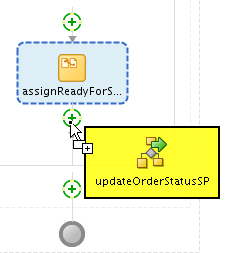
  7. From the Subprocess section of the Components window, drag the inline subprocess into an appropriate section of the BPEL 2.0 process. Figure 39-31 provides details.

    Figure 39-31 Subprocess Added to Same BPEL 2.0 Process

    Description of Figure 39-31 follows
    Description of "Figure 39-31 Subprocess Added to Same BPEL 2.0 Process"

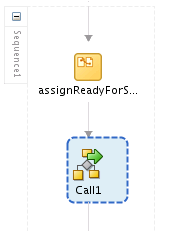
    The subprocess name is automatically changed to Callnumber as shown in Figure 39-32.

    Figure 39-32 Subprocess Name Changed

    Description of Figure 39-32 follows
    Description of "Figure 39-32 Subprocess Name Changed"

For more information about using inline BPEL subprocesses, see Section "Updating Order Status with an Inline BPEL Subprocess" of Understanding Oracle SOA Suite.

39.5.3 How to Create a Standalone Subprocess that Takes a Partner Link as a Parameter

This section describes how a subprocess takes a partner link as a parameter and uses it to call the partner and return the result. You are essentially using a partner link from subprocess to subprocess.

To create a standalone subprocess that takes a partner link as a parameter:

  1. Create a SOA composite application that includes a BPEL 2.0 process. For this example, a synchronous BPEL 2.0 process is created.
  2. Go to the SOA composite application in the SOA Composite Editor.
  3. Right-click and select Insert > Subprocess.

    The Create Subprocess dialog is displayed.

  4. Accept the default values (for this example, the default name is Subprocess1), and click OK.

    You now create a second process to use as the partner link.

  5. Create a second synchronous BPEL 2.0 process in the SOA composite application for this example, named BPELProcess2). This is the process to call.
  6. From the Components window, drag an Assign activity into the second BPEL 2.0 process.
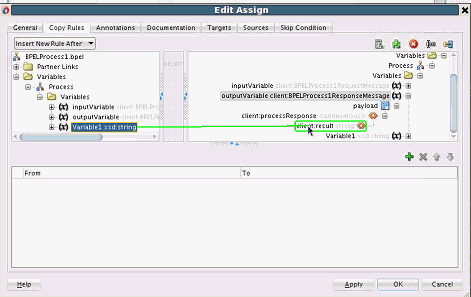
  7. In the Target section of the Copy Rules tab, drag the Expression Builder icon onto the result variable. Figure 39-33 provides details.

    Figure 39-33 Edit Assign Dialog

    Description of Figure 39-33 follows
    Description of "Figure 39-33 Edit Assign Dialog"
  8. Build an XPath expression, and click OK.
    string("hello from process2")
    
  9. Save the second BPEL 2.0 process, and return to the subprocess.
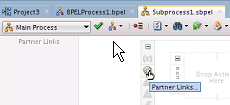
  10. Click the Partner Links icon, as shown in Figure 39-34.

    Figure 39-34 Partner Link Creation

    Description of Figure 39-34 follows
    Description of "Figure 39-34 Partner Link Creation"

    The Partner Links dialog is displayed.

  11. Click the Add icon.

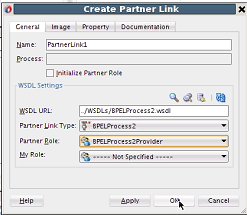
    The Create Partner Link dialog is displayed. You now define this partner link as a parameter.

  12. Design the partner link (for this example, named PartnerLink1), and click OK. Figure 39-35 provides details. The role of the partner link is as the provider.

    Figure 39-35 Partner Link Creation

    Description of Figure 39-35 follows
    Description of "Figure 39-35 Partner Link Creation"

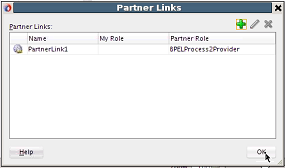
    The Partner Links dialog looks as shown in Figure 39-36.

    Figure 39-36 Partner Links Dialog

    Description of Figure 39-36 follows
    Description of "Figure 39-36 Partner Links Dialog"

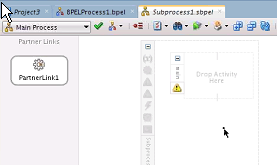
    Figure 39-37 shows the contents of the subprocess.

    Figure 39-37 Subprocess Contents

    Description of Figure 39-37 follows
    Description of "Figure 39-37 Subprocess Contents"
  13. Drag a Scope activity into the subprocess.
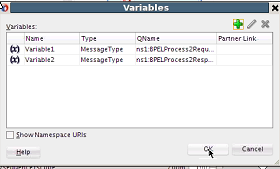
  14. Click the Variables icon in the scope activity, and create request and response message type variables. Figure 39-38 provides details.

    Figure 39-38 Request and Response Message Type Variable Creation

    Description of Figure 39-38 follows
    Description of "Figure 39-38 Request and Response Message Type Variable Creation"
  15. Drag a Sequence activity into the subprocess.
  16. Drag an Invoke activity into the subprocess for invoking the partner link.
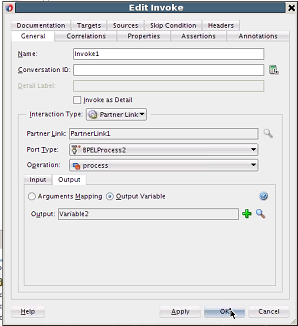
  17. Design the invoke activity to invoke the partner link in the subprocess, as shown in Figure 39-39. The design includes the output variable (Variable2).

    Figure 39-39 Edit Invoke Dialog

    Description of Figure 39-39 follows
    Description of "Figure 39-39 Edit Invoke Dialog"

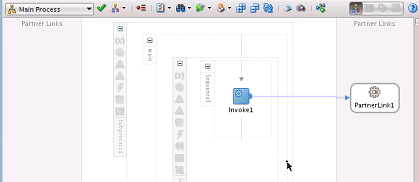
    Figure 39-40 shows the subprocess.

    Figure 39-40 BPEL Subprocess

    Description of Figure 39-40 follows
    Description of "Figure 39-40 BPEL Subprocess"
  18. Click the Variables icon in the subprocess to create a string variable to return the result.

    The Variables dialog is displayed.

  19. Click the Add icon to invoke the Create Variable dialog.
  20. Create a string variable (for this example, named result).
  21. Drag an assign activity into the subprocess.
  22. Map the result of the partner link invocation to the result variable, and click OK, as shown in Figure 39-41.

    Figure 39-41 Edit Assign Activity

    Description of Figure 39-41 follows
    Description of "Figure 39-41 Edit Assign Activity"

    Subprocess design is now complete.

  23. Return to the main BPEL 2.0 process in Oracle BPEL Designer (BPELProcess1).
  24. Click the Variables icon in the process.
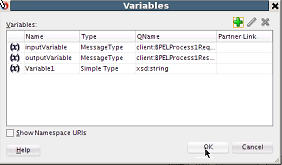
  25. Click the Add icon to create a string variable to contain the result configured in Step 22 and passed back (for this example, named Variable1). Figure 39-42 provides details.

    Figure 39-42 Variables Dialog

    Description of Figure 39-42 follows
    Description of "Figure 39-42 Variables Dialog"
  26. Add an assign activity to assign the string value to Variable1.
  27. Drag a call activity below the assign activity in Oracle BPEL Designer. Figure 39-43 provides details.

    Figure 39-43 Subprocess Added to Main BPEL 2.0 Process

    Description of Figure 39-43 follows
    Description of "Figure 39-43 Subprocess Added to Main BPEL 2.0 Process"
  28. Right-click the Partner Links swimlane, and select Create Partner Link.
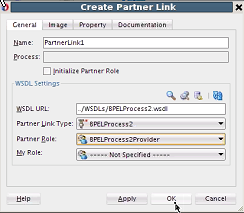
  29. Design a partner link to invoke BPELProcess2, as shown in Figure 39-44.

    Figure 39-44 Create Partner Link Dialog

    Description of Figure 39-44 follows
    Description of "Figure 39-44 Create Partner Link Dialog"
  30. Right-click the Call activity, and click Edit.

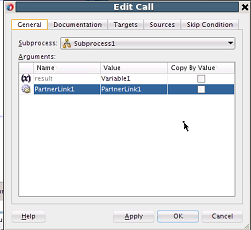
    The Edit Call dialog shows the partner link created earlier in the subprocess.

  31. In the result row, click the Value column to invoke the Variable Chooser dialog.
  32. Select Variable1, and click OK.
  33. In the PartnerLink1 row, click the Value column to invoke the Partner Link Chooser dialog.
  34. Select PartnerLink1, and click OK. Figure 39-45 shows the Edit Call dialog with design complete. Since the variables are sent by reference, if the subprocess does something to change the partner link (such as copying in another partner link), that impacts the calling process's partner link. This is the same process as with variables.

    Figure 39-45 Edit Call Dialog

    Description of Figure 39-45 follows
    Description of "Figure 39-45 Edit Call Dialog"
  35. Drag an Assign activity below the Call activity to return the result.
  36. In the Copy Rules tab, map Variable1 to result to return the result to the caller. Figure 39-46 provides details.

    Figure 39-46 Edit Assign Dialog

    Description of Figure 39-46 follows
    Description of "Figure 39-46 Edit Assign Dialog"
  37. Deploy the SOA composite application.

39.5.4 What You May Need to Know About Renaming a Subprocess

When you rename a subprocess, it is not updated in the invoking call activity. You must manually update the subprocess name in the call activity.

Assume you perform the following steps:

  1. Create an asynchronous BPEL 2.0 process.
  2. Right-click the SOA Composite Editor, and select Insert > Subprocess.
  3. Create a subprocess named SubProcessNew.
  4. Right-click SubProcessNew, and click Edit.
  5. From the Components window, drag an Empty activity into the subprocess.
  6. Open the asynchronous BPEL 2.0 process.
  7. From the Components window, drag a Call activity into the process.
  8. Invoke the SubProcessNew subprocess from the call activity.
  9. Return to the SOA Composite Editor, and rename the SubProcessNew subprocess to SubProcessRenamed.
  10. Open the call activity in the asynchronous BPEL 2.0 process, and note that the Subprocess field is now empty.
  11. In the Subprocess field, manually enter the updated name of SubProcessRenamed.