2 Configuring the Oracle E-Business Suite Plug-In

This chapter describes how to configure the Oracle E-Business Suite plug-in for use by WebCenter adapter solutions, including configuring the Oracle E-Business Suite database, compiling Oracle E-Business Suite Forms, and configuring Oracle Application Framework (OAF) pages via personalization. It also addresses securing communications through SOAP security and SSL.

Configuring the Oracle E-Business Suite portion of AXF requires an active connection to the Oracle E-Business Suite database, general database experience, and knowledge of Oracle E-Business Suite Forms Builder and OAF page personalization.

Note:

If installing adapter solutions for Oracle PeopleSoft but not Oracle E-Business Suite, skip this chapter and complete the steps described in Configuring the Oracle PeopleSoft Plug-In.

This chapter covers the following topics:

2.1 Configuring the Oracle E-Business Suite Database

The adapter uses an Oracle E-Business Suite database to store PL/SQL procedures and Oracle E-Business Suite configuration information. Consult your local DBA for assistance with these tasks. The instructions in this section assume the use of SQL*PLUS, but you can use any tool capable of querying the Oracle Database.

2.1.1 Creating the AXF Oracle E-Business Suite Configuration Schema User (AXF)

Follow these steps to create a database user for use by AXF within the Oracle E-Business Suite database.

Note:

If using Oracle E-Business Suite 11i and Oracle Database 9i, you must install the Oracle XML Database XDB Package into the Oracle E-Business Suite database. (This requirement applies only when using Oracle E-Business Suite 11i and Oracle Database 9i.) For information about installing the Oracle XML Database XDB Package, see the Oracle Database 9i documentation.

  1. Create a user named AXF.

    A system account user name and password is required to create the user. For assistance creating the user, contact your DBA.

  2. Assign the configuration schema user the following access privileges:
    • Create table

    • Create sequence

    • Create type

    • Create public synonym

    • Create session

    • Create procedure

    • Unlimited tablespace

2.1.2 PL/SQL Procedures Provided

Table 2-1 lists the PL/SQL scripts to run. In some cases, separate Oracle E-Business Suite release 11 and 12 scripts are provided. Scripts whose names begin with OAF apply to OAF configurations.

It is recommended that you run all scripts for your Oracle E-Business Suite release as described in Running the PL/SQL Scripts regardless of whether you are configuring Forms and/or OAF applications.

Table 2-1 PL/SQL Procedures Provided With Oracle E-Business Suite Plug-In

PL/SQL Procedure Applies To Description

AXF_CREATE_TABLES_SYNONYM

OAF_AXF_CREATE_TABLES_SYNONYM

Forms

OAF

These scripts create the tables and synonyms used by AXF for Forms and OAF applications. In addition, OAF_AXF_CREATE_TABLES_SYNONYM.sql populates the OAF_AXF_PROPERTIES table.

AXF_EBS_PROPERTIES_DATA

Forms

Populates the AXF_PROPERTIES table with security information for various Oracle E-Business Suite calls to AXF.

AXF_APPS_INIT

Forms

Required for Oracle E-Business Suite attachment for Forms applications.

AXF_ADD_EBS_ATTACHMENT_PROC_R11

AXF_ADD_EBS_ATTACHMENT_PROC_R12

Forms

Creates a stored procedure that adds an attachment to a transaction in Oracle E-Business Suite Forms applications.

AXF_MANAGED_ATTACHMENT_DATA

AXF_MANAGED_ATTACH_AVAIL

AXF_MANAGED_ATTACH_VALUES

Forms

Required for document attachment, for Forms applications.

AXF_SOAP_CALL_PROC

Forms

OAF

This script creates a stored procedure to make SOAP calls from PL/SQL.

2.1.3 Running the PL/SQL Scripts

Follow these steps to configure the Oracle E-Business Suite database.

  1. Locate the scripts in the following folders. Separate folders are provided for Oracle E-Business Suite Forms releases 11 and 12.
    • For 11g Oracle E-Business Suite Forms:

      MW_HOME/ECM_HOME/axf/adapters/ebs/R11/

      MW_HOME/ECM_HOME/axf/adapters/ebs/R12/

    • For 11g Oracle E-Business Suite OAF:

      MW_HOME/ECM_HOME/axf/adapters/ebs/oaf/

    • For 12c Oracle E-Business Suite Forms:

      MW_HOME/wccontent/ucm/Distribution/EBSIntegration/R11/

      MW_HOME/wccontent/ucm/Distribution/EBSIntegration/R12/

    • For 12c Oracle E-Business Suite OAF:

      MW_HOME/wccontent/ucm/Distribution/EBSIntegration/oaf/

  2. Using SQL*PLUS, log in to the Oracle E-Business Suite database as the AXF Oracle E-Business Suite configuration schema user (AXF).

    This user was previously created, as described in Creating the AXF Oracle E-Business Suite Configuration Schema User (AXF).

  3. As the AXF user, execute the AXF_CREATE_TABLES_SYNONYM script from the applicable Oracle E-Business Suite location.

    To execute the script, enter:

    @AXF_CREATE_TABLES_SYNONYM.sql

    Verify that the following tables were created: AXF_COMMAND_PARAMETERS, AXF_COMMANDS, AXF_CONFIGS, AXF_PROPERTIES, and AXF_FND_MAP.

  4. As the AXF user, customize and execute the OAF_AXF_CREATE_TABLES_SYNONYM script from the applicable Oracle E-Business Suite location.

    Before executing the script, set the script's AXF_OAF_REDIRECT_PAGE_URL value so that it identifies the Oracle E-Business Suite system's hostname and port (typically 8000).

    To execute the script, enter:

    @OAF_AXF_CREATE_TABLES_SYNONYM.sql

    Verify that the following tables were created: OAF_AXF_CMD_PARAMS, OAF_AXF_COMMANDS, OAF_AXF_CONFIGS, and OAF_AXF_PROPERTIES.

    Note:

    The AXF_CREATE_TABLES_SYNONYM and OAF_AXF_CREATE_SYNONYM scripts insert rows into the AXF_PROPERTIES and OAF_AXF_PROPERTIES tables, respectively. By default, the AXF_SOAP_SECURITY security parameter is set to TRUE. For SOAP security to work, you must store the SOAP user's password in the FND_VAULT. See Securing Adapter Communications for Oracle E-Business Suite for information on storing the SOAP user name and password in the Oracle E-Business Suite FND_VAULT.

  5. As the AXF user, execute the AXF_EBS_PROPERTIES_DATA script from the applicable Oracle E-Business Suite location.

    To execute the script, enter:

    @AXF_EBS_PROPERTIES_DATA.sql

  6. Log in as the APPS user.
  7. As the APPS user, execute the AXF_APPS_INIT script from the applicable Oracle E-Business Suite location.

    Execute the script by entering:

    @AXF_APPS_INIT.sql

  8. As the APPS user, execute the AXF_ADD_EBS_ATTACHMENT_PROC_R12 or AXF_ADD_EBS_ATTACHMENT_PROC_R11 script from the applicable Oracle E-Business Suite location.

    Execute the script by entering the command appropriate for your version:

    @AXF_ADD_EBS_ATTACHMENT_PROC_R12.sql

    @AXF_ADD_EBS_ATTACHMENT_PROC_R11.sql

    Note:

    This compilation may result in warnings, which you can ignore.

  9. As the APPS user, execute the AXF_MANAGED_ATTACH_AVAIL, AXF_MANAGED_ATTACH_VALUES, and AXF_MANAGED ATTACHMENT_DATA scripts from the applicable Oracle E-Business Suite location.

    Execute the scripts by entering:

    @AXF_MANAGED_ATTACH_AVAIL.sql

    @AXF_MANAGED_ATTACH_VALUES.sql

    @AXF_MANAGED_ATTACHMENT_DATA.sql

  10. As the APPS user, execute the AXF_SOAP_CALL_PROC script from the applicable Oracle E-Business Suite location.

    Execute the script by entering:

    @AXF_SOAP_CALL_PROC.sql

    Note:

    This compilation may result in warnings, which you can ignore.

2.2 Compiling Oracle E-Business Suite Forms

To enable a seamless integration of custom actions with existing Oracle E-Business Suite Forms, certain files are uploaded to the Oracle E-Business Suite system for the adapters. The adapters use user interface .PLL extension modules to access workflow tasks (Imaging Solution) and documents associated with business records (both solutions).

The Custom.PLL module is slightly modified during configuration to call AXF functions. It notifies AXF each time an Oracle E-Business Suite event occurs, allowing AXF to determine if it relates to AXF functionality.

The AXF_Custom.PLL component performs the following functions:

  • Calls out to a web service to execute an AXF Command

  • Responds to the following AXF response commands:

    • Open Browser

    • Terminate Conversation

  • Renders menus to expose AXF functionality based on the Oracle E-Business Suite configuration database.

Follow these steps to copy the AXF_CUSTOM.pld file, convert it to an AXF_CUSTOM.pll file, make modifications, and then compile it to an AXF_CUSTOM.plx file.

Note:

To compile AXF_CUSTOM.pll using an alternative command line method (applicable for Oracle E-Business Suite 12 Forms use only), see Compiling AXF_CUSTOM.pll Using the Command Line.

Note:

For information on using Oracle Forms Builder, see its Oracle E-Business Suite documentation.

  1. For the applicable version listed below, copy the AXF_CUSTOM.pld file to the E-Business Server (to FORMS_PATH for Oracle E-Business Suite 12, or FORMS60_PATH for Oracle E-Business Suite 11).

    For 12c

    Oracle E-Business Suite 12: MW_HOME/wccontent/ucm/Distribution/EBSIntegration/R12/AXF_CUSTOM.pld

    Oracle E-Business Suite 11: MW_HOME/wccontent/ucm/Distribution/EBSIntegration/R11/AXF_CUSTOM.pld

    For 11g

    Oracle E-Business Suite 12: MW_HOME/ECM_HOME/axf/adapters/ebs/R12/AXF_CUSTOM.pld

    Oracle E-Business Suite 11: MW_HOME/ECM_HOME/axf/adapters/ebs/R11/AXF_CUSTOM.pld

    Note:

    If you are using a Linux/UNIX system and copied the .PLD from a Windows system, issue the dos2unix command before converting it below.

  2. Open Oracle Forms Builder and connect to the Oracle E-Business Suite database as the APPS user. Forms Builder is typically located in the /bin/ subdirectory of your database's Oracle home.

    Note:

    Be sure to connect to the Oracle E-Business Suite database. If you fail to connect, verify the tnsnames.ora file.

  3. In Forms Builder, convert AXF_CUSTOM.pld to AXF_CUSTOM.pll.
    • In Oracle E-Business Suite 12, select File, then Convert.

    • In Oracle E-Business Suite 11, select File, then Administration, then Convert.

    Select PL/SQL libraries and Text to binary while converting the file.

    Note:

    If the following error displays during conversion of AXF_CUSTOM.pld to AXF_CUSTOM.pll, repeat this step until the file successfully converts.

    PDE-PLI038 - Can not open file as a PL/SQL Library

    Note:

    If the following error displays during conversion, click OK repeatedly until the file successfully converts.

    PDE-PLI018 - Could not find library AXF_CUSTOM

  4. From the File menu, open AXF_CUSTOM.pll.
    • In Oracle E-Business Suite 12, select Program, then Compile pl/sql, then All.

    • In Oracle E-Business Suite 11, select Program, then Compile, then All.

  5. Compile AXF_CUSTOM into a module (.plx).
    • In Oracle E-Business Suite 12, select Program, then Compile Module.

    • In Oracle E-Business Suite 11, select File, then Administration, then Compile File.

    Note:

    • You must compile AXF_CUSTOM using the APPS schema user ID.

    • If you encounter the following identifier or other errors referencing objects in APPCORE.pll while compiling, this indicates that the APPCORE.pll file must be attached to your form:

      'APP_SPECIAL.ENABLE' must be declared (a).

  6. Select File then Connect and ensure that you are connected to the database as the APPS user.
  7. Back up the CUSTOM.pll file.

    WARNING:

    Modifications to CUSTOM.pll are modifications to the Oracle E-Business Suite infrastructure. Ensure that you have appropriately backed up this file before making changes.

  8. Open CUSTOM.pll by selecting File, then Open and selecting PL/SQL Libraries (*.pll) in the Files of Type field. After opening the file and expanding Program Units, right-click the custom package body of CUSTOM.pll and select pl/sql editor.
  9. In the body text of CUSTOM.pll, modify the following text formatted in bold italics for the solutions you are configuring. If the file contains other customizations, place the following modification after the existing code inside each function/procedure.
    • For Managed Attachments Only or Both Solutions:

      function zoom_available return boolean is
      begin
      
      -- Required for ALL integrations
      return true;
      end zoom_available;
      
    • For Imaging Solution Only:

      function zoom_available return boolean is
      begin
      
      -- Required for ALL integrations
      return AXF_CUSTOM.zoom_available();
      end zoom_available;
      

    Important

    Be sure to modify the body text of the pll, NOT its header. Scroll down until you reach the following comment header:

    - -Real code starts here

  10. In the body text of CUSTOM.pll, modify the following text formatted in bold italics. If the file contains other customizations, place the following modification after the existing code inside each function/procedure.
    procedure event(event_name varchar2) is
    begin
    
    -- Required for AXF integrations
    AXF_CUSTOM.event(event_name);
    null;
    
    end event;
    

    Note:

    Do not remove the null; line.

  11. Save CUSTOM.pll by selecting File, then Save.
  12. With CUSTOM.pll open, determine if AXF_CUSTOM is listed as an attached library.
    • If it is listed, highlight AXF_CUSTOM and click the minus (-) symbol to detach it. Then reattach AXF_CUSTOM by highlighting Attached Libraries under CUSTOM and clicking the plus (+) symbol; browse to AXF_CUSTOM.pll and select it.

    • If it is not listed, attach AXF_CUSTOM by highlighting Attached Libraries under CUSTOM and clicking the plus (+) symbol; browse to AXF_CUSTOM.pll and select it.

    When prompted to remove the path, click Yes.

  13. With CUSTOM.pll open, verify that APPCORE and APPCORE2 are listed as attached libraries to AXF_CUSTOM.pll. If not listed, attach them. If listed, detach and attach them.
  14. With CUSTOM.pll open, select Program, then Compile pl/sql, then All (Oracle E-Business Suite 12) or Program, then Compile, then All (Oracle E-Business Suite 11).
  15. Compile CUSTOM into a module (.plx) by selecting Program, then Compile Module (Oracle E-Business Suite 12) or File, then Administration, then Compile File (Oracle E-Business Suite 11).
  16. Save all before exiting Forms Builder. Verify that the Zoom menu command displays in the appropriate Oracle E-Business Suite forms.

2.2.1 Compiling AXF_CUSTOM.pll Using the Command Line

This section describes an alternative command line method for compiling Oracle E-Business Suite Forms for adapter use. It applies only to Oracle E-Business Suite Suite 12 Forms use only, and does not apply to Oracle E-Business Suite 11.

Follow the steps below to copy the AXF_CUSTOM.pld file, convert it to an AXF_CUSTOM.pll file, make modifications, and then compile it to an AXF_CUSTOM.plx file. Then follow the steps in Compiling Oracle E-Business Suite Forms as indicated to modify the other file, CUSTOM.pll, and complete the Forms configuration.

  1. Copy the AXF_CUSTOM.pld file to a UNIX system and run the dos2unix command to convert the file to UNIX format.

    As an alternative, open the file in vi editor and manually remove the ^M characters from the file.

  2. Enter the following command line to convert AXF_CUSTOM.pld to AXF_CUSTOM.pll:
    $APPL_TOP/au/12.0.0/resource>frmcmp_batch.sh module=AXF_CUSTOM.pld  userid=apps/apps output_file=AXF_CUSTOM.pll module_type=library parse=yes
    
  3. Enter the following command line to convert AXF_CUSTOM.pll to AXF_CUSTOM.plx:
    $APPL_TOP/au/12.0.0/resource>frmcmp_batch.sh module=AXF_CUSTOM.pll userid=apps/apps output_file=AXF_CUSTOM.plx module_type=library compile_all=special
    
  4. Modify the CUSTOM.pll file by following the steps in Compiling Oracle E-Business Suite Forms, starting with step 6. Complete the remaining steps.

2.3 Configuring Oracle Application Framework (OAF) Pages Via Personalization

Managed Attachments functionality for OAF pages works as follows:

  • You manually add a Managed Attachments button to the OAF page using OAF personalization, positioning the button in a custom flex region imported into the MDS repository.

  • The button is associated with a generic extended controller class which redirects the call from Oracle E-Business Suite to a custom intermediate OAF page, passing the required Oracle E-Business Suite mapping entities.

  • The controller class analyzes which OAF page called it. The OAF page's key identifiers (name, view object, primary key attributes, and labels) are stored in the database tables. Based on the OAF page calling the controller, the solution fetches the appropriate rows from the database tables along with the required business entity values, which it adds as parameters to the custom intermediate OAF page's URL.

  • When the user clicks the Managed Attachments button, the custom intermediate OAF page opens, its ProcessRequest method is called, and the SOAP packet is created. The SOAP call fetches the Content Server URL, and upon loading, the page is redirected to the Content Server URL.

Note:

In addition to configuring OAF pages for Managed Attachments functionality, you can also provide imaging access on OAF pages, as described in Configuring Other Services on OAF Pages (Optional).

To configure the Oracle E-Business Suite OAF plug-in, follow the instructions in these sections:

2.3.1 Compiling Java Files, Copying Class Files, and Importing XML Files

Follow these steps to compile Java files, copy class files, and import XML files to the MDS repository, to enable adding the Managed Attachments button to OAF pages. In Personalizing OAF Pages to Add Managed Attachments, you will add the button to a custom flex region from the MDS repository.

Note:

This procedure assumes you are familiar with using JDeveloper to compile Java files. For basic information, see the section on building your first program with JDeveloper 10g at:

http://download.oracle.com/otndocs/tech/ias/portal/files/RG/OBE/FirstStep/FirstStep.htm

  1. Verify that you are using the correct JDeveloper version for your Oracle E-Business Suite release. At http://support.oracle.com, search for the following articles to verify that your JDeveloper version includes the needed OAF patch. If you do not have the correct version, download and unzip the appropriate JDeveloper OAF patch file.
    • Doc ID 416708.1, How to find the correct version of JDeveloper to use with Oracle E-Business Suite 11i or Release 12.x

    • Doc ID 357218.1, Troubleshooting JDeveloper setup for Oracle Applications

  2. Start JDeveloper, and create an application. Within the new application, create a project.
  3. In the following location, locate the java files GenericUcmButtonCO.java and RedirectToAxfCO.java and add them to the project:

    $MiddlewareHome/OracleHome/axf/adapters/ebs/oaf/src/oracle/apps/ak/ucm/axf/webui

    Choose Add Project Content, then click the Add button and select the folder containing the Java files.

  4. In the project properties, add the following OAF libraries:
    • BC4J Client

    • BC4J Runtime (Note: Do NOT add BC4J EJB Runtime)

    • Cabo

    • FND Libraries

  5. Compile the Java files in the project (right-click the project and choose Rebuild).
  6. Copy the class files (find Output Directory, which has the generated classes, via project properties) to the specified Oracle E-Business Suite mid tier $JAVA_TOP directory, creating the required directory structure.
    • Class files to copy: GenericUcmButtonCO.class and RedirectToAxfCO.class

    • Oracle E-Business Suite Server directory to copy class files to:

      $JAVA_TOP/oracle/apps/ak/ucm/axf/webui

  7. Import the XML file for the Generic Flex Layout Region into the MDS Repository.
    • XML file to import: ManagedAttachmentButtonRN.xml

    • Directory from which to execute the command (might be $JDEV_USER_HOME, then up two levels to jdevbin):

      $JdevHome/jdevbin/oaext/bin

    • ManagedAttachmentButtonRN import command to execute (from the command prompt, replacing italicized parameters):

      ./import Full path to ManagedAttachmentButtonRN.xml -username appsUsername -password appsPassword -dbconnection "(description = (address_list = (address = (community = tcp.world)(protocol = tcp)(host = DB Hostname)(port = DB Port)))(connect_data = (sid = DB SID)))" -rootdir path to directory where ManagedAttachmentButtonRN.xml is located -rootPackage /oracle/apps/ak/ucm/axf/webui
      
    • Example ManagedAttachmentButtonRN import command (where the XML file is in the $JAVA_TOP directory):

      ./import /$JAVA_TOP/ManagedAttachmentButtonRN.xml -username apps -password password -dbconnection "(description = (address_list = (address = (community = tcp.world)(protocol = tcp)(host = DB Hostname)(port = DB Port)))(connect_data = (sid = DB SID)))" -rootdir /$JAVA_TOP -rootPackage /oracle/apps/ak/ucm/axf/webui
      

      Note:

      If the import fails and returns an error that a jar file is missing, add the full path for the oamdsdt.jar file to the CLASSPATH entry in the import script (import file on Linux, import.bat on Windows). The full path for oamdsdt.jar is:

      $JdevHome/jdevbin/oaext/lib/oamdsdt.jar

      For example, the import file typically contains a CLASSPATH entry of the form:

      set CLASSPATH=$JRAD_ROOT/jdev/appslibrt/uix2.jar

      Change it to add the required jar, like this:

      set CLASSPATH=$JRAD_ROOT/jdev/appslibrt/uix2.jar:/oracle/r12/JDeveloper/jdevbin/oaext/lib/oamdsdt.jar

  8. Import the XML file for the Custom OAF page used for redirection into the MDS Repository.
    • XML file to import: RedirectToAxfPG.xml

    • Directory from which to execute the command:

      $JdevHome/jdevbin/oaext/bin

    • RedirectToAxfPG import command to execute (from the command prompt, replacing italicized parameters):

      ./import Full path to RedirectToAxfPG.xml -username appsUsername -password appsPassword -dbconnection "(description = (address_list = (address = (community = tcp.world)(protocol = tcp)(host = DB Hostname)(port = DB Port)))(connect_data = (sid = DB SID)))" -rootdir Path to directory where RedirectToAxfPG.xml is located -rootPackage /oracle/apps/ak/ucm/axf/webui
      

      Example RedirectToAxfPG import command (where the XML file is in the $JAVA_TOP directory):

      ./import /$JAVA_TOP/RedirectToAxfPG.xml -username apps -password password -dbconnection "(description = (address_list = (address = (community = tcp.world)(protocol = tcp)(host = DB Hostname)(port = DB Port)))(connect_data = (sid = DB SID)))" -rootdir /$JAVA_TOP -rootPackage /oracle/apps/ak/ucm/axf/webui
      

      Note:

      If the import fails and returns an error that a jar file is missing, see the note in step 7.

  9. Verify that the import was successful, by running the following commands via SQL prompt as the Oracle E-Business Suite APPS user:
    SET SERVEROUTPUT ON
    BEGIN
    JDR_UTILS.PRINTDOCUMENT('/oracle/apps/ak/ucm/axf/webui/RedirectToAxfPG');
    JDR_UTILS.PRINTDOCUMENT('/oracle/apps/ak/ucm/axf/webui/ManagedAttachmentButtonRN');
    END;
    /
    
  10. Load the oaf_axf_messages.ldt message bundle using FNDLOAD. This file contains the translatable messages used by the controller classes.
    • Verify that the LD_LIBRARY_PATH variable is set to $ORACLE_HOME/lib

    • As the Oracle E-Business Suite APPS user, execute the following command from $FND_TOP/bin:

      FNDLOAD apps/$CLIENT_APPS_PWD 0 Y UPLOAD $FND_TOP/patch/115/import/afmdmsg.lct Full path to oaf_axf_messages.ldt
      
    • When prompted, enter the APPS user password.

  11. Restart the Oracle E-Business Suite instance.

2.3.2 Personalizing OAF Pages to Add Managed Attachments

Perform these steps for each OAF page on which you want to display a Managed Attachment button. You create a flexible layout via personalization and add the Managed Attachment button file you previously imported into the MDS repository as flexible content.

Note:

Add one Managed Attachments button per OAF page only; including multiple buttons causes the same controller code to execute multiple times.

The Managed Attachments functionality cannot be implemented for attachments for line items on OAF pages.

  1. Log in to Oracle E-Business Suite as the OPERATIONS user.

  2. Display the OAF page on which to add a Managed Attachment button, and click the Personalize the page link at the top of the page.

  3. Under Personalization Structure on the Personalize Page page, select the Complete View option, and click the Expand All link. A full hierarchical view of all regions on the OAF page displays.

  4. Create and configure the flexible layout.

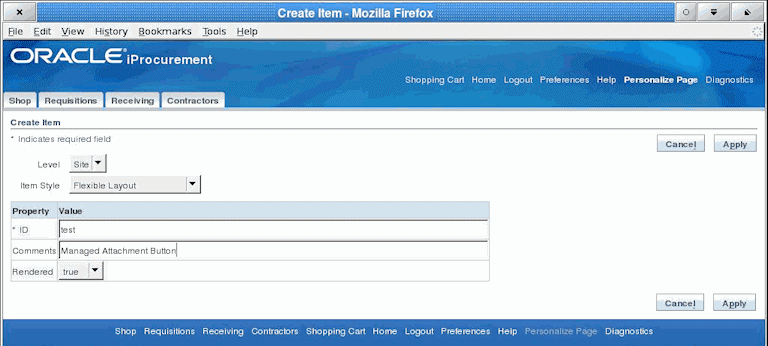
    1. Scroll down the hierarchical listing below the region where the button will display on the OAF page and click the Create Item icon. A Create Item page displays, as shown in Figure 2-1.

    2. In the Level field, select Site.

    3. In the Item Style field, select Flexible Layout.

    4. In the ID field, enter any value (test, for example).

    5. Click Apply.

      Figure 2-1 Creating the Flexible Layout

      Description of Figure 2-1 follows
      Description of "Figure 2-1 Creating the Flexible Layout"
  5. Create and configure the flexible content.

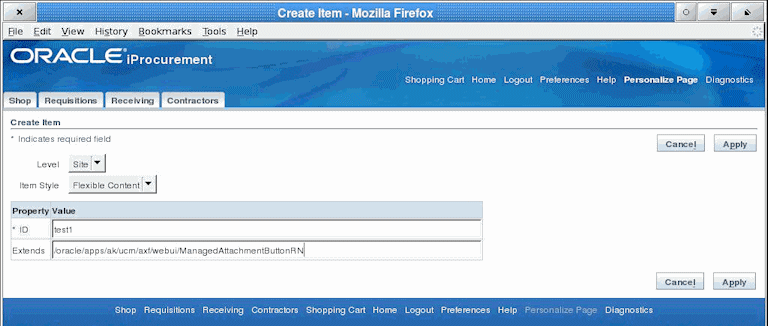
    1. In the hierarchical list, locate the flexible layout you just added and click its Create Item icon. A Create Item page displays, as shown in Figure 2-2.

    2. In the Item Style field, select Flexible Content.

    3. In the ID field, enter any value (test1, for example).

    4. In the Extends field, enter the package for the flex region you imported into the MDS repository (in Compiling Java Files_ Copying Class Files_ and Importing XML Files):

    /oracle/apps/ak/ucm/axf/webui/ManagedAttachmentButtonRN

    Figure 2-2 Creating the Flexible Content

    Description of Figure 2-2 follows
    Description of "Figure 2-2 Creating the Flexible Content"
  6. Click the Apply button.

    Figure 2-3 Page Hierarchy After Adding Managed Attachments Button Via Personalization
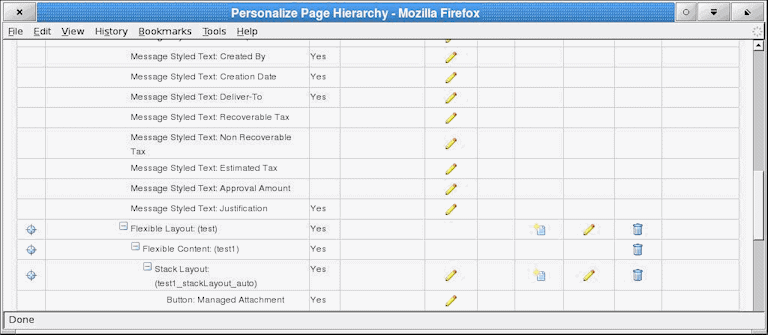
    Description of Figure 2-3 follows
    Description of "Figure 2-3 Page Hierarchy After Adding Managed Attachments Button Via Personalization"

2.3.3 Personalizing OAF Pages for Oracle E-Business Suite 12.2.x

Perform the following steps, if you are using Oracle E-Business Suite 12.2.x for OAF pages:
  1. Source the APPS environment file and run the adadmin tool.
  2. In the adadmin tool, select Regenerate all the product jar files.
  3. When adadmin tool finishes regenerating the product jar files, restart the Oracle E-Business Suite servers.

2.3.4 Configuring Other Services on OAF Pages (Optional)

You can provide access to the Imaging solution instead of the Managed Attachments solution on OAF pages. For example, you might include a button that allows users to access the supplier maintenance functionality available in the Imaging solution.

The procedure below provides several steps to follow to add a custom button (instead of the Managed Attachment button) and to identify the button's action in the database table as Imaging instead of Managed Attachments.

  1. Complete all steps except step 7 in Compiling Java Files_ Copying Class Files_ and Importing XML Files. (Step 7, which imports the ManagedAttachmentButtonRN.xml file, is not needed.)
  2. Customize the sample XML file provided (SampleAXFButtonRN.xml), modifying the following button ID and button prompt (title) values.

    <oa:button id="AXFButton" prompt="Sample AXF Button"/>

    For example, you might change the button ID to IPM_BUTTON and button prompt (title) to Supplier Maintenance.

  3. Import the XML file into the MDS Repository.
    • XML file to import: SampleAXFButtonRN.xml (or modified version)

    • Directory from which to execute the command:

      $JdevHome/jdevbin/oaext/bin

    • Import command to execute (from the command prompt, replacing italicized parameters):

      ./import  Full path to XML file -username apps -password appsPassword -dbconnection "(description = (address_list = (address = (community = tcp.world)(protocol = tcp)(host = DB Hostname)(port = DB Port)))(connect_data = (sid = DB SID)))" -rootdir path to directory where XML file is located -rootPackage /oracle/apps/ak/ucm/axf/webui
      
    • Example import command (where the XML file is in the $JAVA_TOP directory):

      ./import /$JAVA_TOP/SampleAXFButtonRN.xml  -username appsUsername -password appsPassword -dbconnection "(description = (address_list = (address = (cUommunity = tcp.world)(protocol = tcp)(host = DB Hostname)(port = DB Port)))(connect_data = (sid = DB SID)))" -rootdir /$JAVA_TOP -rootPackage /oracle/apps/ak/ucm/axf/webui
      
  4. Use this button ID for the command in the OAF_AXF_COMMANDS Table (Oracle E-Business Suite OAF). The new button ID will correspond to AXF_EVENT_ID. An example is shown in OAF_AXF_COMMANDS Table (Oracle E-Business Suite OAF).
  5. In the OAF_AXF_CMD_PARAMS table, add required command parameters, if any, for the AXF_EVENT_ID.
  6. Follow the steps in Personalizing OAF Pages to Add Managed Attachments to add the button imported above via personalization. In step 5 of Personalizing OAF Pages to Add Managed Attachments, be sure to enter the name of the package you imported into the MDS repository in step 3 of this section. In the example provided, this name is /oracle/apps/ak/ucm/axf/webui/SampleAXFButtonRN.

2.4 Securing Adapter Communications for Oracle E-Business Suite

This section covers the following topics:

2.4.1 Securing Communications Through SOAP Security

Follow these steps to configure SOAP security, in which the application sends the SOAP user and password in the header for authentication.

Note:

Configuring SOAP security is required.

  1. Ensure that SOAP security is enabled, by verifying that it is set to TRUE for the AXF_SOAP_SECURITY property in the AXF_PROPERTIES Table (Oracle E-Business Suite) and the OAF_AXF_PROPERTIES Table (Oracle E-Business Suite OAF).

    Note:

    Ensure that you restart Oracle E-Business Suite after changing AXF_SOAP_SECURITY from FALSE to TRUE.
  2. Set the AXF_SOAP_POLICY property to USER_NAME_TOKEN.
  3. Set the AXF_SOAP_USER value (for example, to weblogic). By default, this setting might be AXF and should be changed. The AXF_SOAP_USER refers to a valid Oracle WebLogic Server administrator.
  4. Store the SOAP password in the database vault by executing the following command as APPS schema:

    execute fnd_vault.put('AXF','AXF_SOAP_USER','SOAP_PASSWORD');

    Where AXF_SOAP_USER is the SOAP user ID used in the SOAP header for authentication, and SOAP_PASSWORD is the SOAP password. (The first item, 'AXF', is an identifier that needs to be included as is.)

    For example:

    execute fnd_vault.put('AXF','weblogic','examplepassword');

  5. Verify the previous command with this statement:

    select fnd_vault.get ('AXF','AXF_SOAP_USER') from dual;

    For example:

    select fnd_vault.get ('AXF','weblogic') from dual;

2.4.2 Securing Communications Through SSL (Oracle E-Business Suite)

Perform the following procedures to specify Oracle E-Business Suite system settings for SSL configuration for AXF.

2.4.2.1 Configuring the Oracle Wallet

  1. Run Oracle Wallet Manager. In Linux, the owm executable is located at:

    //ORACLE_HOME/bin/owm

  2. Create a wallet. Using the wizard, enter the required information to create a certificate. Export to a file.
  3. Submit the certificate request to CA (Certificate Authority, such as Verisign) to purchase a new certificate.
  4. Save the SSL certificates with a .cer extension. Most likely, the CA provided an SSL certificate, an Intermediate certificate, and a Trusted Root certificate through e-mail.
  5. Import the Root and Intermediate certificates into the Oracle Wallet by right-clicking Trusted Certificates and importing.
  6. Import the SSL certificate into the wallet manager.

    If the process is successfully completed, a Ready status displays.

    Tip:

    To import the SSL certificate, right- click the Certificate Requested tree item if needed.

  7. Save the wallet in one of the folders defined in the FORMS_PATH. (It is saved with the name ewallet.p12).

2.4.2.2 Configuring the Integration for SSL

For more information, see Configuring SSL in Administering Security for Oracle WebLogic Server.

  1. On the Oracle E-Business Suite database, run the SQL statements listed below.

    1. For Oracle E-Business Suite Forms applications:

      update AXF_PROPERTIES set propvalue='file:walletpath' where propname = 'AXFWalletPath';
      update AXF_PROPERTIES set propvalue='ON/OFF' where propname = 'SecureMode';
      commit;
      
    2. For Oracle E-Business Suite OAF applications:

      update OAF_AXF_PROPERTIES set propvalue='file:walletpath' where propname = 'AXFWalletPath';
      update OAF_AXF_PROPERTIES set propvalue='ON/OFF' where propname = 'SecureMode';
      commit;
      
  2. Update tables to reflect the SecureMode setting and secure port. When SecureMode is on, the integration attempts to connect to the AXF application using SSL (https).

    1. In the Oracle E-Business Suite AXF_CONFIGS table, update the SOLUTIONENDPOINT value to begin with https:// if SecureMode is on, or begin with http:// if SecureMode is off. Change Port to match the secure port on the Oracle WebCenter Content side.

    2. In the Oracle E-Business Suite OAF_AXF_CONFIGS table, update the SOLUTIONENDPOINT value to begin with https:// if SecureMode is on, or begin with http:// if SecureMode is off. Change Port to match the secure port on the Oracle WebCenter Content side.

    For an Imaging configuration, see AXF_CONFIGS Table (Oracle E-Business Suite). For a Managed Attachments Forms configuration, see AXF_CONFIGS Table (Oracle E-Business Suite Forms). For a Managed Attachments OAF configuration, see OAF_AXF_CONFIGS Table (Oracle E-Business Suite OAF).

  3. Store the Wallet password in the database vault by executing the following command as APPS schema:

    execute fnd_vault.put('AXF','AXFWalletKey','WalletPassword');

    Where WalletPassword is the wallet password.

  4. Verify the previous command with this statement:

    select fnd_vault.get ('AXF','AXFWalletKey') from dual;

  5. Import the AXF certificate into the wallet.

  6. Enable SSL on Oracle WebLogic Server on the Oracle WebCenter Content side.

    For information, see "Configuring SSL for Oracle WebCenter Content Applications" in Installing and Configuring Oracle WebCenter Content.

  7. Exchange server certificates between the web servers.

    This step involves exporting the certificate from Oracle Wallet and importing it into the Oracle WebLogic Server keystore on the Oracle WebCenter Content side of the integration. This keystore must be enabled for both the Administration and Imaging servers. In addition, you must export the server certificate from the Oracle Weblogic Server and import it into the Oracle Wallet.

2.5 Configuring Oracle E-Business Suite Logging

2.5.1 Configuring Logging for Forms Applications

Enable logging for specific forms in the AXF_CONFIGS table. For the Imaging solution, see AXF_CONFIGS Table (Oracle E-Business Suite); for the Managed Attachments solution, see AXF_CONFIGS Table (Oracle E-Business Suite Forms).

To enable logging for a particular Form function, set the LOGENABLED field to either 1, YES or TRUE to create the file in the UTL_FILE_DIR folder. Consult with your DBA to verify that the UTL_FILE_DIR folder is available and accessible. Log files are named Username_MASTER_LOG.txt, and continue to grow as items are appended.

2.5.2 Configuring Logging for OAF Applications

Follow these steps to enable diagnostics on a specific OAF page.

  1. Click the Diagnostics link at the top of the OAF page.

  2. On the Diagnostics page, select the following settings:

    1. In the Diagnostic field, select Show Log on page.

    2. In the Log Level field, select Statement (1).

  3. Click Go.

  4. Navigate to the page with an error. Search for the string Debug--> on the page.

2.6 Setting User Locales

To prevent issues with different locales when invoking AXF, Oracle E-Business Suite users should set the same values for their user locale preference and their browser locale. If using the Managed Attachments Solution, set the same value for the Content Server locale.

2.7 Configuring Solutions for Oracle E-Business Suite

See the information below for additional tasks to configure each solution.

For the Imaging Solution

Configure the Imaging solution as described in Configuring the BPEL Imaging Solution. Configure AXF-related Oracle E-Business Suite tables as described in Oracle E-Business Suite Forms Tables For the BPEL Imaging Solution or apply a solution accelerator as described in Configuring the AXF Tables or Applying a Solution Accelerator.

Note:

The Oracle E-Business Suite imaging solution is supported for Forms-based applications only, not OAF applications.

For the Managed Attachments Solution

  1. Configure the Managed Attachments solution as described in Configuring the Managed Attachments Solution. In addition to configuring Content Server components and running the AXF_ATTACHMENTS_CONFIG.sql script, which configures AXF elements such as solutions and commands, you must run scripts to populate the tables for Forms and OAF applications:

    1. For Forms applications, running the AXF_EBS_ATTACHMENTS_CONFIG.sql configures the Zoom menu to enable the Managed Attachments solution. For details, see Enabling Managed Attachments for Oracle E-Business Suite Forms Applications.

    2. For OAF applications, running the OAF_AXF_EBS_ATTACHMENTS_CONFIG.sql script populates the tables listed in Oracle PeopleSoft Tables For the Managed Attachments Solution for the Managed Attachments solution for selected OAF pages, which you can modify for your OAF pages. For details, see Enabling Managed Attachments for Oracle E-Business Suite OAF Applications.

2.8 Uninstalling AXF From Oracle E-Business Suite

Follow the steps that apply to your Oracle E-Business Suite configuration to uninstall AXF from Oracle E-Business Suite.

2.8.1 Uninstalling From Oracle E-Business Suite Forms

  1. Assign the AXF configuration schema user the following privileges:
    • Drop table

    • Drop sequence

    • Drop public synonym

  2. As the AXF user, execute the AXF_DROP_TABLES_SYNONYM script for your Oracle E-Business Suite version, from the applicable location listed below. This script drops all tables, synonyms, and sequences created by the AXF_CREATE_TABLES_SYNONYM script run during installation.

    For 12c

    Oracle E-Business Suite 12: MW_HOME/wccontent/ucm/Distribution/EBSIntegration/R12/AXF_DROP_TABLES_SYNONYM.sql

    Oracle E-Business Suite 11: MW_HOME/wccontent/ucm/Distribution/EBSIntegration/R11/AXF_DROP_TABLES_SYNONYM.sql

    For 11g

    Oracle E-Business Suite 12: MW_HOME/ECM_HOME/axf/adapters/ebs/R12/AXF_DROP_TABLES_SYNONYM.sql

    Oracle E-Business Suite 11: MW_HOME/ECM_HOME/axf/adapters/ebs/R11/AXF_DROP_TABLES_SYNONYM.sql

    Execute the script by entering:

    @AXF_DROP_TABLES_SYNONYM.sql

  3. Remove the AXF database schema user.
  4. Remove AXF_CUSTOM.* (AXF_CUSTOM.pll, AXF_CUSTOM.pld, and AXF_CUSTOM.plx) from FORMS_PATH (or FORMS60_PATH on Oracle E-Business Suite 11 systems).
  5. Restore the CUSTOM.pll file you backed up in step 7 in Compiling Oracle E-Business Suite Forms.
  6. Open Oracle Forms Builder and connect to the Oracle E-Business Suite database as the APPS user. Forms Builder is typically located in the /bin/ subdirectory of your database's Oracle home.
  7. Open the restored CUSTOM.pll by selecting File, then Open and selecting PL/SQL Libraries (*.pll) in the Files of Type field.
  8. With CUSTOM.pll open, select Program, then Compile pl/sql, then All (Oracle E-Business Suite 12) or Program, then Compile, then All (Oracle E-Business Suite 11).
  9. Compile CUSTOM into a module (.plx) by selecting Program, then Compile Module (Oracle E-Business Suite 12) or File, then Administration, then Compile File (Oracle E-Business Suite 11).
  10. Save all before exiting Forms Builder.

2.8.2 Uninstalling From Oracle E-Business Suite OAF

  1. Assign the AXF configuration schema user the following privileges:
    • Drop table

    • Drop sequence

    • Drop public synonym

  2. As the AXF user, execute the OAF_AXF_DROP_TABLES_SYNONYM script from the location listed below. This script drops all tables, synonyms, and sequences created by the OAF_AXF_CREATE_TABLES_SYNONYM script run during installation.

    For 12c

    MW_HOME/wccontent/ucm/Distribution/EBSIntegration/oaf/OAF_AXF_DROP_TABLES_SYNONYM.sql

    For 11g

    MW_HOME/ECM_HOME/axf/adapters/ebs/oaf/OAF_AXF_DROP_TABLES_SYNONYM.sql

    Execute the script by entering:

    @OAF_AXF_DROP_TABLES_SYNONYM.sql

  3. Remove the AXF database schema user.