Creating a Data Set Using a CSV File
BI Publisher supports data sets that use CSV file data sources to return valid XML data.
The following topics describe using requirements and procedures for using a CSV as a data source:
About Supported CSV Files
Support of CSV files as a data set type in BI Publisher follow certain guidelines.
-
You can use a CSV file that is located in a directory that your administrator has set up as a data source. For more information, see Setting Up a Connection to a File Data Source in Administrator's Guide for Oracle Business Intelligence Publisher.
You can upload a file from a local directory.
-
The supported CSV file delimiters are Comma, Pipe, Semicolon, and Tab.
-
If your CSV file contains headers, the header names are used as the XML tag names. The following characters are not supported in XML tag names: ~, !, #, $, %, ^, &, *, +, `, |, :, \", \\, <, >, ?, ,, /. If your data source file contains any of these characters in a header name, use the data model editor Structure tab to edit the tag names.
-
CSV data sets support editing the data type assigned by the data model editor. See Editing the Data Type for more information. If you update the data type for an element in the data set, you must ensure that the data in the file is compliant with the data type that you selected.
-
The CSV files that you use as input to the Oracle BI Publisher data engine must be UTF-8 encoded and cannot contain empty column headers.
-
Group breaks, data links, expression and group-level functions are not supported.
-
Data fields in CSV files must use the canonical ISO date format for mapped date elements, for example, 2012-01-01T10:30:00-07:00, and ######.## for mapped number elements.
-
Data validation is not provided for CSV files.
Creating a Data Set from a Centrally Stored CSV File
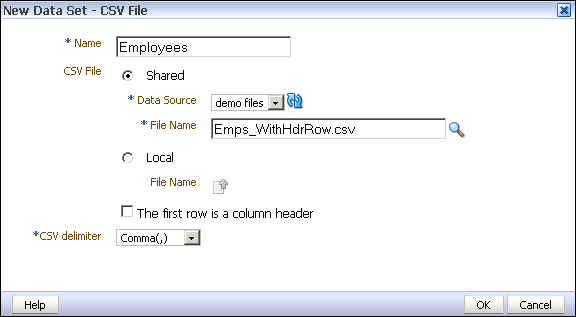
You can use a CSV file from a file directory to create a data set.
Uploading a CSV File Stored Locally
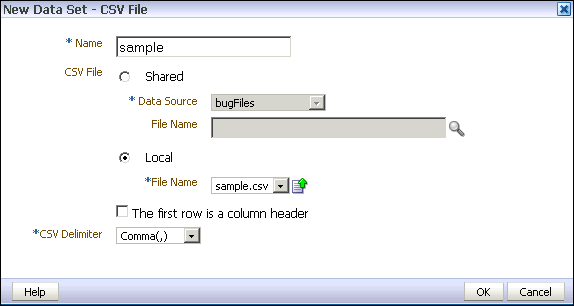
Create data sets using CSV files stored in local file directories.
To create a data set using a CSV file stored locally:
Editing the Data Type
After uploading a CSV file data type, you can edit it as needed.
To edit the data type for a CSV file element, click the data type icon or update it from the element Properties dialog.
The data for an element must be compliant with the data type that you assign. The user interface does not validate the data when you update the data type. If the data does not match, for example, a string value is present for an element you defined as Integer, errors may occur in the layout editing tools and or at runtime.
You can only update the data types for CSV file data sources.
Refreshing and Deleting an Uploaded CSV File
You can refresh and delete uploaded local CSV files.
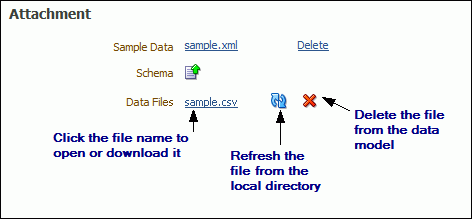
After uploading the file, it is displayed on the Properties pane of the data model under the Attachments region, as shown below.
See Setting Data Model Properties for more information about the Properties pane.
To refresh the local file in the data model:
-
In the component pane, click Data Model to view the Properties page.
-
In the Attachment region of the page, locate the file in the Data Files list.
-
Click Refresh.
-
In the Upload dialog, browse for and upload the latest version of the file. The file must have the same name or it will not replace the older version.
-
Save the data model.
To delete the local file:
- In the component pane, click Data Model to view the Properties page.
- In the Attachment region of the page, locate the file in the Data Files list.
- Click Delete.
- Click OK to confirm.
- Save the data model.


