Defining Groups
By defining a group, you notify BI Publisher that for each occurrence of an element, you want the included fields displayed. At runtime, BI Publisher loops through the occurrences of the element and displays the fields each time.
In the example, for each occurrence of G_VENDOR_NAME in the XML file, you want the template to display its child elements VENDOR_NAME (Supplier Name), G_INVOICE_NUM (the Invoices group), Total Entered Amount, and Total Accounted Amount. And, for each occurrence of G_INVOICE_NUM (Invoices group), you want the template to display Invoice Number, Invoice Date, GL Date, Currency, Entered Amount, and Accounted Amount.
To designate a group of repeating fields, insert the grouping tags around the elements to repeat.
Insert the following tag before the first element:
<?for-each:XML group element tag name?>
Insert the following tag after the final element:
<?end for-each?>
Note:
For more information, see Inserting a Repeating Group.
Grouping Scenarios
When grouping, note that the group element must be a parent of the repeating elements in the XML input file. These are some of the grouping scenarios.
-
If you insert the grouping tags around text or formatting elements, then the text and formatting elements between the group tags are repeated.
-
If you insert the tags around a table, then the table is repeated.
-
If you insert the tags around text in a table cell, then the text in the table cell between the tags is repeated.
-
If you insert the tags around two different table cells, but in the same table row, then the single row is repeated.
-
If you insert the tags around two different table rows, then the rows between the tags are repeated (this does not include the row that contains the "end group" tag).
Using the Basic RTF Method
Enter the tags in the document to define the beginning and end of the repeating element group.
To create the Suppliers group in the example, insert the tag:
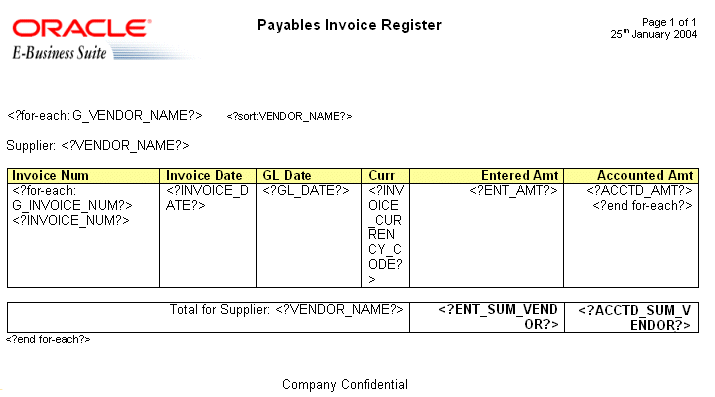
<?for-each:G_VENDOR_NAME?>
before the Supplier field that you previously created.
Insert <?end for-each?> in the document after the summary row.
The following illustration shows the Payables Invoice Register with the basic RTF grouping and placeholder markup.
Using the Form Field Method
You can define a group using the Form Field method.
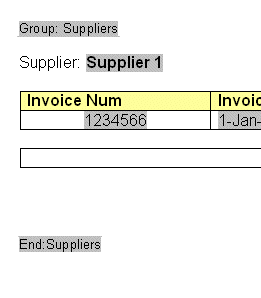
To use Microsoft Word's Form Field method to defining a group:
Completing the Example
The second group in the example is the invoices group. The repeating elements in this group are displayed in the table. For each invoice, the table row should repeat. Create a group within the table to contain these elements.
Note:
For each invoice, only the table row should repeat, not the entire table. Placing the grouping tags at the beginning and end of the table row repeats only the row. If you place the tags around the table, then for each new invoice the entire table with headings is repeated.
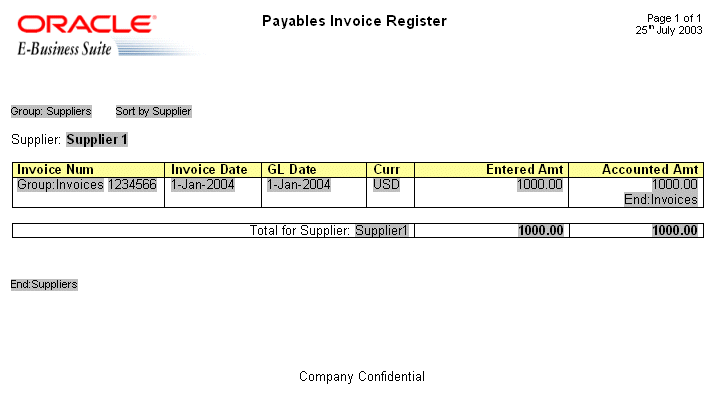
To mark up the example, insert the grouping tag <?for-each:G_INVOICE_NUM?> in the table cell before the Invoice Num placeholder. Enter the Default text Group:Invoices to designate the beginning of the group.
Insert the end tag inside the final table cell of the row after the Accounted Amt placeholder. Enter the Default text End:Invoices to designate the end of the group.
The following figure shows the completed example using the form field method.


