Supported Formatting Features of Microsoft Word
Microsoft Word can simplify formatting output.
In addition to the features already listed, BI Publisher supports the features of Microsoft Word that are described in the following sections:
General Features of Microsoft Word
The general features of Microsoft Word are large blocks of text, page breaks, page numbering, and hidden text.
-
Large blocks of text
-
Page breaks
(Not supported for HTML output) To insert a page break, press
Ctrl+Enterright before the closing tag of a group. For example if you want the template to start a new page for every Supplier in the Payables Invoice Register:-
Place the cursor just before the Supplier group's closing
<?end for-each?>tag. -
Press
Ctrl+Enterto insert a page break.
At runtime each Supplier starts on a new page.
Using this Microsoft Word native feature causes a single blank page to print at the end of the report output. To avoid this single blank page, use BI Publisher's page break alias. See Inserting Page Breaks.
-
-
Page numbering
Insert page numbers into the final report by using the page numbering methods of the word processor. For example, if you are using Microsoft Word:
-
From the Insert menu, select Page Numbers...
-
Select the Position, Alignment, and Format as desired.
At runtime the page numbers are displayed as selected.
Note that page numbering is not supported for HTML output and has limited support in RTF output. After the RTF report is generated, press
F9to reset the page numbers. -
-
Hidden text
You can format text as hidden in Microsoft Word and the hidden text is maintained in RTF output reports.
Aligning Objects
Use the word processor's alignment features to align text, graphics, objects, and tables. Bidirectional languages are handled automatically using the word processor's left/right alignment controls.
Note that BI Publisher output documents do not support right and left justification for symbol-based languages such as Chinese, Japanese, and Korean.
Inserting Tables
Microsoft Word tables are can be used to enhance your reports.
The following Microsoft Word features are supported in BI Publisher:
-
Nested Tables
-
Cell Alignment
You can align any object in the template using the word processor's alignment tools. This alignment is reflected in the final report output.
-
Row spanning and column spanning
To span both columns and rows in the template:
-
Select the cells that you want to merge.
-
From the Table menu, select Merge Cells.
-
Align the data within the merged cell as you would normally.
At runtime the cells appear merged.
-
-
Table Autoformatting
BI Publisher recognizes the table autoformats available in Microsoft Word.
To autoformat tables:
-
Select the table that you want to format.
-
From the Table menu, select Autoformat.
-
Select the desired table format.
At runtime, the table is formatted using your selection.
-
-
Cell patterns and colors
To highlight cells or rows of a table with a pattern or color:
-
Select the cell(s) or table.
-
From the Table menu, select Table Properties.
-
From the Table tab, select the Borders and Shading... button.
-
Add borders and shading as desired.
-
-
Repeating table headers
Note:
This feature is not supported for RTF output.If the data is displayed in a table and you expect the table to extend across multiple pages, then you can define the header rows that you want to repeat at the start of each page.
To repeat header rows:
-
Select the row(s) that you want to repeat on each page.
-
From the Table menu, select Heading Rows Repeat.
-
-
Prevent rows from breaking across pages.
If you want to ensure that data within a row of a table is kept together on a page, you can set this as an option using Microsoft Word's Table Properties.
To keep a row's contents together on one page:
-
Select the row(s) that you want to ensure do not break across a page.
-
From the Table menu, select Table Properties.
-
From the Row tab, deselect the check box Allow row to break across pages.
-
-
Fixed-width columns
To set the widths of table columns:
-
Select a column and then select Table > Table Properties.
-
In the Table Properties dialog, select the Column tab.
-
Enable the Preferred width checkbox and then enter the width as a Percent or in Inches.
-
Select the Next Column button to set the width of the next column.
Note that the total width of the columns must add up to the total width of the table.
-
-
Text truncation
By default, if the text within a table cell does not fit within the cell, then the text is wrapped. To truncate the text instead, use the table properties dialog.
Note that table text truncation is supported for PDF and PPT outputs only.
To truncate the text within a table cell:
-
Place the cursor in the cell in which you want the text truncated.
-
Right-click and select Table Properties... from the menu, or navigate to Table > Table Properties...
-
From the Table Properties dialog, select the Cell tab, then select Options...
-
Deselect the Wrap Text check box.
-
An example of truncation is shown in the following figure.
Note:
When using multibyte characters (for example, simplified Chinese) in tables, ensure that the column widths are large enough to contain the width of the largest character plus the cell's left and right margins to avoid unexpected character display in your final output.Inserting Date Fields
Insert dates using the date feature of the word processor. Note that this date corresponds to the publishing date, not to the request run date.
Inserting Multiple Columns on Pages
BI Publisher supports Microsoft Word's Columns function to enable you to publish the output in multiple columns on a page. (Note that this is not supported for HTML output.)
Select Format, then Columns to display the Columns dialog to define the number of columns for the template.
To generate address labels in a two-column format:
- Divide the page into two columns using the Columns command.
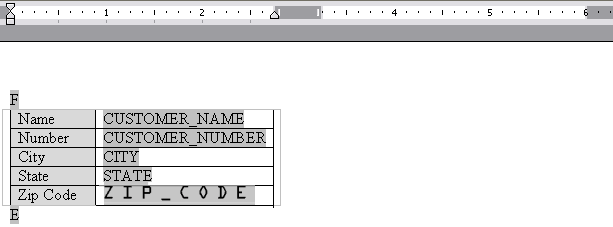
- Define the repeatable group in the first column. Note that you define the repeatable group only in the first column, as shown in the following illustration.
Tip:
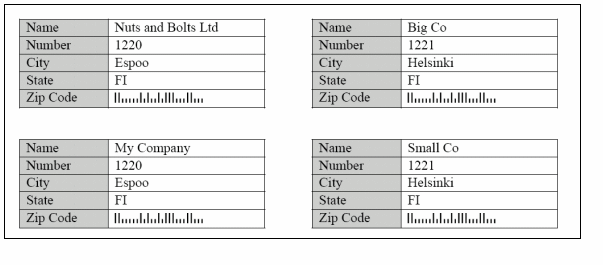
To prevent the address block from breaking across pages or columns, embed the label block inside a single-celled table. Then specify in the Table Properties that the row should not break across pages. See Inserting Tables.This template produces the multicolumn output that is shown in the following illustration.
Inserting Backgrounds and Watermarks
BI Publisher supports the Background feature in Microsoft Word. You can specify a single, graduated color or an image background for the template to be displayed in the PDF output.
Note:
This feature is supported for PDF output and PPT output only.To add a background to the template, use the Format > Background menu option.
Adding a Background Using Microsoft Word 2000
With the Background support feature in Microsoft Word you can select a color background and fill effects.
From the Background pop up menu, you can:
-
Select a single color background from the color palette.
-
Select Fill Effects to open the Fill Effects dialog.
From this dialog, select one of the following supported options:
-
Gradient: This can be either one or two colors.
-
Texture: Select one of the textures provided, or load your own.
-
Pattern: Select a pattern and background/foreground colors.
-
Picture: Load a picture to use as a background image.
-
Adding a Text or Image Watermark Using Microsoft Word 2002 or later
These versions of Microsoft Word allow you to add either a text or image watermark. Note that the steps you take to add a watermark depend on which version of Microsoft Word you are using.
You can add the following types of watermarks to documents:
-
Picture Watermark - Load an image and define how it should be scaled on the document.
-
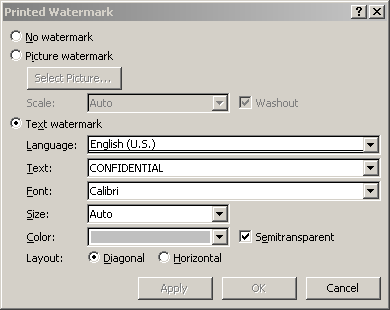
Text Watermark - Use the predefined text options or enter your own, then specify the font, size and how the text should be rendered.
The following figure shows an example of the Printed Watermark dialog completed to display a text watermark in Microsoft Word 2010:


