3 Working with Models

A model provides a grammar for describing the aspects of an application that are key for tracking business performance and mapping those concepts to existing software application implementation.

In general, models of a high-level application are defined through an iterative collaboration between a business user and an architect. The business user generally describes the high-level concepts associated with an integration application, whereas the architect refines those concepts and maps them to an application implementation. Once the model is defined and mapped, the system starts collecting metrics associated with instances of the business model. The metrics are used to render dashboards and reports.

Creating a model involves collaboration between users that have different personas: business users and architects. Business users define the abstract model, including milestones and indicators, while architects map those abstractions to underlying artifacts such as services and components.

A model includes:

  • Basic metadata

  • Identifier — this is the unique identifier which identifies an instance of the model and it is mandatory to define it

  • Set of ordered milestones and their associated indicators.

For detailed description about milestones, indicators, and identifiers, see Understanding Oracle Real-Time Integration Business Insight.

3.1 Model Lifecycle and Activation

A newly created model is in Draft state until the model is activated. Only activated models collect metrics. While a model is being activated, it is temporarily in the state of Activation in Progress. If activation is unsuccessful, the state is updated to Activation Failed. If the activation is successful, the state changes to Activated. A model can be deactivated as a result of a change to the underlying implementation, or a user can deactivate it – in either case the model is in Deactivated state with additional information available on hover.

To make changes to an active model, a new Draft is created, which can be activated after the changes have been completed.

Figure 3-1 Model Lifecycle State Transition
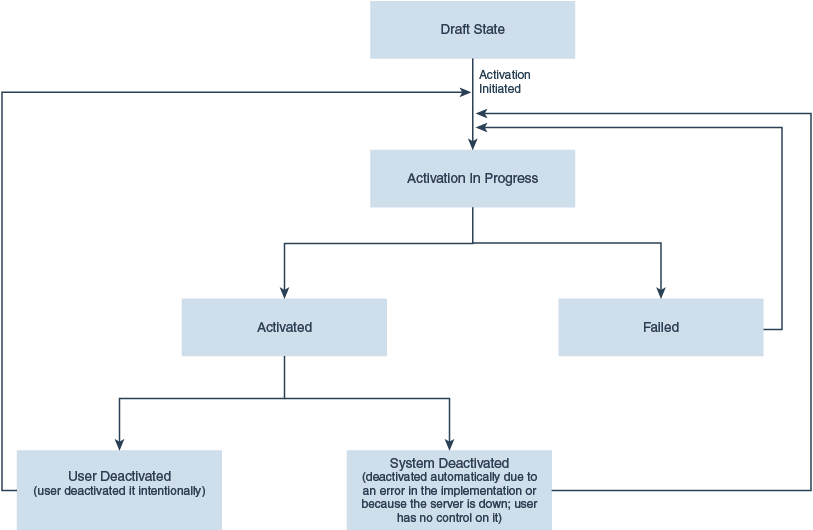
Model Lifecycle State Transition

Sometimes, a model moves into an Unknown state. This happens when the runtime cannot determine the state of the model as Activated or Deactivated. You can perform all the lifecycle actions on a model in such state.

For more information, see Model Lifecycle States.

3.1.1 Model Lifecycle States

Any model passes through the following lifecycle states:

  • Draft: In this state, changes can be made to the model and no metrics are collected. A draft model supports an Export option which allows you to export the model and use the exported model to import into the application.

  • In Progress: A model is this state when activation has been initiated

  • Activated: When a model is in this state, metrics are now being collected, changes are not possible. An activated model supports an Export option which allows you to export the model and use the exported model to import into the application.

  • Failed: A model falls into this state when it encounters issues during activation

  • Deactivated: A model moves into this state when a change occurs in the underlying implementation or you deactivate it specifically.

    • System Deactivated: when the integration application is altered due to either deactivation/undeployment/systemic errors like loss of connectivity/retries exceeding threshold/application redeployment to a different path/application changes. Insight agent automatically deactivates the model and the user has no control on it.

    • User Deactivated if you specifically deactivate the model.

3.1.2 Model Lifecycle Actions

You can execute the following actions on a model, depending on the current state of the model:

Apart from the lifecycle actions, you can also perform some other actions on the models. See Other Model Actions.

3.2 Creating a Model

Only users with the role InsightModelCreator or InsightAdmin can create models.

To create a model:

  1. Click the Designer tab or the navigational shortcut on the Home page.
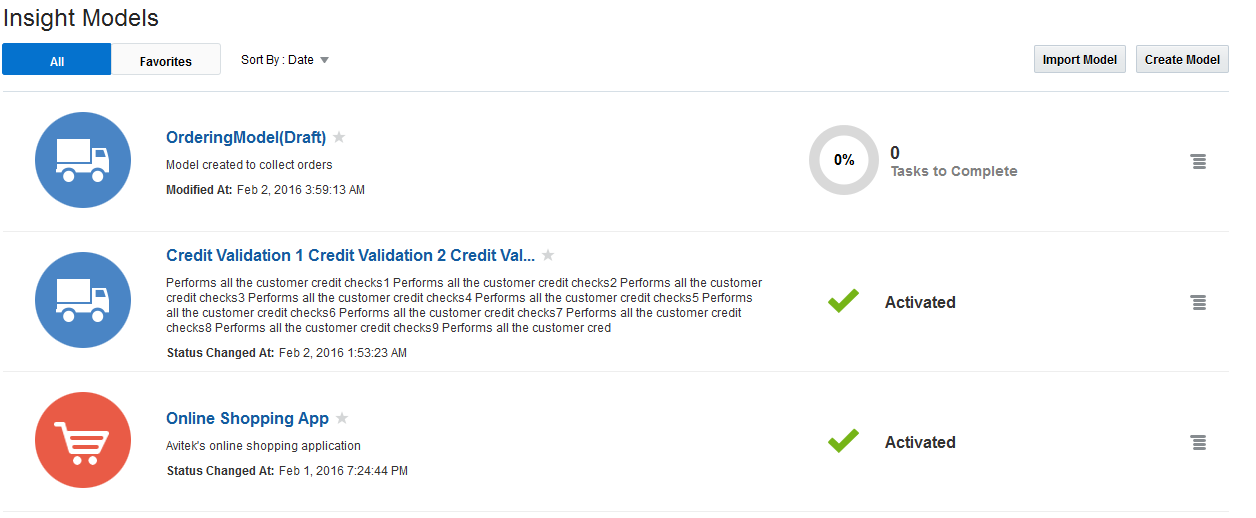
    The Insight Models page opens. This page lists all the Models, irrespective of the state they are in. You can perform various actions on the models listed on this page. For more information, see Other Model Actions.
  2. Perform step 3 or 4.
  3. Click Create Model.
  4. Click the Draft version of the model if you already have a draft model.
  5. Enter the following details:
    1. Name: a suitable name for the model
    2. Description: an appropriate description for the model
    3. Icon: select any icon of your choice. The icon you choose here appears next to the model on the Insight Models page.
    4. Single Instance Label: an appropriate label to be used for the single instance of the model. For example, order.
    5. Multiple Instance Label: an appropriate lable to be used for multiple instances of the model. For example, orders.
  6. Click Save to save the model.
    A confirmation message appears.
The model is created and is in Draft state.

For more information about the various states of the models, see Model Lifecycle States.

Figure 3-2 Draft Model

Draft Model

Note:

The model displays the number of Tasks to Complete at the top. You must complete all these tasks before you can activate a model.

Click the Models button on the top-left corner of the page to back to the Designer page.

3.3 Creating Milestones

After you create a model, the next important step is to create milestones for the model. The milestones are points in the business process that help you in monitoring the business progress. Generally, milestones are created iteratively. For more information, see Types of Milestones in Understanding Oracle Real-Time Integration Business Insight.

Only users with the role InsightBusinessUser/InsightIntegrationArchitect/InsightModelCreator/InsightAdmin can create milestones.

To create a milestone:
  1. Click the draft version of the model for which you want to create milestones on the Designer page, generally known as the Models page.

    Figure 3-3 Designer Page

    Designer page
  2. Click Create Milestone.

    Note:

    Only users with the role InsightBusinessUser/InsightIntegrationArchitect/InsightModelCreator/InsightAdmin can create milestones.
  3. Provide a suitable name for the milestone.
    The milestone expands.
  4. Enter an appropriate description for the milestone.
  5. Select the appropriate Milestone Type. The available types are: Initial, Standard, Error, Terminal, and Terminal/Error.

    The bar which lists the type of milestones is known as Milestone Toolbar. If you accidentally close this toolbar, you must log in again to the application to see the Milestone Toolbar.

    For more information about the types of milestones, see the Understanding Oracle Real-Time Integration Business Insight.
  6. Map the milestone to an implementation. See Mapping Milestone to an Implementation.

    Note:

    Only users with the role InsightModelCreator/InsightIntegrationArchitect/InsightAdmin can create the implementation mapping.

    Note:

    Milestone mapping is not available for pipelines/Business services with a service type of Messaging Request/Response XML which do not have a schema.
  7. (Optional) Define indicators for the milestone. See Defining Indicators.

    Note:

    Only users with the role InsightBusinessUser/InsightIntegrationArchitect/InsightModelCreator/InsightAdmin can create/define indicators.
  8. Repeat steps 2 to 7 to create all the required milestones for the model.
  9. Click the Delete icon if you want to delete any milestone.

    Note:

    Only users with the role InsightBusinessUser/InsightModelCreator/InsightIntegrationArchitect/InsightAdmin can delete a milestone.
Milestones are created for the model.

Figure 3-4 Milestone Details

Milestone Details

3.4 Mapping Milestone to an Implementation

When you define a milestone for a model, it is essential to map the milestone to an existing implementation. If the mapping is not done, a warning message appears next to the milestone stating that Milestone Mapping is Missing.

Only users with the role InsightModelCreator/InsightIntegrationArchitect/InsightAdmin can create implementation mapping.

There are different types of implementation mapping supported by the product, including SOA and Service Bus:

Note:

Milestone mapping is not available for pipelines/Business Services with a service type of Messaging: Request/Response XML, which do not have a schema. See Mapping to Service Bus Pipelines and Mapping to Service Bus Business Services.

3.4.1 Mapping to a SOA BPEL Component

Only users with the role InsightModelCreator/InsightIntegrationArchitect/InsightAdmin can create implementation mapping.

If any variable is initialized in an activity, then the activation of the activity does not capture the value in an indicator. It can be captured only on the completion of the activity. For example, if the variable that is being extracted is initialized in the receive activity, then the indicator does not capture the value in the activation of the receive. If the activity is the initial receive of the BPEL process, then the input variable is initialized within the receive. So, the activation of the receive does not capture the value.

To create an implementation mapping to a SOA BPEL Component:

  1. Click Create Mapping within the milestone for which you are creating the implementation mapping.
    The Implementation Mappings page opens.
  2. Select a SOA connection from the Data Connection drop-down list. If you do not see any connections in the drop-down list, you must create a data connection. See Creating a Data Connection.

    Note:

    You can see only the configured connections in the drop-down list. Connections that are in Draft state (yet to be configured) do not appear for selection.
    This selection loads information about all the composites deployed in that domain.
  3. Expand the required component and drill down to the required level.
  4. Select the required entry and click the BPEL Structure icon to drill down further.

    Figure 3-5 Mapping Icons

    Mapping Icons
  5. Navigate to the required BPEL activity in the BPEL structure tree and click the Edit Mapping icon.

    Figure 3-6 Edit Mapping Icon

    Edit Mapping Icon
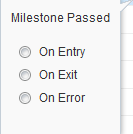
  6. Select a suitable entry from the Milestone Passed popup.

    Figure 3-7 Milestone Passed Popup

    Milestone Passed Group
    • On Entry indicates activation

    • On Exit indicates completion

    • On Error indicates fault.

    The mapping is done and the first mapping on the Implementation Mappings page opens in an expanded form.
    Mapped to Activation

    Note:

    Insight does not support mapping to the OnMessage and OnAlarm BPEL constructs. These elements are branches of the Pick and EventHandlers activities and can only be mapped as such, and not as independent activities themselves.
  7. Select Delete or Reset from the Mapping Actions menu if you want to either delete or reset the defined mapping.
  8. Click Add Mapping (at the top-right corner of the page) and repeat steps 2 to 6 to define additional mappings for the milestone.
  9. Click Return to Editor to go back to the Model Editor.
The milestone is mapped to an implementation.

Figure 3-8 Milestone Mapped to Implementation

Milestone Mapped to Implementation

3.4.2 Mapping to SOA Services/References/Components

Only users with the role InsightModelCreator/InsightIntegrationArchitect/InsightAdmin can create implementation mapping.

To create an implementation mapping to a SOA Composite services/references:

  1. Click Create Mapping within the milestone for which you are creating the implementation mapping.
    The Implementation Mappings page opens.
  2. Select a SOA connection from the Data Connection drop-down list. If you do not see any connections in the drop-down list, you must create a data connection. See Creating a Data Connection.

    Note:

    You can see only the configured connections in the drop-down list. Connections that are in Draft state (yet to be configured) do not appear for selection.
    This selection loads information about all the composites deployed in that domain.
  3. Expand the required artifact and drill down to the required Services/References/Components.
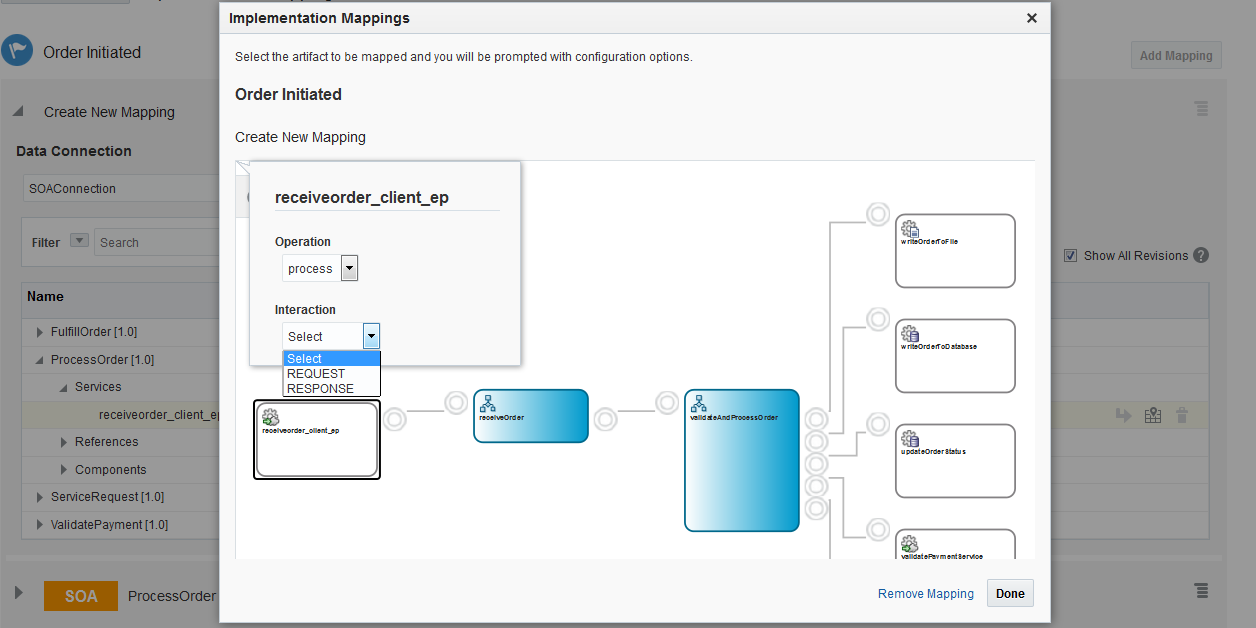
  4. Select the required entry and click the Edit Mapping icon to define the mapping.
  5. Select an appropriate value from the Operation drop-down list.
  6. Select an appropriate value from the Interaction drop-down list.

    Note:

    This field does not appear unless you select a value in the Operation drop-down list.
    The visual representation will not be available for composites built in 11g version of SOA. In that case, only the popup containing the Operation and Interaction drop-down will be visible.

    Figure 3-9 Mapping to SOA Services/References

    Mapping to SOA Services/References
  7. Click Remove Mapping to remove the existing mapping and create a new mapping.
  8. Click Done to complete the process of mapping.
The mapping is done and the first mapping on the Implementation Mappings page opens in an expanded form.

3.4.3 Mapping to Service Bus Pipelines

Only users with the role InsightModelCreator/InsightIntegrationArchitect/InsightAdmin can create implementation mapping.

Note:

The mapping page will only show service bus pipelines and business services that are WSDL based or Messaging Service with a request or response type of XML. For a complete list of Service Bus constructs supported for mapping, see Supported and Unsupported Features in Oracle Service Bus.

To create an implementation mapping to Pipelines:

  1. Click Create Mapping within the milestone for which you are creating the implementation mapping.
    The Implementation Mappings page opens.
  2. Select a Service Bus connection from the Data Connection drop-down list. If you do not see any connections in the drop-down list, you must create a data connection. See Creating a Data Connection.

    Note:

    You can see only the configured connections in the drop-down list. Connections that are in Draft state (yet to be configured) do not appear for selection.
    This selection loads all the service bus projects deployed in that domain.

    Note:

    You will see that only the projects that conform to the supported Service Bus feature set (for example, WSDL services) are loaded and available. For a complete list of Service Bus constructs supported for mapping, see Supported and Unsupported Features in Oracle Service Bus.
  3. Expand the desired project and drill down to the required Pipeline.
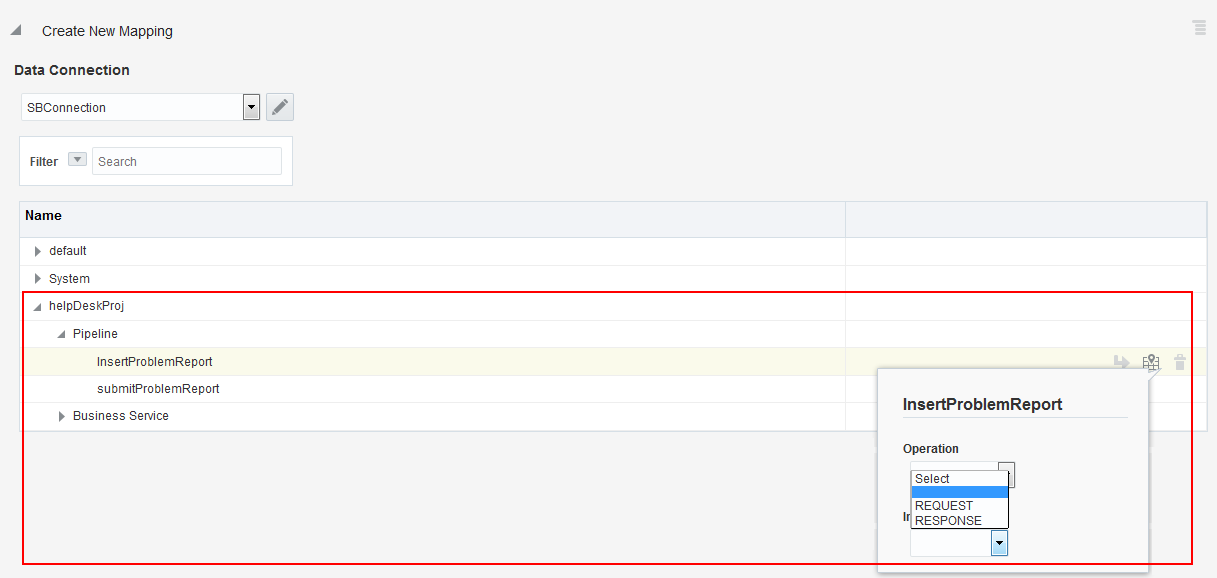
  4. Click the Edit Mapping icon for the pipeline to map.

    The service type can be:

    • WSDL: both Operation and Interaction appear in the pop-up window. Possible values for Interaction are REQUEST, RESPONSE, and FAULT.

    • Message Service: only Interaction appears in the pop-up window as a drop-down list with the values REQUEST and RESPONSE.

  5. Select the Operation in the drop-down list that opens in a pop-up window.
  6. Select the Interaction in the drop-down list that opens in a pop-up window. The possible values for Interaction are:
    • REQUEST

    • RESPONSE

    • FAULT.

    Important

    Any business service referencing artifacts (like WSDL, XSD, etc) that has a circular dependency or any cyclic references, then such a business service will not be available for mapping within Mapping Editor. The only way to map to such a business service is to remove the cyclic references from the artifacts.
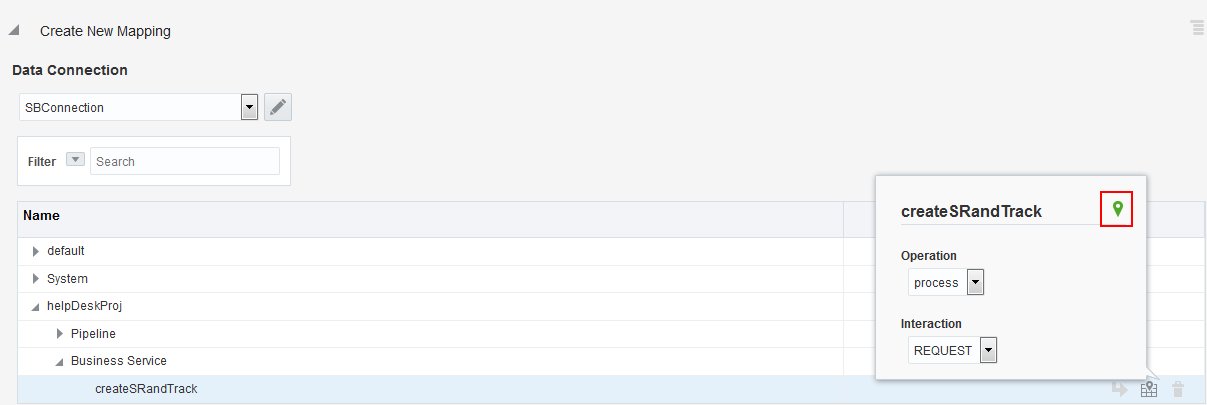
    When you select a value for Interaction, the window disappears and you can see an indication of mapping created. A green icon appears while editing a mapping.

    Figure 3-10 Mapping to Service Bus Pipelines

    Mapping to Service Bus Pipelines
The mapping is done and the first mapping on the Implementation Mappings page opens in an expanded form.

3.4.4 Mapping to Service Bus Business Services

Only users with the role InsightModelCreator/InsightIntegrationArchitect/InsightAdmin can create implementation mapping.

To create an implementation mapping to Business Services:

  1. Click Create Mapping within the milestone for which you are creating the implementation mapping.
    The Implementation Mappings page opens.
  2. Select a Service Bus connection from the Data Connection drop-down list. If you do not see any connections in the drop-down list, you must create a data connection. See Creating a Data Connection.

    Note:

    You can see only the configured connections in the drop-down list. Connections that are in Draft state (yet to be configured) do not appear for selection.
    This selection loads information about all the projects deployed in that domain.

    Note:

    You will see that only the projects that conform to the supported Service Bus feature set (for example, WSDL services) are loaded and available. For a complete list of Service Bus constructs supported for mapping, see Supported and Unsupported Features in Oracle Service Bus.
  3. Expand the desired project and drill down to the required Business Service.

    The service type can be:

    • WSDL: both Operation and Interaction appear in the pop-up window. Possible values for Interaction are REQUEST, RESPONSE, and FAULT.

    • Message Service: only Interaction appears in the pop-up window as a drop-down list with the values REQUEST and RESPONSE.

  4. Click the Edit Mapping icon for the business service to map.
  5. Select the Operation in the drop-down list that opens in a pop-up window.
  6. Select the Interaction in the drop-down list that opens in a pop-up window.

    Note:

    This drop-down list appears only if you select a value for Operation.

    Important

    Any business service referencing artifacts (like WSDL, XSD, etc) that has a circular dependency or any cyclic references, then such a business service will not be available for mapping within Mapping Editor. The only way to map to such a business service is to remove the cyclic references from the artifacts.
    When you select a value for Interaction, the window disappears and you can see an indication of mapping created. A green icon appears while editing a mapping.

    Figure 3-11 Mapping to Service Bus Business Service

    Mapping to Service Bus Business Service
The mapping is done and the first mapping on the Implementation Mappings page opens in an expanded form.

3.5 Editing the Milestone Mapping

Only users with the role InsightModelCreator/InsightIntegrationArchitect/InsightAdmin can edit the implementation mapping.

To edit mapping of a milestone:

  1. Expand the required milestone in Model Editor.
  2. Click the defined mapping to open the Implementation Mappings page.
  3. Click the Edit Mapping icon for Service Bus based mappings (pipelines and business services), and drill down to the BPEL structure for SOA BPEL based mappings.
    The existing mapping opens.
  4. Make the required changes.
    The mapping is updated.
  5. Click Return to Editor to go to the Model Editor. In the Model Editor, you can see the changes you have made to the mapping.

3.6 Defining Unique Identifier

Defining a unique instance identifier for a model is mandatory. The identifier must be unique from all other instances. Only users with the role InsightBusinessUser/InsightModelCreator/InsightIntegrationArchitect/InsightAdmin can create/define a unique instance identifier.

To define a unique instance identifier for a model:

  1. Expand the milestone to which you want to associate the unique instance identifier.
  2. Perform step 3 or 4.
  3. Click the Unique Instance Identifier tile.

    Figure 3-12 Unique Instance Identifier Tile

    Unique Instance Identifier
  4. Click Create Indicator and select Identifier.
    Indicators

    Note:

    If you perform step 3 first, then Identifier option in this step will be disabled, as you can define only one unique instance identifier.
  5. Enter the following in the Unique Instance Identifier area:
    1. Name
    2. Description
  6. Associate the identifier with a milestone. For more information, see Mapping Milestone to an Implementation.
  7. Define extraction criteria for the implementation mapping. For more information, see Defining Extraction Criteria.
A unique identifier is defined for the model. You can only create one unique identifier. Once you create the unique identifier, the Identifier option shown in step 2 will be disabled. You can add additional mappings for the identifier.

Figure 3-13 Unique Instance Identifier Defined

Unique Instance Identifier Defined

3.7 Defining Indicators

Indicators represent metrics that are unique to your application. These indicators quantify the performance of your business, and are used to create dashboards and reports used for tracking your business. There are two types of indicators: dimensions and measures.

Dimensions are used to categorize your instances. For example, in the case of a help desk system, you might want to be able to group your help tickets by geographic region (e.g., state or province), or by customer type (e.g., gold, silver, or bronze support). Dimensions allow you to slice and dice your business data.

Measures, on the other hand, represent values associated with each specific instance. For example, you might use a numerical measure to represent the cost associated with each help ticket, or a date measure to represent the date that the ticket was submitted.

Note:

Only users with the roles InsightIntegrationArchitect/InsightModelCreator/InsightBusinessUser/InsightAdmin can create/define indicators.

Important

Oracle Real-Time Integration Business Insight does not support duplicate indicators.

To define indicators:

  1. Expand the milestone for which you want to create indicator.
  2. Click Create Indicator.
  3. Select the type of indicator, either a Dimension or a Measure.
    A dimension is indicated by Dimension and a measure is indicated by Measure.
  4. Enter the following:
    1. Name
    2. Description
  5. Indicate if you want the indicator to be filterable or not by selecting an appropriate value from the Filterable drop-down list. If you make the indicator filterable it appears in the graph. But, be careful with the number of indicators you mark as Filterable, as too many filterable indicators slows down the performance.
  6. Defining Extraction Criteria for the Implementation Mapping. Only the users with the roles InsightModelCreator/InsightIntegrationArchitect/InsightAdmin can define the extraction criteria.
    Till you define the extraction criteria, a warning message appears next to the indicator’s name.

    Figure 3-14 Extraction Criteria Warning

    Extraction Criteria Warning
  7. Repeat the steps 2 to 6 to create as many indicators as you want.

3.8 Defining Extraction Criteria

Only users with the role InsightModelCreator/InsightIntegrationArchitect/InsightAdmin can define extraction criteria for the indicators.

To define extraction criteria for an indicator:

  1. Expand the indicator for which you want to define the extraction criteria.
  2. Ensure that you have defined the implementation mapping for the milestone. If the mapping is not yet done, complete the mapping first.
  3. Click Define next to the Extraction Criteria field.
    The Implementation Mappings (s) page opens.
  4. Click the Edit Extraction Criterion (the pencil icon) for each of the implementation mapping.
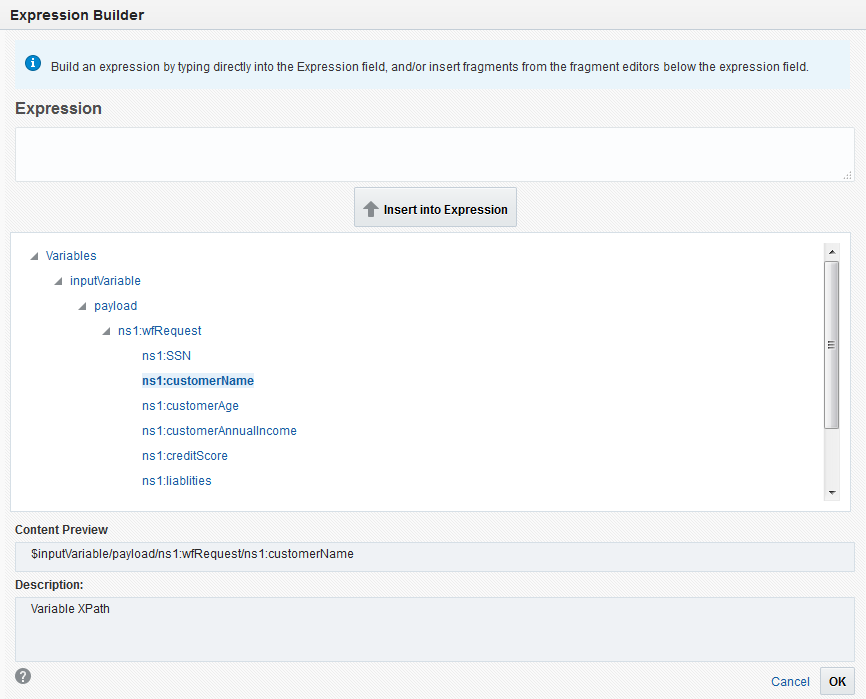
    The Expression Builder dialog opens.
  5. Insert fragments from the fragment editor using the Insert into Expression button.

    Note:

    If you use a complex data type in the expression for defining the extraction criteria, the identifier value does not appear in the runtime metrics data. Use simple data types to overcome this issue.
  6. Click OK to complete defining the expression.
  7. Click Cancel to abort the operation.

    Figure 3-15 Expression Builder

    Expression Builder
  8. Repeat steps 3 to 7 for each implementation mapping.
Extraction criteria is defined for all the implementation mappings. The information icon next to the xpath string displays the data type when you hover your mouse.

Figure 3-16 Extraction Criteria Defined

Extraction Criteria Defined

3.9 Activating a Model

After you have defined milestones, unique identifier, indicators, mappings, and extraction criteria, it is now time to activate the model. Activating a model will push the model definitions out to the appropriate runtime engines, where monitoring will be initiated. After activation has completed, you will immediately have access to dashboards that allow you to monitor your application. See Working with Dashboards (Consoles). Only users with the role /InsightModelCreator/InsightIntegrationArchitect/InsightAdmin can activate a model.

To activate a model:

  1. Click the Designer tab or the Designer Tile on the Home page.
    The Insight Models page opens.
  2. Ensure that the model you want to activate is 100% complete and has no tasks to complete.
  3. Select Activate from the Model Actions menu.
    Model Actions
    A confirmation dialog appears. Click Continue.

    Figure 3-17 Activation Confirmation Dialog

    Activation Confirmation Dialog

    A message appears that the activation is in process and the progress is indicated by a progress bar.

    Activation Progress Indicator

The model is activated.

3.10 Importing a Model

Only users with the role InsightModelCreator/InsightAdmin can import a model.

To import a model into the Oracle Real-Time Integration Business Insight application:

  1. Navigate to Insight Models page.
  2. Click Import Model.
    The Import Model dialog opens.

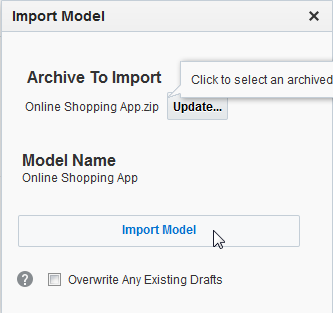
    Figure 3-18 Import Model Dialog

    Import Model Dialog
  3. Click Browse to select an archive of a previously exported model to import.
    The name of the model in the archived model is populated on the screen under the Model Name field.
  4. Select Overwrite Any Existing Drafts if you want to overwrite the existing drafts with the model being imported.
  5. Click Import Model.
    The model gets imported as a Draft.
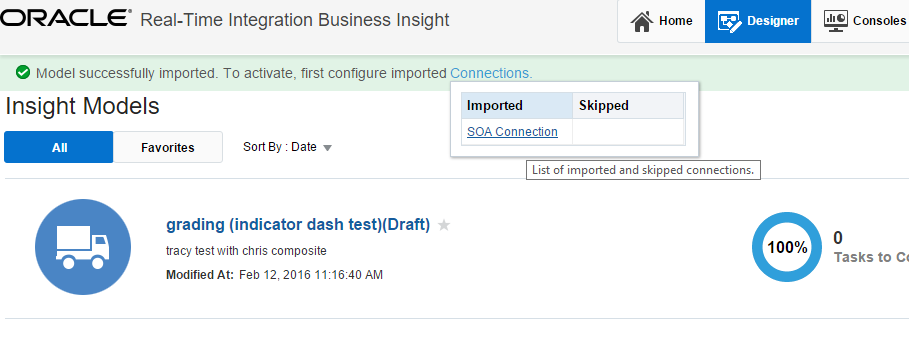
  6. Configure the connections before you activate the imported model. Click Connections within the confirmation message that appears at the top of the screen.

    Note:

    When you import a model from one system to another, the connections will need to be re-configured by a user with an InsightAdmin role. Generally, connections from one environment may be invalid in another environment (e.g., firewall issues, different network segments, development vs. production environments). Thus, importing a model only creates stubs (name only) of the connections used in the imported model, if connections with the same ID do not exist already. The user with the InsightAdmin role will subsequently need to fill in the details for these stubbed connections before the imported model can be activated.
    You can see the imported and skipped connections. You must configure the connections that appear under the Imported cell. Click the connection under the Imported cell to navigate to the Administration page.

    Figure 3-19 Imported Connections

    Imported Connections

    If a connection of the same internal name has already been defined, the following message appears.

    Figure 3-20 Skipped Connections

    Skipped Connections

3.11 Other Model Actions

Apart from the lifecycle actions (see Model Lifecycle Actions), there are other actions that you can perform on a model. You can perform the following actions from the Model Actions menu:

You cam mark any model as a favorite by clicking the Favorite icon next to the model. This icon is a toggle icon. The models marked as favorites appear under the Favorites tab of the Insight Models page.

You can sort the models by Date or Name using the options in the Sort By drop-down list on the Designer page.

Figure 3-21 Sorting Options for Models

Sorting Options for Models