5 Create a Fraud Detection Application with EDN Adapters
This chapter walks through the steps to create and deploy a fraud detection application to present two major new features in the Oracle Stream Analytics 12c release. The first feature is support for the entire Oracle Stream Analytics application life cycle with Oracle JDeveloper. The second feature is Event Delivery Network (EDN) adapter support so that an Oracle Stream Analytics application can send events to and receive events from Oracle SOA Suite. You create and deploy the Oracle Stream Analytics fraud detection application entirely in Oracle JDeveloper.
This chapter covers the following topics:
5.1 Fraud Detection Scenario
In this walkthrough, you create an Oracle Stream Analytics application that implements a real-time analysis of customer orders. An email address uniquely identifies each customer. While order data (event data) passes to the Oracle Stream Analytics server, an Oracle Stream Analytics application dynamically accesses the data and checks for potential fraudulent activity. In this example, event patterns with an aggregated dollar amount for orders by the same person that exceeds $1000 in any 24 hour period indicate possible fraudulent activity.
You can use this fraud detection example application as a base for future real-time fraud detection event-based solutions. Once deployed, the Oracle Stream Analytics EDN application listens for events coming from the Oracle SOA suite event network.
5.2 Before You Begin
This walkthrough assumes that you have Oracle SOA Suite and Oracle Stream Analytics installed. In this walkthrough, the top-level installation directory is referred to as /Oracle/Middleware/, the Oracle SOA Suite installation directory is referred to as /Oracle/Middleware/my_soa, and the Oracle Stream Analytics installation directory is referred to as /Oracle/Middleware/my_oep.
You should also have your JAVA_HOME variable set to point to JDK7_u55 or above, and the PATH variable set to point to the bin directory under your JDK installation:
export JAVA_HOME=<path to installation directory>
export PATH=${JAVA_HOME}/bin:${PATH}
Note:
Although this walkthrough introduces features specific to Oracle Stream Analytics, it assumes that you are familiar with basic Java programming.
5.3 Event Delivery Network Walkthrough
The following list outlines the high-level tasks required to develop and deploy the Oracle Stream Analytics fraud detection application:
5.3.1 Start Oracle WebLogic Server
To perform the steps in the walkthrough, start Oracle JDeveloper and Oracle WebLogic Server. Oracle JDeveloper and Oracle WebLogic Server are part of Oracle SOA Suite.
You start the Oracle Stream Analytics server at a later step in the walkthrough.
Start Oracle JDeveloper and Oracle WebLogicServer
5.3.2 Copy the Artifacts Folder
The OEP_Fraud_Detection_Walkthrough_Files.zip file provides supporting files that you need for this walkthrough. The folder contains the event definition files (*.edl and *.xsd), the sample fraud detection Oracle CQL code, and a sample SOA Composite (EDNOEPv2). A SOA composite is a SOA application that interfaces between Oracle SOA Suite and the EDN.
Note that the EDL and schema (xsd) files have to be in the fixed path of the bundled JAR file
Get the Artifacts Folder
- Go to
http://www.oracle.com/technetwork/middleware/complex-event-processing/overview/complex-event-processing-088095.html. - Locate the
OEP_Fraud_Detection_Walkthrough_Files.zipfile and download it to an accessible location on your computer. - Unzip the zip file.
5.3.3 Create an Oracle Stream Analytics Domain
In this step, you use the config.sh command to start the Configuration wizard and create a new domain for the Fraud Check application to use.
Create a New Domain
-
Navigate to your Oracle Stream Analytics installation to the
/Oracle/Middleware/my_oep/oep/common/bindirectory. -
In the
/Oracle/Middleware/my_oep/oep/common/bindirectory, type./config.shto start the Configuration wizard.The Configuration wizard Welcome screen displays.
-
On the Welcome screen, click Next.
The Choose Create or Update Domain screen displays.
-
On the Choose Create or Update Domain screen, select Create a new OEP domain and click Next.
The Create or Update Domain screen displays.
-
In the Create or Update Domain screen, in the User Name field, enter oepadmin, and enter and confirm the password, welcome1.
-
Click Next.
The Configure Server screen displays.
-
In the Configure Server screen, click Next to accept the defaults.
The Configure Domain Identity Keystore screen displays.
-
In the Configure Domain Identity Keystore screen, enter and confirm the password welcome1 and click Next.
The Configuration Options screen displays.
-
In the Configuration Options screen, click Next to not perform any optional configuration.
The Create OEP Domain screen displays.
-
In the Create OEP Domain screen, enter fraudcheck_domain and make a note of its location.
The location will be something like
/Oracle/Middleware/my_oep/user_projects/domains. -
Click Create, and after a few moments, click Done.
Add the EDNConnectionFactory to the Domain
5.3.4 Create a Java Message Service Topic
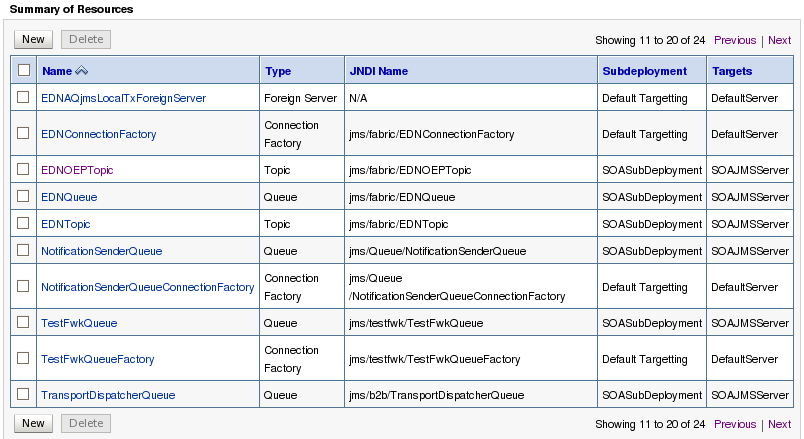
A Java Message Service (JMS) topic is a mechanism for publishing messages to one or more subscribers. Use the Oracle WebLogic Server administration console to create a JMS topic.
Create a JMS Topic
5.3.5 Start the Oracle Stream Analytics Server
Start the Oracle Stream Analytics server so that you can create and deploy the Oracle Stream Analytics Fraud Detection application.
Start the Oracle Stream Analytics Server
-
Go to
/Oracle/Middleware/my_oep/user_projects/domains/fraudcheck/ domain/defaultserver. -
Execute the appropriate startup script:
-
On Windows:
-
prompt> startwlevs.cmd
-
-
On UNIX:
-
prompt> ./startwlevs.sh
-
The terminal window displays messages as the server starts. When you see,
<The application context for "com.bea.wlevs.dataservices" was started successfully>, the Oracle Stream Analytics server is ready. -
5.3.6 Use Oracle JDeveloper to Create An Oracle Stream Analytics Application
Start Oracle JDeveloper
If Oracle JDeveloper is not already running, start it.
-
Go to
/Oracle/Middleware/my_soa/jdeveloper/jdev/bin. -
Type
./jdev -clean.The Select Role dialog displays.
-
In the Select Role dialog, select Studio Developer (All Features) and click OK.
Wait a few moments while Oracle JDeveloper starts.
Create a New Application
-
Select File > New > Application.
The New Gallery dialog displays.
-
In the New Gallery dialog, select OEP Application and click OK.
The Create OEP Application screen displays.
-
In the Create OEP Application dialog, enter the following values:
Application Name: FraudOEPApplication Directory: Accept the default Application Package Prefix: Leave blank
-
Click Next.
The Create OEP Application - Step 2 screen displays.
-
In the Create OEP Application - Step 2 dialog, enter the following values:
Project Name: FraudCheck Directory: Accept the default Project Features: OEP Suite
-
Click Next.
The Create OEP Application - Step 3 dialog displays.
-
In the Create OEP Application - Step 3 dialog, click Next to accept the defaults.
The Create OEP Application - Step 4 dialog displays.
-
In the Create OEP Application - Step 4 dialog, Click Finish to accept the defaults:
The Empty OEP Project template provides the basic structure of an Oracle Stream Analytics application, which are an empty configuration file and assembly files.
The OEP Server Connections can be left blank at this stage. In a later step, you create the Oracle Stream Analytics server connection.
-
Click Finish.
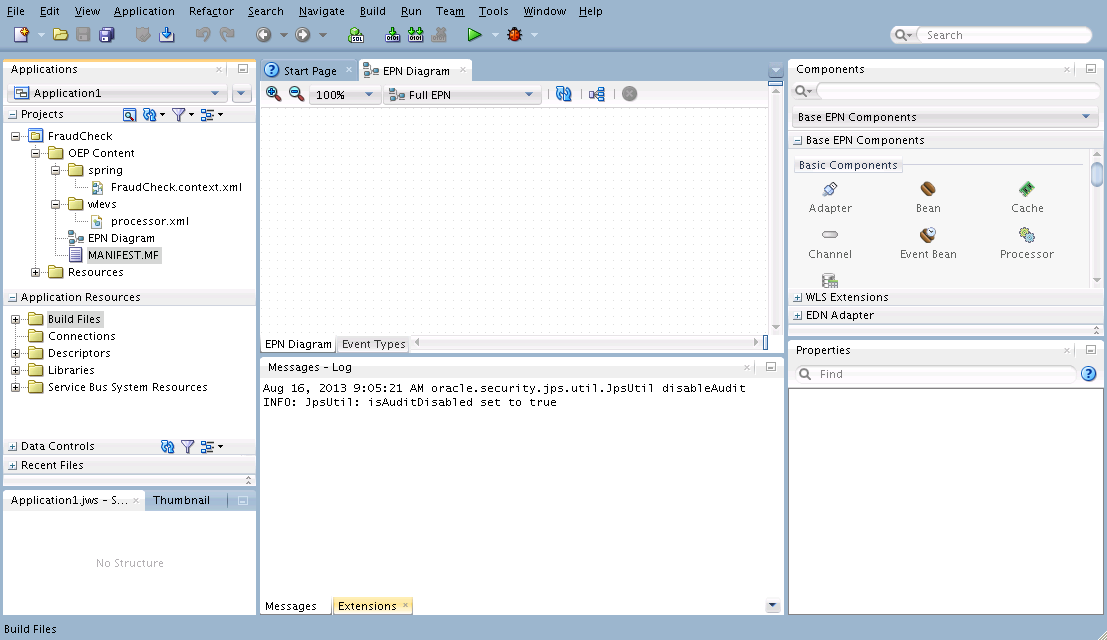
The Oracle Stream Analytics FraudCheck project displays.
-
If you cannot see the empty EPN Diagram tab and the components panel, go to the Applications panel, expand FraudCheck > OEP Content and double-click EPN Diagram.
Add an Inbound Adapter Stage
-
With the EPN diagram open, go to the right panel under Components, and open the EDN Adapter window
The EDN inbound and outbound adapters display.
-
Drag the EDN Inbound Adapter component from the EDN Adapter window to the empty middle panel (canvas).
The New EDN Adapter wizard starts.
-
In the New EDN Adapter wizard, provide the following values:
Adapter ID: edn-inbound-adapter. File name: adapter.xml.
Changing the file name from processor.xml to a name that is specific to your usage, distinguishes the files you create from the default files provided by Oracle JDeveloper.
-
Click Next.
-
In the EDN Inbound Adapter Configuration dialog, specify the following values that relate to your Oracle WebLogic Server configuration.
JNDI Provider URL: t3://localhost:7101. JNDI Factory: weblogic.jndi.WLInitialContextFactory. User: weblogic. Password: welcome1.
WebLogic T3 clients are Java RMI clients that use the Oracle T3 protocol to communicate with Oracle WebLogic Server. T3 clients typically outperform other client types.
-
Under Edl Properties, load the Edl File as follows:
-
Click the search icon (magnifying glass) next to the EDL File field.
-
Navigate to the location where you unzipped the
OEP_Fraud_Detection_Walkthrough_Files.zipfile. -
Select the
FraudCheckEvent.edlfile inside the folder and click OK.
-
-
Under Edl Properties, select FraudCheckRequest from the Event Type drop-down list.
-
In the EDN Inbound Adapter Configuration dialog, under Advanced Properties, select the schema file associated with the FraudCheckEvent.edl file as follows:
-
Click the search icon (magnifying glass) next to the Schema File field.
-
Navigate to the location where you unzipped the
OEP_Fraud_Detection_Walkthrough_Files.zipfile. -
Select the
FraudCheckType.xsdfile inside the folder and click OK.
-
-
Click Finish.
Two informational dialogs display about the files you are uploading.
-
Read the informational message and press OK to dismiss them.
The EDN diagram displays the edn-inbound-adapter that you just created, and the Fraud Check project lists the files that you uploaded.
-
Select File > Save to save your work.
Add an Input Channel Stagestage
-
In the right panel under Components, open the Base EPN Components window.
The base EPN components display.
-
Drag the Channel component to a free space on the canvas.
The New Channel dialog displays.
-
In the New Channel dialog, provide the following information:
Channel ID: ednInputChannel. Event Type: <NONE>
-
Click OK.
The EDN diagram displays the channel that you just created.
-
Select File > Save to save your work.
Connect the Input Channel and Inbound Adapter Components
-
Select and hold edn-inbound-adapter with the left mouse button.
-
Drag the edn-inbound-adapter to the ednInputChannel.
After a few moments, a line displays to connect the adapter to the channel. The components adjust so that the adapter and channel are in a line going left to right with the channel to the left of the adapter. This alignment depicts the flow of information into and out of the EDN from left to right.
-
Select File > Save to save your work.
Set properties on the edn-inbound-adapter
-
Select the ednInputChannel event stage.
Oracle JDeveloper highlights the ednInputChannel.
-
In the Properties window in the bottom-right corner of Oracle JDeveloper, select edl:FraudCheckRequest from the event-type drop-down list.
The FraudCheckRequest event type is now associated with the ednInputChannel. This means that the Fraud Check application checks for FraudCheckRequest events as events come through the ednInputChannel.
-
Select File > Save to save your work.
Add an EPN Oracle CQL processor Stage
-
Under Base EPN Components, drag the Processor component to a free space on the canvas.
The New Processor dialog displays.
-
In the New Processor dialog, provide the following information:
Processor ID: ednProcessor. File name: processor.xml.
-
Click OK.
The EDN diagram displays the ednprocessor that you just created.
-
Select File > Save to save your work.
Add CQL code to the Processor
-
Right-click the ednProcessor stage.
The context menu displays.
-
From the context menu, select Go To Configuration Source.
Oracle JDeveloper opens a source editor where you place the Oracle CQL rules to be applied to the streaming event data. The source editor provides a sample query that you can edit or replace.
-
Replace the sample Oracle CQL with the Oracle CQL provided in the
ProcessorCQLFraudSample.xmlfile that is inside yourOEP_Fraud_Detection_Walkthrough_Filesfolder.You replace the sample Oracle CQL including
<rules>..</rules>with the following Oracle CQL code:<rules> <view id="FraudView"><![CDATA[ select S.properties as properties, cast@java(S.javaContent, com.oracle.oep.FraudCheckRequest.class).getOrderNumber() as orderNumber, cast@java(S.javaContent, com.oracle.oep.FraudCheckRequest.class).getEmail() as email, cast@java(S.javaContent, com.oracle.oep.FraudCheckRequest.class).getTotalAmount() as totalAmount from ednInputChannel as S ]]></view> <!-- With id=FraudViewAmountOk, the view and query statements detect the case where the sum of all order amounts from a specific email over a 24 hour period is less than $1000. In this case, he query issues a FraudCheckResponseEvent with status OK. --> <view id="FraudViewAmountOk"><![CDATA[ select email from FraudView[range 24 hours] group by FraudView.email having sum(FraudView.totalAmount) <= 1000.0 ]]></view> <query id="FraudQueryAmountOk"><![CDATA[ select V1.properties as properties, FraudCheckResponse(V1.orderNumber, "OK") as javaContent from FraudView[partition by email rows 1] as V1, FraudViewAmountOk as V2 where V1.email = V2.email ]]></query> <!-- With id= FraudViewAmountAlert, the view and query statements detect the case where the sum of all order amounts from a specific email over a 24 hour period is greater than $1000. In this case, the query issues a FraudCheckResponseEvent with status THRESHOLD_EXCEEDED. --> <view id="FraudViewAmountAlert"><![CDATA[ select email from FraudView[range 24 hours] group by FraudView.email having sum(FraudView.totalAmount) > 1000.0 ]]></view> <query id="FraudQueryAmountAlert"><![CDATA[ select V1.properties as properties, FraudCheckResponse(V1.orderNumber, "THRESHOLD_EXCEEDED") as javaContent from FraudView[partition by email rows 1] as V1, FraudViewAmountAlert as V2 where V1.email = V2.email ]]></query> </rules> -
Select File > Save to save your work.
-
Click the EPN Diagram tab to return to the EPN diagram.
Connect the Input Channel and the Oracle CQL processor
-
Select and hold ednInputChannel with the left mouse button.
Oracle JDeveloper highlights the ednInputChannel.
-
Drag ednInputChannel to the ednProcessor.
After a few moments, a line displays to connect the input channel to the Oracle CQL processor. The components adjust so that the adapter, channel, and Oracle CQL processor are in a line going left to right.
-
Select File > Save to save your work.
Add an Outbound Channel Stage
-
Under Base EPN Components, drag the Channel component to a free space on the canvas.
The New Channel dialog displays.
-
In the New Channel dialog, provide the following information:
Channel ID: ednOutputChannel. Event Type: <NONE>
-
Click OK.
The EDN diagram displays the channel that you just created.
-
Select File > Save to save your work.
Set properties on the Outbound Channel
-
Select ednOutputChannel.
Oracle JDeveloper highlights the ednOutputChannel.
-
In the Properties window in the bottom-right corner of Oracle JDeveloper, select edl:FraudCheckResponse from the event-type drop-down list.
-
Select File > Save to save your work.
Connect the Processor and the Outbound Channel
-
Select and hold ednProcessor with the left mouse button.
Oracle JDeveloper highlights the ednProcessor.
-
Drag ednProcessor to ednOutputChannel.
After a few moments, a line displays to connect the Oracle CQL processor to the output channel. The components adjust so that the adapter, channel, and Oracle CQL processor are in a line going left to right.
-
Select File > Save to save your work.
Add an Outbound Adapter Stage
-
Under EDN Adapters, drag the EPN Outbound Adapter component from the EDN Adapter window to the canvas.
The New EDN Adapter wizard starts.
-
In the New EDN Adapter wizard, provide the following values:
Adapter ID: edn-outbound-adapter. File name: adapter.xml.
-
Click Next.
The EDN Outbound Adapter Configuration dialog displays.
-
In the EDN Outbound Adapter Configuration dialog, specify the following values that relate to your Oracle WebLogic Server configuration.
JNDI Provider URL: t3://localhost:7101. JNDI Factory: weblogic.jndi.WLInitialContextFactory. User: weblogic. Password: welcome1.
-
In the EDN Outbound Adapter Configuration dialog, under Edl Properties, load the Edl File as follows:
-
Click the search icon (magnifying glass) next to the EDL File field.
-
Navigate to the location where you unzipped the
OEP_Fraud_Detection_Walkthrough_Files.zipfile.Because you already loaded this file, you can also locate it under
$HOME/jdeveloper/mywork/Application1/FraudCheck/META-INF/wlevs/edn. -
Select the
FraudCheckEvent.edlfile inside the folder and click OK.When you load the FraudCheckEvent.edl file, the Event Type drop-down list is populated with events to use in the Fraud Check application.
-
-
In the EDN Outbound Adapter Configuration dialog, in the Event Type drop-down list, select FraudCheckResponse.
-
Click Finish.
The EDN diagram displays the edn-inbound-adapter that you just created, and the Fraud Check project lists the files that you uploaded.
-
Select File > Save to save your work.
Connect the Outbound Channel and the Outbound Adapter
-
Select and hold ednOutputChannel with the left mouse button.
Oracle JDeveloper highlights the ednOutputChannel.
-
Drag ednOutputChannel to edn-Outbound-adapter.
After a few moments, a line displays to connect the output channel to the output adapter. The components adjust so that the adapter, channel, and Oracle CQL processor are in a line going left to right.
-
Select File > Save to save your work.
5.3.7 Deploy the Application with JDeveloper
Application deployment involves creating a server connection and a deployment profile.
Create an Oracle Stream Analytics Server Connection
-
In Oracle JDeveloper, select File > New > From Gallery.
The New Gallery dialog displays.
-
In the New Gallery dialog under Categories, select Connections.
-
In the New Gallery dialog under Items, select OEP Connection, and click OK.
The Create OEP Server Connection dialog displays.
-
In the Create OEP Server Connection dialog, provide the following information:
Connection will be created in: IDE Connections: Checked OEP Server Connection Name: FraudDetectionConnection. OEP Server Home Path: /Oracle/Middleware/my_oep/ Use Default Values: Unchecked. OEP Server Projects Directory:
user_projects/domains/ fraudcheck_domain/defaultserver. Use Default Values: Checked. Host: 127.0.0.1. Port: 9002. Use Default Values: Unchecked. Username: oepadmin. User Password: welcome1. Additional Parameters for OEP Server: blank. -
In the Create OEP Server Connection dialog, click Test Connection.
If you see Success in the area below the Test Connection button, you entered the information correctly. If you see errors, correct them and test again until you see Success.
-
In the Create OEP Server Connection dialog, when you see the Success message, click OK.
FraudDetectionConnection displays under Application Resources > Connections > OEP Server Connection in the left panel.
Create a Deployment Profile
A deployment profile creates an OSGi bundle that contains the required library JAR file.
-
Right-click the FraudCheck project and select Deploy > New Deployment Profile.
The Create Deployment Profile dialog displays.
-
In the Create Deployment Profile dialog, provide the following values.
Profile Type: OEP Project Deployment Profile.
Note:
Make sure you select the correct Profile Type, OEP Project Deployment Profile.
Deployment Profile Name: oep-profile-Production
-
Click OK.
The Deployment Properties dialog displays.
-
In the Deployment Properties dialog, edit the information so that it is correct:
Connection to Local OEP Server: FraudDetectionConnection (127.0.0.1:9002) Symbolic Name: FraudOEPApplication.FraudCheck Bundle Name: FraudOepApplication.FraudCheck Bundle Version: 1.0.0 OSGi JAR file: Application1/FraudCheck/deploy/oep_profile-production.jar
-
Click OK.
Deploy the Application
5.3.8 Create and Deploy the Sample SOA Composite
A sample SOA composite provides FraudCheckRequest events so that the application can check for potential fraudulent activities. How to create the sample composite is not fully described, but it does provide a good code sample for you to leverage in existing or new SOA composites.
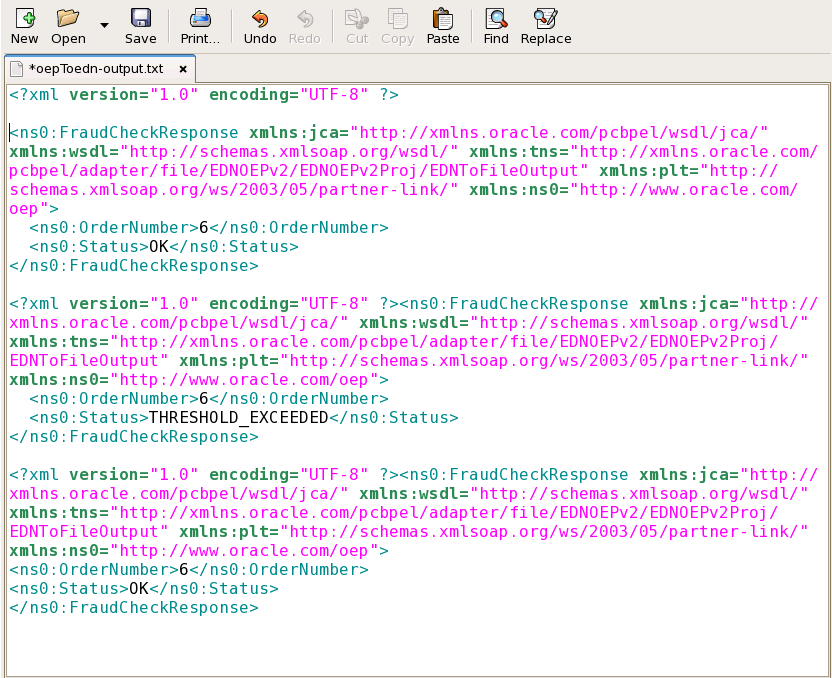
The EDNOEPv2Proj SOA composite is provided in the OEP_Fraud_Detection_Walkthrough_Files.zip file. The SOA composite sends EDN events to the Oracle Stream Analytics application and the resulting EDN events are sent back to the SOA composite. The SOA composite then uses the JCA File adapter to write the information to a file that is saved for you to review and analyze later.
Access the Provided SOA Composite
-
In Oracle JDeveloper, select File > Open.
The Open dialog displays.
-
In the Open dialog, navigate to where you unzipped the OEP_Fraud_Detection_Walkthrough_Files.zip file.
-
Open the EDNOEPv2 folder and select EDNOEPv2.jws project.
-
Click Open.
Oracle JDeveloper adds the SOA composite to the FraudCheck project.
View and Deploy the SOA Mediators
-
Navigate to Projects > EDNOEPv2Proj > SOA > Mediators and view the mediators.
-
Right-click the EDNEOPv2Proj project.
The context menu displays.
-
In the context menu, select Deploy > New Deployment Profile.
The Create Deployment Profile dialog displays.
-
In the Create Deployment Profile dialog under Profile Type, select SOA-SAR File.
-
In the Ceate Deployment Profile dialog in the Deployment Profile Name field, enter sar_OEP_TEST_COMPOSITE.
-
Click OK.
The SAR Deployment Properties dialog displays.
-
In the SAR Deployment Profile Properties dialog, click OK.
-
Right-click the EDNEOPv2Proj project.
The context menu displays.
-
In the context menu, select Deploy > sar_OEP_TEST_COMPOSITE
The Deployment Action dialog displays.
-
In the Deployment Action dialog, select Deploy to Application Server.
-
Click Next.
The Deploy Configuration dialog displays.
-
In the Deploy Configuration dialog, check the Overwrite any existing composites with the same revision ID check box.
Keep the default values.
-
Click Next.
The Select Server dialog displays.
-
In the Select Server dialog, select IntegratedWebLogicServer and click Next.
The SOA Servers dialog displays.
-
In the SOA Servers dialog, click Next to keep the default values.
The Summary dialog displays.
-
In the Summary dialog, review the settings for accuracy, and click Finish.
When the modified SOA composite successfully deploys, it creates a default JMS mapping for the FraudCheckRequest and FraudCheckResponse event types. It is likely that this JMS mapping uses AQ, instead of WLS JMS. To interoperate with this Oracle Stream Analytics application, the JMS mapping for these specific event types needs to be changed to use WLS JMS. The mapping change is done with Oracle Enterprise Manager, which is part of Oracle SOA Suite.
Use Oracle Enterprise Manager to Verify the JMS Mapping
-
Open a browser, and enter localhost:7101/em into the URL box.
-
Log in with the user name weblogic and the password welcome1.
-
In the left panel, expand SOA > soa-infra (Default Server) > default > EDNOEPv2Proj.
-
Right-click soa-infra (Default Server) and select Business Events from the context menu.
The Business Events screen displays in the right panel.
-
On the Business Events screen, select the Events tab.
The Namespaces and Events table displays FraudCheckRequest and FraudCheckResponse with a Default link in the JMS Mapping column.
-
In the Events tab, select the Default link.
The JMS Mapping dialog displays.
-
In the JMS Mapping dialog, verify the following information and make changes as needed.
Oracle Enterprise Messaging System(OEMS): Oracle Weblogic JMS JNDI Connection Factory (XA, Durable): eis/wls/EDNxaDurableTopic JNDI Connection Factory (XA, Non-Durable): eis/wls/EDNxaTopic JNDI Connection Factory (Non-XA, Durable): eis/wls/EDNLocalTxDurableTopic JNDI Connection Factory (Non-XA, Non-Durable): eis/wls/EDNLocalTxTopicJMS Topic Name: jms/fabric/EDNTopic
-
Press Apply.
The JMS Mapping value changes to Modified.
-
Repeat for the second Default link.
Update the Sample SOA Composite for Results Analysis
-
In Oracle JDeveloper, under EDNOEPv2Proj > SOA, double-click EDNOEPv2Proj to display the diagram.
-
On the diagram, double-click the EDNToFileOutput component.
The File Adapter Configuration Wizard displays.
-
In the File Adapter Configuration Wizard, step through the dialogs accepting the provided values until you get to the File Configuration dialog.
The File Configuration dialog displays.
-
In the File Configuration dialog, change the Directory for Outgoing Files (physical path) to a location that is valid in your environment.
-
Write the new location down because you will use it later to review and analyze the response information.
-
Click Next and complete the remaining steps by accepting the default values.
-
Click Finish.
Redeploy the SOA Composite
5.3.9 Test the Fraud Detection Application
Use Oracle Enterprise Manager to test the SOA Composite and its interaction and integration with the new Oracle Stream Analytics Application.
Log in to Enterprise Manager and navigate to the Test Web Service Screen
-
Open a browser, and enter localhost:7101/em into the URL box.
The Enterprise Manager login screen displays.
-
Log in to Enterprise Manager with the user name weblogic and the password welcome1.
The SOA Infrastructure screen displays.
-
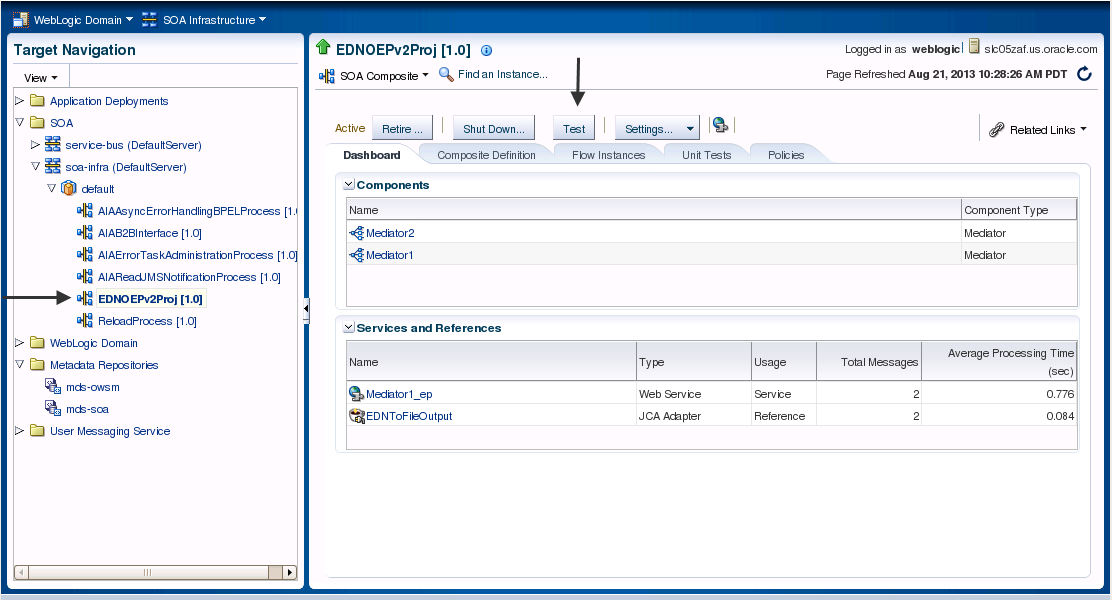
In the SOA Infrastructure screen left panel under Target Navigation, expand SOA > soa-infra (Default Server) > default and select EDNOEPv2Proj.
-
In the SOA Infrastructure right panel, press the Test button.
Test the SOA Composite and the Oracle Stream Analytics Application


