3 Using the Managed Attachments Solution
This chapter includes the following main sections:
For more information about Content Server procedures, see Working with Oracle WebCenter Content in Using Oracle WebCenter Content.
Note:
Depending on customization, some functionality described in this section may not be available. For example, some buttons may not be displayed or some icons may be dimmed (grayed out).
3.1 Viewing Attachments
This section includes the following topics:
3.1.1 How do I display Managed Attachments in the business application?
Follow these steps to display the Managed Attachments page from an Oracle E-Business Suite, Oracle PeopleSoft, or other business application record.
Note:
Ensure the following browser settings are configured:
-
Pop-up blockers are disabled for the hostnames used in this solution.
-
Cookies are not blocked.
3.1.2 How do I view attached documents?
The Managed Attachments page provides multiple ways of accessing and viewing documents:
-
Click the attachment's link in the Name field to open the document in a Web-viewable format or save the document in its native format to a selected location. For more information, see How do I open or save a document?.
-
Click the attachment's Edit icon under Actions options to make and save changes to the document. See How do I edit a document in its native application?.
-
Click the Info icon to view the attachment's content information, and view the Web-viewable or native version of the document. See How do I view information about a document?.
-
Click the AutoVue icon (if displayed) to view the document in the AutoVue applet, which provides enhancing options such as annotation and markup. See How do I view documents in AutoVue?.
3.1.3 How do I view documents in AutoVue?
Depending on configuration, you may have access to enhanced viewing options in the Managed Attachments page through AutoVue. If configured, AutoVue enables you to view, print, collaborate, annotate, and mark up non-private (shared) attachments of virtually any document type. For details on shared versus private documents, see How do I check in and attach a document to the application record?.
3.1.4 How do I configure fields to be displayed in the Managed Attachments page?
Follow these steps to select and order fields for display in the Managed Attachments page.
3.1.5 How do I view information about a document?
Follow these steps to view an attached document's metadata values or previous revisions.
- On the Managed Attachments page, click the Info icon displayed in the Info column for a selected attachment.
- View details about the document on the Content Information page.
3.2 Attaching and Detaching Documents
This section includes the following topics:
3.2.1 How do I check in and attach a document to the application record?
Follow these steps to check in a document and attach it to the selected business application record.
3.2.2 How do I check out documents or undo document check-outs?
Checking out a document in Content Server makes it temporarily unavailable for other users to save changes to it, until you check it back in, or you or another user undo the check-out.
-
Check out a document by choosing Checkout from the Content Actions menu on the Content Information page. Editing a document using the Edit icon also checks out a document.
Documents Checked Out By You
A green check mark icon is displayed in the Revision column (if shown) when a document is checked out by you.
-
To undo a check-out by you or check in a revised document, click the Checked Out By Me icon to display the Content Information page. From its Content Actions menu, choose Undo Check-out or Check-in.
Documents Checked Out By Another User
A lock icon is displayed in the Revision column (if shown) when a document is checked out by another user.
- To undo the check-out, click the Lock icon to display the Content Information page, and choose Undo Check-out from its Content Actions menu.
3.2.3 How do I scan using Oracle WebCenter Enterprise Capture?
The Managed Attachments page provides a Scan button that, when configured, launches the Oracle WebCenter Enterprise Capture application and enables you to either scan a document using a TWAIN compliant scanner or import a file. After reviewing, editing, and indexing the document, click the Release button, which transfers it from Oracle WebCenter Enterprise Capture to Content Server and attaches it to the selected business application entity.
Follow these steps to scan or import a document.
-
If scanning documents, place the documents in the feeder tray of the scanner.
-
On the Managed Attachments page, click the Scan button. The Scan Document window is displayed.
-
Select a classification from the Document Classification drop-down list.
This identifies the type of document to be scanned or imported. For example, you might choose a document classification of Identity Documents to scan a photocopy of a driver's license or passport.
-
Select the Share Document field to make the document available to other Content Server users with appropriate access. Leave the field deselected (default) to make the document available when viewed through the business application but hidden from the standard Content Server user interface.
-
In the Security Group field, select a group for the document. The attachment is available only to users who have permission to the group you select. This field is available only if you chose to share the document in the previous step.
-
Click the Scan Document button. The Oracle WebCenter Enterprise Capture client application launches and displays options based on whether the selected document classification is configured for scanning or importing.
-
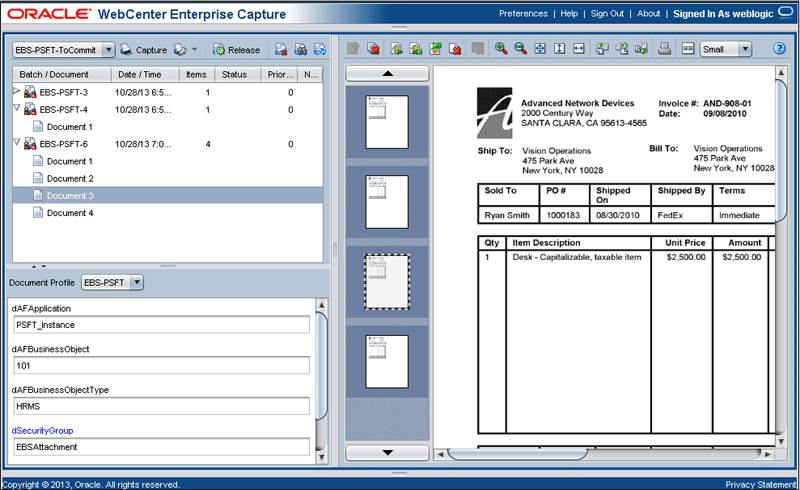
If set for scanning, the scanner scans the pages you placed in the feeder and displays them as shown in Figure 3-3, ready for you to review and index.
-
If set for importing, a File Import window is displayed, prompting you to select one or more files to import. You can import non-image files in addition to image files, if allowed by the client profile. After you select files, their pages are displayed as shown in Figure 3-3, ready for you to review and index.
Figure 3-3 WebCenter Enterprise Capture Client Window

Description of "Figure 3-3 WebCenter Enterprise Capture Client Window" -
-
In the client window, review, edit, and index the document. For more information on indexing, see How does indexing work? in Using Oracle WebCenter Enterprise Capture. Follow these guidelines:
-
You can add pages to documents, but should not add documents to the batch.
-
Metadata fields are displayed in the lower side pane. Metadata fields provide values that are stored as metadata with the Content Server document. An asterisk is displayed before the names of required metadata fields.
-
All pages in a document have the same metadata values. Changing the values on one page changes them for all pages in the document.
Note:
If you decide to cancel a document scan or import, you must close the Oracle WebCenter Enterprise Capture window and return to the Managed Attachments page and perform a new scan or import. This ensures that the metadata values are properly set for attachments.
-
-
When done, click Release to commit the document to Content Server and attach it to the business application record.
Note:
If you release a batch without completing its required metadata fields, the batch may encounter an error when Content Server attempts to store and attach its documents.
-
On the Managed Attachments page, click the Refresh button to display the newly scanned or imported document now attached to the selected business application record. Note that it may take a few minutes for the generated document to be displayed.
3.2.4 How do I scan using Oracle Distributed Document Capture?
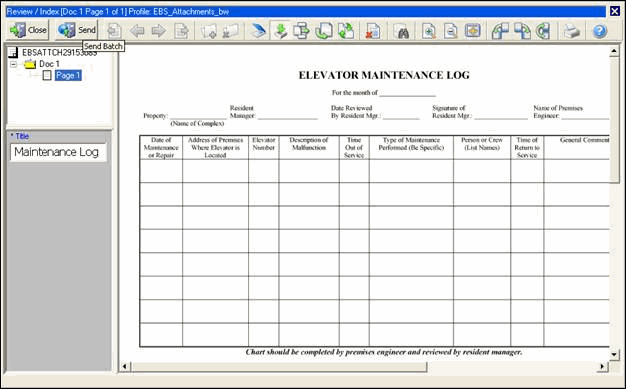
The Managed Attachments page provides a Scan button that, when configured, launches the Oracle Distributed Document Capture application and enables you to either scan a document using a TWAIN compliant scanner or import a scanned image file from disk. After reviewing, editing, and indexing the document, click the Send button, which transfers it from Oracle Distributed Document Capture to Content Server and attaches it to the selected business application entity.
Follow these steps to scan or import a document.
3.2.5 How do I attach documents from the Content Server repository?
Follow these steps to search for and attach documents from the Content Server repository to the selected business application record.
3.2.6 How do I detach a document from the application record?
Follow these steps to detach a document from the selected business application record. Detaching a document removes the link to the business application record, but does not delete the document from the Content Server. Also see How do I delete a document from the Content Server repository?.
3.3 Editing Attachments
This section includes the following topics:
3.3.1 How do I open or save a document?
Follow these steps to open a document in a Web-viewable format or save the document in its native format to a selected location such as a local computer. Note that changes you make to a document in this way are not saved on the Content Server; instead, see How do I edit a document in its native application?.
- On the Managed Attachments page, click a selected document's link in the Name field. A File Download dialog box is displayed with options to open or save the file.
- Click Open or Save.
3.3.2 How do I edit a document in its native application?
Follow these steps to edit a document on the Content Server. Note that you must have access to the native application.
3.3.3 How do I update the metadata of a document?
Follow these steps to make changes to a selected document's metadata values.
- On the Managed Attachments page, click the Info icon for a selected attachment.
- On the Content Information page, choose Update from the Content Actions menu.
- Make changes to the document's metadata values on the Info Update Form.
- Click the Submit Update button.
3.3.4 How do I work with document revisions?
The Revision column contains useful information about the attachment revision, including:
-
The revision number of the attachment.
-
If the attachment is checked out by you (green check mark) or another user (locked icon, hover to view user name).

-
If Revision-specific mode has been configured and a newer revision than the attached revision exists, the Newer Revision Available icon (page with green up arrow, shown below) is displayed. To make the newest revision the attached revision, click the icon and choose Update Attachment to This Revision from the Content Actions menu on the Content Information page.

3.3.5 How do I delete a document from the Content Server repository?
Follow these steps to remove a document from the Content Server and also detach it from the business application record. To detach a document only (remove its link to the selected business application record without deleting it from the Content Server), see How do I detach a document from the application record?.
- On the Managed Attachments page, click the Info icon for a selected attachment.
- Under Actions options, click the Delete link for the revision to delete. You are prompted to confirm the deletion.
3.4 Finding Attachments
This section includes the following topics:
3.4.1 How do I search for documents from the Content Server repository?
Follow these steps to search for documents on the Content Server to view them or attach them to the selected business record.
Note:
Private (not shared) attachments are not returned in search results when searching from within the business application as described in this section.


