11 Uploading and Checking In Documents
11.1 About Uploading and Checking In Documents
You upload a document to have it managed by Oracle WebCenter Content. Uploading a document copies the document into a repository and if WebCenter Content is set to do so, converts the document to a version viewable in a web browser. Once the document is in a repository, it can be checked out, revised, and checked back in. Oracle WebCenter Content controls access to the document, tracks revisions to the document, and maintains metadata information associated with the document.
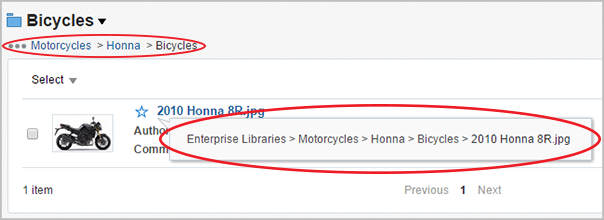
When you upload documents to a specific library or folder, you must navigate to the library first and then upload the document. Doing so applies the correct metadata to a document and organizes it in Oracle WebCenter Content so that you and others can find it. For detailed information on Libraries and Folders, see Understanding Libraries and Understanding Folders.
Figure 11-1 Document Context

11.2 Uploading Documents from a Web Browser
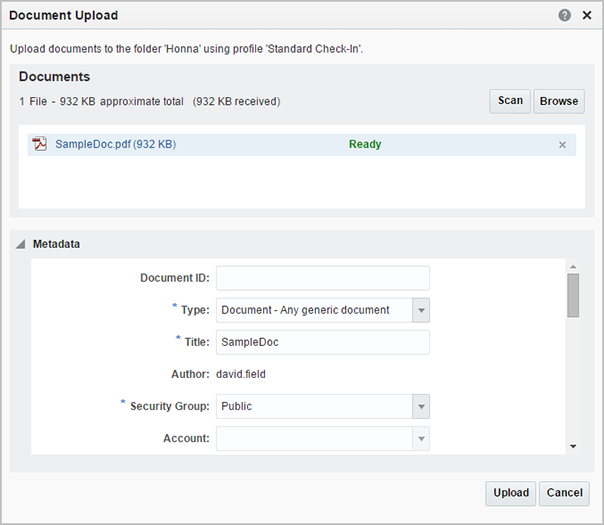
Uploading documents to Oracle WebCenter Content is similar to uploading documents in many other applications. Once you begin, you navigate to the file you want to upload and then provide information about the document.
The information asked for when uploading a document is determined by the profile used when uploading. Profiles are configured by a system administrator to organize what metadata fields are available. For example, uploading a presentation using a profile configured for Marketing may require different metadata fields than when uploading a job application for Human Resources.
Much of the necessary information is automatically assigned based on the context of the library or folder used when uploading the document. For example, security access to a library automatically gets applied to a document uploaded to that library. If uploading to a folder in the library and the folder has different security properties, then they override the library security properties. If you want, you can see and change the metadata information when uploading a document.
You begin uploading documents in one of the following ways:
-
Select a profile from the Upload menu on the Find Documents page. This option uses the metadata fields of the selected profile and the default information from the library or folder context used when uploading.
-
Select Upload Similar Document from the More menu on either the Find Documents or View Documents page, or from the contextual menu when you right-click a document on a results list. This option uses the profile and default information of a document already uploaded to Oracle WebCenter Content.
Note:
When uploading a document, it is recommended that you navigate to the library or folder you want the document in and select the default profile used by the library or folder to ensure that all metadata options are available during upload. The default profile for a library or folder is listed in bold face at the top of the Upload menu.
Note that profiles can set default values for some metadata fields, but the library or folder used to upload the document can override the profile.
To upload documents:
Figure 11-2 The Document Upload Page

11.2.1 How do I change access to uploaded documents?
Access to documents uploaded to Oracle WebCenter Content is initially determined by the profile used to upload the document and the document context. This means that the library or folder to which the document is uploaded can set the default security metadata values. For example, if you upload a document to an enterprise library folder accessible by everyone without changing security settings, then everyone initially has access to the document.
You can change the access to unfiled documents or documents uploaded to an enterprise library using security groups, accounts, and access control lists. The following table lists and describes the security options available when uploading an unfiled document, or adding a document to an enterprise library in Oracle WebCenter Content.
Table 11-1 Security Options For Unfiled Documents and Enterprise Libraries
| Option | Description |
|---|---|
|
Security groups control access to documents. Roles assigned to people within the security group are used to grant permissions to view, edit, and delete particular documents. The security group is a required metadata field for all documents and may be assigned by default. Only those who belong to that security group can work with the document. When you upload a file, you may be able to specify or change the security group metadata value. |
|
|
Accounts are an optional feature that a system administrator can set up to define a more flexible security model. As with security groups, only users who have permission to a particular account can work with documents that belong to that account. When you upload a file, you may be able to specify or change the account metadata values. |
|
|
permissions |
Each role can have the following permissions for each security group:
The permissions for a security group are the highest permission defined by any of the roles for that group. For example, if you are assigned Guest and Contributor roles, where guest is given Read permission and Contributor is given Write permission to the Public security group, you have Write permission to content in the Public security group. |
|
access control list (ACL) security |
An access control list is an explicit list of individuals or groups with permission to access or interact with a specific document. Depending on how access control list security is configured, up to three additional fields are available for use when adding, modifying, or searching for documents:
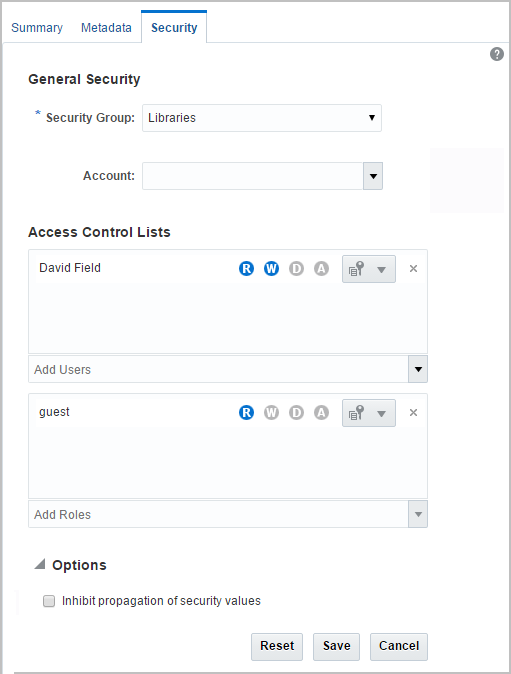
Important: To use an access control list on a document, the document must be uploaded to a security group that supports access control lists, or the added security does not work. If you are uncertain if the security group you are using supports access control lists, check with your system administrator. To use access control lists with documents, you assign one or more predefined users, groups, or roles to the document. In addition, you assign the permissions (Read (R), Write (W), Delete (D), Admin (A), or Annotation Privileges) to each of the access list entries you specify. For example, suppose you add a document and you want guests to have read access with standard annotation privileges and you want all logged-in users to have read/write access with hidden annotation privileges. First, add the guest role to the document, click the R (Read) permission icon, and select Standard Annotations from the Annotations Privileges drop-down menu. Then, add the authenticated user role to the document, click the W (Write) permission icon to grant both the read and write permissions, and select Hidden Annotations from the Annotations Privileges drop-down menu. If either role is valid for the user, they have the access specified for the valid role. If both roles are valid for the user, they have the greater of the two permission sets. Important: If there are no entries in the access control list fields for a document, then the document is available to any user whose security group and account permissions allow them access. However, once a user or group has been added to the access control list of a document, then users not explicitly added lose access to the document. The Access Control List metadata associated with a document can include multiple entries and permissions. When searching for content using Access Control List metadata, use the "Contains" or the "Substring" option (depending on your search engine) to help ensure that you find all instances of the specified metadata. |
Figure 11-3 Security Tab of the View Documents Page Properties Section

11.2.1.1 How do I change access to unfiled or enterprise library documents?
Changing access to an unfiled document or document uploaded to an enterprise library is done using the document properties section of the View Documents page. To change access:
-
On the View Documents page of the document you want to modify, click Security in the Document Properties section.
-
In the Security area of the Document Properties section, select the security group or account you want to use.
-
If you want to define rights for specific people, add them using the Add User field in the Users area of the Access Control Lists section and set the rights you want them to have.
-
If you want to modify the rights given to certain roles, add the role using the Add Roles field in the Roles area of the Access Control Lists section and set the rights you want for that role for this document. Modifying the rights a role has for a specific document does not change the rights it has for other documents.
Remember, you can restrict permissions using an access control list within a security group, but not expand them beyond the permissions of the security group. For example, if everyone in the Authenticated role is set to have Write access to a document, you cannot specify Delete access to a person. You can, however, specify Read access for a specific person and they are limited to Read access.
However, if a person has two valid roles set in an Access Control List, then they have the greater of the two permissions. In other words, if an Access Control List is set to give Write access to all people with the Contributor role and Read access to all people with the Guest role, and a person is both Contributor and Guest, then they have Write access to the document.
11.3 Checking In New Revisions from a Web Browser
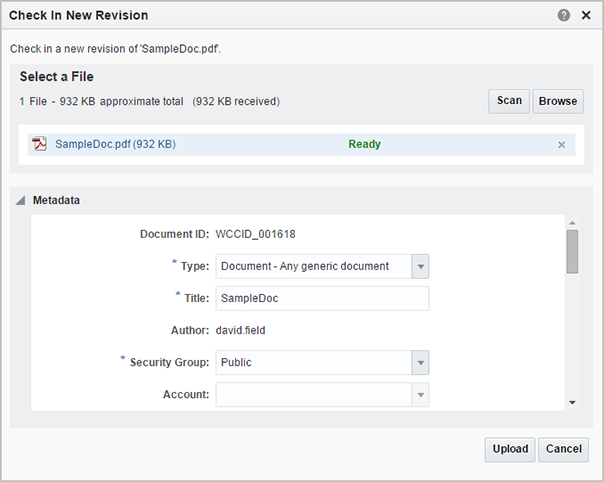
After a document is uploaded to Oracle WebCenter Content, any changes to the document must be checked in as a new revision. You can manually check in new revisions in the following ways:
-
Using the Check In button on a View Documents page
-
Adding a revision tab on the View Documents page
-
Right-clicking on a document in a results list on the Find Documents page and selecting Check In New Revision from the contextual menu
-
Selecting a document in a results list on the Find Documents page and clicking the Check In New Revision icon in the tool bar
Note:
You can also check in a new revision automatically after editing using the Check Out and Edit feature of the More menu. For more information, see How do I check out and edit a document?.
If a document is checked out by someone else, the document is locked and a new revision can be checked in only by the person who has checked it out unless they undo the check-out. If a document is not checked out, you can check it out to lock it while you edit it before checking it back in, or add an edited revision to the View Documents page without first checking out the document. For more information on the options available for checking out and editing documents, see Checking Out Documents.
To check in a new revision:
Figure 11-4 Check In New Revision Page

11.4 Uploading and Checking In Documents from WebCenter Content: Desktop
Oracle WebCenter Content: Desktop provides quick access to Oracle WebCenter through a standard Microsoft Windows files system or through Microsoft Office products such as Outlook and Word. When integrated with Oracle WebCenter Content: Desktop, uploading files to Oracle WebCenter Content is as simple as copying a file to a folder in Windows Explorer or saving a file from a Microsoft Office Application. See How do I integrate Microsoft File Explorer with content servers? and subsequent sections in Using Oracle WebCenter Content: Desktop.