6 Managing Import Processing
This chapter includes the following sections:
6.1 Introduction to Import Processing
This section covers the following topics:
6.1.1 Key Import Processor Job Settings
You can apply the Import Processor's automated import of images and other electronic documents into Capture to such applications as:
-
Multi-function devices
-
Images scanned using third-party software
-
Documents sent as email attachments
-
Images referenced in a list file that were scanned by a service bureau
Depending on the files to be imported, you create Import Processor jobs for the following import sources:
-
Email Source: Import Processor imports files attached to incoming email messages into Capture. It can also import the email body and the entire email message.
-
Folder Source: Import Processor monitors an import folder and imports all files it finds with a specified file mask.
-
List File Source: Import Processor monitors an import folder and reads a list (text) file containing records that identify each file to import, zero or more attachment files to import, and optionally, metadata values to be assigned to the file or values to be matched against a database.
6.1.2 Important Points About Import Processing
-
Unlike the other batch processors that process batches that are queued, the Import Processor polls at a specified frequency (ranging from every 30 seconds to once a day), in which it searches the specified source for files to import, and if found, begins processing them.
-
You configure settings specific to the selected source (email, folder, or list file) on the Import Source Settings train stop. For example:
-
For a folder import job, you identify the folder and file types to import, as shown in Figure 6-1.
-
For a list file job, you identify the folder and list files to be read.
-
For an email source, you specify email accounts to monitor and email messages and/or attachments to import.
-
-
The Import Processor supports processing of all import sources across multiple threads on a server as well as multiple servers in a cluster.
-
You can customize the Import Processor's behavior by incorporating JavaScripts. See Customizing Import Processing Using Scripts.
Figure 6-1 Selecting General Settings, including an Import Source, for an Import Processor Job
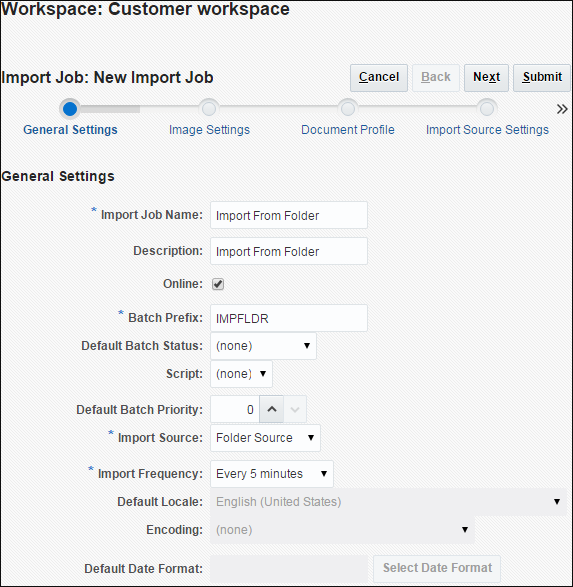
Description of "Figure 6-1 Selecting General Settings, including an Import Source, for an Import Processor Job"
6.2 Adding, Copying, or Editing an Import Processor Job
Follow these guidelines regarding editing Import Processor jobs:
-
It is recommended that you do not make major changes to an Import Processor job's workspace elements while it is online. For example, if you modify or remove metadata fields used by the job, errors will occur, since the data in the batch no longer matches the job's settings.
-
While editing processor job settings, it is useful to also run the client to view imported batches. When using the client, you must refresh the batch list to see newly imported batches.
To add, copy, or edit an Import Processor job:
-
In a selected workspace, click the Capture tab.
-
In the Import Processor Jobs table, click the Add button or select a job and click the Edit button.
You can also copy an Import Processor job by selecting a job, clicking the Copy button, and entering a new name when prompted. Copying a job allows you to quickly duplicate and modify it.
-
Select settings on the General Settings train stop.
-
Enter a name in the Import Job Name field and a prefix in the Batch Prefix field. Imported batches are named using this prefix, followed by a number that increments with each new batch.
-
In the Import Source field, specify a source for imported files: Email Source, Folder Source, or List File Source.
The source you select determines the settings shown on the Import Source Settings train stop.
-
In the Import Frequency field, specify the time interval at which the Import Processor job checks for files to import. You can choose every 30 seconds, every 1, 5, 15, or 30 minutes, every 1 hour, or every day. If you specify every day, specify a time in the Time Hr and Min fields that display.
-
Complete other settings on the train stop, such as specifying a default batch status or priority to assign to batches when they are created.
-
-
On the Image Settings train stop, complete settings relating to how imported image files are formatted and validated.
-
Select the Preserve Image Files option to preserve image files and allow the Import Processor to import images without performing any image processing. Selecting this option automatically disables all the other options on this train stop.
You will be unable to edit preserved image file documents (for example, append pages, delete pages, or move pages).
-
In the Image Down-Sample field, specify how to convert images, by retaining their image format (None), converting color to grayscale (Down-sample color to 8 bit grayscale), or converting either to black and white (Down-sample color or grayscale to black and white).
-
In the JPEG Image Quality field, specify a value between 0 and 99, where 99 is the highest quality and 85 is the default setting. This field does not apply to black and white images.
-
In the If Image Validation Fails field, specify an action if an image page fails decompression validation: Delete the batch or Skip the file.
-
-
On the Document Profile train stop, complete settings related to assigning metadata to imported documents. See Configuring Metadata Assignment During Import.
-
On the Import Source Settings train stop, configure source-specific settings.
-
For an email source job, see Configuring Email Message and Email Attachment Importing.
-
For a folder source job, see Configuring File Importing From a Folder.
-
For a list file source job, see Configuring List File Importing.
-
-
On the Database Lookup train stop, optionally configure a database lookup to assign metadata values from a database during import. See Assigning Metadata Values from a Database Lookup During Import.
-
On the Post-Processing train stop, specify what happens after import processing completes, depending on whether system errors were encountered.
-
Review settings on the Import Job Summary train stop and click Submit.
-
Test the Import Processor job you created.
Set the frequency to every 30 seconds and monitor the folder, list file, or email account to view processing activity.
6.3 Deleting an Import Processor Job
When you delete an import job, the Import Processor no longer monitors for files to import at the job's specified frequency.
To delete an import job:
6.4 Activating or Deactivating Import Jobs
If online, import jobs run at the interval specified in the Import Frequency field on the job's General Settings train stop. You can temporarily stop the job from running (take it offline) or change a deactivated job to run again.
Follow these steps to change an Import Processor job to online or offline:
6.5 Configuring Email Message and Email Attachment Importing
With an email import job, the Import Processor imports files attached to incoming email messages into Capture along with email message elements, such as subject and body text. Each imported email message becomes a batch, with email elements such as attachments, message body, or entire email message created as separate documents within the batch.
To configure email Import Processor job settings:
-
Follow the steps in Adding, Copying, or Editing an Import Processor Job to add, edit, or copy an Import Processor job, selecting Email Source in the Import Source field on the General Settings train stop.
-
Select the Import Source Settings train stop to configure email import configuration on each tab.
Figure 6-2 Choosing Email Source Settings on the Import Source Settings Train Stop
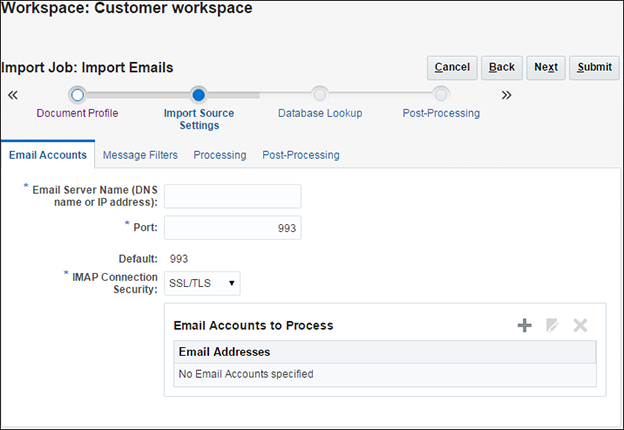
Description of "Figure 6-2 Choosing Email Source Settings on the Import Source Settings Train Stop" -
On the Email Accounts tab, configure the email server the Import Processor job will connect to by defining its DNS name or IP address, port, and security. If using SSL (Secure Sockets Layer) or TLS (Transport Layer Security), the certificate for the email server must be in the application server (WebLogic) keystore. See Configuring WebLogic Security: Main Steps in Administering Security for Oracle WebLogic Server.
Then configure the specific email accounts that the job will check for messages. In the Email Accounts to Process table, click the Add button. In the Add/Edit Email Account window, enter an email address and password to provide the job access to the email account. Click Verify to confirm that Capture can connect to the email server using the specified account information. Include additional email accounts if needed.
-
On the Message Filters tab, specify where and how to search for email messages and/or attachments.
-
In the Folders to Process field, enter one or more folders to search in the specified email accounts. The default value is the server's inbox. To specify multiple folders, separate them with a ; (semi-colon). To specify subfolders, include a path delimiter applicable for the mail server, such as a / (forward slash), as in folder/subfolder.
-
By default, Capture will process all emails in the specified folder unless a message filter is applied to the job. Optionally, in the Message Filters table, select the Enabled field for each email element to search, then enter characters to find in the Field Contains field.
For example, to search for emails whose subject or message body contains the word payment, you would select Enabled for both search fields, include
paymentin each Field Contains entry, and select the Or search operator. -
In the Search Operator field, select the search operator to use for the specified message filters: And (default) imports only if all search criteria match, while Or imports if any search criteria matches.
-
-
On the Processing tab, specify how to process the email messages and their attachments. For example, specify information to include, and priority to assign to batches, based on email priority.
-
Under Email Message Options, specify whether to import the message body file, and if yes, select an import format (text or EML) and whether to include it when no attachments are present. Lastly, specify whether to import the entire email message (including attachments) as an EML file.
-
In the Include attachments matching these masks(s) field, specify attachment files to include or exclude based on their file masks. You can enter multiple file masks separated by a comma or semi-colon. For example, you might include all PDF files (*.pdf) or exclude all GIF files (*.gif).
-
Under Document Ordering, specify the order in which the elements (for example, message body and attachments) from an email message are ordered as documents in imported batches.
-
Under Include in Batch Note, select message elements (such as Received Date/Time, From Address, To Address, Subject, and Message Body) to include in a note attached to each imported batch. See How do I add, edit, and delete batch notes? in Using Oracle WebCenter Enterprise Capture.
-
Under Batch Priority, optionally assign a priority to each new batch based on its email priority (low, normal, or high). For example, enter 8 in the High field to assign high priority emails a batch priority of 8 in Capture. Emails not assigned a priority are considered normal priority.
-
-
On the Post-Processing tab, specify what happens to email messages after successful or failed import. You can delete messages, move them to a specified folder within the email account, or in the case of failed import, prevent messages from being deleted. For example, you might prevent successfully imported emails from being imported again if the job is run regularly by moving them to a specified folder, but retain messages that failed import.
-
Complete other Import Processor job train stops as described in Adding, Copying, or Editing an Import Processor Job.
-
Test the email import job.
When the job is activated at the specified frequency, the Import Processor checks the specified email accounts for messages and searches folders for matching emails. If found, the Import Processor creates a Capture batch and creates a document for each document being imported from the email message, optionally populates metadata fields with email metadata, and deletes successfully imported messages or moves them to a folder.
6.6 Configuring File Importing From a Folder
With a folder import job, the Import Processor monitors an import folder, and imports all files it finds with a specified file mask.
To configure folder Import Processor job settings:
-
Follow the steps in Adding, Copying, or Editing an Import Processor Job to add, edit, or copy an Import Processor job, selecting Folder Source in the Import Source field on the General Settings train stop.
-
Complete settings on the Import Source Settings train stop.
-
In the Import Folder Path field, specify the folder for the Import Processor to monitor. Use a fully qualified folder path relative to the Capture server operating system.
On Linux, you might enter:
/net/abc-01/import/expensesOn Windows, you might enter:
\\abc-01\import\expenses -
In the File Mask(s) field, specify the type of files to import by entering an extension (*.tif or *.pdf, for example). Specify *.* to import all files. Separate multiple masks with a semi-colon (;) character.
-
If you want Import Processor to monitor and import files from subfolders within this folder, select the Process subfolders field.
Figure 6-3 Choosing Folder Settings on the Import Source Settings Train Stop
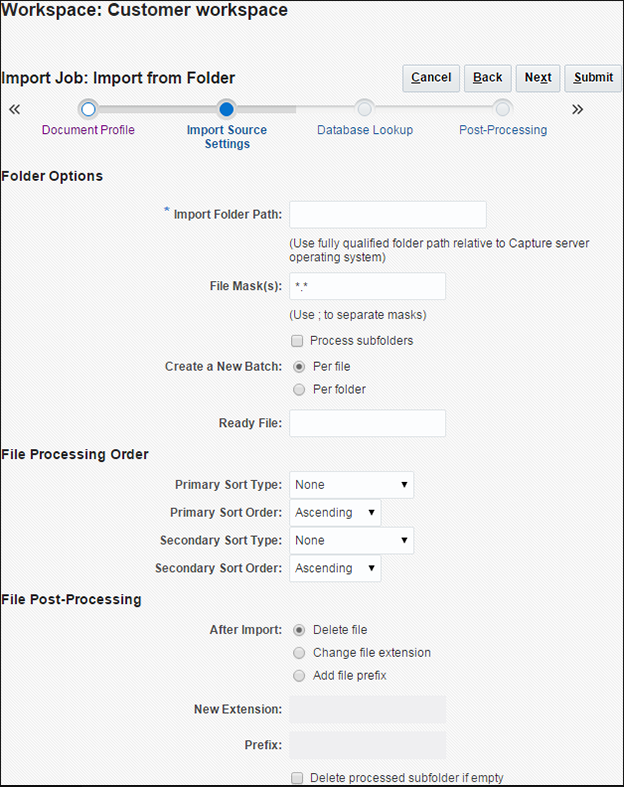
Description of "Figure 6-3 Choosing Folder Settings on the Import Source Settings Train Stop" -
In the Create a New Batch field, specify whether to create a new batch with each file imported or with each folder imported. When creating a batch per folder, each subfolder processed will create a new batch.
-
In the Ready File field, optionally enter a file name that must exist in the folder (and each subfolder, if applicable) before processing the folder. This option delays the processing of a folder until the ready file appears. When processing is completed, the ready file is deleted.
-
In the File Processing Order fields, specify the order in which files in the import folder are processed, by specifying their primary and secondary sort type and order. You can specify import order based on sort types of None (no sort order), File Name, File Extension, or File Modified Date, and specify a sort order of Ascending or Descending.
-
In the File Post-Processing fields, specify how to change files after import so they are not imported again if the job is run regularly. In other words, you must change the file names so that they no longer match the File Mask(s) specified for the job. You can delete files, change their extension, or add a prefix to them. You can also perform cleanup on processed subfolders by selecting the Delete processed subfolder if empty field.
-
-
Complete other Import Processor job train stops as described in Adding, Copying, or Editing an Import Processor Job.
-
Test the folder import job.
When the job is activated at the specified frequency, the Import Processor checks the folder for files matching the file mask(s). If it finds matches, it imports the files and creates new batches, populates metadata fields, and deletes or renames the files as specified.
6.7 Configuring List File Importing
With a list file import job, the Import Processor monitors an import folder for matching list files, and imports the document files, metadata values, and attachments identified in the list file.
A list file job can also search a database for matching list file values in order to populate metadata fields. See Assigning Metadata Values from a Database Lookup During Import.
To configure list file Import Processor job settings:
-
Generate a list file.
A list file is a text file containing records of delimited data that identify the names of files to be imported and their location. Each record may also include metadata values to assign to the document or to match against a database file. The list file may also contain one or more attachment records to be imported for a document. For more information, see Importing Attachments During List File Importing.
-
Follow the steps in Adding, Copying, or Editing an Import Processor Job to add, edit, or copy an Import Processor job, selecting List File Source in the Import Source field on the General Settings train stop.
-
On the General Settings train stop, complete the Default Locale, Encoding, and Default Date Format fields.
These fields enable the Import Processor to correctly read list files based on your locale.
-
Complete settings on the Import Source Settings train stop.
-
In the Import Folder Path field, specify the folder for the Import Processor to monitor. Use a fully qualified folder path relative to the Capture server operating system.
On Linux, you might enter:
/net/abc-01/import/expensesOn Windows, you might enter:
\\abc-01\import\expenses -
In the File Mask(s) field, specify the type of files to import by entering an extension. Specify *.* to import all files. Separate multiple masks with a semi-colon (;) character.
-
To monitor and import list files from subfolders within the specified folder, select the Process subfolders field.
-
From the Create a New Batch options, specify whether to create a new batch for each list file or folder imported. When creating a batch per folder, each subfolder processed will create a new batch.
-
In the Field Delimiter field, specify how fields are delimited in the list file. Use a delimiter that will not be used in the list file metadata.
For example, enter | (pipe), , (comma) or ~ (tilde).
-
In the Maximum Fields Per Document field, specify a maximum number of fields in the list file to map to metadata fields.
-
In the Document File Field Position field, enter the list file field position of document file names and locations. For example, enter
1if the first field in each record in the list file identifies a document file path and name.Note:
If the specified document file field position does not contain a path to the file to be imported, it is assumed that the file is located in the same folder as the list file being processed.
-
In the List File Post-Processing fields, specify how to change list files after import so they are not imported again if the job is run regularly. In other words, you must change the list file names so that they no longer match the File Mask(s) specified for the job. You can delete them, change their extension, or add a prefix to them.
-
In the Document File Post-Processing fields, specify if you want to delete document files and their attachments from their specified location after successful import.
Figure 6-4 Choosing List File Settings on the Import Source Settings Train Stop
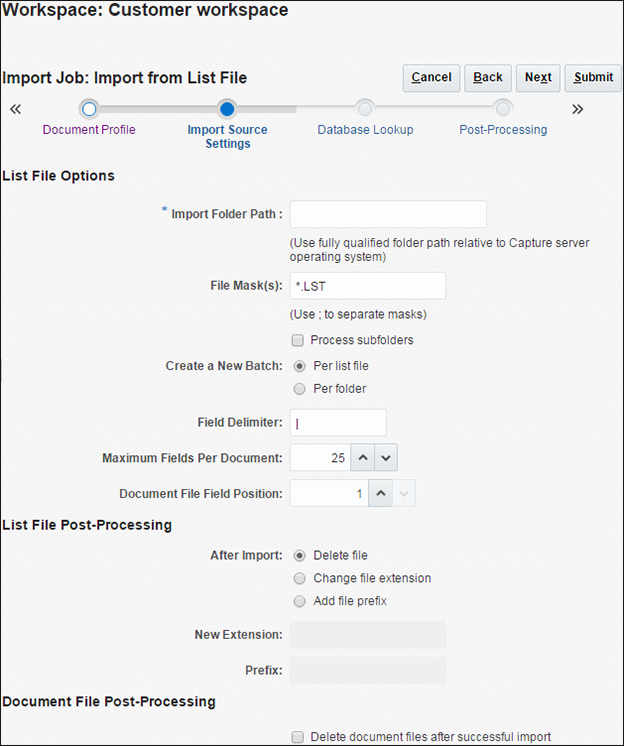
Description of "Figure 6-4 Choosing List File Settings on the Import Source Settings Train Stop"
-
-
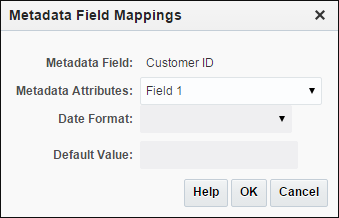
On the Document Profile train stop, map Capture metadata fields to list file values, identifying field position in the list file using the Field 1 - Field n metadata attributes. You can also map system level fields, as described in Configuring Metadata Assignment During Import.
For example, to map a
Customer IDmetadata field with the first field in each record in the list file, you would select theCustomer IDfield in the Metadata Field Mappings table, click the Edit button, and select Field 1 in the Metadata Attributes field of the Metadata Field Mappings window.Figure 6-5 Mapping Metadata Fields to List File Fields
Description of "Figure 6-5 Mapping Metadata Fields to List File Fields" -
Complete other Import Processor job train stops as described in Adding, Copying, or Editing an Import Processor Job.
-
Test the list file import job.
When the job is activated at the specified frequency, the Import Processor checks the folder for list files matching the specified file mask(s), imports the document files and their attachments identified in the list file, optionally populates metadata fields with list file data and deletes or renames the list file.
6.8 Importing Attachments During List File Importing
When processing a list file, the Import Processor imports the document files, metadata values, and attachments identified in the list file. The format to define an attachment within the list file is:
@Attachment[delimiter][Attachment Type][delimiter][Attachment File]
or
@Support[delimiter][Attachment Type][delimiter][Attachment File]
Usage of the @Attachment command is recommended.
When the Import Processor processes an attachment record, it imports the attachment for the document specified in the previous record. Therefore, the attachment must not be specified as the first record in the list file. Specifying the attachment as the first record will cause an error.
Example 6-1 Example:
Doc1.TIF|Corp 1|Invoice
@Attachment|PO|PO1.TIF
Doc2.TIF|Corp 2|Invoice
In the above example, PO1.TIF is imported as a document attachment for the Doc1.TIF document. Multiple attachment records can be specified for a document.
Example 6-2 Example:
Doc1.TIF|Corp 1|Invoice
@Attachment|PO|PO1.TIF
@Attachment|Contract|Contract1.PDF
@Attachment|Contract|Amendment1.PDF
Doc2.TIF|Corp 2|Invoice
If the attachment file is a multiple page TIFF, each page is imported as a separate batch item and assembled into an attachment.
6.9 Configuring Metadata Assignment During Import
Use the Document Profile train stop to configure how import job values are mapped to Capture metadata fields during import processing.
-
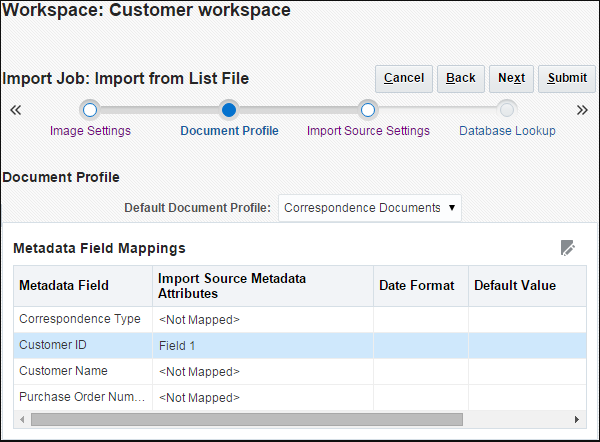
In an Import Processor job, select the Document Profile train stop, as shown in Figure 6-6.
-
In the Default Document Profile field, specify a document profile to assign to imported documents. The selected profile classifies the document. For example, if users open the batch in the client, this document profile is selected.
Figure 6-6 Configuring Metadata Assignment for an Import Processor Job
Description of "Figure 6-6 Configuring Metadata Assignment for an Import Processor Job" -
In the Metadata Field Mappings table, map Capture metadata fields to metadata values specific to the selected import source.
In the Metadata Field column, select a Capture field to populate, and click the Edit button.
Note:
Regardless of the default document profile selected, all metadata fields in the workspace are available for mapping.
-
Complete settings in the Metadata Field Mappings window.
-
Select a metadata value for the import source in the Metadata Attributes field. To populate with a default value, select Default value in this field, then specify the value in the Default Value field. If needed, select a date format in the Date Format field.
Note:
The Date Format field is available only for the List File source and only when mapped to a list file position, Field 1 - Field n. If a date format is not specified, the default date format specified on the General Settings train stop is used.
-
In a list file import job, select from list file, document, or field-related attributes, listed in Table 6-1. To map values contained in the list file, identify their field position using the field attributes (Field 1, Field 2, and so on.) The number of field attributes displayed depends on the number specified in the Maximum Fields Per Document field on the list file's Import Source Settings train stop.
Table 6-1 System Metadata Attributes for List File Import Jobs
System Attribute Value for example list file being imported (/import/expenses/20120426/Customer1.LST) List File Name
Customer1.lst
List File Base File Name
Customer1
List File Extension
LST
List File Folder Path
/import/expenses/20120426
List File Folder Name
20120426
List File Full File Path
/import/expenses/20120426/Customer1.LST
Document File Name
Customer1.pdf
Document Base File Name
Customer1
Document File Extension
pdf
Document Folder Path
/import/expenses/20120426
Document Folder Name
20120426
Document Full File Path
/import/expenses/20120426/Customer1.pdf
Document File Modified Date/Time
File modified date/time - system value
-
In a folder import job, select from folder, file, or path-related attributes, listed in Table 6-2.
Table 6-2 System Metadata Attributes for Folder Import Jobs
System Attribute Value for example path for file being imported (/import/expenses/20120426/Customer1.pdf) File Name
Customer1.pdf
Base File name
Customer1
File Extension
pdf
Folder Path
/import/expenses/20120426
Folder Name
20120426
Full File Path
/import/expenses/20120426/Customer1.pdf
File Modified Date/Time
File modified date/time - system value
-
In an email import job, select from email message-related attributes, listed in Table 6-3.
Table 6-3 System Metadata Attributes for Email Import Jobs
System Attribute Description From Name
Name alias of From address
From Address
Sender's email address
Reply To Name
Reply To Name for the message
Reply To Address
Reply To Address for the message
Recipient Names
Collection of recipient names for the message
Recipient Addresses
Collection of recipient address for the message
Folder
Folder name from which the message was obtained
Received Date
Date and time message was received
Sent Date
Date and time message was originally sent
Subject
Subject of the message
Email Importance
Low, normal and high priority value of the message
MessageId
Unique ID of the message
-
In any import job, select from common system attributes, listed in Table 6-4.
Table 6-4 Common System Metadata Attributes for Import Jobs
System Attribute Description Import Date/Time
Date and time at which the batch was imported
Import Job Name
Name assigned to the Import Processor job
Default Value
Default value assigned as specified
Capture Server's Host Name
Host name assigned to the Capture server
-
-
Click OK. Map other metadata fields in the Metadata Field Mappings table as needed.
6.10 Assigning Metadata Values from a Database Lookup During Import
Follow these steps to use a database lookup profile in an import job. Using a database lookup allows the Import Processor, in addition to importing from an email, folder, or list file source, to also search a specified database for a record that matches an identifying value and if found, populate other metadata fields from the database.
To perform a database search during an import job, the Import Processor needs a value to search for in a specified database record. For example:
-
A list file import job might search for a list file value, such as a
Customer IDfield value. -
An email import job might search for an email message value, such as the subject or from address value.
-
A folder import job might search for a file name, such as files named with an employee ID value.
To configure a database lookup for an Import Processor job:
-
On the Metadata tab, create the database lookup profile, as described in Managing Database Lookups.
-
On the Capture tab, add or edit an Import Processor job, as described in Adding, Copying, or Editing an Import Processor Job.
-
On the import job's Document Profile train stop, configure mapping for the search field you defined in the database lookup. See Configuring Metadata Assignment During Import.
For example, for a list file import job, you would map the database lookup's search field by selecting the metadata field in the Metadata Field Mappings table, clicking the Edit button, and selecting the field position of the list file value to search.
-
On the import job's Database Lookup train stop, configure the lookup.
-
In the Database Lookup Profile field, select the profile you created in step 1.
-
In the Database Search Field field, select the Capture field on which to search.
-
In the When more than one record is found field, select whether to use the first record found or skip selecting a record.
-
-
Run the Import Processor job and test the database lookup.
When the job is online and run at its frequency, the Import Processor imports as specified, reads or acquires the specified search field, searches the database field for a matching value and if found, populates other metadata fields from the database table.
6.11 Configuring Post-Processing
You use post-processing settings to specify what happens after import processing completes a batch. To configure post-processing for an Import Processor job:
- When adding or editing a job (see Adding, Copying, or Editing an Import Processor Job), select the Post-Processing train stop.
- In the Batch Processor field, select the next step for batches after they are created and import processing is complete. Selecting None allows the batch to be immediately available to the client.
- In the Batch Processor Job field, select a recognition or document conversion job to run, if you selected Recognition Processor or Document Conversion Processor in the previous step.
- Click Submit to save the client profile.
6.12 Customizing Import Processing Using Scripts
To customize Import Processor behavior, incorporate JavaScripts. For example, you might use scripts to skip the importing of certain files or batches or to add document-level metadata values during importing.
To use a script in an Import Processor job: