9 Developing Visualization Templates
Topics:
9.1 About Visualization Templates
Introduced in WebCenter Portal 12c (12.2.1) is the ability to retrieve data from a REST or SQL data source using a business object, simplifying the complexities of application integration. The retrieved data can be rendered on a portal page in a data visualization using a visualization template. For example, the data can be presented in one of the built-in visualization templates, or you can build a custom visualization template in JDeveloper if none of the built-in templates meet the needs of your organization.
See Also:
For information about the built-in visualization templates, see About Visualization Templates in Oracle Fusion Middleware Building Portals with Oracle WebCenter PortalA visualization template is a JSFF file (JSP page fragment) that defines how the data retrieved by a business object is presented on a portal page. Unlike built-in visualization templates, which are generic presentation styles that can be used in multiple scenarios by binding to different business objects, a custom visualization template has little to no reusability as each custom template is designed to be used with a specific business object. Hence, a custom visualization template is also known as a bound visualization template.
When an application specialist or portal manager adds a data visualization component to a portal page in WebCenter Portal (as described in Adding a Data Visualization to a Page in Oracle Fusion Middleware Building Portals with Oracle WebCenter Portal), they configure the data visualization using the Define Data Visualization wizard to select the data source and visualization template, which is bound to the business object. The Options page of the wizard dynamically displays the selected template’s attributes, either those of a built-in template or the placeholder EL specified in a custom template. For a custom visualization template, placeholder EL is bound to each business object attribute, which replaces the EL at runtime. For more information, see Configuring a Data Visualization in Oracle Fusion Middleware Building Portals with Oracle WebCenter Portal
9.2 Creating a Visualization Template
This section describes how to create a new custom visualization template in the following topics:
9.2.1 How to Create a Visualization Template
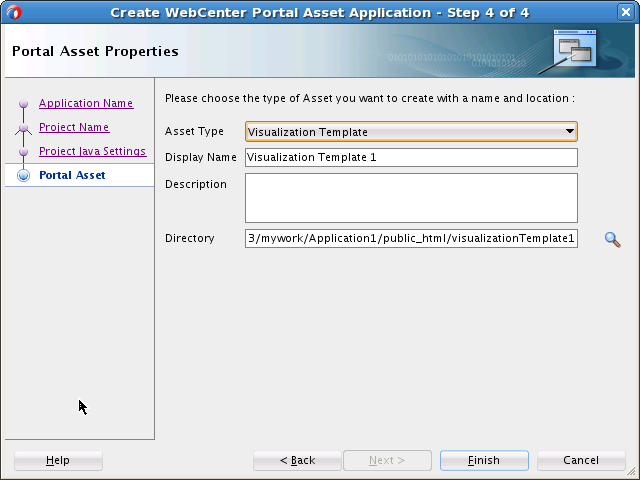
This section describes how to create a WebCenter Portal asset application for a new visualization template. Once the asset application with its associated artifacts has been created, you can continue by modifying the visualization template as described in Editing a Visualization Template.
Note:
Oracle recommends that you store asset-related artifacts, such as images and icons, on your content server and that you create a folder structure on your content server specifically for asset artifacts so that content is easy to identify and move, if required.
To create a custom visualization template:
9.2.2 What You May Need to Know About Visualization Template Artifacts
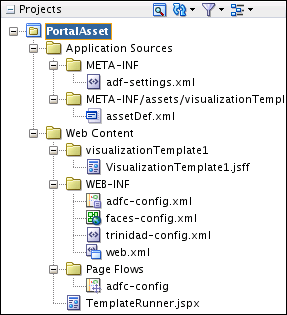
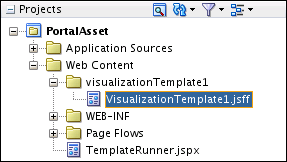
Creating a visualization template asset application produces a default template, with the following artifact:
-
A view fragment file (for example,
VisualizationTemplate1.jsff)
This file appears in the Application Navigator as shown in Figure 9-3.
Figure 9-3 Visualization Template Asset Application Artifacts

Description of "Figure 9-3 Visualization Template Asset Application Artifacts"
To expose a visualization template for use when creating data visualizations at runtime, you must consider the following requirements:
-
Create only one view fragment for a task flow that will be used as a visualization template. The view fragment JSFF file must be created in the same location as the task flow definition XML file.
-
If the visualization template references code (for example, using an EL value), then that code must be present in the deployed application.
9.3 Editing a Visualization Template
After creating the initial framework of a visualization template (see How to Create a Visualization Template), you must edit it to define the template.
Note:
If changes are made to a custom visualization template that is already selected in a data visualization, you will need to configure a new data visualization and reselect the revised visualization template in order to reflect the changes in the data presented on the page.To edit a visualization template:
9.3.1 Placeholder EL Binding in Visualization Templates
Custom visualization templates contain placeholder Expression Language (EL) that is bound to business object attributes at runtime. Using placeholder EL allows you to add a binding hint to the custom visualization template so that users creating the data visualization can select the placeholder EL in the Define Data Visualization wizard to bind to a business object attribute, parameter, or method at runtime.
-
af:form -
af:image -
af:inputDate -
af:inputText -
af:iterator -
af:link -
af:listView -
af:outputFormatted -
af:outputText -
af:selectBooleanCheckbox -
af:selectOneChoice -
af:selectOneRadio -
af:selectBooleanRadio -
af:table
Within these components, the syntax for binding custom visualization template placeholder EL to a business object is as follows:
Binding Template Placeholder EL to a Business Object Attribute
Placeholder EL syntax:
#{owcp.appsint.data('displayName','parentInformation','defaultValue','attribute binding hint','')} where:
-
owcp.appsint.datais a keyword to indicate that this placeholder is to be bound to a business object attribute. Only placeholder EL that containsowcp.appsint.datawill be bound to a business object attribute at runtime. -
displayNameis the placeholder display name of the attribute that will be shown to the user in the Define Data Visualization wizard Options page. -
parentInformationis the value of theidattribute of the parent (iterator), if the attribute’s component depends on a parent (iterator). For example,af:outputTextinsideaf:columnhasparentInformationas theidof the containingaf:tablecomponent:<af:table var="row" id="t1" value="#{owcp.appsint.data('DOCUMENT Details','','None','','')}" > <af:column headerText="Name" id="c1" > <af:outputText value="#{owcp.appsint.data('Name','t1','Name','','')}" id="ot1"/> </af:column> </af:table> -
defaultValueis the default value for the component to render it in JDeveloper for testing purposes. -
attribute binding hintis the xpath (operationName.accessor1.accessor2.attribute) for the attribute, so that the exposed placeholder in the EL is bound to the business object attribute by default.For a SQL data source, the binding hint is
GET.ResultSet.column_name. For example, for a SQL data source that retrievesNAMEandIDvalues (select NAME, ID from some_table), the binding hint forNAMEisGET.ResultSet.NAMEand forIDisGET.ResultSet.ID.Example JSFF to list employees for a SQL data source:
-
Using table:
<af:table var="row" id="t1" value="#{owcp.appsint.data('Employee List','','None','GET.ResultSet','')}" > <af::column headerText="Name" id="c1" > <af:outputText value="#{owcp.appsint.data('Name','t1','Name','GET.ResultSet.NAME','')}" id="ot1"/> </af:column> </af:table> -
Using iterator:
<af:iterator id="i1" value="#{owcp.appsint.data('Employee List','','None','GET.ResultSet','')}" var="row">
  <af:panelGroupLayout id="pgl2" layout="vertical">
    <af:outputText value="#{owcp.appsint.data('Name','i1','John','GET.ResultSet.NAME','')}" id="of1"/>
    <af:inputText label="ID : " value="#{owcp.appsint.data('ID','i1','1','GET.ResultSet.ID','')}" id="it1"/>
  </af:panelGroupLayout>
</af:iterator>
For a REST data source, given the following example of returned data, where
empis repeating data:<emps> <emp> <name>EMP1</name> <id>1</id> </emp> <emp> <name>EMP2</name> <id>2</id> </emp> </emps>The iterator hint is
GET.emps.empand the value hint isGET.emps.emp.name.Example JSFF with binding hints to list employees for the REST data shown above:
<af:iterator id="i1" value="#{owcp.appsint.data('Employee List','','None','GET.emps.emp','')}" var="row">
   <af:panelGroupLayout id="pgl2" layout="vertical">
      <af:outputText value="#{owcp.appsint.data('Name','i1','John','GET.emps.emp.name','')}" id="of1"/>
      <af:inputText label="ID : " value="#{owcp.appsint.data('ID','i1','1','GET.emps.emp.id','')}" id="it1"/>
   </af:panelGroupLayout>
</af:iterator>
Note:
If the data type returned by the Resource Path URL (specified in the Define Data Visualization wizard) for the REST data source is in JSON format, thenmethodReturnmust be added afteroperationNamein the binding hint. For example:GET.methodReturn.name -
Binding Template Placeholder EL to a Business Object Parameter
Placeholder EL syntax:
#{owcp.appsint.parameter('displayName','','defaultValue','parameter binding hint','')} where:
-
owcp.appsint.parameteris a keyword to indicate that this placeholder is to be bound to a business object parameter. Only placeholder EL that containsowcp.appsint.parameterwill be bound to a business object parameter at runtime. -
displayNameis the placeholder display name of the attribute that will be shown to the user in the Define Data Visualization wizard Options page. -
defaultValueis the default value for the component to render it in JDeveloper for testing purposes. -
parameter binding hintis the xpath (operationName.parameter1) for the parameter, so that the exposed attribute in the EL is bound to the business object parameter by default.For a SQL data source, the binding hint is
GET.bind_param_name. For example, for a SQL data source that retrieves data using a bind parameter namedtype(select * from some_table where column= :type), the binding hint isGET.type.For a REST data source, the binding hint is
GET.query_paramorGET.path_param, assuming aGEToperation on REST.
Binding Template Placeholder EL to a Business Object Method
Placeholder EL syntax:
#{owcp.appsint.method('displayName','','defaultValue','method binding hint','')} where:
-
owcp.appsint.methodis a keyword to indicate that this placeholder is to be bound to a business object method. Only placeholder EL that containsowcp.appsint.methodwill be bound to a business object method at runtime. -
displayNameis the placeholder display name of the attribute that will be shown to the user in the Define Data Visualization wizard Options page. -
defaultValueis the default value for the component to render it in JDeveloper for testing purposes. -
method binding hintis the xpath for the method, so that the exposed attribute in the EL is bound to the business object method by default.
Binding Template Placeholder EL to a Business Object Attribute and Parameter
Placeholder EL syntax:
#{owcp.appsint.inout('displayName','','defaultValue','attribute binding hint','parameter binding hint')} where:
-
owcp.appsint.inoutis a keyword to indicate that this placeholder is to be bound to a business object attribute and parameter. -
displayNameis the placeholder display name of the attribute that will be shown to the user in the Define Data Visualization wizard Options page. -
defaultValueis the default value for the component to render it in JDeveloper for testing purposes. -
attribute binding hintis the xpath (operationName.accessor1.accessor2.attribute) for the attribute, so that the exposed attribute in the EL is bound to the business object attribute by default. -
parameter binding hintis the xpath (operationName.parameter1) for the parameter, so that the exposed attribute in the EL is bound to the business object parameter by default.
Example: Binding Template Placeholder EL to a Business Object Attribute
This template placeholder EL will display as Name of the Employee in the Define Data Visualization wizard Options page and it will be bound to the business object attribute. Parent information is empty for the table component, as the table component does not depend on any parent.
<af:outputText value="#{owcp.appsint.data('Name of the Employee','row','John','GET.emp.name','')}" />
<af:table value="#{owcp.appsint.data('Name of the Employee','' ,None,'GET.emps.emp','')}"   id=”t1”>
   <af:column sortable="false" headerText="#{owcp.appsint.data('Fourth Column Header','t1','Column Header','GET.emps.emp.name','') }" id="c4">
      <af:outputText value="#{owcp.appsint.data('Fourth Column','t1','Text','GET.emps.emp.name','')}" id="ot4"/>
   </af:column>
</af:table>
Example: Search and Update Employee Data
This example illustrates placeholder EL that binds to a business object parameter, method, and attribute/parameter.
Assuming the REST data source supports GET and PUT operations:
-
For
GET- Retrieve employee based onid:- Query parameter:
id - Response Payload:
<employee><id>1</id><name>Arnold</name></employee>
- Query parameter:
-
For
PUT- Update employee:- Request Payload:
<employee><id>1</id><name>Arnold</name></employee>
Note:
Request payload containsidto which the update applies. - Request Payload:
The visualization template for this example may look as follows:
<?xml version='1.0' encoding='UTF-8'?>
<jsp:root xmlns:jsp="http://java.sun.com/JSP/Page" version="2.1" xmlns:af="http://xmlns.oracle.com/adf/faces/rich"
                                                                 xmlns:f="http://java.sun.com/jsf/core">
   <af:panelGridLayout id="pgl1">
      <af:gridRow id="gr1">
         <af:gridCell halign="stretch" valign="stretch" id="gc3">
            <af:panelHeader text="Update portal details" id="ph3"/>
            <af:panelFormLayout id="pfl4">
               <af:inputText label="id" editable="always" value="#{owcp.appsint.parameter('id','','','GET.id','')}" id="search1"/>
               <af:spacer height="20" id="s2"/>
               <af:button text="Search emp" id="b1" actionListener="#{owcp.appsint.method('Search emp','','None','GET','')}"/>
               <af:inputText label="name" value="#{owcp.appsint.inoutdata('name','','','GET.employee.name','PUT.employee.name')}"
                             id="it8" partialTriggers="::b1"/>
               <af:inputText label="id" value="#{owcp.appsint.inoutdata('id','','','GET.id','PUT.employee.id')}"
                             id="it10" partialTriggers="::b1"/>
               <af:spacer height="20" id="s6"/>
               <af:button text="Update employee" id="b3" actionListener="#{owcp.appsint.method('update employee','','None','PUT','')}"/>
            </af:panelFormLayout>
         </af:gridCell>
      </af:gridRow>
   </af:panelGridLayout>
</jsp:root>
9.4 Publishing a Visualization Template
After creating a WebCenter Portal asset application and editing the JSFF file for the visualization template, the next step is to publish it and test it in WebCenter Portal. For instructions on how to publish a visualization template to WebCenter Portal as a shared asset, or to a specific portal as a portal asset, see Publishing WebCenter Portal Assets.
9.5 What Happens at Runtime
When an application specialist or portal manager configures a data visualization at runtime and selects a custom visualization template, WebCenter Portal dynamically renders the wizard’s Options page based on the placeholder EL that needs to be bound to business object attributes.
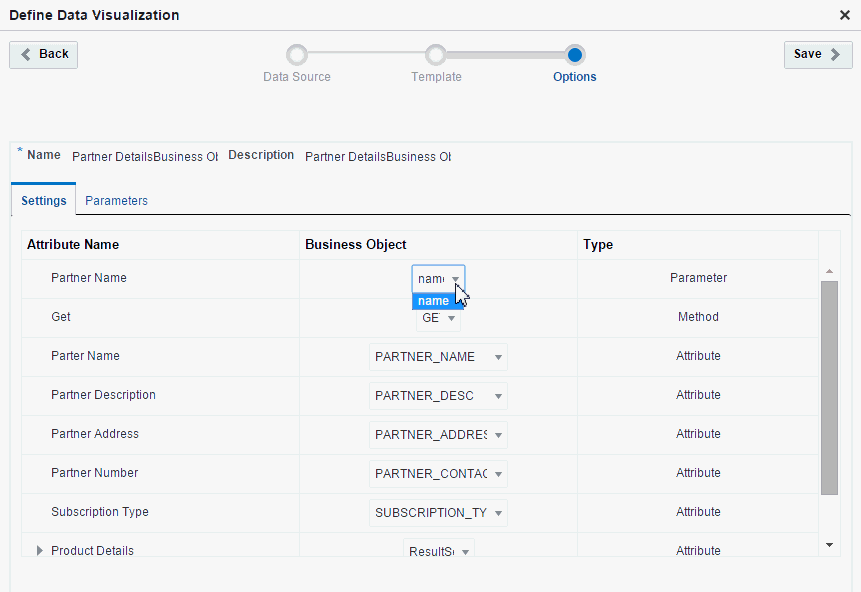
Figure 9-4 shows an example Options page for a custom visualization template selected in the Define Data Visualization wizard.
Figure 9-4 Define Data Visualization Wizard: Options Page

When the user clicks Save in the Define Data Visualization wizard, WebCenter Portal assigns the selected business object attributes to the visualization template. The page definition is also updated with the associated information. For example, before binding, the visualization template code for the Partner Name parameter value shown in Figure 9-4 may look like this:
...
<af:panelLabelAndMessage label="Partner Name" id="plam3">
   <af:inputText simple="true" value="#{owcp.appsint.parameter('Partner Name','','None','GET.NAME','')}" id="it7"/>
</af:panelLabelAndMessage>
...
After binding, the visualization fragment will look like this:
...
<af:panelLabelAndMessage label="Partner Name" id="plam3">
   <af:inputText simple="true" value="#{bindings.name.inputValue}" id="it7"/>
</af:panelLabelAndMessage>
...

