73 Customizing Asset Forms for the Contributor Interface

When you customize asset forms in the Oracle WebCenter Sites: Contributor interface, you can also modify the asset form headers and also build single-valued and multi-valued attribute editors for some supported data types.

Topics:

73.1 About Asset Forms Customization

You can modify an asset form’s header and customize or build an attribute editor.

See Customizing Attribute Editorsand Building an Attribute Editor.

Note:

Unlike other components of the Contributor interface, asset forms are not in the Contributor framework. Therefore, requests for asset forms are not processed by the UI Controller.

73.2 Modifying the Header of Asset Forms

You can modify the header of an asset form by creating a custom assettype-specific element and including additional stylesheets or JavaScript code.

To modify the header of an asset form, create a custom assettype-specific element in the OpenMarket/Xcelerate/AssetType/<AssetTypeName>/ directory.

You can include additional stylesheets or JavaScript code instead of modifying the body of the HTML pages. The name of the element must be Header.

73.3 Building an Attribute Editor

You can create a custom attribute editor for the data types supported in WebCenter Sites. You can also customize the look and feel of some existing ready-to-use attribute editors.

See Customizing Attribute Editors.

This topic describes how to build a custom attribute editor that supports a single value of data type text, string, integer, or money. This section also provides pointers and sample code for implementing a multi-valued attribute editor for the same data types.

Note:

To create a custom attribute editor for the blob or asset data type, base your implementation on the UPLOADER attribute editor for the blob type and the PICKASSET attribute editor for the asset data type.

Topics:

73.3.1 Creating a Dojo Widget and its Template

This section describes how to create a Dojo widget to handle a single value of data type text, string, integer, or money.

This section includes the following topics:

73.3.1.1 Create a Template for the Dojo Widget

To create an HTML template for the Dojo widget:

  1. In your WebCenter Sites installation directory, navigate to the <context_root>/js/ directory.
  2. Create a new directory structure under the js directory as follows: extensions/dijit/templates.
  3. In the <context_root>/js/extensions/dijit/templates directory, create an HTML template file and give it a meaningful name; for example: MyWidget.html.
  4. In the HTML template file, define the look and feel of the new Dojo widget. The content of this HTML template would look similar to the following:
    <div>
       <div>
           <input type="text" dojoAttachPoint='inputNode'
            name='${name}'size='60' class='valueInputNode'>
           </input>
       </div>
    </div>
    

    If you use this code for the template, then the input node takes the input from the end user and the value of the input node is maintained in the Dojo widget which you create in Creating a Dojo Widget.

  5. Save your template file.

73.3.1.2 Creating a Dojo Widget

To create a Dojo widget:

  1. Navigate to the js/extensions/dijit directory of the WebCenter Sites installation.
  2. Create a dojo widget, for example, MyWidget.js (see the example below) by implementing the following mandatory functions:
    • _setValueAttr: This setter method sets the value of the attribute.

    • _getValueAttr: This getter method gets the attribute value.

    • isValid: This method runs validations to see if the given value is valid or not.

    • focus: This sets the focus on the attribute editor.

    • onChange: This method is called whenever the user updates the value of the attribute.

    • onBlur: This method updates the widget when the attribute value is entered by the user. An update is triggered when the user selects another field.

    dojo.provide('extensions.dijit.MyWidget');
    dojo.require('dijit._Widget');
    dojo.require('dijit._Templated');
    dojo.declare('extensions.dijit.MyWidget', [dijit._Widget, dijit._Templated], {
      //string.
      //The value of the attribute.
      value: '',
      //int
      //The Attribute editor's MAXALLOWEDCHARS should be assigned to this variable.
      //maxAllowedLength: 15,
      //string
      //   This variable is required only for single valued instance.
      //   The server should recieve information from input element with this name.
      name: '',
      //HTMLElement
      //   This stores the cached template of the widget's representation.
      templateString: dojo.cache('extensions.dijit', 'templates/MyWidget.html'),
      //string
      //   This class will be applied to the top div of widget.
      //   It will help in managing css well.
      baseClass: 'MyWidget',
      postCreate: function() {
          var self = this;
          // Do not allow typing characters more than allowed length.
             dojo.connect(this.inputNode, 'onkeypress', function(e) {
             if (this.value.length >= self.maxAllowedLength && e.keyCode !=
                 dojo.keys.BACKSPACE) 
             e.preventDefault();
          });
    },
    // Start -  Mandatory functions
    _setValueAttr: function(value) {
        //  summary:
        //     Set the value to 'value' attribute and input node
        if (value === undefined || !this._isValid(value)) return;
        this.value = value;
        this._setInputNode(value);
    },
    _getValueAttr: function() {
       // summary:
       //Get the latest value and return it.
       return this.value;
    },
    _isValid: function(newVal) {
       //summary:
       //Verify if the given value is as per the expectation or not.
       if (newVal.length > this.maxAllowedLength) {
       return false;
    }
       return true;
    },
       focus: function() {
       //summary:
       //Set the focus to the representation node, that is, input node here.
       if (typeof this.inputNode.focus === 'function')
       this.inputNode.focus();
    },
    onBlur: function() {
       //summary:
       //Custom selected browser event when the value should be updated
       //Any activity which leads to value change should update 
       //the widget value as well.
       this.updateValue();
    },
    _onChange: function(newValue) {
       //summary:
       //Internal onChange method
       this.onChange(newValue);
    },
    onChange: function(newValue) {
       //summary:
       //A public hook for onChange.
    },
       // End -  Mandatory functions
       // Extra functions used in Mandatory functions
    _setInputNode: function(value) {
      //summary:
      //Sets the value to input node.
      this.inputNode.value = value;
    },
    updateValue: function() {
      //summary:
      //Validate the newly entered value and if it is successful 
      //then update widget's value.
      var newVal = this.inputNode.value;
      if (!this._isValid(newVal)) return;
      if (this.value != newVal)
      this._onChange(newVal);
      this.set('value', newVal);
    }
    });
    

    Note:

    For information about creating Dojo widgets, see:

    http://dojotoolkit.org/

  3. Create the js/extensions/themes/directory, create a CSS (for example, MyWidget.css) for this widget. Use the following code in the CSS file, or write your own code:
    .fw .MyWidget .valueInputNode {
    color: blue;
    }
    
  4. In the js/extensions/themes/directory, create the UI.css with an import statement for the Dojo widget's CSS. For example, @import url("MyWidget.css");
  5. Save your work.

73.3.2 Defining the Attribute Editor as a Presentation Object

This section describes how to define input tags (presentation objects) for flex attributes. It also describes how to assign arguments that the input tags can pass from the attribute editor to the display elements.

To define the attribute editor:

  1. In your WebCenter Sites installation, navigate to the <OracleHome>\wcsites\webcentersites\sites-home\sites.war\WEB-INF\sites\presentationobject.dtd file, or to the <OracleHome>\wcsites\webcentersites\sites-home\sites-samples.war\WEB-INF\sites\presentationobject.dtd file (whichever path applies to your installation).
  2. In the presentationobject.dtd file, do the following;
    • Add a new tag (presentation object) to the list in the <!ELEMENT PRESENTATIONOBJECT …> statement. In this example, the new tag is named MYATTREDITOR.

      In the following line, MYATTREDITOR is the custom attribute editor whose name matches the name of the element you create in Creating the Attribute Editor Element. All other tags are ready-to-use attribute editors.

      <!ELEMENT PRESENTATIONOBJECT (TEXTFIELD | TEXTAREA | PULLDOWN | RADIOBUTTONS | CHECKBOXES | PICKFROMTREE | EWEBEDITPRO | REMEMBER |
      PICKASSET | FIELDCOPIER | DATEPICKER | IMAGEPICKER | REALOBJECT | 
      CKEDITOR | DATEPICKER | IMAGEPICKER | REALOBJECT | CKEDITOR | FCKEDITOR | UPLOAD | MAGEEDITOR | RENDERFLASH | PICKORDERASSET | TYPEAHEAD | UPLOADER |
      MYATTREDITOR)>
      
    • Add an <!ELEMENT … > section that defines the new tag (presentation object) and the arguments it takes. This new tag includes elements that supply the logic behind the format and behavior of the attribute when it is displayed on a form. Ensure that MAXALLOWEDCHARS is marked as a required attribute.

      <!ELEMENT MYATTREDITOR ANY>
      <!ATTLIST MYATTREDITOR MAXALLOWEDCHARS CDATA #REQUIRED>
      <!ATTLIST MYATTREDITOR MAXVALUES CDATA #IMPLIED>
      
    • Save and close the presentationobject.dtd file.

73.3.3 Creating the Attribute Editor Element

This section describes how to create an element that shows an "edit" view of an attribute (single-valued) when it displays in a New or Edit form. This element must be located in the OpenMarket/Gator/AttributeTypes directory in the ElementCatalog table. The element name must exactly match the name of the tag you defined in Defining the Attribute Editor as a Presentation Object, so that it can be invoked by the tag (in this example, MYATTREDITOR).

  1. Navigate to the OpenMarket/Gator/AttributeTypes directory in your ElementCatalog.
  2. Create an attribute element for your new editor (in this example, MYATTREDITOR.jsp.) Ensure that the name of this element matches the tag name you defined in the presentationobject.dtd file.
  3. To prevent the default rendering of the attribute editor, set the doDefaultDisplay variable to no.
  4. To display the attribute name, call the element OpenMarket/Gator/FlexibleAssets/Common/DisplayAttributeName. The code is:
    <ics:callelement
      element="OpenMarket/Gator/FlexibleAssets/Common/DisplayAttributeName"/>
    
  5. To render the widget, call the element OpenMarket/Gator/AttributeTypes/CustomTextAttributeEditor by using the following parameters:
    • editorName: Name of the widget created in Creating a Dojo Widget. In this example it is extensions.dijit.MyWidget.

    • editorParams: This argument passes the JSON string of parameters to the widget. In this example, it passes the maxAllowedLength value. For example, the value can look like this: { maxAllowedLength: "10" }

    • maximumValues: Required only for a multi-valued widget. This is the maximum number of values allowed to be rendered in a multi-valued widget.

      For a single-valued widget, the complete code with the initialization parameters and formatting styles should look like the code in the following code example.

    If you use the code given in the following example, then the single-valued attribute editor would look like the editor.

    Figure 73-1 Single-Valued Attribute Editor

    Description of Figure 73-1 follows
    Description of "Figure 73-1 Single-Valued Attribute Editor"

    Note:

    In the example below, the following core logic is implemented to render the single-valued attribute using the new attribute editor:

    <ics:if condition='<%= "no".equals(ics.GetVar("MultiValueEntry")) %>'>
    <ics:then>
         <div dojoType='<%= ics.GetVar("editorName") %>'
         name='<%= ics.GetVar("cs_SingleInputName") %>'
         value='<%= attributeValue %>'
         >
         </div>
    </ics:then>
    

    The name that is coded in the element must be ics.GetVar("cs_SingleInputName") to ensure that the input node in the Dojo template has the same name. The input node value is sent to the server for saving the attribute.

    <%@ taglib prefix="cs" uri="futuretense_cs/ftcs1_0.tld" %>
    <%@ taglib prefix="ics" uri="futuretense_cs/ics.tld" %>
    <%@ taglib prefix="satellite" uri="futuretense_cs/satellite.tld" %>
    <%//
    // OpenMarket/Gator/AttributeTypes/MYATTREDITOR
    //
    // INPUT
    //
    // OUTPUT
    //%>
    <%@ page import="COM.FutureTense.Interfaces.FTValList" %>
    <%@ page import="COM.FutureTense.Interfaces.ICS" %>
    <%@ page import="COM.FutureTense.Interfaces.IList" %>
    <%@ page import="COM.FutureTense.Interfaces.Utilities" %>
    <%@ page import="COM.FutureTense.Util.ftErrors" %>
    <%@ page import="COM.FutureTense.Util.ftMessage"%>
    <cs:ftcs>
    <ics:setvar name="doDefaultDisplay" value="no" />
    <script>
         dojo.require('extensions.dijit.MyWidget');
    </script>
    <link href="<%=ics.GetVar("cs_imagedir")%>/../js/extensions/themes/MyWidget.css"
         rel="stylesheet" type="text/css"/>
    <%
    FTValList args = new FTValList();
    args.setValString("NAME", ics.GetVar("PresInst"));
    args.setValString("ATTRIBUTE", "MAXALLOWEDCHARS");
    args.setValString("VARNAME", "MAXALLOWEDCHARS");
    ics.runTag("presentation.getprimaryattributevalue", args);
    args.setValString("NAME", ics.GetVar("PresInst"));
    args.setValString("ATTRIBUTE", "MAXVALUES");
    args.setValString("VARNAME", "MAXVALUES");
    ics.runTag("presentation.getprimaryattributevalue", args);
    String maximumValues = ics.GetVar("MAXVALUES");
    maximumValues = null == maximumValues ? "-1" : maximumValues;
    String editorParams = "{ maxAllowedLength: " 
         + ics.GetVar("MAXALLOWEDCHARS") + " }";
    %>
    <tr>
    <ics:callelement
      element="OpenMarket/Gator/FlexibleAssets/Common/DisplayAttributeName"/>
        <td></td>
        <td>
        <ics:callelement
          element="OpenMarket/Gator/AttributeTypes/CustomTextAttributeEditor">
             <ics:argument name="editorName" value="extensions.dijit.MyWidget" />
             <ics:argument name="editorParams" value='<%= editorParams %>' />
             <ics:argument name="maximumValues" value="<%= maximumValues %>" />
    </ics:callelement>
        </td>
     </tr>
    </cs:ftcs>


73.3.4 Creating the Attribute Editor

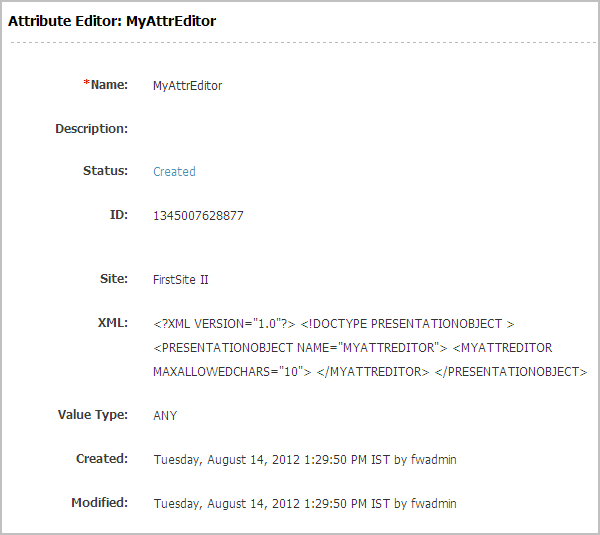
This topic describes how to create an attribute editor asset to make it available to content contributors on their content management sites. This asset supports the input types you defined in Creating the Attribute Editor Element, for example, check boxes, radio options, and drop-down lists. The developer selects this editor when creating or modifying the attribute.

  1. Open the Admin interface of your site.
  2. On the New page, under the Name column, click New Attribute Editor.
  3. For Name, enter a meaningful name for your editor. For example, MyAttrEditor.
  4. For XML, enter the XML code for your attribute editor. Ensure that the name of the attribute editor in this code is exactly the same as the element name. For example:
    <?XML VERSION="1.0"?> 
    <!DOCTYPE PRESENTATIONOBJECT >
    <PRESENTATIONOBJECT NAME="MYATTREDITOR">
    <MYATTREDITOR MAXALLOWEDCHARS="10"> </MYATTREDITOR> </PRESENTATIONOBJECT>
    
  5. For Attribute Type, accept the appropriate value(s).
  6. Click the Save icon.

    The attribute editor similar to the editor in the following figure is created.

    Figure 73-2 Sample Attribute Editor for a Site

    Description of Figure 73-2 follows
    Description of "Figure 73-2 Sample Attribute Editor for a Site"

73.3.5 Implementing a Multi-Valued Attribute Editor

In Creating the Attribute Editor Element, the second example shows the implementation for a single-valued attribute editor.

  • To implement a multi-valued attribute editor for text, integer, string, or money data types, write a code similar to the code in the following example:

    <%@ taglib prefix="cs" uri="futuretense_cs/ftcs1_0.tld" %>
    <%@ taglib prefix="ics" uri="futuretense_cs/ics.tld" %>
    <%@ taglib prefix="satellite" uri="futuretense_cs/satellite.tld" %>
    <%//
    // OpenMarket/Gator/AttributeTypes/CustomTextAttributeEditor
    //
    // INPUT
    //
    // OUTPUT
    //%>
    <%@ page import="COM.FutureTense.Interfaces.FTValList" %>
    <%@ page import="COM.FutureTense.Interfaces.ICS" %>
    <%@ page import="COM.FutureTense.Interfaces.IList" %>
    <%@ page import="COM.FutureTense.Interfaces.Utilities" %>
    <%@ page import="COM.FutureTense.Util.ftErrors" %>
    <%@ page import="COM.FutureTense.Util.ftMessage"%>
    <cs:ftcs>
    <%
    IList attributeValueList = ics.GetList("AttrValueList", false);
    boolean hasValues = null != attributeValueList && attributeValueList.hasData();
    String attributeValue = hasValues ? attributeValueList.getValue("value") : "";
    %>
    <ics:if condition='<%= "no".equals(ics.GetVar("MultiValueEntry")) %>'>
    <ics:then>
           <div dojoType='<%= ics.GetVar("editorName") %>'
                name='<%= ics.GetVar("cs_SingleInputName") %>'
                value='<%= attributeValue %>'
           >
           </div>
    </ics:then>
    <ics:else>
    <ics:callelement
      element="OpenMarket/Gator/AttributeTypes/RenderMultiValuedTextEditor">
        <ics:argument name="editorName" 
          value='<%= ics.GetVar("editorName") %>' />
        <ics:argument name="editorParams" 
          value='<%= ics.GetVar("editorParams") %>' />
        <ics:argument name="multiple" 
          value="true" />
        <ics:argument name="maximumValues" 
          value='<%= ics.GetVar("maximumValues") %>' />
    </ics:callelement>
    </ics:else>
    </ics:if>
    </cs:ftcs>
    

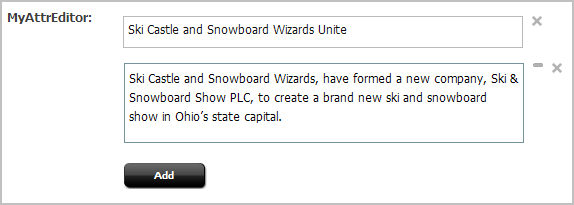
    If the code in the example above is used, then the multi-valued attribute editor looks similar to the editor in this figure.

    Figure 73-3 Multi-Valued Attribute Editor
    Description of Figure 73-3 follows
    Description of "Figure 73-3 Multi-Valued Attribute Editor"

    Note the following points about the code example:

    • You can instantiate a multi-valued widget, which uses a single-valued widget to render multi-valued representations.

    • The MultiValueEntry variable with the no value indicates that the attribute editor renders a single value. Changing the variable value to yes enables the attribute editor to render multiple values.

    • You can implement a multi-valued widget that accepts values in the JSON object or in any other format.

    • For a multi-valued attribute editor, the RenderMultiValuedTextEditor element creates hidden input nodes required for Save logic. The value of each node is sent to the server.

    • The multi-valued widget is rendered by calling the OpenMarket/Gator/AttributeTypes/RenderMultiValuedTextEditor element using the following code in the previous example:

      <ics:else>
        <ics:callelement
          element="OpenMarket/Gator/AttributeTypes/RenderMultiValuedTextEditor">
                <ics:argument name="editorName" 
                 value='<%= ics.GetVar("editorName") %>' />
                <ics:argument name="editorParams" 
                 value='<%= ics.GetVar("editorParams") %>' />
                <ics:argument name="multiple" 
                 value="true" />
                <ics:argument name="maximumValues" 
                  value='<%= ics.GetVar("maximumValues") %>' />
           </ics:callelement>
      </ics:else>
      </ics:if>
      
  • To create a custom attribute editor for the blob or asset data type, base your implementation on the UPLOADER attribute editor for the blob type and the PICKASSET attribute editor for the asset data type.