5 Creating the Source Files for an ADF Skin
This chapter includes the following sections:
5.1 About Creating an ADF Skin
An ADF skin defines the properties for the selectors that ADF Faces and ADF Data Visualization components expose.
Using the editor in JDeveloper, you can create a source file for an ADF skin. As a source file for an ADF skin is a type of CSS file, you could create it without using an editor. However, when you use the editor, associated configuration files get created (the first time that you create an ADF skin) or modified (when you create subsequent ADF skins). For information about these configuration files, see Configuration Files for an ADF Skin.
5.2 Creating an ADF Skin File
Create an ADF skin file in JDeveloper that defines how ADF Faces and ADF Data Visualization components render at runtime.
The ADF skin that you create must extend either one of the ADF skins that Oracle ADF provides or from an existing ADF skin that you created. The ADF skins that Oracle ADF provides vary in the level of customization that they define for ADF Faces and ADF Data Visualization components. For information about the inheritance relationship between the ADF skins that Oracle ADF provides, see Inheritance Relationship of the ADF Skins Provided by Oracle ADF . For information about the levels of customization in the ADF skins provided by Oracle ADF and for a recommendation about the ADF skin to extend, see ADF Skins Provided by Oracle ADF.
By default, the editors in JDeveloper create ADF skins for the org.apache.myfaces.trinidad.desktop render kit. A render kit defines how ADF Faces components map to component tags that are appropriate for a particular client.
After you create an ADF skin, you can use the design editor and the other provided editors to modify the values for the selectors that the ADF Faces and ADF Data Visualization components expose. Otherwise, the ADF skin that you create defines the same appearance as the ADF skin from which it extends. See Working with Component-Specific Selectors .
If you create an ADF skin that extends from the Skyros ADF skin, you enable the design editor. This tab provides an overview pane where you can use controls to set properties for many frequently-used selectors. For information about using the design editor, see Working with the ADF Skin Design Editor.
5.2.1 How to Create an ADF Skin in JDeveloper
You can create an ADF skin in JDeveloper.
To create an ADF skin in JDeveloper:
5.2.2 What Happens When You Create an ADF Skin
If you accepted the default value proposed for the Directory field, a file with the extension .css is generated in a subdirectory of the skins directory in your project.
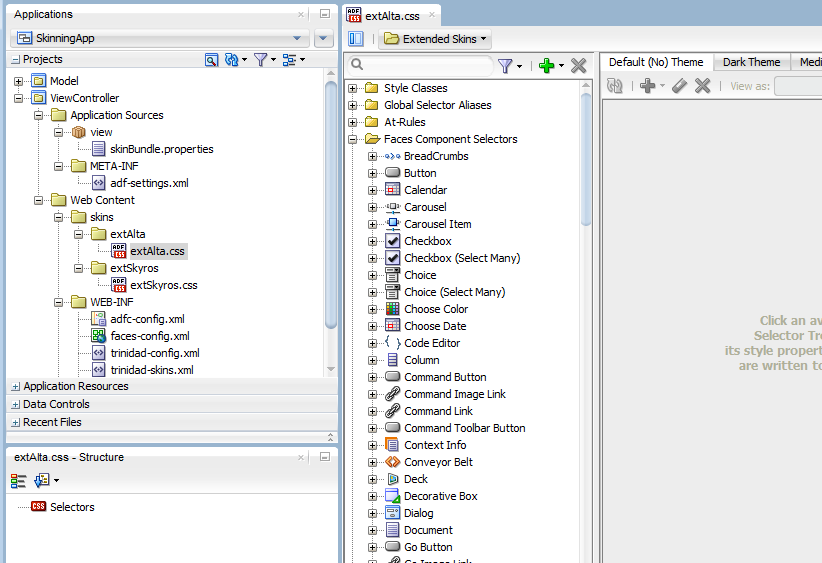
An ADF skin that extends the Alta skin opens in the selectors editor, as illustrated in Figure 5-1. This selectors editor is also available if you create an ADF skin that extends from the Skyros ADF skin.
Figure 5-1 Newly-Created ADF Skin that Extends from Alta in the Selectors Editor

Description of "Figure 5-1 Newly-Created ADF Skin that Extends from Alta in the Selectors Editor"
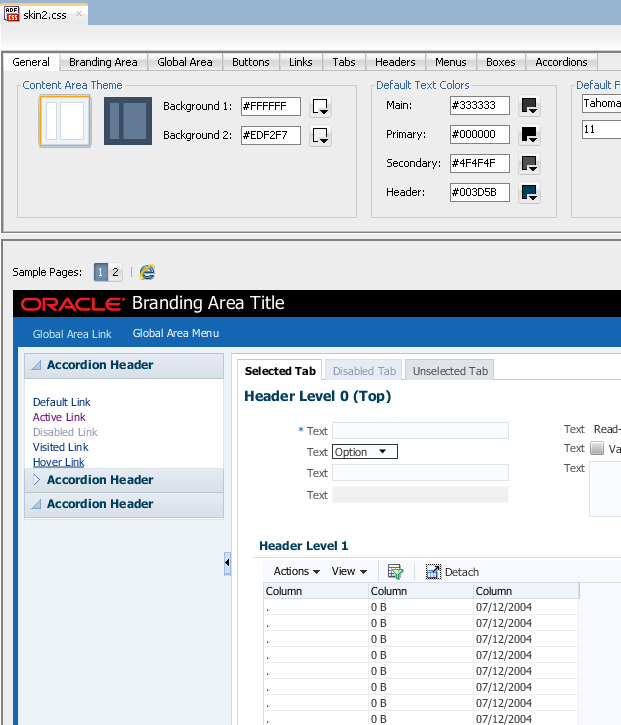
An ADF skin that extends the Skyros ADF skin opens in the design editor, as illustrated in Figure 5-2.
Figure 5-2 Newly-Created ADF Skin that Extends from Skryos in the Design Tab

Description of "Figure 5-2 Newly-Created ADF Skin that Extends from Skryos in the Design Tab"
The trinidad-skins.xml file is modified to include metadata for the ADF skin that you create, as illustrated in Example 5-1, which shows entries for an ADF skin that extends from the Skyros family of ADF skins. Example 5-1 also contains values that specify the render kit and the resource bundle associated with this ADF skin. For information about resource bundles, see Working With Text in an ADF Skin.
If you select the Use as the default skin family for this project check box in the Create ADF Skin dialog, the trinidad-config.xml file is modified to make the new ADF skin the default skin for your application. This means that if you run the application from JDeveloper, the application uses the newly-created ADF skin. See Applying an ADF Skin to Your Web Application. The following example shows a trinidad-config.xml file that makes the ADF skin in Example 5-1 the default for an application.
<?xml version="1.0" encoding="windows-1252"?>
<trinidad-config xmlns="http://myfaces.apache.org/trinidad/config">
  <skin-family>skin2</skin-family>
</trinidad-config>
The source file for the ADF skin contains a comment and namespace references, as illustrated in the following example. These entries in the source file for the ADF skin distinguish the file from non-ADF skin files with the .css file extension. A source file for an ADF skin requires these entries in order to open in the design or selectors editors for the ADF skin.
/**ADFFaces_Skin_File / DO NOT REMOVE**/
@namespace af "http://xmlns.oracle.com/adf/faces/rich";
@namespace dvt "http://xmlns.oracle.com/dss/adf/faces";
The first time that you create an ADF skin in your project, a resource bundle file (skinBundle.properties) is generated, as illustrated in Figure 5-1. For information about using resource bundles, see Working With Text in an ADF Skin.
Example 5-1 trinidad-skins.xml File
<?xml version="1.0" encoding="windows-1252"?>
<skins xmlns="http://myfaces.apache.org/trinidad/skin">
  ....
  <skin>
    <id>skin2.desktop</id>
    <family>skin2</family>
    <extends>skyros-v1.desktop</extends>
    <render-kit-id>org.apache.myfaces.trinidad.desktop</render-kit-id>
    <style-sheet-name>skins/skin2/skin2.css</style-sheet-name>
    <bundle-name>resources.skinBundle</bundle-name>
  </skin>
</skins>
5.3 Importing One or More ADF Skins Into the Current ADF Skin
Import another ADF skin that is in your JDeveloper project into your ADF skin using the @import rule.
This makes the style properties defined in the latter ADF skin available to your ADF skin. The following examples demonstrate the valid syntax to import an ADF skin (skinA) into the current ADF skin:
/** Use the following syntax if skinA.css is in the same directory **/
@import "skinA.css";
@import url("skinA.css");

/** Use the following syntax if skinA.css is in another directory **/
@import "../skinA/skinA.css";
@import url("../skinA/skinA.css");
The @import rule(s) must follow all @charset rules and precede all other at-rules and rule sets in an ADF skin, as shown in the following example that imports two ADF skins into the current ADF skin:
     @charset "UTF-8";

@import url("../skinA/skinA.css");
@import url("../skinB/skinB.css");

/**ADFFaces_Skin_File / DO NOT REMOVE**/
@namespace af "http://xmlns.oracle.com/adf/faces/rich";
@namespace dvt "http://xmlns.oracle.com/dss/adf/faces";

af|inputText{
    background-color: Green;
}
...
5.4 Adding ADF Skins from an ADF Library JAR
Add ADF skins that have been packaged in a JAR file into your JDeveloper project. When you add an ADF skin into your project, it is available to extend from when you create a new ADF skin.
The recommended type of JAR file to use to package an ADF skin is an ADF Library JAR file. For information about how to package an ADF skin into this type of JAR file, see Packaging an ADF Skin into an ADF Library JAR.
5.4.1 How to Add an ADF Skin from an ADF Library JAR
You can add ADF skins into your project that have been packaged in a JAR file.
To add an ADF skin from an ADF Library JAR:
5.4.2 What Happens When You Import an ADF Skin from an ADF Library JAR
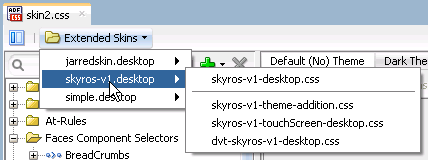
The ADF skin(s) that you add from the JAR file appear in the Extends list when you create a new ADF skin, as described in Creating an ADF Skin File. After you create a new ADF skin by extending an ADF skin that you added from a JAR file, the Extended Skins list in the selectors editor's Preview Pane displays the name of the ADF skin that you added. For example, in Figure 5-3 the skin2.css ADF skin has been created by extending the ADF skin, jarredskin.css, that was added into the project from a JAR file.
Figure 5-3 Imported ADF Skin in the Extended Skins List

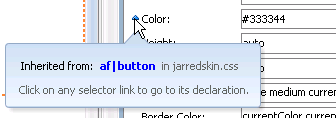
Properties that have been defined in the ADF skin that you added appear with a blue upward pointing arrow in the Properties window. An information tip about the inheritance relationship displays when you hover the mouse over the property, as illustrated in Figure 5-4.
Figure 5-4 Property Inherited from an Imported ADF Skin
