8 Configuring System Maintenance Properties
It covers the following topics:
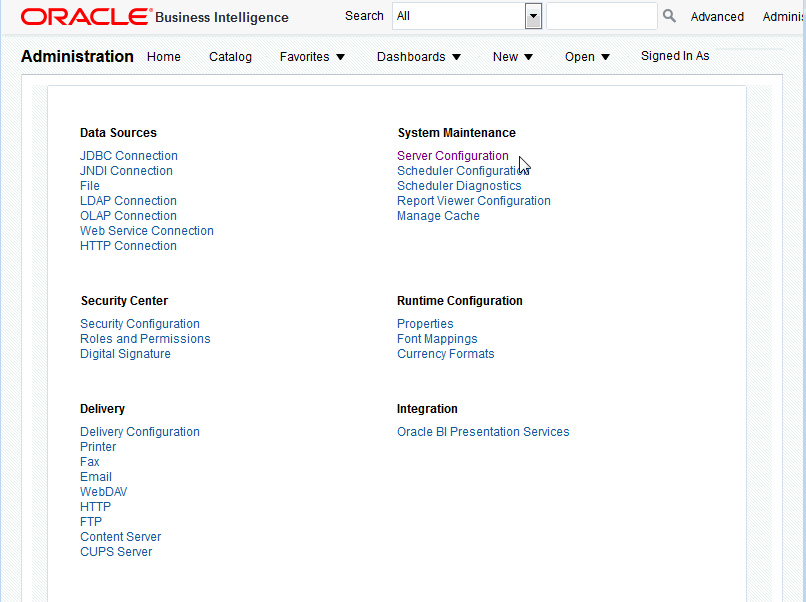
Navigating to the System Maintenance Properties
You navigate to the System Maintenance properties from the Administration page.
Configuring the Catalog
You can configure the catalog location by changing the SDD (Singleton Data Directory) path. The default SDD path is DOMAIN_HOME/bidata.
In Oracle Business Intelligence 12c, for metadata and other cross-cluster files, there is one SDD (Singleton Data Directory) for each domain. You can change the SDD path in the DOMAIN_HOME/config/fmwconfig/bienv/core/bi-environment.xml file. See Changing the Singleton Data Directory (SDD) in System Administrator's Guide for Oracle Business Intelligence Enterprise Edition.
BI Publisher supports:
-
Oracle BI Publisher file system catalog for installations of BI Publisher that are not integrated with Oracle Business Intelligence Enterprise Edition. When using file systems such as NFS, Windows, or NAS for the repository, ensure that the file system is secured.
-
Shared Oracle BI EE Presentation catalog for installations of BI Publisher integrated with the Oracle Business Intelligence Enterprise Edition.
Configuring the BI Search Fields
If you have configured Oracle Business Intelligence with Oracle Secure Enterprise Search (Oracle SES), configure certain fields to enable the full text search for BI Publisher objects.
Prerequisites
Before configuring the fields in BI Publisher, you must first perform the following:
- Set up Oracle Secure Enterprise Search (Oracle SES).
- Integrate Oracle SES with Oracle Business Intelligence Presentation Services.
For completing the prerequisites and configuring for full-text catalog search, see System Administrator's Guide for Oracle Business Intelligence Enterprise Edition.
Enter the following fields in BI Publisher:
- BI Search URL - enter the basic URL for Oracle Business Intelligence, adding the search context name; takes the format:
http://computer_name:port/bisearch -
BI Search URL Suffix — this field defaults to "rest/BISearchQueryService/search". Do not edit this field.
-
BI Search Group name — enter the name of the search group that you created in Oracle SES, for example: bisearch_ws
-
BI Search Timeout (millisecond) — enter the maximum number of milliseconds that Oracle BI Publisher waits for a response to return with search results. This field defaults to 22000.
The figure below shows the BI search fields.
Setting General Properties
The general properties region includes the following settings:
System Temporary Directory
This section includes the topics about setting a system temporary directory.
Topics include:
About Temporary Files
BI Publisher creates both temporary and cache files.
Temporary files:
-
Temporary files created by the formatting engines (FO processor, PDF Form Processor, PDF generators and so on)
-
Data Files
These files are removed after the reports generate successfully.
Dynamic image files for HTML output:
-
Dynamic charts
-
Embedded images in RTF templates
Cache files:
-
Data cache
-
LOV (List of Values) cache
-
Document Cache
-
XSL Cache from RTF templates
Setting the System Temporary Directory
If you do not specify a temporary directory here, temporary files and dynamic image files are generated under {bip_deployment_directory}/xdo/tmp. Cache files are generated under {bip_deployment_directory}/xdo/cache.
When you configure a System Temporary Directory using this field, for example: "/disk1/BIP_Temp", the BI Publisher server automatically creates the following directories:
-
/disk1/BIP_Temp/xdo
-
/disk1/BIP_Temp/xdo/tmp
-
/disk1/BIP_Temp/xdo/cache
Temporary files are generated under /disk1/BIP_Temp/xdo/tmp.
Cache files are generated under /disk1/BIP_Temp/xdo/cache.
Dynamic image files are still created in the {bip_deployment_directory}/xdo/tmp directory and are not affected by this configuration.
Whenever the BI Publisher server is restarted, any files under /disk1/BIP_Temp/xdo are removed.
Note:
When using the BI Publisher web services uploadReportDataChunk() or downloadReportDataChunk() in a clustered environment, you must set the System Temporary Directory to be a shared directory accessible to all servers within the cluster.
You must enter the absolute path to the directory. For example, the directory can exist under ${xdo.server.config.dir}/temp but you must enter the absolute path, such as /net/subfoldera/scratch/subfolderb/12ccat/temp
Repeat this procedure for all servers in the cluster, entering the same value for System Temporary Directory.
Sizing the System Temporary Directory
Sizing requirements depend on how large the generated data files and reports are, how many reports enabled cache, and the number of concurrent users.
If you must process 1 GB of data and then to generate a report that is 1 GB, then the temp disk should have more than 2 GB of disk space for a single report run. If you require ten concurrent report runs of similarly sized reports, then more than 20 GB of disk space is required. In addition, if you must cache the data and reports for these ten users, you need additional 20 GB of disk space. Note that cache is per user.
Report Scalable Threshold
This property specifies the threshold at which data is cached on the disk.
When the data volume is large, caching the data saves memory, but results in slower processing. Enter a value in bytes. The default and general recommendation for this property is 1000000 (1 megabyte).
Setting Server Caching Specifications
When BI Publisher processes a report, the data and the report document are stored in cache.
Each item creates a separate cache file. Set the following properties to configure the size and expiration of this cache:
-
Cache Expiration — Enter the expiration period for the cache in minutes. The default is 30.
-
Cache Size Limit — Enter the maximum number of cached items to maintain regardless of the size of these items. The default is 1000.
When BI Publisher processes a report it stores the report definition in memory so that for subsequent requests for the same report the report definition can be retrieved from memory rather than from disk. Set the following property to configure this cache:
-
Maximum Cached Report Definitions — Enter the maximum number of report definitions to maintain in cache. The default is 50. You can specify the timeout for report definitions in the "Cache Expiration" box. If you do not specify the expiration, the default timeout is 20 minutes.
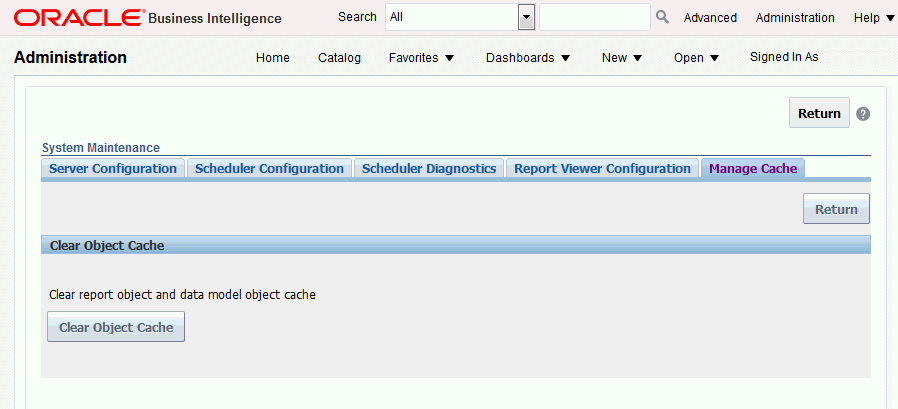
To manually purge this cache, use the Clear Object Cache button on the Manage Cache tab. See Clearing Report Objects from the Server Cache.
Note:
Report-specific caching of data sets can be set as a report property. See Configuring Report Properties in Report Designer's Guide for Oracle Business Intelligence Publisher.
Setting Retry Properties for Database Failover
If BI Publisher fails to connect to a data source through the defined JDBC or JNDI connection, then these properties control the number of retries that are attempted before switching to the backup connection for the database.
-
Number of Retries
Default value is 6. Enter the number of times to attempt to make a connection before switching to the backup database.
-
Retry Interval (seconds)
Default value is 10 seconds. Enter the number of seconds to wait before retrying the connection.
Enabling Monitor and Audit
This setting enables user auditing and monitoring in BI Publisher. Performance monitoring enables you to monitor the performance of queries, reports and document generation and to analyze the provided details.
Selecting the Enable Monitor and Audit check box on the Server Configuration page is the first step required for enabling performance monitoring and user auditing in your system.
For the complete steps, see About Performance Monitoring and User Auditing.
Setting Report Viewer Properties
The Report Viewer Configuration tab enables you to set the Show Apply Buttonreport viewer property .
When set to True, reports with parameter options display the Apply button in the report viewer. When a user changes the parameter values, he must click Apply to render the report with the new values.
When set to False, the report viewer does not display the Apply button. Instead, when a user enters a new parameter value, BI Publisher automatically renders the report after the new value is selected or entered.
This property can also be set at the report level to override the system setting. For information on setting the property at the report level, see Configuring Parameter Settings for the Report in Report Designer's Guide for Oracle Business Intelligence Publisher.
Clearing Report Objects from the Server Cache
Use the Manage Cache page to clear the server cache.
The server cache (Setting Server Caching Specifications) stores report definitions, report data, and report output documents. If you need to manually purge this cache (for example, after patching) use the Manage Cache page.
To manually clear this cache before the expiration:
Purging Job Diagnostics Log
Use the Manage Job Diagnostics Log page to purge old job diagnostics log.
The retention period of job diagnostic log is set to 30 days, by default. If you frequently enable diagnostic logs, these diagnostic logs might consume space in the database, and you might need to periodically free the space consumed by the old diagnostic logs.
- In Administration > System Maintenance page, click Manage Job Diagnostics Log.
- Click Purge log beyond retention period.


