16 Translating Individual Templates
This chapter includes the following sections:
Overview
This chapter describes how to create and upload translated template files when you want to provide translations only for specific templates.
The following template types can be translated individually:
-
RTF layout files
-
style templates
-
subtemplates
-
BI Publisher layouts (.xpt)
To translate the layouts within the broader scope of the catalog, see Translating Catalog Objects, Data Models, and Templates.
Types of Translations
You can add different types of translations to templates.
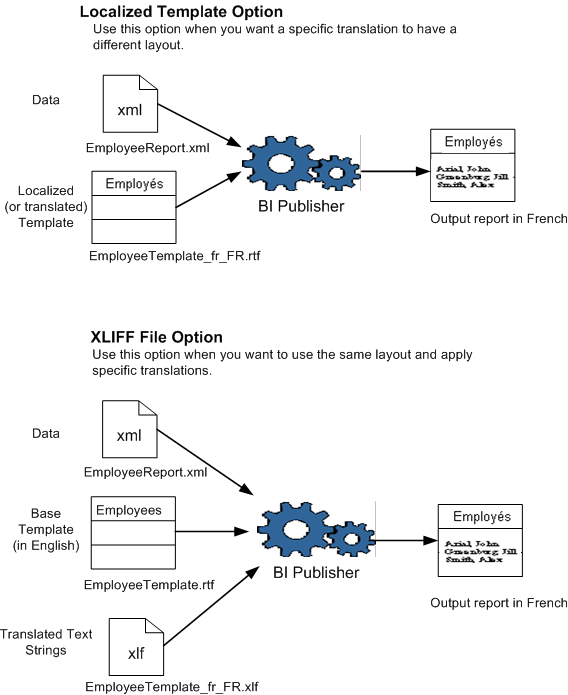
There are two options for adding translations for templates:
-
Create a separate RTF template that is translated (a localized template). This option is available for RTF templates only.
-
Generate an XLIFF from the original template. At runtime the original template is applied for the layout and the XLIFF is applied for the translation.
Use the first option if the translated template requires a different layout from the original template
If you require only translation of the text strings of the template layout, then use the XLIFF option.
The diagrams in the following graphic illustrate the translation concepts.
Using the XLIFF Option
The XLIFF option is used to translate files.
The following sections describe using the XLIFF option:
Generating the XLIFF from a Template
These sections describe the two methods for generating an XLIFF for a single template file.
-
Generating the XLIFF from the Template Builder (not supported for XPT templates)
Generating the XLIFF from the Template Builder
Follow these steps to generate the XLIFF from the template builder.
Note:
This procedure assumes that you have installed the BI Publisher Template Builder for Microsoft Word. See Creating RTF Templates Using the Template Builder for Word for information on downloading the add-in for Microsoft Word.
Generating the XLIFF from the Layout Properties Page
You can generate the XLIFF file for report layout templates or for style templates and subtemplates.
-
Navigate to the report in the catalog and click Edit to open it for editing.
-
From the thumbnail view of the report layouts, click the Properties link of the layout (RTF or XPT) to open the Layout Properties page.
-
In the Translations region, click Extract Translation.
BI Publisher extracts the translatable strings from the template and exports them to an XLIFF (.xlf) file.
-
Save the XLIFF file to a local directory.
Translating the XLIFF
When you have downloaded the XLIFF file, it can be sent to a translation provider, or using a text editor, you can enter the translation for each string.
See Structure of the XLIFF File for instructions on how to edit the XLIFF file.
A "translatable string" is any text in the template that is intended for display in the published report, such as table headers and field labels. Text supplied at runtime from the data is not translatable, nor is any text that you supply in the Microsoft Word form fields.
You can translate the template XLIFF file into as many languages as desired and associate these translations to the original template. See Uploading the Translated XLIFF to BI Publisher.
Note:
Ensure that when you save your translated file, you save it with UTF-8 encoding.Using the Localized Template Option
If you must design a different layout for the reports that you present for different localizations, then you can create a new RTF file that is designed and translated for the locale and upload this file to the Template Manager.
Note:
The localized template option is not supported for XPT templates.The following sections describe using the localized template option:
Designing the Localized Template File
Use the same tools that you used to create the base template file, translating the strings and customizing the layout as desired for the locale.
