4 Other Security Topics
It covers the following topics:
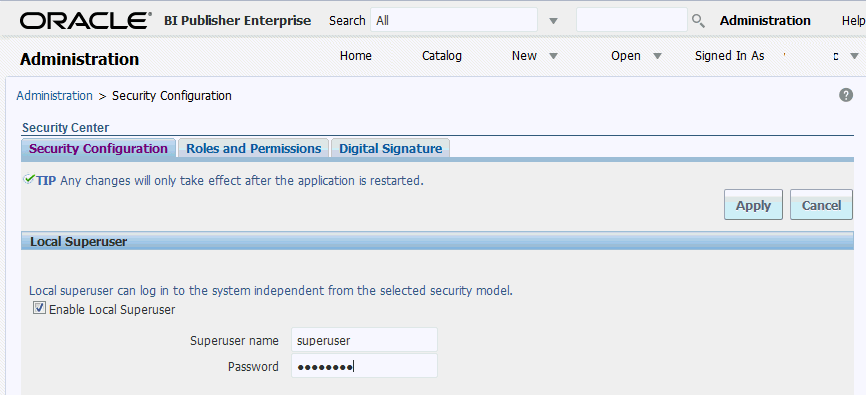
Enabling a Local Superuser
BI Publisher enables you to define an administration Superuser.
Using the Superuser credentials you can directly access the BI Publisher administrative functions without logging in through the defined security model.
Set up this Superuser to ensure access to all administrative functions in case of failures with the configured security model. It is highly recommended that you set up a Superuser. Catalog operations are not available to a Superuser, if BI Publisher is configured to use Oracle Business Intelligence Enterprise Edition catalog,
To enable a local superuser:
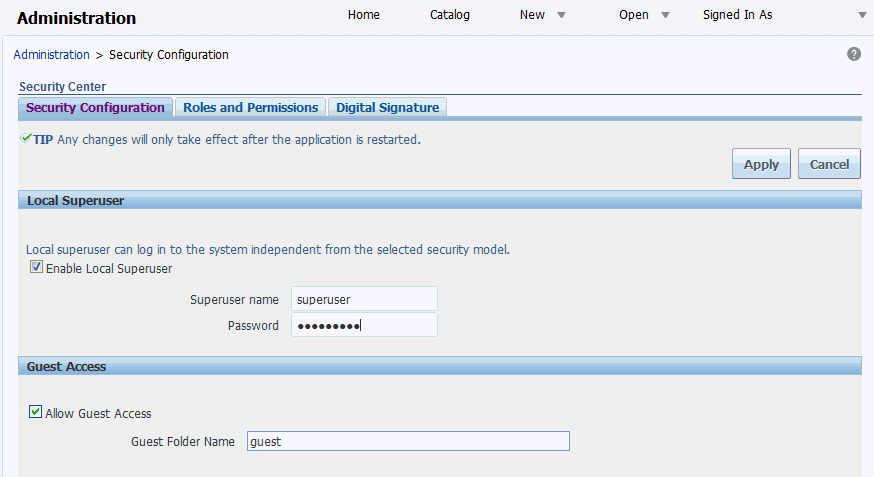
Enabling a Guest User
BI Publisher allows you configure public access to specific reports by defining a "Guest" folder. Any user can access the reports in this folder without entering credentials.
Note:
Guest access is not supported when BI Publisher uses a shared catalog or is installed with Oracle Business Intelligence Enterprise Edition.
Guest access is not supported with Single Sign-On.
All objects that are required to view a report must be present in the Guest folder because the Guest folder is the only folder the guest user has any access rights to. Therefore the report and the data model must be present in the Guest folder and Sub Templates and Style Templates, if applicable. The guest user must have read access only.
The Guest user must also be granted access to the report data source.
To enable guest access:
Users who access BI Publisher see the Guest button on the log on page. Users can click this button and view the reports in your chosen guest folder without presenting credentials.
Configuring BI Publisher for Secure Socket Layer (SSL) Communication
It is strongly recommended that you enable Secure Socket Layer (HTTPS) on the middle tier hosting the Web services because the trusted username/password that is passed can be intercepted.
This also pertains to Web services that are used for communication between BI Publisher and Oracle BI Presentation Services.
Tasks for enabling SSL with BI Publisher:
-
Adding the Virtualize Property to the Identity Store Configuration
-
Updating the JDBC Connection String to the Oracle BI EE Data Source
See Enabling End-to-End SSL in the Security Guide for Oracle Business Intelligence Enterprise Edition.
Importing Certificates for Web Services Protected by SSL
If you make calls to Web services that are protected through Secure Sockets Layer (SSL), then you must export the certificate from the Web server hosting the Web service and import it into the Java keystore on the computer that is running BI Publisher.
To import certificates for Web services:
These steps should not be required if the server certificate is linked to some certificate authority (such as Verisign). But if the Web service server is using a self-generated certificate (for example, in a testing environment), then these steps are required.
Adding the Virtualize Property to the Identity Store Configuration
You must add the property "virtualize" to the Identity Store Configuration in Fusion Middleware Control to enable SSL for BI Publisher.
To add the virtualize property:
-
Log in to Fusion Middleware Control 12c:
https://<Host>/<SecureAdminPort>/em -
Select WebLogic Domain, Security, and then Security Provider Configuration.
-
Expand the Security Store Provider segment.
-
Expand the Identity Store Provider segment.
-
Click Configure.
-
Click Add (+) to add a new property.
-
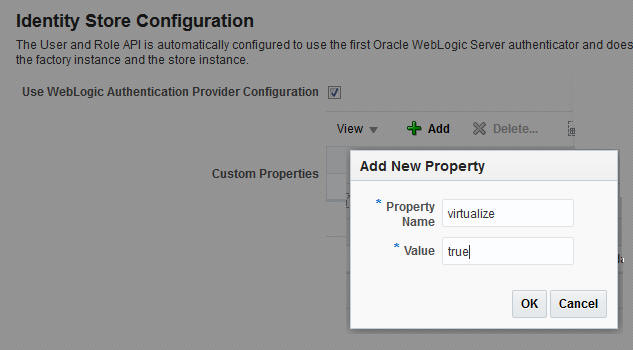
In the Add New Property dialog, enter
Property Name — virtualize
Value — true
-
-
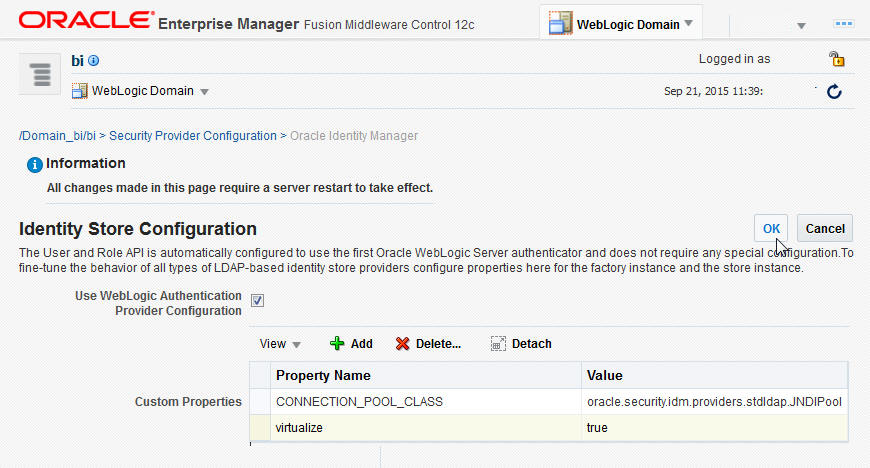
On the Identity Store Provide page, click OK.
-
Confirm that the property is added to the
jps-config.xmlfile:-
Open the
jps-config.xmlfile located in<DomainHome>/config/fmwconfig/jps-config.xml -
Ensure that the file contains the line:
<property name="virtualize" value="true"/>
-
Updating the JDBC Connection String to the Oracle BI EE Data Source
For BI Publisher to connect to Oracle BI EE as a data source when SSL is enabled, you must update the default connection string.
Follow the guidelines detailed in Setting Up a JDBC Connection to the Oracle BI Server.
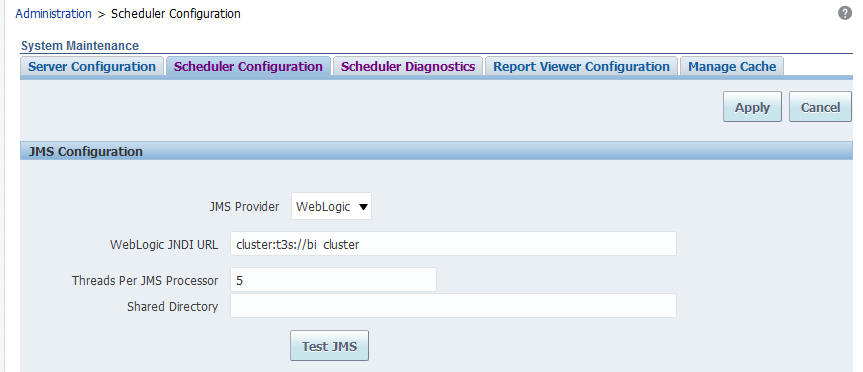
Updating the JMS Configuration
You update the Scheduler JMS configuration to use the SSL URL.
To update the JMS configuration:
-
On the BI Publisher Administration page, under System Maintenance, click Scheduler Configuration.
-
Update the WebLogic JNDI URL to use SSL. For example,
- Click Apply.
-
Select the Scheduler Diagnostics tab.
-
Verify that the connection passed diagnostics.
Configuring the Delivery Manager
If you want to use the default certificates built-in with BI Publisher, then no further configuration is required.
SSL works with the default certificate if the server uses the certificate signed by a trusted certificate authority such as Verisign.
If the user uses the SSL with a self-signed certificate, then the certificate information must be entered in the Delivery Configuration page, as described in Configuring Delivery Options. A self-signed certificate means that the certificate is signed by a non-trusted certificate authority (usually the user).
Enabling Secure Cookies
The cookie-secure flag tells the Web browser to only send the cookie back over an HTTPS connection.
This ensures that the cookie is transmitted only on a secure channel. HTTPS must be enabled for the URL exposed by the application.
To enable the cookie-secure flag, you must update the weblogic.xml within the xmlpserver.war file (within the xmlpserver.ear) as follows:
-
Locate the
xmlpserver.earfile underORACLE_HOME/bifoundation/jee/ -
Unpack the
xmlpserver.earfile. -
Unpack the
xmlpserver.warfile. -
Back up the
WEB-INF/weblogic.xmlfile. -
Open the
WEB-INF/weblogic.xmlfile. -
Add the following attributes to the
<wls:session-descriptor>:<wls:cookie-secure>true</wls:cookie-secure> <wls:url-rewriting-enabled>false</wls:url-rewriting-enabled>
Example:
<?xml version = '1.0' encoding = 'US-ASCII'?>
<wls:weblogic-web-app
xmlns:wls="http://xmlns.oracle.com/weblogic/weblogic-web-app"
xmlns:xsi="http://www.w3.org/2001/XMLSchema-instance"
xsi:schemaLocation="http://java.sun.com/xml/ns/javaee
http://java.sun.com/xml/ns/javaee/ejb-jar_3_0.xsd
http://xmlns.oracle.com/weblogic/weblogic-web-app
http://xmlns.oracle.com/weblogic/weblogic-web-app/1.2/weblogic-web-app.xsd">
  <wls:session-descriptor>
   <wls:cookie-path>/xmlpserver</wls:cookie-path>
   <wls:cookie-secure>true</wls:cookie-secure>
   <wls:url-rewriting-enabled>false</wls:url-rewriting-enabled>
  </wls:session-descriptor>
  <wls:context-root>xmlpserver</wls:context-root>
   <wls:library-ref>
...
-
Repack the
xmlpserver.warfile. -
Repack the
xmlpserver.earfile. -
Go to your WebLogic Server console and update the bipublisher deployment.
Configuring Proxy Settings
To use external Web Services or HTTP data sources when the BI Publisher server is configured behind a firewall or requires a proxy to access the internet, you must configure Oracle WebLogic Server to allow the Web service requests and to be aware of the proxy.
When configuring the proxy setting, you must also configure WebLogic Server to be aware of any hosts that BI Publisher must connect to directly (not through the proxy) for example, the Oracle BI Enterprise Edition host. Define the proxy host and the non-proxy hosts to WebLogic Server by setting the following parameters:
-
-Dhttp.proxyHost- specifies the proxy host. For example:-Dhttp.proxyHost=www-proxy.example.com
-
-Dhttp.proxyPort- specifies the proxy host port. For example:-Dhttp.proxyPort=80
-
-Dhttp.nonProxyHosts- specifies the hosts to connect to directly, not through the proxy. Specify the list of hosts, each separated by a "|" character; a wildcard character (*) can be used for matching. For example:-Dhttp.nonProxyHosts="localhost|*.example1.com|*.example2.com
To set these proxy parameters and the Web service configuration for your WebLogic Server add the following to the WebLogic setDomainEnv script as follows:
Restricting Embedding of BI Publisher in iframes
You can prevent embedding of BI Publisher in iframes.
Configuring Embedding of BI Publisher
By default, users can embed BI Publisher in an iframe only if the iframe and BI Publisher are in the same domain.
If you want to allow embedding of BI Publisher in an iframe belonging to another domain or you want to completely restrict embedding of BI Publisher in an iframe, provide appropriate values for the X_FRAME_OPTIONS and FRAME_ANCESTORS properties in the xmlp-server-config.xml file.
Note:
If you set X_FRAME_OPTIONS toDeny and FRAME_ANCESTORS to none, you can’t access the user interface of BI Publisher from other products that can embed BI Publisher, including Oracle BI Enterprise Edition. If you specify the values for both X_FRAME_OPTIONS and FRAME_ANCESTORS, the value used depends on the browser. Make sure you provide similar values to X_FRAME_OPTIONS and FRAME_ANCESTORS to ensure consistent behavior across browsers.X_FRAME_OPTIONS Values
| Value | Specifies |
|---|---|
False |
Do not set the header option. |
Deny |
Do not allow users to embed BI Publisher in iframes. |
SameOrigin |
Allow users to embed BI Publisher in iframes of the same domain. This is the default. |
Allow-From url |
Allow users to embed BI Publisher only from the domain specified in the url parameter. |
See https://developer.mozilla.org/en-US/docs/Web/HTTP/Headers/X-Frame-Options.
FRAME_ANCESTORS Values
| Value | Specifies |
|---|---|
False |
Do not set the header option. |
none |
Do not allow users to embed BI Publisher in iframes. |
self |
Allow users to embed BI Publisher in iframes of the same domain. This is the default. |
| url | Allow users to embed BI Publisher only from the domain specified in the url parameter.
The URL can be repeated and can be specified in more than one format. |
