12 Scaling Out Oracle Business Intelligence
This chapter describes the steps to scale out your initial Oracle Business Intelligence domain to BIHOST2.
Scaling out your components involves installing the Oracle Business Intelligence on the other host computers, stopping and cloning the components on BIHOST1, packing and unpacking the domain and starting the components after scaling out.
- Installing Oracle Fusion Middleware Infrastructure on the Other Host Computers
- Installing Oracle Business Intelligence on the Other Host Computers
If you have configured a separate shared storage volume or partition for BIHOST2, then you must also install the software on BIHOST2. - Stopping the Components on BIHOST1
Before you scale out, you must stop all the component processes in the domain on BIHOST1. - Cloning the Components on BIHOST1
After stopping all the component processes, you must clone the components in the domain on BIHOST1, which will create new components on BIHOST2 based on the initial domain you created. - Packing Up the Initial Domain on BIHOST1
Use the steps in this section to create a template jar file that contains the domain configuration information, which now includes configuration information about the Oracle HTTP Server instances. - Unpacking the Domain on BIHOST2
Use the steps in this section to unpack the domain template containing the domain configuration information and copy thebidomaintemplate.jarfile from BIHOST1 to BIHOST2. - Starting the Components on BIHOST1 and BIHOST2 After Scaling Out
This section describes the steps to start the component processes on BIHOST1 and BIHOST2 after scale out. The component processes include the Node Managers, the Administration Server for the WebLogic domain, the system components, and the Managed Servers. - Verifying Oracle Business Intelligence URLs on BIHOST2
After starting the components in the domain on BIHOST2, access these URLs to verify the configuration of Oracle Business Intelligence. - Configuring Oracle BI Publisher
Perform these manual tasks to configure Oracle BI Publisher. - Backing Up the Oracle Business Intelligence Configuration After Scaling Out
It is an Oracle best practices recommendation to create a backup after successfully configuring a domain or at another logical point. Create a backup after verifying that the installation so far is successful. This is a quick backup for the express purpose of immediate restoration in case of problems in later steps.
Parent topic: Configuring the Enterprise Deployment
12.1 Installing Oracle Fusion Middleware Infrastructure on the Other Host Computers
If you have configured a separate shared storage volume or partition for secondary hosts, then you must install the Infrastructure on one of those hosts.
See Shared Storage Recommendations When Installing and Configuring an Enterprise Deployment.
To install the software on the other host computers in the topology, log in to each host, and use the instructions in Starting the Infrastructure Installer on BIHOST1 and Navigating the Infrastructure Installation Screens to create the Oracle home on the appropriate storage device.
Note:
In previous releases, the recommended enterprise topology included a colocated set of Oracle HTTP Server instances. In those releases, there was a requirement to install the Infrastructure on the web tier hosts (WEBHOST1 and WEBHOST2). However, for this release, the Enterprise Deployment topology assumes that the web servers are installed and configured in standalone mode, so they are not considered part of the application tier domain. See Configuring Oracle HTTP Server for an Enterprise Deployment
Parent topic: Scaling Out Oracle Business Intelligence
12.2 Installing Oracle Business Intelligence on the Other Host Computers
If you have configured a separate shared storage volume or partition for BIHOST2, then you must also install the software on BIHOST2.
See Shared Storage Recommendations When Installing and Configuring an Enterprise Deployment.
To install the software on the other host computers in the topology, log in to each host, and use the instructions in Starting the Installation Program and Navigating the Installation Screens.
Parent topic: Scaling Out Oracle Business Intelligence
12.3 Stopping the Components on BIHOST1
Before you scale out, you must stop all the component processes in the domain on BIHOST1.
The component processes include the Node Managers, the Administration Server for the WebLogic domain, the system components, and the WLS_BI1 Managed Server, which is controlled by the Node Manager.
To stop all the components in the domain on BIHOST1, perform the following tasks.
- Stopping the System Components
- Stopping the WLS_BI1 Managed Server
- Stopping the Administration Server
- Stopping the Node Manager in the Administration Server Domain Home
- Stopping the Node Manager in the Managed Server Domain Directory
Parent topic: Scaling Out Oracle Business Intelligence
12.3.1 Stopping the System Components
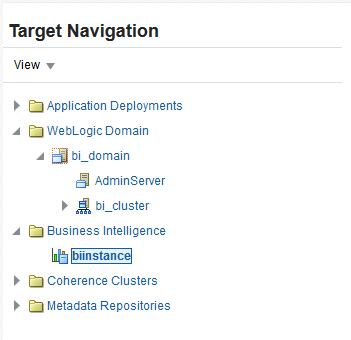
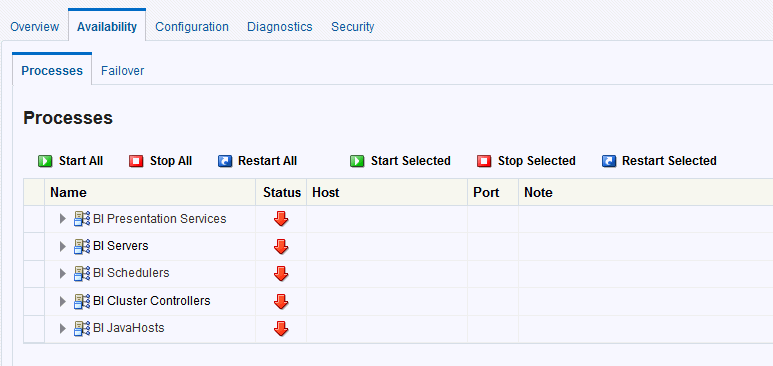
Follow these steps to stop the system components using Fusion Middleware Control.
Parent topic: Stopping the Components on BIHOST1
12.3.2 Stopping the WLS_BI1 Managed Server
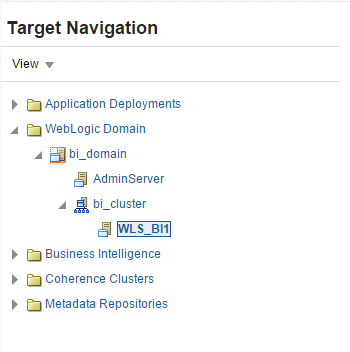
Follow these steps to stop the WLS_BI1 Managed Server using Fusion Middleware Control.
Parent topic: Stopping the Components on BIHOST1
12.3.3 Stopping the Administration Server
Use these steps to stop the Administration Server using the Node Manager.
Parent topic: Stopping the Components on BIHOST1
12.3.4 Stopping the Node Manager in the Administration Server Domain Home
Use these steps to stop the per-domain Node Manager for the ASERVER_HOME domain directory.
Parent topic: Stopping the Components on BIHOST1
12.3.5 Stopping the Node Manager in the Managed Server Domain Directory
Use these steps to stop the per-domain Node Manager for the MSERVER_HOME domain directory.
Parent topic: Stopping the Components on BIHOST1
12.4 Cloning the Components on BIHOST1
After stopping all the component processes, you must clone the components in the domain on BIHOST1, which will create new components on BIHOST2 based on the initial domain you created.
Perform the following steps on BIHOST1 to create additional components by cloning your existing Managed Server, Node Manager, system components, and service instance. You will later pack and unpack the new components on BIHOST2.
Parent topic: Scaling Out Oracle Business Intelligence
12.5 Packing Up the Initial Domain on BIHOST1
Use the steps in this section to create a template jar file that contains the domain configuration information, which now includes configuration information about the Oracle HTTP Server instances.
Parent topic: Scaling Out Oracle Business Intelligence
12.6 Unpacking the Domain on BIHOST2
Use the steps in this section to unpack the domain template containing the domain configuration information and copy the bidomaintemplate.jar file from BIHOST1 to BIHOST2.
Parent topic: Scaling Out Oracle Business Intelligence
12.7 Starting the Components on BIHOST1 and BIHOST2 After Scaling Out
This section describes the steps to start the component processes on BIHOST1 and BIHOST2 after scale out. The component processes include the Node Managers, the Administration Server for the WebLogic domain, the system components, and the Managed Servers.
-
Disable the Derby database. See Disabling the Derby Database.
-
Create a separate domain directory for managed servers. See Creating a Separate Domain Directory for Managed Servers on BIHOST1.
-
Configure security for Essbase. See Configuring Security for Essbase in Oracle Business Intelligence.
To start the components after scale out, perform the following tasks.
- Starting the Node Manager in the Administration Server Domain Home
- Starting the Administration Server
- Starting the Node Managers in the Managed Server Domain Directories
- Starting the Managed Servers
- Starting the System Components
Parent topic: Scaling Out Oracle Business Intelligence
12.7.1 Starting the Node Manager in the Administration Server Domain Home
To start the per-domain Node Manager for the ASERVER_HOME domain directory on BIHOST1, use the procedure in Starting the Node Manager in the Administration Server Domain Home on BIHOST1.
12.7.2 Starting the Administration Server
To start the Administration Server using the Node Manager, use the procedure in Starting the Administration Server Using the Node Manager.
12.7.3 Starting the Node Managers in the Managed Server Domain Directories
To start the per-domain Node Managers for the MSERVER_HOME directories on BIHOST1 and BIHOST2, use the procedure in Starting the Node Manager in the Managed Server Domain Directory on BIHOST1. When following the steps in the Starting the Node Manager in the Managed Server Domain Directory on BIHOST1 section, substitute the value of BIHOST2 where BIHOST1 is used.
12.7.4 Starting the Managed Servers
- Sign in to Fusion Middleware Control using the Administration Server credentials.
- Select the drop-down for WebLogic Domain. Select Environment and then Machines.
- Select the machine BIHOST2.
- Click the Configuration tab and then the Node Manager tab.
- Click Lock & Edit in the Change Center menu at the top right corner of the page.
- Change the listen address to be the value for BIHOST2.
- Click Save.
- Click Activate Changes in the Change Center menu at the top right corner of the page.
To start the WLS_BI1 and WLS_BI2 Managed Servers, use the procedure in Starting the WLS_BI1 Managed Server on BIHOST1.
12.7.5 Starting the System Components
12.8 Verifying Oracle Business Intelligence URLs on BIHOST2
After starting the components in the domain on BIHOST2, access these URLs to verify the configuration of Oracle Business Intelligence.
Parent topic: Scaling Out Oracle Business Intelligence
12.9 Configuring Oracle BI Publisher
Perform these manual tasks to configure Oracle BI Publisher.
- Updating the JMS Shared Temp Directory
Follow these steps to update the JMS Shared Temp Directory for BI Publisher Scheduler. You need to perform the steps in this section on only one of the BI hosts (either BIHOST1 or BIHOST2). - Configuring Integration with Oracle BI Presentation Services
- Setting the Oracle BI EE Data Source
The Oracle Business Intelligence Enterprise Edition (BI EE) data source must point to the clustered Oracle BI Servers through the Cluster Controllers. You must perform this task in BI Publisher. - Configuring BIPJmsResource for the Oracle BI Cluster
To configure the BIPJMSResource JMS Module, you must modify some default values within the module as listed in this topic.
Parent topic: Scaling Out Oracle Business Intelligence
12.9.1 Updating the JMS Shared Temp Directory
Follow these steps to update the JMS Shared Temp Directory for BI Publisher Scheduler. You need to perform the steps in this section on only one of the BI hosts (either BIHOST1 or BIHOST2).
Perform the following steps to update the BI Publisher Scheduler configuration:
Parent topic: Configuring Oracle BI Publisher
12.9.2 Configuring Integration with Oracle BI Presentation Services
Parent topic: Configuring Oracle BI Publisher
12.9.3 Setting the Oracle BI EE Data Source
The Oracle Business Intelligence Enterprise Edition (BI EE) data source must point to the clustered Oracle BI Servers through the Cluster Controllers. You must perform this task in BI Publisher.
Perform the following steps to set the Oracle BI EE data source in BI Publisher:
Parent topic: Configuring Oracle BI Publisher
12.9.4 Configuring BIPJmsResource for the Oracle BI Cluster
To configure the BIPJMSResource JMS Module, you must modify some default values within the module as listed in this topic.
The BIPJMSResource JMS Module is deployed automatically when you configure Oracle Business Intelligence Publisher in an Oracle WebLogic Server domain. However, you must modify the default values for the forwarding policy for the distributed topic in a cluster configuration.
Table 12-1 Specifying Custom Values for Setting Forwarding Policy
| Property Name | Description |
|---|---|
| JMS Resource | BIP distributed topic in a cluster configuration - dist_BIP.System.T_auto |
| Property | Forwarding Policy |
| Description | A distributed BIP topic in a cluster installation is configured by default with the Forwarding Policy set to Partitioned. |
| Recommended Setting | Change the Forwarding Policy to Replicated. |
- Sign in to the Oracle WebLogic Server Administration Console.
- From Services, click Messaging and select JMS Modules from the left navigation pane.
- Click BIPJMSResource on the list of JMS Modules.
- Select dist_BIP.System.T_auto on the Summary of Resources table.
- Click General tab.
- From the Forwarding Policy menu, select Replicated.
- Click Save.
- Click Activate Changes.
Parent topic: Configuring Oracle BI Publisher
12.10 Backing Up the Oracle Business Intelligence Configuration After Scaling Out
It is an Oracle best practices recommendation to create a backup after successfully configuring a domain or at another logical point. Create a backup after verifying that the installation so far is successful. This is a quick backup for the express purpose of immediate restoration in case of problems in later steps.
The backup destination is the local disk. You can discard this backup when the enterprise deployment setup is complete. After the enterprise deployment setup is complete, you can initiate the regular deployment-specific Backup and Recovery process.
See Performing Backups and Recoveries for an Enterprise Deployment.
Parent topic: Scaling Out Oracle Business Intelligence


