3 Configuring the Content of a MAF Application
This chapter describes how you configure the maf-application.xml and maf-features.xml files to define information such as the application name and application features to include for your MAF application.
This chapter includes the following sections:
-
Section 3.1, "Introduction to Configuring MAF Application Display Information"
-
Section 3.2, "Setting Display Properties for a MAF Application"
-
Section 3.3, "Setting Display Properties for an Application Feature"
3.1 Introduction to Configuring MAF Application Display Information
You can configure the display information that appears to the end users of your MAF application by setting values in the overview editor of the maf-application.xml file. Examples of the type of information you enter for the application include the display name, a description of your application, and the application's version number. You can enter similar information for individual application features that you include in your MAF application or distribute for use in other MAF applications. Additionally, you can specify icons that an application feature displays when it renders in a MAF application's navigation bar or springboard.
3.2 Setting Display Properties for a MAF Application
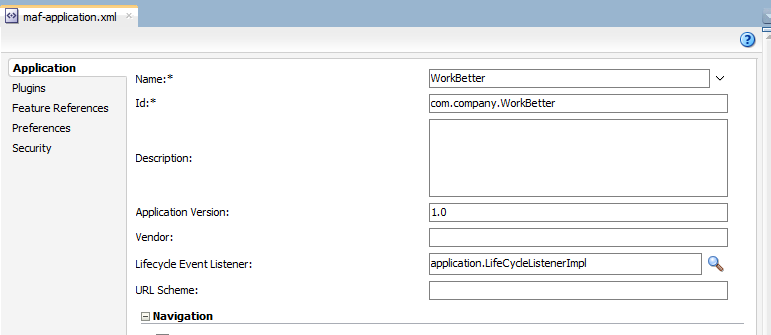
Figure 3-1 shows the Application page of the maf-application.xml file's overview editor where you set the display name and application ID of your MAF application.
To set the basic information for a MAF application:
-
Choose the Application page.
-
In the Applications window, expand the Application Resources panel.
-
In the Application Resources panel, expand Descriptors and then ADF META-INF.
-
Double-click the maf-application.xml file and in the overview editor that appears, click the Application navigation tab.
-
Enter a display name for the application in the Name field.
You can select a value from a resource bundle if you intend to localize your application. For more information, see Section 6.1, "Introduction to MAF Application Localization."
Note:
MAF uses the value entered in this field as the name for the iOS archive (.ipaor.app) file that it creates when you deploy the application to an iOS-powered device or simulator. For more information, see Section 27.2.5, "How to Create an iOS Deployment Profile." -
Enter a unique ID in the Id field.
To avoid naming conflicts, Android and iOS use reverse package names, such as com.company.application. JDeveloper prefixes com.company as a reverse package to the application name, but you can overwrite this value with another as long as it is unique and adheres to the ID guidelines for both iOS- and Android-powered devices. For iOS application, see the "Creating and Configuring App IDs" section in iOS Team Administration Guide (available from the iOS Developer Library at
http://developer.apple.com/library/ios). For Android, refer to the document entitled "The AndroidManifest.xml File," which is available from the Android Developers website (http://developer.android.com/guide/topics/manifest/manifest-intro.html). You can overwrite this ID in the deployment profiles described in Section 27.2.4, "How to Create an Android Deployment Profile" and Section 27.2.5, "How to Create an iOS Deployment Profile."Note:
To make sure that an application deploys successfully to an Android-powered device or emulator, the ID must begin with a letter, not with a number or a period. For example, an ID comprised of a wholly numeric value, such as 925090 (com.company.925090) fails to deploy. An ID that begins with letters, such as hello925090 (com.company.hello925090) deploys successfully. -
In the Description field, enter text that describes the application.
-
Enter the version in the Version field.
-
Enter the name of the vendor who originated this application in the Vendor field.
-
In the Lifecycle Event Listener field, enter a class with code that executes in response to lifecycle events in your MAF application. A newly-created MAF application specifies
application.LifeCycleListenerImplby default.For more information, see Chapter 11, "Using Lifecycle Listeners in MAF Applications."
3.3 Setting Display Properties for an Application Feature
Each MAF application must have at least one application feature. Application features can be developed independently of each other (and also from the MAF application itself). The overview editor for the maf-feature.xml file enables you to define the child elements of <adfmf:features> to differentiate the application features by assigning each application feature a name, an ID, and setting how their content can be implemented. Using the overview editor for application features, you can also control the runtime display of the application feature within MAF application and designate when an application feature requires user authentication.
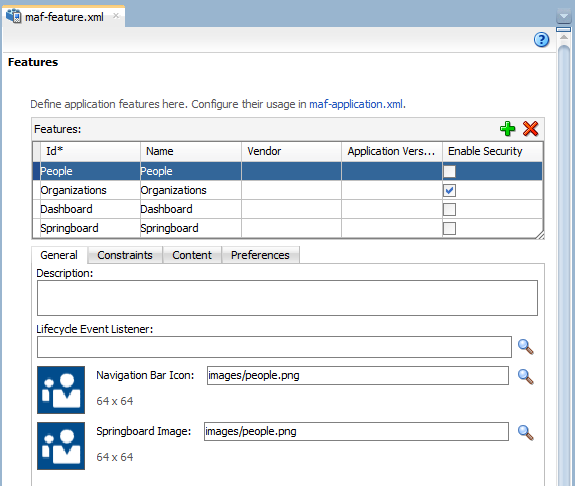
Figure 3-2 shows the General tab of the overview editor for the People application feature in the WorkBetter sample application. Use this tab to specify information such as the name of the application feature and the icons that display in the springboard and navigation bar.
If an application feature uses custom images for the navigation bar and springboard rather than the default ones provided by MAF, you must create these images to the specifications described by the Android Developers website (http://developer.android.com/design/style/iconography.html) and in the "Custom Icon and Image Creation Guidelines" chapter in iOS Human Interface Guidelines, which is available from the iOS Developer Library (http://developer.apple.com/library/ios/navigation/).
You place these images in the view controller project's public_html directory. See also Section 5.4, "What You May Need to Know About Selecting External Resources."
In addition, you must open the maf-feature.xml file and select the General tab.
To set the basic information for the application feature:
-
Choose the General tab.
-
Click the Add icon in the Features section.
-
Complete the Create MAF Feature dialog and click OK.
To complete the Create MAF Feature dialog:
-
Enter a display name for the application feature in the Feature Name field.
-
Enter a unique identifier for the application feature in the Feature ID field.
-
If needed, change the location for the application feature to any directory within the
public_htmldirectory (the default parent directory). Enter this location in the Directory field. -
Select the Add a corresponding feature reference to maf-application.xml checkbox to include the newly defined application feature in the MAF application.
-
-
(Optional) In the General tab of the overview editor, enter the originator of the application feature in the Vendor field.
-
(Optional) Enter the version number of the application feature in the Version field.
-
(Optional) Enter a brief description of the application's purpose in the Description field.
-
(Optional) Enter the fully qualified class name (including the package, such as
oracle.adfmf.feature) using the Class and Package Browser in the Lifecycle Event Listener field to enable runtime calls for start, stop, hibernate, and return to hibernate events. For more information, see Chapter 11, "Using Lifecycle Listeners in MAF Applications." -
(Optional) In the Navigation Bar Icon and Springboard Image fields, browse to, and select, images from the project to use as the icon in the navigation bar and also an image used for the display icon in the springboard. You can also drag and drop the image files from the Applications window into the file location field.