27 Deploying MAF Applications
This chapter describes how to deploy MAF applications for testing and for publishing.
This chapter includes the following sections:
-
Section 27.1, "Introduction to Deployment of MAF Applications"
-
Section 27.8, "Deploying MAF Applications from the Command Line"
-
Section 27.9, "Deploying with Oracle Mobile Security Suite (OMSS)"
27.1 Introduction to Deployment of MAF Applications
Before you can publish an application for distribution to end users, you must test it on a simulator or on an actual device to assess its behavior and ease of use. By deploying an iOS application bundle (.ipa and .app files) or Android application package (.apk) file to the platform-appropriate device or simulator, MAF enables you to test applications before publishing them to the App Store (Apple iTunes), or to an application marketplace, such as Google Play.
27.1.1 MAF Deployment Options
MAF executes the deployment of a project by copying a platform-specific template application to a temporary location and updating that application with the code, resources, and configuration defined in the MAF project. MAF then builds and deploys the application using the tools of the target platform. You can deploy a mobile application as the platform-specific package (.ipa for iOS, .h for Android) which you can make available from a download site or application marketplace, such as the Apple App Store or Google Play. For testing and debugging, you can deploy to a simulator or to a device. You can reuse the application features by deploying the view controller projects as a feature archive (FAR). You also have the option to reuse the entire mobile application by deploying it as a Mobile Application Archive (.maa) file.
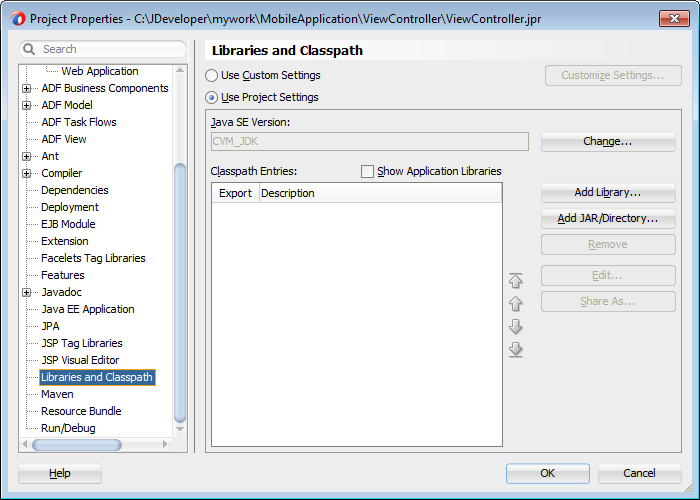
27.1.1.1 Deployment of Project Libraries
The libraries that you declare for the project using the Libraries and Classpath dialog, shown in Figure 27-1, are included in the deployment artifacts for the project. This dialog enables the application features to access these libraries at runtime.
27.1.1.2 Deployment of the JVM Libraries
For both Android and iOS applications, each MAF deployment includes a set of different libraries that are specific to the type of deployment (release or debug) in combination with the deployment target (simulators or actual devices). In addition, each set of these libraries includes a JVM JAR file. The application binding layer resides within this virtual machine, which is a collection of Objective-C libraries. For example, MAF deploys a JVM JAR file and a set of libraries for a debug deployment targeted at an iOS simulator, but deploys a different JVM JAR file and set of libraries to a debug deployment targeted to an actual iOS-powered device.
27.2 Working with Deployment Profiles
Preparing mobile applications for deployment begins with the creation of platform-specific deployment profiles. A deployment profile defines how an application is packaged into the archive that will be deployed to iOS- or Android-powered devices, iOS simulators, or Android emulators. The deployment profile does the following:
-
Specifies the format and contents of the archive. For iOS, the archive format is an
.ipafile, known as an application bundle. For Android, the format is an Android application package (.apk) file.Note:
The.apkfile is archive-compatible, meaning that you can view its contents using an archiving tool such as WinZip or 7-Zip. -
Lists the source files, deployment descriptors, and other auxiliary files that will be packaged into the archive file.
-
Describes the type and name of the archive file to be created.
-
Highlights dependency information, platform-specific instructions, and other information.
27.2.1 About Automatically Generated Deployment Profiles
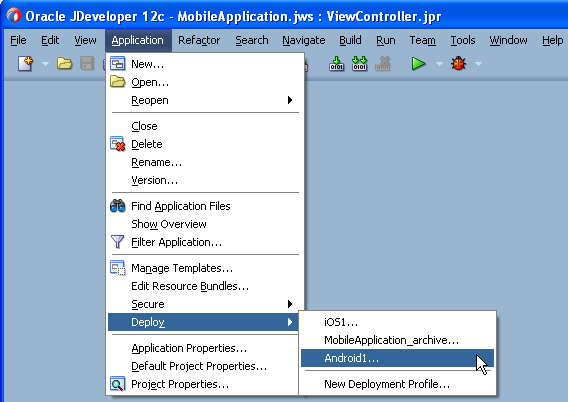
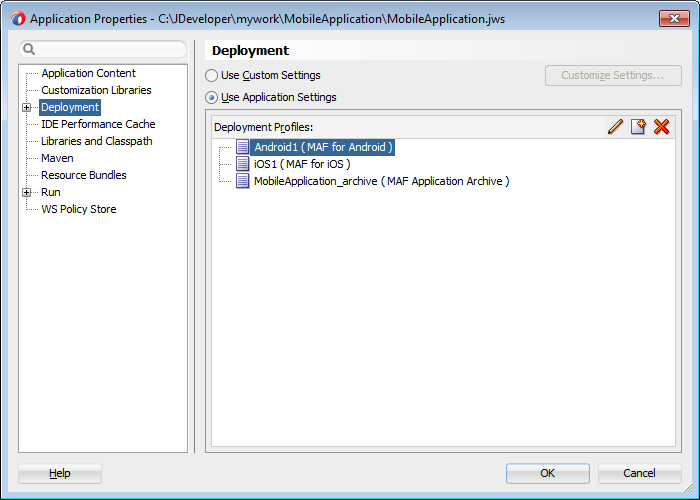
After you create an application, MAF generates deployment profiles that are seeded with default settings and image files. Provided that you have configured the environment correctly, you can use these profiles to deploy a MAF application immediately after creating it by choosing Application and then Deploy, as shown in Figure 27-2.
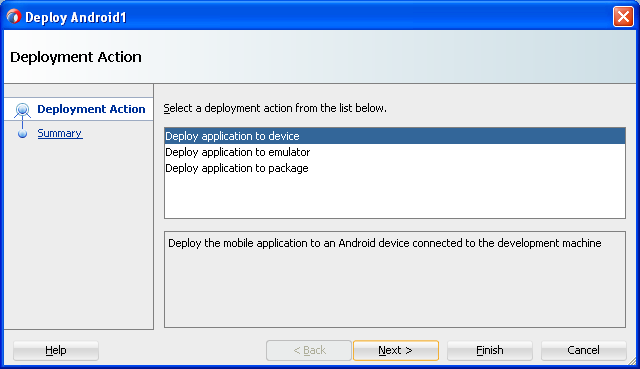
Using the Deployment Action page, shown in Figure 27-3, you then select the appropriate deployment target.
Note:
iOS and Android application deployments have distinct environment set up and configuration requirements. For more information, see Section 27.3, "Deploying an Android Application," and Section 27.4, "Deploying an iOS Application."As illustrated in Figure 27-2, MAF creates application-level profiles for both supported platforms (iOS and Android) and names them iOS1 and Android1.
Note:
MAF increments the name of each new deployment profile by 1. For example, iOS2, iOS3.You can accept the default values used for these profiles, or edit them. For information on the values configured for MAF application profiles, see Section 27.2.4, "How to Create an Android Deployment Profile" and Section 27.2.5, "How to Create an iOS Deployment Profile."
MAF packages the application and view controller projects as separate Feature Archive (FAR) files. These JAR files of MAF files are used as resources for other applications and are described in Section 27.5, "Deploying Feature Archive Files (FARs)." Because MAF creates these FAR files as dependencies to the MAF application profile, you can include or exclude them using the Profile Dependencies page of the Application Properties dialog, as illustrated in Figure 27-5.
Note:
The application controller project must contain a single FAR profile dependency; otherwise, the deployment will fail.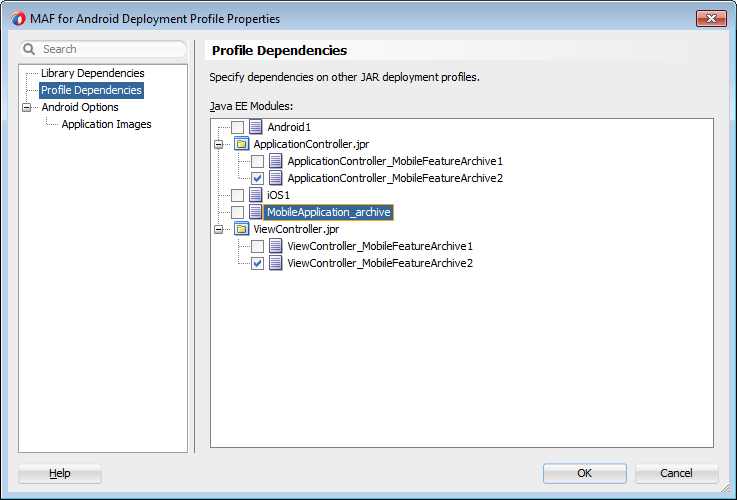
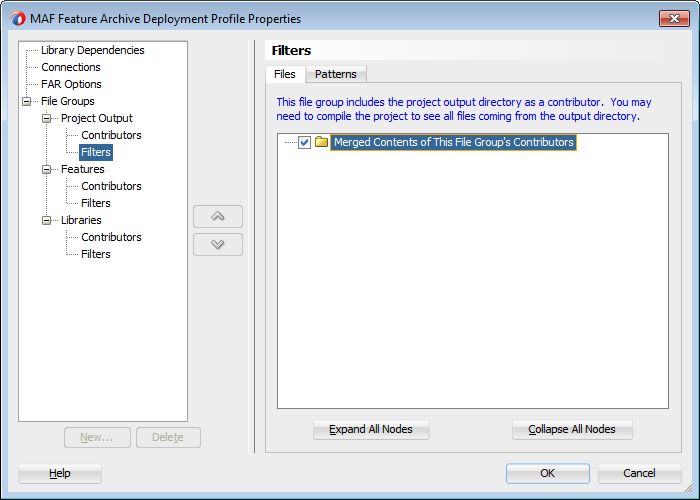
Using the File Groups-related pages of the Project Properties dialog, you can customize the contents of the view controller FAR file, as shown in Figure 27-6. For more information on the Project Properties dialog, see the Oracle JDeveloper online help and also the "Configuring Deployment Profiles" in Oracle Fusion Middleware Developing Applications with Oracle JDeveloper.
In addition to the platform-specific deployment profiles, MAF also creates a deployment profile that enables you to package the MAF application as a MAF Application Archive (.maa) file. Using this file, you can create a new MAF application using a pre-existing application that has been packaged as an .maa file. For more information, see Section 27.6, "Creating a Mobile Application Archive File" and Section 27.7, "Creating Unsigned Deployment Packages."
By default, this deployment file bears the name of the MAF application followed by _archive. As illustrated in Figure 27-2, this profile is called Employees_archive and, if needed, can be edited using the Application Properties dialog.
For more information on editing deployment profiles using the Application Properties dialog pages, see the "Viewing and Changing Deployment Profile Properties" section in Oracle Fusion Middleware Developing Applications with Oracle JDeveloper and the Oracle JDeveloper online help for the Application Properties and Project Properties dialogs.
27.2.2 How to Create a Deployment Profile
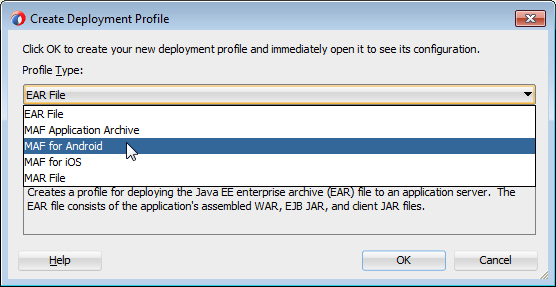
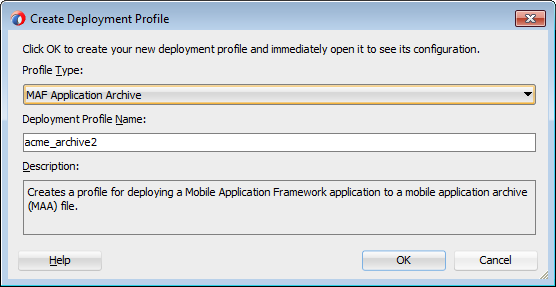
As described in Section 27.2.1, "About Automatically Generated Deployment Profiles," MAF creates a set of deployment profiles when you create a mobile application. You can deploy an application using these profiles, edit them, or construct new ones using the MAF-specific deployment profile pages. The Create Deployment Profile wizard, shown in Figure 27-8, enables you to create a default deployment profile from these pages. You can create as many deployment profiles as needed. For more information on these standard deployment profile pages, click Help to see the JDeveloper online help.
Note:
MAF application deployment only requires the creation of an application-level deployment profile; you do not have to create a view controller-level deployment profile.Before you begin:
To enable JDeveloper to deploy mobile applications, you must designate the SDKs for the target platforms as described in the "Configuring the Development Environment for Platforms and Form Factors" section in Oracle Mobile Application Framework Installing Oracle Mobile Application Framework.
Tip:
For iOS deployments, run iTunes and the iOS Simulator at least once before you configure their directory locations.To create a deployment profile:
-
Choose Application and then Deploy.
-
Choose New Deployment Profile.
-
Depending on the target platform, select either MAF for Android, MAF for iOS, or MAF Application Archive, as shown in Figure 27-8.
-
Accept the default name for the profile or enter a new one. Click OK.
-
If needed, use the Options and Application Images pages as required for the applications and then click OK.
27.2.3 What Happens When You Create a Deployment Profile
After you complete the wizard, JDeveloper creates a deployment profile and opens the Deployment Profile Properties editor.
Table 27-1 lists the MAF-specific pages in the Deployment Profile Properties editor, shown in Figure 27-10.
Table 27-1 MAF-Specific Deployment Profile Pages
| Page | Function |
|---|---|
|
iOS Options |
Enables you to modify the settings for an application to be deployed on an iOS-powered device or iOS simulator. |
|
Android Options |
Enables you to modify the settings for an application deployed to an Android-powered device or Android emulator. |
|
Application Images |
Enables you to assign custom icons to an application by adding the appropriate graphics file. |
|
Device Orientations |
Enables you to restrict the display of an application to certain device orientations. This page is used only for iOS deployment profiles. |
Note:
Deployment depends on the needs of your application. You can deploy an application using the default values seeded in the pages listed in Table 27-1.When you deploy an application, JDeveloper creates a deployment directory and related subdirectory. It also creates Feature Archive files (FARs) for the view controller projects (which must have different names) and application controller project. In addition to these two FARs, JDeveloper creates copies of any FARs that were imported into the project. Changes to the compilation profiles require the removal of the deployment directory. You can remove this directory, as well as the deployment directory within the view controller project that contains the FAR, by selecting Build and then Clean All.
27.2.4 How to Create an Android Deployment Profile
The deployment profile creates the template for the application deployment to an Android device or emulator, or for creating an application as an Android application package (.apk) file. To create the deployment profile for Android, you must define the signing options for the application, the behavior of the javac compiler, and if needed, override the default Oracle images used for application icons with custom ones.
Before you begin:
Install and download the Android SDK as described in the "How to Install the Android SDK" section in Oracle Mobile Application Framework Installing Oracle Mobile Application Framework.
If you deploy to an Android emulator, you must create a virtual device for each emulator instance using the Android Virtual Device Manager, as described in the "Managing Virtual Devices" document, available from the Android Developers website (http://developer.android.com/tools/devices/index.html).
You must also set the MAF preferences for the locations for the SDK and platform, which are part of the Android SDK package download.
To set the MAF preferences for the Android platform SDKs:
-
Choose Tools > Preferences from JDeveloper's main menu to open Preferences.
-
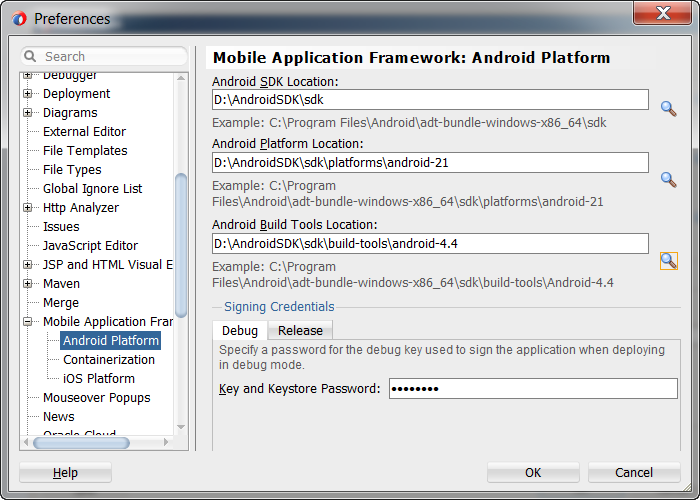
In the Preferences dialog, select Mobile Application Framework > Android Platform from the tree to open the Android preferences page, as shown in Figure 27-9.
-
Specify the following:
-
The Android SDK location on your computer.
-
The local directory of your target Android platform.
-
The Android build tools location on your computer.
-
Information on the signing credentials.
-
-
Note:
Push notifications require devices and emulators running Android 4.0.3 (API 15) platform (or later). The Google Play store must be installed on these devices, and the Google API must be installed in the SDK to enable push notifications on emulators. Users must create a Google account (and be logged in).See also the "GCM Architectural Overview" chapter in Google Cloud Messaging for Android, available from the Android Developers website (http://developer.android.com/index.html).
Using the Android Platform page, you also define the debug and release properties for a key that is used to sign the MAF application that you deploy to the Android platform. Within the deployment profile, you subsequently designate a mobile application's release type as either debug or release. You only need to define the signing key properties once. For more information, see Section 27.2.4.3, "Defining the Android Signing Options." See also the application publishing information in the "Signing Your Applications" document, available from the Android Developers website (http://developer.android.com/tools/publishing/app-signing.html).
27.2.4.1 Setting the Options for the Application Details
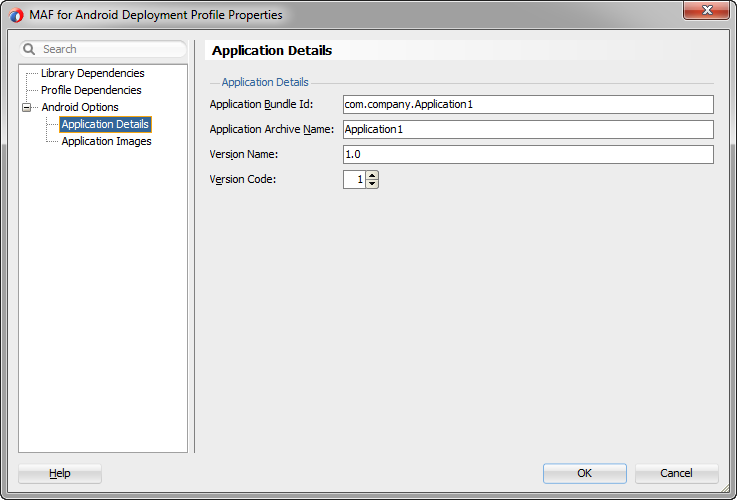
The Android Application Details page, shown in Figure 27-10, enables you to specify the application bundle ID, archive name, version name, and version code.
To set the application details:
-
Choose Application > Application Properties > Deployment.
-
In the Deployment page, double-click a deployment profile.
-
Choose Android Options > Application Details, as shown in Figure 27-10.
-
Accept the default values, or define the following options:
-
Application Bundle ID—A unique ID for the application, as set in the
idattribute of themaf-application.xmlfile. Each application deployed to an Android device has a unique ID, one that cannot start with a numeric value or contain spaces. If needed, you can overwrite this value with another as long as it is unique and adheres to the ID guidelines. For more information, see Section 3.2, "Setting Display Properties for a MAF Application."Note:
To ensure that an application deploys successfully to an Android-powered device or emulator, the ID must begin with a letter, not with a number or a period. For example, an ID comprised of a wholly numeric value, such as 925090 (com.company.925090) will prevent the application from deploying. An ID that begins with letters, such as hello925090 (com.company.hello925090) will enable the deployment to succeed. -
Application Archive Name—If needed, enter the name for the
.apkfile created by MAF. Otherwise, accept the default name.By default, MAF bases the name of the
.apkfile on the applicationidattribute configured in themaf-application.xmlfile. For more information, see Section 3.2, "Setting Display Properties for a MAF Application." -
Version Name—The release version of the application code that displays for the user. For example, enter 2.0 if this is the second version of your application. The value you enter appears in application information dialogs when you deploy the application to a device or device simulator, such as the App Info screen on Android devices.
-
Version Code—An integer value that represents the version of the application code, which is checked programmatically by other applications for upgrades or downgrades. The minimum and default value is 1. You can select any value and increment it by 1 for each successive release.
Note:
For more information about version name and version code, refer to the "Versioning Your Applications" document, available from the Android Developers website (http://developer.android.com/tools/publishing/versioning.html). -
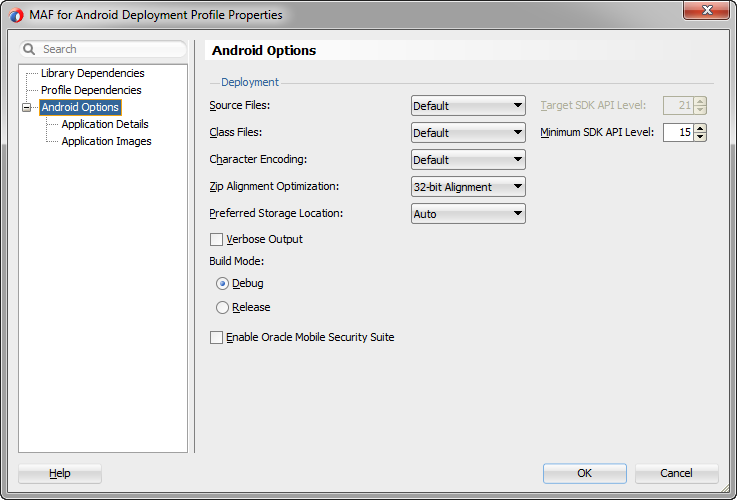
27.2.4.2 Setting Deployment Options
The Options page, shown in Figure 27-4, enables you to set values that are passed in by the javac compiler tool options, set the zipalign options, and also set the Android API levels.
To set the Android deployment options:
-
Choose Application > Application Properties > Deployment.
-
In the Deployment page, double-click a deployment profile.
-
Choose Android Options, as shown in Figure 27-4.
-
Accept the default values, or define the following options:
-
Source Files—Select the JDK-compatibility level from the dropdown list. The value is specified when the deployment runs the
javactool to compileR.java, the Android-generated file for referencing application resources, using thejavac-sourceoption.For information on
R.java, see the "Accessing Resources" document, available from the Android Developers website (http://developer.android.com/guide/topics/resources/accessing-resources.html). -
Class Files—Select the JDK version compatibility for the compiled
.classfiles from the dropdown list. The value is specified when the deployment runs thejavactool to compile theR.javafile using thejavac-targetoption. -
Character Encoding—Select the native-encoding name that controls how the compiler interprets characters beyond the ASCII character set. The default is UTF-8.
-
ZIP Alignment Optimization—Select the byte alignment (32-bit or 64-bit) to optimize the packaging of
.apkfiles. Selecting 32-bit (the default) provides 4-byte boundary alignment. Data files stored in each application package, such as data manifests, are continually accessed by multiple processes within the Android operating environment. For more information, see the "zipalign" document, available from the Android Developers website (http://developer.android.com/tools/help/zipalign.html). -
Preferred Storage Location—Select the storage option for the deployed application. By default, mobile apps are stored on the device's internal storage after they have been deployed from JDeveloper to a device, or downloaded from an application marketplace, such as Google Play. The following options enable you to specify a preferred storage location for the mobile application.
Internal—Forces the mobile application to be installed on the device's internal storage.
External—Allows the application to be installed on the device's SD card. However, if the Android system determines that the application cannot be installed on the SD card (for example, no SD card has been mounted, or the SD card exists but has insufficient space), then it installs the application on the device's internal storage instead. The mobile device user can move the application between internal and external storage using the system settings.
Auto—Specifies that the application may be installed on the device's external or internal storage. The mobile device user can move the application between internal and external storage using the system settings.
Selecting the External or Auto options enables the deployment framework to update the
<manifest>element in theAndroidManifest.xmlfile with anandroid:installLocationattribute and a value of"preferExternal"or"auto". Populating theAndroidManifest.xmlfile with this attribute enables mobile applications to be stored on an external SD card or internal storage. For more information, see the "App Install Location" chapter in Data Storage Guide, available from the Android Developers website (http://developer.android.com/guide/topics/data/install-location.html) or from the Android SDK documentation. -
Verbose Output—Select to log the full output provided by each of the command-line tools invoked by the deployment while building the
.apkfile. If you do not select this option, then the deployment does not log the full output. -
Build Mode—Choose from the following build options.
Debug—Select this option for development builds. Designating a debug build results in the inclusion of debugging symbols. See also Section 30.3.3, "How to Debug on the Android Platform" and Section 30.3.5, "How to Enable Debugging of Java Code and JavaScript."
Release—Select to compile the build with release bits and libraries.
Tip:
Use the release mode, not the debug mode, to test application performance.Enable Oracle Mobile Security Suite—Select to enable containerization with Oracle Mobile Security Suite. For more information, see Section 27.9, "Deploying with Oracle Mobile Security Suite (OMSS)."
-
Target SDK API Level—Select the minimum API Level on which the application is able to run. The minimum and default value is 15, which corresponds to Android 4.0.3 platform. You may increase the minimum SDK version to exclude devices running older Android versions from installing your application.
-
Minimum SDK API Level—Shows the minimum API Level on which the application is designed to run. This value cannot be changed. For more information, refer to the description of the
<uses-sdk>attribute in the document entitled "The AndroidManifest.xml File," available through the Android Developers website (http://developer.android.com/guide/topics/manifest/manifest-intro.html).
-
27.2.4.3 Defining the Android Signing Options
An application must be signed before it can be deployed to an Android device or emulator. Android does not require a certificate authority; an application can instead be self-signed.
Defining how the deployment signs a mobile application is a two-step process: within the MAF Platforms preference page, you first define debug and release properties for a key that is used to sign Android applications. You only need to configure the debug and release signing properties once. After you define these options, you configure the deployment profile to designate if the application should be deployed in debug or release mode.
Before you begin:
If no keystore file exists, you can create one using the keytool utility, as illustrated in the following example.
keytool -genkeypair
        -v
        -keystore c:\jdeveloper\mywork\releasesigning.keystore
        -alias releaseKeyAlias
        -keyalg RSA
        -keysize 2048
        -validity 10000
In this example, the keystore contains a single key, valid for 10,000 days. As described in the "Signing Your Applications" document, available from the Android Developers website (http://developer.android.com/tools/publishing/app-signing.html), the keytool prompts you to provide passwords for the keystore and key, and to provide the Distinguished Name fields for your key before it generates the keystore. Refer to Java SE Technical Documentation (https://download.oracle.com/javase/index.html) for information on how to use the keytool utility.
To configure the key options for debug mode:
-
Choose Tools > Preferences > Mobile Application Framework > Android Platform.
-
Select the Debug tab, shown in Figure 27-11.
-
Enter a password used by the deployment to create a keystore file and key needed for a debug deployment in the Key and Keystore Password field. This password, which generates a keystore and keyfile for deployment to an Android-powered device or emulator, can be any value, but must be at least six characters long. The default password is Android.

To configure the key options for release mode:
-
Choose Tools > Preferences > Mobile Application Framework > Android Platform.
-
Select the Release tab and then define the following:
-
Keystore Location—Enter, or browse to and retrieve, the directory of the keystore containing the private key used for signing the application for distribution.
-
Keystore Password—Enter the password for the keystore. This password allows access to the physical file.
-
Key Alias—Enter an alias for the key. This is the value set for the keytool's
-aliasargument. Only the first eight characters of the alias are used. -
Key Password—Enter the password for the key. This password allows access to the key (identified by the alias) within the keystore.
Tip:
Enter the password and key password requested by the keytool utility before it generates the keystore.In addition to designating how the application will be signed, these parameters designate how the
R.Javaclasses are compiled.
-
-
Click OK.
To Set the Android build mode:
-
In the Options page, select either Debug or Release as the build mode:
-
Select Debug for developing and testing an application (such as Java and JavaScript debugging). This option enables you to deploy an application on the Android platform without having to provide a private key. Use this option when deploying an application to an Android emulator or to an Android-powered device for testing. See also Section 30.3.5, "How to Enable Debugging of Java Code and JavaScript."
Note:
You cannot publish an application signed with the debug keystore and key; this keystore and key are used for testing purposes only and cannot be used to publish an application to end users. -
When the application is ready to be published, select Release. Use this option when the application is ready to be published to an application marketplace, such as Google Play.
Tip:
Use the release mode, not the debug mode, to test application performance.
-
-
Click OK.
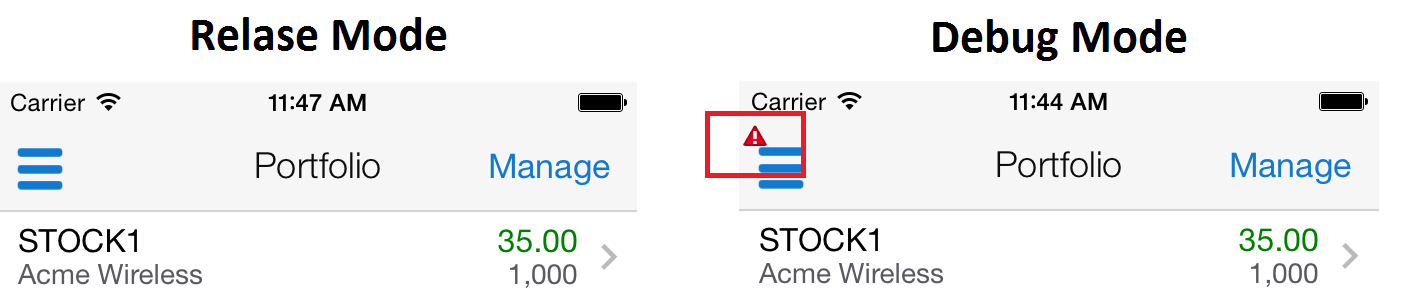
After the
.apkfile is signed in either debug or release mode, you can deploy it to a device or to an emulator. At runtime, MAF indicates that an application has been deployed in debug mode by overlaying a debugging symbol that is represented by an exclamation point within a red triangle, as shown in Figure 27-12.
27.2.4.4 What You May Need to Know About Credential Storage
MAF stores passwords for the key and keystore in the file-based credential store, cwallet.sso. This file, which manages credential storage and retrieval, is located within the o.maf folder in the user's JDeveloper system folder. For example, in a Windows 7 environment, the cwallet.sso file is located at C:\Users\jsmith\AppData\Roaming\JDeveloper\system12.1.3\o.maf.
For more information, see the "About Oracle Wallet" section in Oracle Fusion Middleware Administrator's Guide and the "Credential Store Basics" section in Oracle Fusion Middleware Securing Applications with Oracle Platform Security Services.
Note:
MAF stores the key and keystore credentials in a file calledproduct-preferences.xml. MAF migrates these credentials to the cwallet.sso file if you preserve the preference settings by clicking Yes in the Confirm Import Preferences dialog during the installation process of the current version of JDeveloper and MAF. However, the cwallet.sso file is not migrated to other installations of the current version of Oracle JDeveloper with MAF. If you reinstall (or create a separate installation), you must either copy the cwallet.sso file to the o.maf folder or reconfigure the release mode credentials in the Platforms preferences page.27.2.4.5 How to Add a Custom Image to an Android Application
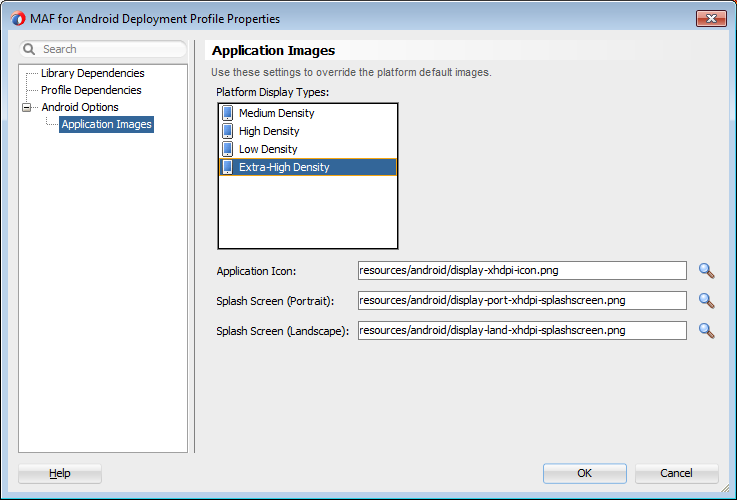
Enabling MAF application icons to display properly on Android-powered devices of different sizes and resolutions requires low-, medium-, and high-density versions of the same images. MAF provides default Oracle images that fulfill these display requirements. However, if the application requires custom icons, you can use the Application Images page, shown in Figure 27-13, to override default images by selecting PNG-formatted images for the application icon and for the splash screen. For the latter, you can add portrait and landscape images. If you do not add a custom image file, then the default Oracle icon is used instead. To create custom images, refer to the "Iconography" document, available from the Android Developers website (http://developer.android.com/design/style/iconography.html).
Before you begin:
Obtain the images in the PNG, JPEG, or GIF file format that use the dimensions, density, and components that are appropriate to Android theme and that can also support multiple screen types. For more information, see "Supporting Multiple Screens" document, available from the Android Developers website (http://developer.android.com/guide/practices/screens_support.html).
To add custom images:
-
Click Application Images.
-
Use the Browse function to select the splash screen and icon image files from the project file. Figure 27-13 shows selecting images for application icons and portrait orientation splash screen images that applications use for displaying on devices with low-, medium-, high- and extra-high density displays.
-
Click OK.
27.2.4.6 What Happens When JDeveloper Deploys Images for Android Applications
During deployment, MAF enables JDeveloper to copy the images from their source location to a temporary deployment folder. For the default images that ship with the MAF extension (located at application workspace directory\Application Resources\Resources\images), JDeveloper copies them from their seeded location to a deployment subdirectory of the view controller project (application workspace\ViewController\deploy). As shown in Table 27-2, each image file is copied to a subdirectory called drawable, named for the drawable object, described on the Android Developers website (http://developer.android.com/reference/android/graphics/drawable/Drawable.html). Each drawable directory matches the image density (ldpi, mdpi, hdpi, and xhdpi) and orientation (port, land). Within these directories, JDeveloper renames each icon image file as adfmf_icon.png and each splash screen image as adfmf_loading.png.
Table 27-2 Deployment File Locations for Seeded Application Images
| Source File (...\resource\Android) | Temporary Deployment File (...ViewController\deploy) |
|---|---|
|
|
|
|
|
|
|
|
|
|
|
|
|
|
|
|
|
|
|
|
|
|
|
|
|
|
|
|
|
|
|
|
|
|
|
|
For custom images, JDeveloper copies the set of application icons from their specified location to the corresponding density and orientation subdirectory of the temporary deployment location.
27.2.5 How to Create an iOS Deployment Profile
For iOS, use the Deployment Profiles Properties Editor to define the iOS application build configuration as well as the locations for the splash screen images and application icons.
Before you begin:
Download Xcode (which includes the Xcode IDE, performance analysis tools, the iOS simulator, and the Mac OS X and iOS SDKs) to the Apple computer that also runs JDeveloper.
Tip:
Refer to the Certification and Support Matrix on Oracle Technology Network (http://www.oracle.com/technetwork/developer-tools/maf/documentation) for the minimum supported version required to compile applications.Because Xcode is used during deployment, you must install it on the Apple computer before you deploy the mobile application from JDeveloper.
Tip:
While the current version of Xcode is available through the App Store, you can download prior versions through the following site:https://developer.apple.com/xcode/
Access to this site requires an Apple ID and registration as an Apple developer.
After you download Xcode, you must enter the location of its xcodebuild tool and, for deployment to iOS simulators, the location of the iOS simulator's SDK, in the iOS Platform preference page. For more information, see the "Configuring the Development Environment for Platforms and Form Factors" section in Oracle Mobile Application Framework Installing Oracle Mobile Application Framework.
Note:
Run both iTunes and the iOS simulator at least once before entering their locations in the iOS Platform preference page.To deploy a mobile application to an iOS-powered device (as opposed to deployment to an iOS simulator), you must obtain both a provisioning profile and a certification from the iOS Provisioning Profile as described in Section 27.2.5.2, "Setting the Device Signing Options."
To create a deployment profile:
-
Choose Application > Application Properties > Deployment.
-
In the Deployment page, double-click a deployment profile.
-
Choose iOS Options, as shown in Figure 27-14.
-
Accept the default values, or define the following:
-
Application Bundle Id—A unique ID for the application that identifies the domain name of the company. The deployed bundle Id must be unique for each application installed on an iOS device and must adhere to reverse-package style naming conventions (that is, com.<organization name>.<company name>). For more information, see the App Distribution Guide, which is available through the iOS Developer Library at
http://developer.apple.com/library/ios/navigation/). If needed, you can overwrite this value with another as long as it is unique and adheres to the ID guidelines. For more information, see Section 3.2, "Setting Display Properties for a MAF Application." For information on obtaining the Bundle Seed ID using the iOS Provisioning Portal, see Section 27.4.4.3, "Registering an Application ID."Note:
The deployed bundle ID cannot start with a numeric value or contain spaces.Because each application bundle ID is unique, you can deploy multiple mobile applications to the same device. Two applications can even have the same name as long as their application bundle IDs are different. Mobile applications deployed to the same device are in their own respective sandboxes. They are unaware of each other and do not share data (they have only the Device scope in common).
-
Application Archive Name—If needed, enter the name for the
.ipafile or the.appfile. MAF creates an.ipafile when you select either the Deploy to distribution package or Deploy to iTunes for synchronization to device options in the Deployment Action dialog, shown in Figure 27-24. It creates an.appfile when you select the Deploy application to simulator option. Otherwise, accept the default name. For more information, see Section 27.4.2, "How to Deploy an Application to an iOS-Powered Device" and Section 27.4.5, "How to Distribute an iOS Application to the App Store."By default, MAF bases the name of the
.ipafile (or.appfile) on the applicationidattribute configured in themaf-application.xmlfile. For more information, see Section 3.3, "Setting Display Properties for an Application Feature." -
Minimum iOS Version—Indicates the earliest version of iOS to which you can deploy the application. The default value is the current version. The version depends on the version of the installed SDK.
-
Simulator—Select the hardware and iOS version of the simulator to which you are deploying the application. Available versions are displayed in the dropdown list. For more information, see the iOS Simulator User Guide, which is available through the iOS Developer Library (
http://developer.apple.com/library/ios/navigation/). -
Family—Select the family of iOS products on which the application is intended to run. The default option is for both iPad and iPhone.
-
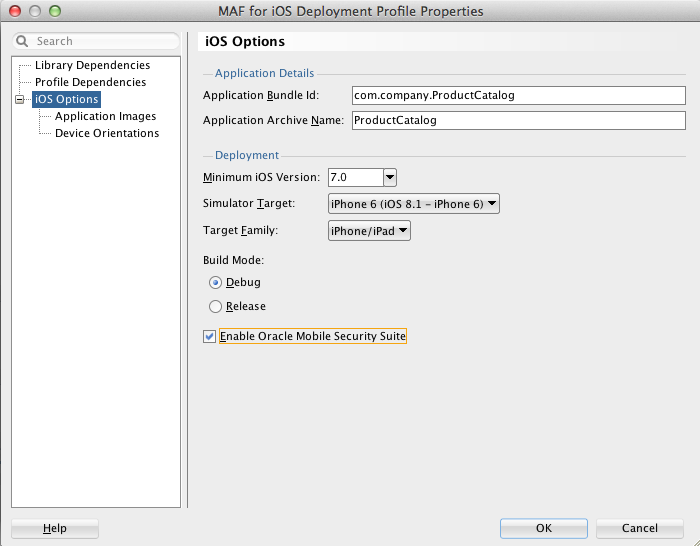
27.2.5.1 Defining the iOS Build Options
The iOS build options enable you to deploy an application with debug or release bits and libraries. The iOS Options page is also where you can enable containerization with Oracle Mobile Security Suite (OMSS).
Before you begin:
Deployment of an iOS application (that is, an .ipa file) to an iOS-powered device requires a provisioning profile, which is a required component for installation, and also a signed certificate that identifies the developer and an application on a device. You must obtain these from the iOS Provisioning portal as described in Section 27.4.4, "What You May Need to Know About Deploying an Application to an iOS-Powered Device." In addition, you must enter the location for a provisioning profile and the name of the certificate in the iOS Platform preference page, as described in Section 27.2.5.2, "Setting the Device Signing Options."
To set the build options:
-
Choose Application > Application Properties > Deployment.
-
In the Deployment page, double-click an iOS deployment profile.
-
Choose iOS Options, as shown in Figure 27-14.
-
Choose from the following build options.
-
Debug—Select this option for development builds. Designating a debug build results in the inclusion of debugging symbols. See also Section 30.3.2, "How to Debug on the iOS Platform" and Section 30.3.5, "How to Enable Debugging of Java Code and JavaScript."
-
Release—Select to compile the build with release bits and libraries.
Tip:
Use the release mode, not the debug mode, to test application performance. -
Enable Oracle Mobile Security Suite—Select to enable containerization with Oracle Mobile Security Suite. This option is only applicable for deployment to iTunes and is ignored for deployment to a package or simulator. For more information, see Section 27.9, "Deploying with Oracle Mobile Security Suite (OMSS)."
-
At runtime, MAF indicates that an application has been deployed in debug mode by overlaying a debugging symbol that is represented by an exclamation point within a red triangle, as shown in Section 27.2.4.3, "Deployment Modes."
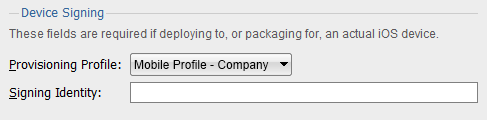
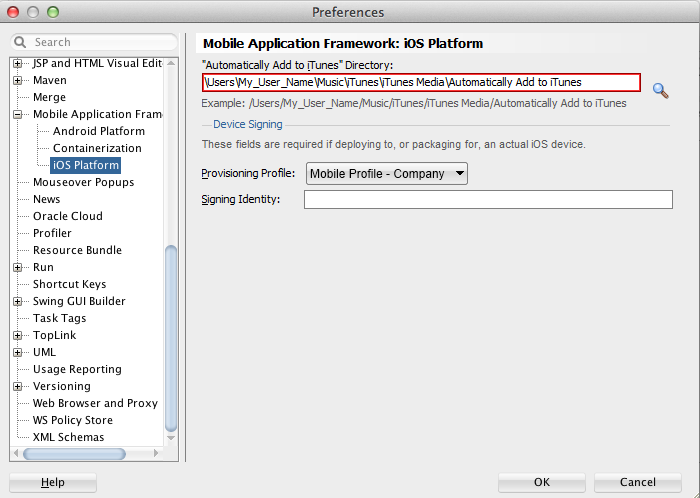
27.2.5.2 Setting the Device Signing Options
The iOS Platform preference page for iOS includes fields for the location of the provisioning profile on the development computer and the name of the signing identity. You must define these parameters if you deploy an application to a distribution package or to iTunes for synchronization to a device. You use a signing identity to code sign your application. When Xcode requests your development certificate, the certificate and its public key is stored in the Member Center, and the signing identity (the certificate with its public and private key) is stored in your keychain. You will not be able to code sign without this private key.
Note:
Neither a signing identity nor a provisioning profile are required if you deploy a mobile application to an iOS simulator.To set the signing options:
-
Choose Tools > Preferences > Mobile Application Framework > iOS Platform.
-
From the Provisioning Profile dropdown list, choose the provisioning profile.
-
In the Signing Identity field, enter the name of the developer or distribution certificate that identifies the originator of the code (such as a developer or a company). You can view the name of the certificate using the Keychain Access utility (accessed from the Applications folder). Copy the entire name from the Keychain Access utility. The name entered into this field may look similar to the following example.
iPhone Developer: John Smith (Oracle123)
Note:
There are provisioning profiles used for both development and release versions of an application. While a provisioning profile used for the release version of an application can be installed on any device, a provisioning profile for a development version can only be installed on the devices whose IDs are embedded into the profile. For more information, see the App Distribution Guide, which is available from the iOS Developer Library (http://developer.apple.com/library/ios/navigation/27.2.5.3 Adding a Custom Image to an iOS Application
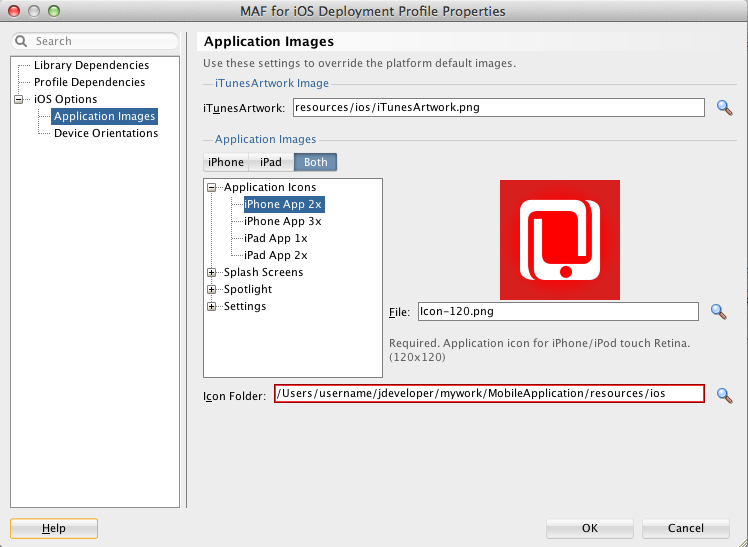
The Application Images page enables you to rebrand an application by overriding the default Oracle image used for application icons and artwork with custom images. The options in this page, shown in Figure 27-16, enable you to enter the locations of custom images used for different situations, device orientation, and device resolutions. For more information on iOS application icon images, see the "Icon and Image Design" section in iOS Human Interface Guidelines. This document is available from the iOS Developer Library (http://developer.apple.com/library/ios/navigation/).
Note:
All images must be in the PNG format.To add custom images:
-
Choose Application > Application Properties > Deployment.
-
In the Deployment page, double-click an iOS deployment profile.
-
Select iOS Options > Application Images from the tree on the left of the iOS deployment profile properties editor.
-
Choose Browse to select an icon image to override the default Apple image that iTunes assigns to
.ipafiles. This image is required for all applications and must be 512 x 512 pixels for both iPhone and iPad applications. For more information, see Section 27.2.5.4, "What You May Need to Know About iTunes Artwork." -
Select the device type to display the available image types in the tree. By default, MAF displays all of the image styles and types available to iPad and iPhone devices. However, you can narrow the selection by selecting the device type, as shown in Figure 27-16. In the Icon Folder field, MAF displays the location within the application's
Resourcesdirectory where these image files are stored. -
Select an image type from the tree.
-
In the File field, choose Browse to select another image. This image file must exist within the current application.
During deployment, JDeveloper copies the custom image file into the deployment profile and renames it to match the name of the default image.
-
Click OK.
27.2.5.4 What You May Need to Know About iTunes Artwork
By default, mobile applications deployed to an iOS device through iTunes, or deployed as an archive (.ipa file) for download, use the default Oracle image unless otherwise specified.
By selecting an iTunes artwork image as the icon for the deployed application, you override the default image. You can use an image to differentiate between versions of the application. Figure 27-17 illustrates the difference between the default image and a user-selected image, where Application4 is displayed with the default image and Application6 is displayed with a user-selected image (the Oracle icon, scaled to 512 x 512 pixels).
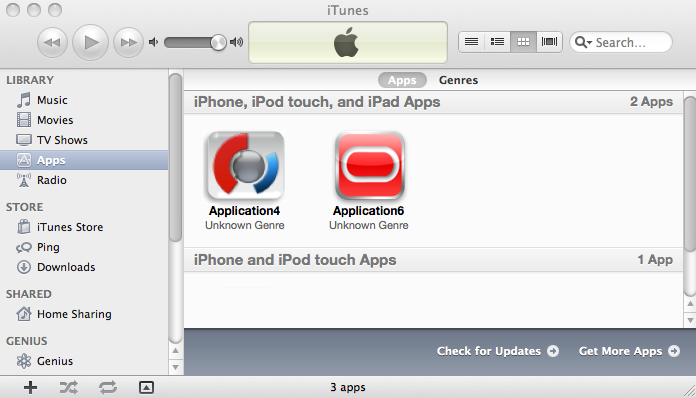
During deployment, MAF ensures that the icon displays in iTunes by adding the iTunes artwork image to the top-level of the .ipa file in a file called iTunesArtwork.
Note:
iTunes artwork is only packaged into the application when you select the deployment type called Deploy to iTunes for synchronization to device.27.2.5.5 How to Restrict the Display to a Specific Device Orientation
By default, MAF supports all orientations for both iPhone and iPad. If, for example, an application must display only in portrait and in upside-down orientations on iPads, you can limit the application to rotate only to these orientations using the Device Orientation page, shown in Figure 27-18
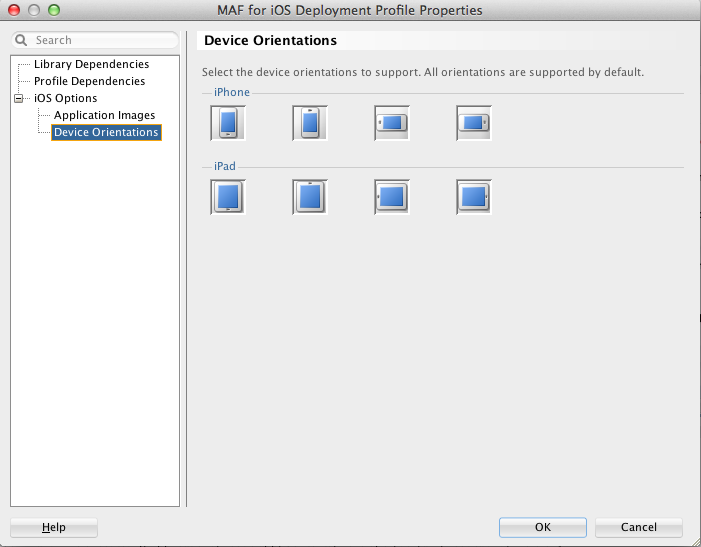
To limit the display of an application to a specific device orientation:
-
Choose Device Orientations, as shown in Figure 27-18.
-
Clear all unneeded orientations from among those listed in Table 27-3. By default, MAF deploys to all of these device orientations. By default, all of these orientations are selected.
Table 27-3 iPhone Device Orientations
Icon Description 
iPad, portrait—The home button is at the bottom of the screen.

iPad, upside-down—The home button is at the top of the screen.

iPad, landscape left—The home button is at the left side of the screen.

iPad, landscape right—The home button is at the right side of the screen.

iPhone, portrait—The home button is at the bottom of the screen.

iPhone, upside-down—The home button is at the top of the screen.
iPhone, landscape left—The home button is at the left side of the screen.

iPhone, landscape right—The home button is at the right side of the screen.
-
Click OK.
27.3 Deploying an Android Application
After you define the deployment profile, you can deploy a mobile application to the Android platform using the Deployment Action dialog, shown in Figure 27-19. Using this dialog, you can deploy the completed application to an Android emulator or to an Android-powered device for testing. After you have tested and debugged the application, this dialog enables you to bundle the mobile application as an Android application package (.apk) file so that it can be published to end users through an application marketplace, such as Google Play.
Tip:
As an alternative to the Deployment Action dialog, you can deploy a mobile application to the Android platform in a headless mode using the OJDeploy command line tool as described in Section 27.8, "Deploying MAF Applications from the Command Line."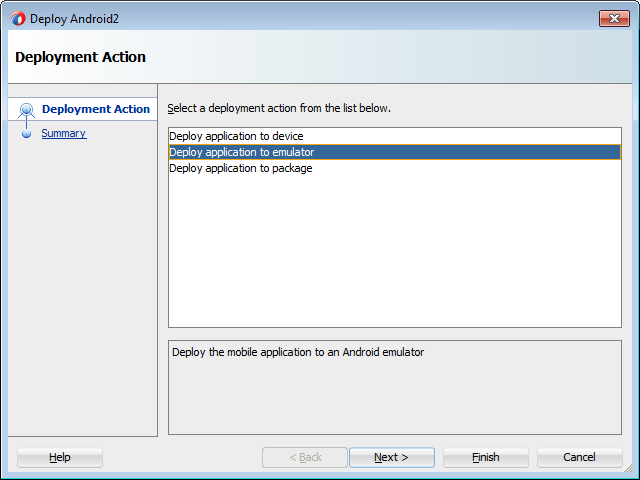
27.3.1 How to Deploy an Android Application to an Android Emulator
You can deploy the mobile application directly to an Android emulator, also known as an Android Virtual Device (AVD).
Before you begin:
Deployment to an Android emulator requires the following:
-
Install Android Platform version 21 (Android 5.0).
-
Ensure that the Android Virtual Device instance configuration reflects the ARM or Intel Atom x86 system image.
-
In the Android Options page of the deployment profile:
-
Ensure that Debug is selected.
-
Click OK.
Note:
The Android Platform preferences page must be configured with the password that is used to generate the keystore and key for debug-mode deployment. See Section 27.2.4.3, "Defining the Android Signing Options." -
-
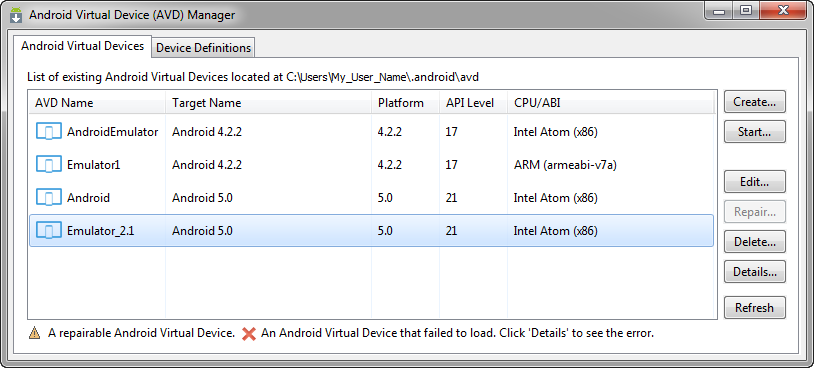
Start the Android emulator (Android Virtual Device) before you deploy an application.
You can start the emulator using the Android Virtual Device Manager, as illustrated in Figure 27-20, or from the command line by first navigating to the
toolsdirectory (located inAndroid\android-sdk) and then starting the emulator by first enteringemulator -avdfollowed by the emulator name (such as-avd AndroidEmulator1).Note:
You can run only one Android emulator during a deployment.
To deploy an application to an Android emulator:
-
Choose Applications, then Deploy, and then select an Android deployment profile.
-
Choose Deploy application to emulator and then choose Next.
-
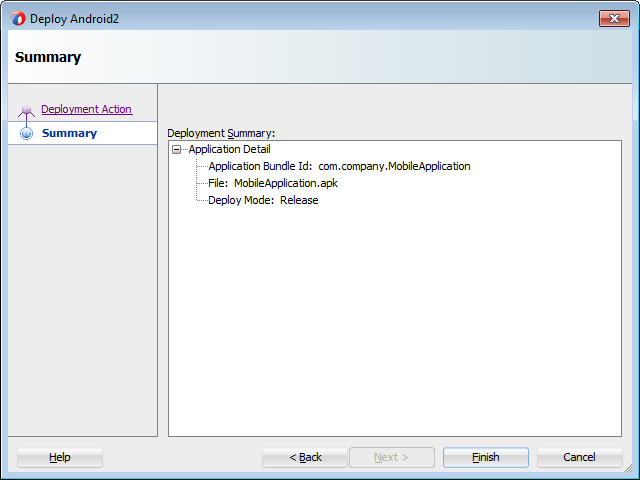
Review the Summary page, shown in Figure 27-8, choose Back to select another deployment activity or choose Finish. The Summary page displays the following parameters from the deployment profile:
-
Application Bundle Id—The unique, Java language-like package name identifying the application.
Note:
The Summary page shown in Figure 27-21 shows that the application bundle ID is in the reverse package format required for a successful deployment to an emulator. Deploying an application that does not follow the reverse-package format causes the emulator to shut down, which prevents the deployment from completing. -
File—The name of the
.apkthat is deployed to an Android target. -
Deploy Mode—The build mode. This value is either Release or Debug, depending on the value set in the deployment profile.
-
-
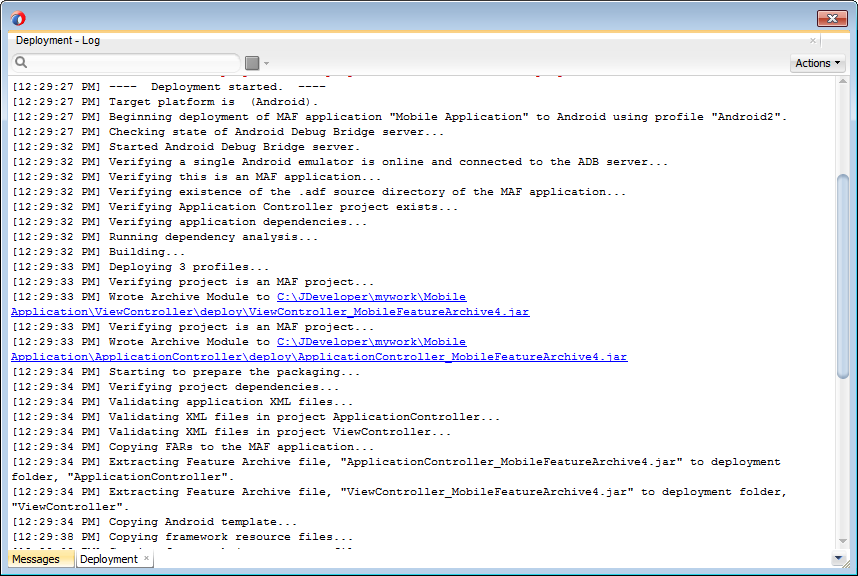
Review the deployment log, as shown in Figure 27-22. The deployment log notes that the deployer starts the Android Debug Bridge server when it detects a running instance of an Android emulator. See also Section 27.3.6, "What You May Need to Know About Using the Android Debug Bridge."
27.3.2 How to Deploy an Application to an Android-Powered Device
You can deploy a mobile application directly to an Android-powered device that runs on API 15 or later (that is, Platform 4.0.3.).
Before you begin:
In order to deploy directly to an Android-powered device, connect the device to the development computer that hosts JDeveloper, set the device to developer mode, and turn on USB debugging. For more information, see "How to Set Up an Android-Powered Device" in Oracle Mobile Application Framework Installing Oracle Mobile Application Framework.
In the Android Options page, select Debug as the build mode. Ensure that the debug signing credentials are configured in the Android Platform preference page. For details, see Section 27.2.4.1, "Setting the Options for the Application Details."
To deploy an application to an Android device:
-
Choose Applications, then Deploy, then select an Android deployment profile.
-
Choose Deploy application to device and then choose Next.
-
Review the Summary page. Click Back or Next.
-
Click Finish.
27.3.3 How to Publish an Android Application
After you have tested and debugged the application, as described in Chapter 30, "Testing and Debugging MAF Applications," you can publish it to an application marketplace (such as Google Play) by following the instructions provided on the Android Developers website (http://developer.android.com/tools/publishing/publishing_overview.html).
Before you begin:
In the Android Options page of the deployment profile, select Release as the build mode.
Note:
You must configure the signing options in the Android Platform preference page (accessed by choosing Tools > Preferences > Mobile Application Framework) as described in Section 27.2.4.3, "Defining the Android Signing Options."To deploy an application as an .apk file:
-
Choose Applications, then Deploy, then select an Android deployment profile.
-
Choose Deploy application to package and then choose Next.
-
Review the Summary page, shown in Figure 27-21. Click Back or Next.
-
Click Finish.
-
Publish the application to an application marketplace.
27.3.4 What Happens in JDeveloper When You Create an .apk File
Deploying an application results in the following being deployed in an .apk file.
-
The content in the
adfmsrc -
The content in the
.adffolder -
maf-application.xmlandmaf-feature.xmlfiles -
logging.propertiesfile -
The JVM files
27.3.5 Selecting the Most Recently Used Deployment Profiles
After you select a deployment action, JDeveloper creates a shortcut on the Deploy menu that enables you to easily redeploy the application using that same deployment action.
27.3.6 What You May Need to Know About Using the Android Debug Bridge
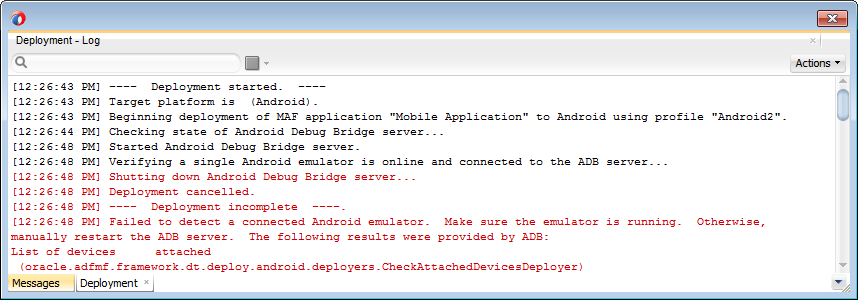
The deployment restarts the Android Debug Bridge server five times until it detects a device (if deploying to a device) or emulator (if deploying to an Android emulator). If it detects neither, then it ends the deployment process, as shown in Figure 27-23.
If you are using the Android Debug Bridge command line tool prior to deployment, then you must enter the same command again after the deployment has completed. For example, if you entered adb logcat to view logging information for an emulator or device prior to deployment, you would have to enter adb logcat again after the application has been deployed to resume the retrieval of the logging output. For more information about the Android Debug Bridge command line tool, which is located within (and executed from) the platform-tools directory of the Android SDK installation, refer to the Android Developers website (http://developer.android.com/tools/help/adb.html).
27.4 Deploying an iOS Application
The Deployment Action dialog, shown in Figure 27-24, enables you to deploy an iOS application directly to an iOS simulator or to a device through iTunes. You can only deploy an iOS application from an Apple computer. Deployment to the iOS simulator does not require membership to either the iOS Developer Program or the iOS Developer Enterprise Program; registration as an Apple developer, which provides access to versions of Xcode that are not available through the App Store, will suffice. For more information on iOS developer programs, which are required for deployment to iOS-powered devices (and are described at Section 27.4.2, "How to Deploy an Application to an iOS-Powered Device," and Section 27.4.5, "How to Distribute an iOS Application to the App Store"), see https://developer.apple.com/programs/.
Tip:
As an alternative to the Deployment Action dialog, you can deploy a mobile application to the iOS platform manually using the OJDeploy command line tool as described in Section 27.8, "Deploying MAF Applications from the Command Line."27.4.1 How to Deploy an iOS Application to an iOS Simulator
The Deployment Actions dialog enables you to deploy an iOS application directly to an iOS simulator.
Before you begin:
To enable deployment to an iOS simulator, you must perform the following tasks:
-
Run Xcode after installing it, agree to the licensing agreements, and perform other post-installation tasks, as prompted.
Note:
You must run Xcode at least once before you deploy the application to the iOS simulator. Otherwise, the deployment will not succeed. -
In the iOS Options page of the deployment profile, select Debug, and then click OK.
-
Before you deploy an application, shut down the iOS simulator if it is running. If you do not shut down the simulator, the deployment will do it for you.
-
Refer to the iOS Simulator User Guide, available through the iOS Developer Library (
http://developer.apple.com/library/ios/navigation/). The iOS simulator is installed with Xcode.
To deploy an application to an iOS simulator:
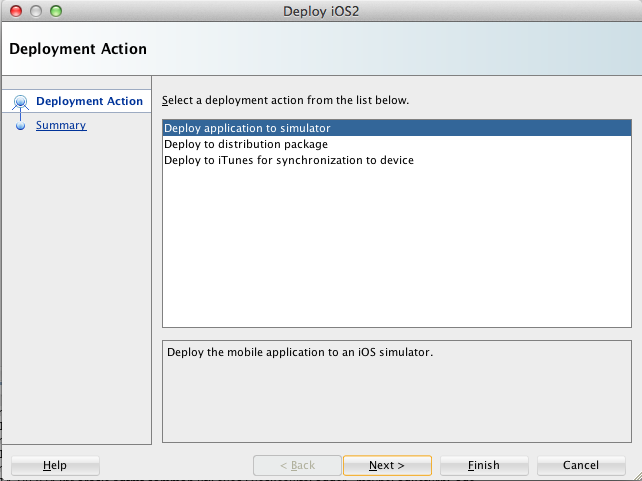
-
Choose Applications, then Deploy, then select an iOS deployment profile.
-
Choose Deploy application to simulator and then choose Next.
-
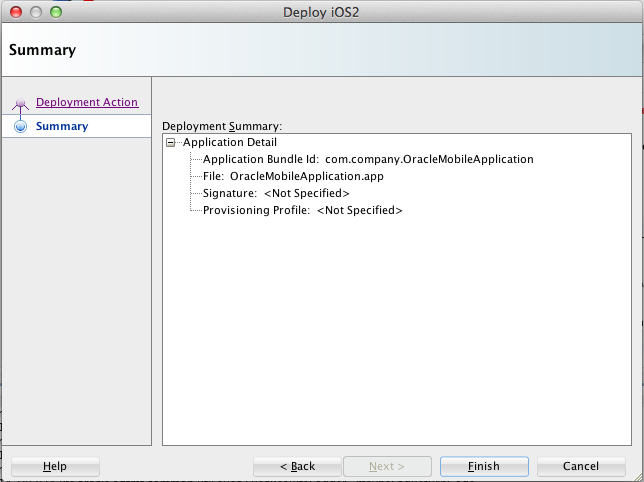
Review the Summary page, shown in Figure 27-25, which displays the following values. Click Finish.
-
Application Bundle Id—The unique name that includes a Java language-like package name (com.<organization name>.<application name>) prefixed with the Bundle Seed that is generated from the iOS Provisioning Portal.
-
File—The file name of the final image deployed to an iOS target.
-
Signature—The developer or company that authored the application. If this value has not been configured in the Options page of the deployment profile, then the Summary page displays <Not Specified>.
-
Provisioning Profile—The name of the provisioning profile that associates one or more development certificates and devices with an application ID. If this value is not configured in the Options page of the deployment profile, then the Summary page displays <Not Specified>.
Note:
Deployment to an iOS simulator does not require that the values for Signing Identity and Provisioning Profile be defined. In this deployment scenario, the Summary page displays <Not Specified> for these values. -
27.4.2 How to Deploy an Application to an iOS-Powered Device
The Deploy to iTunes for Synchronization to device option enables you to deploy a mobile application to an iOS-powered device for debugging and testing. Deployment to an iOS-powered device or to a distribution site requires membership to either the iOS Developer Program or the iOS Developer Enterprise Program. For more information, see https://developer.apple.com/programs/.
Before you begin:
You cannot deploy an application directly from JDeveloper to a iOS device; an application must instead be deployed from the Applications folder in Apple iTunes. To accomplish this, you must perform the following tasks:
-
Download Apple iTunes to your development computer and run it at least once to create the needed folders and directories.
-
Set the location of the
Automatically Add to iTunesfolder (the location used for application deployment) in the iOS Platform preference page, shown in Figure 27-26.Tip:
Although your user home directory (/User/<username>/Music/iTunes/iTunes Media/Automatically Add to iTunes.localized) is the default directory for the iTunes Media folder, you can change the location of this folder as follows:-
In iTunes, select Edit, Preferences, then Advanced.
-
Click Change and then browse to the new location.
-
Consolidate the library.
-
Delete the original iTunes Media folder.
For instructions, refer to Apple Support (
http://support.apple.com).You must also update the location in the iOS Platform preference page.
-
-
Enter the name and location of the provisioning profile and the signing identity in the iOS Platform preference page. The OS Provisioning Portal generates the certificate and provisioning profile needed for deployment to iOS devices, or for publishing
.ipafiles to the App Store or to an internal download site.Note:
The deployment will fail unless you set the iOS provisioning profile and signing identity to deploy to a device or to an archive. MAF logs applications that fail to deploy under such circumstances. For more information, see Section 27.4.4, "What You May Need to Know About Deploying an Application to an iOS-Powered Device." -
In the iOS Options page of the deployment profile, select Debug as the build mode and then OK.
-
Refer to the App Distribution Guide, which is available through the iOS Developer Library (
http://developer.apple.com/library/ios/navigation/).
To deploy an application to an iOS-powered device:
-
Choose Applications, then Deploy, and then select an iOS deployment profile.
-
Choose Deploy to iTunes for Synchronization to device and then choose Next.
-
Review the Summary page, which displays the following values. Click Finish.
-
Application Bundle Id—The unique name that includes a Java language-like package name (com.<organization name>.<application name>) prefixed with the Bundle Seed that is generated from the iOS Provisioning Portal.
-
File—The file name of the final image deployed to an iOS target.
-
Signature—The developer (or company) who authored the application. If this value has not been configured in the Options page of the deployment profile, then the Summary page displays <Not Specified>.
-
Provisioning Profile—The name of the provisioning profile that associates one or more development certificates and devices with an application ID. If this value is not configured in the Options page of the deployment profile, then the Summary page displays <Not Specified>.
Note:
You must specify the Signature and Provisioning Profile values in the Options page to enable deployment to iTunes. -
-
Connect the iOS-powered device to the development computer.
-
Open iTunes and then synchronize the device.
27.4.3 What Happens When You Deploy an Application to an iOS Device
The application appears in the iTunes Apps Folder, similar to the one illustrated in Figure 27-17 after a successful deployment.
27.4.4 What You May Need to Know About Deploying an Application to an iOS-Powered Device
You cannot deploy an iOS application (that is, an .ipa file) to an iOS-powered device or publish it to either the App Store or to an internal hosted download site without first creating a provisioning profile using the iOS Provisioning Portal, which is accessible only to members of the iOS Developer Program. You enter the location of the provisioning profile and the name of the certificate in the Options page as described in Section 27.2.5.2, "Setting the Device Signing Options."
As noted in the App Distribution Guide, (which is available through the iOS Developer Library at http://developer.apple.com/library/ios/navigation/), a provisioning profile associates development certificates, devices, and an application ID. The iOS Provisioning Portal enables you to create these entities as well as the provisioning profile.
Tip:
After you download the provisioning profile, double-click this file to add it to yourLibrary/MobileDevice/Provisioning Profile directory.
27.4.4.1 Creating iOS Development Certificates
A certificate is an electronic document that combines information about a developer's identity with a public key and private key. After you download a certificate, you essentially install your identity into the development computer, as the iOS Development Certificate identifies you as an iOS developer and enables the signing of the application for deployment. In the iOS operating environment, all certificates are managed by the Keychain.
Using the Certificates page in the iOS Provisioning Portal, you log a CSR (Certificate Signing Request). The iOS Provisioning Portal issues the iOS Development Certificate after you complete the CSR.
27.4.4.2 Registering an Apple Device for Testing and Debugging
After you install a certificate on your development computer, review the Current Available Devices tab (located in the iOS Provisioning Portal's Devices page) to identify the Apple devices used by you (or your company) for testing or debugging. The application cannot deploy unless the device is included in this list, which identifies each device by its serial number-like Unique Device Identifier (UDID).
27.4.4.3 Registering an Application ID
An application ID is a unique identifier for an application on a device. An application ID is comprised of the administrator-created reverse domain name called a Bundle Identifier in the format described in Section 3.2, "Setting Display Properties for a MAF Application" prefixed by a ten-character alpha-numeric string called a bundle seed, which is generated by Apple. Figure 27-28 illustrates an application ID that is unique, one that does not share files or the Keychain with any other applications.
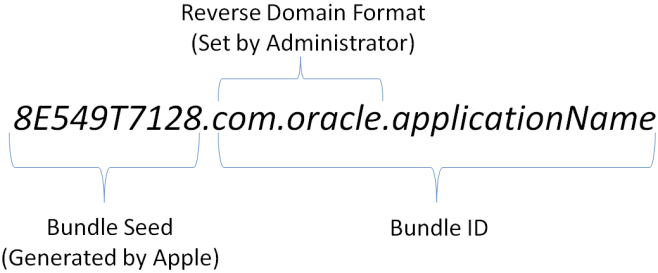
Using a wildcard character (*) for the application name, such as 8E549T7128.com.oracle.*, enables a suite of applications to share an application ID. For example, if the administrator names com.oracle.MAF.* on the iOS Provisioning Portal, it enables you to specify different applications (com.oracle.MAF.application1 and com.oracle.MAF.application2).
Note:
For applications that receive push notifications, the application ID must be a full, unique ID, not a wildcard character; applications identified using wildcards cannot receive push notifications. For more information, see the "Provisioning and Development" section of Local and Push Notification Programming Guide, available from the iOS Developer Library (http://developer.apple.com/library/ios/navigation/)When applications share the same prefix, such as 8E549T7128, they can share files or Keychains.
Note:
The Bundle ID must match the application ID set in the Options page of the deployment profile.27.4.5 How to Distribute an iOS Application to the App Store
After you test and debug an application on an iOS device, you can distribute the application to a wider audience through the App Store or an internal download site. To publish an application to the App Store, you must submit the .ipa file to iTunes Connect, which enables you to add .ipa files to iTunes, as well as update applications and create test users.
Before you begin:
Before you distribute the application, you must perform the following tasks:
-
In the iOS Platform preference page, shown in Figure 27-26, enter the location of the
Automatically Add to iTunesdirectory.Tip:
Run iTunes at least once before entering this location. See also Section 27.4.2, "How to Deploy an Application to an iOS-Powered Device." -
Test the application on an actual iOS device. See Section 27.4.2, "How to Deploy an Application to an iOS-Powered Device."
-
Obtain a distribution certificate through the iOS Provisioning Portal.
Note:
Only the Team Agent can create a distribution certificate. -
Obtain an iTunes Connect account for distributing the
.ipafile to iTunes. For information, refer to the App Store distribution guidelines at http://developer.apple.com/. -
You may want to review the iTunes Connect Developer Guide available through the iOS Developer Library (
http://developer.apple.com/library/ios/navigation/). -
In the iOS Options page of the deployment profile, select App Distribution Guide Release as the build mode and then click OK.
To distribute an iOS application to the App Store:
-
Choose Applications, then Deploy, and then select an iOS deployment profile.
-
Choose Deploy to Distribution Package.
-
Review the Summary page, which displays the following values. Click Finish.
-
Application Bundle Id—The unique name that includes a Java language-like package name (com.<organization name>.<application name>) prefixed with the Bundle Seed that is generated from the iOS Provisioning Portal.
-
File—The file name of the final image deployed to an iOS target.
-
Signature—The application's author. If this value has not been configured in the iOS Platform preference page of the deployment profile, then the Summary page displays <Not Specified>.
-
Provisioning Profile—The name of the provisioning profile that associates one or more development certificates and devices with an application ID. If this value is not configured in the iOS Platform preference page, then the Summary page displays <Not Specified>.
Note:
You must specify the Signature and Provisioning Profile values in the Options page to enable the.ipafile to be accepted by iTunes. -
-
Log in to iTunes Connect.
-
Submit the
.ipafile to iTunes Connect for consideration. Refer to the iTunes Connect Developer Guide for information (http://developer.apple.com/library/ios/navigation/). -
Refer to the iTunes Connect Developer Guide for information on updating the binary (http://developer.apple.com/library/ios/navigation/).
27.5 Deploying Feature Archive Files (FARs)
To enable re-use by MAF view controller projects, application features— typically, those implemented as MAF AMX or Local HTML— are bundled into an archive known as a Feature Archive (FAR). As stated in Chapter 8, "Reusing MAF Application Content," a FAR is a JAR file that contains the application feature artifacts that can be consumed by mobile applications, such as icon images, resource bundles, HTML, JavaScript, or other implementation-specific files. (A FAR may contain Java classes, though these classes must be compiled.) The following example illustrates the contents of a FAR, which includes a single maf-feature.xml file and a connections.xml file. For more information on connections.xml, see Chapter 16, "Configuring End Points Used in MAF Applications.".
/* Contents of a Feature Archive File */
connections.xml (or some form of connection metadata)

  META-INF
     adfm.xml
     maf-feature.xml
     MANIFEST.MF
     task-flow-registry.xml

  oracle
    application1
      mobile
         Class1.class
         DataBindings.cpx
         pageDefs
           view1PageDefs

  model
     adfc-mobile-config.adfc.diagram
     ViewController-task-flow.adfc.diagram

  public_html
     adfc-mobile-config.xml
       index.html
       navbar-icon.html
       springboard-icon.html
     view1.amx
     ViewController-task-flow.xml
Working with Feature Archive files involves the following tasks:
-
Creating a Feature Archive file—You create a Feature Archive by deploying a feature application as a library JAR file.
-
Using the Feature Archive file when creating a mobile application—This includes importing FARs and re-mapping the imported connection.
-
Deploying a mobile application that includes features from FARs—This includes unpacking the FAR to a uniquely named folder within the deployment template.
Note:
MAF generates FARs during the deployment process. You only need to deploy a view controller project if you use the FAR in another application.
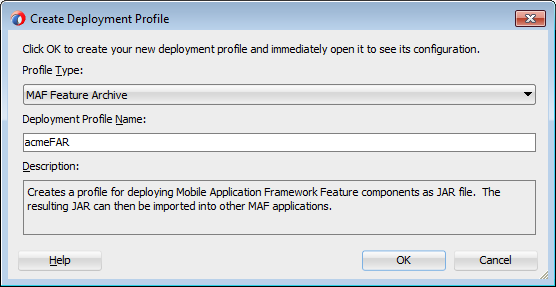
27.5.1 How to Create a Deployment Profile for a Feature Archive
Use the Create Deployment Profile dialog, shown in Figure 27-29.
Before you begin:
Create the appropriate connections for the application. Because FARs may be used in different MAF applications with different connection requirements, choose a connection name that represents the connection source or the actual standardized connection name.
To create a deployment profile for a Feature Archive:
-
Right-click a view controller project, choose New, then Deploy, and then New Deployment Profile.
Note:
You do not need to create a separate, application-level deployment profile. -
Select MAF Feature Archive in the Create Deployment Profile dialog.
-
Enter a profile name, or accept the default, and then click OK.
Note:
Name the profile appropriately. Otherwise, you may encounter problems if you upload more than one application feature with the same archive name. For more information, see Section 8.5, "What You May Need to Know About Enabling the Reuse of Feature Archive Resources." -
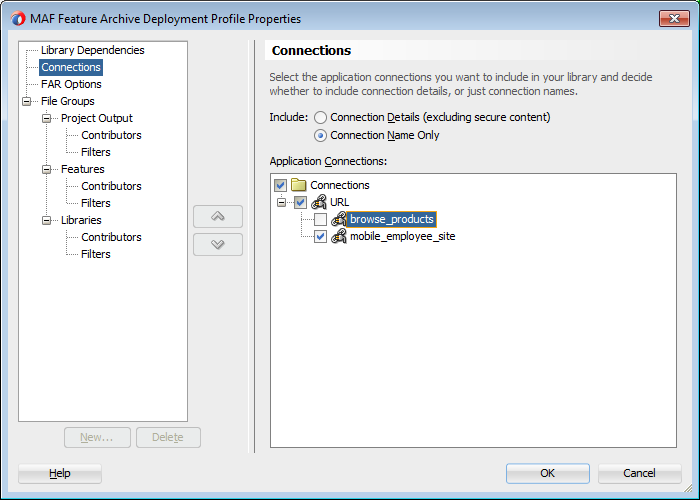
Select the connections that you want to include in the Feature Archive JAR file, as shown in Figure 27-30.
-
Click Next, review the options, and then click Finish.
27.5.2 How to Deploy the Feature Archive Deployment Profile
The Deployment Actions dialog enables you to deploy the FAR as a JAR file. This dialog, shown in Figure 27-31, includes only one deployment option, Deploy to feature archive JAR file.
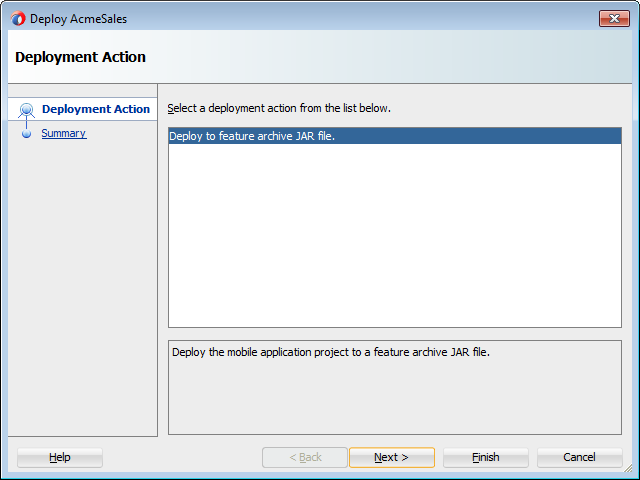
To deploy the Feature Archive deployment profile:
-
Right-click the view controller project and then select the Feature Archive deployment profile.
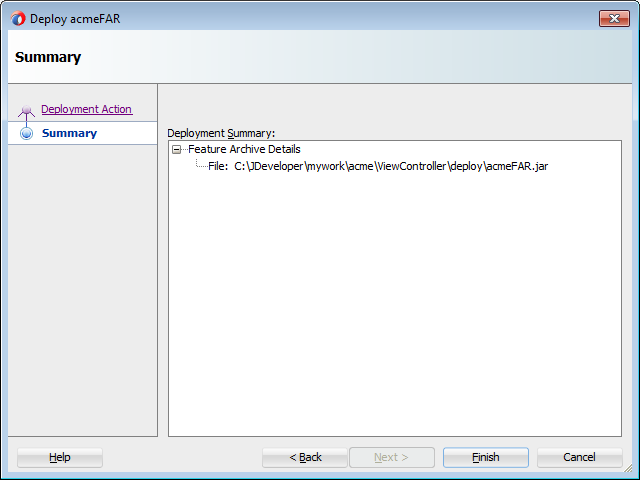
-
Click Finish. The Summary page, shown in Figure 27-32, displays the full path of where the Feature Archive file's JAR path is deployed.
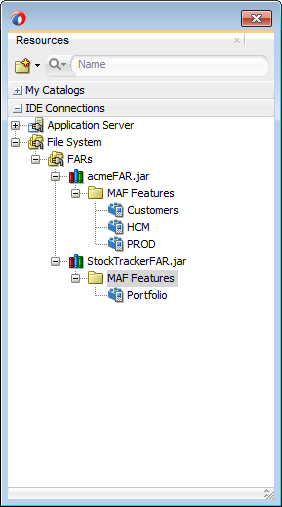
27.5.3 What Happens When You Deploy a Feature Archive File Deployment Profile
After you complete the deployment action dialog, MAF creates a library JAR in the path shown in the Summary page. To make this JAR available for consumption by other applications, you must first make it available through the Resource Palette, shown in Figure 27-33 (and described in Section 8.2, "Using FAR Content in a MAF Application") by creating a connection to the location of the Feature Archive JAR. Figure 27-33 shows Feature Archives that can be made available to a mobile application through a file system connection.
27.6 Creating a Mobile Application Archive File
You can create a new mobile application from an existing mobile application by first packaging the original mobile application as a Mobile Application Archive (.maa) file and then by deriving a new mobile application from this file. An .maa file can be used by third parties, as described in Section 27.7, "Creating Unsigned Deployment Packages."
An .maa file preserves the structure of the mobile application. Table 27-4 describes the contents of this file.
Table 27-4 Contents of a Mobile Application Archive File
| Directory | Description |
|---|---|
|
|
Contains the
|
|
|
Contains a JAR file for each project in the workspace. For example, a |
|
|
Contains the application-level libraries (including FARs) that are external to the original mobile application. |
|
|
Includes the |
|
|
Includes the following directories:
|
In addition to the artifacts listed in Table 27-4, the .maa file includes any folder containing FARs or JAR files that are internal to the original mobile application, as well as its control (.jws)file. See also Section 27.7.2, "What Happens When You Import a MAF Application Archive File."
27.6.1 How to Create a Mobile Application Archive File
JDeveloper creates a default MAF Application Archive deployment profile after you create a mobile application. Using the Mobile Application Archive wizard, you can create the .maa file.
Tip:
You can also create an.maa file using OJDeploy, as described in Section 27.8, "Deploying MAF Applications from the Command Line."To create a Mobile Application Archive file:
-
Click Application, then Deploy, then New Deployment Profile.
-
In the Create Deployment Profile dialog, choose MAF Application Archive and then click OK, as shown in Figure 27-34.
-
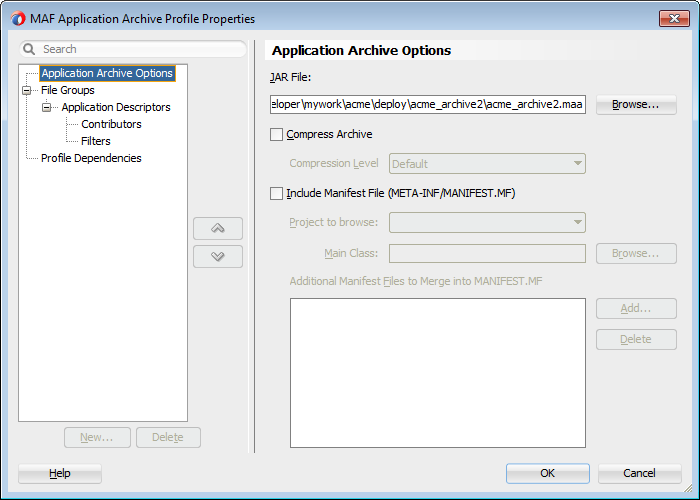
If needed, enter a name for the Mobile Application Archive in the Application Archives Options page, shown in Figure 27-35, or accept the default name (and path). Click OK.
-
If needed, perform the following:
-
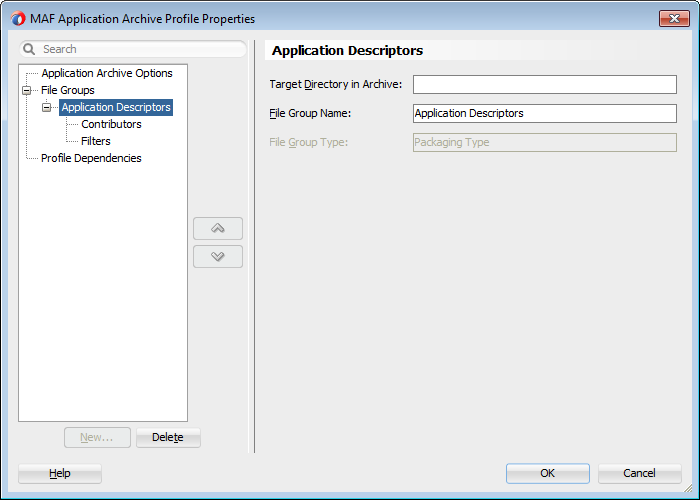
In the Application Descriptors page, shown in Figure 27-36, enter the file group name (or accept the default name) used for the contents of the
META-INFfolder (application_workspace\src\META-INF). -
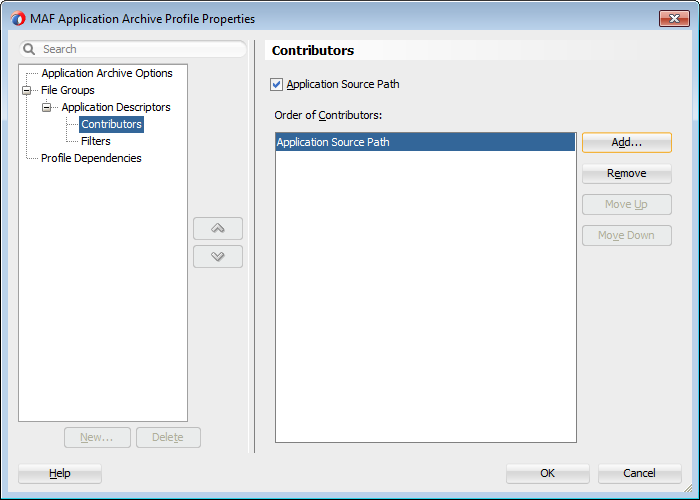
Select the Contributors sub-page of this Application Descriptors page to edit the list of directories and JAR files that provide the contents for the file group.
-
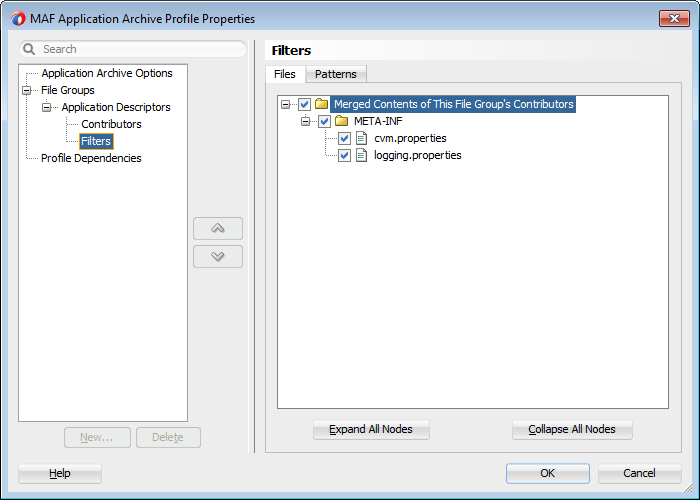
Use the Filters page, shown in Figure 27-38 to edit the files that will be included in the
.maafile or set the content inclusion or exclusion rules. -
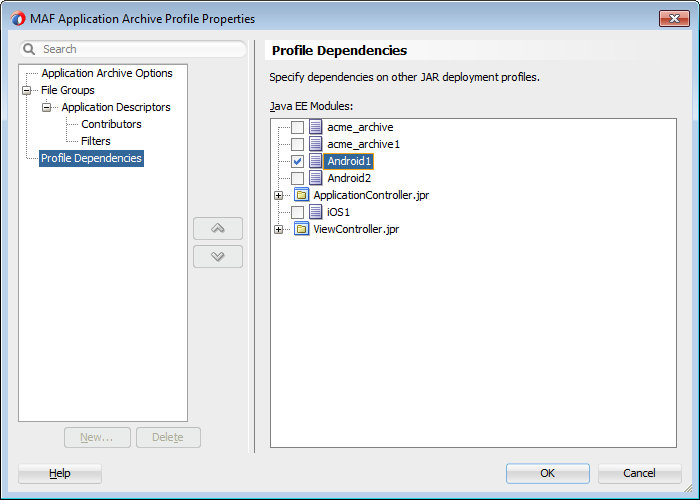
Use the Profile Dependencies page, shown in Figure 27-39, to specify dependent profiles within the project.
-
To package a mobile application as a MAF Application Archive file:
-
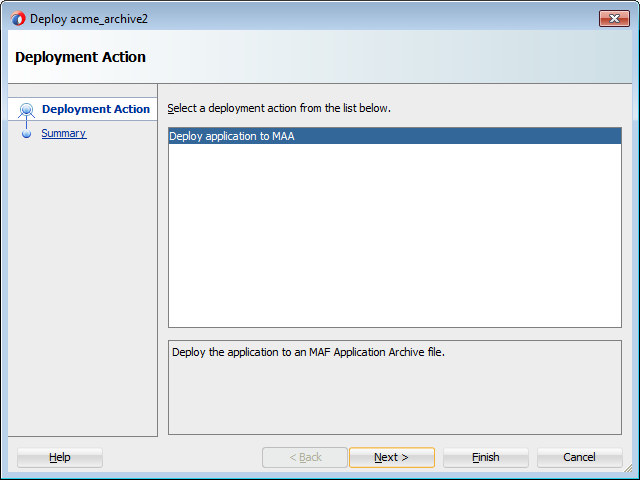
Choose Application, then Deploy and then choose the MAF Application Archive deployment profile.
-
In the Deployment Action wizard, select Deploy application to MAA, as shown in Figure 27-40.
-
Click Next to review the deployment summary, as shown in Figure 27-41.
-
Click Finish.

27.7 Creating Unsigned Deployment Packages
The MAF Application Archive (.maa) file format enables you to provide third-parties with an unsigned mobile application. By deriving a mobile application from an imported .maa file, you enable various customizations, which include:
-
Giving an application a unique application ID (to enable push notifications, for example).
-
Signing an application with a company-specific credential or certificate.
-
Replacing the resources with customized splash screens and application icons.
Note:
Importing an.maa file into an existing application overwrites the workspace and project container files (the.jws and .jpr files, respectively). As a result, all prior changes to MAF AMX pages and configuration files, such as maf-application.xml, maf-config.xml, connections.xml, and adf-config.xml, will not be retained.27.7.1 How to Create an Unsigned Application
You create an unsigned application by importing an .maa file into a new mobile application.
To create an unsigned application:
-
Choose File and then New.
-
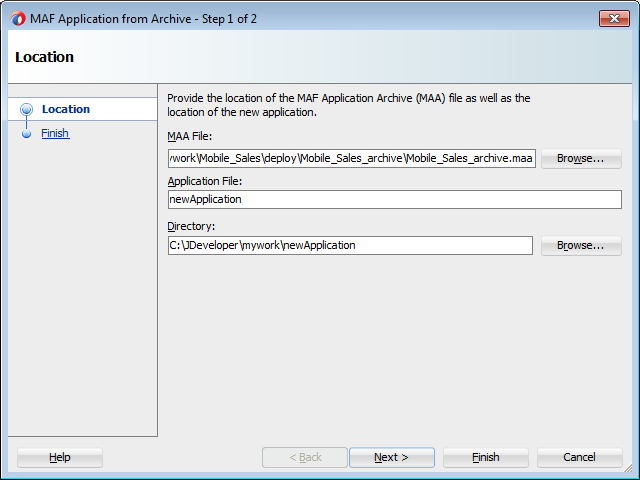
In the New Gallery, choose Applications and then MAF Application from Archive File.
Note:
Alternatively, you can choose File, then Import, and then MAF Application from Archive File. -
In the Location page, choose Browse in the MAA File field.
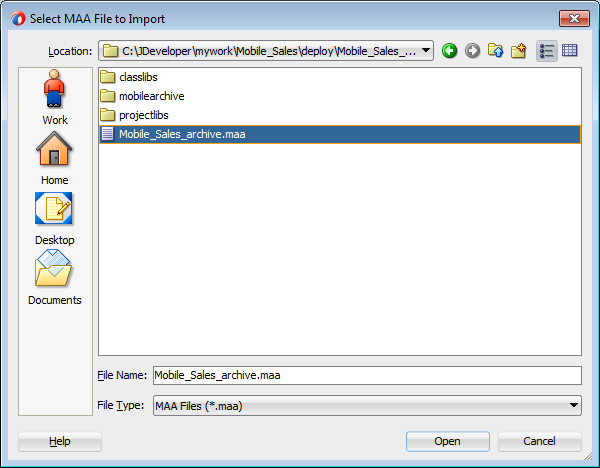
-
In the Select MAA File to Import page, highlight the
.maafile, as shown in Figure 27-42, and then click Open. -
If needed, perform the following, or accept the default values:
-
Enter a name for the mobile application derived from the
.maafile in the Application File field, as shown in Figure 27-43. -
Click Browse to retrieve the directory of the mobile application.
-
-
Click Next.
-
Review the import summary information and then click Finish.

27.7.2 What Happens When You Import a MAF Application Archive File
MAF performs the following after you import an .maa file:
-
Creates an application folder.
-
Unpacks the workspace container (
.jws) file from the.maafile to the application file and renames it per the user-specified value. -
Unpacks the
adfdirectory and its contents to the application folder. This directory is renamed.adf. -
Unpacks the
META-INFdirectory and its contents and places them in asrcdirectory in the application folder. -
Unpacks the
ExternalLibsdirectory and its contents to the application folder.Note:
While any of the external resources contained in this directory are available in the mobile application that has been packaged as an.maafile (and imported into the application), the references to these resources will be invalid for a mobile application derived from the.maafile. -
Unpacks the
resourcesdirectory to the application folder. -
Unpacks all folders that contain FARs (or other libraries) that are internal to the original mobile application. MAF preserves the original locations of these artifacts.
-
For each JAR file within the original mobile application's
Projectsdirectory, MAF performs the following:-
Creates a project folder under the application directory that corresponds to the name of the JAR file (but without the
.jarextension). -
Unpacks the contents of the JAR files into the appropriate project folder. MAF includes the following in these project folders:
-
The original
.jprfile. -
The standard directories, such as
META-INF,public_html,src, andadfmsrc. -
The contents of the
ExternalLibsdirectory.Note:
While any of the external resources contained in this directory are available in the MAF project that has been packaged with the imported.maafile, the references to these resources will be invalid for an existing project, or a project created by importing the.maafile. -
The
classlibdirectory, which contains any Java classes packaged in a JAR file.Note:
If the.maafile includes aclasslibdirectory, then MAF adds all of the JAR files from this directory as library dependencies in the newly created mobile application.
-
-
27.8 Deploying MAF Applications from the Command Line
You can deploy iOS or Android applications from JDeveloper without starting the JDeveloper IDE using the OJDeploy command line tool. Command line deployment can serve as a tool for testing, as well as a means of deploying applications using a script.
After you have created iOS or Android deployment files using Deployment Profile Properties editor, you can use OJDeploy to deploy applications in the headless mode to iOS simulators and iOS-powered devices (through iTunes), or as iOS bundles (.ipa and .app files), or Feature Archive JAR files. Likewise, OJDeploy enables you to deploy applications to both Android emulators and Android-powered devices, or deploy them as an Android application package (.apk) file or as Feature Archive JAR files.
Note:
To use OJDeploy on a Mac, add the following line to theojdeploy.conf file:
SetSkipJ2SDKCheck true
This file is located at: jdev_install/jdeveloper/jdev/bin
27.8.1 Using OJDeploy to Deploy Mobile Applications
The following commands enable you to deploy MAF deployment profiles:
-
deployToDevice—Deploys an application to iOS- or Android-powered devices. For iOS applications, this command is used in debugging scenarios where the application is deployed to a device using iTunes. For more information, see Section 27.4.5, "How to Distribute an iOS Application to the App Store." -
deployToSimulator—Deploys an application to an iOS simulator (as an.appfile) or Android emulator. You can only deploy a mobile application to an iOS simulator on an Apple computer. -
deployToPackage—Deploys an iOS application as an.ipafile or an Android application as an.apkfile. You can only package an application as an.ipafile on an Apple computer. -
deployToFeatureArchive—Deploys a Feature Archive to a JAR file. -
deployToApplicationArchive—Packages a mobile application as a MAF Application Archive (.maa) file.
You use these commands in conjunction with the ojdeploy command line tool, OJDeploy's arguments, and its options as follows:
ojdeploy deployToSimulator -profile <profile name> -workspace <jws file location>
Note:
OJDeploy commands and arguments are case-sensitive.Table 27-5 lists the OJDeploy arguments that you use to modify the MAF deployment commands.
Tip:
Using the-help option with any command (such as ojdeploy deployToSimulator -help) retrieves usage and syntax information.Table 27-5 OJDeploy Arguments for MAF Deployments
| Argument | Description |
|---|---|
|
|
The name of the Android or iOS deployment profile. For example: ojdeploy deployToSimulator -profile iosDeployProfile ... |
|
|
The full path to the mobile application workspace container ( ... -workspace /usr/jsmith/mywork/Application1/Application1.jws To package a mobile application as a mobile Application Archive:
ojdeploy deployToApplicationArchive
         -profile applicationArchiveProfile
         -workspace /usr/jdoe/Application1/application1.jws
|
|
|
For the
ojdeploy deployToFeatureArchive
         -profile farProfileName
         -project ViewController
         ...
|
|
|
The full path to a build file for batch deploy. |
|
|
Print XML Schema for the build file. |
In addition to the arguments listed in Table 27-5, you can also use OJDeploy options described in the "Command Usage" section of Oracle Fusion Middleware Developing Applications with Oracle JDeveloper.
Note:
The following options are not supported:-
-forcerewrite -
-nocompile -
-nodatasources -
-nodepdendents -
-outputfile -
-updatewebxmlejbrefs
Table 27-6 provides examples of how to use the OJDeploy options with the MAF deployment commands.
Table 27-6 OJDeploy Options for MAF Deployments
| Option | Description |
|---|---|
|
|
Deletes all files from the project output directory before compiling. For example:
ojdeploy deployToSimulator
         -profile iosDeployProfile
         -workspace /usr/jsmith/jdeveloper/mywork/Application1.jws
         -clean
|
|
|
Redirects the standard output and error logging streams to a file for each profile and project. For example:
ojdeploy deployToSimulator -profile iosDeployProfile
         -workspace /usr/jsmith/jdeveloper/mywork/Application1.jws
         -clean
         -stdout /usr/jsmith/stdout/stdout.log
         -stderr /usr/jsmith/stderr/stderr.log
|
Table 27-7 lists the macros used with the deployToApplicationArchive command:
Table 27-7 Macros Used with MAF Application Archive Packaging
| Macros | Description |
|---|---|
|
|
The name of the application workspace container file (without the |
|
|
The directory of the application workspace container ( |
|
|
The name of the profile being deployed. |
|
|
The default deployment directory for the profile. |
|
|
Override the current OJDeploy directory using this parameter. You can also override the current OJDeploy directory using the basedir attribute in the build script. |
27.9 Deploying with Oracle Mobile Security Suite (OMSS)
Oracle Mobile Security Suite (OMSS) provides enterprise-level security for mobile applications. It offers data leakage prevention and encryption of application data and database content through containerization at deployment time. For more information about containerizing your MAF application with OMSS, see Section 2.7, "Containerizing a MAF Application for Enterprise Distribution."
Before you begin:
You must have the OMSS containerization tool installed. This tool is a command-line utility with the file name c14n. You can download OMSS and read instructions on installation on the Oracle Technology Network:
http://www.oracle.com/technetwork/middleware/id-mgmt/overview/default-2099033.html
Note:
For iOS, you must also have selected the name of the provisioning profile in the iOS Platform preferences page as described in Section 27.2.5.2, "Setting the Device Signing Options."To containerize an application using Oracle Mobile Security Suite:
-
Choose Tools, then Preferences, and then Mobile Application Framework.
-
Select Containerization.
-
Click the Browse icon and browse to the location of the Oracle Mobile Security
c14ncontainerization tool on your local file system, as shown in Figure 27-45. -
Click OK to select the containerization tool.
-
Choose Application > Application Properties > Deployment.
-
In the Deployment page, double-click a deployment profile, then select Options.
-
At the bottom of the Options page, select Enable Oracle Mobile Security Suite.
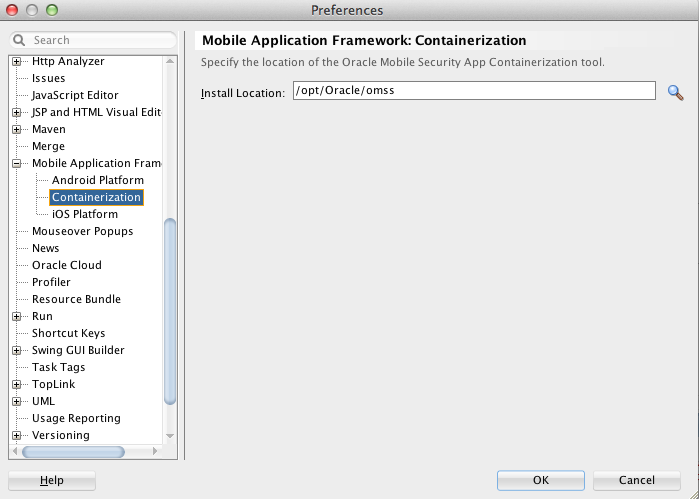
To deploy an application using Oracle Mobile Security Suite:
-
Choose Application, then Deploy, and then select a deployment profile.
-
In the Deployment Action dialog, choose how to deploy the application.
Note:
For iOS, containerization is supported for iTunes deployment only. Deployment to a distribution package or simulator will not create a containerized.ipafile.For Android, containerization is supported for deployment only to a device or distribution package. Deployment to an emulator will not create a containerized
.hfile. -
Deploy the application. A platform-specific file (
.ipafor iOS,.hfor Android) secured by Oracle Mobile Security Suite will be created. After you add the containerized application to your device, it will display a lock icon, as shown in Figure 27-46.
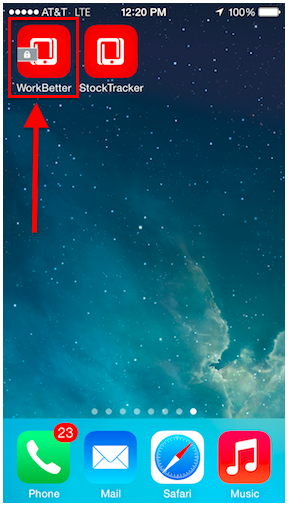
27.9.1 What Happens When You Containerize Your App with OMSS
When you deploy a MAF application containerized with Oracle Mobile Security Suite (OMSS), you can then upload it to the OMSS Mobile App Catalog, which displays a list of currently available apps. Before publishing the application to end users, the OMSS administrator applies various policies to the app to manage its functionality. By applying specific policies on the OMSS server side, the OMSS administrator can manage the security and sharing requirements for applications containerized with the Oracle Mobile Security App Containerization Tool. Data in transit and data stored locally inside containerized apps on the mobile device is encrypted. Encrypted data storage includes application data, including files, databases, application cache, and user preferences.
After applying OMSS data leakage protection and encryption, you can then make the app available to users from a download site.
Note:
iOS MAF apps that are containerized with OMSS can only be distributed to users through an internal download site or enterprise app store. Containerized iOS MAF apps cannot be uploaded to the Apple App store.This restriction is not applicable to Android MAF apps that are containerized with OMSS. These apps can be distributed through an internal download site, enterprise app store, or Google Play.
For details about how system administrators use the OMSS Mobile App Catalog to manage the MAF application provisioned to devices and workspaces, see the "Managing Devices and Workspaces" chapter in Administering Oracle Mobile Security Suite.
The following OMSS data leakage protection policies restrict how and if users can share data within an app:
-
Email allowed can restrict the ability to send email from an app.
-
Instant Message allowed can restrict the ability to send Instant Message from an app.
-
Video chat allowed restricts the ability to share information via services such as FaceTime.
-
Social Share allowed restricts the ability to share information via services such as Facebook or Twitter.
-
Print allowed restricts the ability of the user to print.
-
Restrict file sharing restricts the ability of the user to share files outside the secure enterprise workspace.
-
Restrict copy/paste allows copy/paste inside the secure container, containerized apps or between containerized apps, but not to apps outside the secure enterprise workspace.
-
Redirects to container allowed prevents any app outside the Mobile Security Container workspace from redirecting a URL into the container.
-
Save to media gallery allowed prevents images, videos and audio files from being saved to media gallery and photo stores.
-
Save to local contacts allowed prevents contacts inside secure enterprise workspace apps from being saved down to native device contacts app.
-
Redirects from container allowed prevents any vApp from the Mobile Security Container workspace or containerized app from redirecting a URL outside the Mobile Security Container workspace or containerized app.