10 Using Plugins in MAF Applications
This chapter includes the following sections:
10.1 Introduction to Using Plugins in MAF Applications
MAF packages a number of Cordova plugins that enable your MAF application to interact with the device on which you deploy the application.
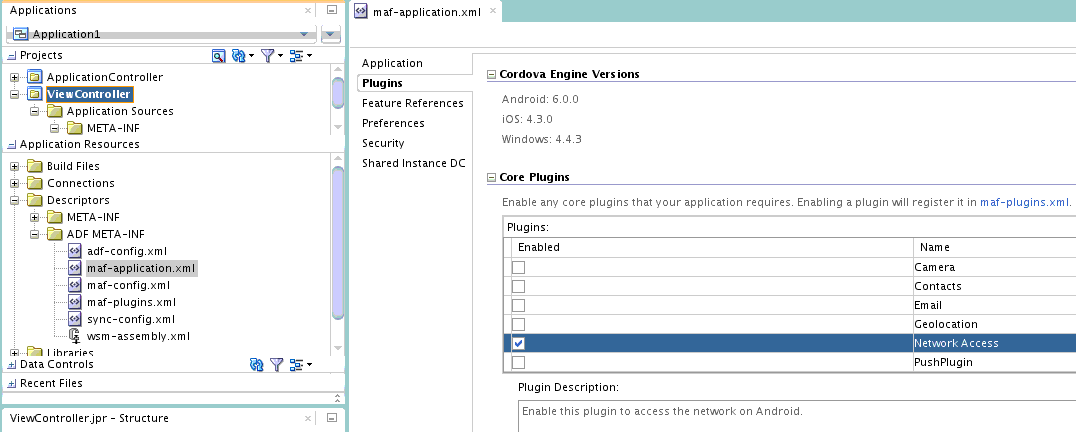
Core plugins are the plugins that MAF provides by default. View these plugins in the overview editor of maf-application.xml. Examples include the Email and Contacts plugins that MAF applications use to access email and contact functionality from a device. View the Cordova versions used by the Android, iOS, and Windows platforms in the overview editor of the maf-application.xml file. Select a plugin in the Core Plugins list, as shown in Figure 10-1 to view a description of the plugin. By default, a newly-created MAF application enables only the Network Information plugin. Enable the core plugins, as described in Enabling a Core Plugin in Your MAF Application.
Note:
All applications on iOS devices have network access by default. You cannot change this behavior. If an application that is deployed to an Android device does not require network access, disable the Network Information plugin. The Network Information plugin must be enabled to facilitate remote debugging of an application running on an Android emulator or device.
You can register additional plugins if the core plugins that MAF provides do not meet the requirements of your MAF application. See Introduction to custom Cordova plugin development at http://blogs.oracle.com/mobile/entry/introduction_to_custom_cordova_plugin and Registering Additional Plugins in Your MAF Application. Once you have either enabled the core plugin or registered any additional plugins for your MAF application, you create content in an application feature that accesses the functionality of the plugin. See Using a Plugin in a MAF Application.
The deployment of a MAF application may fail after the registration of additional plugins for the following reasons:
-
Filename conflicts between plugins that your MAF application uses.
-
The additional plugins that were registered require dependent plugins to function correctly.
For information, see Deploying Plugins with Your MAF Application. MAF applications may also fail to deploy to the iOS platform if you do not provide usage descriptions when your MAF application uses plugins that access private data (contacts, photos, and so on) on the iOS device, as described in Providing Usage Descriptions for Plugins that Access Device Capabilities on iOS.
To migrate a MAF application created with an earlier release of MAF, see Migrating Cordova Plugins from Earlier Releases to MAF 2.4.1 in Installing Oracle Mobile Application Framework.
Note:
Editing the maf-application.xml file to manage plugins in an application results in revisions to the maf-plugins.xml file. The ADF-META-INF node of the Application Resources pane from which both files are accessed, is shown in Figure 10-1.
Figure 10-1 Plugins in the Overview Editor of maf-application.xml
10.2 Enabling a Core Plugin in Your MAF Application
A new application enables only the core Network Information plugin. Additional plugins must be registered before they can be used.
By default, newly-created MAF applications enables only one core plugin (Network Information plugin). Enable or disable additional core plugins so that your MAF application can access the associated device functionality.
10.2.1 How to Enable a Core Plugin in Your MAF Application
Use the procedure to enable a core plugin using the overview editor of the mafapplication.xml file in a MAF application.
You enable a core plugin using the overview editor of the maf-application.xml file of the MAF application.
To enable a core plugin in your MAF application:
10.2.2 What Happens When You Enable a Core Plugin in Your MAF Application
JDeveloper edits the maf-plugins.xml file of the application with entries that identify the enabled plugins in the application.
Once you enable a plugin in the overview editor, JDeveloper edits the application's maf-plugins.xml file with entries that identify the enabled plugins in your MAF application. Example 10-1 shows the entries for a MAF application where the Email and Network Information plugins have been enabled. Enabling these plugins is a prerequisite to your MAF application using the device's email client and accessing the internet.
Example 10-1 Enabled Core Plugins in maf-plugins.xml File
<?xml version="1.0" encoding="UTF-8" ?>
<maf-plugins xmlns:xsi="http://www.w3.org/2001/XMLSchema-instance" xmlns="http://xmlns.oracle.com/adf/mf">
  <cordova-plugins>
    <core-cordova-plugin id="c1" pluginId="cordova-plugin-network-information"/>
    <core-cordova-plugin id="c2" pluginId="com.oracle.maf.email"/>
 </cordova-plugins>
</maf-plugins>
10.3 Registering Additional Plugins in Your MAF Application
You can use additional plugins in a MAF application after registering the plugins.
Register additional plugins in your MAF application when you require functionality in your MAF application not provided by the core plugins that MAF delivers.
10.3.1 How to Register an Additional Plugin
Use the procedure to register plugins using the overview editor of the maf-application.xml file of a MAF application. Registration is necessary if you want to use additional plugins.
To register an additional plugin for a MAF application, use the overview editor of the maf-application.xml file of the application .
Before you begin, ensure that the application, and the plugin to be registered with the application, are stored on the same drive. If, for example, you store your application on the C: drive in a Windows environment, you must also store the plugin that you want to register with the application on the C: drive. This ensures that JDeveloper, using a relative path, successfully registers the plugin with your application.
To register an additional plugin for a MAF application:
- In the Applications window, expand the Application Resources panel.
- In the Application Resources panel, expand Descriptors and then ADF META-INF.
- Double-click the maf-application.xml file and in the overview editor that appears, click the Plugins navigation tab.
- Expand the Additional Plugins section, and click the Add icon to display the dialog.
- Browse to and select the directory that stores the plugin to be registered with the application.
10.3.2 What Happens When You Register an Additional Plugin for Your MAF Application
When an additional plugin is registered, JDeveloper edits the maf-plugins.xml file of the application with entries that identify the enabled plugin in the MAF application.
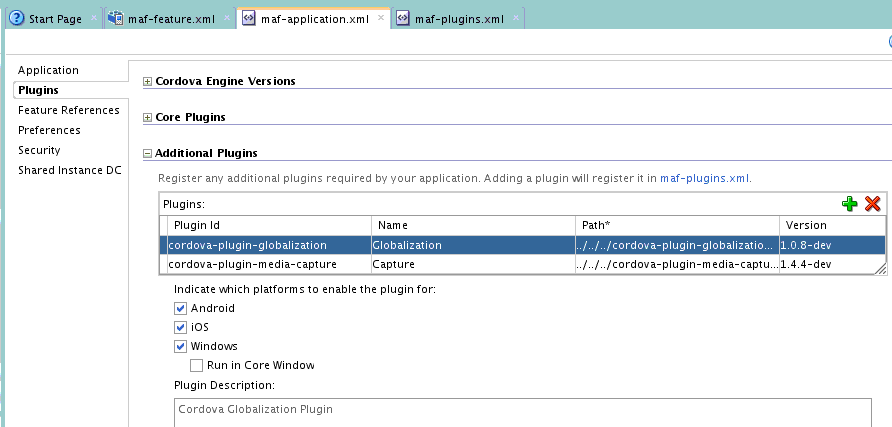
Once you select the source files for the plugin you want your MAF application to use, JDeveloper edits the application's maf-plugins.xml file with entries that identify the enabled plugins in your MAF application. Example 10-2 shows the entries in a maf-plugins.xml file where the Globalization plugin shown in Figure 10-2 has been registered with the MAF application.
Figure 10-2 Additional Plugins in the Overview Editor of maf-application.xml
Example 10-2 Additional Plugin in maf-plugins.xml File
<?xml version="1.0" encoding="UTF-8" ?>
<maf-plugins xmlns:xsi="http://www.w3.org/2001/XMLSchema-instance" xmlns="http://xmlns.oracle.com/adf/mf">
  <cordova-plugins>
    <core-cordova-plugin id="c1" pluginId="cordova-plugin-network-information"/>
    <cordova-plugin id="c2" pluginId="cordova-plugin-globalization"
                    path="../../../../CordovaPlugins/cordova-plugin-globalization/">
      <platform id="p1" name="android" enabled="true"/>
      <platform id="p2" name="ios" enabled="true"/>
      <platform id="p3" name="windows" enabled="true"/>
    </cordova-plugin>
  </cordova-plugins>
</maf-plugins>
10.4 Deploying Plugins with Your MAF Application
A plugin may be deployed to a FAR, or a Mobile Application Archive file. A plugin may be deployed using an Android, iOS, or Windows deployment profile.
The deployment of a plugin with your MAF application depends on the chosen method of deployment.
Deployment to a FAR
A deployment to a FAR includes a copy of the maf-plugins.xml file of the application named jar-maf-plugins.xml. It is identical to the maf-plugins.xml file of the application with the exception that the path attribute value of each plugin is an empty string. A FAR deployment does not include the source files for the plugin.
Deployment to a Mobile Application Archive File
A deployment to a Mobile Application Archive File includes a copy of the maf-plugins.xml file of the application with all path attributes set to an empty string.
Deployment Using an Android, iOS, or Windows Deployment Profile
During deployments using an Android, iOS or Windows deployment profile, JDeveloper invokes tools that build and deploy the application. These tools, in turn, invoke the Cordova plugman tool to install the configured plugins from their source location to the deployment folder.
Resolving Naming Conflicts Between Plugins
Deployment can fail due to naming conflicts if more than one plugin used by your MAF application contains resource files with the same name. For example, deployment fails if a MAF application uses two plugins that both have a resource file name arrays.xml.
To resolve these naming conflicts, rename the resource file in the plugin that conflicts with the resource file name in the other plugin. Update the reference to the resource file in the plugin.xml file of the first plugin. In our example, this requires you to rename the array.xml resource file name of the first plugin to pluginone_arrays.xml and edit the plugin.xml file of the plugin as follows:
<source-file src="src/android/LibraryProject/res/values/pluginone_arrays.xml"
                                                         target-dir="res/values"/>
Usage Descriptions for MAF Applications Deployed to iOS
Deployment to the iOS platform fails if you enable a plugin that requires your MAF application to access device features (contacts and photos, for example). Provide a usage description as described in Providing Usage Descriptions for Plugins that Access Device Capabilities on iOS.
Adding Missing Dependent Plugins
Deployment can fail if an additional plugin that your MAF application uses does not locate the plugins that it requires (dependent plugins). This scenario can arise if you work behind a firewall. At deployment time, JDeveloper invokes the tools of Apache Cordova to manage plugins dependencies. These tools may fail to download dependent plugins if their proxy settings are not configured to allow the download of dependent plugins. To work around this scenario, download the missing dependent plugin, and add it to your MAF application. You add the missing dependent plugin the same way as other plugins that you want to add to your MAF application. See Registering Additional Plugins in Your MAF Application. After you add the dependent plugin, make sure that it appears before the plugin that requires it in the maf-plugins.xml file, as demonstrated in Example 10-3.
Example 10-3 Adding Dependent Plugins to the MAF Application
<maf-plugins xmlns:xsi="http://www.w3.org/2001/XMLSchema-instance"
xmlns="http://xmlns.oracle.com/adf/mf">
   <cordova-plugins>
     ....
    <cordova-plugin id="c2" pluginId="com.example.dependent.dependentPlugin"
                    path="../../../../../plugins/Dependent-Plugin-Required-By-PluginWithID_c3/">
      ...
    <cordova-plugin id="c3" pluginId="com.example.plugin"
                    path="../../../../../plugins/AdditionalPlugin/">
      ...
   </cordova-plugins>
</maf-plugins>
10.5 Importing Plugins from a Feature Archive File
Plugins can be imported into an application from a Feature Archive file.
When you import a FAR that contains a jar-maf-plugins.xml file to your application, the content in the jar-maf-plugins.xml file merges with the maf-plugins.xml file of the consuming application. JDeveloper logs information about the merge to its Messages window.
If the plugin to import from the FAR already exists in the maf-plugins.xml file of the consumer application, JDeveloper logs a message that the plugin exists in the application, and will not be merged.
If the plugin to import from the FAR does not exist in the maf-plugins.xml file of the consumer application, JDeveloper adds the plugin to the maf-plugins.xml file of the application. In this scenario, you need to set the path to the newly-imported plugin, as described in Registering Additional Plugins in Your MAF Application.
10.6 Using a Plugin in a MAF Application
A plugin that is enabled in a MAF application can be invoked to interact with device features, such as the camera, or use other applications on the device, such as email or barcode scanner applications.
See Integrating a custom Cordova plugin into a MAF app at http://blogs.oracle.com/mobile/entry/integrating_a_custom_cordova_plugin for information about how you can invoke a plugin from Java, from a MAF AMX page, and from local HTML.
The BarcodeDemo sample application also demonstrates how you can accomplish this task.
Figure 10-3 Platform-Specific Content and Constraint To Access a Plugin
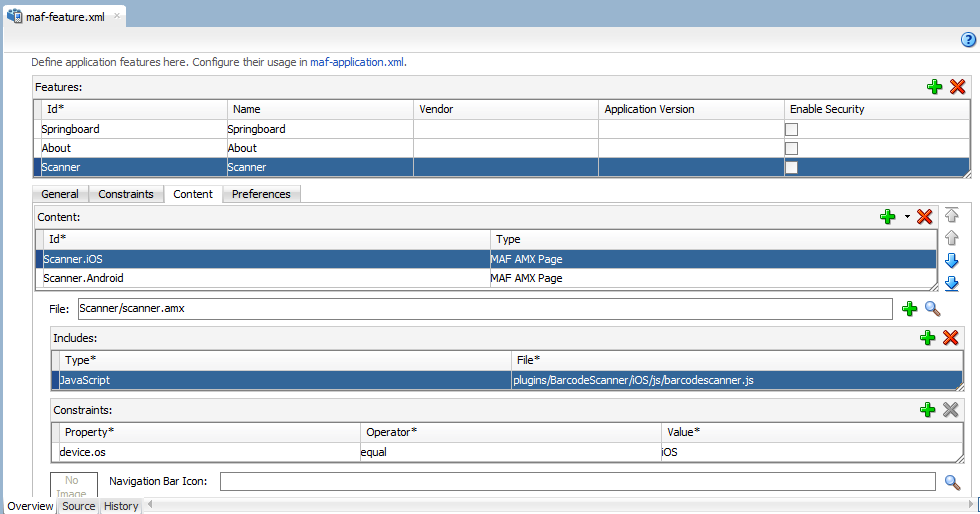
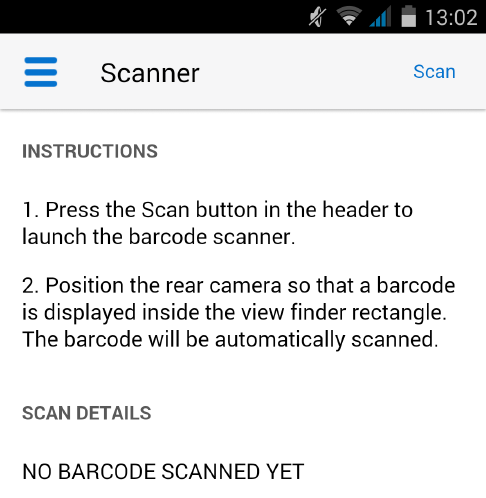
Figure 10-4 shows a button (Scan) in the MAF AMX page that the BarcodeDemo sample application renders on the user’s device at runtime. This button invokes a managed bean method and the managed bean method invokes a JavaScript function that calls the BarcodeScanner plugin.
Figure 10-4 Command Button Invoking Managed Bean Method to Access Plugin
Example 10-4 shows a number of code extracts from the BarcodeDemo sample application.
Other sample applications, apart from the BarcodeDemo sample application, that demonstrate how to use additional plugins in MAF applications are BeaconDemo, FakeBeacon, and DatePicker. See MAF Sample Applications.
Example 10-4 Using the Barcode Scanner Plugin
<!--  The following code snippet from the scanner.amx file shows how the Scan button invokes the scanBarcode method in the managed bean -->
<amx:commandButton text="Scan" id="cl2" actionListener="#{viewScope.BarcodeBean.scanBarcode}"/>

<!--  The following code snippet from the BarcodeBean.java file shows how the scanBarcode managed bean method invokes a JavaScript function -->
  public void scanBarcode (ActionEvent event)
  {
    // Invokes a JavaScript function named “scanBarcodeFromJavaBean”
    AdfmfContainerUtilities.invokeContainerJavaScriptFunction(AdfmfJavaUtilities.getFeatureId(),
                                                               "scanBarcodeFromJavaBean",
                                                               new Object[] { });
  }

<!--  The following code snippet from the scanner.js file shows how the JavaScript function accesses the barcode scanner and sets the resulting value in a managed bean field.-->
function scanBarcodeFromJavaBean(options)
        {
            cordova.plugins.barcodeScanner.scan(
              function(result)
               function onSuccess(result) {
        adf.mf.api.setValue( { "name": "#{viewScope.BarcodeBean.barcodeError}",
                               "value": ""},
                               function() {},
                               function() {});

        adf.mf.api.setValue( { "name": "#{viewScope.BarcodeBean.barcodeResult}",
                               "value": result.text},
                               function() {},
                               function() {});

        adf.mf.api.setValue( { "name": "#{viewScope.BarcodeBean.barcodeFormat}",
                               "value": result.format},
                               function() {},
                               function() {});

        adf.mf.api.setValue( { "name": "#{viewScope.BarcodeBean.barcodeCancelled}",
                               "value": result.cancelled == 1 ? "Yes" : "No"},
                               function() {},
                               function() {});
    }

    function onError(error) {
        adf.mf.api.setValue( { "name": "#{viewScope.BarcodeBean.barcodeError}",
                               "value": "ERROR: " + error.text},
                               function() {},
                               function() {});
    }

    // Callable externally
    scanBarcodeFromJavaBean = function() {
        cordova.plugins.barcodeScanner.scan(onSuccess, onError);
    }
10.7 Providing Usage Descriptions for Plugins that Access Device Capabilities on iOS
MAF applications that you deploy to iOS require usage descriptions if the MAF application uses hardware capabilities, such as the device camera, that allow it to access user data.
The iOS platform requires these descriptions to display in the system dialog that it uses to prompts an end user to allow an application access to the functionality and potentially sensitive user data. Figure 10-5 shows an example where the text “This application allows the user to upload photos from their photo library” is the usage description from the MAF application.
Figure 10-5 Usage Description in the UI of a MAF Application Deployed to iOS
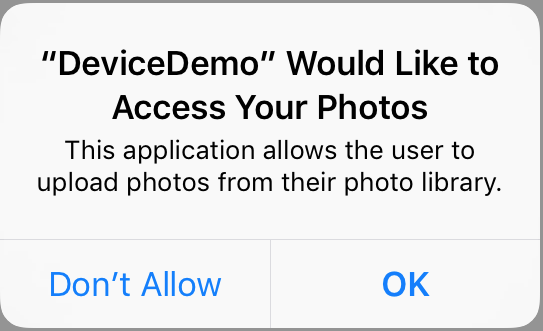
Basic usage of MAF does not enable functionality that requires you to provide usage descriptions. However, if you enable a core plugin that requires a usage description or use other plugins that require usage description, you need to provide a usage description to successfully deploy the application. Your application may crash or the Apple App Store may reject it if you do not provide a usage description.
The Camera, Contacts, and Geolocation core plugins require usage descriptions. MAF provides the following generic usage descriptions for these core plugins:
-
Camera: The camera plugin enables access to the device camera and photo libraries.This plugin requires usage descriptions for the following Cocoa keys:
NSCameraUsageDescriptionandNSPhotoLibraryUsageDescription. -
Contacts: The contacts plugin enables access to the address book on the device.This plugin requires a usage description for the following Cocoa key:
NSContactsUsageDescription. -
Geolocation: The geolocation plugin uses device location services on the device.This plugin requires a usage description for the following Cocoa key:
NSLocationWhenInUseUsageDescription.
These generic usage descriptions meet the technical requirements of the iOS platform to successfully deploy the MAF application. We recommend that you provide a specific usage description that explains to your end users why your application needs to access the functionality and data requested by the plugin. For additional plugins that you register with your MAF application that require usage descriptions, you must provide the usage description.
You provide a usage description in your application’s resource bundle .XLF file. The usage descriptions uses an iOS platform Cocoa key(s) as the value for the trans-unit element’s id attribute. The following example shows a usage description that appears when a MAF application prompts an end user to grant access to the user’s photo library.
<?xml version="1.0" encoding="UTF-8" ?>
<xliff version="1.1" xmlns="urn:oasis:names:tc:xliff:document:1.1">
  <file source-language="en" original="mobile.ViewControllerBundle" datatype="x-oracle-adf">
    <body>
      <trans-unit id="NSPhotoLibraryUsageDescription">
        <source>This application allows the user to upload photos from their photo library.</source>
        ...
Also provide usage descriptions in locale-specific resource bundles if your MAF application supports more than one locale. The following example shows the corresponding usage description that renders when the locale is French.
...
  <file source-language="fr" original="mobile.ViewControllerBundle_fr" datatype="x-oracle-adf">
    <body>
      <trans-unit id="NSPhotoLibraryUsageDescription">
        <source>Cette application permet à l'utilisateur de télécharger des photos à
                partir de leur bibliothèque de photos.</source>
        ...
At deployment time, MAF populates the usage descriptions that you define in the resource bundle into the info.plist file of the application that is deployed to the iOS device.
For information about creating resource bundles in a MAF application, including how to create locale-specific resource bundles, see Localizing MAF Applications.
For a list of the Cocoa keys that identify usage descriptions, see the keys that append UsageDescription to their key name in Apple’s Cocoa Keys documentation at https://developer.apple.com/library/content/documentation/General/Reference/InfoPlistKeyReference/Articles/CocoaKeys.html.
10.8 Allowing Cordova Plugins to Run in the Native UI on the Windows Platform
You need to add a windows-run-in-core-window="enabled" attribute to the maf-plugins.xml file entry for plugins that need to display or use the native UI on the Windows platform.
An example of such a plugin is cordova-plugin-media-capture, which starts applications on Windows to capture images, videos, or audio.
A standard Cordova application that runs on the Windows platform runs like a single-page application where Cordova and its plugins run inside the main HTML page. Cordova applications that run on the Android and iOS platforms run inside a container. The WebView of these latter two platforms displays the UI and loads Cordova plugins so that users can invoke the functionality that the plugin provides access to, such as a camera.
MAF applications run inside a container on the device where the application is installed, be that an Android, an iOS, or a Windows device. When you enable a Cordova plugin in a MAF application that runs on Windows and uses the native UI, you need to select the Run in Core Windows checkbox shown in Figure 10-6 so that the MAF application can invoke the required application on the Windows device. You must also set this attribute for additional plugins that your primary plugin requires so that the primary plugin functions correctly.
Figure 10-6 Run in Core Windows Checkbox for Plugin to Access the Native UI on Windows
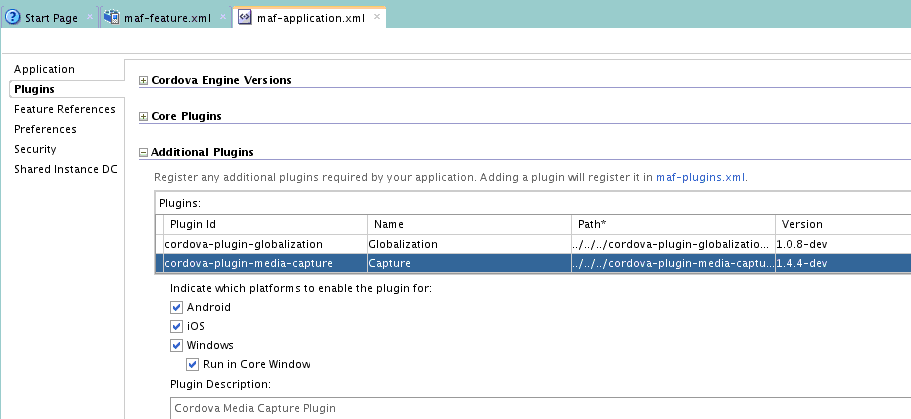
Selecting the Run in Core Windows checkbox shown in Figure 10-6 updates the maf-plugins.xml file in the AppRootDirectory\.adf\META-INF directory of your application, as shown by the following example.
The default value for this attribute is disabled (windows-run-in-core-window="disabled").
Example 10-5 Configuration in maf-plugins.xml File to Access the Native UI on Windows
<maf-plugins xmlns:xsi="http://www.w3.org/2001/XMLSchema-instance" xmlns="http://xmlns.oracle.com/adf/mf">
<cordova-plugins>
  <cordova-plugin id="c3" pluginId="cordova-plugin-media-capture" path="../../plugins/cordova-plugin-media-capture/"
                                                                              windows-run-in-core-window="enabled">
     <platform id="p1" name="android" enabled="true"/>
     <platform id="p2" name="ios" enabled="true"/>
     <platform id="p3" name="windows" enabled="true" />
  </cordova-plugin>
...
// The cordova-plugin-media-capture requires the cordova-plugin-file plugin be enabled so that media files
// can be saved on the device. For that reason, you must also configure the additional Windows-specific attribute here.
  <cordova-plugin id="c4" pluginId="cordova-plugin-file" path="../../plugins/cordova-plugin-file/"
                                                                               windows-run-in-core-window="enabled">
...