2 Setting Up the Development Environment
This chapter includes the following sections:
2.1 Introduction to the MAF Development Environment
The development environment for MAF applications requires that you install JDeveloper and the MAF extension, configure form factors, and install and configure third-party tools to package and deploy the applications to supported platforms.
After you install JDeveloper and the MAF extension, as described in Installing Mobile Application Framework with JDeveloper , configure the development environment for the platforms to which you want your MAF application deployed. Configure form factors if you want to test or deploy applications on a particular mobile device. Install and configure third-party tools if you want to package and deploy your MAF application on supported platforms.
For the complete list of supported versions of development and runtime tools, see Certification Information in Oracle Mobile Application Framework Documentation on Oracle Technology Network at: http://www.oracle.com/technetwork/developer-tools/maf/documentation/index.html.
2.2 Configuring the Development Environment for Target Platforms
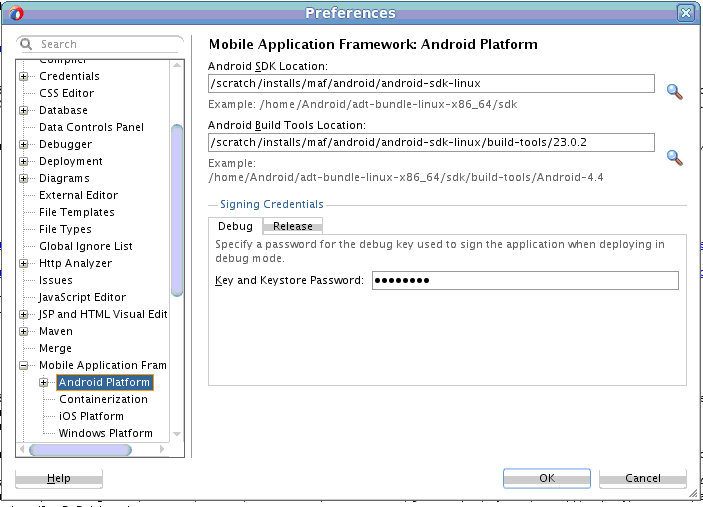
Configure the platform-specific settings to package and deploy applications to the Android, iOS, or Windows platforms.
-
Download and install JDeveloper and the MAF extension. See Installing Mobile Application Framework with JDeveloper .
-
For the Android platform, download and configure the Android SDK. (See Setting Up Development Tools for the Android Platform)
-
For the iOS platform, download and configure the iOS SDK and Xcode. (See How to Install Xcode and iOS SDK.)
-
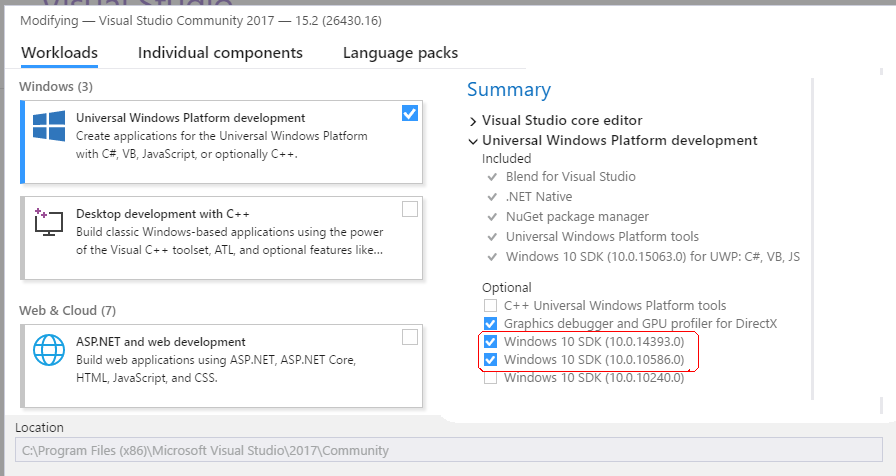
For the Universal Windows Platform (UWP), download and configure the Windows SDKs when installing Microsoft Visual Studio 2017. See Setting Up Development Tools for the Universal Windows Platform.
To configure your environment for target platforms:
2.3 Configuring the Development Environment for Form Factors
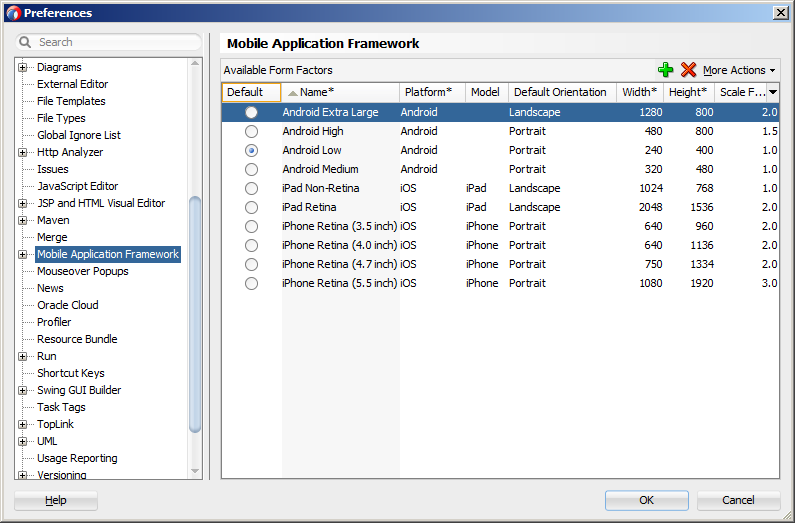
A form factor is a specific device configuration. Each form factor is identified by a name that you specify for it, and contains information on the specified resolution denoted by pixel width and pixel height.
Since form factors that are defined in preferences are used in the MAF AMX page Preview tab (see Using the Preview in Developing Mobile Applications with Oracle Mobile Application Framework), you may choose to perform this configuration if you are planning to include a MAF AMX application feature as part of your MAF application and you do not want to accept the default settings. During development, you can select or switch between various form factors to see how a MAF AMX page is rendered. You can also see multiple form factors applied to the same page using the split screen view.
See About the maf-config.xml File in Developing Mobile Applications with Oracle Mobile Application Framework.
Before you begin:
Download and install JDeveloper and the MAF extension, as described in Installing Mobile Application Framework with JDeveloper .
To configure the form factors:
2.4 Setting Up Development Tools for the iOS Platform
Set up the iOS devices or install XCode containing iOS SDK with simulators to equip the environment for the deployment of applications to the iOS platform.
In addition to the general-purpose tools listed in Introduction to Installing the MAF Extension with JDeveloper, you might want to set up an iPhone or iPad when getting ready for the development of a MAF application for the iOS platform (see How to Set Up an iPhone or iPad).
Since iPhone and iPad simulators are included in the iOS SDK installation, which, in turn, is included in the Xcode installation, you need not install them separately. See How to Set Up an iPhone or iPad Simulator.
2.4.1 How to Install Xcode and iOS SDK
Follow the instructions to download Xcode, which includes the iOS SDK.
You download Xcode from http://developer.apple.com/xcode/. This download includes the iOS SDK.
After installing Xcode, you have to run it at least once and complete the Apple licensing and setup dialogs. If these steps are not followed, the build and deploy cycle from JDeveloper to Xcode or a device simulator fails with a "Return code 69" error.
Note:
Since older versions of Xcode and iOS SDK are not available from the Mac App Store, in order to download them you must obtain an Apple ID from http://appleid.apple.com, and then register this Apple ID with the Apple Developer Program to access the Apple developer site at http://developer.apple.com.
2.4.2 How to Set Up an iPhone or iPad
Connect an iOS-powered device, with a valid license, certificates, and distribution profile, to your computer to deploy an application to the device.
In your MAF application development and deployment, you can use either the iPhone, iPad, or their simulators (see How to Set Up an iPhone or iPad Simulator). If you plan to use an iPhone or iPad, which is preferable for testing (see Testing MAF Applications in Developing Mobile Applications with Oracle Mobile Application Framework), connect the device to your computer to establish a link between the two devices.
To deploy to an iOS-powered device, you need to have an iOS-powered device with a valid license, certificates, and distribution profiles. See Deploying Mobile Applications in Developing Mobile Applications with Oracle Mobile Application Framework.
Note:
Since the Apple licensing terms and conditions may change, ensure that you understand them, comply with them, and stay up to date with any changes.
2.4.3 How to Set Up an iPhone or iPad Simulator
Configure external network access to use iOS simulators, included in XCode downloads, to deploy MAF applications.
In your MAF application development and deployment, you can use either the iOS-powered device itself (see How to Set Up an iPhone or iPad) or its simulator. Deploying to a simulator is usually much faster than deploying to a device, and it also means that you do not have to sign the application first.
A simulator can be invoked automatically, without any additional setup.
Note:
Before attempting to deploy your application from JDeveloper to a device simulator, you must first run the simulator.
If you plan to use web services in your application, and you are behind a corporate firewall, you may need to configure external network access. You do so by modifying the network settings in the System Preferences on your development computer. See Configuring the Browser Proxy Information in Developing Mobile Applications with Oracle Mobile Application Framework.
2.5 Setting Up Development Tools for the Android Platform
Install the Android SDK to deploy a MAF application to Android devices.
The Android SDK provides the tools that build and package your application into an .APK file (the file type that installs applications on Android devices), an emulator to create Android Virtual Devices (AVD) where you can test your application if you do not have access to a physical Android device, and an OEM USB driver to connect your development machine to a physical Android device through a USB cable if you do have a device. This last option enables you to deploy an application from your development machine to the Android device.
Android Studio, Google’s IDE for Android development, includes the Android SDK in its installation and provides wizard options that simplify the management of the SDK platforms and tools that you need.
Install Android Studio, and the Android SDK that it includes, by downloading the installation file from https://developer.android.com/studio/index.html. The Android Developer’s website provides installation instructions for Windows, Mac, and Linux. See https://developer.android.com/studio/install.html.
Once you have installed Android Studio, perform the tasks described in the following topics:
2.5.1 Install an Emulator Accelerator
You can accelerate the performance of the emulator that renders AVDs by installing an emulator accelerator.
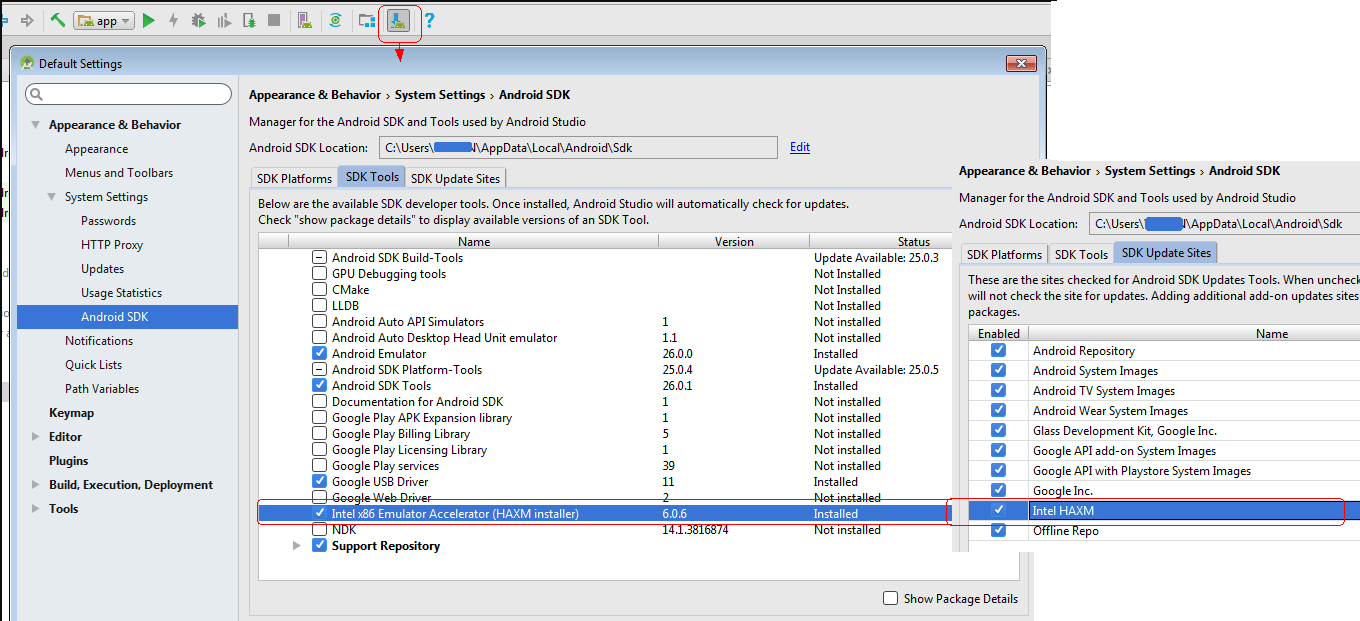
Once installed, the emulator accelerator speeds up the performance of the emulator and the AVDs that it emulates by allocating additional resources from your development machine. You specify the amount during installation of the accelerator. Once installed, the accelerator appears in the SDK Tools list of the SDK Manager that you can launch from Android Studio, as shown in the following image. The Intel x86 Emulator Accelerator (HAXM) is one type of emulator accelerator that is available.
Make sure that the update site for the emulator accelerator that you want to download is selected in the SDK Update Sites tab shown in the previous image. Once downloaded, execute the installer. See https://developer.android.com/studio/run/emulator-acceleration.html#accel-vm.
2.5.2 Create an Android Virtual Device
An Android Virtual Device (AVD) replicates an Android device on your development computer. It is a useful option for testing, especially if you only have access to one or a limited range of physical Android devices.
The AVD Manager that you launch from Android Studio by clicking Tools, Android, and AVD Manager has a range of ready-to-use virtual devices, mostly of those devices developed by Google itself, such as the Nexus and Pixel XL range. Other Android device vendors, such as Samsung, provide specifications on their websites that you can use to create the AVD yourself.
Google maintains documentation describing how to manage AVDs. See https://developer.android.com/studio/run/managing-avds.html.
To create an AVD:
-
In Android Studio, launch the Android Virtual Device Manager by selecting Tools > Android > AVD Manager.
-
In the Your Virtual Devices screen, click Create Virtual Device.
-
In the Select Hardware screen, select a phone device, such as Pixel, and then click Next.
-
In the System Image screen, click Download for one of the recommended system images. Agree to the terms to complete the download.
-
After the download completes, select the system image from the list and click Next.
-
On the next screen, leave all the configuration settings unchanged and click Finish.
-
In the Your Virtual Devices screen, select the device you just created and click Launch this AVD in the emulator.
2.5.3 Set Up Your Android Device to Install an App from Your Development Machine
You can install your app directly from your development machine to your Android device by configuring the Android device and connecting it to your development machine using a USB cable.
To set up your Android device:
-
Connect your device to your development machine with a USB cable. If you are developing on Windows, you might need to install the appropriate USB driver for your device. For help installing drivers, see the OEM USB Drivers document.
-
Enable USB debugging on your device by going to Settings > Developer options.
Note:
Developer options is hidden by default. To make it available, go to Settings > About phone and tap Build number seven times. Return to the previous screen to find Developer options.
2.6 Setting Up Development Tools for the Universal Windows Platform
Ensure that the development computer meets the installation requirements, install the MAF extension and Visual Studio 2017, create and install the PFX file, and enable Development Mode on the computer to set up a Windows 10 computer for application development.
To set up your development machine so that you can develop and deploy a MAF application to UWP:
-
Verify that your computer meets the requirements listed in Installation Requirements for MAF Applications to be Deployed to the Universal Windows Platform.
-
Install the MAF extension following the steps in Installing the MAF Extension in JDeveloper.
-
Install Visual Studio from Microsoft as described in Installing Visual Studio. The Visual Studio installer also allows you to install the Windows SDKs that enable deployment of applications to the UWP. Select the Visual Studio edition that you require: Community, Professional, or Enterprise. All editions provide the required software to develop and deploy a MAF application to the UWP. Visit the Visual Studio Community product page for information about the eligibility criteria to use Visual Studio Community edition.
-
Create and install the PFX file as described in Creating a PFX File for MAF Applications and Installing a PFX File on a Windows 10 Device.
-
Enable Development Mode on the computer on which you intend to develop the application as described in Enabling Development Mode in a Windows 10 Device.
After completing these setup tasks, a MAF application can be deployed to UWP. See Deploying a MAF Application to the Universal Windows Platform in Developing Mobile Applications with Oracle Mobile Application Framework.
2.6.2 Creating a PFX File for MAF Applications
MAF applications deployed to the UWP must be digitally signed using a Personal Information Exchange (PFX) file.
Use Microsoft’s New-SelfSignedCertificate cmdlet in a PowerShell console with administrator privileges to create a PFX file.
2.6.3 Installing a PFX File on Windows 10
Follow the steps in the task to install a Personal Information Exchange (PFX) file in a certificate store on a computer so that the certificate can be used for application signing.
Note:
The installation has to be completed once, manually, for every PFX file on a given computer.2.6.4 Enabling Developer Mode on Windows 10
Enable Developer Mode on the Windows 10 development computer to side-load applications and to run them in the Debug mode.
Windows 10 runs UWP applications from a trusted source. Since the certificates you imported are self-signed, they will not run by default.
If you want to develop and deploy MAF applications to the UWP you must enable Developer Mode on the Windows 10 computer that you use. Developer Mode is required for the following reasons:
-
Side-load, or install and run applications, from unofficial sources.
-
Run an application in the Debug mode.
2.7 Testing the Environment Setup
Deploy a MAF sample application to test that you set up your environment successfully.
You can test your environment setup as follows:
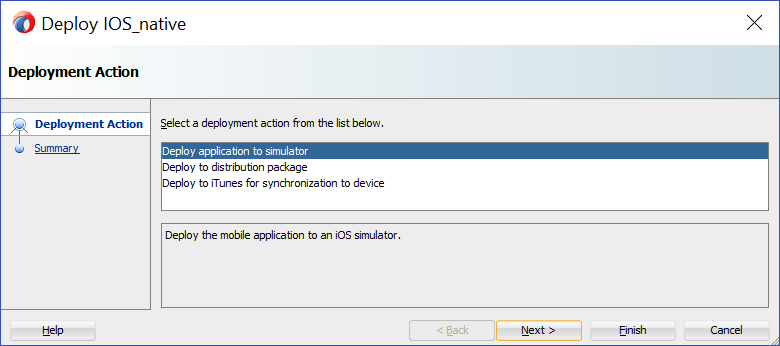
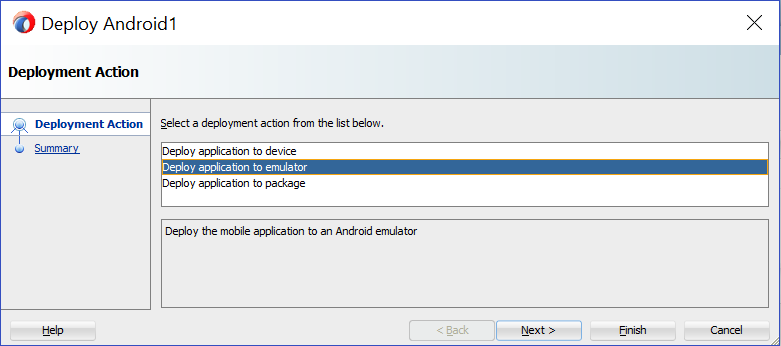
See Deploying Mobile Applications in Developing Mobile Applications with Oracle Mobile Application Framework.
After a successful deployment (which might take a few minutes), the device to which you had deployed the application displays the launch screen of the HelloWorld application, and then displays the default application feature.
2.8 Setting Up Development Tools from the Command Line Using Startup Parameters
You can set MAF preferences required to develop MAF applications, such as the Android SDK location, by specifying startup parameters when you start JDeveloper. Startup parameters exist to specify the MAF preferences to develop and deploy MAF applications on the Android and iOS platforms.
To launch JDeveloper from the command line with startup parameters, use the -J-D options. All strings must be enclosed in double-quotes, as shown in the examples.
The following example shows how to override the location of the Android SDK:
jdeveloper.exe -J-Doracle.adfmf.framework.dt.preferences.PlatformSDKsPrefs.androidPlatformDir="C:\<my_Android_SDK_path>"
These are the startup parameters you can use to set Android preferences from the command line:
-
oracle.adfmf.framework.dt.preferences.PlatformSDKsPrefs.androidSdkDir -
oracle.adfmf.framework.dt.preferences.PlatformSDKsPrefs.androidPlatformDir -
oracle.adfmf.framework.dt.preferences.PlatformSDKsPrefs.androidBuildToolsDir -
oracle.adfmf.framework.dt.preferences.PlatformSDKsPrefs.androidReleaseSigningKeystorePath -
oracle.adfmf.framework.dt.preferences.PlatformSDKsPrefs.androidReleaseSigningKeystorePath
The following example shows how to override the location of the iTunes Media folder:
./jdev -J-Doracle.adfmf.framework.dt.preferences.PlatformSDKsPrefs.iOSiTunesDir="/Users/<my_username>/Music/iTunes/iTunes Media/Automatically Add to iTunes.localized"
These are the startup parameters you can use to set iOS preferences from the command line:
-
oracle.adfmf.framework.dt.preferences.PlatformSDKsPrefs.iosProvisioningProfileName -
oracle.adfmf.framework.dt.preferences.PlatformSDKsPrefs.iosProvisioningProfileTeamName -
oracle.adfmf.framework.dt.preferences.PlatformSDKsPrefs.iOSiTunesDir -
oracle.adfmf.framework.dt.preferences.PlatformSDKsPrefs.iosCertificate -
oracle.adfmf.framework.dt.preferences.PlatformSDKsPrefs.iosProvisioningProfile
