5 Integrating Oracle Cloud Services
For more information about Oracle Cloud, or to open an Oracle Cloud account, visit http://cloud.oracle.com.
This document contains the following:
5.1 About Integrating Oracle Cloud Services
Oracle Cloud is an enterprise cloud for business. Oracle Cloud offers self-service business applications delivered on an integrated development and deployment platform with tools to extend and create new services rapidly.
With OEPE, you can develop applications for:
-
Oracle Java Cloud Service - SaaS Extension, which provides rapid and agile deployment of extensions to Oracle SaaS (such as CRM, or HCM).
-
Oracle Java Cloud Service, an enterprise-grade platform to develop and deploy business applications in the cloud.
-
Oracle Developer Cloud Service, which allows you to develop applications securely hosted in the cloud.
-
Database as a Service, which allows you to create and work with Oracle databases in the Cloud
-
Oracle Storage Cloud Service, which provides storage, data protection, and data management.
-
Oracle Messaging Cloud Service, which provides rapid and agile deployment of JavaEE applications.
In addition, you can use Oracle Mobile Cloud Service to develop mobile applications which use services provided on an MCS Mobile back end. For more information, see "Working with MCS" in Developing Mobile Applications with Oracle Mobile Application Framework (OEPE Edition).
Before you can sign in to an Oracle Cloud service, you must have a user account that defines your credentials (user name, password, and identity domain) and access rights to the service.
For information about requesting a trial subscription to an Oracle Cloud service, or purchasing a subscription to an Oracle Cloud service, see Getting Started with Oracle Cloud.
When an Oracle Cloud service is activated, Oracle sends the sign-in credentials and URL to the designated administrator. The administrator then creates an account for each user who needs access to the service. Check your email or contact your administrator for your account credentials and service URL.
5.1.1 Using the Oracle Cloud View
When you subscribe to the Oracle Cloud service, the Cloud service nodes in the Oracle Cloud view, shown in Figure 5-1, depend on the type of service you have subscribed to.
Figure 5-1 Oracle Cloud View
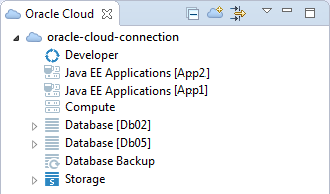
The top node in the Oracle Cloud view is the Oracle Cloud connection. Under that are the service nodes which are specific to the type of Oracle Cloud service the connection is to. Below that are nodes which depend on the type of Oracle Cloud service. For example, for Oracle Storage Cloud Service, the nodes are containers, or folders, which contain the objects stored in the service.
Table 5-1 Oracle Cloud View Toolbar Icons
| Icon | Name | Function |
|---|---|---|
|
|
Collapse All |
Click to collapse all expanded nodes. |
|
|
New Oracle Cloud Connection |
Click to open the Oracle Cloud Connection dialog, where you enter the details to create a connection to a Oracle Cloud. |
|
|
Hide Inactive |
Click to hide inactive connection nodes. |
|
|
View Menu |
Click to access the Oracle Cloud view menu, where you can choose the type of package presentation, and customize the view. |
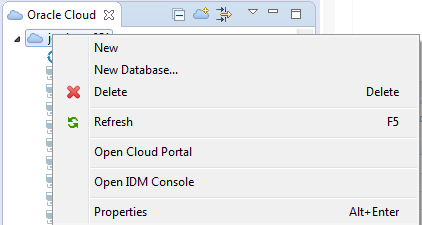
A number of options are available from the context menu of nodes in the Oracle Cloud view. For example, Figure 5-2 shows the options available from a connection node. You can:
-
Create a new Oracle Cloud connection. You can do this from any Oracle Cloud connection node.
-
Create a new database. For more information, see Administering Database as a Service.
-
Delete the connection. You can do this from any Oracle Cloud connection.
-
Refresh the content of the Cloud View.
-
Open Oracle Cloud portal in a browser.
-
Open IDM console, where you manage users and roles.
-
Open the properties of the Oracle Cloud connection.
Figure 5-2 Cloud View - Right-Click Server Instance Options
5.1.2 Customizing the Content of the Oracle Cloud View
You can customize what you see in the Oracle Cloud view from ![]() in the menu bar of the Oracle Cloud view. You can customize the view to:
in the menu bar of the Oracle Cloud view. You can customize the view to:
-
Filter the types of object shown
-
Specify the available extensions to show.
To customize the Oracle Cloud view:
- In the Oracle Cloud view, click
 .
. - Choose Customize View. In the Available Customizations dialog choose the filters to apply (on the Filters tab) and the available extensions to show (on the Content tab).
5.1.3 How to Create an Oracle Cloud Connection
To create a connection to Oracle Cloud Services, use the Java EE perspective. The Oracle Cloud view opens by default at the lower left of the IDE.
To connect to a Cloud Service:
Figure 5-3 Oracle Cloud Connection - Add Details
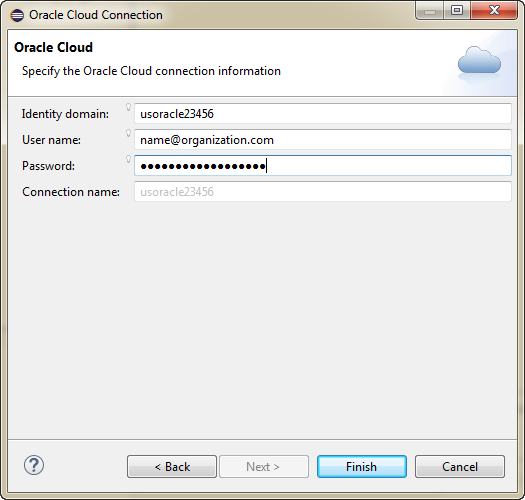
When you click Finish, Eclipse contacts Oracle Cloud and you will see the connection and the services available in that connection in the Oracle Cloud view. There are various options available from the context menu of the connection and each service.
5.1.4 How to Connect From Behind a Firewall
If you are working behind a firewall you may need to update OEPE with details of the proxy server in order to connect to http://cloud.oracle.com.
To use a proxy server when you are behind a firewall:
- In the Eclipse IDE, choose Window > Preferences > General > Network Connections.
- In the Network Connections page of the Preferences dialog, change the active provider to Manual. Select the HTTP proxy entry and click Edit to open the Edit Proxy Entry dialog.
- In the dialog enter the proxy host server and port number.
- Click OK in the Edit Proxy Entry dialog, then OK in the Preferences dialog.
5.1.5 How to Open the IDM Console
You can open the IDM Console, where you manage users and roles, from the Oracle Cloud view:
-
In the Oracle Cloud view, right-click the Cloud Service connection and choose Open IDM Console.
The IDM Console opens in Eclipse.
5.1.6 How to Open the Cloud Portal
You can open the Cloud Portal, where you manage your Oracle Cloud services, from the Oracle Cloud view:
-
In the Oracle Cloud view, right-click the Cloud Service connection and choose Open Cloud Portal.
The dashboard opens in Eclipse.
5.2 Using the Oracle Java Cloud Service - SaaS Extension
With the Oracle Java Cloud Service - SaaS Extension you can build extensions to one of the Oracle Software as a Service offerings like Oracle Sales Cloud, Oracle Service Cloud, Oracle Marketing Cloud. When you sign up for the Java Oracle Cloud Service - SaaS Extension, you get a deployment target for your Java EE application using a set of Java EE release 5, Java EE release 6, and Oracle WebLogic Server capabilities, in addition to a My Services web-based interface to manage your cloud tools.
For more information about the Oracle Java Cloud Service - SaaS Extension, see the Oracle Java Cloud Service - SaaS Extension documentation library at https://docs.oracle.com/cloud/latest/javacs_gs/index.html.
5.2.1 How to Activate the Oracle Java Cloud Service - SaaS Extension
You can create a connection to Oracle Java Cloud Service - SaaS Extension from the Oracle Cloud view, described in How to Create an Oracle Cloud Connection.
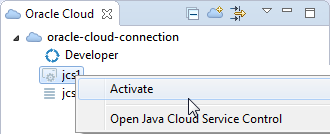
Once you have created a connection, you can activate Oracle Java Cloud Service - SaaS Extension so that you can run your application:
5.2.2 How to Deploy to the Oracle Java Cloud Service - SaaS Extension
OEPE enables you to deploy your project to Oracle Java Cloud Service - SaaS Extension.
To deploy to Oracle Java Cloud Service - SaaS Extension, use one of the following methods:
-
Right-click the project you want to deploy, and select Run As > Run on Server. Then select the Oracle Cloud server listed on the Run on Server page and click Finish.
-
Right-click the Oracle Cloud configuration in the Servers view and select Add and Remove to open the Add and Remove dialog where you can add the project you want to deploy to Oracle Cloud.
5.2.3 How to View the Oracle Java Cloud Service - SaaS Extension Jobs Log
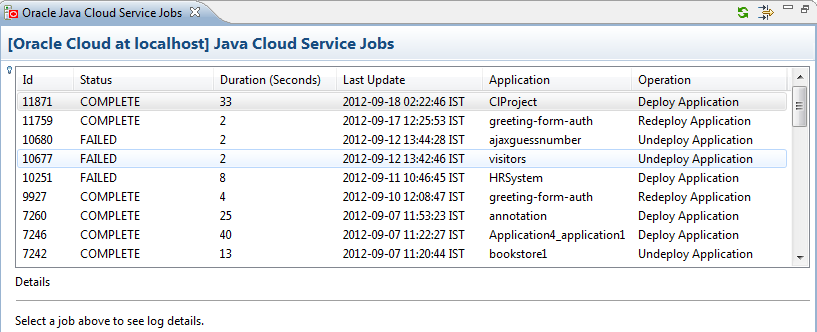
The Oracle Java Cloud Service - SaaS Extension Jobs log, shown in Figure 5-5, provides comprehensive information on the jobs being executed by the Oracle Java Cloud Service - SaaS Extension, including Id, status, duration, and nature of your operation.
Figure 5-5 Oracle Java Cloud Service - SaaS Extension - Jobs View
To view the Oracle Java Cloud Service Jobs Log:
-
Right-click your service in the Servers view and select Open Jobs View.
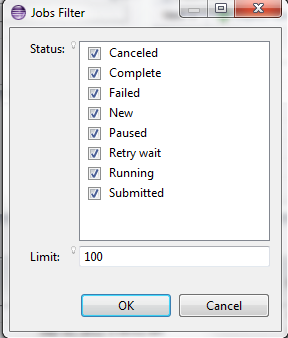
You can filter jobs shown in the Oracle Java Cloud Service Jobs Log by clicking the Filter icon in the toolbar to open the Jobs Filter, shown in Figure 5-6.
Figure 5-6 Jobs Filter Dialog
5.2.4 How to View the Oracle Java Cloud Service - SaaS Extension Instance Log
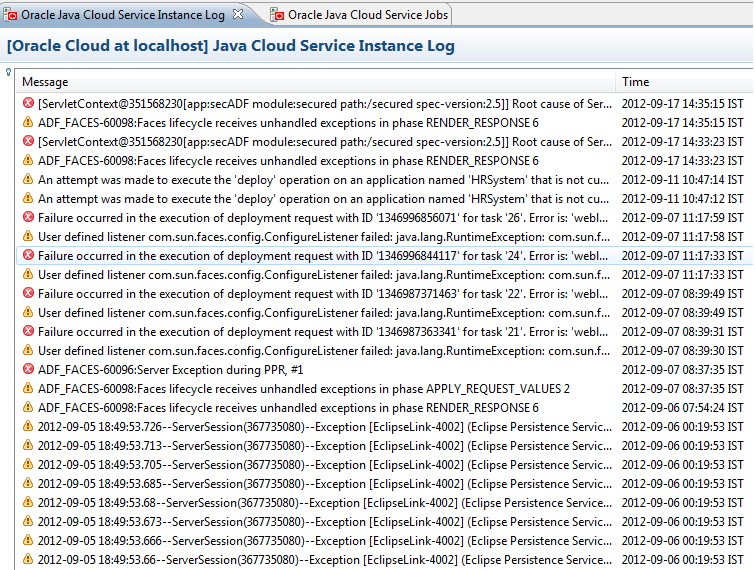
The Oracle Java Cloud Service - SaaS Extension Instance log provides detail on the performance of your services, as shown in Figure 5-7.
Figure 5-7 Oracle Java Cloud Service - SaaS Extension Instance Log
To view the Oracle Java Cloud Service Instance Log:
Right-click your service in the Servers view and select Open Log View.
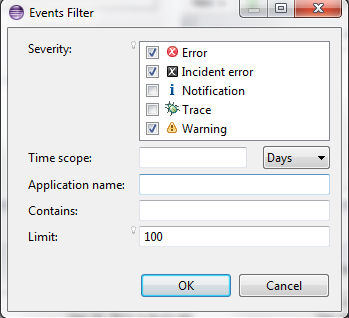
You can filter events shown in the Oracle Java Cloud Service Instance Log by clicking the Filter icon in the toolbar to open the Events Filter, shown in Figure 5-8.
Figure 5-8 Events Filter
5.3 Using the Oracle Java Cloud Service
Oracle Java Cloud Service is an enterprise-grade platform which allows you to develop and deploy business applications in the cloud. Java Cloud Service is a purpose-built for environments with higher availability needs, such as user acceptance testing, staging and production.
For more information about the Oracle Java Cloud Service, see the Oracle Java Cloud Service documentation library at https://docs.oracle.com/cloud/latest/jcs_gs/index.html.
When you connect to the Oracle Java Cloud Service, the background server is associated with a local instance of a WebLogic server. The version of the local server must match the Java Cloud Service WebLogic Server version.
5.3.1 How to Activate the Oracle Java Cloud Service
You can create a connection to Oracle Java Cloud Service from the Oracle Cloud view, described in How to Create an Oracle Cloud Connection.
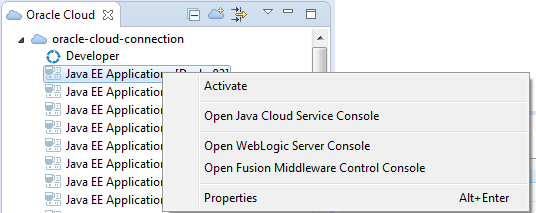
Once you have created a connection, you can activate Oracle Java Cloud Service:
5.3.2 What Happens When You Activate the Java Cloud Service Instance
An SSH tunnel is created to connect to the remote WebLogic Server.
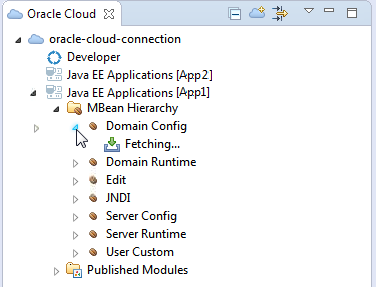
You can expand the Java Cloud Service instance node in the Oracle Cloud view to work with the objects available, as shown in Figure 5-10
Figure 5-10 Activated Java Cloud Service Instance
You only need to activate an instance once. Until you deactivate the instance the connection information is persisted.
5.3.3 How to Deactivate a Java Cloud Service Instance
You can deactivate an instance by right-clicking the instance in the Oracle Cloud view, and choosing Deactivate.
The SSH tunnel is disconnected and the local WebLogic Server instance is removed from the Servers view.
5.3.4 How to View Properties
You can view properties of the Java Cloud Service connection by right-clicking the instance in the Oracle Cloud view, and choosing Properties, as shown in Figure 5-11.
Figure 5-11 Java Cloud Service Properties
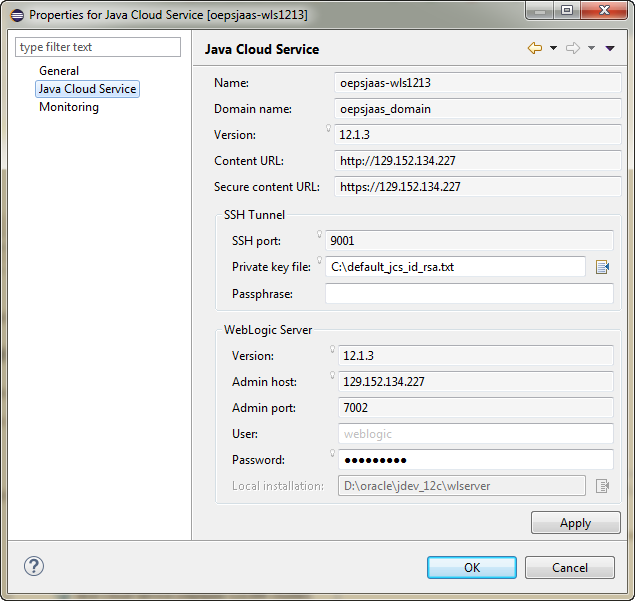
In the Properties window, you can change the following:
-
The private key file.
-
A passphrase associated with the private key file.
-
The admin username and password for the WebLogic Admin Server.
-
The location of the local WebLogic server.
5.3.5 How to Open the Oracle Java Cloud Service Console
You can open the Java Cloud Service console by right-clicking the instance in the Oracle Cloud view, and choosing Open Java Cloud Service Console.
The console opens in a browser instance.
5.3.6 How to Open the Oracle WebLogic Server Console
You can open the WebLogic server console by right-clicking the instance in the Oracle Cloud view, and choosing Open WebLogic Server Console.
The console opens in a browser instance.
5.3.7 How to Open the Fusion Middleware Control Console
You can open the Enterprise Manager console by right-clicking the instance in the Oracle Cloud view, and choosing Open Fusion Middleware Control Console.
The console opens in a browser instance.
5.3.8 How to Deploy to the Oracle Java Cloud Service
You can deploy Eclipse projects to Java Cloud Service by dragging and dropping the project onto the Java Cloud Service in Oracle Cloud view.
For more information about deploying and undeploying to Oracle Java Cloud Service, see "Using an IDE to Deploy and Undeploy an Application" in Using Oracle Java Cloud Service.
5.4 Using the Oracle Developer Cloud Service
OEPE includes integration for Oracle Developer Cloud Service, which exposes the most common development tasks from the cloud directly from within the IDE. Oracle Developer Cloud Service is a collection of software and services hosted on the Oracle Cloud. It is a cloud-based software development Platform as a Service (PaaS) and a hosted environment for your application development infrastructure. It provides open-source, standards-based solutions to develop, collaborate, and deploy applications within Oracle Cloud.
Oracle Developer Cloud Service integration with OEPE includes the following:
-
A dedicated Oracle Cloud view that displays Oracle Developer Cloud Service projects that you are a member of.
-
Integration with Eclipse Mylyn and Oracle Developer Cloud Service Tasks system.
-
Source Control System integration with Oracle Developer Cloud Service GIT repository.
-
Build node in Oracle Developer Cloud Service that displays the status of Hudson builds.
For more information about the Oracle Developer Cloud Service see, http://cloud.oracle.com/developer_service.
5.4.1 How to Work with Oracle Developer Cloud Service
You can create a connection to Oracle Developer Cloud Service from the Oracle Cloud view, described in How to Create an Oracle Cloud Connection.
After validating credentials, you are logged in to Oracle Developer Cloud Service from OEPE. After you log in, all the projects that are assigned to you are displayed in the Oracle Cloud view, as shown in Figure 5-12.
Figure 5-12 Oracle Developer Cloud Service Connection
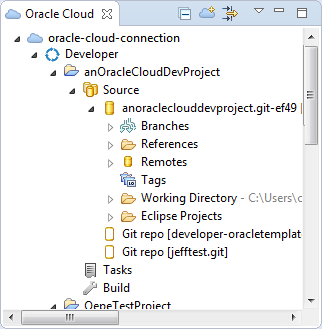
The Oracle Cloud view displays all your projects, and links to the common features of your service.
You can have multiple Oracle Developer Cloud Service accounts in the Oracle Cloud view. To add another account, create a new connection for the account, as described in How to Create an Oracle Cloud Connection.
The Oracle Cloud view enables you to run the following actions for each project:
-
Import projects from Oracle Developer Cloud Service, and push projects to Oracle Developer Cloud Service (see Synchronizing Eclipse Projects with Oracle Developer Cloud Service.)
-
Search and manage tasks (see How to Work with Tasks.)
-
Monitor builds of your project (see How to Work with Hudson Builds.)
5.4.2 Synchronizing Eclipse Projects with Oracle Developer Cloud Service
OEPE helps makes it easy for you to push Eclipse projects in the workspace and synchronize them to a remote Git repository. The first time you drag an Eclipse project from the Project Explorer and drop it in the Oracle Cloud view, OEPE performs a number of actions.
-
If there are no local Git repositories, OEPE creates a local Git repository and commits the Eclipse projects to the local Git repository. If one or more local Git repositories already exist, drop the project on the Git repository you want to use.
-
OEPE pushes the local Git repository to the Oracle Developer Cloud Service Git repository.
-
OEPE creates a Maven
pom.xmlbuild file (if no build files exist) and pushes the Maven jar dependencies into the Oracle Developer Cloud Service project Maven repository. -
OEPE creates Hudson build jobs to automatically build the Eclipse projects in the Oracle Developer Cloud Service project.
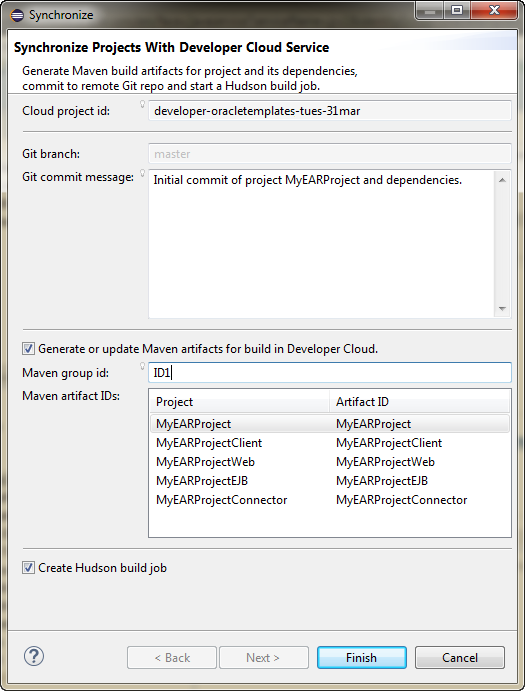
The synchronization wizard, shown in Figure 5-13, allows you to choose whether to create Maven artifacts and specify the Maven group id, and whether to create a Hudson build job.
Figure 5-13 Synchronize Eclipse Projects
5.4.3 How to Synchronize an Existing Project to Oracle Developer Cloud Service
-
After making further changes to your project, right-click the project in the Project Explorer and choose Synchronize with Oracle Cloud.
5.4.4 How to Push a New Project to Oracle Developer Cloud Service
To push a new project to Oracle Cloud Developer Service:
5.4.5 How to Import an Oracle Developer Cloud Service Project
Importing a project from Oracle Developer Cloud Service to OEPE Workspace creates a local clone of Oracle Developer Service Git repository. OEPE makes it easy to import Eclipse projects found in the Oracle Developer Service repository into the workspace.
Eclipse projects contain artifacts checked into Oracle Developer Service Git repository by developers using OEPE as their primary IDE. Other types of project checked into Oracle Developer Service Git repository (for example, JDeveloper projects or Maven projects) do not appear in the OEPE workspace when you create a local clone of the Oracle Developer Service Git repository.
To import a Project from Oracle Developer Cloud Service to OEPE Workspace:
5.4.6 How to Work with Tasks
By default, following task queries are available in the Tasks node of Oracle Cloud view:
-
All: Lists all tasks of the project
-
Mine: Lists all tasks assigned to you
-
Open: Lists all open tasks
-
Recent: Lists all recently changed tasks
-
Related: Lists all tasks related to you
Double-click a query to run it, and then double-click a task to open it in the Task Editor.
You can also perform the following tasks related actions from OEPE:
-
Create a new query and import tasks, features, and defects from Oracle Developer Cloud Service
-
Update imported tasks from OEPE
-
Create local tasks and push them to Oracle Developer Cloud Service
5.4.6.1 Creating a Local Task
To create a task:
- In the Oracle Cloud view expand the project, right-click Tasks and choose New Task.
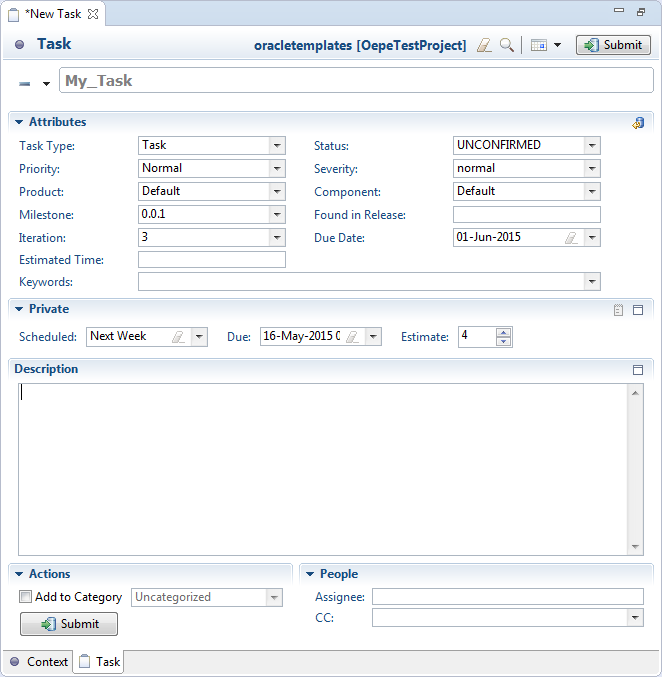
- In the New Task dialog, enter details of the task and click Submit. OEPE synchronizes with Oracle Developer Cloud Service, and adds the task to the Open list in the Oracle Cloud view.
Figure 5-14 Creating a New Task
5.4.6.2 Editing Tasks
To view and edit a specific task:
- Right-click the task in the Oracle Cloud view and choose Open.
- Update the task, and click Submit. The task is updated in Oracle Developer Cloud Service task repository.
5.4.6.3 Synchronizing Tasks
To synchronize tasks with incoming information from Oracle Developer Cloud Service:
- Right-click the task in the Oracle Cloud view and choose Open.
- In the menu bar of the task open in the task editor, click
 . The task is updated in the local task repository.
5.4.6.4 Importing Tasks from Oracle Developer Cloud Service With a Custom Query
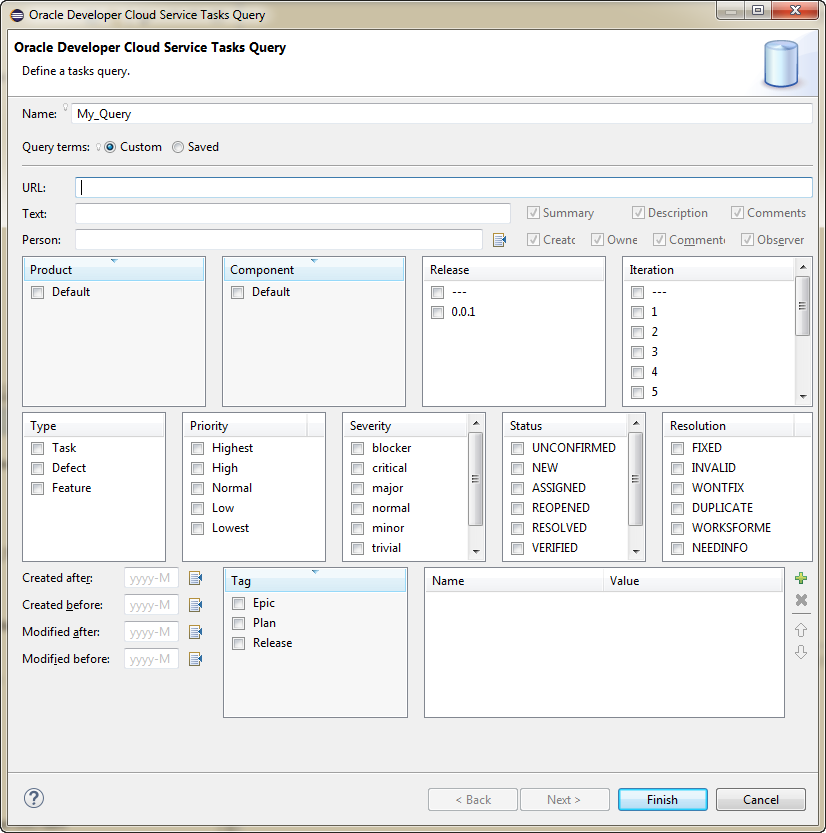
To import tasks from Oracle Developer Cloud Service, you would need to create a search query. For example, you can create a query to import all open defects assigned to you.
To import tasks with a custom query:
All tasks matching the specified criteria are listed in the Oracle Cloud view under the name of the query.
5.4.6.5 Synchronizing Tasks with Oracle Developer Cloud Service
To synchronize a task (or a query) between OEPE and Oracle Developer Cloud Service, right-click the task (or the query) in Task List view, and choose Synchronize.
5.4.6.6 Associating a Task with a Commit Transaction
If you want to associate a task with a commit transaction, you should activate the task first. To activate a task, select and right-click the task in Task List view, and choose Activate.
OEPE also provides integration with Mylyn. Activating a task enables Mylyn to track which files are related to the current task. Mylyn automatically hides files that are not related to the active task. When committing changes to Git for the Active task, your commit message automatically references the Task ID in Oracle Developer Cloud Service. This effectively creates a link between the code commit and the task allowing for easy traceability. Links between source commits and Tasks are also reflected in the web interface of Oracle Developer Cloud Service.
You can find more information about working with Mylyn Tasks and the Tasks user interface in the Mylyn User Guide at the following URL:
5.4.7 How to Work with Hudson Builds
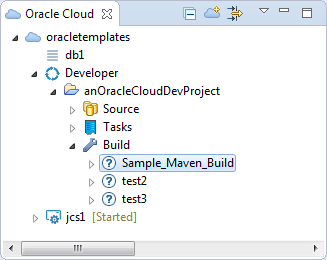
To view all jobs of the Hudson builds, expand the Build node of a project in Oracle Cloud view. To perform any action, select the job (or the build) and click Open in Browser. The Builds module of Oracle Developer Cloud Service opens in the web browser. Figure 5-16 shows the Build node in the Oracle Cloud view.
Figure 5-16 Builds in Oracle Cloud View
5.4.7.1 How to Run Hudson Builds
To run a Hudson build:
- Expand the Build node of a project in Oracle Cloud view.
- Right-click the build you want to run and choose Run Build.
5.5 Using the Oracle Database Cloud - Database as a Service
Oracle Database Cloud - Database as a Service provides you the ability to deploy Oracle databases in the Cloud, with each database deployment containing a single Oracle database. You have access to the features and operations available with Oracle Database, but with Oracle providing the computing power, physical storage and (optionally) tooling to simplify routine database maintenance and management operations.
For more information about the Database as a Service, see http://docs.oracle.com/cloud/latest/dbcs_dbaas/index.html.
The Eclipse views that you use to work with Database As A service are:
-
Oracle Cloud view, described in Using the Oracle Cloud View.
-
Data Source Explorer, described in Using the Data Source Explorer.
In addition, you can examine and edit your database schema using the Schema Editor that displays tables and the relationships between them. For more information, see Using the RDB Schema Editor.
While you are connected, OEPE checks the status of database services every few minutes and if it finds a change it updates the list of services.
While you are connected, OEPE checks for changed services every few minutes and if it finds status changes it updates the list of services. So if you have made a change to Database as a Service connecting to your account in a browser, the change may not appear in OEPE immediately. You can refresh the view in Cloud View to see changes sooner.
There are a few tasks which you cannot perform in OEPE and have to perform after connecting to your account in a browser, for example, adding additional CPUs.
5.5.1 Working with Database as a Service Connections
You can create a connection to Database as a Service from the Oracle Cloud view, described in How to Create an Oracle Cloud Connection. This displays the service nodes which are specific to the type of Oracle Cloud service the connection is to.
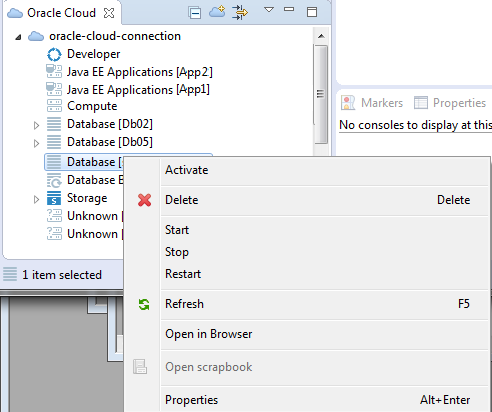
There are a number of tasks you can perform from the context menu of a Database as a Service node, as shown in Figure 5-17
Figure 5-17 Service node for database services
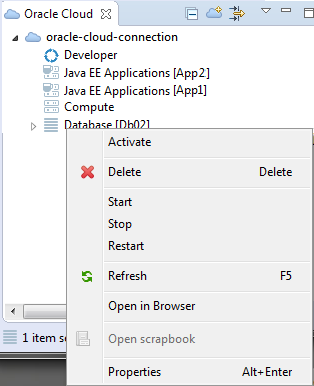
The options are:
-
Activate/Deactivate—Click Activate to log in to the database. For more information, see Activating the Database Service.
Click Deactivate to disconnect from the database.
-
Delete—Click to delete the database. You will be asked to confirm the action, and you can choose to run this in the background. When it is complete, the database is no longer listed in the Cloud View.
-
Start—Click to start a stopped database.
-
Stop—Click to stop a database.
-
Restart—Click to stop and then start the database.
-
Refresh
-
Open in Browser—Click to open the Oracle Database Cloud Service page in the default browser.
-
Open scrapbook—Click to open the database in the SQL Scrapbook.
-
Properties—Click to open the Properties dialog for the database, which has three pages:
-
The Database Connection Filter Properties page (activated database only). This allows you to filter the objects you see under the database service node. For more information, see Filtering Database Objects.
-
The Database Connection Properties page (activated database only), which displays the database connection credentials.
-
The Oracle Database Cloud Service page, which gives details of the service name, status, public IP address, and so on.
-
5.5.2 Working with the Database
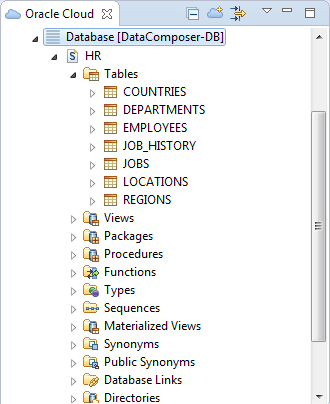
When you activate the database connection, you can see the database objects in the schema, as shown in the Cloud View in Figure 5-19.
Figure 5-19 Database objects in Cloud View
If you open the Data Source Explorer from Window > Show View > Other > Data Management > Data Source Explorer, you can see the same connection with the same database elements, as shown in Figure 5-20. For more information about the Data Source Explorer, see Using the Data Source Explorer.
Figure 5-20 Database objects in Data Source Explorer

In general, you can perform the same operations to an activated database connection in the Cloud View as in the Data Source Explorer, for example:
-
Refresh
-
From the schema node:
-
Edit—Opens the schema in the graphical Schema Editor.
-
New Table—Opens the Create Table dialog which allows you to define a new table.
-
Generate DDL—Opens the Generate DDL dialog where you select the model elements to include in the generated DDL script.
-
-
From the Tables node:
-
Edit Schema—Opens the schema in the graphical Schema Editor.
-
New Table—Opens the schema in the graphical Schema Editor.
-
5.5.3 Filtering Database Objects
You can filter the schemas you see in Cloud View and Data Source Explorer by editing the properties of an activated database service node.
The objects you choose to display by filtering are also shown in the Data Source Explorer.
You can also filter schemas in Data Source Explorer using the connection properties.
5.5.4 Editing Databases
You can edit schema objects in:
-
Cloud View
-
Data Source Explorer
-
Schema Editor
You can perform similar tasks in the Cloud View and the Data Source Explorer, and the actions available depend on the database object node selected. For example:
-
From the context menu of the schema node or the Tables node you can create a new table.
-
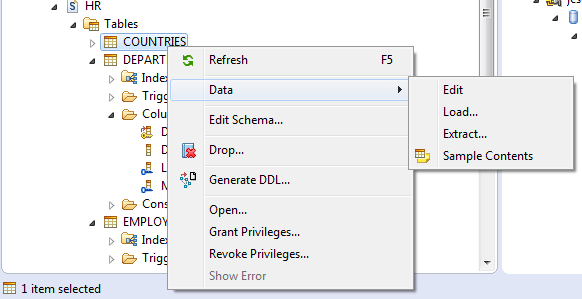
From the context menu of a table, you can choose from a number of options, as shown in Figure 5-21.
Figure 5-21 Context menu options for a table
For more information about working with database objects, see Oracle Database Support.
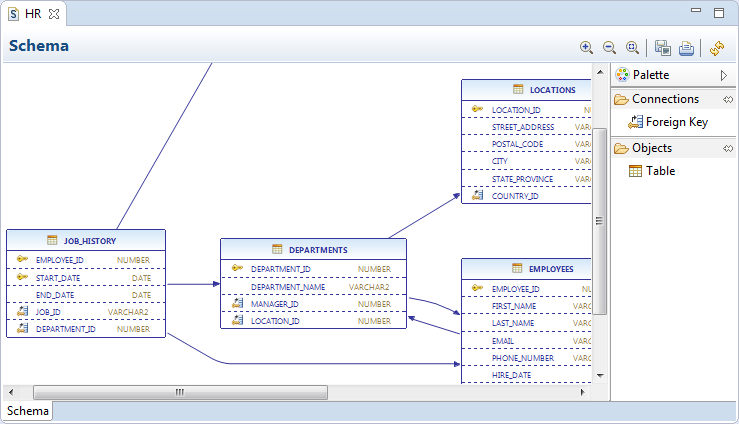
Alternatively, you can work graphically with the schema in the Schema Editor, as shown in Figure 5-22. For more information about using the Schema Editor, see Using the RDB Schema Editor.
Figure 5-22 Database in Schema Editor
To open the schema in the schema editor:
-
In either the Cloud View or the Data Source Explorer, right-click the schema or Tables node and choose Edit or Edit Schema.
Note:
When you work in the Schema Editor, your changes are not saved back to Oracle Cloud until you click Save. Additionally, you should refresh Cloud View and Data Source Explorer so they reflect the current view in the Schema Editor.
5.5.5 Administering Database as a Service
Database as a Service supports administration tasks such as creating a new instance or deleting an instance, and you can perform these tasks from OEPE.
5.5.5.1 How to Create a New Database as a Service Instance
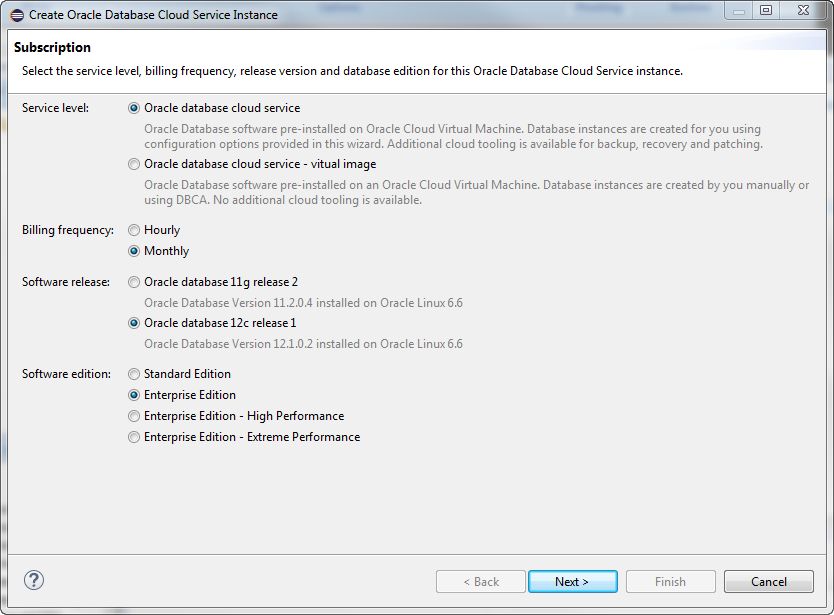
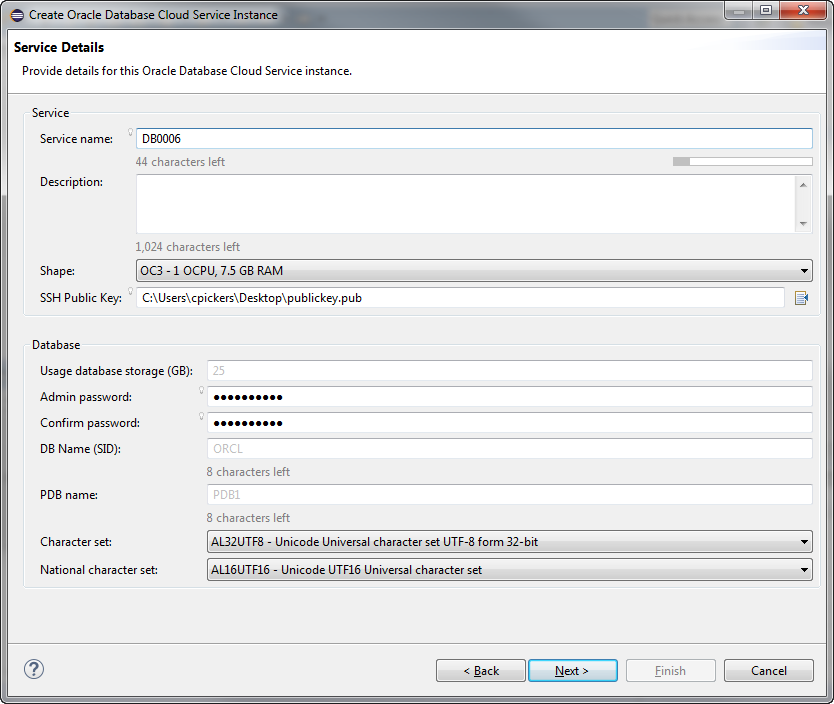
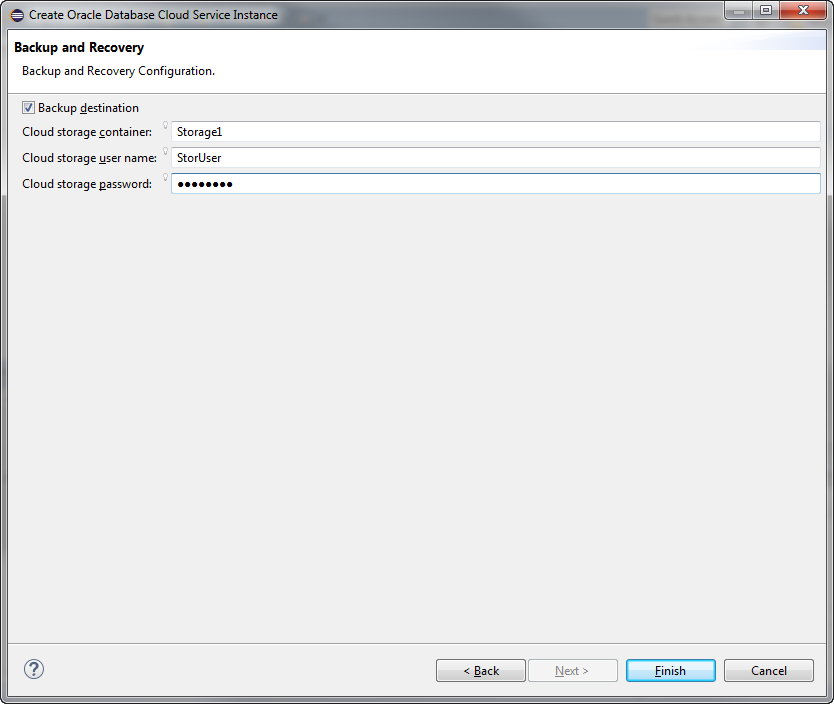
If you already have an Oracle Cloud account you can create a Database as a Service instance from the Cloud View in OEPE.
To create a new Database as a Service instance:
It can take up to an hour to provision the new service, and you can run the progress monitor in the background. Once the service instance is listed in the Cloud View without a status next to it you can activate it as described in Activating the Database Service.
5.5.5.2 Deleting a Database as a Service Instance
When you no longer require a database deployment on Oracle Database Cloud - Database as a Service, you can delete it.
To delete a database deployment:
- In Cloud View, location the database deployment you want to delete.
- Right-click and choose Delete. You are prompted to confirm the deletion. Once deleted, the entry is removed from the list of database deployments displayed in Cloud View.
5.5.6 Using Java with Database as a Service
OEPE helps you quickly incorporate an Database as a Service database into an application.
You can drag a schema from Cloud View or Data Source Explorer into a Java Project in the Project Explorer and OEPE automatically generates sample code, as shown in the example below. The sample code includes:
-
User and password for the connection.
-
The service name,
PDB1.demo001.oraclecloud.internalin the example. -
The public IP address for the service,
192.0.2.1in the example.
     public Connection createDatabaseConnection() throws SQLException {
                final Properties properties = new Properties();
                properties.setProperty("user", "hr");
                properties.setProperty("password", "hr");
                final Driver driver = new oracle.jdbc.OracleDriver();
                final Connection connection = driver
                                .connect("jdbc:oracle:thin:@//192.0.2.1:1521/PDB1.demo001.oraclecloud.internal", properties);
                return connection;
        }
Before you begin, you must have a Java project in the Project Explorer.
You can drag the schema into an existing Java class, or you can drag the schema into an empty package in which case a new class is created containing the sample code.
To generate sample code from the database service:
-
From either the Cloud View or the Data Source Explorer, drag the schema node to the Java project in the Project Explorer.
5.6 Using the Oracle Storage Cloud Service
Oracle Storage Cloud Service is a public cloud storage solution which allows you to store, manage, and consume large amounts of unstructured data over the Internet.
The Storage Cloud Service design time tools support a number of actions including:
-
Create new storage containers.
-
Store and retrieve objects in the storage containers.
-
Rename the storage object and object manifest. (You cannot rename the container.)
-
Update the container and object metadata.
-
Support transparent encryption and define access controls to containers.
-
View the properties of any container and object.
For more information about the Oracle Storage Cloud Service see, http://cloud.oracle.com/storage.
5.6.1 How to Log In to Oracle Storage Cloud Service
You can create a connection to Oracle Storage Cloud Service from the Oracle Cloud view, described in How to Create an Oracle Cloud Connection.
After validating credentials, you are logged in to Oracle Storage Cloud Service from OEPE. After you log in, the Oracle Cloud Storage Service containers and objects are displayed in the Oracle Cloud view, as shown in Figure 5-26.
Figure 5-26 Oracle Cloud Storage Service Elements
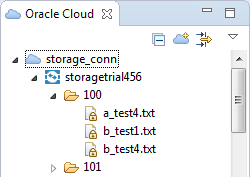
The Oracle Cloud view displays the container and objects in the storage service instance. When you open a container or folder, Eclipse lists the contents of the container.
5.6.2 How to Upload and Download Objects
There are a number of ways that you can move objects between OEPE and Oracle Developer Cloud Service, which are summarised here:
-
To move individual files, you can drag and drop them from the OEPE Project Explorer into storage containers in the Oracle Cloud view.
-
To bulk copy objects, you can create
*.tarand*.tar.gzfiles, then drag them to the Cloud storage connection. The archive file must be in the proper format, with one level of folders corresponding to the Cloud storage container. For more information, search for "Bulk-Creating Objects" in the Oracle Storage Cloud Service Help Center athttp://docs.oracle.com/cloud/latest/storagecs_common/index.html. -
For source files larger than 5GB, you can create object manifests to store segmented objects.
When you drag and drop the manifest into the local file system, the combined object is copied over. (This cannot be used with transparent encryption.)
-
You can drag and drop, or copy and paste objects and object manifests across containers within the same Cloud storage instance.
-
You can drag and drop, or copy and paste objects across containers and across same Cloud storage instance. (The object manifest cannot be dragged and dropped into the Cloud instance.)
-
You can drag and drop, or copy and paste objects from the Cloud storage container into the local project folder or file system.
-
You can open the object in the Eclipse editor and save changes back to the Cloud instance.
5.6.4 How to Rename Objects
You can rename storage objects and object manifests. You cannot rename containers.
To rename an object:
- Right-click the object and choose Rename.
- In the Rename dialog, enter the new name and click OK.
5.6.5 How to Work with Large Objects
Objects larger than 5 GB cannot be stored directly in Oracle Storage Cloud Service. Instead, you create a manifest which allows you to store a large object as a number of segments which are associated by the manifest.
To manage a file larger than 5 GB:
5.6.6 How to Bulk-Create Objects
To bulk-create objects, you can create *.tar file and *.tar.gz files to contain archives and add them to Oracle Storage Cloud Service by dragging them to the Cloud Storage connection in the Oracle Cloud view.
The archive file must have the proper structure, with the top level of folders corresponding to existing Cloud storage containers. For more information, search for "Bulk-Creating Objects" in the Oracle Storage Cloud Service Help Center at http://docs.oracle.com/cloud/latest/storagecs_common/index.html.
5.6.7 How to Manage Container and Object Properties
You can manage container properties in the Properties dialog. It allows you to edit metadata, and to view:
-
Container or object name.
-
The URL to the specific container or object at Oracle Cloud.
-
The size of the container or object.
To edit container or object metadata:
- In the Oracle Cloud view, right-click a container or an object and choose Properties.
- In the Properties dialog select Container.
- In the Container page, add or edit the metadata as name/value pairs. When you are finished click Apply and then click OK.
5.6.8 How to Control Access to Containers
You can specify the access types available to the different roles for your Storage service.
You can specify the roles available for your service in the IDM Console, see How to Open the IDM Console.
- In the Oracle Cloud view, right-click a container and choose Properties.
- In the Properties dialog select Container Access Control.
- In the Container Access Control page, specify the role. Click
 to create a new row, and click
  to open the Role dialog where you can select one of the roles defined for your Storage service.
 - Choose the type of access by double-clicking the Access type and choosing
 and choosing from the list: Read Only, Read and Write, Write.
 - When you are finished click Apply and then click OK.
5.6.9 How to Use Encryption
Oracle Storage Cloud Service supports object encryption. For more information, search for "Encrypting Objects" in the Oracle Storage Cloud Service Help Center at http://docs.oracle.com/cloud/latest/storagecs_common/index.html
Encryption key pairs can be managed at Cloud service level, or at container level, or at the object level. You can:
-
Assign security key pairs to the Cloud storage connection. These security key pairs can be used to encrypt and decrypt objects.
-
Automatically decrypt encrypted files when they are downloaded.
-
Optionally encrypt files when the are uploaded to the Cloud.
The encryption options are:
-
Always encrypt. Encryption will always be used when storing objects to the Cloud service.
-
Never encrypt. Encryption will never be used for storage objects.
-
Always ask. You will be prompted to choose whether the object should be encrypted.
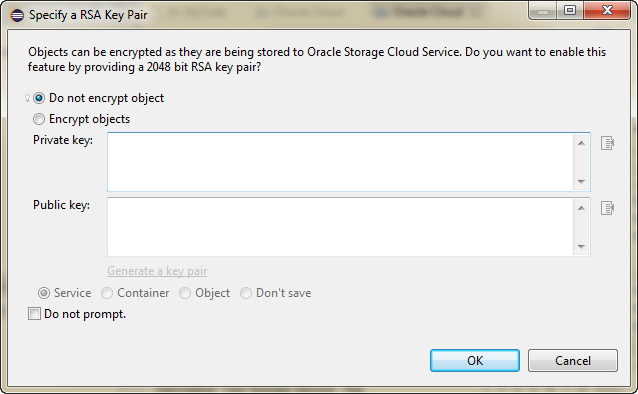
When you upload an object to Oracle Cloud storage instance, the Specify a RSA Key Pair dialog, shown Figure 5-27, opens where you can choose whether the object is encrypted.
Figure 5-27 Encrypting an Uploaded Object
5.6.9.3 Using Object Level Encryption
If an object is encrypted, this is indicated by having a lock icon overlay in the Oracle Cloud view.
If an object has inherited encryption from the container or the service, then in the Properties dialog the encryption details on the Object Encryption page are greyed out. You can override the inherited encryption by using object specific keys
To set object encryption:
5.6.10 How to Open Storage Cloud Control
You can open the Storage Cloud Control web interface, where you manage your Oracle Storage Cloud Service, from the Oracle Cloud view:
-
In the Oracle Cloud view, right-click the Storage node under the Cloud Service connection and choose Open Storage Cloud Control.
The Storage Cloud Control web interface opens in the Eclipse browser.
5.6.11 How to View Storage Cloud Size
You can see how much of the quota you have used by examining the properties of the Storage Cloud Service.
To view the quota and how much has been used:
- In the Oracle Cloud view, right-click the Storage service under the Cloud connection and choose Properties.
- The General page of the Properties dialog displays the name of the service, and the quota and how much of the quota has been used.
5.7 Using the Oracle Messaging Cloud Service
Oracle Messaging Cloud Service allow you to:
-
Send and receive messages through JMS and RESTful Web Service.
-
Use point-to-point communication with queues.
-
Publish and subscribe using topics.
For more information about the Oracle Messaging Cloud Service see, http://cloud.oracle.com/messaging.
5.7.1 How to Log In to Oracle Messaging Cloud Service
You can create a connection to Oracle Messaging Cloud Service from the Oracle Cloud view, described in How to Create an Oracle Cloud Connection.
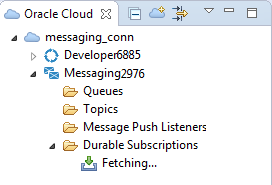
After validating credentials, you are logged in to Oracle Messaging Cloud Service from OEPE. After you log in, the Oracle Developer Cloud Service and its associated Oracle Cloud Messaging Service are displayed in the Oracle Cloud view, as shown in Figure 5-28.
Figure 5-28 Oracle Cloud Messaging Service Elements
5.7.2 How to Use Oracle Messaging Cloud Services
Information is transmitted between clients as messages. At the sending client, a producer sends a message to a destination. At the receiving client, a consumer retrieves the message from the destination.
The Oracle Cloud view displays the messaging elements:
-
Queues. Messages sent to a queue are received by one and only one consumer.
-
Topics. Messages sent to a topic may be received by multiple consumers or none.
Queues and topics are types of destination.
-
Message Push Listeners. Messages sent to a destination can be pushed to either another destination or to a user-defined URL through message push listeners.
-
Durable Subscriptions store all messages sent to a topic. They ensure that a publish/subscribe application receives all sent messages, even if there is no client currently connected to the topic.
The options available from context menu are:
-
New to create a new queue, topic, message push listener, or durable subscription.
-
Delete which deletes the selected element.
-
Send Message (Queue) which opens a dialog that allows you to send a test message to the selected queue.
-
Properties (Message Push Listeners and Durable Subscriptions) which displays a read-only view of the listener or durable subscription.
-
Refresh (Queue and Durable Subscriptions) refreshes the list.
5.7.3 How to Create and Send a Message
To create a message to be sent to a destination for one consumer:
-
Right-click Queue and choose New.
-
In the Create New Queue dialog, enter a name for the queue and click OK.
-
Right-click the queue and choose Send Message. In the Send Message to a Queue dialog, enter the content of the message and click OK.
To create a message to be sent to a destination for many consumers or none:
- Right-click Topic and choose New.
- In the Create New Topic dialog, enter a name for the topic and click OK.
- Right-click the topic and choose Publish Message. In the Publish Message to a Topic dialog, enter the content of the message and click OK.
5.7.4 How to Create a Message Push Listener
Message Push Listeners are used to push messages to another destination or to a user-defined URL.
To create a Message Push Listeners:
