24 调用已部署的代理
您可以从生产应用调用代理的端点 URL。
无论用于调用代理端点的编程接口如何,都必须通过 OCI 进行验证并具有相关权限。在代理端点的情况下,调用方需要对代理端点至少具有 USE 权限。
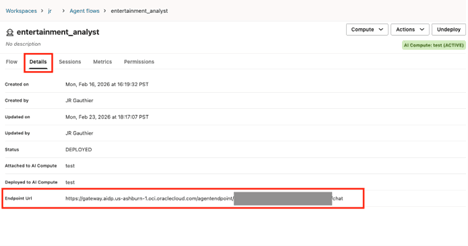
端点 URI 记录在代理 UI 的详细信息选项卡中。您可以将该端点 URI 复制到代码中以调用代理。
调用端点 URI 的方法
您可以通过不同的工具、SDK 和 CLI 调用代理端点 URI。
以下方法允许您在 Oracle AI Data Platform 代理中调用端点 URI。
使用 OCI CLI 调用
提供的示例演示了如何使用 OCI CLI 并使用安全令牌进行验证。将 <your-agent-flow-endpoint-uri> 替换为代理端点 URI,将 <security_token> 替换为 OCI 安全令牌。
oci raw-request
--http-method POST
--target-uri <your-agent-flow-endpoint-uri>
--request-body '{"query":"Tell me about the Ryder Cup in 1985"}'
--auth <security_token>
使用 Python 请求库调用
您可以使用 OCI Python SDK 创建签名者以通过 OCI 进行验证。Python 请求库可用于将请求发布到代理端点 URI 并返回响应。以下示例演示如何通过 OCI 配置和私钥文件使用用户主体:
import oci import requests import json import uuid from contextlib import closing from requests import Request, Response
class AuthHelper: """ AuthHelper allows creating an OCI signer with either API key or security_token (which are short term sessions) """ def init(self, oci_profile: str, use_security_token:bool = True): config = oci.config.from_file(file_location="/Volumes/jr/default/misc/config",profile_name=oci_profile) if use_security_token: with open(config["security_token_file"], 'r') as f: token = f.read() private_key = oci.signer.load_private_key_from_file(config["key_file"])
 self.signer = oci.auth.signers.SecurityTokenSigner(token, private_key) else: self.signer = oci.signer.Signer( tenancy=config["tenancy"], user=config["user"], fingerprint=config["fingerprint"], private_key_file_location=config["key_file"], #pass_phrase=config.get("pass_phrase"), #private_key_content=config.get("key_content") )
@property
def Signer(self):
    return self.signer

class MyRawJsonRpcClient: """ Simple class using requests lib to post JSON to chat endpoint using OCI signing """ def init(self, chat_url:str, oci_profile: str, sessionKey:str, use_security_token:bool = True): self.authhelper = AuthHelper(oci_profile=oci_profile, use_security_token=use_security_token) self.authsigner = self.authhelper.Signer self.chat_url = chat_url self.sessionKey = sessionKey
def send(self, input:str) -> Response:
    body = {
        "isStreamEnabled" : False,
        "sessionKey" : self.sessionKey,
        "trace" : False,
        "input" :[{
            "role":"User",
            "content":[{
                "type" : "INPUT_TEXT",
                "text" : input
            }]
        }]
    }

    response:Request = requests.post(
        url =self.chat_url,
        params = None,
        auth = self.authsigner,
        json=body,
        headers={}
    )
    return response
您可以通过实例化 MyRawJsonRPCClient 类并提供 OCI 配置文件值(在 OCI 配置文件中找到)、代理端点 URI (chat_url) 和 sessionKey 来调用代理端点 URI。您可以提供任意
sessionKey。sessionKey 是代理的用户会话的唯一标识符。如果继续重复使用相同的 sessionKey,则会将用户消息和代理响应附加到相同的保护。 client = MyRawJsonRpcClient(chat_url="<your-agent-flow-endpoint-uri>",
oci_profile = "DEFAULT",
sessionKey= “<your-session-key>”,
use_security_token = False )user_input = f"Hello, tell me a good dad joke."
r = client.send(input = user_input)
response_json = r.json()通过 APEX
您可以使用 AI Data Platform Samples Github 库中提供的代码示例。此示例将引导您完成从 APEX 应用调用代理部署端点的过程。
通过 Streamlit
您可以使用 AI Data Platform Samples Github 库中提供的代码示例。该示例将引导您完成从 Streamlit 应用程序调用代理部署端点的过程。
最佳实践 - 异步和非异步响应
我们建议您编写假定异步响应的客户端代码。例如:
import httpx

async def fetch_data():
    async with httpx.AsyncClient() as client:
        response = await client.get(URL)
        return response.json()