使用 Oracle NoSQL Database Migrator
了解 Oracle NoSQL Database Migrator 以及如何将其用于数据迁移。
Oracle NoSQL Database Migrator 是一个工具,可用于将 Oracle NoSQL 表从一个数据源迁移到另一个数据源。此工具可以对 Oracle NoSQL Database Cloud Service、Oracle NoSQL Database 本地和 AWS S3 中的表进行操作。Migrator 工具支持多种不同的数据格式和物理介质类型。支持的数据格式包括 JSON、Parquet、MongoDB 格式的 JSON、DynamoDB 格式的 JSON 和 CSV 文件。支持的物理介质类型包括文件、OCI 对象存储、本地 Oracle NoSQL Database、Oracle NoSQL Database Cloud Service 和 AWS S3。
本文包含以下主题:
概述
借助 Oracle NoSQL Database Migrator,您可以将 Oracle NoSQL 表从一个数据源移动到另一个数据源,例如本地或云端 Oracle NoSQL Database,甚至是简单的 JSON 文件。
在许多情况下,您都需要从迁移 NoSQL 表或迁移到 Oracle NoSQL Database。例如,一组增强 NoSQL 数据库应用的开发人员可能希望使用 cloudsim 在本地 Oracle NoSQL Database Cloud Service (NDCS) 实例中测试其更新的代码。要验证所有可能的测试用例,他们必须设置与实际数据类似的测试数据。为此,他们必须将 NoSQL 表从生产环境复制到本地 NDCS 实例(即 cloudsim 环境)。在另一种情况下,NoSQL 开发人员可能需要将其应用数据从本地迁移到云端,反之亦然,用于开发或测试。
在所有此类案例以及更多案例中,您可以使用 Oracle NoSQL Database Migrator 将 NoSQL 表从一个数据源移动到另一个数据源,例如 Oracle NoSQL Database 本地部署或云端,甚至是简单的 JSON 文件。您还可以将 NoSQL 表从 MongoDB 格式的 JSON 输入文件、DynamoDB 格式的 JSON 输入文件(存储在 AWS S3 源中或从文件中)或 CSV 文件复制到本地或云端的 NoSQL 数据库中。
如下图所示,NoSQL Database Migrator 实用程序充当数据源和目标(称为汇)之间的连接器或管道。本质上,此实用程序从所选源导出数据,并将该数据导入接收器。此工具面向表,也就是说,您只能在表级别移动数据。单个迁移任务对单个表进行操作,支持以各种数据格式将表数据从源迁移至汇。
Oracle NoSQL Database Migrator 旨在支持未来的其他源和汇。有关截至当前发行版 Oracle NoSQL Database Migrator 支持的源和接收器的列表,请参见 Supported Sources and Sinks 。 
与 Oracle NoSQL Database Migrator 一起使用的术语
详细了解上图中使用的不同术语。
-
源:从中导出 NoSQL 表以进行迁移的实体。源的一些示例包括 Oracle NoSQL Database 本地或云端、JSON 文件、MongoDB 格式的 JSON 文件、DynamoDB 格式的 JSON 文件和 CSV 文件。
-
接收:从 NoSQL 数据库迁移程序导入 NoSQL 表的实体。例如,Oracle NoSQL Database 本地部署或云端部署以及 JSON 文件。
NoSQL Database Migrator 工具支持不同类型的源和接收器(即物理介质或数据存储库)和数据格式(即数据在源或接收器中的表示方式)。支持的数据格式包括 JSON、Parquet、MongoDB 格式的 JSON、DynamoDB 格式的 JSON 和 CSV 文件。支持的源和接收器类型包括文件、OCI 对象存储、内部部署 Oracle NoSQL Database 和 Oracle NoSQL Database Cloud Service。
-
迁移管道: NoSQL Database Migrator 将将数据从源传输到汇。这可以可视化为迁移管道。
-
转换:您可以添加规则来修改迁移管道中的 NoSQL 表数据。这些规则称为转换。Oracle NoSQL Database Migrator 仅允许在顶层字段或列中进行数据转换。它不允许您转换嵌套字段中的数据。允许转换的一些示例包括:
-
删除或忽略一列或多列,
-
重命名一个或多个列,或者
-
将多个列聚合到一个字段中,通常是 JSON 字段。
-
-
配置文件:配置文件用于以 JSON 格式定义迁移活动所需的所有参数。稍后,您将此配置文件作为单个参数从 CLI 传递到
runMigrator命令。典型的配置文件格式如下所示。{ "source": { "type" : <source type>, //source-configuration for type. }, "sink": { "type" : <sink type>, //sink-configuration for type. }, "transforms" : { //transforms configuration. }, "migratorVersion" : "<migrator version>", "abortOnError" : <true|false> }分组 参数 必填(是/否) 用途 支持的值 sourcetype是 表示要从中迁移数据的源。源提供用于迁移的数据和元数据(如果有)。 要了解每个源的 type值,请参见 Supported Sources and Sinks 。source类型源配置 是 定义源的配置。这些配置参数特定于上面选择的源类型。 有关每种源类型的配置参数的完整列表,请参见 Source Configuration Templates 。 sinktype是 表示要将数据迁移到的汇。sink 是迁移的目标或目标。 要了解每个源的 type值,请参见 Supported Sources and Sinks 。sink类型的 sink-configuration 是 定义 sink 的配置。这些配置参数特定于上面选择的接收器类型。 有关每种汇类型的配置参数的完整列表,请参见 Sink Configuration Templates 。 transforms转换配置 N 定义要应用于迁移管道中数据的转换。 有关 NoSQL 数据迁移程序支持的转换的完整列表,请参阅转换配置模板。 - migratorVersionN NoSQL 数据迁移器的版本 - - abortOnErrorN 指定是否在发生任何错误时停止迁移活动。
默认值为 true ,指示迁移在遇到迁移错误时停止。
如果将此值设置为 false ,则即使出现失败的记录或其他迁移错误,迁移也会继续进行。失败的记录和迁移错误将在 CLI 终端记录为警告。true、false
注:由于 JSON 文件区分大小写,因此除非另行指定,否则配置文件中定义的所有参数均区分大小写。
支持的源和汇
本主题提供了 Oracle NoSQL Database Migrator 支持的源和接收器的列表。
您可以将此表中的有效源和汇的任意组合用于迁移活动。但是,必须确保至少其中一个端(即源或接收器)必须是 Oracle NoSQL 产品。不能使用 NoSQL 数据库迁移程序将 NoSQL 表数据从一个文件移动到另一个文件。
| 类型(值) | 格式(值) | 有效来源 | 有效接收器 |
|---|---|---|---|
Oracle NoSQL Database (nosqldb) |
NA | 是 | 是 |
Oracle NoSQL Database Cloud Service (nosqldb_cloud) |
NA | 是 | 是 |
文件系统 (file) |
JSON (json) |
是 | 是 |
文件系统 (file) |
MongoDB JSON (mongodb_json) |
是 | N |
文件系统 (file) |
DynamoDB JSON (dynamodb_json) |
是 | N |
文件系统 (file) |
Parquet(parquet) |
N | 是 |
文件系统 (file) |
CSV (csv) |
是 | N |
OCI Object Storage (object_storage_oci) |
JSON (json) |
是 | 是 |
OCI Object Storage (object_storage_oci) |
MongoDB JSON (mongodb_json) |
是 | N |
OCI Object Storage (object_storage_oci) |
Parquet(parquet) |
N | 是 |
OCI Object Storage (object_storage_oci) |
CSV (csv) |
是 | N |
| AWS S3 | DynamoDB JSON (dynamodb_json) |
是 | N |
注:许多配置参数在源和接收器配置中是通用的。为便于参考,在文档部分中针对每个源和接收器重复了此类参数的说明,其中解释了各种源和接收器的配置文件格式。在所有情况下,具有相同名称的参数的语法和语义都是相同的。
源和接收安全
某些源和接收器类型具有用于验证的可选或必需的安全信息。
在 Oracle Cloud Infrastructure (OCI) 中使用服务的所有源和接收器都可以使用某些参数来提供可选的安全信息。可以使用 OCI 配置文件或实例主用户提供此信息。
如果安装是安全的并且使用基于 Oracle Wallet 的验证,则 Oracle NoSQL Database 源和接收器需要必需的安全信息。可以通过将 jar 文件添加到 <MIGRATOR_HOME>/lib 目录来提供此信息。
使用实例主用户进行验证
实例主体是 IAM 服务功能,它允许实例成为可以对服务资源执行操作的授权角色(或主体)。每个计算实例都有自己的身份,并使用添加到其中的证书进行验证。
Oracle NoSQL Database Migrator 提供了使用实例主用户验证连接到 NoSQL 云以及 OCI 对象存储源和接收器的选项。仅当在 OCI 计算实例中使用 NoSQL Database Migrator 工具(例如,在 OCI 上托管的 VM 中运行的 NoSQL 数据库迁移器工具)时,才支持该工具。要启用此功能,请使用 NoSQL 云源和接收器配置文件的 useInstancePrincipal 属性。有关不同类型的源和接收器的配置参数的更多信息,请参见 Source Configuration Templates 和 Sink Configuration Templates 。
有关实例主体的更多信息,请参阅从实例调用服务。
Oracle NoSQL Database Cloud Service 源和接收器中的授权
通过身份和访问管理 (Identity and Access Management,IAM) 策略来管理对 Oracle NoSQL Database Cloud Service 中资源(例如表、表空间和 API)的访问。这可确保仅对特定区间中具有相应检查、读取、使用或管理表权限的用户或应用可以与这些资源进行交互。有关详细信息,请参阅管理对 NDCS 表的访问。
使用 Migrator 实用程序从 Oracle NoSQL Database Cloud Service 表导入或导出数据时,您的有效 IAM 权限决定了您可以读取或写入的资源。如果定义组中的用户尝试执行超出其授权权限的操作,则迁移程序实用程序将返回 OCI IAM 提供的相应授权错误。
例如,如果您的用户组仅对表具有“读取”权限,则 OCI IAM 拒绝任何将数据导入 Oracle NoSQL Database Cloud Service 表的尝试。日志中将显示类似于以下内容的错误消息:
[INSUFFICIENT_PERMISSION] Authorization failed or requested resource not foundOracle NoSQL Database Migrator 的工作流
了解使用 Oracle NoSQL Database Migrator 实用程序迁移 NoSQL 数据时涉及的各个步骤。
下图描述了使用 NoSQL 数据库迁移程序所涉及的高级别任务流。
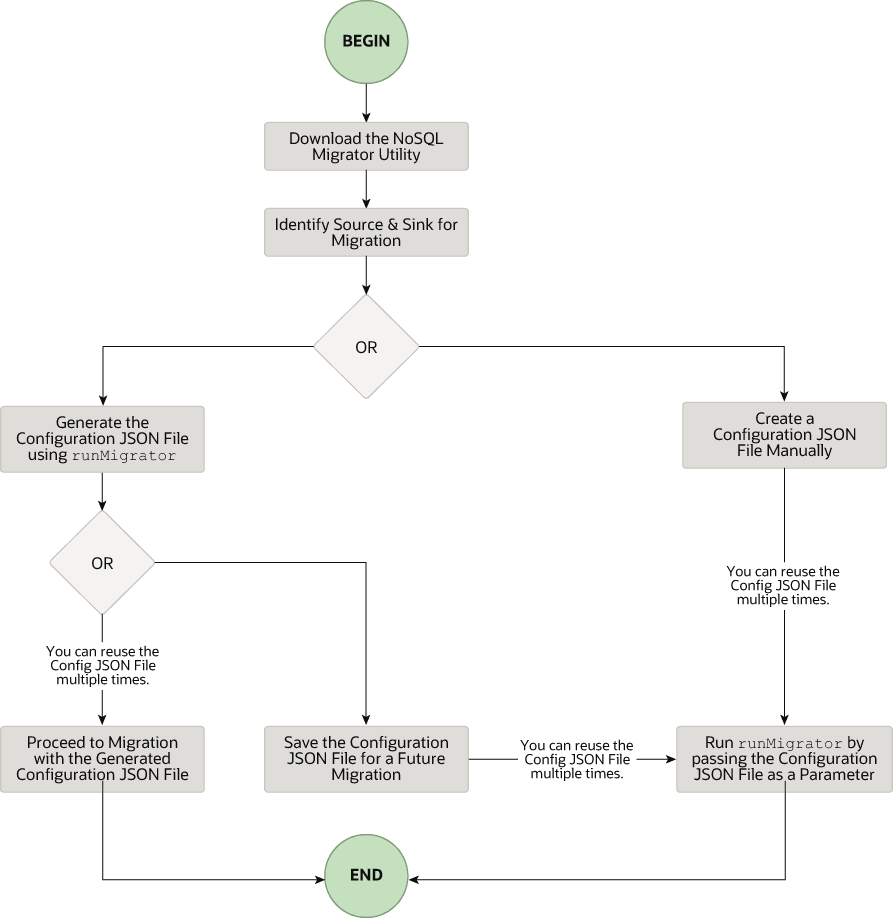
下载 NoSQL 数据迁移程序实用程序
可从 Oracle NoSQL 下载页面下载 Oracle NoSQL Database Migrator 实用程序。在计算机上下载并解压缩后,可以从命令行界面访问 runMigrator 命令。
注:Oracle NoSQL Database Migrator 实用程序需要运行 Java 11 或更高版本。
标识源和接收器
在使用迁移程序之前,必须确定数据源和接收器。例如,如果您要将 NoSQL 表从本地部署的 Oracle NoSQL Database 迁移到 JSON 格式的文件,则源将是 Oracle NoSQL Database,接收器将是 JSON 文件。确保 Oracle NoSQL Database Migrator 通过引用支持的源和接收器来支持标识的源和接收器。这也是一个合适的阶段,用于确定目标或接收器中 NoSQL 表的方案并创建它们。
-
标识 sink 表方案:如果 sink 是 Oracle NoSQL Database 本地部署或云部署,则必须标识 sink 表的方案并确保源数据与目标方案匹配。如果需要,使用转换将源数据映射到汇表。
-
默认方案: NoSQL Database Migrator 提供了一个用于创建具有默认方案的 sink 表的选项,而无需预定义表的方案。
MongoDB 格式化的 JSON:
如果源是 MongoDB 格式的 JSON 文件,则表的默认方案如下所示:
CREATE TABLE IF NOT EXISTS <tablename>(id STRING, document JSON,PRIMARY KEY(SHARD(id))其中:
-
表名 = 为配置中的表属性提供的值。
-
id = 来自 MongoDB 导出 JSON 源文件的每个文档的 _id 值。
-
document = 对于 MongoDB 导出的文件中的每个文档,不包括
_id字段的内容会聚合到文档列中。
注:
- 如果未在 MongoDB 格式的 JSON 文件中以字符串形式提供 _id 值,NoSQL 数据库迁移程序会先将其转换为字符串,然后再将其插入到默认方案中。
- 如果 Oracle NoSQL Database 内部部署或云中已存在表
<tablename>,并且您希望使用defaultSchema配置将数据迁移到表,则必须确保现有表的 ID 列采用小写 (ID) 并且类型为 STRING。
DynamoDB 格式化的 JSON:
如果源是 DynamoDB 格式的 JSON 文件,则表的默认方案如下所示:
CREATE TABLE IF NOT EXISTS <tablename>(DDBPartitionKey_name DDBPartitionKey_type,
[DDBSortKey_name DDBSortKey_type],DOCUMENT JSON,
PRIMARY KEY(SHARD(DDBPartitionKey_name),[DDBSortKey_name]))
其中:
-
表名 = 为配置中的汇表提供的值
-
DDBPartitionKey_name = 为配置中的分区键提供的值
-
DDBPartitionKey_type = 为配置中分区键的数据类型提供的值
-
DDBSortKey_name = 为配置中的排序键提供的值(如果有)
-
DDBSortKey_type = 为配置中排序关键字的数据类型提供的值(如果有)
-
DOCUMENT = 聚合到 NoSQL JSON 列中的 DynamoDB 表项的分区和排序键以外的所有属性
如果源格式为 CSV 文件,则目标表不支持默认方案。您可以创建一个方案文件,其表定义包含与源 CSV 文件相同的列数和数据类型。有关模式文件创建的更多详细信息,请参见 Providing Table Schema 。
其他有效来源:
对于所有其他源,默认方案如下所示:
CREATE TABLE IF NOT EXISTS <tablename> (id LONG GENERATED ALWAYS AS IDENTITY, document JSON, PRIMARY KEY(id))其中:
-
表名 = 为配置中的表属性提供的值。
-
id = 自动生成的 LONG 值。
-
document = 源提供的 JSON 记录聚合到文档列中。
-
-
-
提供表方案: NoSQL 数据库迁移程序允许源使用 schemaInfo 属性为表数据提供方案定义。schemaInfo 属性可用于所有尚未定义隐式方案的数据源。Sink 数据存储可以选择以下任一选项。
-
使用 NoSQL 数据库迁移程序定义的默认方案。
-
使用源提供的方案。
-
通过定义自己的方案来覆盖源提供的方案。例如,如果要将数据从源方案转换为其他方案,则需要覆盖源提供的方案并使用 NoSQL 数据库迁移器工具的转换功能。
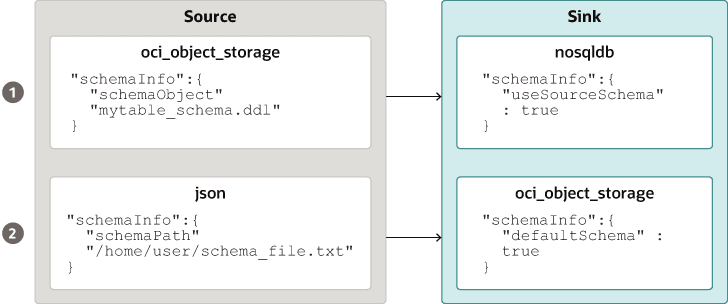
插图 source_sink_schema_example.png 的说明
例如,表方案文件
mytable_schema.ddl可以包括表 DDL 语句。在开始迁移之前,NoSQL 数据库迁移器工具会执行此表方案文件。迁移程序工具在方案文件中支持每行不超过一个 DDL 语句。例如:CREATE TABLE IF NOT EXISTS(id INTEGER, name STRING, age INTEGER, PRIMARY KEY(SHARD(ID))) -
注:如果表存在于接收器中,并且 schemaPath 中的 DDL 与表不同,则迁移将失败。
- 创建汇表:在确定汇表方案后,通过管理 CLI 或使用汇配置文件的
schemaInfo属性创建汇表。请参见 Sink Configuration Templates 。
注:如果源是 CSV 文件,则使用 DDL 命令为目标表的方案创建文件。在 sink 配置文件的 schemaInfo.schemaPath 参数中提供文件路径。
运行 runMigrator 命令
提取的 NoSQL 数据库迁移程序文件中提供了 runMigrator 可执行文件。必须在系统上安装 Java 11 或更高版本和 bash 才能成功运行 runMigrator 命令。
可以通过两种方式运行 runMigrator 命令:
-
通过使用
runMigrator命令的运行时选项创建配置文件,如下所示。[~]$ ./runMigrator configuration file is not provided. Do you want to generate configuration? (y/n) [n]: y ... ...-
调用
runMigrator实用程序时,它会提供一系列运行时选项,并根据每个选项的选择创建配置文件。 -
在实用程序创建配置文件后,您可以选择在同一运行中继续执行迁移活动,或保存配置文件以供将来迁移。
-
无论您决定使用生成的配置文件继续或推迟迁移活动,该文件都将可供编辑或自定义,以满足您的未来需求。您可以稍后使用定制配置文件进行迁移。
-
-
通过使用
-c或--config选项将手动创建的配置文件(采用 JSON 格式)作为运行时参数传递。在运行带有-c或--config选项的runMigrator命令之前,必须手动创建配置文件。有关源和接收器配置参数的任何帮助,请参阅 Oracle NoSQL Database Migrator Reference 。[~]$ ./runMigrator -c </path/to/the/configuration/json/file>
注: NoSQL Database Migrator 在将数据从 Oracle NoSQL Cloud Service 表导出到任何有效汇时使用读取单位。
记录迁移程序进度
NoSQL Database Migrator 工具提供了选项,可用于将跟踪、调试和进度消息输出到标准输出或文件。此选项可用于跟踪迁移操作的进度,特别是对于非常大的表或数据集。
-
日志级别
要通过 NoSQL 数据库迁移器工具控制日志记录行为,请将– log-level 或 -l 运行时参数传递到
runMigrator命令。可以通过传递相应的日志级别值来指定要写入的日志信息量。$./runMigrator --log-level <loglevel>示例:
$./runMigrator --log-level debug表 - NoSQL 数据库迁移程序支持的日志级别
日志级别 说明 警告 列显错误和警告。 信息(默认值) 列显数据迁移的进度状态,例如验证源、验证接收器、创建表以及迁移的数据记录数。 调试 输出其他调试信息。 全部 打印所有内容。此级别将打开所有级别的日志记录。 -
日志文件:
可以使用– log-file 或 -f 参数指定日志文件的名称。如果将– log-file 作为运行时参数传递到
runMigrator命令,则 NoSQL 数据库迁移程序会将所有日志消息写入到其他文件到标准输出。$./runMigrator --log-file <log file name>示例:
$./runMigrator --log-file nosql_migrator.log
限制
Oracle NoSQL Database Migrator 在备份期间不锁定数据库并阻止其他用户。因此,强烈建议在迁移任务运行时不要执行以下活动:
-
对源表执行的任何 DML/DDL 操作。
-
对数据存储进行的任何与拓扑相关的修改。
迁移表行的 TTL 元数据
了解如何将 TTL 数据从源迁移到接收器。
生存时间 (Time to Live,TTL) 是一种允许自动使表行失效的机制。TTL 表示为允许数据存放在存储中的时间量。无法再检索已达到其到期超时值的数据,并且这些数据不会显示在任何存储统计信息中。
在迁移 Oracle NoSQL Database 表时,可以选择包括表行的 TTL 元数据以及实际数据。NoSQL 数据库迁移程序提供配置参数,以支持以下源类型的表行 TTL 元数据的导出和导入:
表 - 迁移 TTL 元数据
| 源类型 | 源配置参数 | Sink 配置参数 |
|---|---|---|
| Oracle NoSQL 数据库 | includeTTL |
includeTTL |
| Oracle NoSQL Database Cloud Service | includeTTL |
includeTTL |
| DynamoDB 格式的 JSON 文件 | ttlAttributeName |
includeTTL |
| 存储在 AWS S3 中的 DynamoDB 格式的 JSON 文件 | ttlAttributeName |
includeTTL |
在 Oracle NoSQL Database 和 Oracle NoSQL Database Cloud Service 中导出 TTL 元数据
NoSQL 数据库迁移程序提供 includeTTL 配置参数,以支持导出表行的 TTL 元数据。
导出表时,会为具有有效到期时间的表行导出 TTL 数据。如果行未到期,则导出的数据中不会显式包括 _metadata JSON 对象,因为其到期值始终为
- NoSQL 数据库迁移程序将每行的失效时间导出为自 UNIX 纪元 (Jan 1st,1970) 以来的毫秒数。例如:
//Row 1
{
    "id" : 1,
    "name" : "xyz",
    "age" : 45,
    "_metadata" : {
        "expiration" : 1629709200000   //Row Expiration time in milliseconds
    }
}

//Row 2
{
    "id" : 2,
    "name" : "abc",
    "age" : 52,
    "_metadata" : {
        "expiration" : 1629709400000   //Row Expiration time in milliseconds
    }
}

//Row 3 No Metadata for below row as it will not expire
{
    "id" : 3,
    "name" : "def",
    "age" : 15
}
导入 TTL 元数据
您可以选择使用接收器配置模板中的 includeTTL 配置参数导入 TTL 元数据。
导入操作的默认引用时间是从运行 NoSQL 数据库迁移器工具的计算机的 System.currentTimeMillis() 获取的当前时间(以毫秒为单位)。但是,如果要延长失效时间并导入原本会立即失效的行,还可以使用 ttlRelativeDate 配置参数设置定制引用时间。扩展的计算方法如下,并添加到到期时间。
Extended time = expiration time - reference time在迁移包含 TTL 元数据的表行时,导入操作将处理以下用例。仅当 includeTTL 配置参数设置为 true 时,这些用例才适用。
-
用例 1 :导入表行中不存在 TTL 元数据信息。
如果要导入的行不包含 TTL 信息,则 NoSQL 数据库迁移程序会为该行设置 TTL=0。
-
用例 2 :相对于导入表行时的参考时间,源表行的 TTL 值已过期。
已过期的表行将被忽略,不会写入存储中。
-
用例 3 :相对于导入表行时的参考时间,源表行的 TTL 值不会过期。
使用 TTL 值导入表行。但是,导入的 TTL 值可能与原始导出的 TTL 值不匹配,因为 TimeToLive 类中存在整数小时和日时段约束。例如:
考虑导出的表行:
{
  "id" : 8,
  "name" : "xyz",
  "_metadata" : {
  "expiration" : 1734566400000 //Thursday, December 19, 2024 12:00:00 AM in UTC
  }
}
进口时的参考时间为 173448000000,即 2024 年 12 月 18 日星期三上午 12:00:00。
导入的表行
{
  "id" : 8,
  "name" : "xyz",
  "_metadata" : {
    "ttl" :  1734739200000 //Saturday, December 21, 2024 12:00:00 AM
  }
}
在存储在 AWS S3 中的 DynamoDB 格式 JSON 文件和 DynamoDB 格式 JSON 文件中导入 TTL 元数据
NoSQL Database Migrator 提供了附加的配置参数 ttlAttributeName,以支持从 DynamoDB 格式的 JSON 文件项导入 TTL 元数据。
DynamoDB 导出的 JSON 文件在每个项目中包含一个特定属性,用于存储 TTL 到期时间戳。要从 DynamoDB 导出的 JSON 文件中(可选)导入 TTL 值,必须将特定属性的名称作为值提供给 DynamoDB 格式的 JSON 文件或 DynamoDB 格式的 JSON 文件存储在 AWS S3 源配置文件中的 ttlAttributeName 配置参数。此外,还必须在接收器配置模板中设置 includeTTL 配置参数。有效的接收器是 Oracle NoSQL Database 和 Oracle NoSQL Database Cloud Service。NoSQL 数据库迁移程序将 TTL 信息存储在导入项的 _metadata JSON 对象中。
在迁移 DynamoDB 导出的 JSON 文件的表项时,导入操作管理以下用例:
-
用例 1: ttlAttributeName 配置参数值设置为在 DynamoDB 导出的 JSON 文件中指定的 TTL 属性名称。
NoSQL Database Migrator 将此项目的到期时间导入为自 UNIX 时代 (Jan 1st,1970) 以来的毫秒数。
例如,考虑 DynamoDB 导出 JSON 文件中的项:
{
    "Item": {
        "DeptId": {
            "N": "1"
        },
        "DeptName": {
            "S": "Engineering"
        },
        "ttl": {
            "N": "1734616800"
        }
    }
}
此处,属性
ttl指定项的生存时间值。如果在 DynamoDB 格式的 JSON 文件或存储在 AWS S3 源配置文件中的 DynamoDB 格式的 JSON 文件中将 ttlAttributeName 配置参数设置为ttl,NoSQL 数据库迁移程序将按如下方式导入项的到期时间:{ "DeptId": 1, "document": { "DeptName": "Engineering" } "_metadata": { "expiration": 1734616800000 } }
注:您可以在接收器配置模板中提供 ttlRelativeDate 配置参数作为计算到期时间的参考时间。
-
用例 2:设置了 ttlAttributeName 配置参数值,但是,该值不存在为 DynamoDB 导出的 JSON 文件项中的属性。
NoSQL 数据库迁移程序不会导入给定项的 TTL 元数据信息。
-
用例 3: ttlAttributeName 配置参数值与 DynamoDB 导出的 JSON 文件项中的属性名称不匹配。NoSQL 数据库迁移程序根据接收器配置以以下方式之一处理导入:
-
如果已配置为使用默认方案导入,则将属性作为普通字段复制。
-
如果配置为使用用户定义的方案导入,则跳过属性。
-
将数据导入具有 IDENTITY 列的汇
了解如何将数据导入到包含 IDENTITY 列的汇。
您可以将数据从有效源导入到具有 IDENTITY 列的汇表(内部部署/云服务)。可以将 IDENTITY 列创建为“始终作为 IDENTITY 生成”或“由 DEFAULT 作为 IDENTITY 生成”。有关使用 IDENTITY 列创建表的更多信息,请参阅《 SQL Reference Guide 》中的 Creating Tables With an IDENTITY Column 。
在导入数据之前,请确保接收器上的 Oracle NoSQL Database 表为空(如果存在)。如果 sink 表中存在预先存在的数据,迁移可能会导致问题,例如在导入期间覆盖 sink 表中的现有数据或跳过源数据。
IDENTITY 列为 GENERATED ALWAYS AS IDENTITY 的接收表
考虑一个 sink 表,其中 IDENTITY 列创建为 GENERATED ALWAYS AS IDENTITY。数据导入取决于源是否向配置文件中的 IDENTITY 列和 ignoreFields 转换参数提供值。
例如,您希望将数据从 JSON 文件源导入到 Oracle NoSQL Database 表中作为接收器。sink 表的方案为:
CREATE TABLE IF NOT EXISTS migrateID(ID INTEGER GENERATED ALWAYS AS IDENTITY, name STRING, course STRING, PRIMARY KEY
      (ID))
Migrator 实用程序可按以下情况所述处理数据迁移:
| 源条件 | 用户活动 | 迁移结果 |
|---|---|---|
|
CASE 1:源数据未为汇表的 IDENTITY 字段提供值。 示例:JSON 源文件 |
创建/生成配置文件。 |
数据迁移成功。IDENTITY 列值是自动生成的。在 Oracle NoSQL Database sink 表 |
|
CASE 2:源数据为接收表的 IDENTITY 字段提供值。 示例:JSON 源文件 |
创建/生成配置文件。您可以在接收器配置模板中为 ID 列提供忽略字段转换。
|
数据迁移成功。提供的 ID 值将跳过,IDENTITY 列值将自动生成。 在 Oracle NoSQL Database sink 表 |
|
可以创建/生成配置文件,但不对 IDENTITY 列执行 ignoreFields 转换。 |
数据迁移失败,并显示以下错误消息:
|
有关转换配置参数的更多详细信息,请参阅主题转换配置模板。
IDENTITY 列为 GENERATED BY DEFAULT AS IDENTITY 的接收表
考虑一个 sink 表,其中 IDENTITY 列创建为 GENERATED BY DEFAULT AS IDENTITY。数据导入取决于源是否向 IDENTITY 列和 ignoreFields 转换参数提供值。
例如,您希望将数据从 JSON 文件源导入到 Oracle NoSQL Database 表中作为接收器。sink 表的方案为:
CREATE TABLE IF NOT EXISTS migrateID(ID INTEGER GENERATED BY DEFAULT AS IDENTITY, name STRING, course STRING, PRIMARY KEY
      (ID))
Migrator 实用程序可按以下情况所述处理数据迁移:
| 源条件 | 用户活动 | 迁移结果 |
|---|---|---|
|
CASE 1:源数据未为汇表的 IDENTITY 字段提供值。 示例:JSON 源文件 |
创建/生成配置文件。 |
数据迁移成功。IDENTITY 列值是自动生成的。在 Oracle NoSQL Database sink 表 |
|
CASE 2:源数据为接收表的 IDENTITY 字段提供值,该字段为主键字段。 示例:JSON 源文件 |
创建/生成配置文件。您可以在接收器配置模板(建议)中为 ID 列提供 ignoreFields 转换。
|
数据迁移成功。提供的 ID 值将跳过,IDENTITY 列值将自动生成。 在 Oracle NoSQL Database sink 表 |
|
可以创建/生成配置文件,但不对 IDENTITY 列执行 ignoreFields 转换。 |
数据迁移成功。源中提供的 尝试在不提供 ID 值的情况下向表中插入其他行时,序列生成器会尝试自动生成 ID 值。序列生成器的起始值为 1。因此,生成的 ID 值可能会与汇表中的现有 ID 值之一重复。由于这违反了主键约束条件,因此会返回一个错误,不会插入该行。 有关附加信息,请参阅序号生成器。 为避免违反主键约束条件,序列生成器必须以与汇表中的现有 ID 值不冲突的值启动序列。要使用 START WITH 属性进行此修改,请参见以下示例: 示例:在 Oracle NoSQL Database sink 表 要查找要插入 ID 列的序列生成器的相应值,请使用以下查询提取 输出: sink 表中 这将在 4 开始序列。 现在,在不提供 ID 值的情况下向汇表中插入行时,序列生成器会自动从 4 开始生成 ID 值,以避免重复的 ID。 |
有关转换配置参数的更多详细信息,请参阅主题转换配置模板。
使用查询谓词筛选数据
了解如何指定查询谓词以仅导出符合筛选标准的表行。
查询谓词
NoSQL 数据库迁移器提供了通过指定查询谓词在导出期间筛选出数据的选项。查询谓词指定要导出行必须满足的条件。Migrator 实用程序将查询谓词转换为 SQL WHERE 子句,并将其应用于给定表,以提供筛选条件,以便仅导出与指定条件匹配的行。可以在查询谓词中使用内置函数 (modification_time(),expiration_time(),creation_time()) 来创建高级过滤器选项。
只能在 Oracle NoSQL Database 和 Oracle NoSQL Database Cloud Service 源上为所有受支持的汇使用查询谓词。有关详细信息,请参阅 Oracle NoSQL Database 和 Oracle NoSQL Database Cloud Service 。
有关用例演示,请参阅从 Oracle NoSQL Database Cloud Service 迁移到 JSON 文件。
转储筛选器
Migrator 实用程序提供了一个选项来回显在后端执行的 SQL 查询。此功能可帮助您验证生成的查询,如果需要,请在运行迁移任务之前细化筛选器。
可以使用转储过滤器选项运行 Migrator 实用程序,如下所示:
[~/nosqlMigrator]$./runMigrator --dump-filter|df [optional-config-file]-
使用配置文件: Migrator 实用程序显示提供的配置文件和生成的查询,如以下示例中所示:
[~/nosqlMigrator]./runMigrator --dump-filter migrator-config.json[INFO] Configuration for migration: { "source" : { "type" : "nosqldb", "storeName" : "kvstore", "helperHosts" : ["<hostname>:5000"], "table" : "users", "queryFilter" : "$row.address.city='Houston'", "includeTTL" : true, "requestTimeoutMs" : 5000 }, "sink" : { "type" : "file", "format" : "json", "useMultiFiles" : false, "schemaPath" : "<complete/path/to/the/JSON/file/with/DDL/commands/for/the/schema/definition>", "pretty" : true, "dataPath" : "<complete/path/to/directory>" }, "abortOnError" : true, "migratorVersion" : "1.8.0" } [INFO] Query for the migration: 'select $row, expiration_time($row) from users $row where $row.address.city='Houston'' -
没有配置文件: Migrator 实用程序以交互方式收集生成配置文件(包括查询谓词)所需的所有输入。然后显示生成的配置文件和查询。
注:
转储筛选器选项仅显示配置文件和查询。它不会启动数据迁移。查看之后,要执行迁移,请使用
--c或--config选项对配置文件运行 Migrator 实用程序,如下所示:$./runMigrator --config <complete/path/to/the/JSON/config/file>
Oracle NoSQL Database Migrator 用例演示
了解如何使用 Oracle NoSQL Database Migrator 为特定用例执行数据迁移。您可以在每个用例中找到详细的系统说明以及用于执行迁移的代码示例。
本文包含以下主题:
从 Oracle NoSQL Database Cloud Service 迁移到 JSON 文件
此示例说明如何使用 Oracle NoSQL Database Migrator 将 NoSQL 表的数据和方案定义从 Oracle NoSQL Database Cloud Service (NDCS) 复制到 JSON 文件。
用例
组织决定使用 Oracle NoSQL Database Cloud Service (NDCS) 数据训练模型,以预测未来的行为并提供个性化建议。他们可以定期将 NDCS 表的数据复制到 JSON 文件中,并将其应用于分析引擎以分析和训练模型。这样做有助于他们将分析查询与低延迟关键路径分开。
示例
在演示中,让我们看看如何将名为 myTable 的 NoSQL 表的数据和方案定义从 NDCS 迁移到 JSON 文件。
先决条件
-
确定迁移的源和接收器。
-
来源:Oracle NoSQL Database Cloud Service
-
Sink:JSON 文件
-
-
确定 OCI 云身份证明并将其捕获到 OCI 配置文件中。将配置文件保存在
/home/.oci/config中。请参见 Acquiring Credentials 。[DEFAULT] tenancy=ocid1.tenancy.oc1.... user=ocid1.user.oc1.... fingerprint= 43:d1:.... key_file=</fully/qualified/path/to/the/private/key/> pass_phrase=<passphrase> -
确定 Oracle NoSQL Database Cloud Service 的区域端点和区间名称。
-
端点:
us-ashburn-1 -
区间:
ocid1.compartment.oc1..aa..rhsmq
-
过程
要将表的数据和方案定义从 Oracle NoSQL Database Cloud Service 迁移到 JSON 文件,可以使用以下选项之一:
-
打开命令提示符并导航到从中提取 NoSQL Database Migrator 实用程序的目录。
-
要使用 NoSQL 数据库迁移器生成配置文件,请运行不带任何运行时参数的
runMigrator命令。[~/nosqlMigrator]$./runMigrator -
由于您未将配置文件作为运行时参数提供,因此实用程序会提示您是否要立即生成配置。键入
**y**。Configuration file is not provided. Do you want to generate configuration? (y/n) [n]: y Generating a configuration file interactively. -
根据实用程序中的提示,选择源配置的选项。
Enter a location for your config [./migrator-config.json]: /home/<user>/nosqlMigrator/NDCS2JSON Select the source: 1) nosqldb 2) nosqldb_cloud 3) file 4) object_storage_oci 5) aws_s3 #? 2 Configuration for source type=nosqldb_cloud Enter endpoint URL or region ID of the Oracle NoSQL Database Cloud: us-phoenix-1 Select the authentication type: 1) credentials_file 2) instance_principal 3) delegation_token 4) session_token 5) oke_workload_identity #? 1 Enter path to the file containing OCI credentials [/home/<user>/.oci/config]: Enter the profile name in OCI credentials file [DEFAULT]: Enter the compartment name or id of the table []: developers Enter table name: myTable Include TTL data? If you select 'yes' TTL of rows will also be included in the exported data.(y/n) [n]: Enter percentage of table read units to be used for migration operation. (1-100) [90]: Enter store operation timeout in milliseconds. (1-30000) [5000]: -
根据实用程序中的提示,选择 Sink 配置的选项。
Select the sink: 1) nosqldb 2) nosqldb_cloud 3) file #? 3 Configuration for sink type=file Enter path to a directory to store JSON data: /home/<user>/nosqlMigrator would you like to export data to multiple files for each source?(y/n) [y]: n Would you like to store JSON in pretty format? (y/n) [n]: y Would you like to migrate the table schema also? (y/n) [y]: y Enter path to a file to store table schema: /home/<user>/nosqlMigrator/myTableSchema -
根据实用程序中的提示,选择源数据转换的选项。默认值为
n。Would you like to add transformations to source data? (y/n) [n]: -
输入您的选择,以确定是否在任何记录无法迁移时继续迁移。
Would you like to continue migration in case of any record/row is failed to migrate?: (y/n) [n]: -
该实用程序在屏幕上显示生成的配置。
generated configuration is: { "source": { "type": "nosqldb_cloud", "endpoint": "us-ashburn-1", "table": "myTable", "compartment": "ocid1.compartment.oc1..aa..rhsmq", "credentials": "/home/<user>/.oci/config", "credentialsProfile": "DEFAULT", "readUnitsPercent": 90, "requestTimeoutMs": 5000 }, "sink": { "type": "file", "format": "json", "useMultiFiles" : false, "schemaPath": "/home/<user>/nosqlMigrator/myTableSchema", "pretty": true, "dataPath": "/home/<user>/nosqlMigrator" }, "abortOnError": true, "migratorVersion": "1.8.0" } -
该实用程序会提示您选择是否使用生成的配置文件继续迁移。缺省选项为
y。注:如果选择
n,则可以使用生成的配置文件使用./runMigrator -c或./runMigrator --config选项运行迁移。Would you like to run the migration with above configuration? If you select no, you can use the generated configuration file to run the migration using: ./runMigrator --config /home/<user>/nosqlMigrator/NDCS2JSON (y/n) [y]: -
NoSQL 数据库迁移程序将您的数据和方案从 NDCS 迁移到 JSON 文件。
Records provided by source=10,Records written to sink=10,Records failed=0,Records skipped=0.
Elapsed time: 0min 1sec 277ms
Migration completed.
确认
要验证迁移,可以导航到指定的 sink 目录并查看方案和数据。
-- Exported myTable Data. JSON files are created in the supplied data path

[~/nosqlMigrator]$cat myTable_1_5.json
{
  "id" : 10,
  "document" : {
    "course" : "Computer Science",
    "name" : "Neena",
    "studentid" : 105
  }
}
{
  "id" : 3,
  "document" : {
  "course" : "Computer Science",
    "name" : "John",
    "studentid" : 107
  }
}
{
  "id" : 4,
  "document" : {
    "course" : "Computer Science",
    "name" : "Ruby",
    "studentid" : 100
  }
}
{
  "id" : 6,
  "document" : {
    "course" : "Bio-Technology",
    "name" : "Rekha",
    "studentid" : 104
  }
}
{
  "id" : 7,
  "document" : {
    "course" : "Computer Science",
    "name" : "Ruby",
    "studentid" : 100
  }
}
{
  "id" : 5,
  "document" : {
    "course" : "Journalism",
    "name" : "Rani",
    "studentid" : 106
  }
}
{
  "id" : 8,
  "document" : {
    "course" : "Computer Science",
    "name" : "Tom",
    "studentid" : 103
  }
}
{
  "id" : 9,
  "document" : {
    "course" : "Computer Science",
    "name" : "Peter",
    "studentid" : 109
  }
}
{
  "id" : 1,
  "document" : {
    "course" : "Journalism",
    "name" : "Tracy",
    "studentid" : 110
  }
}
{
  "id" : 2,
  "document" : {
    "course" : "Bio-Technology",
    "name" : "Raja",
    "studentid" : 108
  }
}
-- Exported myTable Schema
[~/nosqlMigrator]$cat myTableSchema
CREATE TABLE IF NOT EXISTS myTable (id INTEGER, document JSON, PRIMARY KEY(SHARD(id)))-
使用 Oracle NoSQL Database Cloud Service (NDCS) 源和 JSON 接收器详细信息准备配置文件(采用 JSON 格式)。请参见 Source Configuration Templates 和 Sink Configuration Templates 。
在此示例中,
users表与以下数据一起使用:{"id":10,"firstName":"John","lastName":"Smith","age":22,"income":45000,"address":{"city":"Santa Cruz","number":101,"phones":[{"area":408,"kind":"work","number":4538955},{"area":831,"kind":"home","number":7533341},{"area":831,"kind":"mobile","number":7533382}],"state":"CA","street":"Pacific Ave","zip":95008}} {"id":20,"firstName":"Jane","lastName":"Smith","age":22,"income":55000,"address":{"city":"San Jose","number":201,"phones":[{"area":608,"kind":"work","number":6538955},{"area":931,"kind":"home","number":9533341},{"area":931,"kind":"mobile","number":9533382}],"state":"CA","street":"Atlantic Ave","zip":95005}} {"id":30,"firstName":"Adam","lastName":"Smith","age":45,"income":75000,"address":{"city":"Houston","number":301,"phones":[{"area":618,"kind":"work","number":6618955},{"area":951,"kind":"home","number":9613341},{"area":981,"kind":"mobile","number":9613382}],"state":"TX","street":"Indian Ave","zip":95075}} {"id":40,"firstName":"Joanna","lastName":"Smith","age":null,"income":75000,"address":{"city":"Houston","number":401,"phones":[{"area":null,"kind":"work","number":1618955},{"area":451,"kind":"home","number":4613341},{"area":481,"kind":"mobile","number":4613382}],"state":"TX","street":"Tex Ave","zip":95085}}确保在源配置模板中包括具有相应查询谓词的
queryFilter参数,以便仅从表中导出所需的行。有关如何创建查询谓词的详细信息,请参阅 NoSQL Database Cloud Service Source 主题中的 Sample Query Predicates 表。在此示例中,查询谓词从
users表导出addressJSON 列中city字段 = ‘ Houston ’的行。{ "source" : { "type" : "nosqldb_cloud", "endpoint" : "us-ashburn-1", "table" : "users", "queryFilter" : "$row.address.city='Houston'", "compartment" : "ocid1.compartment.oc1..aa..rhsmq", "credentials" : "/home/<user>/.oci/config", "credentialsProfile" : "DEFAULT", "readUnitsPercent" : 90, "includeTTL" : true, "requestTimeoutMs" : 5000 }, "sink" : { "type" : "file", "format" : "json", "useMultiFiles" : true, "chunkSize" : 32, "schemaPath" : "/scratch/<user>/nosqlMigrator/tableschema.ddl", "pretty" : false, "dataPath" : "/scratch/<user>/nosqlMigrator" }, "abortOnError" : true, "migratorVersion" : "1.8.0" } -
打开命令提示符并导航到从中提取 NoSQL Database Migrator 实用程序的目录。
-
通过传递配置文件运行
runMigrator命令。使用--config或-c选项。[~/nosqlMigrator]$./runMigrator --config <complete/path/to/the/JSON/config/file>注:
您还可以使用以下命令运行命令:
用于在运行迁移任务之前查看和验证生成的查询的选项,如下所示。有关详细信息,请参见
.
[~/nosqlMigrator]$./runMigrator --dump-filter <complete/path/to/the/JSON/config/file>该实用程序继续进行数据迁移,如下所示:
[INFO] creating source from given configuration:
[INFO] [cloud source] : query = 'SELECT $row,expiration_time_millis($row) AS expiration FROM users $row where $row.address.city='Houston''
[INFO] source creation completed
[INFO] creating sink from given configuration:
[INFO] sink creation completed
[INFO] creating migrator pipeline
[INFO] [json file sink] : writing table schema to /scratch/raumesh/nosqlMigrator/tableschema.ddl
[INFO] migration started
[INFO] Migration success for source users. read=2,written=2,failed=0
[INFO] Migration is successful for all the sources.
[INFO] migration completed.
Records provided by source=2, Records written to sink=2, Records failed=0,Records skipped=0.
Elapsed time: 0min 0sec 182ms
Migration completed.
验证
要验证迁移,可以导航到指定的 sink 目录并查看方案和数据。仅导出 address JSON 列中具有 city 字段值 'Houston' 的行。
-- Exported users data. Schema and JSON files are created in the supplied data paths.

[~/nosqlMigrator]: cat tableschema.ddl

CREATE TABLE IF NOT EXISTS users (id INTEGER, firstName STRING, lastName STRING, age INTEGER, income INTEGER, address JSON, PRIMARY KEY(SHARD(id)))
[~/nosqlMigrator]: cat users_6_10.json
{"id":30,"firstName":"Adam","lastName":"Smith","age":45,"income":75000,"address":{"city":"Houston","number":301,"phones":[{"area":618,"kind":"work","number":6618955},{"area":951,"kind":"home","number":9613341},{"area":981,"kind":"mobile","number":9613382}],"state":"TX","street":"Indian Ave","zip":95075}}
{"id":40,"firstName":"Joanna","lastName":"Smith","age":null,"income":75000,"address":{"city":"Houston","number":401,"phones":[{"area":null,"kind":"work","number":1618955},{"area":451,"kind":"home","number":4613341},{"area":481,"kind":"mobile","number":4613382}],"state":"TX","street":"Tex Ave","zip":95085}}
bash-4.4$从本地 Oracle NoSQL Database 迁移到 Oracle NoSQL Database Cloud Service
此示例说明如何使用 Oracle NoSQL Database Migrator 将 NoSQL 表的数据和方案定义从 Oracle NoSQL Database 复制到 Oracle NoSQL Database Cloud Service (NDCS)。
用例
作为开发人员,您将探索各种选项,以避免为现有 NoSQL 数据库 KVStore 工作负载管理资源、集群和垃圾收集所产生的开销。作为解决方案,您决定将现有的内部部署 KVStore 工作负载迁移到 Oracle NoSQL Database Cloud Service,因为 NDCS 会自动管理这些工作负载。
示例
在演示中,让我们看看如何将名为 myTable 的 NoSQL 表的数据和方案定义从 NoSQL 数据库 KVStore 迁移到 NDCS。我们还将使用此用例来说明如何通过传递预先创建的配置文件来运行 runMigrator 实用程序。
先决条件
-
确定迁移的源和接收器。
-
来源:Oracle NoSQL Database
-
Sink:Oracle NoSQL Database Cloud Service
-
-
确定 OCI 云身份证明并将其捕获到 OCI 配置文件中。将配置文件保存在
/home/.oci/config中。请参阅 Using Oracle NoSQL Database Cloud Service 中的 Acquiring Credentials 。[DEFAULT] tenancy=ocid1.tenancy.oc1.... user=ocid1.user.oc1.... fingerprint= 43:d1:.... key_file=</fully/qualified/path/to/the/private/key/> pass_phrase=<passphrase> -
确定 Oracle NoSQL Database Cloud Service 的区域端点和区间名称。
-
端点:
us-phoenix-1 -
区间:
developers
-
-
了解内部部署 KVStore 的以下详细信息:
-
storeName:
kvstore -
helperHosts:
<hostname>:5000 -
表:
myTable
-
过程
要将 myTable 的数据和方案定义从 NoSQL 数据库 KVStore 迁移到 NDCS,请执行以下操作:
-
使用标识的源和接收器详细信息准备配置文件(采用 JSON 格式)。请参见 Source Configuration Templates 和 Sink Configuration Templates 。
{ "source" : { "type" : "nosqldb", "storeName" : "kvstore", "helperHosts" : ["<hostname>:5000"], "table" : "myTable", "requestTimeoutMs" : 5000 }, "sink" : { "type" : "nosqldb_cloud", "endpoint" : "us-phoenix-1", "table" : "myTable", "compartment" : "developers", "schemaInfo" : { "schemaPath" : "<complete/path/to/the/JSON/file/with/DDL/commands/for/the/schema/definition>", "readUnits" : 100, "writeUnits" : 100, "storageSize" : 1 }, "credentials" : "<complete/path/to/oci/config/file>", "credentialsProfile" : "DEFAULT", "writeUnitsPercent" : 90, "requestTimeoutMs" : 5000 }, "abortOnError" : true, "migratorVersion" : "1.8.0" } -
打开命令提示符并导航到从中提取 NoSQL Database Migrator 实用程序的目录。
-
通过使用
--config或-c选项传递配置文件来运行runMigrator命令。[~/nosqlMigrator/nosql-migrator-1.8.0]$./runMigrator --config <complete/path/to/the/JSON/config/file> -
该实用程序继续进行数据迁移,如下所示。
Records provided by source=10, Records written to sink=10, Records failed=0.
Elapsed time: 0min 10sec 426ms
Migration completed.
确认
要验证迁移,您可以登录到 NDCS 控制台并验证是否已使用源数据创建 myTable。
从 JSON 文件源迁移到 Oracle NoSQL Database Cloud Service
此示例显示 Oracle NoSQL Database Migrator 将数据从 JSON 文件源复制到 Oracle NoSQL Database Cloud Service 的用法。
在评估多个选项后,组织将 Oracle NoSQL Database Cloud Service 最终确定为其 NoSQL 数据库平台。由于其源内容采用 JSON 文件格式,因此他们正在寻找一种将它们迁移到 Oracle NoSQL Database Cloud Service 的方法。
在此示例中,您将学习如何从名为 SampleData.json 的 JSON 文件迁移数据。可以通过传递预创建的配置文件来运行 runMigrator 实用程序。如果未将配置文件作为运行时参数提供,则 runMigrator 实用程序会提示您通过交互过程生成配置。
先决条件
-
确定迁移的源和接收器。
-
源:JSON 源文件。
SampleData.json是源文件。它包含多个 JSON 文档,每行包含一个文档,用新行字符分隔。{"id":6,"val_json":{"array":["q","r","s"],"date":"2023-02-04T02:38:57.520Z","nestarray":[[1,2,3],[10,20,30]],"nested":{"arrayofobjects":[{"datefield":"2023-03-04T02:38:57.520Z","numfield":30,"strfield":"foo54"},{"datefield":"2023-02-04T02:38:57.520Z","numfield":56,"strfield":"bar23"}],"nestNum":10,"nestString":"bar"},"num":1,"string":"foo"}} {"id":3,"val_json":{"array":["g","h","i"],"date":"2023-02-02T02:38:57.520Z","nestarray":[[1,2,3],[10,20,30]],"nested":{"arrayofobjects":[{"datefield":"2023-02-02T02:38:57.520Z","numfield":28,"strfield":"foo3"},{"datefield":"2023-02-02T02:38:57.520Z","numfield":38,"strfield":"bar"}],"nestNum":10,"nestString":"bar"},"num":1,"string":"foo"}} {"id":7,"val_json":{"array":["a","b","c"],"date":"2023-02-20T02:38:57.520Z","nestarray":[[1,2,3],[10,20,30]],"nested":{"arrayofobjects":[{"datefield":"2023-01-20T02:38:57.520Z","numfield":28,"strfield":"foo"},{"datefield":"2023-01-22T02:38:57.520Z","numfield":38,"strfield":"bar"}],"nestNum":10,"nestString":"bar"},"num":1,"string":"foo"}} {"id":4,"val_json":{"array":["j","k","l"],"date":"2023-02-03T02:38:57.520Z","nestarray":[[1,2,3],[10,20,30]],"nested":{"arrayofobjects":[{"datefield":"2023-02-03T02:38:57.520Z","numfield":28,"strfield":"foo"},{"datefield":"2023-02-03T02:38:57.520Z","numfield":38,"strfield":"bar"}],"nestNum":10,"nestString":"bar"},"num":1,"string":"foo"}} -
Sink:Oracle NoSQL Database Cloud Service。
-
-
确定 OCI 云身份证明并将其捕获到 OCI 配置文件中。将配置文件保存在
/home/<user>/.oci/config目录中。有关更多详细信息,请参阅 Using Oracle NoSQL Database Cloud Service 中的 Acquiring Credentials 。[DEFAULT] tenancy=ocid1.tenancy.oc1.... user=ocid1.user.oc1.... fingerprint= 43:d1:.... region=us-ashburn-1 key_file=</fully/qualified/path/to/the/private/key/> pass_phrase=<passphrase> -
确定 Oracle NoSQL Database Cloud Service 的区域端点和区间名称。
-
端点:
us-ashburn-1 -
区间:
Training-NoSQL
-
-
确定 JSON 源文件的以下详细信息:
-
schemaPath:
<absolute path to the schema definition file containing DDL statements for the NoSQL table at the sink>。在此示例中,DDL 文件为
schema_json.ddl。create table Migrate_JSON (id INTEGER, val_json JSON, PRIMARY KEY(id));如果未提供
schemaPath,则 Oracle NoSQL Database Migrator 提供了一个用于创建具有默认方案的表的选项。有关更多详细信息,请参阅 Workflow for Oracle NoSQL Database Migrator 中的 Identify the Source and Sink 主题。 -
数据路径:
<absolute path to a file or directory containing the JSON data for migration>。
-
过程
要将 JSON 源文件从 SampleData.json 迁移到 Oracle NoSQL Database Cloud Service,请执行以下操作:
-
使用标识的源和接收器详细信息准备配置文件(采用 JSON 格式)。请参见 Source Configuration Templates 和 Sink Configuration Templates 。
{ "source" : { "type" : "file", "format" : "json", "schemaInfo" : { "schemaPath" : "[~/nosql-migrator-1.8.0]/schema_json.ddl" }, "dataPath" : "[~/nosql-migrator-1.8.0]/SampleData.json" }, "sink" : { "type" : "nosqldb_cloud", "endpoint" : "us-ashburn-1", "table" : "Migrate_JSON", "compartment" : "Training-NoSQL", "includeTTL" : false, "schemaInfo" : { "readUnits" : 100, "writeUnits" : 60, "storageSize" : 1, "useSourceSchema" : true }, "credentials" : "/home/<user>/.oci/config", "credentialsProfile" : "DEFAULT", "writeUnitsPercent" : 90, "overwrite" : true, "requestTimeoutMs" : 5000 }, "abortOnError" : true, "migratorVersion" : "1.8.0" } -
打开命令提示符并导航到从中提取 Oracle NoSQL Database Migrator 实用程序的目录。
-
通过使用
--config或-c选项传递配置文件来运行runMigrator命令。[~/nosql-migrator-1.8.0]$./runMigrator --config <complete/path/to/the/config/file> -
该实用程序继续进行数据迁移,如下所示。
Migrate_JSON表是使用schemaPath中提供的方案在汇处创建的。creating source from given configuration: source creation completed creating sink from given configuration: sink creation completed creating migrator pipeline migration started [cloud sink] : start loading DDLs [cloud sink] : executing DDL: create table Migrate_JSON (id INTEGER, val_json JSON, PRIMARY KEY(id)),limits: [100, 60, 1] [cloud sink] : completed loading DDLs [cloud sink] : start loading records [json file source] : start parsing JSON records from file: SampleData.json [INFO] migration completed. Records provided by source=4, Records written to sink=4, Records failed=0, Records skipped=0. Elapsed time: 0min 5sec 778ms Migration completed.
确认
要验证迁移,您可以登录到 Oracle NoSQL Database Cloud Service 控制台并验证是否已使用源数据创建 Migrate_JSON 表。有关访问控制台的过程,请参阅 Oracle NoSQL Database Cloud Service 文档中的从基础结构控制台访问服务文章。
图 - Oracle NoSQL Database Cloud Service 控制台表
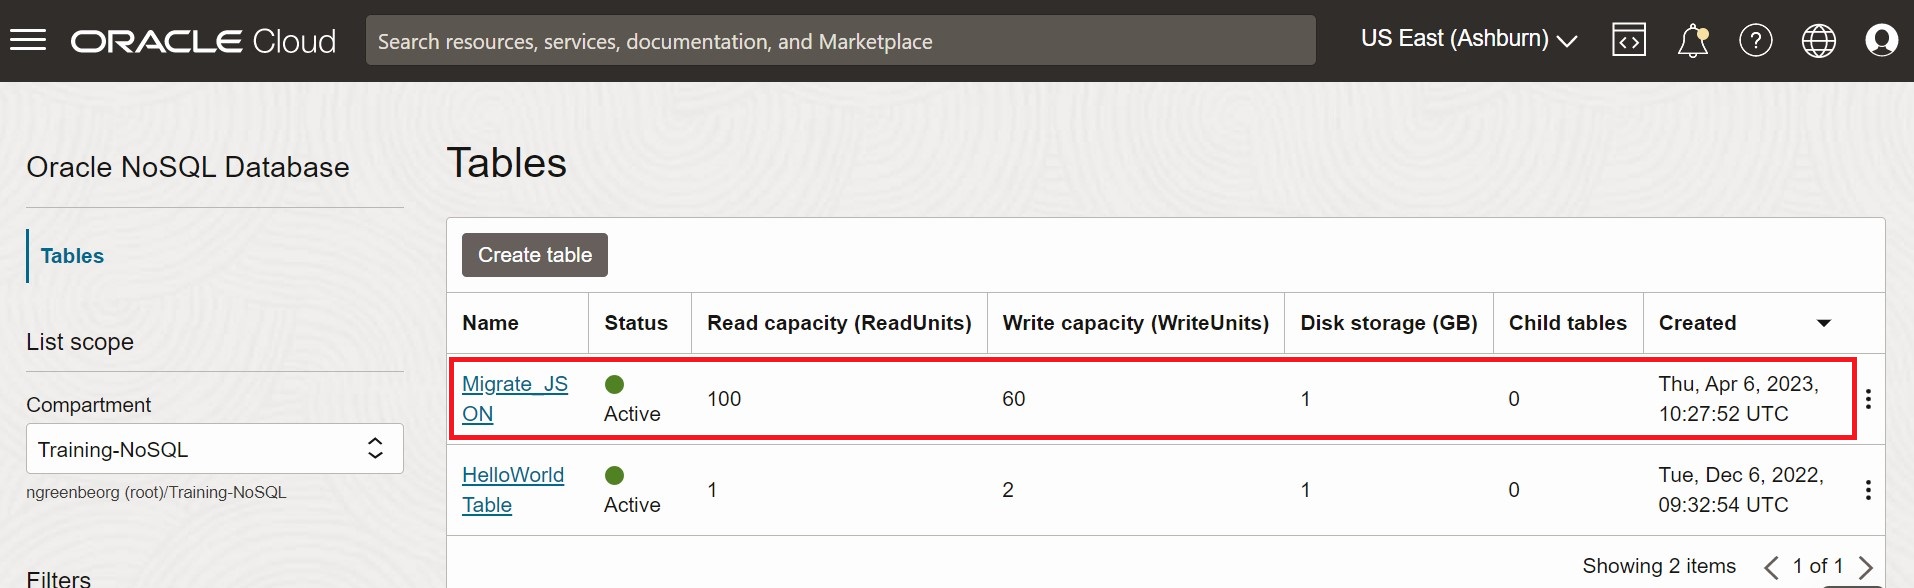
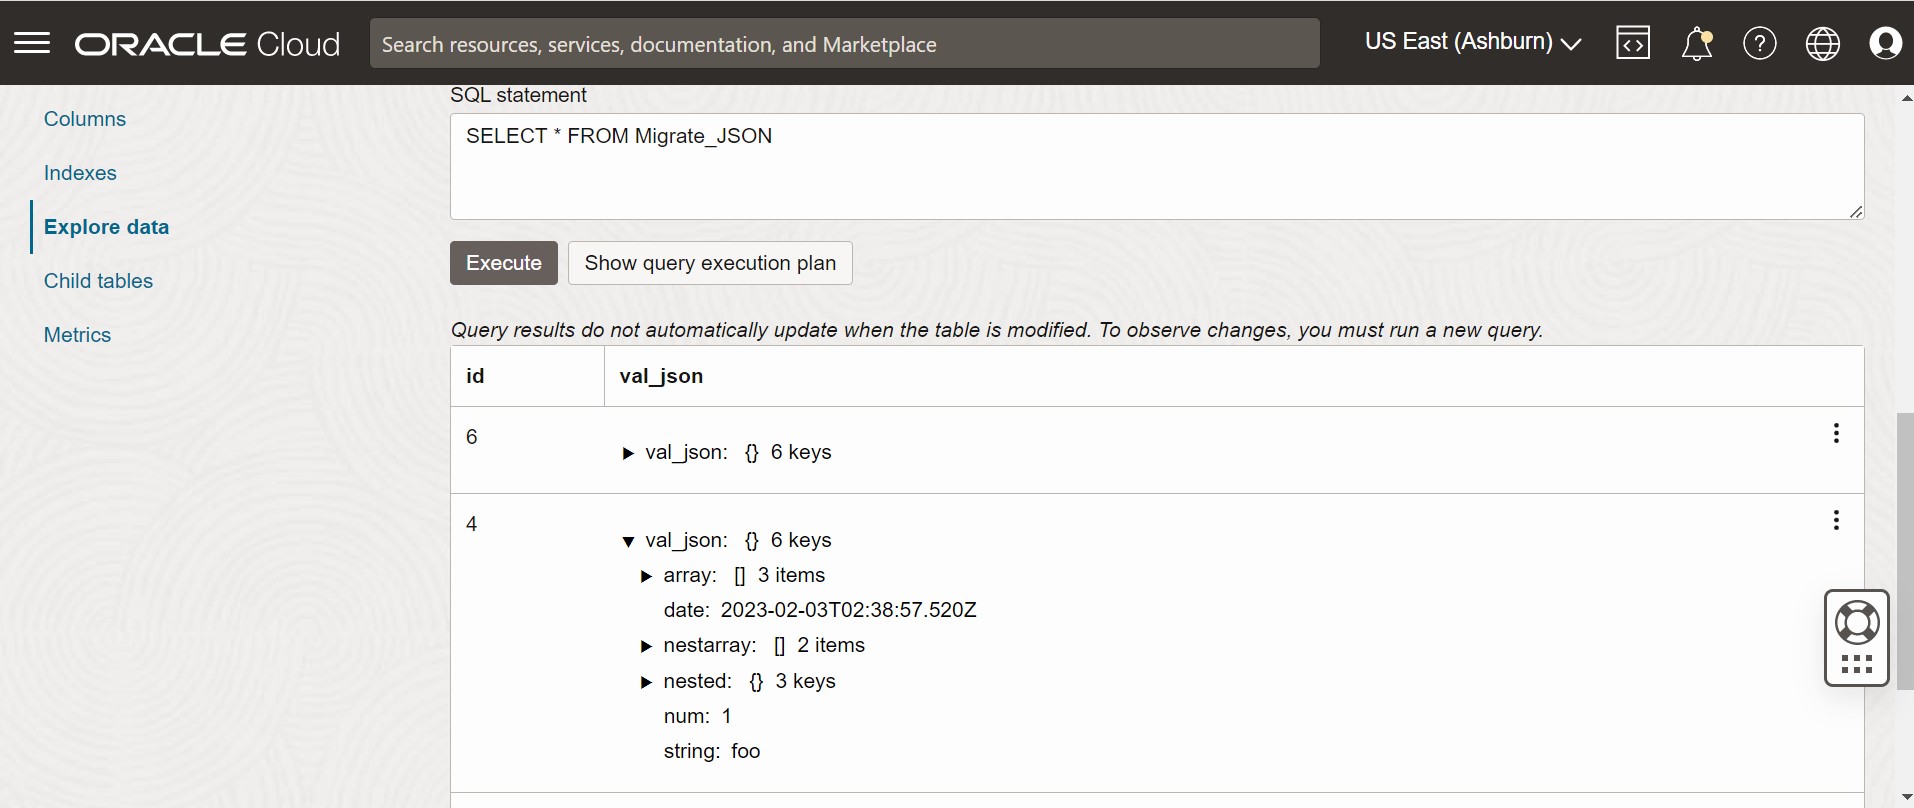
图 - Oracle NoSQL Database Cloud Service 控制台表数据
从 MongoDB JSON 文件迁移到 Oracle NoSQL Database Cloud Service
此示例说明如何使用 Oracle NoSQL Database Migrator 将 MongoDB 格式的数据复制到 Oracle NoSQL Database Cloud Service (NDCS)。
用例
在评估多个选项后,组织将 Oracle NoSQL Database Cloud Service 最终确定为其 NoSQL 数据库平台。表和数据位于 MongoDB 中,组织希望将两者迁移到 Oracle NDCS。
通过在源配置模板中指定文件或目录,可以复制包含用于迁移的 MongoDB 导出的 JSON 数据的文件或目录。
让我们考虑从 MongoDB 导出以下两个示例 JSON 文件,以演示我们的用例。
MongoDB 格式的 JSON 文件示例如下:
{"_id":0,"name":"Aimee Zank","scores":[{"score":1.463179736705023,"type":"exam"},{"score":11.78273309957772,"type":"quiz"},{"score":35.8740349954354,"type":"homework"}]}
{"_id":1,"name":"Aurelia Menendez","scores":[{"score":60.06045071030959,"type":"exam"},{"score":52.79790691903873,"type":"quiz"},{"score":71.76133439165544,"type":"homework"}]}
{"_id":2,"name":"Corliss Zuk","scores":[{"score":67.03077096065002,"type":"exam"},{"score":6.301851677835235,"type":"quiz"},{"score":66.28344683278382,"type":"homework"}]}
{"_id":3,"name":"Bao Ziglar","scores":[{"score":71.64343899778332,"type":"exam"},{"score":24.80221293650313,"type":"quiz"},{"score":42.26147058804812,"type":"homework"}]}
{"_id":4,"name":"Zachary Langlais","scores":[{"score":78.68385091304332,"type":"exam"},{"score":90.2963101368042,"type":"quiz"},{"score":34.41620148042529,"type":"homework"}]}
从 Spring 应用程序导出的 MongoDB 格式的 JSON 文件示例如下:
{"_id":{"$oid":"63d3a87cf564fc21dac3838d"},"firstName":"John","lastName":"Smith","address":{"Country":"France"},"_class":"com.example.demo.Customer"}
{"_id":{"$oid":"63d3a87cf564fc21dac3838e"},"firstName":"Sam","lastName":"David","address":{"Country":"USA"},"_class":"com.example.demo.Customer"}
{"_id":"3","firstName":"Dona","lastName":"William","address":{"Country":"England"},"_class":"com.example.demo.Customer"}
MongoDB 支持两种格式化 JSON 文件的扩展类型:规范模式和放松模式。您可以在规范或放松模式下提供使用 mongoexport 工具生成的 MongoDB 格式的 JSON 文件。NoSQL 数据库迁移程序支持这两种模式。
有关 MongoDB Extended JSON (v2) 文件的更多信息,请参见 mongoexport_formats 。
有关生成 MongoDB 格式的 JSON 文件的详细信息,请参见 mongoexport 。
示例
在演示中,让我们看看如何将 MongoDB 格式的 JSON 文件迁移到 NDCS。我们将为此示例使用手动创建的配置文件。
先决条件
-
确定迁移的源和接收器。
-
来源:MongoDB 格式化 JSON 文件
-
Sink:Oracle NoSQL Database Cloud Service
-
- 使用 mongoexport 实用程序从 MongoDB 中提取数据。请参见 mongoexport 。
-
确定 OCI 云身份证明并将其捕获到 OCI 配置文件中。将配置文件保存在
/home/<user>/.oci/config目录中。有关详细信息,请参阅获取身份证明。[DEFAULT] tenancy=ocid1.tenancy.oc1.... user=ocid1.user.oc1.... fingerprint= 43:d1:.... key_file=</fully/qualified/path/to/the/private/key/> pass_phrase=<passphrase> -
确定 Oracle NoSQL Database Cloud Service 的区域端点和区间名称。
-
端点:
us-ashburn-1 -
区间:
ocid1.compartment.oc1..aaaaaaaaadeskhnnfkenws4k2vdyklcc32hfpzzz4z3zum3ubhmpz6zxnoza
-
过程
要将 MongoDB 格式的 JSON 数据迁移到 Oracle NoSQL Database Cloud Service,您可以选择以下选项之一:
-
使用标识的源和接收器详细信息准备配置文件(采用 JSON 格式)。请参见 Source Configuration Templates 和 Sink Configuration Templates 。
在此处,您将
defaultSchema配置参数设置为 true。因此,NoSQL 数据库迁移程序会在接收器中创建具有默认方案的表。{ "source" : { "type" : "file", "format" : "mongodb_json", "dataPath" : "<complete/path/to/the/MongoDB/Formatted/JSON/file>" }, "sink" : { "type" : "nosqldb_cloud", "endpoint" : "us-ashburn-1", "table" : "mongoImport", "compartment" : "ocid1.compartment.oc1..aaaaaaaaadeskhnnfkenws4k2vdyklcc32hfpzzz4z3zum3ubhmpz6zxnoza", "includeTTL" : false, "schemaInfo" : { "readUnits" : 100, "writeUnits" : 60, "storageSize" : 1, "defaultSchema" : true }, "credentials" : "<complete/path/to/the/oci/config/file>", "credentialsProfile" : "DEFAULT", "writeUnitsPercent" : 90, "overwrite" : true, "requestTimeoutMs" : 5000 }, "abortOnError" : true, "migratorVersion" : "1.8.0" }MongoDB 格式化 JSON 文件源的默认方案如下所示:
CREATE TABLE IF NOT EXISTS <tablename>(id STRING, document JSON,PRIMARY KEY(SHARD(id));其中:
-
tablename= 为配置中的table属性提供的值。 -
id= MongoDB 导出 JSON 源文件的每个文档中的_id值。 -
document= 对于 MongoDB 导出的文件中的每个文档,不包括_id字段的内容会聚合到document列中。
注:如果 Oracle NoSQL Database Cloud Service 中已存在表
<tablename>,并且您希望使用defaultSchema配置将数据迁移到表,则必须确保现有表的 ID 列采用小写 (id) 并且类型为 STRING。 -
-
打开命令提示符并导航到从中提取 NoSQL Database Migrator 实用程序的目录。
-
通过传递配置文件运行
runMigrator命令。使用--config或-c选项。$./runMigrator --config <complete/path/to/the/JSON/config/file> -
该实用程序继续进行数据迁移,如下所示。
[INFO] creating source from given configuration:
[INFO] source creation completed
[INFO] creating sink from given configuration:
[INFO] sink creation completed
[INFO] creating migrator pipeline
[INFO] [cloud sink] : start loading DDLs
[INFO] [cloud sink] : executing DDL: CREATE TABLE IF NOT EXISTS mongoImport (id STRING, document JSON, PRIMARY KEY(SHARD(id))),limits: [100, 60, 1]
[INFO] [cloud sink] : completed loading DDLs
[INFO] migration started
[INFO] [mongo file source] : start parsing MongoDB JSON records from file: mongoDBSample.json
[INFO] Migration success for source mongoDBSample. read=5,written=5,failed=0
[INFO] Migration is successful for all the sources.
[INFO] migration completed.
Records provided by source=5, Records written to sink=5, Records failed=0,Records skipped=0.
Elapsed time: 0min 0sec 448ms
Migration completed.
验证
要验证迁移,您可以登录到 Oracle NoSQL Database Cloud Service 控制台并验证是否已使用源数据创建 mongoImport 表。有关访问控制台的过程,请参见 Accessing the Service from the Infrastructure Console 一文。
-
使用标识的源和接收器详细信息准备配置文件(采用 JSON 格式)。请参见 Source Configuration Templates 和 Sink Configuration Templates 。
在此处,您可以在源配置模板的
schemaPath参数中指定包含 sink 表的 DDL 语句的文件。相应地,在汇配置模板中将useSourceSchema配置参数设置为 true。可以按如下方式生成定制方案:
-
请注意 MongoDB 格式的 JSON 数据中每列的名称和数据类型。使用此信息可以为 Oracle NoSQL Database Cloud Service 表创建方案 DDL 文件。
-
在方案文件中,将第一列(主键)命名为 STRING 类型的
id。对于 MongoDB 格式的 JSON 文件中记录的其余列,请包含相同的名称和类型。 -
保存方案文件,并记下它的完整路径。
此示例中使用了以下用户定义的方案:
CREATE TABLE IF NOT EXISTS sampleMongoDBImp (id STRING, name STRING, scores JSON, PRIMARY KEY(SHARD(id)));您必须包括
renameFields转换,指示 NoSQL 数据库迁移程序在创建表时将_id列转换为id。有关参数详细信息,请参见 Transformation Configuration Templates 。NoSQL 数据库迁移程序在接收器中创建具有定制方案的表。{ "source" : { "type" : "file", "format" : "mongodb_json", "schemaInfo" : { "schemaPath" : "<complete/path/to/the/schema/file>" }, "dataPath" : "<complete/path/to/the/MongoDB/Formatted/JSON/file>" }, "sink" : { "type" : "nosqldb_cloud", "endpoint" : "us-ashburn-1", "table" : "sampleMongoDBImp", "compartment" : "ocid1.compartment.oc1..aaaaaaaaadeskhnnfkenws4k2vdyklcc32hfpzzz4z3zum3ubhmpz6zxnoza", "includeTTL" : true, "schemaInfo" : { "readUnits" : 100, "writeUnits" : 60, "storageSize" : 1, "useSourceSchema" : true }, "credentials" : "<complete/path/to/the/oci/config/file>", "credentialsProfile" : "DEFAULT", "writeUnitsPercent" : 90, "overwrite" : false, "requestTimeoutMs" : 5000 }, "transforms": { "renameFields" : { "_id":"id" } }, "abortOnError" : true, "migratorVersion" : "1.8.0" } -
-
打开命令提示符并导航到从中提取 NoSQL Database Migrator 实用程序的目录。
-
通过传递配置文件运行
runMigrator命令。使用--config或-c选项。$./runMigrator --config <complete/path/to/the/JSON/config/file> -
该实用程序继续进行数据迁移,如下所示。
[INFO] creating source from given configuration:
[INFO] source creation completed
[INFO] creating sink from given configuration:
[INFO] sink creation completed
[INFO] creating migrator pipeline
[INFO] [cloud sink] : start loading DDLs
[INFO] [cloud sink] : executing DDL: CREATE TABLE IF NOT EXISTS sampleMongoDBImp (id INTEGER, name STRING, scores JSON, PRIMARY KEY(SHARD(id))),limits: [100, 60, 1]
[INFO] [cloud sink] : completed loading DDLs
[INFO] migration started
[INFO] [mongo file source] : start parsing MongoDB JSON records from file: mongoDBSample.json
[INFO] Migration success for source mongoDBSample. read=5,written=5,failed=0
[INFO] Migration is successful for all the sources.
[INFO] migration completed.
Records provided by source=5, Records written to sink=5, Records failed=0,Records skipped=0.
Elapsed time: 0min 0sec 438ms
Migration completed.
验证
要验证迁移,您可以登录到 Oracle NoSQL Database Cloud Service 控制台并验证是否已使用源数据创建 sampleMongoDBImp 表。有关访问控制台的过程,请参见 Accessing the Service from the Infrastructure Console 一文。
-
对于此用例,我们将使用从 Spring 应用程序导出的示例 MongoDB 格式的 JSON 文件作为源。有关此格式的更多详细信息,请参阅春季数据。
-
使用标识的源和接收器详细信息准备配置文件(采用 JSON 格式)。请参见 Source Configuration Templates 和 Sink Configuration Templates 。
在此处,您可以在源配置模板的
schemaPath参数中指定包含 sink 表的 DDL 语句的文件。相应地,在汇配置模板中将useSourceSchema配置参数设置为 true。可以按如下方式生成定制方案:
-
请注意 MongoDB 格式的 JSON 数据中每列的名称和数据类型。
-
在方案文件中,将第一列(主键)命名为 STRING 类型的
id。将剩余字段聚集到 JSON 类型的名为kv_json_的字段,并遵循 Spring 数据格式。有关更多详细信息,请参阅弹簧数据框架的持久性模型。 -
保存方案文件,并记下它的完整路径。
此示例中使用了以下用户定义的方案:
CREATE TABLE IF NOT EXISTS sampleMongoDBSpringImp(id STRING, kv_json_ JSON, PRIMARY KEY(SHARD(id)))对于上面给出的 Spring 数据示例,必须包括以下转换:
-
将
_id列转换为id的renameFields转换 -
ignoreFields转换,忽略_class列,而不将其包括在汇表中 -
aggregateFields转换,将剩余字段(id以外)聚合到 JSON 类型的字段
有关参数详细信息,请参见 Transformation Configuration Templates 。NoSQL 数据库迁移程序在接收器中创建具有定制方案的表。
{ "source": { "type": "file", "format": "mongodb_json", "schemaInfo": { "schemaPath": "<complete/path/to/the/schema/file>" }, "dataPath": "<complete/path/to/the/MongoDB/Formatted/JSON/file>" }, "sink": { "type": "nosqldb_cloud", "endpoint": "us-ashburn-1", "table": "sampleMongoDBSpringImp", "compartment": "ocid1.compartment.oc1..aaaaaaaaadeskhnnfkenws4k2vdyklcc32hfpzzz4z3zum3ubhmpz6zxnoza", "includeTTL": true, "schemaInfo": { "readUnits": 100, "writeUnits": 60, "storageSize": 1, "useSourceSchema": true }, "credentials": "<complete/path/to/the/oci/config/file>", "credentialsProfile": "DEFAULT", "writeUnitsPercent": 90, "overwrite": false, "requestTimeoutMs": 5000 }, "transforms": { "renameFields": { "_id": "id" }, "ignoreFields": ["_class"], "aggregateFields": { "fieldName": "kv_json_", "skipFields": ["id"] } }, "abortOnError" : true, "migratorVersion" : "1.8.0" } -
-
打开命令提示符并导航到从中提取 NoSQL Database Migrator 实用程序的目录。
-
通过传递配置文件运行
runMigrator命令。使用--config或-c选项。$./runMigrator --config <complete/path/to/the/JSON/config/file> -
该实用程序继续进行数据迁移,如下所示。
creating source from given configuration:
source creation completed
creating sink from given configuration:
sink creation completed
creating migrator pipeline
[cloud sink] : start loading DDLs
[cloud sink] : executing DDL: CREATE TABLE IF NOT EXISTS sampleMongoDBSpringImp (id STRING, kv_json_ JSON, PRIMARY KEY(SHARD(id))),limits: [100, 60, 1]
[cloud sink] : completed loading DDLs
migration started
[mongo file source] : start parsing MongoDB JSON records from file: mongodbspring.json
Migration success for source mongodbspring. read=3,written=3,failed=0
Migration is successful for all the sources.
migration completed.
Records provided by source=3, Records written to sink=3, Records failed=0,Records skipped=0.
Elapsed time: 0min 0sec 393ms
Migration completed.
验证
要验证迁移,您可以登录到 Oracle NoSQL Database Cloud Service 控制台并验证是否已使用源数据创建 sampleMongoDBImp 表。有关访问控制台的过程,请参见 Accessing the Service from the Infrastructure Console 一文。
从 DynamoDB JSON 文件迁移到 Oracle NoSQL Database Cloud Service
此示例说明如何使用 Oracle NoSQL Database Migrator 将 DynamoDB JSON 文件复制到 NoSQL Database Cloud Service。
用例
在评估多个选项后,组织将基于 DynamoDB 数据库最终确定 Oracle NoSQL Database Cloud Service。该组织希望将其表和数据从 DynamoDB 迁移到 Oracle NoSQL Database Cloud Service。
有关详细信息,请参阅 DynamoDB 表与 Oracle NoSQL 表的映射。
通过在源配置模板中指定路径,可以迁移包含 DynamoDB 导出的 JSON 数据的文件或目录。
DynamoDB 格式的 JSON 文件示例如下:
{"Item":{"Id":{"N":"101"},"Phones":{"L":[{"L":[{"S":"555-222"},{"S":"123-567"}]}]},"PremierCustomer":{"BOOL":false},"Address":{"M":{"Zip":{"N":"570004"},"Street":{"S":"21 main"},"DoorNum":{"N":"201"},"City":{"S":"London"}}},"FirstName":{"S":"Fred"},"FavNumbers":{"NS":["10"]},"LastName":{"S":"Smith"},"FavColors":{"SS":["Red","Green"]},"Age":{"N":"22"},"ttl": {"N": "1734616800"}}}
{"Item":{"Id":{"N":"102"},"Phones":{"L":[{"L":[{"S":"222-222"}]}]},"PremierCustomer":{"BOOL":false},"Address":{"M":{"Zip":{"N":"560014"},"Street":{"S":"32 main"},"DoorNum":{"N":"1024"},"City":{"S":"Wales"}}},"FirstName":{"S":"John"},"FavNumbers":{"NS":["10"]},"LastName":{"S":"White"},"FavColors":{"SS":["Blue"]},"Age":{"N":"48"},"ttl": {"N": "1734616800"}}}您可以按将 DynamoDB 表数据导出到 Amazon S3 中指定的那样,将 DynamoDB 表导出到 AWS S3 存储。
示例
在本演示中,您将学习如何将 DynamoDB JSON 文件迁移到 Oracle NoSQL Database Cloud Service。您将为此示例使用手动创建的配置文件。
先决条件
-
确定迁移的源和接收器。
-
来源:DynamoDB JSON 文件
-
Sink:Oracle NoSQL Database Cloud Service
-
-
要将 DynamoDB 表数据导入 Oracle NoSQL Database,必须先将 DynamoDB 表导出到 S3。请参见 Exporting DynamoDB table data to Amazon S3 中提供的步骤以导出表。导出时,选择格式为 DynamoDB JSON。导出的数据包含多个
gzip文件中的 DynamoDB 表数据,如下所示。/ 01639372501551-bb4dd8c3 |-- 01639372501551-bb4dd8c3 ==> exported data prefix |----data |------sxz3hjr3re2dzn2ymgd2gi4iku.json.gz ==>table data |----manifest-files.json |----manifest-files.md5 |----manifest-summary.json |----manifest-summary.md5 |----_started -
您必须从 AWS S3 下载文件。下载后文件的结构将如下所示。
download-dir/01639372501551-bb4dd8c3 |----data |------sxz3hjr3re2dzn2ymgd2gi4iku.json.gz ==>table data |----manifest-files.json |----manifest-files.md5 |----manifest-summary.json |----manifest-summary.md5 |----_started -
确定 OCI 云身份证明并将其捕获到 OCI 配置文件中。将配置文件保存在
/home/<user>/.oci/config目录中。有关更多详细信息,请参阅 Using Oracle NoSQL Database Cloud Service 中的 Acquiring Credentials 。[DEFAULT] tenancy=ocid1.tenancy.oc1.... user=ocid1.user.oc1.... fingerprint= 43:d1:.... region=us-ashburn-1 key_file=</fully/qualified/path/to/the/private/key/> pass_phrase=<passphrase> -
确定 Oracle NoSQL Database Cloud Service 的区域端点和区间名称。
-
端点:
us-ashburn-1 -
区间:
Training-NoSQL
-
过程
要将 DynamoDB JSON 数据迁移到 Oracle NoSQL Database:
-
使用标识的源和接收器详细信息准备配置文件(采用 JSON 格式)。有关详细信息,请参见 Source Configuration Templates 和 Sink Configuration Templates 。
注:如果 DynamoDB 导出的 JSON 表项包含 TTL 属性,则可以选择导入 TTL 值,在源配置模板的
ttlAttributeName配置参数中指定属性,并在汇配置模板中将includeTTL配置参数设置为 true。有关更多详细信息,请参阅迁移表行的 TTL 元数据。在此处,您将
defaultSchema配置参数设置为 true。因此,NoSQL 数据库迁移程序会在接收器中创建默认方案。必须指定DDBPartitionKey和对应的 NoSQL 列类型。否则,将显示错误。有关 DynamoDB 导出的 JSON 源的默认方案的详细信息,请参阅Oracle NoSQL Data Migrator 工作流中的“确定源和接收”主题。
    {
     "source" : {
      "type" : "file",
      "format" : "dynamodb_json",
      "ttlAttributeName" : "ttl",
      "dataPath" : "complete/path/to/the/DynamoDB/Formatted/JSON/file"
     },
     "sink" : {
      "type" : "nosqldb_cloud",
      "endpoint" : "us-sanjose-1",
      "table" : "sampledynDBImp",
      "compartment" : "ocid
1.compartment.oc1..aaaaaaaa......smq",
      "includeTTL" : true,
      "schemaInfo" : {
       "readUnits" : 10,
       "writeUnits" : 10,
       "storageSize" : 1,
       "schemaPath" : "complete/path/to/the/DDl/file"
      },
      "credentials" : "/home/<username>/.oci/config",
      "credentialsProfile" : "DEFAULT",
      "writeUnitsPercent" : 90,
      "overwrite" : true,
      "requestTimeoutMs" : 5000
     },
     "abortOnError" : true,
     "migratorVersion" : "1.8.0"
    }
此示例中使用了以下默认方案:
CREATE TABLE IF NOT EXISTS sampledynDBImp (Id INTEGER, document JSON, PRIMARY KEY(SHARD(Id))) -
打开命令提示符并导航到从中提取 NoSQL Database Migrator 实用程序的目录。
-
通过传递单独的配置文件来运行
runMigrator命令。使用--config或-c选项。./runMigrator --config <complete/path/to/the/JSON/config/file> -
该实用程序继续进行数据迁移,如以下示例所示:
[INFO] creating source from given configuration:
[INFO] source creation completed
[INFO] creating sink from given configuration:
[INFO] sink creation completed
[INFO] creating migrator pipeline
[INFO] [cloud sink] : start loading DDLs
[INFO] [cloud sink] : executing DDL: CREATE TABLE IF NOT EXISTS sampledynDBImp (Id INTEGER, document JSON, PRIMARY KEY(SHARD(Id)))
[INFO] [cloud sink] : completed loading DDLs
[INFO] migration started
[INFO] Start writing data to OnDB Sink
[INFO] executing for source:DynamoSample
[INFO] [DDB file source] : start parsing JSON records from file: DynamoSample.json.gz
[INFO] Writing data to OnDB Sink completed.
[INFO] migration completed.
Records provided by source=2, Records written to sink=2, Records failed=0,Records skipped=0.
Elapsed time: 0min 0sec 45ms
Migration completed.
验证
要验证迁移,您可以登录到 Oracle NoSQL Database Cloud Service 控制台并验证是否已使用源数据创建 sampledynDBImp 表。
-
使用标识的源和接收器详细信息准备配置文件(采用 JSON 格式)。有关详细信息,请参见 Source Configuration Templates 和 Sink Configuration Templates 。
注:如果 DynamoDB 导出的 JSON 表项包含 TTL 属性,则可以选择导入 TTL 值,在源配置模板的
ttlAttributeName配置参数中指定属性,并在汇配置模板中将includeTTL配置参数设置为 true。在此处,您将
defaultSchema配置参数设置为 false。因此,您可以在schemaPath参数中指定包含 sink 表的 DDL 语句的文件。有关详细信息,请参阅将 DynamoDB 类型映射到 Oracle NoSQL 类型。此示例中使用了以下用户定义的方案:
CREATE TABLE IF NOT EXISTS sampledynDBImp (Id INTEGER, document JSON, PRIMARY KEY(SHARD(Id)))NoSQL 数据库迁移程序使用方案文件在迁移过程中在接收器中创建表。只要提供了主键数据,就会插入输入 JSON 记录。否则,将显示错误。
注:
-
如果 Dynamo DB 表的数据类型在 NoSQL 数据库中不受支持,迁移将失败。
-
如果输入数据不包含特定列的值(主键除外),则将使用列默认值。创建表时,默认值必须是列定义的一部分。例如
id INTEGER not null default 0。如果列没有默认定义,则如果没有为该列提供值,则插入 SQL NULL。 -
如果要将 DynamoDB 表建模为 JSON 文档,请确保使用
AggregateFields转换,以便将非主键数据聚合到 JSON 列中。有关详细信息,请参阅聚合字段
Generated configuration is { "source" : { "type" : "file", "format" : "dynamodb_json", "ttlAttributeName" : "ttl", "dataPath" : "complete/path/to/the/DynamoDB/Formatted/JSON/file" }, "sink" : { "type" : "nosqldb_cloud", "endpoint" : "us-sanjose-1", "table" : "sampledynDBImp", "compartment" : "ocid 1.compartment.oc1..aaaaaaaa......smq", "includeTTL" : true, "schemaInfo" : { "readUnits" : 10, "writeUnits" : 10, "storageSize" : 1, "schemaPath" : "complete/path/to/the/DDl/file" }, "credentials" : "/home/<username>/.oci/config", "credentialsProfile" : "DEFAULT", "writeUnitsPercent" : 90, "overwrite" : true, "requestTimeoutMs" : 5000 }, "abortOnError" : true, "migratorVersion" : "1.8.0" } -
-
打开命令提示符并导航到从中提取 NoSQL Database Migrator 实用程序的目录。
-
通过传递单独的配置文件来运行
runMigrator命令。使用--config或-c选项。./runMigrator --config <complete/path/to/the/JSON/config/file> -
该实用程序继续进行数据迁移,如以下示例所示:
[INFO] creating source from given configuration:
[INFO] source creation completed
[INFO] creating sink from given configuration:
[INFO] sink creation completed
[INFO] creating migrator pipeline
[INFO] [cloud sink] : start loading DDLs
[INFO] [cloud sink] : executing DDL: CREATE TABLE IF NOT EXISTS sampledynDBImp (Id INTEGER, document JSON, PRIMARY KEY(SHARD(Id)))
[INFO] [cloud sink] : completed loading DDLs
[INFO] migration started
[INFO] Start writing data to OnDB Sink
[INFO] executing for source:DynamoSample
[INFO] [DDB file source] : start parsing JSON records from file: DynamoSample.json.gz
[INFO] Writing data to OnDB Sink completed.
[INFO] migration completed.
Records provided by source=2, Records written to sink=2, Records failed=0,Records skipped=0.
Elapsed time: 0min 0sec 45ms
Migration completed.
验证
要验证迁移,您可以登录到 Oracle NoSQL Database Cloud Service 控制台并验证是否已使用源数据创建 sampledynDBImp 表。
从 AWS S3 中的 DynamoDB JSON 文件迁移到 Oracle NoSQL Database Cloud Service
此示例说明如何使用 Oracle NoSQL Database Migrator 将存储在 AWS S3 存储中的 DynamoDB JSON 文件复制到 Oracle NoSQL Database Cloud Service (NDCS)。
用例:
在评估多个选项后,组织将基于 DynamoDB 数据库最终确定 Oracle NoSQL Database Cloud Service。该组织希望将其表和数据从 DynamoDB 迁移到 Oracle NoSQL Database Cloud Service。
有关详细信息,请参阅将 DynamoDB 表映射到 Oracle NoSQL 表。
您可以通过在源配置模板中指定路径,从 AWS S3 存储迁移包含 DynamoDB 导出的 JSON 数据的文件。
DynamoDB 格式的 JSON 文件示例如下:
{"Item":{"Id":{"N":"101"},"Phones":{"L":[{"L":[{"S":"555-222"},{"S":"123-567"}]}]},"PremierCustomer":{"BOOL":false},"Address":{"M":{"Zip":{"N":"570004"},"Street":{"S":"21 main"},"DoorNum":{"N":"201"},"City":{"S":"London"}}},"FirstName":{"S":"Fred"},"FavNumbers":{"NS":["10"]},"LastName":{"S":"Smith"},"FavColors":{"SS":["Red","Green"]},"Age":{"N":"22"}}}
{"Item":{"Id":{"N":"102"},"Phones":{"L":[{"L":[{"S":"222-222"}]}]},"PremierCustomer":{"BOOL":false},"Address":{"M":{"Zip":{"N":"560014"},"Street":{"S":"32 main"},"DoorNum":{"N":"1024"},"City":{"S":"Wales"}}},"FirstName":{"S":"John"},"FavNumbers":{"NS":["10"]},"LastName":{"S":"White"},"FavColors":{"SS":["Blue"]},"Age":{"N":"48"}}}您可以按将 DynamoDB 表数据导出到 Amazon S3 中指定的那样,将 DynamoDB 表导出到 AWS S3 存储。
示例:
在本演示中,您将了解如何将 AWS S3 源中的 DynamoDB JSON 文件迁移到 NDCS。您将为此示例使用手动创建的配置文件。
先决条件
-
确定迁移的源和接收器。
-
来源: AWS S3 中的 DynamoDB JSON 文件
-
接收:Oracle NoSQL Database Cloud Service
-
-
确定 AWS DynamoDB 中需要迁移到 NDCS 的表。使用您的凭据登录 AWS 控制台。转到 DynamoDB 。在表下,选择要迁移的表。
-
创建对象存储桶并将表导出到 S3。从 AWS 控制台转到 S3 。在存储桶下,创建新对象存储桶。返回到 DynamoDB 并单击导出到 S3 。提供源表和目标 S3 存储桶,然后单击导出。
请参阅将 DynamoDB 表数据导出到 Amazon S3 中提供的步骤以导出表。导出时,选择格式为 DynamoDB JSON 。导出的数据包含多个
gzip文件中的 DynamoDB 表数据,如下所示。/ 01639372501551-bb4dd8c3 |-- 01639372501551-bb4dd8c3 ==> exported data prefix |----data |------sxz3hjr3re2dzn2ymgd2gi4iku.json.gz ==>table data |----manifest-files.json |----manifest-files.md5 |----manifest-summary.json |----manifest-summary.md5 |----_started -
您需要 AWS 凭证(包括访问密钥 ID 和密钥访问密钥)和配置文件(凭证和可选配置)来从 NoSQL 数据库迁移器访问 AWS S3。有关配置文件的更多详细信息,请参见 Set and view configuration settings 。有关创建访问密钥的更多详细信息,请参见 Creating a key pair 。
-
确定 OCI 云身份证明并将其捕获到 OCI 配置文件中。将配置文件保存在起始目录 (
~/.oci/config) 下的目录.oci中。有关详细信息,请参见 Acquiring Credentials 。[DEFAULT] tenancy=ocid1.tenancy.oc1.... user=ocid1.user.oc1.... fingerprint= 43:d1:.... key_file=</fully/qualified/path/to/the/private/key/> pass_phrase=<passphrase> -
确定 Oracle NoSQL Database Cloud Service 的区域端点和区间名称。例如:
-
端点:us-phoenix-1
-
区间:开发人员
-
过程
要将 DynamoDB JSON 数据迁移到 Oracle NoSQL Database Cloud Service,请使用以下选项之一:
-
使用标识的源和接收器详细信息准备配置文件(采用 JSON 格式)。有关详细信息,请参见 Source Configuration Templates 和 Sink Configuration Templates 。
注:如果 AWS S3 中的 DynamoDB JSON 文件中的项包含 TTL 属性,则可以选择导入 TTL 值,在源配置模板的
ttlAttributeName配置参数中指定该属性,并在汇配置模板中将includeTTL配置参数设置为 true。有关更多详细信息,请参阅迁移表行的 TTL 元数据。将
defaultSchema设置为TRUE,因此 Migrator 实用程序会在汇处创建默认方案。必须指定DDBPartitionKey和对应的 NoSQL 列类型。否则,将引发错误。{ "source" : { "type" : "aws_s3", "format" : "dynamodb_json", "s3URL" : "<https://<bucket-name>.<s3_endpoint>/export_path>", "credentials" : "</path/to/aws/credentials/file>", "credentialsProfile" : <"profile name in aws credentials file"> }, "sink" : { "type" : "nosqldb_cloud", "endpoint" : "<region_name>", "table" : "<table_name>", "compartment" : "<compartment_name>", "schemaInfo" : { "defaultSchema" : true, "readUnits" : 100, "writeUnits" : 60, "DDBPartitionKey" : "<PrimaryKey:Datatype>", "storageSize" : 1 }, "credentials" : "<complete/path/to/the/oci/config/file>", "credentialsProfile" : "DEFAULT", "writeUnitsPercent" : 90, "requestTimeoutMs" : 5000 }, "abortOnError" : true, "migratorVersion" : "1.8.0" }对于 DynamoDB JSON 源,表的默认方案如下所示:
CREATE TABLE IF NOT EXISTS <TABLE_NAME>(DDBPartitionKey_name DDBPartitionKey_type,
[DDBSortKey_name DDBSortKey_type], DOCUMENT JSON,
PRIMARY KEY(SHARD(DDBPartitionKey_name),[DDBSortKey_name]))
其中:
TABLE_NAME = 为配置中的接收器“表”提供的值
DDBPartitionKey_name = 为配置中的分区键提供的值
DDBPartitionKey_type = 为配置中分区键的数据类型提供的值
DDBSortKey_name = 为配置中的排序键提供的值(如果有)
DDBSortKey_type = 为配置中排序关键字的数据类型提供的值(如果有)
DOCUMENT = 聚合到 NoSQL JSON 列中的 Dynamo DB 表项的分区和排序键以外的所有属性
-
打开命令提示符并导航到从中提取 NoSQL Database Migrator 实用程序的目录。
-
通过传递配置文件运行
runMigrator命令。使用--config或-c选项。[~/nosqlMigrator]$./runMigrator --config <complete/path/to/the/JSON/config/file> -
该实用程序继续进行数据迁移,如下所示。
Records provided by source=7..,
Records written to sink=7,
Records failed=0,
Records skipped=0.
Elapsed time: 0 min 2sec 50ms
Migration completed.
验证
您可以登录到 Oracle NoSQL Database Cloud Service 控制台并验证是否已使用源数据创建新表。
-
使用标识的源和接收器详细信息准备配置文件(采用 JSON 格式)。有关详细信息,请参见 Source Configuration Templates 和 Sink Configuration Templates 。
注:如果 AWS S3 中的 DynamoDB JSON 文件中的项包含 TTL 属性,则可以选择导入 TTL 值,在源配置模板的 ttlAttributeName 配置参数中指定属性,并在汇配置模板中将 includeTTL 配置参数设置为 true。有关更多详细信息,请参阅迁移表行的 TTL 元数据。
要在 sink 配置模板中指定用户定义的方案文件,请将 defaultSchema 设置为
FALSE,并将 schemaPath 指定为包含 DDL 语句的文件。有关详细信息,请参阅将 DynamoDB 类型映射到 Oracle NoSQL 类型。注:如果 Dynamo DB 表的数据类型在 NoSQL 中不受支持,迁移将失败。
示例方案文件如下所示。
CREATE TABLE IF NOT EXISTS sampledynDBImp (AccountId INTEGER,document JSON,
PRIMARY KEY(SHARD(AccountId)));
方案文件用于在迁移过程中在接收器中创建表。只要提供了主键数据,就会插入输入 JSON 记录,否则会引发错误。
注:
- 如果输入数据不包含特定列的值(主键除外),则将使用列默认值。创建表时,默认值应包含在列定义中。例如
id INTEGER not null default 0。如果列没有默认定义,则在没有为该列提供值时插入 SQL NULL。 - 如果要将 DynamoDB 表建模为 JSON 文档,请确保使用
AggregateFields转换,以便将非主键数据聚合到 JSON 列中。有关详细信息,请参见 aggregateFields 。
{ "source" : { "type" : "aws_s3", "format" : "dynamodb_json", "s3URL" : "<https://<bucket-name>.<s3_endpoint>/export_path>", "credentials" : "</path/to/aws/credentials/file>", "credentialsProfile" : <"profile name in aws credentials file"> }, "sink" : { "type" : "nosqldb_cloud", "endpoint" : "<region_name>", "table" : "<table_name>", "compartment" : "<compartment_name>", "schemaInfo" : { "defaultSchema" : false, "readUnits" : 100, "writeUnits" : 60, "schemaPath" : "<full path of the schema file with the DDL statement>", "storageSize" : 1 }, "credentials" : "<complete/path/to/the/oci/config/file>", "credentialsProfile" : "DEFAULT", "writeUnitsPercent" : 90, "requestTimeoutMs" : 5000 }, "transforms": { "aggregateFields" : { "fieldName" : "document", "skipFields" : ["AccountId"] } }, "abortOnError" : true, "migratorVersion" : "1.8.0" } - 如果输入数据不包含特定列的值(主键除外),则将使用列默认值。创建表时,默认值应包含在列定义中。例如
-
打开命令提示符并导航到从中提取 NoSQL Database Migrator 实用程序的目录。
-
通过传递配置文件运行
runMigrator命令。使用--config或-c选项。[~/nosqlMigrator]$./runMigrator --config <complete/path/to/the/JSON/config/file> -
该实用程序继续进行数据迁移,如下所示。
Records provided by source=7..,
Records written to sink=7,
Records failed=0,
Records skipped=0.
Elapsed time: 0 min 2sec 50ms
Migration completed.
验证
您可以登录到 Oracle NoSQL Database Cloud Service 控制台并验证是否已使用源数据创建新表。
在 Oracle NoSQL Database Cloud Service 区域之间迁移
此示例显示使用 Oracle NoSQL Database Migrator 执行跨区域迁移。
用例
组织使用 Oracle NoSQL Database Cloud Service 来存储和管理其数据。它决定将数据从现有区域复制到较新的区域进行测试,然后才能为生产环境启动新区域。
在此使用场景中,您将学习使用 NoSQL 数据库迁移器将数据从 Ashburn 区域中的 user_data 表复制到 Phoenix 区域。
可以通过传递预创建的配置文件来运行 runMigrator 实用程序。如果未将配置文件作为运行时参数提供,则 runMigrator 实用程序会提示您通过交互过程生成配置。
先决条件
-
从 Oracle NoSQL 下载页面下载 Oracle NoSQL Database Migrator,并将内容提取到计算机。有关详细信息,请参阅适用于 Oracle NoSQL Database Migrator 的工作流。
-
确定迁移的源和接收器。
-
来源: Ashburn 区域中的
user_data表。user_data表包含以下数据:{"id":40,"firstName":"Joanna","lastName":"Smith","otherNames":[{"first":"Joanna","last":"Smart"}],"age":null,"income":75000,"address":{"city":"Houston","number":401,"phones":[{"area":null,"kind":"work","number":1618955},{"area":451,"kind":"home","number":4613341},{"area":481,"kind":"mobile","number":4613382}],"state":"TX","street":"Tex Ave","zip":95085},"connections":[70,30,40],"email":"joanna.smith123@reachmail.com","communityService":"**"} {"id":10,"firstName":"John","lastName":"Smith","otherNames":[{"first":"Johny","last":"Good"},{"first":"Johny2","last":"Brave"},{"first":"Johny3","last":"Kind"},{"first":"Johny4","last":"Humble"}],"age":22,"income":45000,"address":{"city":"Santa Cruz","number":101,"phones":[{"area":408,"kind":"work","number":4538955},{"area":831,"kind":"home","number":7533341},{"area":831,"kind":"mobile","number":7533382}],"state":"CA","street":"Pacific Ave","zip":95008},"connections":[30,55,43],"email":"john.smith@reachmail.com","communityService":"****"} {"id":20,"firstName":"Jane","lastName":"Smith","otherNames":[{"first":"Jane","last":"BeGood"}],"age":22,"income":55000,"address":{"city":"San Jose","number":201,"phones":[{"area":608,"kind":"work","number":6538955},{"area":931,"kind":"home","number":9533341},{"area":931,"kind":"mobile","number":9533382}],"state":"CA","street":"Atlantic Ave","zip":95005},"connections":[40,75,63],"email":"jane.smith201@reachmail.com","communityService":"*****"} {"id":30,"firstName":"Adam","lastName":"Smith","otherNames":[{"first":"Adam","last":"BeGood"}],"age":45,"income":75000,"address":{"city":"Houston","number":301,"phones":[{"area":618,"kind":"work","number":6618955},{"area":951,"kind":"home","number":9613341},{"area":981,"kind":"mobile","number":9613382}],"state":"TX","street":"Indian Ave","zip":95075},"connections":[60,45,73],"email":"adam.smith201reachmail.com","communityService":"***"}确定源的区域端点或服务端点和区间名称。
-
端点:
us-ashburn-1 -
区间:
ocid1.compartment.oc1..aaaaaaaahcrgrgptoaq4cgpoymd32ti2ql4sdpu5puroausdf4og55z4tnya
-
-
Sink: Phoenix 区域中的
user_data表。确定区域端点或服务端点以及接收器的区间名称。
-
端点:
us-phoenix-1 -
区间:
ocid1.compartment.oc1..aaaaaaaaleiwplazhwmicoogv3tf4lum4m4nzbcv5wfjmoxuz3doreagvdma
确定 sink 表方案。
您可以使用与源表相同的表名和方案。有关其他方案选项的信息,请参阅适用于 Oracle NoSQL Database Migrator 的工作流中的确定源和接收器主题
-
-
-
确定两个区域的 OCI 云身份证明并将其捕获到配置文件中。将配置文件保存在计算机上的位置
/home/<user>/.oci/config。有关更多详细信息,请参见 Acquiring Credentials 。注:
-
如果区域位于不同的租户下,则必须在
/home//.oci/config文件中提供不同的概要信息,并为每个区域提供相应的 OCI 云身份证明。 -
如果区域位于同一租户中,则可以在
/home//.oci/config文件中具有单个配置文件。
-
在此示例中,区域属于不同的租户。DEFAULT 概要信息包括 Ashburn 区域的 OCI 身份证明,DEFAULT2 包括 Phoenix 区域的 OCI 身份证明。
在迁移程序配置文件 endpoint 参数(源和接收器配置模板)中,可以提供服务端点 URL 或区域的区域 ID。有关 Oracle NoSQL Database Cloud Service 及其服务端点 URL 支持的数据区域列表,请参阅 Oracle NoSQL Database Cloud Service 文档中的数据区域和关联服务 URL 。
[DEFAULT]
user=ocid1.user.oc1....
fingerprint=fd:96:....
tenancy=ocid1.tenancy.oc1....
region=us-ashburn-1
key_file=</fully/qualified/path/to/the/private/key/>
pass_phrase=abcd


[DEFAULT2]
user=ocid1.user.oc1....
fingerprint=1b:68:....
tenancy=ocid1.tenancy.oc1....
region=us-phoenix-1
key_file=</fully/qualified/path/to/the/private/key/>
pass_phrase=23456
过程
要将 user_data 表从 Ashburn 区域迁移到 Phoenix 区域,请执行以下操作:
-
使用标识的源和接收器详细信息准备配置文件(采用 JSON 格式)。请参见 Source Configuration Templates 和 Sink Configuration Templates 。
{ "source" : { "type" : "nosqldb_cloud", "endpoint" : "us-ashburn-1", "table" : "user_data", "compartment" : "ocid1.compartment.oc1..aaaaaaaahcrgrgptoaq4cgpoymd32ti2ql4sdpu5puroausdf4og55z4tnya", "credentials" : "/home/<user>/.oci/config", "credentialsProfile" : "DEFAULT", "readUnitsPercent" : 100, "includeTTL" : false, "requestTimeoutMs" : 5000 }, "sink" : { "type" : "nosqldb_cloud", "endpoint" : "us-phoenix-1", "table" : "user_data", "compartment" : "ocid1.compartment.oc1..aaaaaaaaleiwplazhwmicoogv3tf4lum4m4nzbcv5wfjmoxuz3doreagvdma", "includeTTL" : false, "schemaInfo" : { "readUnits" : 100, "writeUnits" : 60, "storageSize" : 1, "useSourceSchema" : true }, "credentials" : "/home/<user>/.oci/config", "credentialsProfile" : "DEFAULT2", "writeUnitsPercent" : 90, "overwrite" : true, "requestTimeoutMs" : 5000 }, "abortOnError" : true, "migratorVersion" : "1.8.0" } -
在计算机上,导航到从中提取 NoSQL 数据库迁移器实用程序的目录。可以从命令行界面访问
runMigrator命令。 -
通过使用– config 或 -c 选项传递配置文件来运行
runMigrator命令。[~/nosql-migrator]$./runMigrator --config <complete/path/to/the/config/file> -
该实用程序继续进行数据迁移,如下所示。
user_data表是在汇处创建的,其模式与源表相同,因为您已在汇配置模板中将 useSourceSchema 参数配置为 true。creating source from given configuration: source creation completed creating sink from given configuration: sink creation completed creating migrator pipeline migration started [cloud sink] : start loading DDLs [cloud sink] : executing DDL: CREATE TABLE IF NOT EXISTS user_data (id INTEGER, firstName STRING, lastName STRING, otherNames ARRAY(RECORD(first STRING, last STRING)), age INTEGER, income INTEGER, address JSON, connections ARRAY(INTEGER), email STRING, communityService STRING, PRIMARY KEY(SHARD(id))),limits: [100, 60, 1] [cloud sink] : completed loading DDLs [cloud sink] : start loading records migration completed. Records provided by source=5, Records written to sink=5, Records failed=0, Records skipped=0. Elapsed time: 0min 5sec 603ms Migration completed.注:
-
如果该表已存在于与源表具有相同方案的汇处,则将覆盖具有相同主键的行,因为您在配置模板中提供的覆盖参数为 true。
-
如果源表中已存在与源表不同的方案,则迁移将失败。
-
确认
要验证迁移,您可以在 Phoenix 区域中登录到 Oracle NoSQL Database Cloud Service 控制台。验证 Ashburn 区域中 user_data 表的源数据是否已复制到此区域中的 user_data 表。有关访问控制台的过程,请参阅从基础结构控制台访问服务文章。
从 Oracle NoSQL Database Cloud Service 迁移到 OCI Object Storage
此示例显示了 Cloud Shell 中 Oracle NoSQL Database Migrator 的使用情况。
用例
初创企业计划使用 Oracle NoSQL Database Cloud Service 作为其数据存储解决方案。该公司希望使用 Oracle NoSQL Database Migrator 将数据从 Oracle NoSQL Database Cloud Service 中的表复制到 OCI Object Storage,以便定期备份其数据。作为一项经济高效的措施,他们希望通过云 Shell 运行 NoSQL Database Migrator 实用程序,所有 OCI 用户都可以访问该实用程序。
在此用例中,您将学习如何将 NoSQL 数据库迁移器实用程序复制到订阅区域中的 Cloud Shell 并执行数据迁移。您可以将源数据从 Oracle NoSQL Database Cloud Service 表迁移到 OCI Object Storage 中的 JSON 文件。
可以通过传递预创建的配置文件来运行 runMigrator 实用程序。如果未将配置文件作为运行时参数提供,则 runMigrator 实用程序会提示您通过交互过程生成配置。
先决条件
-
将 Oracle NoSQL Database Migrator 从 Oracle NoSQL 下载页面下载到本地计算机。
-
从云控制台上的开发人员工具菜单启动 Cloud Shell。Web 浏览器将打开您的主目录。单击 Cloud Shell 窗口右上角的 Cloud Shell 菜单,然后从下拉列表中选择 upload 选项。在弹出窗口中,从本地计算机拖放 Oracle NoSQL Database Migrator 程序包,或者单击从计算机中选择选项,从本地计算机中选择程序包,然后单击上载按钮。您还可以直接将 Oracle NoSQL Database Migrator 程序包从本地计算机拖放到 Cloud Shell 中的主目录。提取薪资包的内容。
-
确定备份的源和接收器。
-
来源:Oracle NoSQL Database Cloud Service Ashburn 区域中的
NDCSupload表。有关演示,请考虑
NDCSupload表中的以下数据:{"id":1,"name":"Jane Smith","email":"iamjane@somemail.co.us","age":30,"income":30000.0} {"id":2,"name":"Adam Smith","email":"adam.smith@mymail.com","age":25,"income":25000.0} {"id":3,"name":"Jennifer Smith","email":"jenny1_smith@mymail.com","age":35,"income":35000.0} {"id":4,"name":"Noelle Smith","email":"noel21@somemail.co.us","age":40,"income":40000.0}确定源的端点和区间 ID。对于端点,您可以提供区域标识符或服务端点。有关 Oracle NoSQL Database Cloud Service 中支持的数据区域列表,请参阅数据区域和关联服务 URL 。
-
端点:
us-ashburn-1 -
区间 ID:
ocid1.compartment.oc1..aaaaaaaahcrgrgptoaq4cgpoymd32ti2ql4sdpu5puroausdf4og55z4tnya
-
-
Sink:OCI 对象存储桶中的 JSON 文件。
确定 OCI Object Storage 的区域端点、名称空间、存储桶和前缀。有关详细信息,请参阅访问 Oracle Cloud 对象存储。有关 OCI Object Storage 服务端点的列表,请参阅对象存储端点。
-
端点:
us-ashburn-1 -
存储桶:
Migrate_oci -
前缀:
Delegation -
namespace:<> 如果未提供名称空间,实用程序将使用租户的默认名称空间。
注:如果对象存储存储桶位于其他区间中,请确保您有权在存储桶中写入对象。有关设置策略的更多详细信息,请参阅在对象存储中写入对象。
-
-
过程
要从 Oracle NoSQL Database Cloud Service 迁移到 OCI Object Storage,请从 Cloud Shell 窗口执行以下操作:
-
使用 Oracle NoSQL Database Cloud Service 源和 OCI 对象存储接收器准备迁移器配置文件
migrator-config.json。有关模板,请参见 Source Configuration Templates 和 Sink Configuration Templates 。确保在源和接收器配置模板中将useDelegationToken参数设置为true。此用例中使用以下配置模板:
{ "source" : { "type" : "nosqldb_cloud", "endpoint" : "us-ashburn-1", "table" : "NDCSupload", "compartment" : "ocid1.compartment.oc1..aaaaaaaahcrgrgptoaq4cgpoymd32ti2ql4sdpu5puroausdf4og55z4tnya", "useDelegationToken" : true, "readUnitsPercent" : 90, "includeTTL" : true, "requestTimeoutMs" : 5000 }, "sink" : { "type" : "object_storage_oci", "format" : "json", "endpoint" : "us-ashburn-1", "namespace" : "", "bucket" : "Migrate_oci", "prefix" : "Delegation", "chunkSize" : 32, "compression" : "", "useDelegationToken" : true }, "abortOnError" : true, "migratorVersion" : "1.8.0" } -
在 Cloud Shell 中,导航到从中提取 NoSQL Database Migrator 实用程序的目录。
-
通过使用
--config或-c选项传递配置文件来运行runMigrator命令。[~/nosql-migrator]$./runMigrator --config <complete/path/to/the/config/file> -
NoSQL 数据库迁移程序实用程序继续进行数据迁移。由于您已将 useDelegationToken 参数设置为 true ,因此 Cloud Shell 在运行 NoSQL 数据库迁移器实用程序时会自动使用委派令牌进行验证。NoSQL 数据库迁移程序将数据从
NDCSupload表复制到对象存储存储桶Migrate_oci中的 JSON 文件。请查看日志以获得成功的数据备份。[INFO] creating source from given configuration: [INFO] source creation completed [INFO] creating sink from given configuration: [INFO] sink creation completed [INFO] creating migrator pipeline [INFO] migration started [INFO] [OCI OS sink] : writing table schema to Delegation/Schema/schema.ddl [INFO] [OCI OS sink] : start writing records with prefix Delegation [INFO] migration completed. Records provided by source=4,Records written to sink=4,Records failed=0. Elapsed time: 0min 0sec 486ms Migration completed.注:
数据将复制到文件:
Migrate_oci/NDCSupload/Delegation/Data/000000.json根据 sink 配置模板中的 chunkSize 参数,源数据可以拆分为同一目录中的多个 JSON 文件。
方案将复制到文件:
Migrate_oci/NDCStable1/Delegation/Schema/schema.ddl
确认
要验证数据备份,请登录 Oracle NoSQL Database Cloud Service 控制台。在菜单中导航 Storage > Object Storage & Archive Storage > Buckets。从 Migrate_oci 存储桶中的 NDCSupload/Delegation 目录访问文件。有关访问控制台的过程,请参阅从基础结构控制台访问服务文章。
使用 OKE 验证从 OCI Object Storage 迁移到 Oracle NoSQL Database Cloud Service
此示例说明如何使用具有 OKE 工作负载身份验证的 Oracle NoSQL Database Migrator 将数据从 OCI 对象存储中的 JSON 文件复制到 Oracle NoSQL Database Cloud Service 表。
用例
作为开发人员,您可以选择在容器化应用中使用 NoSQL 数据库迁移器将数据从 OCI 对象存储 (OCI OS) 存储桶中的 JSON 文件还原到 Oracle NoSQL Database Cloud Service (NDCS) 表。容器化应用是将应用及其所有依赖项(例如库、二进制文件和配置文件)捆绑在程序包中的虚拟化环境。这样,无论底层基础设施如何,应用都可以在不同的环境中一致地运行。
您希望在 Oracle Cloud Infrastructure Container Engine for Kubernetes (OKE) 云池中运行 NoSQL 数据库迁移程序。要从 OKE 云池安全地访问 OCI OS 和 NDCS 服务,您需要使用工作负载身份验证 (Workload Identity Authentication,WIA) 方法。
在此演示中,您将为 NoSQL 数据库迁移器构建 docker 映像,将映像复制到容器注册表中的资料档案库,创建 OKE 集群,并在 OKE 集群 pod 中部署迁移器映像以运行迁移器实用程序。在此处,您将提供手动创建的 NoSQL 数据库迁移器配置文件,以将迁移器实用程序作为容器化应用程序运行。
先决条件
-
确定迁移的源和接收器。
-
源:OCI 操作系统存储桶中的 JSON 文件和方案文件。
确定源 JSON 文件和方案可用的 OCI 操作系统存储桶的区域端点、名称空间、存储桶和前缀。有关详细信息,请参阅访问 Oracle Cloud 对象存储。有关 OCI OS 服务端点的列表,请参阅对象存储端点。
-
端点:
us-ashburn-1 -
存储桶:
Migrate_oci -
前缀:
userSession -
名称空间:
idhkv1iewjzj
存储桶的名称空间名称与其租户的名称空间相同,在创建租户时会自动生成名称空间。您可以按如下方式获取名称空间名称:
-
从 Oracle NoSQL Database Cloud Service 控制台中,导航到 Storage(存储) > Buckets(时段)。
-
从列表范围中选择区间并选择存储桶。“存储桶详细信息”页在“名称空间”参数中显示名称。
如果您未提供 OCI OS 名称空间名称,则迁移程序实用程序将使用租户的默认名称空间。
-
-
Sink:Oracle NoSQL Database Cloud Service 中的
users表。确定区域端点或服务端点以及接收器的区间名称:
-
端点:
us-ashburn-1 -
区间:
ocid1.compartment.oc1..aaaaaaaaleiwplazhwmicoogv3tf4lum4m4nzbcv5wfjmoxuz3doreagvdma
确定 sink 表方案。
要使用存储在 OCI 操作系统存储桶中的表名和方案,请将
useSourceSchema参数设置为 true。有关其他方案选项的信息,请参阅 Workflow for Oracle NoSQL Database Migrator 中的 "Identify the Source and Sink" 主题。注:请确保您对要将数据恢复到 NDCS 表的区间具有写入权限。有关更多详细信息,请参阅管理区间。
-
-
-
为 NoSQL 数据库迁移器准备 Docker 映像并将其移动到容器注册表。
-
从 OCI 控制台获取租户名称空间。
登录到 Oracle NoSQL Database Cloud Service 控制台。在导航栏中,选择配置文件菜单,然后选择租户:< 域名 > 。
将 Object Storage 名称空间名称(即租户名称空间)复制到剪贴板。
-
为 Migrator 实用程序构建 Docker 映像。
导航到已从中提取 NoSQL Database Migrator 实用程序的目录。Migrator 软件包包含一个名为 Dockerfile 的 docker 文件。从命令界面中,使用以下命令生成 Migrator 实用程序的 Docker 映像:
#Command:
docker build -t nosqlmigrator:<tag> .
#Example: docker build -t nosqlmigrator:1.0 .可以在
tag选项中为 Docker 映像指定版本标识符。使用以下命令检查您的 Docker 映像:#Command: Docker images#Example output ------------------------------------------------------------------------------------------ REPOSITORY TAG IMAGE ID CREATED SIZE localhost/nosqlmigrator 1.0 e1dcec27a5cc 10 seconds ago 487 MB quay.io/podman/hello latest 83fc7ce1224f 10 months ago 580 kB docker.io/library/openjdk 17-jdk-slim 8a3a2ffec52a 2 years ago 406 MB ------------------------------------------------------------------------------------------ -
生成授权令牌。
您需要验证令牌才能登录到容器注册表来存储 Migrator Docker 映像。如果您还没有 Auth 令牌,则必须生成一个。有关详细信息,请参阅获取验证令牌。
-
在容器注册表中存储 Migrator Docker 映像。
要从 Kubernetes 云池访问 Migrator Docker 映像,必须将该映像存储在任何公共或专用注册表中。例如,一些注册表包括 Docker、Artifact Hub、OCI Container Registry 等。在本演示中,我们使用容器注册表。有关详细信息,请参阅容器注册表概览。
-
在 OCI 控制台中,在容器注册表中创建存储库。有关详细信息,请参阅创建存储库。
在本演示中,您将创建
okemigrator系统信息库。图 - 容器注册表中的资料档案库
-
使用以下命令从命令界面登录到容器注册表:
#Command:
docker login <region-key>.ocir.io -u <tenancy-namespace>/<user name>password: <Auth token>
#Example: docker login iad.ocir.io -u idhx..xxwjzj/rx..xxxxh@oracle.com password: <Auth token>#Output: Login Succeeded!在上面的命令中,
region-key:指定要使用容器注册表的区域的密钥。有关详细信息,请参见 Availability by Region 。tenancy-namespace:指定从 OCI 控制台复制的租户名称空间。user name:指定 OCI 控制台用户名。password:指定验证令牌。 -
使用以下命令标记 Migrator Docker 映像并将其推送到容器注册表:
#Command:
docker tag <Migrator Docker image> <region-key>.ocir.io/<tenancy-namespace>/<repo>:<tag>
docker push <region-key>.ocir.io/<tenancy-namespace>/<repo>:<tag>
#Example: docker tag localhost/nosqlmigrator:1.0 iad.ocir.io/idhx..xxwjzj/okemigrator:1.0 docker push iad.ocir.io/idhx..xxwjzj/okemigrator:1.0在上面的命令中,
repo:指定您在容器注册表中创建的资料档案库的名称。tag:指定 Docker 映像的版本标识符。#Output: Getting image source signatures Copying blob 0994dbbf9a1b done | Copying blob 37849399aca1 done | Copying blob 5f70bf18a086 done | Copying blob 2f263e87cb11 done | Copying blob f941f90e71a8 done | Copying blob c82e5bf37b8a done | Copying blob 2ad58b3543c5 done | Copying blob 409bec9cdb8b done | Copying config e1dcec27a5 done | Writing manifest to image destination
-
-
-
为 OKE 集群配置 WIA 到 NDCS 和 OCI OS。
-
使用 OKE 创建 Kubernetes 集群。
在 OCI 控制台中,使用 OKE 根据网络资源的可用性定义和创建 Kubernetes 集群。您需要 Kubernetes 集群才能将迁移程序实用程序作为容器化应用程序运行。有关集群创建详细信息,请参见 Creating Kubernetes Clusters Using Console Workflows 。
对于此演示,您可以使用上面链接中详细介绍的“快速创建”工作流创建单节点托管集群。
图 - 用于迁移器容器的 Kubernetes 集群
-
从 OCI 控制台设置 WIA 以从 Kubernetes 集群访问其他 OCI 资源。
要在从 Kubernetes 集群云池运行时向 Migrator 实用程序授予对 NDCS 和 OCI OS 存储桶的访问权限,必须设置 WIA。请执行以下步骤:
-
设置群集的 kubeconfig 配置文件。
-
从 OCI 控制台中,打开您创建的 Kubernetes 集群,然后单击访问集群按钮。
-
从访问您的集群对话框中,单击云 Shell 访问。
-
单击 Launch Cloud Shell(启动 Cloud Shell)以显示 Cloud Shell 窗口。
-
运行 Oracle Cloud Infrastructure CLI 命令以设置 kubeconfig 文件。可以从 Access Your Cluster 对话框复制命令。您可以期待以下输出:
#Example:
oci ce cluster create-kubeconfig --cluster-id ocid1.cluster.oc1.iad.aaa...muqzq --file $HOME/.kube/config --region us-ashburn-1 --token-version 2.0.0  --kube-endpoint PUBLIC_ENDPOINT
#Output: New config written to the Kubeconfig file /home/<user>/.kube/config
-
-
从上面的命令中的
cluster-id选项复制集群的 OCID,并将其保存以供进一步步骤使用。ocid1.cluster.oc1.iad.aaa...muqzq -
使用 Cloud shell 窗口中的以下命令为 Kubernetes 服务帐户创建名称空间:
#Command:
kubectl create namespace <namespace-name>
#Example: kubectl create namespace migrator#Output: namespace/migrator created -
使用 Cloud shell 窗口中的以下命令在名称空间中为迁移程序应用程序创建 Kubernetes 服务账户:
#Command:
kubectl create serviceaccount <service-account-name> --namespace <namespace-name>
#Example: kubectl create serviceaccount migratorsa --namespace migrator#Output: serviceaccount/migratorsa created -
从 OCI 控制台定义 IAM 策略,使工作负载能够从 Kubernetes 集群访问 OCI 资源。
从 OCI 控制台中,导航到菜单身份和安全 > 身份 > 策略。创建以下策略以允许访问
nosql-family和object-family资源。使用前面步骤中集群、名称空间和服务账户值的 OCID。#Command: Allow <subject> to <verb> <resource-type> in <location> where <conditions>#Example: Allow any-user to manage nosql-family in compartment Training-NoSQL where all { request.principal.type = 'workload', request.principal.namespace = 'migrator', request.principal.service_account = 'migratorsa', request.principal.cluster_id = 'ocid1.cluster.oc1.iad.aaaaaaaa2o6h5noeut7i4xr2bp4aohcc2ncozgvn3nny3uqu7cvp2rwmuqzq'} Allow any-user to manage object-family in compartment Training-NoSQL where all { request.principal.type = 'workload', request.principal.namespace = 'migrator', request.principal.service_account = 'migratorsa', request.principal.cluster_id = 'ocid1.cluster.oc1.iad.aaaaaaaa2o6h5noeut7i4xr2bp4aohcc2ncozgvn3nny3uqu7cvp2rwmuqzq'}有关创建策略的更多详细信息,请参见 Using Console to Create Policy 。
-
-
过程
要从 OCI 操作系统存储桶中的 JSON 文件迁移到 NDCS 表,请从 Cloud Shell 窗口执行以下操作:
-
使用 OCI OS 源和 NDCS 接收器准备迁移器配置文件
migrator-config.json。有关模板,请参见 Source Configuration Templates 和 Sink Configuration Templates 。要使用 OKE WIA 访问 OCI OS 存储桶和 NDCS,请在源和接收配置模板中将
useOKEWorkloadIdentity参数设置为 true。在此处,您将使用 OCI 操作系统存储桶中方案 DDL 文件中的源方案。因此,在 sink 配置模板中将useSourceSchema参数设置为 true。注:在使用 OKE WIA 时,无法以交互方式生成迁移器配置文件。您必须通过引用源和接收器配置模板手动准备配置文件。
{ "source" : { "type" : "object_storage_oci", "format" : "json", "endpoint" : "us-ashburn-1", "namespace" : "", "bucket" : "Migrate_oci", "prefix" : "userSession", "useOKEWorkloadIdentity" : true }, "sink" : { "type" : "nosqldb_cloud", "endpoint" : "us-ashburn-1", "table" : "users", "compartment" : "Training-NoSQL", "includeTTL" : true, "schemaInfo" : { "readUnits" : 100, "writeUnits" : 60, "storageSize" : 1, "useSourceSchema" : true }, "useOKEWorkloadIdentity" : true, "writeUnitsPercent" : 90, "overwrite" : true, "requestTimeoutMs" : 5000 }, "abortOnError" : true, "migratorVersion" : "1.8.0" } -
创建配置映射资源 (configmap) 以在运行时在 Kubernetes 云池中将
migrator-config.json配置输入文件传递到迁移器容器。配置映射将迁移器配置文件作为挂载卷挂载到容器的文件系统中。#Command: kubectl create configmap oci-migrator-config --from-file=<Migrator configuration file> -n <namespace-name>#Example: kubectl create configmap oci-migrator-config --from-file=migrator-config.json -n migrator#Output: configmap/oci-migrator-config created -
创建一个 Docker 注册表密钥,其中包含要使用的 OCI 身份证明,同时将迁移器 Docker 映像从容器注册表提取到 Kubernetes 云池中。
#Command:
kubectl create secret docker-registry ocirsecret --docker-server=<region-key>.ocir.io --docker-username='tenancy-namespace/username' --docker-password='auth token' --docker-email='<user Email>' -n <namespace-name>
#Example: kubectl create secret docker-registry ocirsecret --docker-server=iad.ocir.io --docker-username='idhx..xxwjzj/rx..xxxxh@oracle.com' --docker-password='<Auth token>' --docker-email='rx..xxxxh@oracle.com' -n migrator#Output: secret/ocirsecret created -
创建一个清单文件,您将使用该文件指定 Migrator Docker 映像。确保为名称空间、Kubernetes 服务帐户名称、Docker 映像名称、Docker 注册表密钥和 configmap 提供前面步骤中的值。您可以参考以下清单样例文件:
#migrator-deployment.yaml apiVersion: apps/v1 kind: Deployment metadata: name: nosql-migrator spec: replicas: 1 selector: matchLabels: app: nosql-migrator template: metadata: labels: app: nosql-migrator spec: serviceAccountName: migratorsa automountServiceAccountToken: true containers: - name: nosqlmigrator image: iad.ocir.io/idhx..xxwjzj/okemigrator:1.0 imagePullPolicy: Always args: ["--config", "/config/migrator-config.json", "--log-level", "DEBUG"] volumeMounts: - name: config-volume mountPath: /config # Mount the file here imagePullSecrets: - name: ocirsecret volumes: - name: config-volume configMap: name: oci-migrator-config -
使用以下命令在 Kubernetes 云池中部署 Migrator Docker 映像。OKE 在 Kubernetes 集群的其中一个节点上的容器中运行迁移器实用程序。
#Command:
kubectl create -f <manifest file> -n <namespace-name>
#Example: kubectl create -f migrator-deployment.yaml -n migrator#Output: deployment.apps/nosql-migrator created -
您可以使用以下命令查看日志:
-
提取运行 Migrator 实用程序的 pod 名称。
#Command:
kubectl get pods -n <namespace-name>
#Example: kubectl get pods -n migrator#Output: NAME READY STATUS RESTARTS AGE nosql-migrator-ccdbf549-6sjjg 1/1 Running 0 56s -
使用 pod 的名称提取迁移程序日志。
#Command:
kubectl logs -f <kubernetes cluster pod name> -n <namespace-name>
#Example: kubectl logs -f nosql-migrator-ccdbf549-6sjjg -n migrator#Output: SLF4J(I): Connected with provider of type [org.apache.logging.slf4j.SLF4JServiceProvider] [INFO] Configuration for migration: { "source" : { "type" : "object_storage_oci", "format" : "json", "endpoint" : "us-ashburn-1", "namespace" : "idhkv1iewjzj", "bucket" : "Migrate_oci", "prefix" : "userSession", "useOKEWorkloadIdentity" : true }, "sink" : { "type" : "nosqldb_cloud", "endpoint" : "us-ashburn-1", "table" : "users", "compartment" : "Training-NoSQL", "includeTTL" : true, "schemaInfo" : { "readUnits" : 100, "writeUnits" : 60, "storageSize" : 1, "useSourceSchema" : true }, "useOKEWorkloadIdentity" : true, "writeUnitsPercent" : 90, "overwrite" : true, "requestTimeoutMs" : 5000 }, "abortOnError" : true, "migratorVersion" : "1.8.0" } [INFO] creating source from given configuration: [INFO] source creation completed [INFO] creating sink from given configuration: [INFO] sink creation completed [INFO] creating migrator pipeline [INFO] migration started [INFO] [cloud sink] : start loading DDLs [INFO] [cloud sink] : completed loading DDLs [INFO] [cloud sink] : start loading records [INFO] [OCI OS source] : start parsing JSON records from object: users/userSession/Data/users_1_5_0.json [INFO] [OCI OS source] : start parsing JSON records from object: users/userSession/Data/users_6_10_0.json [INFO] migration completed. Records provided by source=5, Records written to sink=5, Records failed=0, Records skipped=0. Elapsed time: 0min 1sec 15ms Migration completed.
注:
可以按如下方式迭代运行数据迁移:
-
使用以下命令删除
nosql-migrator容器:#Command: kubectl delete -f <manifest file> -n <namespace-name>#Example: kubectl delete -f migrator-deployment.yaml -n migrator#Output: deployment.apps "nosql-migrator" deleted -
更新
migrator-config.json配置输入文件。 -
使用步骤 2 中的命令删除和重新创建配置映射。
不需要创建 Docker 注册表密钥和清单文件。
-
使用清单文件在 Kubernetes 云池中部署 Migrator Docker 映像(步骤 5)。
-
验证
要验证数据还原,请登录到 Oracle NoSQL Database Cloud Service 控制台。从导航栏中,转至数据库 > NoSQL 数据库。从下拉列表中选择区间以查看 users 表。有关访问控制台的过程,请参阅从基础结构控制台访问服务。
使用会话令牌身份验证从 Oracle NoSQL Database 迁移到 OCI 对象存储
此示例说明如何使用具有会话令牌验证的 Oracle NoSQL Database Migrator 将数据从 Oracle NoSQL Database 表复制到 OCI 对象存储存储桶中的 JSON 文件。
用例
作为开发人员,您正在探索将 Oracle NoSQL Database 表数据备份到 OCI Object Storage (OCI OS) 的选项。您希望使用基于会话令牌的验证。
在本演示中,您将使用 OCI 命令行界面命令 (CLI) 创建会话令牌。您将手动创建迁移程序配置文件并执行数据迁移。
先决条件
-
确定迁移的源和接收器。
-
来源:Oracle NoSQL Database 中的
users表。 -
Sink:OCI 操作系统存储桶中的 JSON 文件
确定 OCI 操作系统的区域端点、名称空间、存储桶和前缀。有关详细信息,请参阅访问 Oracle Cloud 对象存储。有关 OCI OS 服务端点的列表,请参阅对象存储端点。
-
端点:
us-ashburn-1 -
存储桶:
Migrate_oci -
前缀:
userSession -
名称空间:
idhkv1iewjzj存储桶的名称空间名称与其租户的名称空间相同,并且会在创建租户时自动生成名称空间。您可以按如下方式获取名称空间名称:
-
从 Oracle NoSQL Database Cloud Service 控制台中,导航到 Storage > Buckets 。
-
从列表范围中选择区间,然后选择存储桶。时段详细信息页在名称空间参数中显示名称。
如果您未提供 OCI OS 名称空间名称,则迁移程序实用程序将使用租户的默认名称空间。
-
-
注:确保您有权在 OCI 操作系统存储桶中写入对象。有关设置策略的更多详细信息,请参见 Write to Object Storage 。
-
通过执行以下步骤生成会话令牌:
-
安装和配置 OCI CLI。请参见 Quickstart 。
-
使用以下 OCI CLI 命令之一生成会话令牌。有关可用选项的更多详细信息,请参见 Token-based Authentication for the CLI 。
# Create a session token using OCI CLI from a web browser:
oci session authenticate --region <region_name> --profile-name <profile_name>

# Example:
oci session authenticate --region us-ashburn-1 --profile-name SESSIONPROFILE
或者
# Create a session token using OCI CLI without a web browser:
oci session authenticate --no-browser --region <region_name> --profile-name <profile_name>

# Example:
oci session authenticate --no-browser --region us-ashburn-1 --profile-name SESSIONPROFILE
在上面的命令中,:
region_name:指定 OCI 操作系统的区域端点。有关 Oracle NoSQL Database Cloud Service 中支持的数据区域列表,请参阅数据区域和关联服务 URL 。profile_name:指定 OCI CLI 命令用于生成会话令牌的配置文件。OCI CLI 命令在 OCI 配置文件中的
$HOME/.oci/config路径中创建条目,如下例所示:[SESSIONPROFILE] fingerprint=f1:e9:b7:e6:25:ff:fe:05:71:be:e8:aa:cc:3d:0d:23 key_file=$HOME/.oci/sessions/SESSIONPROFILE/oci_api_key.pem tenancy=ocid1.tenancy.oc1..aaaaa ... d6zjq region=us-ashburn-1 security_token_file=$HOME/.oci/sessions/SESSIONPROFILE/tokensecurity_token_file指向您使用上面 OCI CLI 命令生成的会话令牌的路径。注:
-
如果该配置文件已存在于 OCI 配置文件中,OCI CLI 命令将在生成会话令牌时使用与会话令牌相关的配置覆盖该配置文件。
-
在接收器配置模板中指定以下内容:
-
身份证明参数中 OCI 配置文件的路径。
-
在 credentialProfile 参数中生成会话令牌时使用的配置文件。
"credentials" : "$HOME/.oci/config"

"credentialsProfile" : "SESSIONPROFILE"
Migrator 实用程序会自动获取使用上述参数生成的会话标记的详细信息。如果未指定身份证明参数,则 Migrator 实用程序将在路径
$HOME/.oci中查找身份证明文件。如果您未指定 credProfile 参数,则 Migrator 实用程序将使用 OCI 配置文件中的默认概要信息名称 (DEFAULT)。- 会话标记的有效期为 60 分钟。要延长会话持续时间,可以刷新会话。有关详细信息,请参见 Refreshing a Token 。
-
-
过程
要从 Oracle NoSQL Database 表迁移到 OCI 操作系统存储桶中的 JSON 文件,请执行以下操作:
-
使用 OCI 操作系统存储桶接收器中的 Oracle NoSQL Database 源和 JSON 文件准备配置文件(采用 JSON 格式)。有关模板,请参见 Source Configuration Templates 和 Sink Configuration Templates 。
要使用会话令牌验证访问 OCI 操作系统存储桶,请在接收器配置模板中将 useSessionToken 参数设置为 true。相应地,在身份证明参数中指定配置路径,在 credProfile 参数中指定概要信息名称。
{ "source" : { "type" : "nosqldb", "storeName" : "kvstore", "helperHosts" : ["<hostname>:<port>"], "table" : "users", "includeTTL" : true, "requestTimeoutMs" : 5000 }, "sink" : { "type" : "object_storage_oci", "format" : "json", "endpoint" : "us-ashburn-1", "namespace" : "idhkv1iewjzj", "bucket" : "Migrate_oci", "prefix" : "userSession", "chunkSize" : 32, "compression" : "", "useSessionToken" : true, "credentials" : "$/home/.oci/config", "credentialsProfile" : "SESSIONPROFILE" }, "abortOnError" : true, "migratorVersion" : "1.8.0" } -
打开命令提示符并导航到从中提取 NoSQL Database Migrator 实用程序的目录。
-
通过传递配置文件选项运行 runMigrator 命令。使用
--config或-c选项传递配置文件,如下所示:./runMigrator --config ./migrator-config.json -
Migrator 实用程序继续进行数据迁移。下面显示了样例输出。
当 useSessionToken 参数为 true 时,Migrator 实用程序将使用会话令牌自动进行验证。Migrator 实用程序将数据从
users表复制到 OCI 操作系统存储桶中名为Migrate_oci的 JSON 文件。请查看日志以获得成功的数据备份。[INFO] creating source from given configuration: [INFO] source creation completed [INFO] creating sink from given configuration: [INFO] sink creation completed [INFO] creating migrator pipeline [INFO] [OCI OS sink] : writing table schema to userSession/Schema/schema.ddl [INFO] migration started [INFO] Migration success for source users_6_10. read=2,written=2,failed=0 [INFO] Migration success for source users_1_5. read=3,written=3,failed=0 [INFO] Migration is successful for all the sources. [INFO] migration completed. Records provided by source=5, Records written to sink=5, Records failed=0,Records skipped=0. Elapsed time: 0min 0sec 982ms Migration completed.注:
根据 sink 配置模板中的 chunkSize 参数,Migrator 实用程序会将源数据拆分为同一目录中的多个 JSON 文件。在此示例中,Migrator 实用程序将数据复制到
Migrate_oci/userSession/Data目录中的users_1_5_0.json和users_6_10_0.json文件。源表方案将复制到
Migrate_oci/userSession/Schema目录中的schema.ddl文件。
验证
要验证数据备份,请登录 Oracle NoSQL Database Cloud Service 控制台。浏览菜单, Storage > Object Storage & Archive Storage > Buckets。从 Migrate_oci 存储桶中的 userSession 目录访问文件。有关访问控制台的过程,请参阅从基础结构控制台访问服务
从 CSV 文件迁移到 Oracle NoSQL Database Cloud Service
此示例显示 Oracle NoSQL Database Migrator 将数据从 CSV 文件复制到 Oracle NoSQL Database Cloud Service 的用法。
示例
在评估多个选项后,组织将 Oracle NoSQL Database Cloud Service 最终确定为其 NoSQL 数据库平台。由于其源内容采用 CSV 文件格式,因此他们正在寻找一种将它们迁移到 Oracle NoSQL Database Cloud Service 的方法。
在此示例中,您将学习从名为 course.csv 的 CSV 文件迁移数据,该文件包含有关大学提供的各种课程的信息。可以通过 runMigrator 实用程序以交互方式生成配置文件。
您还可以使用标识的源和接收器详细信息准备配置文件。请参阅 Oracle NoSQL Database Migrator Reference 。
先决条件
-
标识迁移的源。
-
来源:CSV 文件
在此示例中,源文件为
course.csv1,"Computer Science", "San Francisco", "2500" 2,"Bio-Technology", "Los Angeles", "1200" 3,"Journalism", "Las Vegas", "1500" 4,"Telecommunication", "San Francisco", "2500" -
CSV 文件必须符合
RFC4180格式。 -
为目标表的方案
course创建包含 DDL 命令的文件。表定义必须与涉及列数及其类型的 CSV 数据文件匹配。在本示例中,DDL 文件为
mytable_schema.ddlcreate table course (id INTEGER, name STRING, location STRING, fees INTEGER, PRIMARY KEY(id));
-
-
确定迁移的接收器。
-
Sink:Oracle NoSQL Database Cloud Service
-
确定 OCI 云身份证明并将其捕获到配置文件中。将配置文件保存在
/home/<user>/.oci/config中。有关更多详细信息,请参见 Acquiring Credentials 。[DEFAULT] tenancy=ocid1.tenancy.oc1.... user=ocid1.user.oc1.... fingerprint= 43:d1:.... region=us-ashburn-1 key_file=</fully/qualified/path/to/the/private/key/> pass_phrase=<passphrase> -
确定 Oracle NoSQL Database Cloud Service 的区域端点和区间名称。
-
端点:
us-ashburn-1 -
区间:
ocid1.compartment.oc1..aaaaaaaavjikiwmylfnpofefbdaleg6rqyf7cdnr5o6vozg4lyajeunrhsmq
-
-
过程
要将数据从 course.csv 文件迁移到 Oracle NoSQL Database Cloud Service,请执行以下步骤:
-
打开命令提示符并导航到从中提取 Oracle NoSQL Database Migrator 实用程序的目录。
-
要使用 Oracle NoSQL Database Migrator 生成配置文件,请执行不带任何运行时参数的
runMigrator命令。[~/nosql-migrator-1.8.0]$./runMigrator -
由于您未将配置文件作为运行时参数提供,因此实用程序会提示您是否要立即生成配置。键入
y。您可以为配置文件选择位置,也可以通过按
Enter key来保留默认位置。Configuration file is not provided. Do you want to generate configuration? (y/n) [n]: y Generating a configuration file interactively. Enter a location for your config [./migrator-config.json]: ./migrator-config.json already exist. Do you want to overwrite?(y/n) [n]: y -
根据实用程序中的提示,选择源配置的选项。
Select the source: 1) nosqldb 2) nosqldb_cloud 3) file 4) object_storage_oci 5) aws_s3 #? 3 Configuration for source type=file Select the source file format: 1) json 2) mongodb_json 3) dynamodb_json 4) csv #? 4 -
提供源 CSV 文件的路径。此外,还可以根据实用程序中的提示,选择对列名重新排序,选择编码方法,并从目标表中修剪尾部空格。
Enter path to a file or directory containing csv data: [~/nosql-migrator]/course.csv Does the CSV file contain a headerLine? (y/n) [n]: n Do you want to reorder the column names of NoSQL table with respect to CSV file columns? (y/n) [n]: n Provide the CSV file encoding. The supported encodings are: UTF-8,UTF-16,US-ASCII,ISO-8859-1. [UTF-8]: Do you want to trim the tailing spaces? (y/n) [n]: n -
根据实用程序中的提示,为 Sink 配置选择
nosqldb_cloud选项。Select the sink: 1) nosqldb 2) nosqldb_cloud #? 2 -
提供租户的端点 URL 或区域 ID,并为迁移程序实用程序选择验证类型以访问 Oracle NoSQL Database Cloud Service。
Configuration for sink type=nosqldb_cloud Enter endpoint URL or region ID of the Oracle NoSQL Database Cloud: us-ashburn-1 Select the authentication type: 1) credentials_file 2) instance_principal 3) delegation_token 4) session_token 5) oke_workload_identity #? 1 -
根据实用程序的提示,提供要用于验证的身份证明文件的名称、身份证明概要文件、区间 ID 以及要在汇处将数据复制到的表的名称。
Enter path to the file containing OCI credentials [/home/<user>/.oci/config]: Enter the profile name in OCI credentials file [DEFAULT]: Enter the compartment name or id of the table []: ua_nosql Enter table name: course -
输入设置 TTL 值的选项。默认值为
n。Include TTL data? If you select 'yes' TTL value provided by the source will be set on imported rows. (y/n) [n]: y Would you like to provide TTL reference time?(y/n) [n]: n -
根据实用程序中的提示,指定是否必须通过 Oracle NoSQL Database Migrator 工具创建目标表。如果已创建表,建议提供
n。如果未创建表,该实用程序将请求包含目标表方案的 DDL 命令的文件的路径。Would you like to create table as part of migration process? Use this option if you want to create table through the migration tool. If you select yes, you will be asked to provide a file that contains table DDL or to use schema provided by the source or default schema. (y/n) [n]: y Enter path to a file containing table DDL: [~/nosql-migrator]/mytable_schema.ddl -
输入接收器表的吞吐量值和存储分配。
Would you like to use on demand read and write units? (y/n) [n]: n Enter read throughput in KB of new table: 100 Enter write throughput in KB of new table: 60 Enter storage size in GB of new table: 1 Enter percentage of table write units to be used for migration operation. (1-100) [90]: 90 -
输入您的选择,以确定是否覆盖记录(如果该表已在汇处可用)。您还可以向源数据添加转换。
would you like to overwrite records which are already present? If you select 'no' records with same primary key will be skipped [y/n] [y]: y Enter store operation timeout in milliseconds. [5000]: Would you like to add transformations to source data? (y/n) [n]: n Would you like to continue migration if any data fails to be migrated? (y/n) [n]: n -
该实用程序在屏幕上显示生成的配置。
{ "source" : { "type" : "file", "format" : "csv", "dataPath" : "[~/nosql-migrator]/course.csv", "hasHeader" : false, "csvOptions" : { "encoding" : "UTF-8", "trim" : false } }, "sink" : { "type" : "nosqldb_cloud", "endpoint" : "us-ashburn-1", "table" : "course", "compartment" : "ua_nosql", "includeTTL" : true, "schemaInfo" : { "readUnits" : 100, "writeUnits" : 60, "storageSize" : 1, "schemaPath" : "[~/nosql-migrator]/mytable_schema.ddl" }, "credentials" : "/home/<user>/.oci/config", "credentialsProfile" : "DEFAULT", "writeUnitsPercent" : 90, "overwrite" : true, "requestTimeoutMs" : 5000 }, "abortOnError" : true, "migratorVersion" : "1.8.0" } -
最后,该实用程序会提示您指定是否使用生成的配置文件继续迁移。缺省选项为
y。注:
如果选择
n,则不会启动数据迁移。生成的配置文件保存在 Migrator 目录中。使用以下命令之一运行带有配置文件选项的 Migration 实用程序。./runMigrator -c ./migrator-config.json./runMigrator --config ./migrator-config.jsonWould you like to run the migration with above configuration? If you select no, you can use the generated configuration file to run the migration using: ./runMigrator --config ./migrator-config.json (y/n) [y]: y -
NoSQL 数据库迁移程序将数据从 CSV 文件复制到 Oracle NoSQL Database Cloud Service。
creating source from given configuration:
source creation completed
creating sink from given configuration:
sink creation completed
creating migrator pipeline
[cloud sink] : start loading DDLs
[cloud sink] : executing DDL: create table if not exists course (id INTEGER, name STRING, location STRING, fees INTEGER, PRIMARY KEY(id)),limits: [100, 60, 1]
[cloud sink] : completed loading DDLs
migration started
[csv file source] : start parsing CSV records from file: course.csv
Migration success for source course. read=4,written=4,failed=0
Migration is successful for all the sources.
migration completed.
Records provided by source=4, Records written to sink=4, Records failed=0,Records skipped=0.
Elapsed time: 0min 0sec 395ms
Migration completed.
验证
要验证迁移,您可以登录到 Oracle NoSQL Database Cloud Service 控制台并访问 course 表。该表包含源数据。有关访问控制台的过程,请参阅 Oracle NoSQL Database Cloud Service 文档中的从基础结构控制台访问服务文章。