注:
- 此教程需要访问 Oracle Cloud。要注册免费账户,请参阅开始使用 Oracle Cloud Infrastructure Free Tier 。
- 它使用 Oracle Cloud Infrastructure 身份证明、租户和区间示例值。完成实验室时,请将这些值替换为特定于云环境的那些值。
使用 Oracle Cloud API 网关创建具有函数验证的安全对象存储下载服务
简介
Oracle Cloud 对象存储是存储大文件或小文件的一种非常便宜和有效的方法。对象存储支持在事件驱动的架构中工作,使得进程执行接近实时。您可以在对象存储中配置事件以触发事件,还可以创建 REST 服务来安全、快速、经济高效地写入或从对象存储读取文件。
如果您有兴趣了解如何实施事件驱动的体系结构,请参阅使用 Oracle Cloud Infrastructure Data Flow 在 Autonomous Database 和 Kafka 中处理大型文件。
体系结构
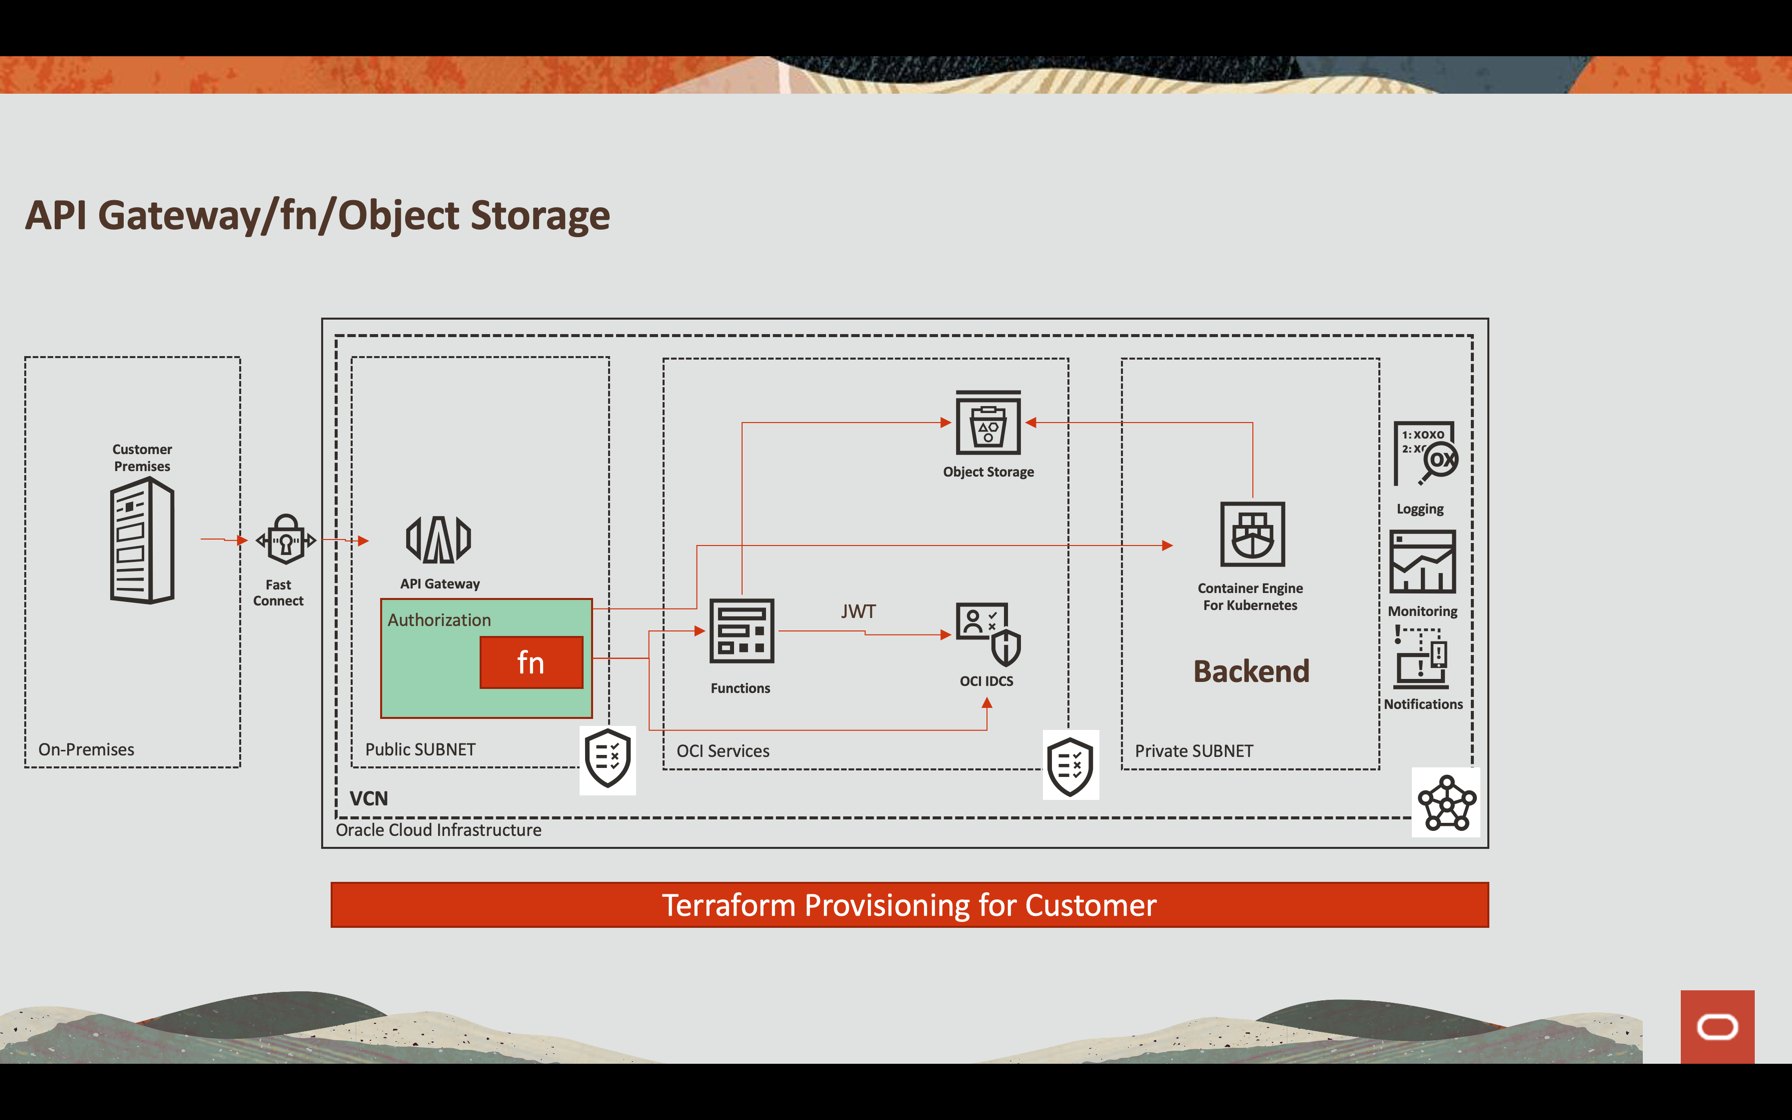
Oracle API Gateway 集成
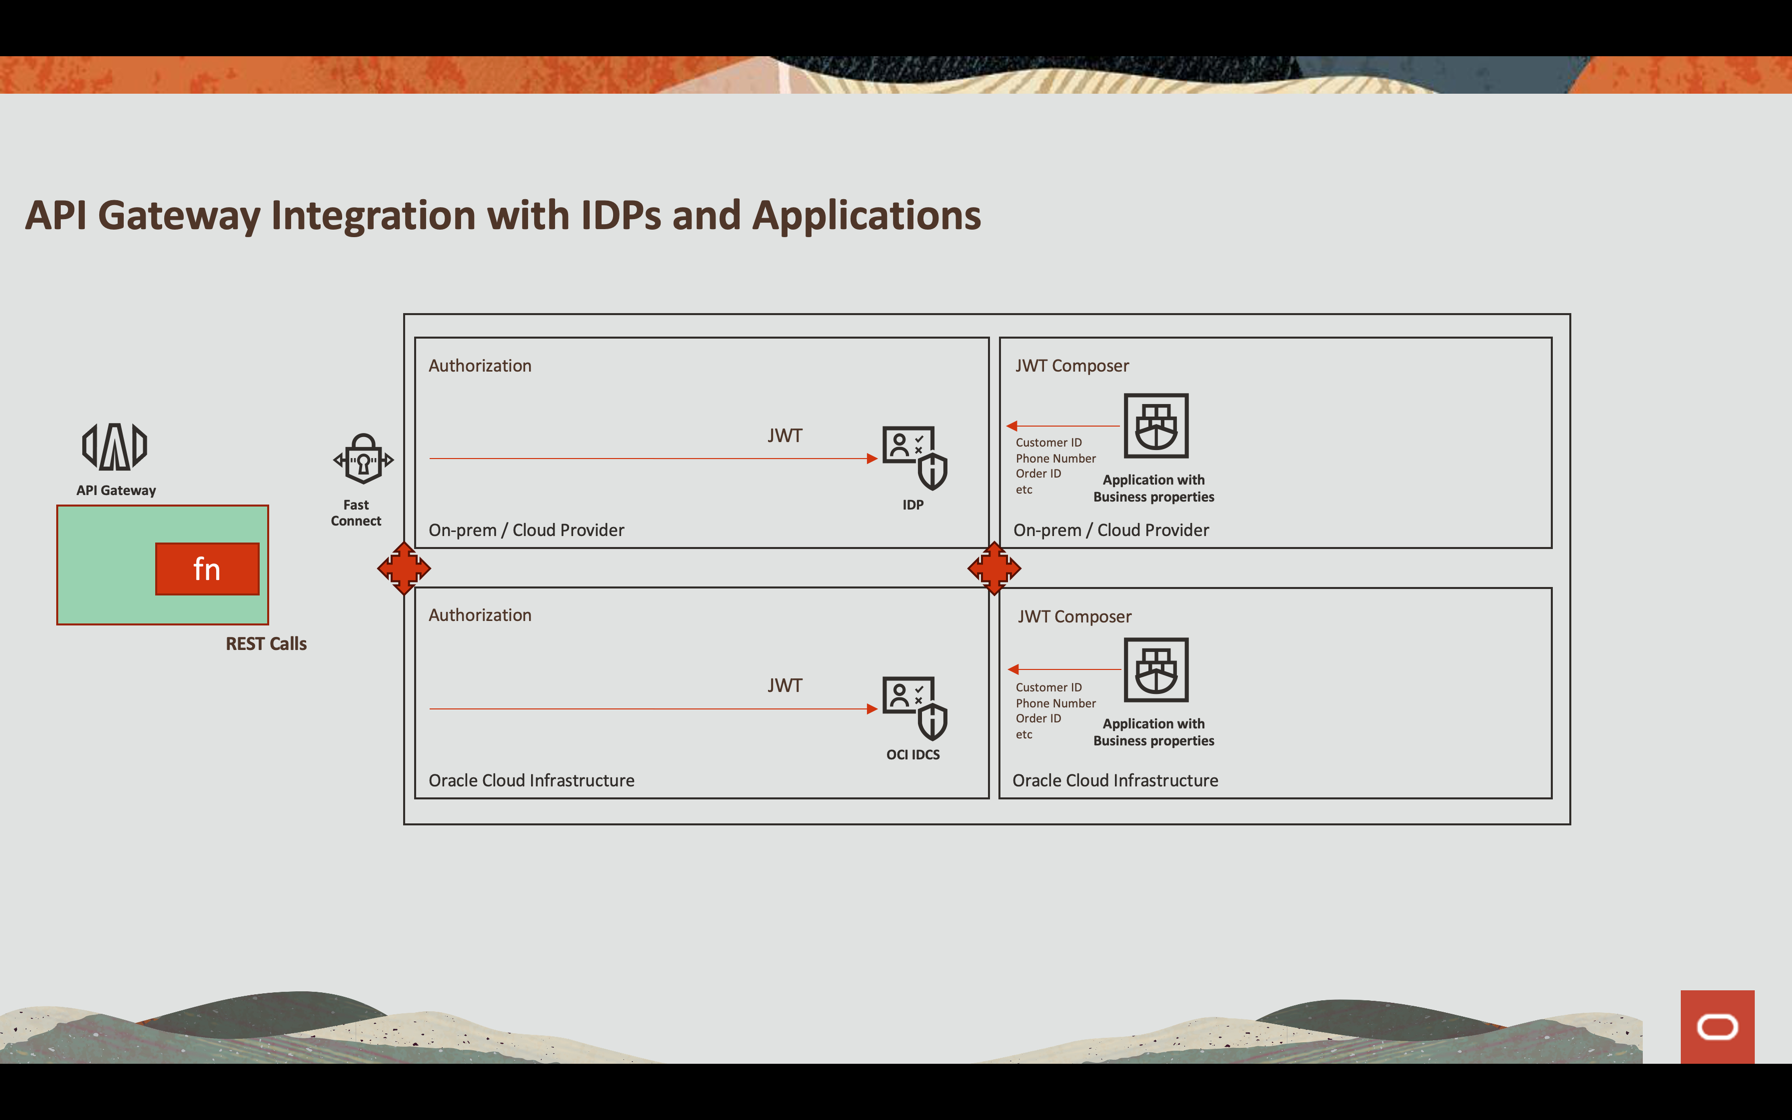
在本教程中,我们将展示如何配置 Oracle API Gateway 以实施 REST 服务,该功能允许以灵活的方式通过外部身份提供者或 Oracle Cloud Infrastructure (OCI) 本身 (Oracle Identity Cloud Service) 验证 JWT 令牌。无论如何,您都可以验证 JWT 令牌(因为属性可以是文件名的一部分),通过其 SDK 和其他可自定义的流程使用 OCI 服务。
目标
- 公开 API REST 服务,安全地从对象存储下载文件
- 使用 OCI API 网关使用 OCI 函数进行验证
- 返回具有 60 秒下载限制时间的预先验证的链接
- 配置可观察性设置以监视文件写入和读取
先决条件
-
创建并配置了写入和读取文件所需的策略的 OCI 对象存储桶。请参阅对象存储安全性
-
一个可操作的 Oracle Cloud 租户:您可以在一个月内创建 300.00 美元的免费 Oracle Cloud 账户,以尝试本教程。请参阅创建免费的 Oracle Cloud 账户。
-
本地计算机上安装的 Oracle Cloud 命令行界面 (OCI CLI):这是用于安装 OCI CLI 的链接。
-
为开发配置的 OCI 函数和策略。此示例在 Python 中实现。有关详细信息,请参阅函数 QuickStart 指南。
-
已创建 OCI API 网关实例,并向互联网公开。请参阅在 Oracle Cloud 中创建第一个 API 网关。
-
访问 Oracle Identity Cloud Service。
任务 1:在 Oracle Identity Cloud Service 中配置应用程序
您可以将任何 REST API 外部身份提供者配置为使用 JWT,例如 Auth0 和 Oracle Identity Cloud Service 。
在本教程中,我们将使用 Oracle Identity Cloud Service 并调用函数内部的验证。
-
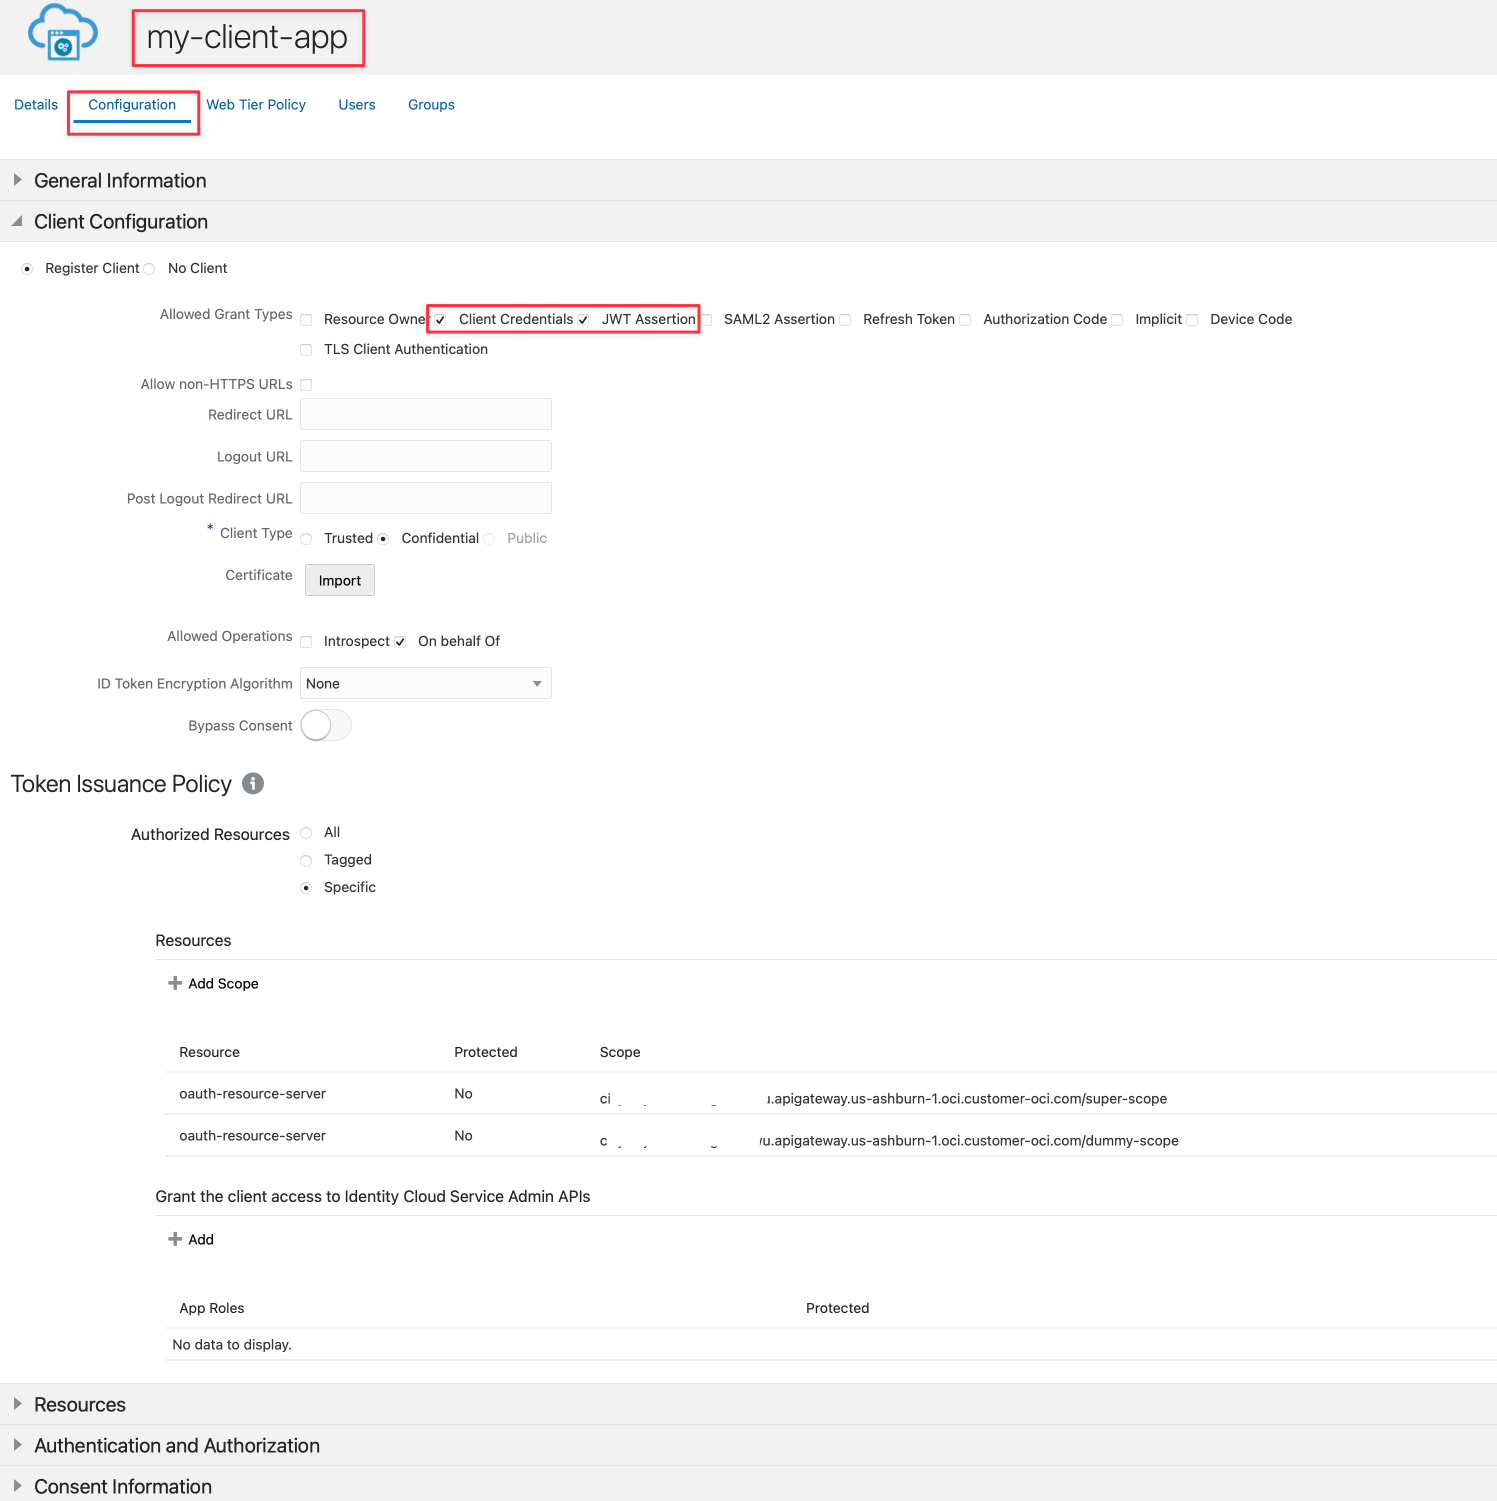
在此示例中,在 Oracle Identity Cloud Service 中创建名为 my-client-app 的应用程序。
-
选择 Client Credentials(客户端身份证明)和 JWT Assertion(JWT 断言)选项。
-
有关配置详细信息,请参阅使用具有作用域和声明的 Oracle Identity Cloud Service/IAM JWT 通过 API 网关保护 API 。
注:此验证示例仅反映用于标识用户和有关存储桶的其他信息的假设情况。这可能无法反映验证和授权应用程序的最佳方式,建议根据公司的标准进行评估。
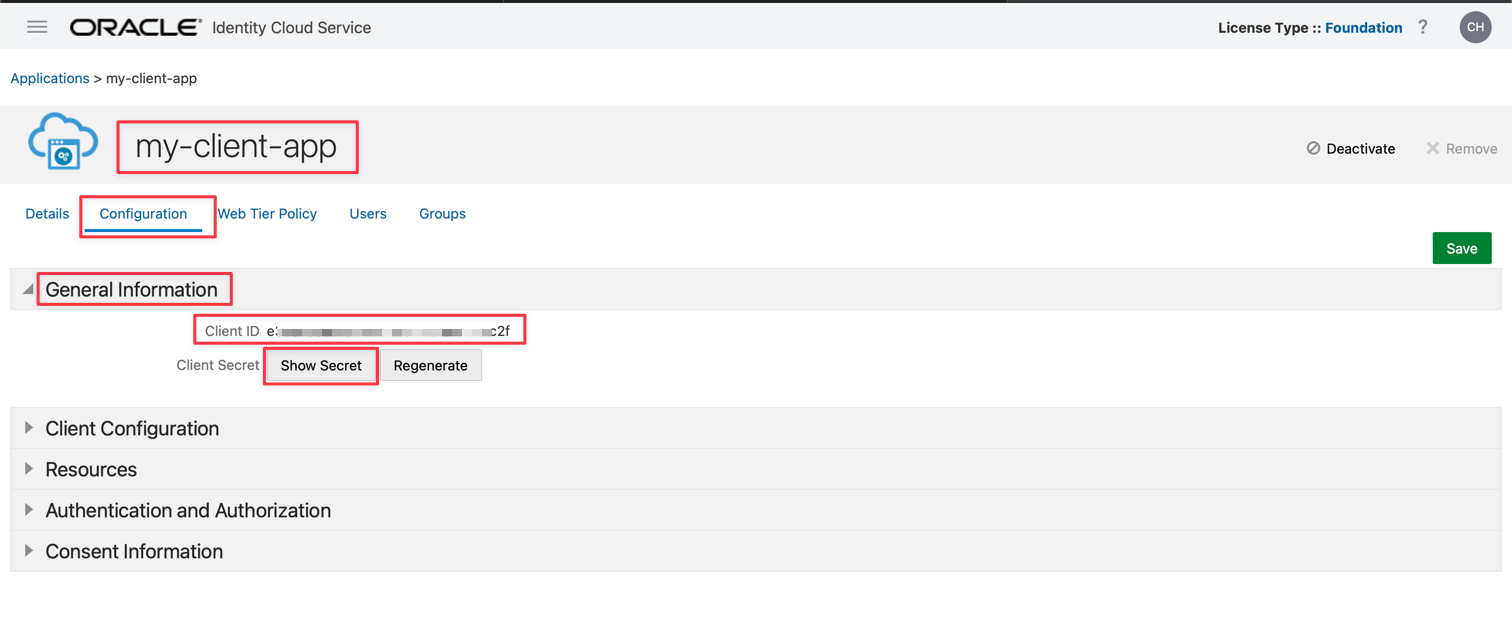
-
保存并激活您的应用程序。可以获取要在下一节中使用的 clientID 和 secretID 。
任务 2:复查代码
这是 API 网关部署中使用的 Python 代码,用于对验证前链接进行授权,以便在对象存储中下载文件。
您可以在此处下载 Python 代码:Python fn Project 。
python
import io
import json
import logging
import datetime
import jwt
import requests
import base64
import oci

from datetime import timedelta
from fdk import response
from py_zipkin import Encoding #import Zipkin package
from py_zipkin.zipkin import zipkin_span #import Zipkin package
from transport import http_transport #import Zipkin transport

@zipkin_span(service_name='Status: Load File', span_name='statusGetFile')
def auth(ctx, data: io.BytesIO = None):
    auth_token = "invalid"
    token = "invalid"
    apiKey = "invalid"
    expiresAt = (datetime.datetime.utcnow() + timedelta(seconds=60)).replace(tzinfo=datetime.timezone.utc).astimezone().replace(microsecond=0).isoformat()

    config = oci.config.from_file("config")
    object_storage = oci.object_storage.ObjectStorageClient(config)
    namespace = object_storage.get_namespace().data

    try:
        auth_token = json.loads(data.getvalue())
        secretID = auth_token.get("secretID")
        clientID = auth_token.get("clientID")

        details = oci.object_storage.models.CreatePreauthenticatedRequestDetails(name="data", access_type="AnyObjectReadWrite", bucket_listing_action="ListObjects", time_expires=expiresAt)

        preauth = object_storage.create_preauthenticated_request(namespace_name=namespace, bucket_name="data", create_preauthenticated_request_details=details)
        preauthstr = str(preauth.data)

        auth = clientID + ":" + secretID
        auth_bytes = auth.encode("ascii")
        auth_base64_bytes = base64.b64encode(auth_bytes)
        auth_base64_message = auth_base64_bytes.decode("ascii")

        headers = {"Authorization": "Basic " + auth_base64_message, "Content-Type": "application/x-www-form-urlencoded"}

        scope = "cihxxxxxxxxxxxxxxxxxowu.apigateway.us-ashburn-1.oci.customer-oci.com/super-scope"
        grant_type = "client_credentials"

        body = {"scope": scope, "grant_type": grant_type}

        url_post = "https://Oracle Identity Cloud Service-4fxxxxxxxxxxxxxxxxxxxxxx9.identity.oraclecloud.com/oauth2/v1/token"
        post_response = requests.post(url_post, headers=headers, data=body)

        jwtTokenDecoded = jwt.decode(post_response.json()['access_token'], options={"verify_signature": False})

        return response.Response(
            ctx,
            status_code=200,
            response_data=json.dumps({"active": True, "principal": "foo", "scope": "bar", "clientId": "1234", "expiresAt": expiresAt, "context": {"username": "wally", "token":
post_response.json()['access_token'], "jwtTokenDecoded": jwtTokenDecoded, "objectID": preauthstr}})
        )

    except (Exception, ValueError) as ex:
        logging.getLogger().info('error parsing json payload: ' + str(ex))
        pass

    return response.Response(
        ctx,
        status_code=401,
        response_data=json.dumps({"active": False, "wwwAuthenticate": "API-key"})
    )

@zipkin_span(service_name='Status: Load File', span_name='statusGetFile')
def handler(ctx, data: io.BytesIO = None):
    with zipkin_span(
            service_name="Status: Load File", #You can change it as you need
            span_name="statusGetFile", #You can change it as you need
            transport_handler=http_transport, #zipkin transport, will use it to upload trace data to OCI APM
            encoding = Encoding.V2_JSON,
            binary_annotations = {"status":"Load File", "objectID":json.loads(data.getvalue()).get("objectID")}, #Custom tag
            sample_rate=100 # this is optional and can be used to set custom sample rates
    ):
        return auth(ctx, data)
我们逐部分分析代码,了解如何:
- 遵循 OCI 可观察性中的流程
- 配置验证前链接以在对象存储中下载文件
- 与身份提供者进行验证并获取 JWT 标记
- 解码 JWT 令牌并使用进程中的信息
- 返回 API 网关部署中的成功或失败状态
代码的此部分将状态位置保存在 OCI Observability 中。它使用 Zipkin 框架发布到 OCI APM Observability
python
@zipkin_span(service_name='Status: Load File', span_name='statusGetFile')
def handler(ctx, data: io.BytesIO = None):
    with zipkin_span(
            service_name="Status: Load File", #You can change it as you need
            span_name="statusGetFile", #You can change it as you need
            transport_handler=http_transport, #zipkin transport, will use it to upload trace data to OCI APM
            encoding = Encoding.V2_JSON,
            binary_annotations = {"status":"Load File", "objectID":json.loads(data.getvalue()).get("objectID")}, #Custom tag
            sample_rate=100 # this is optional and can be used to set custom sample rates
    ):
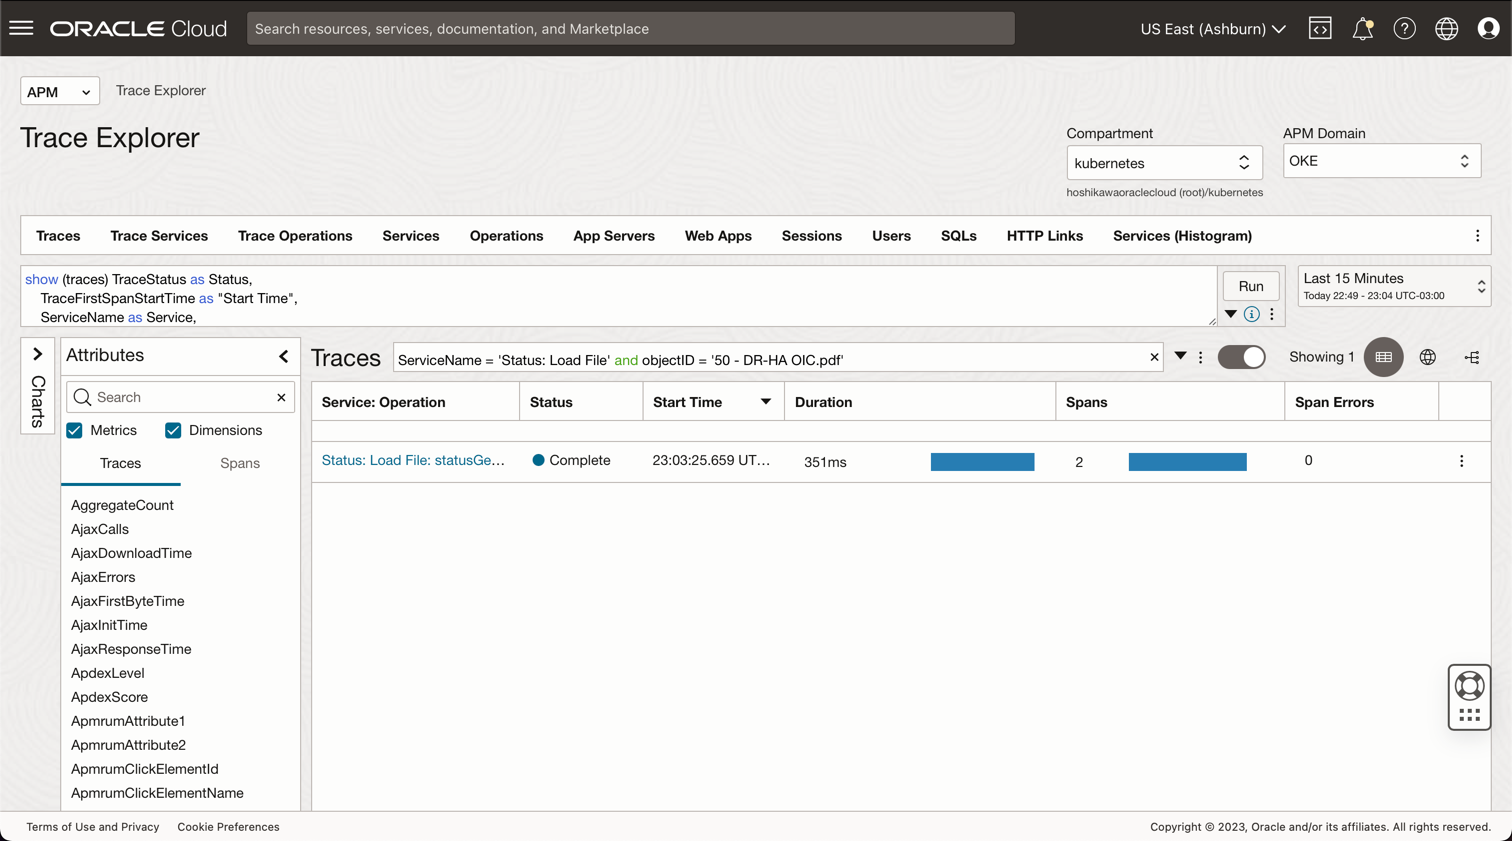
这是代码的 OCI APM 控制台视图,您可以通过如下查询查找文件:
**ServiceName** = 'Status: Load File' and **objectID** = '50 - DR-HA OIC.pdf'
下一个代码将固定对象存储文件的失效日期和时间。将生成预先验证,并将属性 expiresAt 用于此目标。 timedelta 从当前时间开始添加 60 秒来下载文件。
python
expiresAt = (datetime.datetime.utcnow() + timedelta(seconds=60)).replace(tzinfo=datetime.timezone.utc).astimezone().replace(microsecond=0).isoformat()
现在,我们需要基于 OCI CLI 安装中保存的凭证初始化 OCI 对象存储框架。OCI CLI 配置使用 ~/.oci/config 和证书 .pem 文件。因此,您可以在本地安装 OCI CLI 并将用户配置为访问对象存储(请参阅 OCI 文档以在“相关链接”部分中安装 OCI CLI 和对象存储策略),然后将这些 2 个文件复制到此 fn 项目中。
python
config = oci.config.from_file("config")
object_storage = oci.object_storage.ObjectStorageClient(config)
namespace = object_storage.get_namespace().data
下一步将从 Body 参数值获取:secretID 、clientID 和 objectID 。
#secretID = the Oracle Identity Cloud Service secretID from the application created to validate the JWT Token
#clientID = the Oracle Identity Cloud Service clientID from the application created to validate the JWT Token
#objectID = the file name in the Object Storage
python
try:
    auth_token = json.loads(data.getvalue())
    secretID = auth_token.get("secretID")
    clientID = auth_token.get("clientID")
    objectID = auth_token.get("objectID")
OCI SDK 可以为许多服务支持对象存储,例如读取和/或写入文件、列出存储桶的内容等。例如,您可以让使用者列出此部分代码中将生成具有预先验证的 URL 的存储桶的所有内容。变量 bucket_name 包含之前创建的对象存储中存储桶的名称,time_expires 表示下载文件的到期日期和时间。
python
details = oci.object_storage.models.CreatePreauthenticatedRequestDetails(name="data", access_type="AnyObjectReadWrite", bucket_listing_action="ListObjects", time_expires=expiresAt)

preauth = object_storage.create_preauthenticated_request(namespace_name=namespace, bucket_name="data", create_preauthenticated_request_details=details)
preauthstr = str(preauth.data)
此部分代码调用 Oracle Identity Cloud Service 来验证 clientID 和 secretID 来获取 JWT 标记。JWT 可以解码为 JSON 字符串,在这种情况下,无需签名,但可以使用证书轻松验证签名。
python
auth = clientID + ":" + secretID
auth_bytes = auth.encode("ascii")
auth_base64_bytes = base64.b64encode(auth_bytes)
auth_base64_message = auth_base64_bytes.decode("ascii")

headers = {"Authorization": "Basic " + auth_base64_message, "Content-Type": "application/x-www-form-urlencoded"}

scope = "xxxxxxxxxxxxxxxxxxxx.apigateway.us-ashburn-1.oci.customer-oci.com/super-scope"
grant_type = "client_credentials"

body = {"scope": scope, "grant_type": grant_type}

url_post = "https://Oracle Identity Cloud Service-xxxxxxxxxxxxxxxxxxxxxxx.identity.oraclecloud.com/oauth2/v1/token"
post_response = requests.post(url_post, headers=headers, data=body)

jwtTokenDecoded = jwt.decode(post_response.json()['access_token'], options={"verify_signature": False})
这是最后一部分,其中将返回代码为 200 的所有数据。您可以返回应用程序所需的所有信息,并且代码的这一部分将验证验证,从而导致代码 200(已授权/成功)或 401(未授权)。
python
    return response.Response(
        ctx,
        status_code=200,
        response_data=json.dumps({"active": True, "principal": "foo", "scope": "bar", "clientId": "1234", "expiresAt": expiresAt, "context": {"username": "wally", "token": post_response.json()['access_token'], "jwtTokenDecoded": jwtTokenDecoded, "objectID": preauthstr}})
    )

except (Exception, ValueError) as ex:
    logging.getLogger().info('error parsing json payload: ' + str(ex))
    pass

return response.Response(
    ctx,
    status_code=401,
    response_data=json.dumps({"active": False, "wwwAuthenticate": "API-key"})
)
任务 3:配置 OCI API 网关以使用 fn 进行验证
OCI API 网关可以将 API 部署为 OCI 函数。如前所述,代码使用 body ,其中包含由 API 网关配置传递的 clientID 、secretID 和 objectID 信息。您可以配置部署:
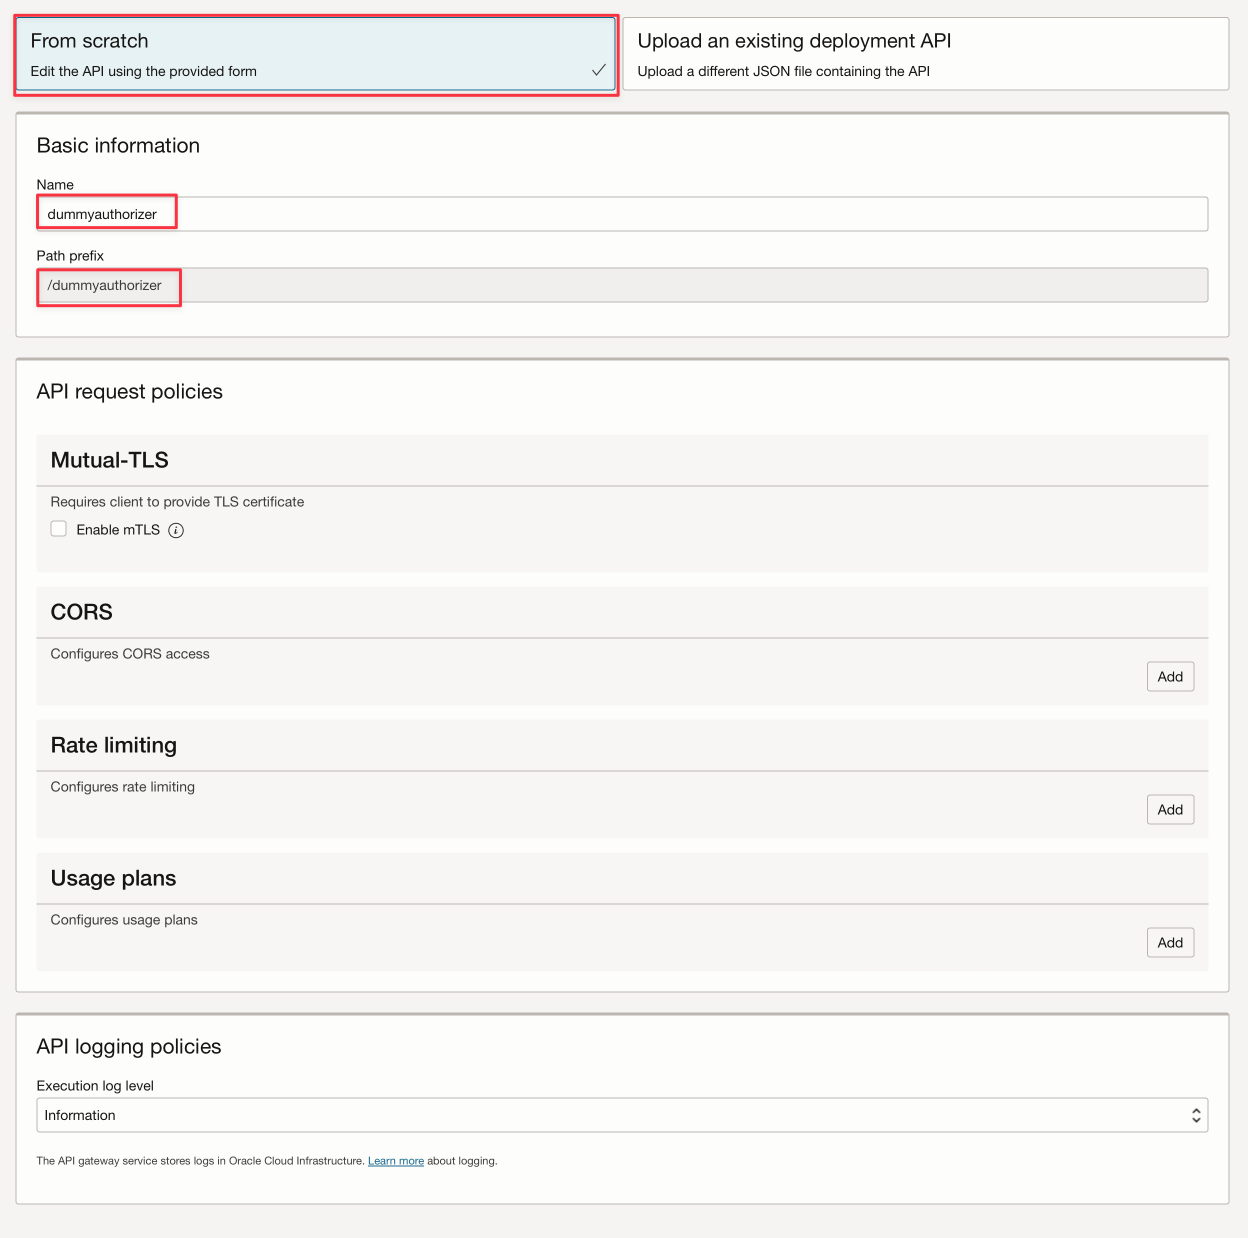

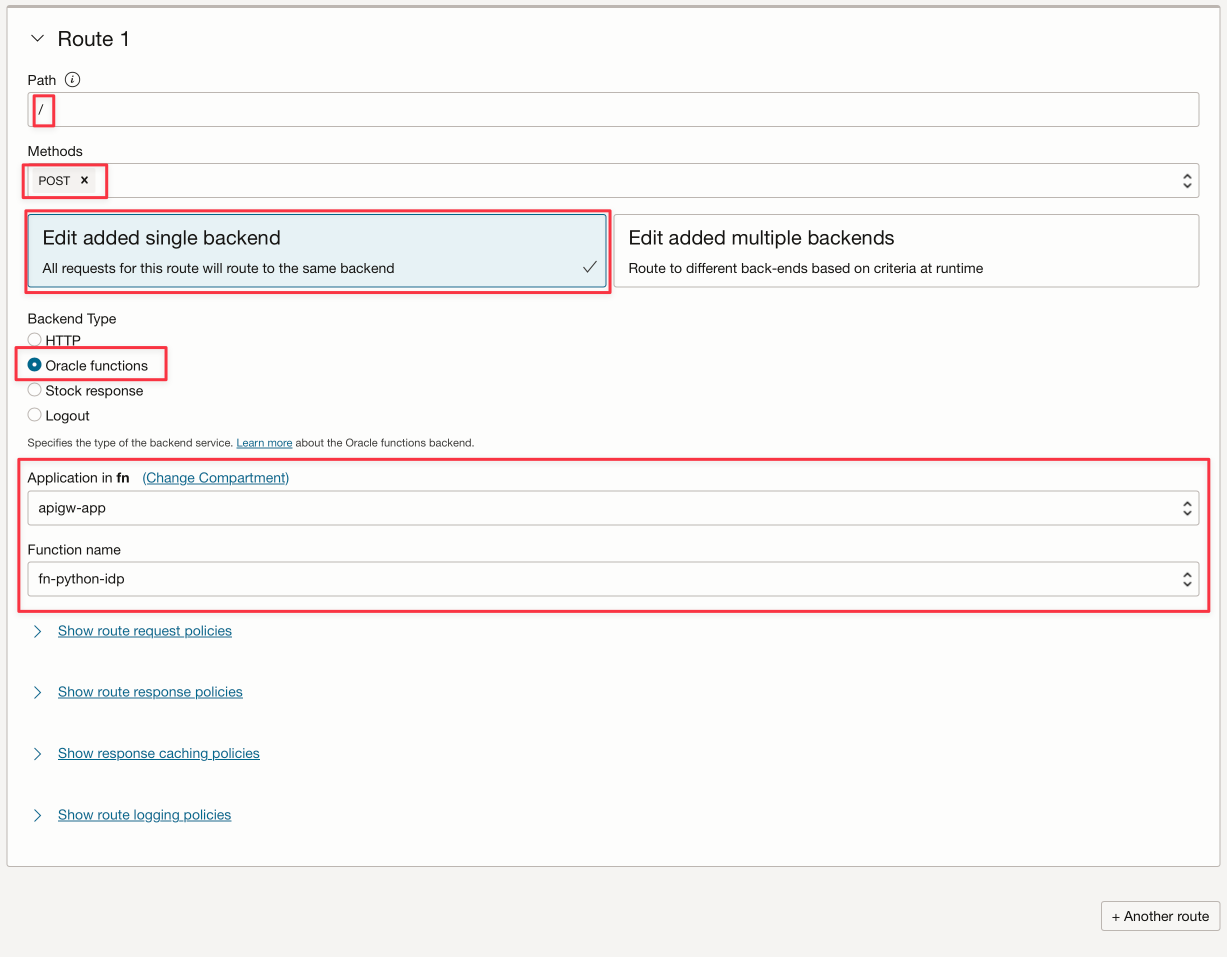
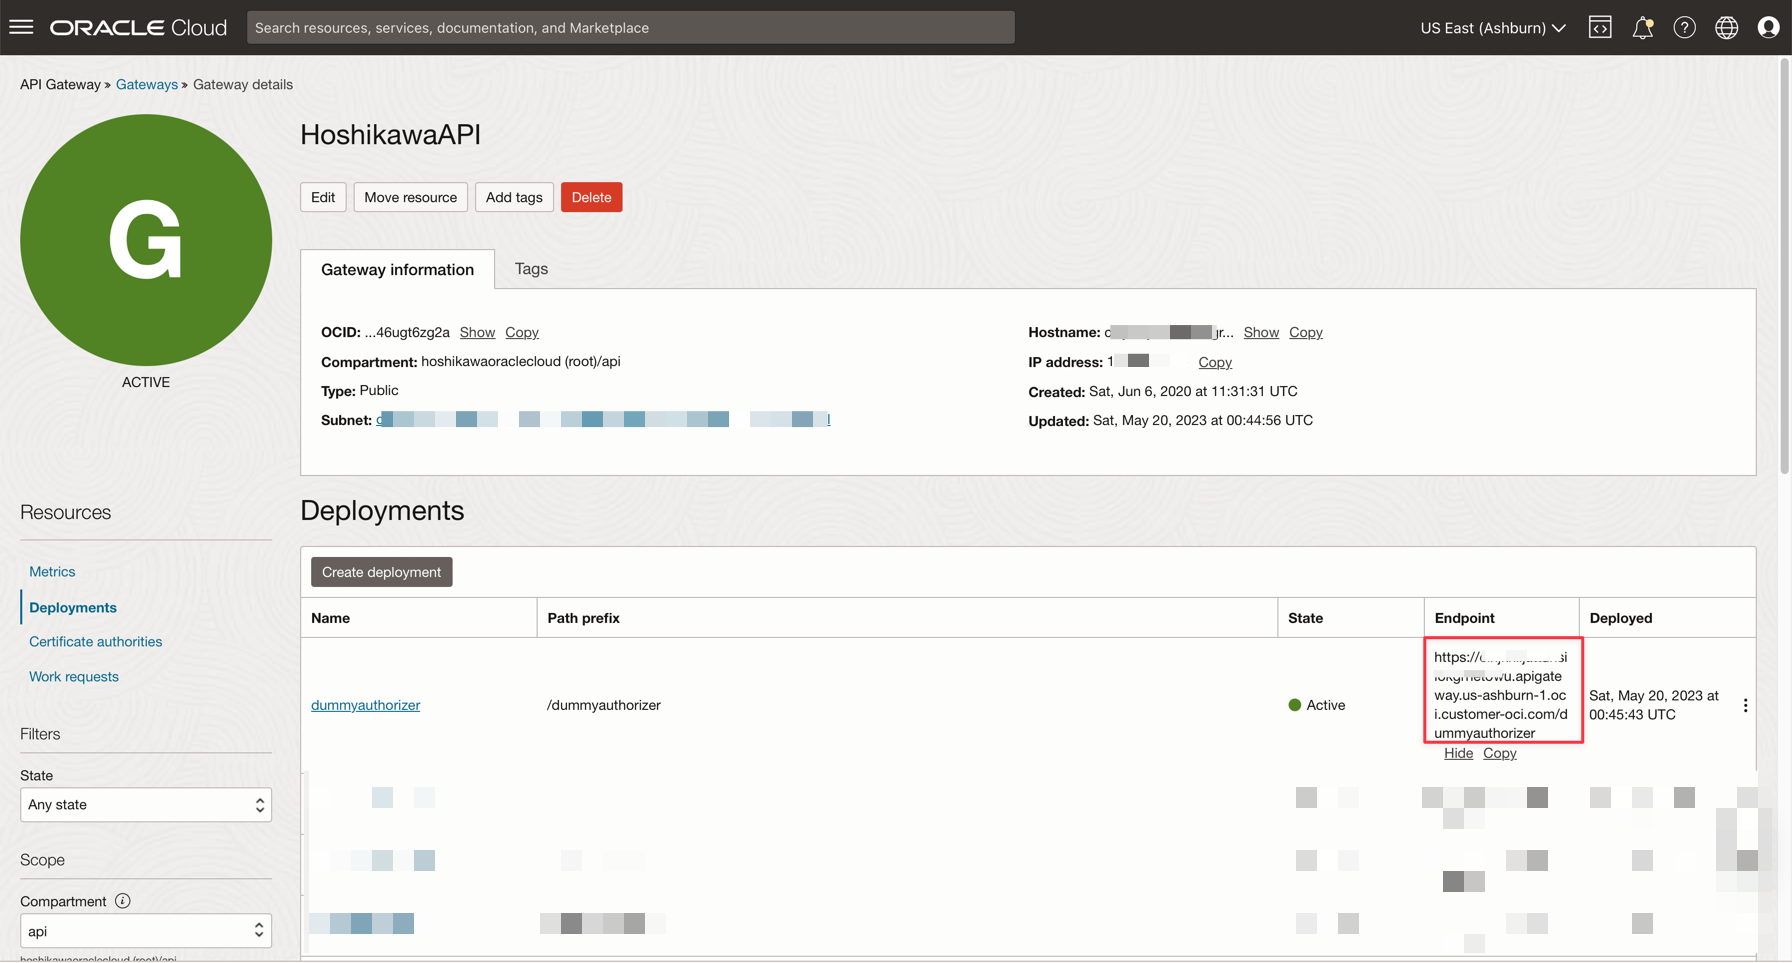
保存部署后,可以在此处获取 REST 端点。请记住,对象存储 REST API 服务的完整端点是此端点加上末尾的“/”(您之前声明了 / 作为您的路径)。
任务 4:测试 API 网关部署
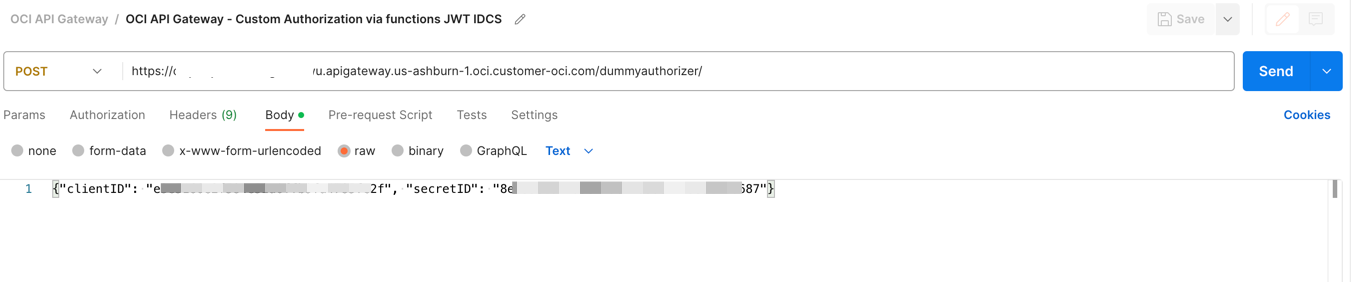
您可以使用 CURL 或 Postman 测试应用程序:
bash
curl --location 'https://xxxxxxxxxxxxxxxxxxx.apigateway.us-ashburn-1.oci.customer-oci.com/dummyauthorizer/' \
--header 'Content-Type: text/plain' \
--data '{"clientID": "e3exxxxxxxxxxxxxxxxxc2f", "secretID": "8exxxxxxx-fa5e-xxcf-8xxxc-xxxxxxxxxxx87", "objectID": "any-file.txt"}'
注意:此处使用的属性
objectID仅用于说明可观察性以及如何在 OCI 控制台的跟踪浏览器上显示状态。
如果一切正常,您可以看到成功代码 200:
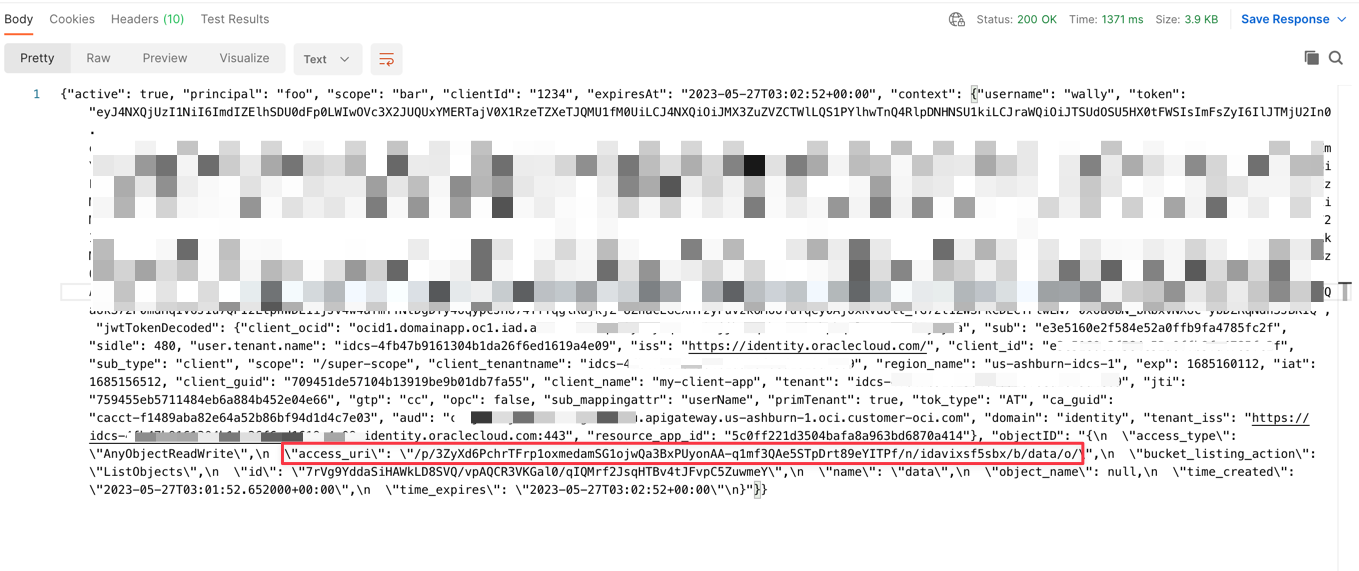
将生成预先验证的对象存储的 URL ,您可以在接下来的 60 秒内下载该文件。可以在此处按照以下示例下载文件:
https://objectstorage.us-ashburn-1.oraclecloud.com + [access_uri]

or

https://objectstorage.us-ashburn-1.oraclecloud.com/p/eL5C0R0luN_cTNn-vUF7_Dx_z2N4w7IXemKr5y61cSRxZZPRXcR2Yj1dNCaJBDK8/n/idavixsf5sbx/b/data/o/calico.yaml
您可以使用此命令行下载、上载或查看存储桶文件:
- TO UPLOAD A FILE: `curl https://objectstorage.us-ashburn-1.oraclecloud.com/p/HoPudIF45Bj6J5-Qy3J1D9dOplLuKtECRFhvOTkKAtBjJXkOTDx0Pt8gXbOOEoRx/n/idavixsf5sbx/b/data/o/ --upload-file func.py`

- TO DOWNLOAD A FILE: `curl https://objectstorage.us-ashburn-1.oraclecloud.com/p/3ZyXd6PchrTFrp1oxmedamSG1ojwQa3BxPUyonAA-q1mf3QAe5STpDrt89eYITPf/n/idavixsf5sbx/b/data/o/func.py`

- TO LIST BUCKET: `curl https://objectstorage.us-ashburn-1.oraclecloud.com/p/ODVRMB71kD0SHWuoY4ojVd93nmIiy8u0zrxA56T7FBaohAgA7k8KOLAIlhxjcveE/n/idavixsf5sbx/b/data/o/``
任务 5:配置可观察性仪表盘
基本上,每个 OCI 资源都可以在仪表盘中显示指标,并且这些资源的许多事件都会触发一个操作。在此演示中,您可以配置仪表盘来显示已在对象存储上写入或读取的文件数:
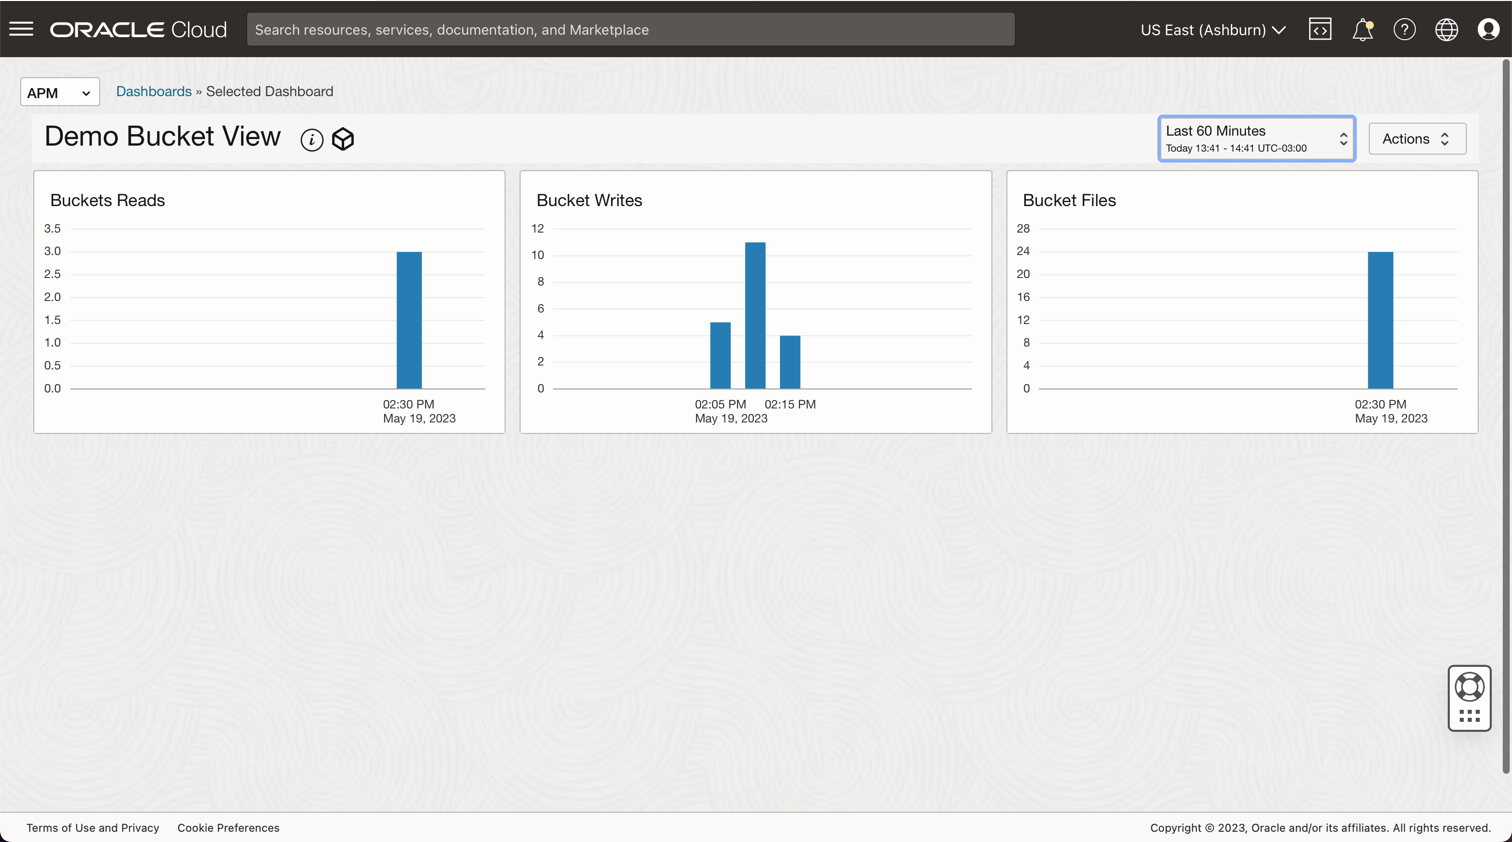
您可以按如下方式配置仪表盘查询:
- 存储桶文件 = ObjectCount[1d].groupby(resourceID).count()
- 存储桶写入数 = PutRequests[5m].grouping().count()
- 存储桶读取数 = GetRequests[5m].grouping().count()
相关链接
- 安装 OCI CLI
- 对象存储安全性
- 在 Oracle Cloud 中创建您的第一个 API 网关
- 函数 QuickStart 指南
- Oracle Functions 示例
- 将令牌传递给授权者功能以将验证和授权添加到 API 部署
- 在 Java 中为 Oracle Identity Cloud Service 创建 JWT 标记
- 对象存储度量
- 监视查询语言 (MQL) 参考
- 使用具有作用域和声明的 Oracle Identity Cloud Service/IAM JWT 通过 API 网关保护 API
- 使用 Oracle Cloud Infrastructure Data Flow 处理 Autonomous Database 和 Kafka 中的大文件
- 对象存储 - 限制和使用多部分上载
确认
- 作者 - Cristiano Hoshikawa(Oracle LAD A-Team 解决方案工程师)
更多学习资源
探索 docs.oracle.com/learn 上的其他实验室,或者访问 Oracle Learning YouTube 频道上的更多免费学习内容。此外,请访问 education.oracle.com/learning-explorer 成为 Oracle Learning Explorer。
有关产品文档,请访问 Oracle 帮助中心。
Use Oracle Cloud API Gateway to create a secure Object Storage download service with function authentication
F84019-01
July 2023
Copyright © 2023, Oracle and/or its affiliates.