注意:
- 本教程需要访问 Oracle Cloud。要注册免费账户,请参阅开始使用 Oracle Cloud Infrastructure 免费套餐。
- 它对 Oracle Cloud Infrastructure 身份证明、租户和区间使用示例值。完成实验室后,请使用特定于云环境的那些值替换这些值。
开始使用 Oracle Cloud Infrastructure 中的 Terraform
简介
Terraform 是由 Hashicorp 开发的基础设施即代码 (IaC) 工具,可用于使用 Terraform 语言语法 HCL 定义、预配和管理多个云提供商的基础设施。借助 Terraform,您可以自动化云基础设施的整个生命周期,以一致且可重现的方式轻松构建、更新和扩展资源。DevOps 团队广泛使用 Terraform 来管理云资源、提高基础设施效率、减少手动错误和版本控制云资源。
此教程可帮助您开始利用 IaC 部署和管理云基础设施的旅程。
Terraform 体系结构工作流

目标
- 在适用于 MacOS 和 Windows 的 Oracle Cloud Infrastructure (OCI) 中安装、配置和使用 Terraform。我们将介绍部署 OCI 网络和计算资源的示例。
先决条件
-
访问 OCI 租户。
-
具有访问 OCI 服务和资源权限的用户账户。
-
安装以下相关项。
-
对于 MacOS:安装 HomeBrew 程序包管理器和 Terraform。
-
转至 HomeBrew 站点。
-
在终端中复制以下安装命令。
Command: /bin/bash -c "$(curl -fsSL https://raw.githubusercontent.com/Homebrew/install/HEAD/install.sh)" -
输入 sudo 权限的密码,安装将遵循。


-
运行以下命令以完成 brew 安装。
Command 1: (echo; echo 'eval "$(/opt/homebrew/bin/brew shellenv)"') >> /Users/{username}/.zprofile Command 2: eval "$(/opt/homebrew/bin/brew shellenv)" -
运行
brew help命令检查安装是否成功。 -
运行以下命令以安装 terraform。
Command 1: brew tap hashicorp/tap
Command 2: brew install hashicorp/tap/terraform
-
运行
terraform -help命令检查安装是否成功。
-
-
在 Windows 中:
-
从此处下载 terraform
.exe文件:安装 Terraform ,根据用户 Windows OS 体系结构使用 x86 或 64。解压缩已下载的 terraform 文件并复制路径。示例路径:C:\Users\useradmin\Downloads\terraform_1.7.5_windows_amd64。 -
在 Windows 10 或 11 中搜索 System Environment Variables ,然后单击 Environment Variables(环境变量)进行编辑。
-
在系统变量下,选择路径并单击编辑。
-
在编辑环境变量下,选择新建并输入为 terraform 文件复制的路径。
-
针对要更新的新条目的所有 3 个窗口单击确定。

-
打开命令提示符,然后运行以下命令。
terraform version注:在 Windows 笔记本电脑或虚拟机 (virtual machine,VM) 中,如果出现 terraform 无法识别的错误,则需要重新启动或重新引导系统,以便新的系统环境变量集将反映在 Windows 计算机上。
-
任务 1:声明提供程序
Terraform 提供程序是指负责了解特定类型的基础设施或服务并与之交互的插件。提供商是 Terraform 与要管理的服务或平台的 API 之间的桥梁。通过提供商,Terraform 可以高效地与云平台通信和交互。换句话说,Terraform 提供程序就像一个翻译器,可帮助 Terraform 与不同的云服务或系统通信,从而创建、管理和删除虚拟机、数据库和网络等资源。
每个提供商通常对应于特定的云平台(例如 OCI、AWS、Azure、GCP)或基础设施服务(例如 Kubernetes、Docker)。
-
创建一个名为
terraform-beginners-demo的文件夹并在 VS Code 中打开它。 -
在 VS Code 中安装 HashiCorp Terraform 扩展。
-
在
terraform-beginners-demo文件夹下创建provider.tf和variables.tf文件。 -
在
provider.tf文件中复制以下代码。terraform { required_providers { oci = { source = "oracle/oci" version = "5.30.0" } } } provider "oci" { tenancy_ocid = var.tenancy_id user_ocid = var.user_id fingerprint = var.api_fingerprint private_key_path = var.api_private_key_path region = var.region }注意:我们已使用官方“Terraform 注册表”页中的代码。有关详细信息,请参阅 Oracle Cloud Infrastructure 提供程序和最新版本 (5.30.0) 。
任务 2:创建 OCI 配置
我们需要 OCI 用户 Oracle Cloud 标识符 (OCID)、租户 OCID、区间 OCID 来配置提供商。
-
登录到 OCI 控制台。
-
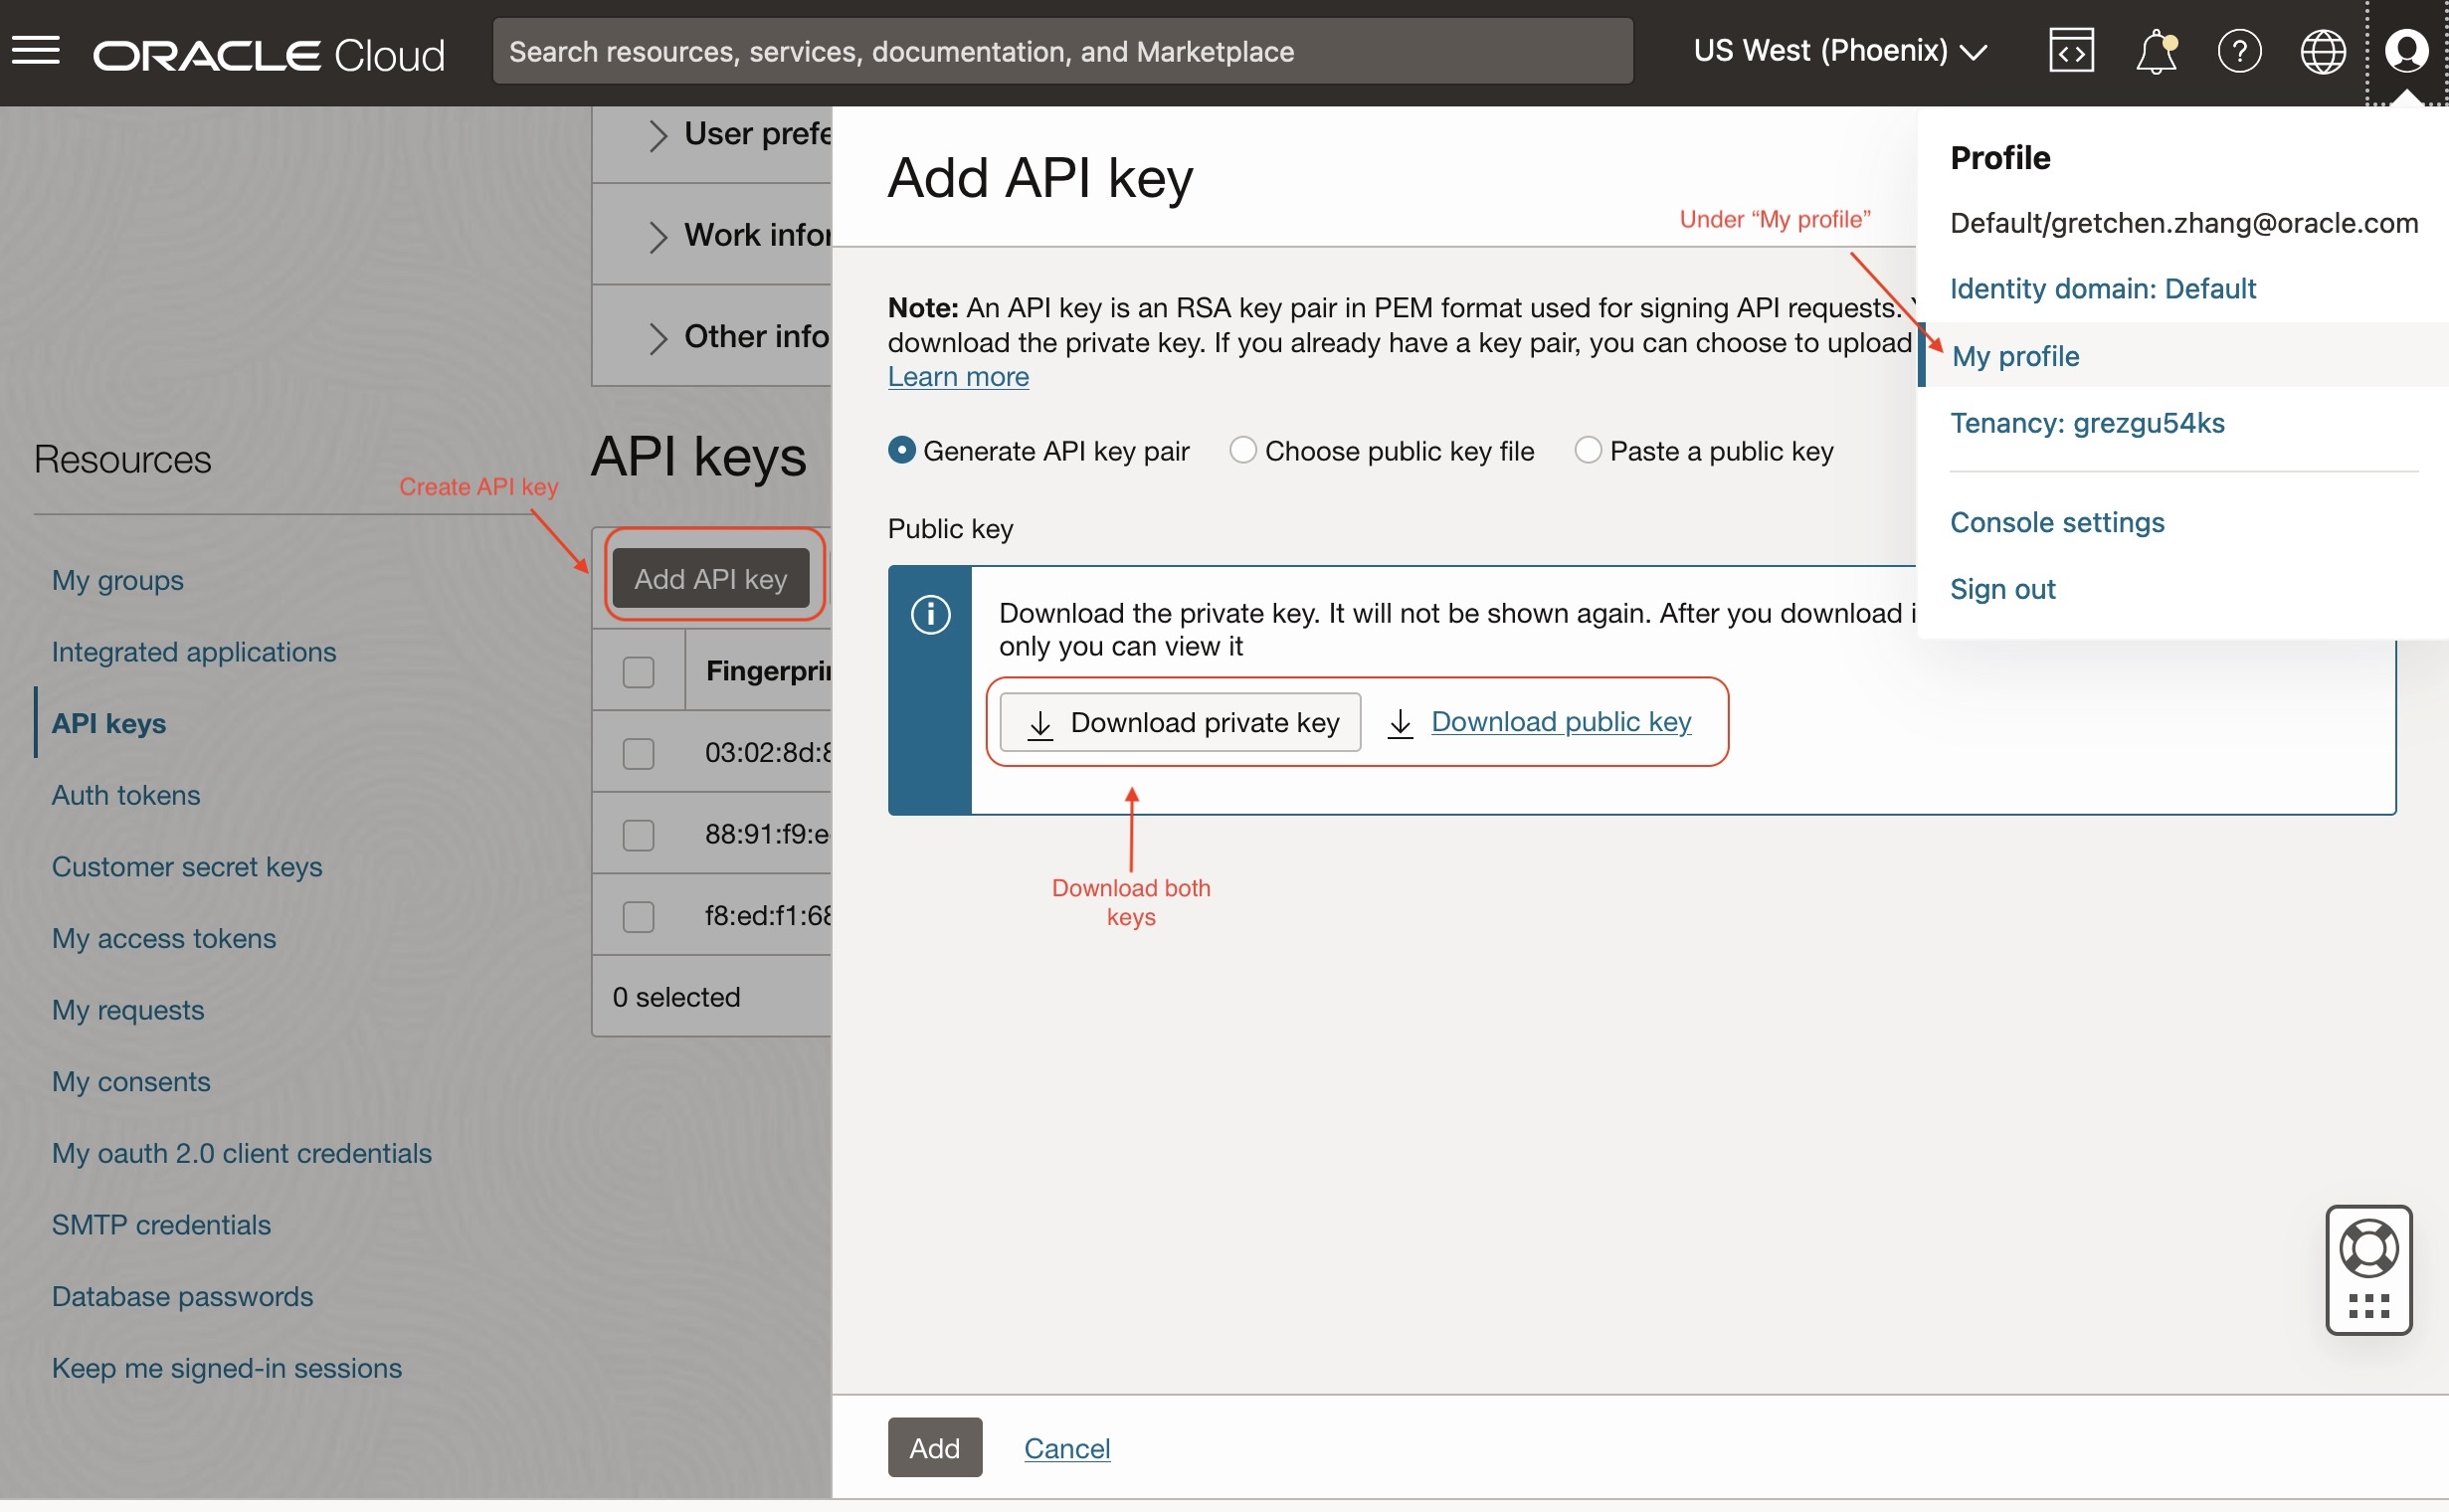
单击用户概要信息图标,然后选择我的概要信息。
-
要获取 API 密钥对,请执行以下步骤:
-
在资源下,选择 API 密钥并单击添加 API 密钥。
-
您可以生成新的 API 密钥对,也可以使用现有的公共密钥来生成 API 密钥对。选择生成 API 密钥对。务必下载私钥和公钥。
-
单击添加。此时将显示配置文件预览框。
-
复制配置文件预览中提供的详细信息并将其保存到某个位置。这将在
variables.tf文件中使用。应如下所示:
[DEFAULT] user=ocid1.user.oc1..xxxxxxxxxxx fingerprint=xx:xx:xx:xx:xx tenancy=ocid1.tenancy.oc1..xxxxxxxxx region=us-phoenix-1 # your region ID key_file=<path to your private keyfile> # TODO -
单击关闭。
或者
要获取 API 密钥对,请参阅在 OCI 控制台中生成 API 密钥配置。
-
任务 3:使用 OCI 身份证明配置 Terraform 环境
-
转到 VS 代码编辑器,在
terraform-beginners-demo文件夹下创建一个名为variables.tf的新文件,然后粘贴以下代码。variable "api_fingerprint" { description = "Fingerprint of OCI API private key for Tenancy" type = string } variable "api_private_key_path" { description = "Path to OCI API private key used for Tenancy" type = string } variable "tenancy_id" { description = "Tenancy ID where to create resources for Tenancy" type = string } variable "user_id" { description = "User ID that Terraform will use to create resources for Tenancy" type = string } variable "region" { description = "OCI region where resources will be created for Tenancy" type = string } -
创建另一个名为
terraform.tfvars的新文件并粘贴以下代码。使用任务 2.3 中的配置文件值定义variables.tf中的每个变量。# Identity and access parameters api_fingerprint = "REPLACE_BY_YOUR_FINGERPRINT" # Fingerprint of OCI API private key for Tenancy api_private_key_path = "~/.oci/oci_api_key.pem" # Path to OCI API private key used for Tenancy region = "us-phoenix-1" # OCI region where resources will be created for Tenancy tenancy_id = "REPLACE_YOUR_TENACY_OCID" # Tenancy ID where to create resources user_id = "REPLACE_BY_YOUR_USER_OCID" # Path to OCI API private key used for Tenancy注:在生产环境中,最好使用
terraform.tfvars文件定义 terraform 变量以提升安全性和可扩展性。有关更多信息,请参见 Variable Definitions (.tfvars) Files 。
任务 4:测试与 OCI 租户的 Terraform 连接
-
在
terraform-beginners-demo文件夹下创建一个名为data_source.tf的新文件,然后复制以下代码。data "oci_identity_availability_domains" "ad" { #Required compartment_id = var.tenancy_id } -
在
terraform-beginners-demo文件夹下创建新名为output.tf的文件,并复制以下代码。output "list_ads" { value = data.oci_identity_availability_domains.ad.availability_domains } -
在 VS Code 中打开新的终端,然后运行以下命令来运行 terraform 脚本。
Command 1: terraform init

Command 2: terraform plan #to view your deployments what is going to be created

Command 3: terraform apply #then type "yes" once prompted alternatively run "apply -auto-approve
现在,您应该可以在输出下查看可用性域及其关联的区间列表。

现在,您已成功将系统配置为在 Terraform 中的 OCI 租户中部署资源。您已传递变量,但未对租户进行任何更改。我们将介绍一些示例,以帮助您更好地了解使用 Terraform 添加、链接和销毁资源的过程。
任务 5:(示例)使用 Terraform 部署 OCI 计算实例
现在,我们将基于您在以前的任务中创建的内容来部署网络和计算资源。
-
创建一个名为
networking.tf的文件并复制以下代码。resource "oci_core_vcn" "test_vcn" { count = (var.create_new_vcn) ? 1 : 0 #Required compartment_id = var.compartment_id cidr_block = var.vcn_cidr_block display_name = var.vcn_display_name dns_label = var.vcn_dns_label }注:有关具有其他配置的 core-vcn 变量的更多信息,请参见 oci_core_vcn 。
-
编辑
variables.tf文件并添加以下变量。#VCN specific variables variable "create_new_vcn" { description = "Boolean variable to specify whether to create a new VCN or to reuse an existing one." type = bool } variable "compartment_id" { description = "OCI compartment where resources will be created" type = string } variable "vcn_cidr_block" { description = "The list of IPv4 CIDR blocks the VCN will use" type = string } variable "vcn_display_name" { description = "provide a descriptive name for the VCN - this is what you will see displayed in the OCI console" type = string } variable "vcn_dns_label" { description = "provide a descriptive alphanumeric name for the DNS - this is what you will see displayed in the OCI console" type = string } variable "vcn_id" { description = "provide your existing VCN OCID if create_new_vcn = false" type = string } variable "private_subnet_id" { description = "provide existing private subnet OCID" type = string } variable "public_subnet_id" { description = "provide existing public subnet OCID" type = string } -
在
terraform.tfvars中添加新变量,并根据租户配置定义每个变量。# VCN specific variables create_new_vcn = true # Set this to true if you want terraform to crearte the network for you, otherwise set it to false. compartment_id = "REPLACE_BY_YOUR_COMPARTMENT_OCID" # add your own compartment id where the vcn will be created vcn_cidr_block = "10.0.0.0/16" # The list of IPv4 CIDR blocks the VCN will use vcn_display_name = "terraform_vcn_example" # provide a descriptive name for the VCN - this is what you will see displayed in the OCI console vcn_dns_label = "terraformvcn" # provide a descriptive alphanumeric name for the DNS - this is what you will see displayed in the OCI console # Configure CIDR Blocks, Subnet(Public, Private) OCIDS for an existing VCN. # vcn_id = "REPLACE_BY_YOUR_VCN_OCID" #ADD WITH YOUR VCN OCID private_subnet_id = "REPLACE_BY_YOUR__PRIVATE_SUBNET_OCID" #ADD WITH YOUR PRIVATE SUBNET public_subnet_id = "REPLACE_BY_YOUR_PUBLIC_SUBNET__OCID" #AA WITH YOUR PUBLIC SUBNET注:如果您已有 VCN,请将
create_new_vcn设置为等于 false 并修改vcn_id、private_subnet_id和public_subnet_id变量。 -
为新 VCN 创建子网。
-
在
networking.tf文件中,添加以下代码以创建公共和专用子网。resource "oci_core_subnet" "private_subnet" { count = (var.create_new_vcn) ? 1 : 0 #Required cidr_block = var.private_subnet_cidr_block compartment_id = var.compartment_id vcn_id = oci_core_vcn.test_vcn.*.id[0] display_name = var.private_subnet_display_name prohibit_public_ip_on_vnic = var.private_subnet_prohibit_public_ip_on_vnic } resource "oci_core_subnet" "public_subnet" { count = (var.create_new_vcn) ? 1 : 0 #Required cidr_block = var.public_subnet_cidr_block compartment_id = var.compartment_id vcn_id = oci_core_vcn.test_vcn.*.id[0] display_name = var.public_subnet_display_name prohibit_public_ip_on_vnic = var.public_subnet_prohibit_public_ip_on_vnic route_table_id = oci_core_route_table.test_route_table.*.id[0] }注:有关具有其他配置的核心子网变量的更多信息,请参见 oci_core_subnet 。
-
通过复制以下代码,将新的子网变量添加到
variables.tf文件中。#Private subnet variables variable "private_subnet_cidr_block" { description = "OCI private subnet CIDR block range" type = string } variable "private_subnet_display_name" { description = "provide a descriptive name for the private subnet - this is what you will see displayed in the OCI console" type = string } variable "private_subnet_prohibit_public_ip_on_vnic" { description = "Allow public IP address to the VNIC" type = bool } #Public subnet variables variable "public_subnet_cidr_block" { description = "OCI public subnet CIDR block range" type = string } variable "public_subnet_display_name" { description = "provide a descriptive name for the public subnet - this is what you will see displayed in the OCI console" type = string } variable "public_subnet_prohibit_public_ip_on_vnic" { description = "Allow public IP address to the VNIC" type = bool } -
在
terrform.tfvars文件中声明新的子网变量。#Private subnet variables private_subnet_cidr_block = "10.0.1.0/24" # OCI private subnet CIDR block range private_subnet_display_name = "terraform_private_subnet_example" # provide a descriptive name for the private subnet - this is what you will see displayed in the OCI console private_subnet_prohibit_public_ip_on_vnic = false # Allow public IP address to the VNIC #Public subnet variables public_subnet_cidr_block = "10.0.2.0/24" # OCI public subnet CIDR block range public_subnet_display_name = "terraform_public_subnet_example" # provide a descriptive name for the public subnet - this is what you will see displayed in the OCI console public_subnet_prohibit_public_ip_on_vnic = false
-
-
在
networking.tf文件中添加以下代码以创建 Internet 网关。resource "oci_core_internet_gateway" "test_internet_gateway" { count = (var.create_new_vcn) ? 1 : 0 #Required compartment_id = var.compartment_id display_name = "INTERNET_GTWFOR_${var.vcn_display_name}" vcn_id = oci_core_vcn.test_vcn.*.id[0] #route_table_id = oci_core_route_table.test_route_table.id } -
在
networking.tf中为路由表添加以下代码以管理到 Internet 的流量。resource "oci_core_route_table" "test_route_table" { count = (var.create_new_vcn) ? 1 : 0 #Required compartment_id = var.compartment_id vcn_id = oci_core_vcn.test_vcn.*.id[0] route_rules { #Required network_entity_id = oci_core_internet_gateway.test_internet_gateway.*.id[0] description = "route rule internet access for ${var.vcn_display_name}" destination = "0.0.0.0/0" destination_type = "CIDR_BLOCK" } } -
创建与 VCN 关联的网络安全组 (NSG)。将以下代码复制到
networking.tf文件中。resource "oci_core_network_security_group" "test_nsg" { count = (var.create_new_vcn) ? 1 : 0 #Required compartment_id = var.compartment_id vcn_id = oci_core_vcn.test_vcn.*.id[0] display_name = "NETWORK_SECURITY_GROUP_${var.vcn_display_name}" freeform_tags = { "Lab" = "Terraofm 101 Guide" } } -
现在,我们将创建 2 个用于部署 Linux VM 和 Windows VM 的新文件
compute_linux.tf和compute_windows.tf。 -
在
compute_linux.tf中,复制以下代码以创建具有 Linux OS 的计算实例。resource "oci_core_instance" "test_linux_instance" { #Required count = var.create_linux_instance ? 1 : 0 availability_domain = data.oci_identity_availability_domains.ad.availability_domains[0].name compartment_id = var.compartment_id create_vnic_details { assign_public_ip = "true" display_name = var.instance_display_name nsg_ids = [] skip_source_dest_check = "false" subnet_id = var.create_new_vcn ? oci_core_subnet.public_subnet.*.id[0] : var.public_subnet_id } display_name = "${var.instance_display_name}_linux" metadata = { ssh_authorized_keys = "${file(var.public_ssh_key)}" } shape = var.instance_shape shape_config { memory_in_gbs = var.instance_flex_memory_in_gbs ocpus = var.instance_flex_ocpus } launch_options { boot_volume_type = "PARAVIRTUALIZED" firmware = "UEFI_64" is_consistent_volume_naming_enabled = "true" is_pv_encryption_in_transit_enabled = "true" network_type = "PARAVIRTUALIZED" remote_data_volume_type = "PARAVIRTUALIZED" } source_details { #Required source_id = var.linux_image_ocid source_type = "image" } preserve_boot_volume = false } -
在
compute_windows.tf中,复制以下代码。resource "oci_core_instance" "test_windows_instance" { #Required count = var.create_windows_instance ? 1 : 0 availability_domain = data.oci_identity_availability_domains.ad.availability_domains[0].name compartment_id = var.compartment_id create_vnic_details { assign_public_ip = "true" display_name = var.instance_display_name nsg_ids = [] skip_source_dest_check = "false" subnet_id = var.create_new_vcn ? oci_core_subnet.public_subnet.*.id[0] : var.public_subnet_id } display_name = "${var.instance_display_name}_windows" metadata = { } shape = var.instance_shape shape_config { memory_in_gbs = var.instance_flex_memory_in_gbs ocpus = var.instance_flex_ocpus } launch_options { boot_volume_type = "PARAVIRTUALIZED" firmware = "UEFI_64" is_pv_encryption_in_transit_enabled = "true" network_type = "PARAVIRTUALIZED" remote_data_volume_type = "PARAVIRTUALIZED" } source_details { #Required source_id = var.windows_image_ocid source_type = "image" } preserve_boot_volume = false } -
使用
compute_linux和compute_windows中的新变量更新variables.tf。#Compute variables variable "instance_shape" { description = "value" type = string } variable "instance_flex_memory_in_gbs" { description = "(Updatable) The total amount of memory available to the instance, in gigabytes." type = number } variable "instance_flex_ocpus" { description = "(Updatable) The total number of OCPUs available to the instance." type = number } variable "instance_create_vnic_details_assign_public_ip" { description = "To allow compute connectivity from internet" type = bool } variable "instance_display_name" { description = "provide a descriptive name for the compute instance - this is what you will see displayed in the OCI console" type = string } variable "public_ssh_key" { description = "Add your public ssh key - for provisioning your compute instance" type = string } variable "private_ssh_key" { description = "Add your private ssh key - for accessing your compute instance after creation" type = string } variable "create_linux_instance" { description = "Boolean variable to specify whether to provision a Linux instances" type = bool } variable "create_windows_instance" { description = "Boolean variable to specify whether to provision a Windows instances" type = bool } variable "windows_image_ocid" { description = "OCID of the Windows image to use" type = string } variable "linux_image_ocid" { description = "OCID of the Linux image to use" type = string } -
在
terraform.tfvars中添加和定义新变量。#Compute variables - Make sure to select a compatible shape (e.g.: VM.Standard.E4.Flex) instance_shape = "VM.Standard.E5.Flex" # Shape of the compute instance instance_flex_memory_in_gbs = 16 # (Updatable) The total amount of memory available to the instance, in gigabytes. instance_flex_ocpus = 1 # (Updatable) The total number of OCPUs available to the instance. instance_create_vnic_details_assign_public_ip = true # To allow compute connectivity from internet instance_display_name = "terraform_compute_example" # provide a descriptive name for the compute instance - this is what you will see displayed in the OCI console #SSH keys https://docs.oracle.com/en/learn/generate_ssh_keys/index.html#introduction public_ssh_key = "~/cloudshellkey.pub" # Add your public ssh key private_ssh_key = "~/cloudshellkey" # Add your private ssh key create_linux_instance = true # if set to true a test linux instance will be created and false no linux instance will be deployed. create_windows_instance = true # # If set to true a test windows instance will be created and false no windows instance will be deployed. linux_image_ocid = "REPLACE_BY_YOUR_REGION_LINUX_IMAGE_OCID" # OCID for chosen image (Oracle Linux 9 example) specific to the test region (us-phoenix-1) windows_image_ocid = "REPLACE_BY_YOUR_REGION_WINDOWS_IMAGE_OCID" # OCID for chosen image (Windows example) specific to each region (us-phoenix-1) # Here are other image OCIDs for popular region (Ashburn, San Jose, Toronto) # Ashburn # Oracle linux image_id = ocid1.image.oc1.iad.aaaaaaaau7uaok7n5qd4nivgiyfatfdddhltmxddtfbyqg3bsg3fxk6z6aqq # Windows image_id = ocid1.image.oc1.iad.aaaaaaaamaaiupezxbrw6fji5ndk3jdujwhjuexcafheqjqf45g6nzyblz6a #San Jose # Oracle linux image_id = ocid1.image.oc1.us-sanjose-1.aaaaaaaabjixxpfouczgpcnpvgny5pcqtgjgi3nincszbfdkd2xr4jvzahua # Windows image_id = ocid1.image.oc1.us-sanjose-1.aaaaaaaatmjlzoqw5gzohjvygzcm5rpugomxyfho5xi6subjchoxnxo4wcfa #Toronto # Oracle linux image_id = ocid1.image.oc1.ca-toronto-1.aaaaaaaai6uhjrtajuuitl5hara5brnvwqvq4aebenmnbehv2cila75xbvzq # Windows image_id = ocid1.image.oc1.ca-toronto-1.aaaaaaaaeged3obrrmmwvyruvknszy23btvb2fqu7vn3c5azeecbj2prm64q # for other image OCIDs: https://docs.oracle.com/en-us/iaas/images/注:映像 OCID 特定于每个区域。上述代码中存在常用区域的映像 OCID,您可以在此处找到所有其他区域的映像 OCID:所有映像系列。
-
在
output.tf中,复制以下代码。这将输出终端中创建的资源。# Regions output "linux_instance_region" { value = oci_core_instance.test_linux_instance.*.region } output "windows_instance_region" { value = oci_core_instance.test_windows_instance.*.region } # Networking output "network_vcn_name" { value = oci_core_vcn.test_vcn.*.display_name } # Compute: Linux Test Instance output "output_linux_instance_display_name" { value = oci_core_instance.test_linux_instance.*.display_name } output "output_linux_instance_public_ip" { value = oci_core_instance.test_linux_instance.*.public_ip } output "output_linux_instance_state" { value = oci_core_instance.test_linux_instance.*.state } # Compute: Windows Test Instance output "output_windows_instance_display_name" { value = oci_core_instance.test_windows_instance.*.display_name } output "output_windows_instance_public_ip" { value = oci_core_instance.test_windows_instance.*.public_ip } output "output_windows_instance_state" { value = oci_core_instance.test_windows_instance.*.state } -
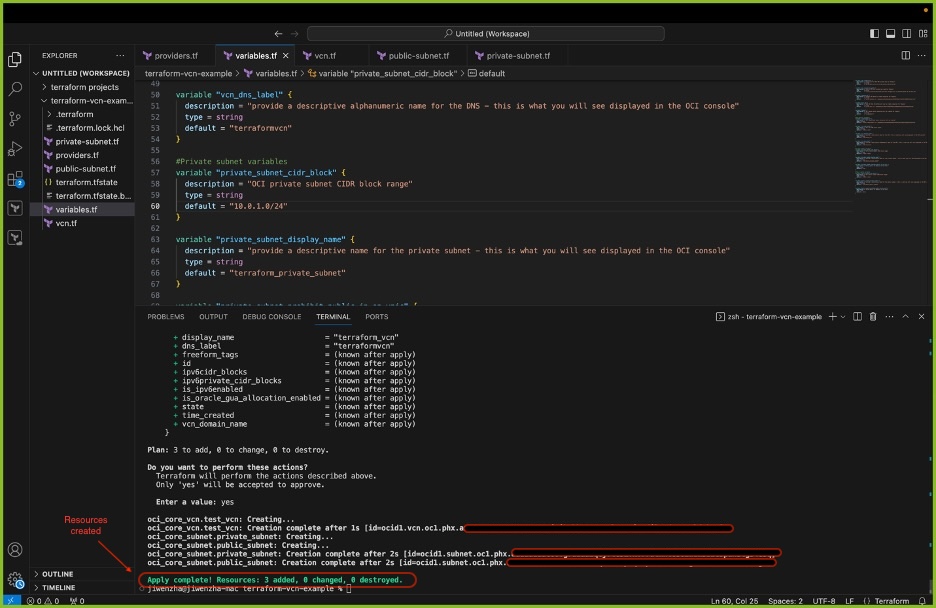
为
terraform-example打开新的终端,然后运行以下命令。Command 1: terraform init Command 2: terraform plan Commnad 3: terraform apply (and then respond "yes") OR terraform apply -auto-approve您应该会看到以下输出,并且应创建 VCN、专用子网和公共子网、路由表、互联网网关、nsg、Linux VM 和 Windows VM。
-
资源现在已使用 Terraform 部署。在 OCI 租户中验证资源创建后,使用以下命令销毁所有资源。
Command: terraform destroy
后续步骤
您现在已经构建了与 Terraform 的连接,并且学会了一个简单的示例来部署、更新和销毁资源。要继续在 OCI 中实施 Terraform 旅程,并为自己设置 OCI Architect Professional Certification ,请查看 Accelerate Oracle Cloud Infrastructure Architect Professional Certification with Terraform 。
我们欢迎读者为改进和扩展本教程做出的贡献。在为未来的 Terraform 学习者改进此资源方面,您的贡献备受推崇。
相关链接
确认
- Authors — Gretchen Zhang(云工程师)、Akarsha I(员工云工程师)、Mahamat Guiagoussou(首席云架构师)
更多学习资源
浏览 docs.oracle.com/learn 上的其他实验室,或者访问 Oracle Learning YouTube 渠道上的更多免费学习内容。此外,请访问 education.oracle.com/learning-explorer 成为 Oracle Learning Explorer。
有关产品文档,请访问 Oracle 帮助中心。
Get Started with Terraform in Oracle Cloud Infrastructure
G18830-01
November 2024