注意:
- 此教程需要访问 Oracle Cloud。要注册免费账户,请参阅开始使用 Oracle Cloud Infrastructure Free Tier 。
- 它使用 Oracle Cloud Infrastructure 身份证明、租户和区间示例值。完成实验室时,请将这些值替换为特定于您的云环境的值。
使用 Oracle Cloud Infrastructure 发布可从 Internet 访问的 Web 服务器,网址为 IPv6
简介
在本教程中,我们将解释如何在 Oracle Cloud Infrastructure (OCI) 中创建 Web 服务器(OCI 实例),并将通过 Internet 访问此 Web 服务器。我们不仅要使此 Web 服务器从公共 IPv4 地址进行访问,而且还可以通过完全配置的 DNS 记录 (FQDN) 从公共 IPv6 地址进行访问。

注:本教程中使用的域已创建并配置为仅用于测试。

目标
-
使用可通过 IPv6 访问的 OCI 实例创建网站。我们还解释了如何创建和配置所有其他先决条件,以使网站最终可用。作为奖励,我们还解释了 NGINX webserver 是如何安装的,以及 PHP 是如何集成的。最后,我们将提供一个自定义 PHP 网站或脚本,可用于验证与 Web 服务器的 IPv4 或 IPv6 连接以及您是否使用 HTTP 或 HTTPS 进行连接。
- 任务 1:在启用 IPv6 的情况下创建新 VCN。
- 任务 2:创建启用了 IPv6 的新子网。
- 任务 3:在启用 IPv6 的情况下创建新实例。
- 任务 4:创建新的 Internet 网关并配置路由。
- 任务 5:在默认安全列表中打开 HTTP 和 HTTPS。
- 任务 6:在此实例上安装 Web 服务器。
- 任务 7:配置 DNS 记录。
- 任务 8:使用 NGINX 和 PHP 创建自定义网站。
- 任务 9:从 Internet 测试 Web 服务器。
任务 1:在启用 IPv6 的情况下创建新 VCN
-
打开汉堡菜单,然后单击虚拟云网络。

- 确保在菜单中选择虚拟云网络。
- 选择要使用的区间。如果尚未设置区间,请使用根区间。
- 单击创建 VCN 。

-
在 Create a Virtual Cloud Networks 中,输入以下信息。
- 输入 VCN 名称。
- 再次选择区间(如果尚未预填充)。
- 选择要在此 VCN 中使用的 IPv4 CIDR。在本教程中,我们使用了 /16 CIDR,因为 IPv4 子网(通常为 /24)将从此 CIDR 时钟中雕刻出来。
- 向下滚动。

- 对于 IPv6,我们将分配一个 Oracle 分配的前缀。选择分配 Oracle 分配的 /56 前缀。
- 单击创建 VCN 。

现在,我们使用新的 IPv4 和 IPv6 网络空间创建了一个新的 VCN,可以使用这些网络空间来切分 IPv4 和 IPv6 子网。
任务 2:在启用 IPv6 的情况下创建新子网
-
单击创建子网。

-
在子网中,输入以下信息。
- 输入子网的名称。
- 选择此子网需要所在的区间(如果尚未预填充)。
- 对于子网类型,我们现在选择区域。
- 输入 IPv4 子网,该子网将从我们在 VCN 中分配的 CIDR 块中切除。确保新的 /24 CIDR 块位于 VCN 中确定的 /16 内。
- 向下滚动。

- 对于 IPv6,我们将分配一个 Oracle 分配的前缀。选择分配 Oracle 分配的 /64 前缀。
- 选择新的 HEX 小数以完成 Oracle 分配的前缀。
- 选择 VCN 的默认路由表。
- 将子网设为公共,以便我们根据需要获得公共 IP 地址,从而使 Web 服务器可以从 Internet 访问。
- 向下滚动。

- 选择 VCN 的默认 DHCP。
- 选择 VCN 的默认安全列表。
- 单击创建子网。

-
请注意,新创建的子网的状态为预配。

几分钟后,新子网的状态将变为可用。

现在,该子网已准备好用于 IPv4 和 IPv6 地址。
任务 3:在启用 IPv6 的情况下创建新实例
-
打开 OCI 控制台。
- 单击左上角的汉堡菜单。
- 单击固定部分中的实例。

-
单击创建实例。

-
在创建计算实例中,输入以下信息。
- 输入实例的名称。
- 选择实例需要所在的区间。
- 选择要在其中放置此实例的可用性域。在本教程中,作为荷兰西北部区域,我们只有一个可用性域。
- 向下滚动。

保留所有默认值并向下滚动。

- 在 Primary network(主网络)中,选择 Select existing virtual cloud network(选择现有虚拟云网络)。
- 选择在任务 1 中创建的 VCN。
- 对于子网,选择选择现有子网。
- 选择在任务 2 中创建的子网。
- 向下滚动。

- 专用 IPv4 地址:选择自动分配专用 IPv4 地址。
- IPv6 地址:选择从子网前缀分配 IPv6 地址,该前缀是在任务 2 中创建子网期间配置的。
- IPv6 地址分配:选择从前缀中自动分配专用 IPv6 地址。
- 向下滚动。

- 为了访问和管理此 Linux 实例,我们需要使用 SSH 密钥。对于本教程,我们将让 OCI 生成新的 SSH 密钥对。
- 下载本地计算机上的私钥和公钥,以便我们可以在创建后使用这些密钥访问和管理此 Linux 实例。

-
单击创建创建实例。

- 在创建期间,实例的状态将为 PROVISIONING 。
- 请注意,尚无可用的 IP 地址详细信息。

- 实例完全创建并准备就绪后,状态将设置为正在运行。
- 请注意,IP 地址详细信息现在可用。

下一个逻辑任务是使用 SSH 访问实例,以便我们可以开始安装和配置 Web 服务器。尝试使用公共 IPv4 地址和私有密钥连接到 Web 服务器时,无法连接,因为在任务 1 中创建的 VCN 没有 Internet 网关,现在我们需要先在 VCN 中创建该 Internet 网关,再配置路由。

任务 4:创建新的 Internet 网关并配置路由
要允许从 Internet 访问新实例 (webserver),首先使用 SSH 并最终转换为 HTTP,我们必须建立 Internet 网关。
-
打开 OCI 控制台。
- 转至虚拟云网络。
- 选择在任务 1 中创建的 VCN。

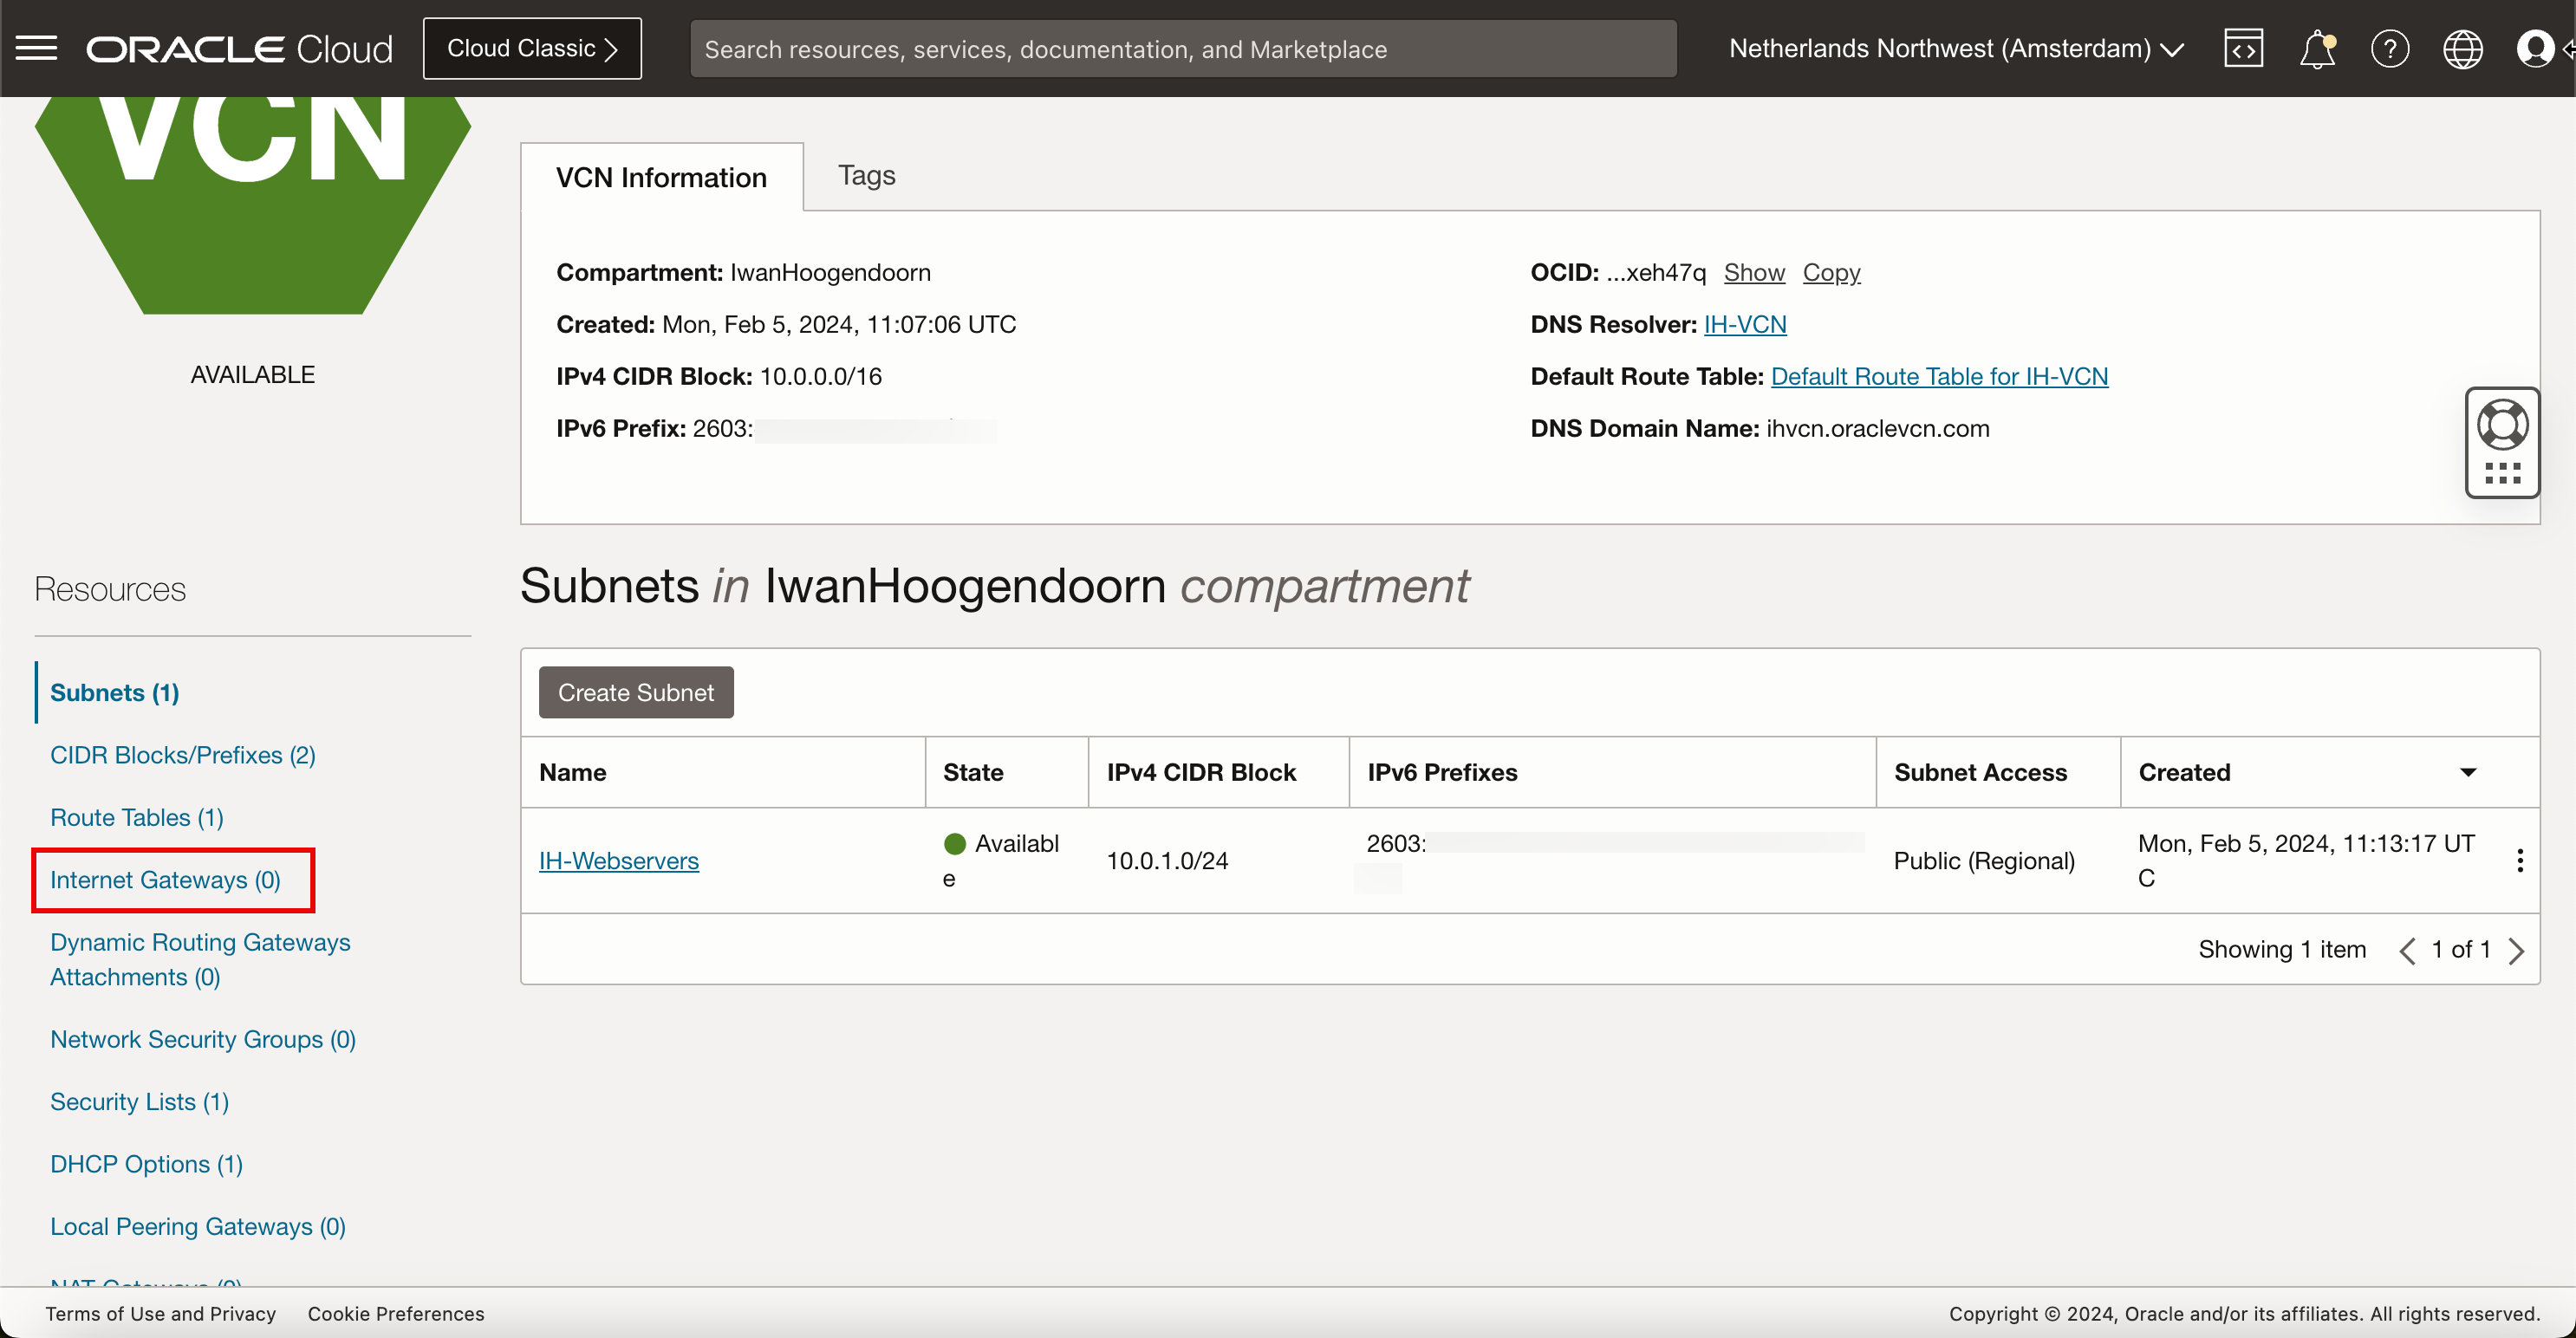
-
在 VCN 详细信息页面中,单击互联网网关。

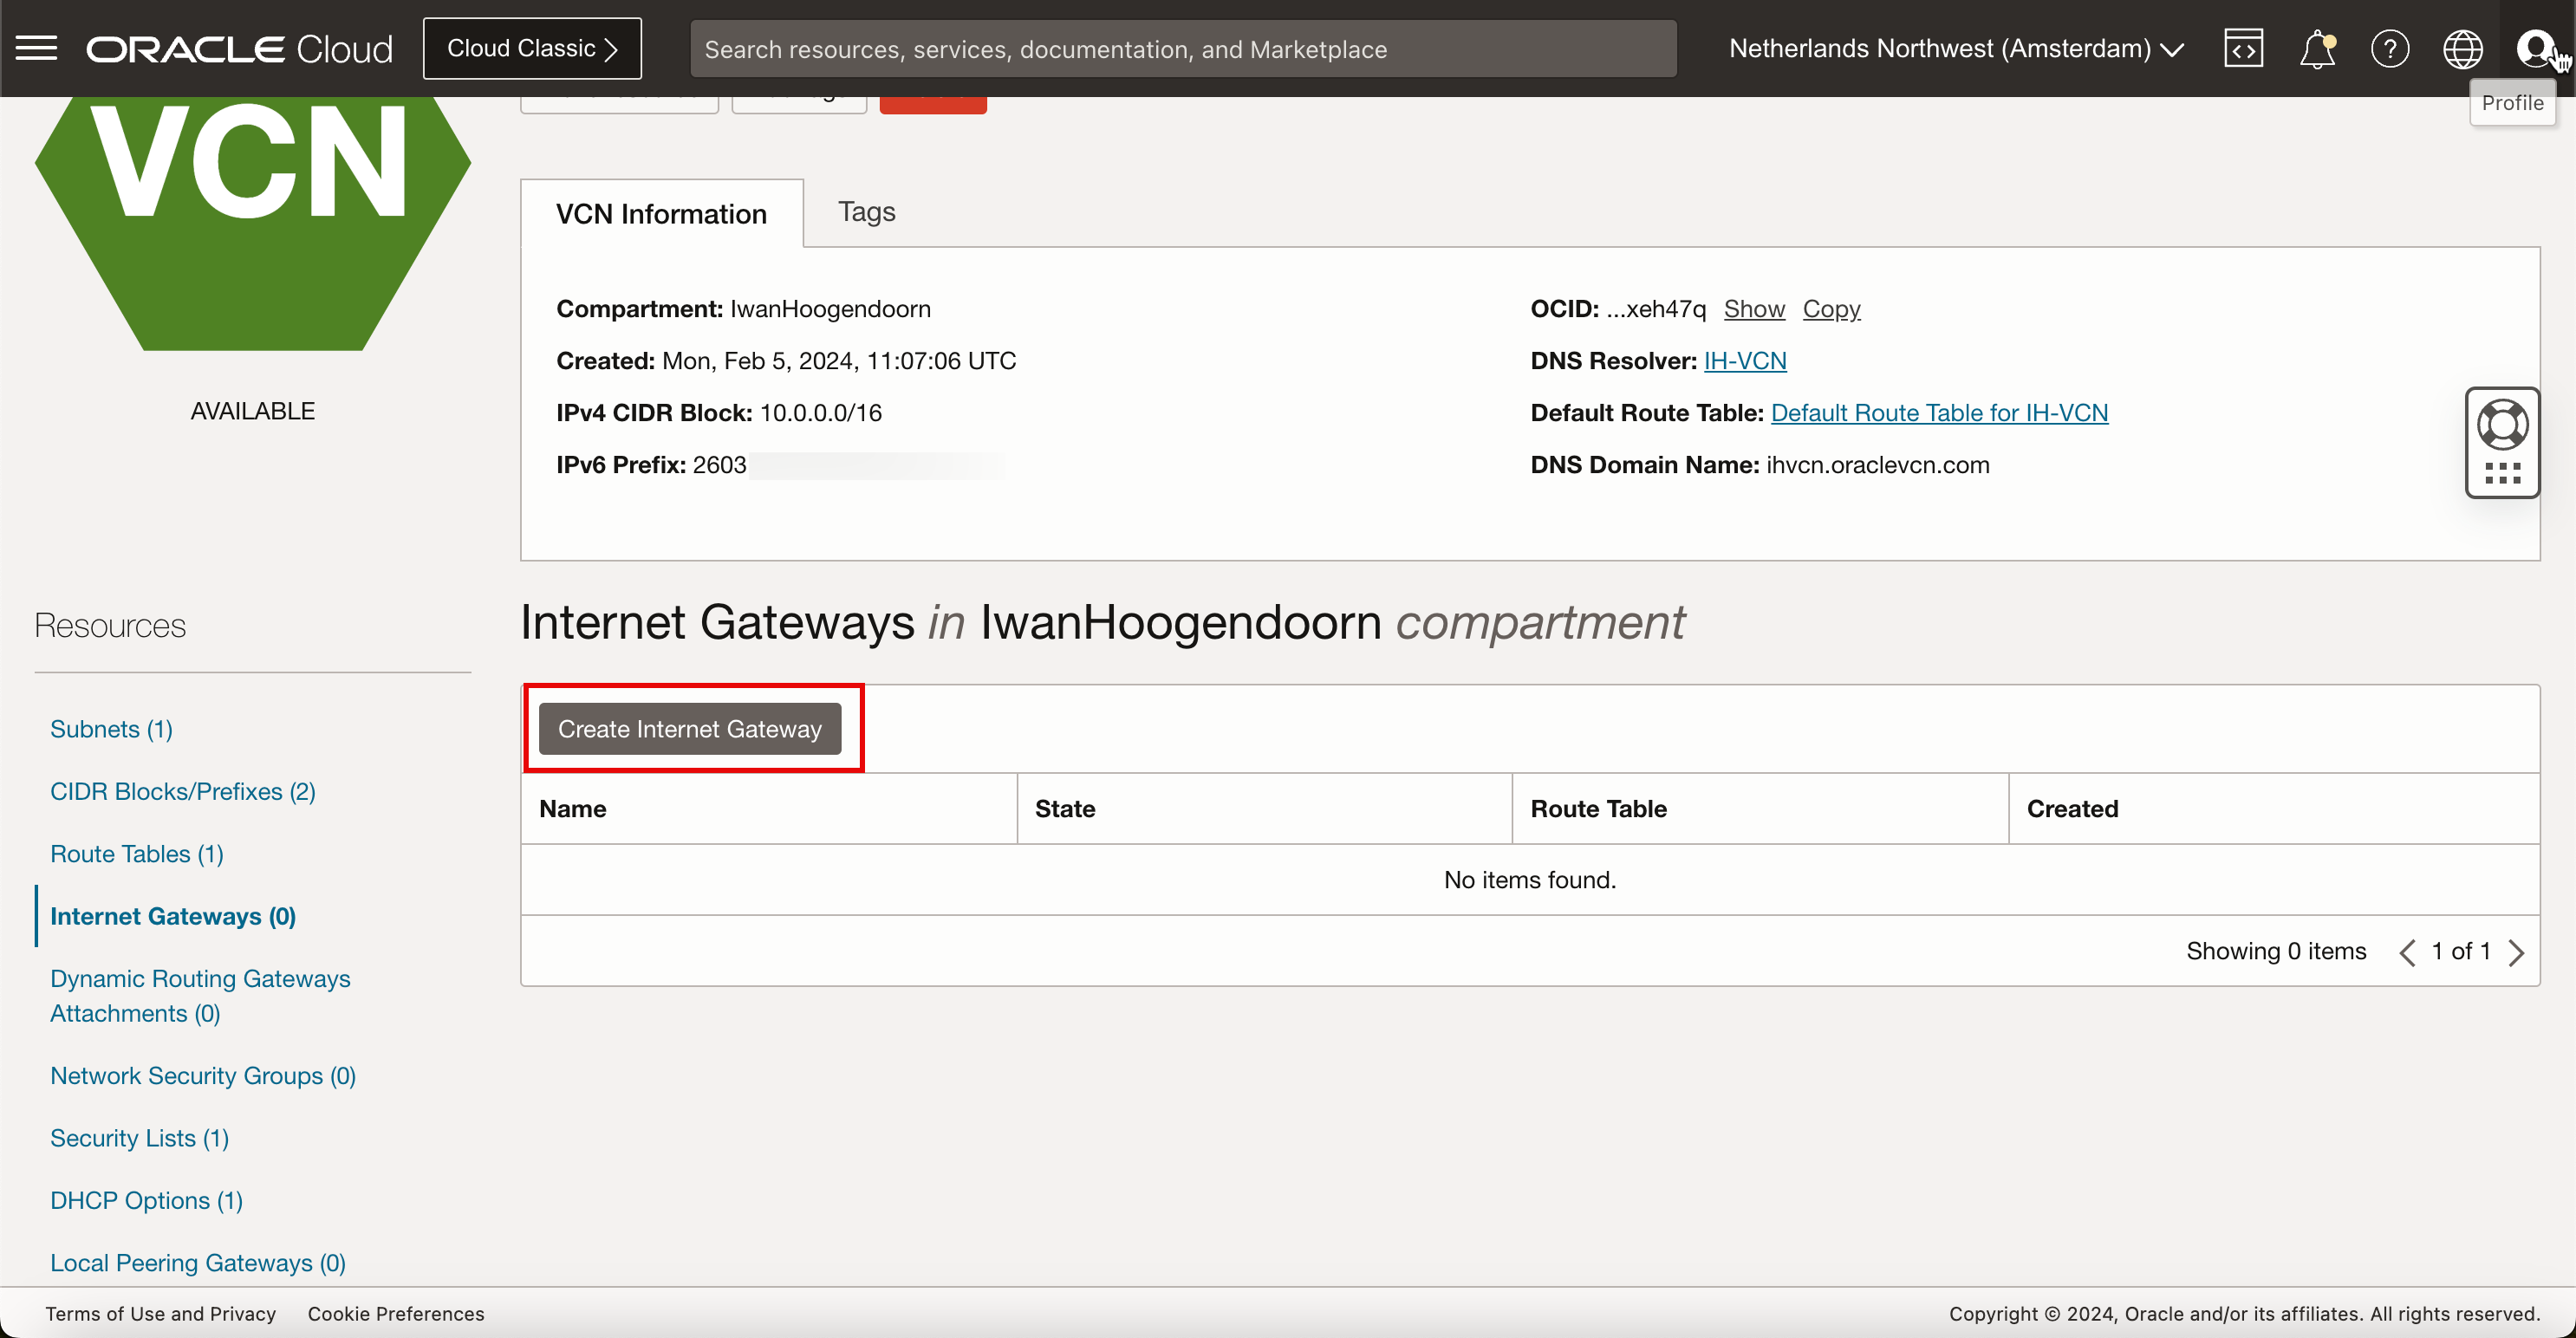
-
单击创建 Internet 网关。

-
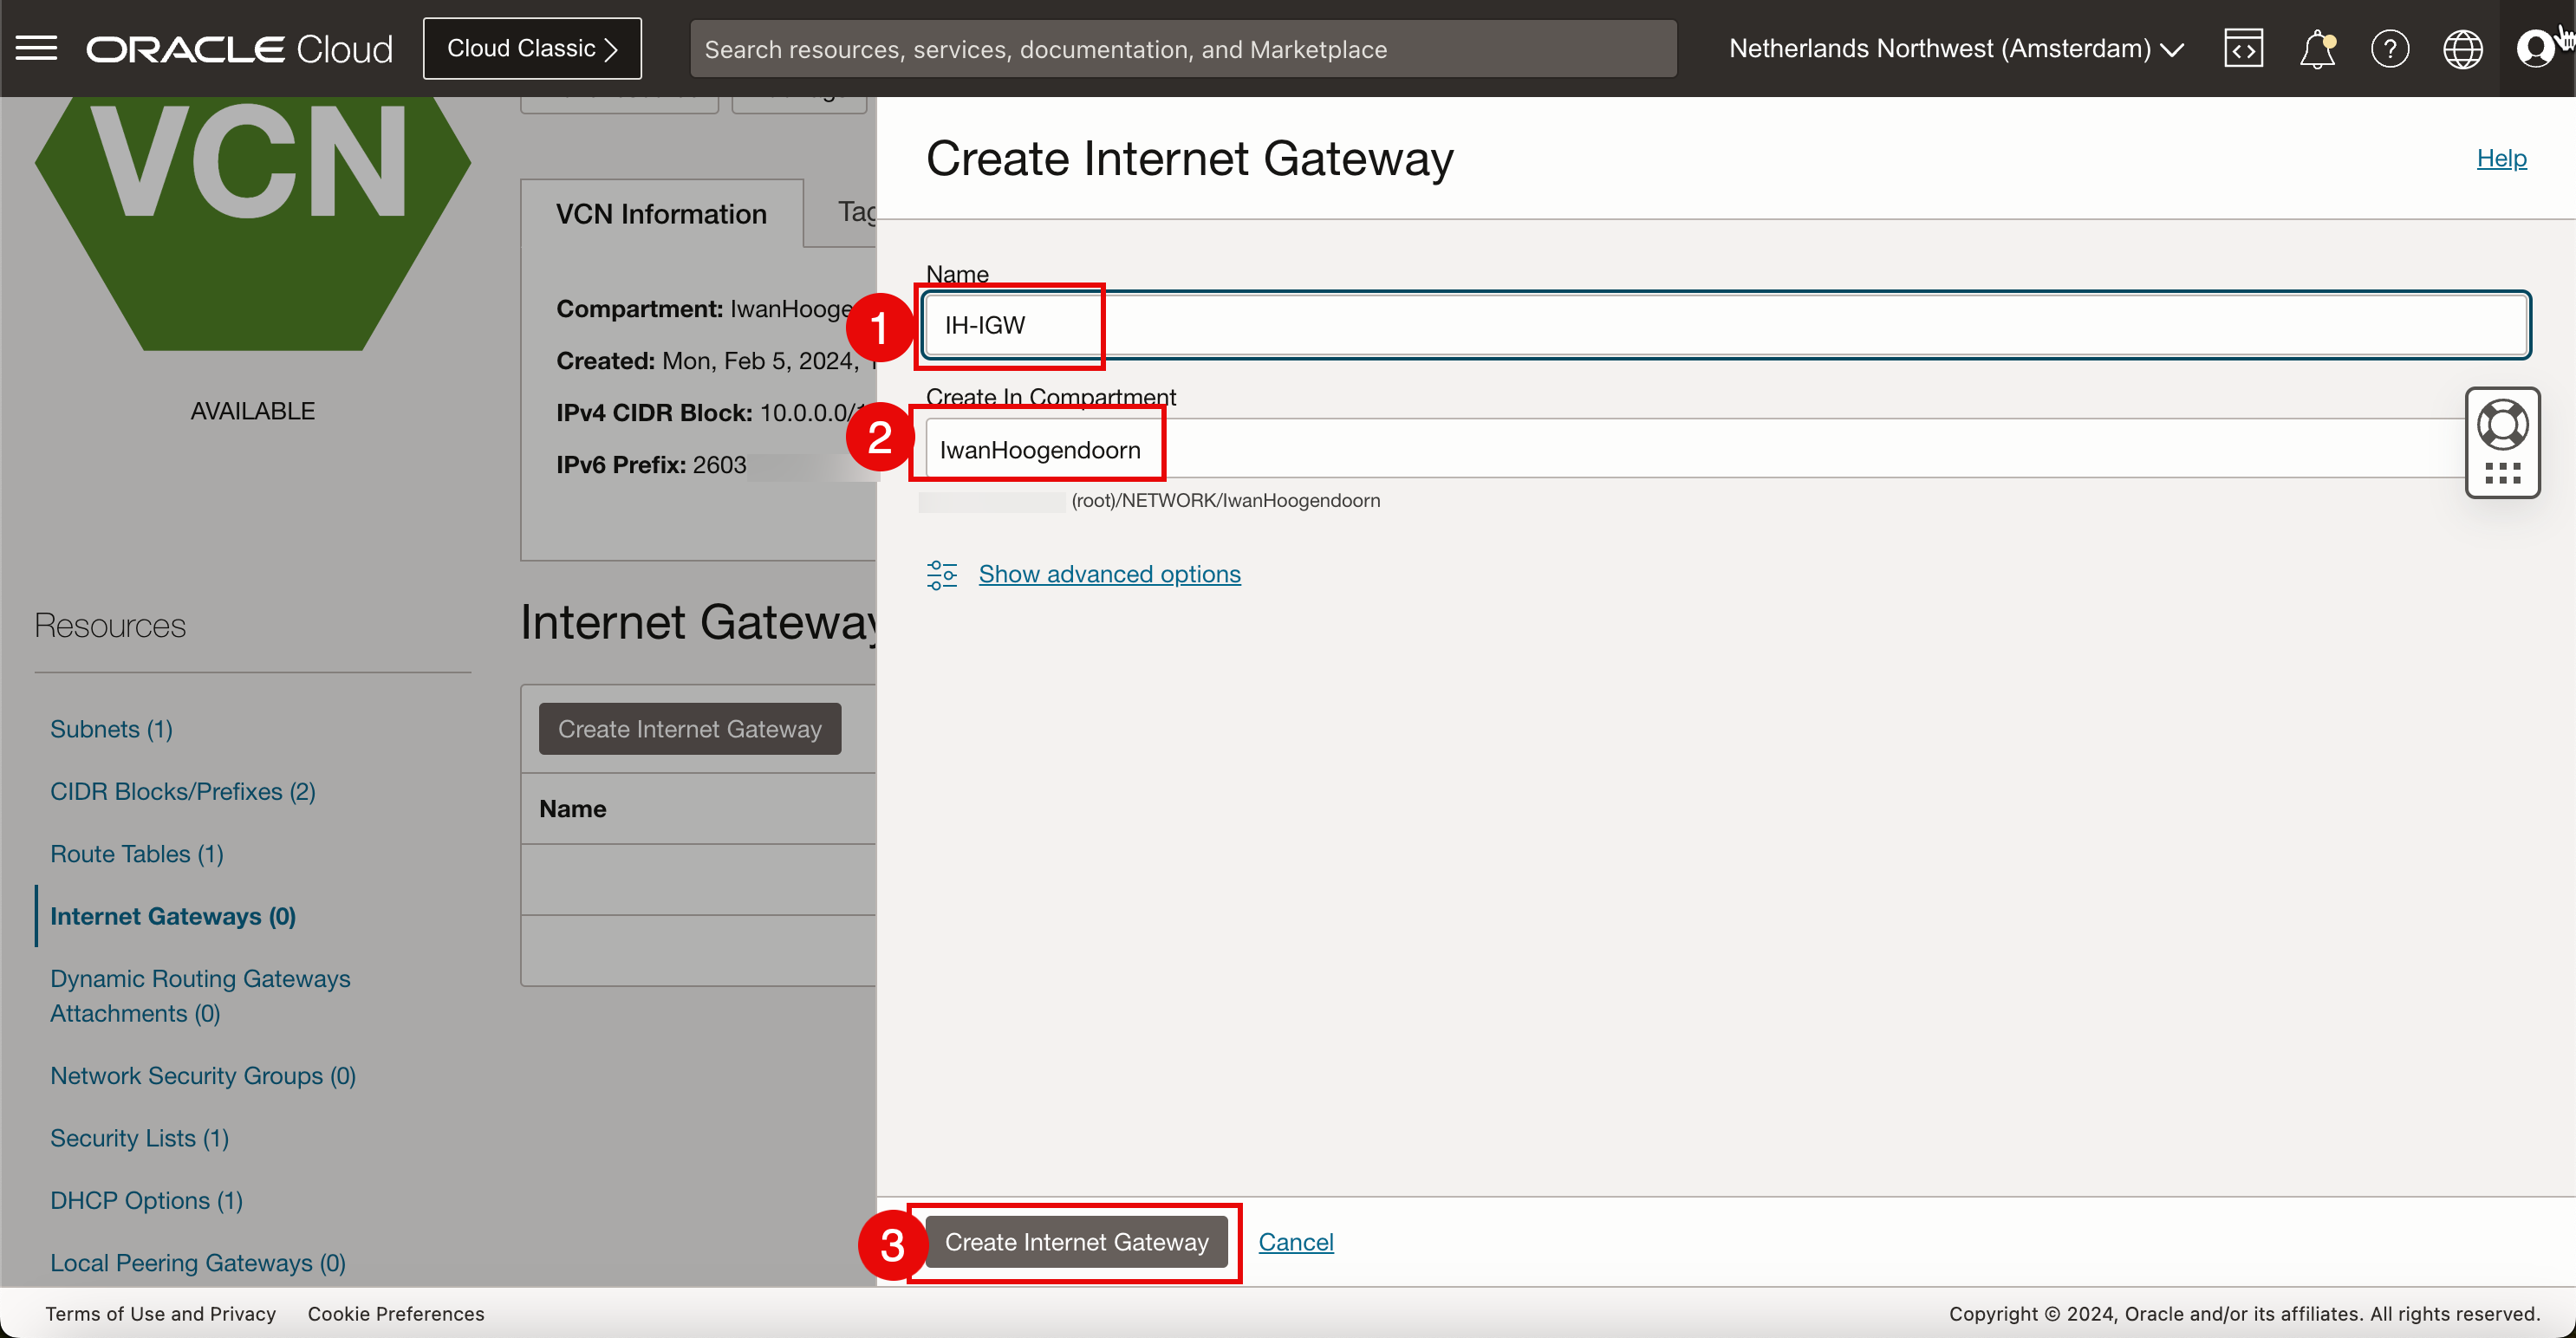
在创建 Internet 网关中,输入以下信息。
- 输入名称。
- 选择区间。
- 单击创建 Internet 网关。

-
添加路由规则。
- 请注意,互联网网关处于可用状态。
- 单击路由表。

- 请注意,默认路由表的规则数中包含
0。 - 单击 Default Route Table 。

- 协议版本:选择 IPv4 。
- 目标类型:选择 Internet 网关。
- 目标 CIDR 块:对于本教程,请选择
0.0.0.0/0,因为我们希望所有默认 IPv4 网络流量都进入 Internet 网关。 - 选择上面在此任务中创建的目标 Internet 网关。
- 单击添加路由规则。

- 请注意,已创建新的 IPv4 默认路由规则。
- 要路由 IPv6 Internet 流量,还需要创建新的 IPv6 默认 Internet 规则。再次单击添加路由规则。

- 协议版本:选择 IPv6 。
- 目标类型:选择 Internet 网关。
- 目标 CIDR 块:对于本教程,请选择
:/0,因为我们希望所有默认 IPv6 网络流量都进入 Internet 网关。 - 选择上面在此任务中创建的目标 Internet 网关。
- 单击添加路由规则。

-
请注意,已创建新的 IPv6 默认路由规则。

- 我们使用私有密钥通过 SSH 连接到新创建的实例。
- 成功建立连接后,运行
ip a命令验证 IP 地址。 - 请注意,专用 IPv4 地址与为实例详细信息提供的地址相同。

- 我们还使用 macOS CLI 终端测试连接,运行
ssh -i ssh-key-2024-02-05.key opc@xxx.xxx.xxx.48命令。 - 成功建立连接后,运行
ip a命令验证 IP 地址。 - 请注意,专用 IPv4 地址与为 OCI 控制台中的实例详细信息提供的地址相同。
请注意,实例没有为 OCI 控制台中的实例详细信息提供的 IPv6 地址。

-
通过重新引导实例可以修复此问题。
- 导航到实例。
- 单击 Reboot 。

- 使用私有密钥通过 SSH 再次连接到实例。
- 成功建立连接后,运行
ip a命令验证 IP 地址。 - 请注意,专用 IPv4 地址与实例详细信息中提供的地址相同。
- 请注意,专用 IPv6 地址与实例详细信息中提供的地址相同。
- 为了测试与互联网的连接,我们还对 Google DNS 服务器之一的 IPv6 IP 地址执行 ping 命令。

- 快速测试以确定我们是否可以使用 IPv6 地址连接到实例。运行
ssh -i ssh-key-2024-02-05.key opc@2603:xxxx:xxxx:xxxx:xxxx:xxxx:xxxx:xxxx命令进行测试。 - 成功建立连接后,运行
ip a命令验证 IP 地址。 - 请注意,专用 IPv4 地址与实例详细信息中提供的地址相同。
- 请注意,专用 IPv6 地址与实例详细信息中提供的地址相同。

任务 5:在默认安全列表中打开 HTTP 和 HTTPS
创建新 VCN 时,会向该 VCN 中的子网应用默认安全列表。默认情况下,允许 ICMP 和 SSH 入站(入站)。我们需要将 HTTP 和 HTTPS 添加到该列表中,以允许 Web 服务器的传入流量。
-
单击汉堡菜单,然后选择虚拟云网络。

-
单击在任务 1 中创建的 VCN。

-
向下滚动。

-
单击安全列表。

-
单击默认安全列表。

-
单击添加入站规则。

-
为 IPv4 网络通信添加新的安全规则。
- 源类型:选择 CIDR 。
- 源 CIDR:输入
0.0.0.0/0。 - IP 协议:选择 TCP 。
- 源端口范围:保持默认值(全部)。
- 目标端口范围:选择
80,443(HTTP 和 HTTPS)。 - 输入说明。
- 单击添加入站规则。

-
查看 IPv4 Security Rules 以允许 HTTP 和 HTTPS 流量入站。

-
要为 IPv6 网络通信添加新的安全规则,请创建新的入站规则。再次单击添加入站规则。
- 源类型:选择 CIDR 。
- 源 CIDR:输入
::/0。 - IP 协议:选择 TCP 。
- 源端口范围:保持默认值(全部)。
- 目标端口范围:选择
80,443(HTTP 和 HTTPS)。 - 输入说明。
- 单击添加入站规则。

-
查看 IPv6 Security Rules 以允许 HTTP 和 HTTPS 流量入站。

安全规则已到位,VCN 子网允许 IPv4 和 IPv6 流量,我们将在实例上安装 Web 服务器应用程序。
任务 6:在实例上安装 Web 服务器
在安装 Web 服务器应用程序之前,请快速验证防火墙端口是否配置正确。请使用以下网站 IPV6 Online Port Scanner 。此网站具有 IPv6 端口扫描程序,但您也可以输入 IPv4 地址。
-
输入 IPv4 地址以及要在 TCP 端口
80上执行扫描的详细信息。请注意,此状态为 CLOSED ,因为尚未安装 Web 服务器应用程序,并且状态不是 FILTERED ,因为我们已将规则添加到默认安全列表中。
-
对于 IPv6 地址,输入以下详细信息。输出与 IPv4 相同,原因相同。

-
在 Web 服务器实例终端控制台或 SSH 上。输入以下命令以更新 DNF 软件包管理器并安装 DNF 实用程序。
[opc@ih-webserver-01 ~]$ sudo dnf update -y [opc@ih-webserver-01 ~]$ sudo dnf install dnf-utils -y -
更新
nginx.repo文件以指定下载和安装 NGINX Web 服务器应用程序的详细信息。[opc@ih-webserver-01 ~]$ sudo nano /etc/yum.repos.d/nginx.repo将以下内容复制并粘贴到
nginx.repo文件中。[nginx-stable] name=nginx stable repo baseurl=http://nginx.org/packages/centos/$releasever/$basearch/ gpgcheck=1 enabled=1 gpgkey=https://nginx.org/keys/nginx_signing.key module_hotfixes=true [nginx-mainline] name=nginx mainline repo baseurl=http://nginx.org/packages/mainline/centos/$releasever/$basearch/ gpgcheck=1 enabled=0 gpgkey=https://nginx.org/keys/nginx_signing.key module_hotfixes=true验证
nginx.repo文件的内容。[opc@ih-webserver-01 ~]$ sudo more /etc/yum.repos.d/nginx.repo [nginx-stable] name=nginx stable repo baseurl=http://nginx.org/packages/centos/$releasever/$basearch/ gpgcheck=1 enabled=1 gpgkey=https://nginx.org/keys/nginx_signing.key module_hotfixes=true [nginx-mainline] name=nginx mainline repo baseurl=http://nginx.org/packages/mainline/centos/$releasever/$basearch/ gpgcheck=1 enabled=0 gpgkey=https://nginx.org/keys/nginx_signing.key module_hotfixes=true [opc@ih-webserver-01 ~]$ -
缺省情况下,使用稳定 Nginx 软件包的系统信息库。要使用主线 Nginx 软件包,请运行以下命令。
[opc@ih-webserver-01 ~]$ sudo yum-config-manager --enable nginx-mainline -
使用以下命令安装 NGINX Web 服务器应用程序。
[opc@ih-webserver-01 ~]$ sudo dnf install nginx -
要启动 NGINX Web 服务器应用程序,请运行以下命令。
[opc@ih-webserver-01 ~]$ sudo systemctl start nginx -
安装完成后,使 NGINX 在系统引导时自动启动并启动 Web 服务器。
[opc@ih-webserver-01 ~]$ sudo systemctl enable nginx Created symlink /etc/systemd/system/multi-user.target.wants/nginx.service → /usr/lib/systemd/system/nginx.service. -
使用以下命令验证 NGINX Web 服务器应用程序的运行状态。
[opc@ih-webserver-01 ~]$ systemctl status nginx ● nginx.service - nginx - high performance web server Loaded: loaded (/usr/lib/systemd/system/nginx.service; enabled; vendor preset: disabled) Active: active (running) since Tue 2024-02-06 08:58:43 GMT; 2min 47s ago Docs: http://nginx.org/en/docs/ Main PID: 43323 (nginx) Tasks: 3 (limit: 99901) Memory: 2.8M CGroup: /system.slice/nginx.service ├─43323 nginx: master process /usr/sbin/nginx -c /etc/nginx/nginx.conf ├─43324 nginx: worker process └─43325 nginx: worker process Feb 06 08:58:43 ih-webserver-01 systemd[1]: Starting nginx - high performance web server... Feb 06 08:58:43 ih-webserver-01 systemd[1]: Started nginx - high performance web server. [opc@ih-webserver-01 ~]$ -
使用以下命令验证 NGINX Web 服务器应用程序的版本。
[opc@ih-webserver-01 ~]$ nginx -v nginx version: nginx/1.25.3 [opc@ih-webserver-01 ~]$ -
firewalld是基于区域的个人防火墙,安装在 OCI 上的 Oracle Linux 部署上。我们已经通过 VCN 子网上的默认安全列表配置了防火墙。我们将禁用内部firewalld服务。运行以下命令。[opc@ih-webserver-01 nginx]$ sudo systemctl stop firewalld [opc@ih-webserver-01 nginx]$ sudo systemctl disable firewalld Removed /etc/systemd/system/multi-user.target.wants/firewalld.service. Removed /etc/systemd/system/dbus-org.fedoraproject.FirewallD1.service. [opc@ih-webserver-01 nginx]$ sudo setenforce 0 [opc@ih-webserver-01 nginx]$ -
要验证 Web 服务器服务是否正在运行,请检查监听程序是否正在运行。运行以下命令。请注意,这三个 NGINX 服务都在 IPv4 和端口
80上运行侦听。值得注意的是,我们缺少 IPv6 监听程序。[opc@ih-webserver-01 ~]$ sudo lsof -i -P -n | grep LISTEN systemd 1 root 71u IPv4 19039 0t0 TCP *:111 (LISTEN) systemd 1 root 82u IPv6 19041 0t0 TCP *:111 (LISTEN) rpcbind 1421 rpc 4u IPv4 19039 0t0 TCP *:111 (LISTEN) rpcbind 1421 rpc 6u IPv6 19041 0t0 TCP *:111 (LISTEN) osms-agen 2429 root 7u IPv6 41713 0t0 TCP 127.0.0.1:32768 (LISTEN) osms-agen 2429 root 10u IPv4 41722 0t0 TCP 127.0.0.1:9003 (LISTEN) pmcd 2469 pcp 0u IPv4 35603 0t0 TCP 127.0.0.1:44321 (LISTEN) pmcd 2469 pcp 3u IPv6 35604 0t0 TCP [::1]:44321 (LISTEN) pmlogger 3188 pcp 7u IPv4 42005 0t0 TCP 127.0.0.1:4330 (LISTEN) pmlogger 3188 pcp 8u IPv6 42006 0t0 TCP [::1]:4330 (LISTEN) sshd 6745 root 3u IPv4 54797 0t0 TCP *:22 (LISTEN) sshd 6745 root 4u IPv6 54799 0t0 TCP *:22 (LISTEN) nginx 43323 root 6u IPv4 98324 0t0 TCP *:80 (LISTEN) nginx 43324 nginx 6u IPv4 98324 0t0 TCP *:80 (LISTEN) nginx 43325 nginx 6u IPv4 98324 0t0 TCP *:80 (LISTEN) -
另一个快速检查,我们向本地 Web 服务器进行卷曲,看看我们是否可以使用 IPv4 查看默认的 NGINX Web 服务器。
[opc@ih-webserver-01 ~]$ curl http://localhost <!DOCTYPE html> <html> <head> <title>Welcome to nginx!</title> <style> html { color-scheme: light dark; } body { width: 35em; margin: 0 auto; font-family: Tahoma, Verdana, Arial, sans-serif; } </style> </head> <body> <h1>Welcome to nginx!</h1> <p>If you see this page, the nginx web server is successfully installed and working. Further configuration is required.</p> <p>For online documentation and support please refer to <a href="http://nginx.org/">nginx.org</a>.<br/> Commercial support is available at <a href="http://nginx.com/">nginx.com</a>.</p> <p><em>Thank you for using nginx.</em></p> </body> </html> [opc@ih-webserver-01 ~]$ -
我们将使用相同的 IPv6 Online Port Scanner 网站从 Internet 执行相同的测试,现在端口为 IPv4 的 OPEN 。

-
最后的测试将是使用 IPv4 的远程浏览器测试网站或 Web 服务器。使用的 URL 为
http://144.xxx.xxx.xxx。
-
即使我们已经安装了 NGINX webserver 应用程序,我们仍然会得到以下 IPv6 地址的结果。

要修复此问题,我们需要确保 Web 服务器也配置为监听 IPv6 地址。为此,请编辑
default.confnginx 文件。[opc@ih-webserver-01 conf.d]$ sudo nano /etc/nginx/conf.d/default.conf配置文件的 server 部分如下所示。
server {
    listen       80;
    server_name  localhost;

    #access_log  /var/log/nginx/host.access.log  main;

    location / {
        root   /usr/share/nginx/html;
        index  index.html index.htm;
    }
将以下行添加到服务器部分。
**listen [::]:80;**server 部分将如下所示。
server {
    listen       80;
    **listen  [::]:80;**
    server_name  localhost;

    #access_log  /var/log/nginx/host.access.log  main;

    location / {
        root   /usr/share/nginx/html;
        index  index.html index.htm;
    }
更新后,
default.conf文件将如下所示。[opc@ih-webserver-01 conf.d]$ sudo more /etc/nginx/conf.d/default.conf server { listen 80; **listen [::]:80;** server_name localhost; #access_log /var/log/nginx/host.access.log main; location / { root /usr/share/nginx/html; index index.html index.htm; } #error_page 404 /404.html; # redirect server error pages to the static page /50x.html # error_page 500 502 503 504 /50x.html; location = /50x.html { root /usr/share/nginx/html; } # proxy the PHP scripts to Apache listening on 127.0.0.1:80 # #location ~ \.php$ { # proxy_pass http://127.0.0.1; #} # pass the PHP scripts to FastCGI server listening on 127.0.0.1:9000 # #location ~ \.php$ { # root html; # fastcgi_pass 127.0.0.1:9000; # fastcgi_index index.php; # fastcgi_param SCRIPT_FILENAME /scripts$fastcgi_script_name; # include fastcgi_params; #} # deny access to .htaccess files, if Apache's document root # concurs with nginx's one # #location ~ /\.ht { # deny all; #} } [opc@ih-webserver-01 conf.d]$ -
使用以下命令重新启动 NGINX Web 服务器。
[opc@ih-webserver-01 ~]$ sudo systemctl restart nginx -
使用以下命令再次验证监听程序。请注意,NGINX 现在也列在 IPv6 上 IPv4 旁边。
[opc@ih-webserver-01 conf.d]$ sudo lsof -i -P -n | grep LISTEN
systemd       1               root   46u  IPv4  19039      0t0  TCP *:111 (LISTEN)
systemd       1               root   48u  IPv6  19041      0t0  TCP *:111 (LISTEN)
rpcbind    1421                rpc    4u  IPv4  19039      0t0  TCP *:111 (LISTEN)
rpcbind    1421                rpc    6u  IPv6  19041      0t0  TCP *:111 (LISTEN)
osms-agen  2429               root    7u  IPv6  41713      0t0  TCP 127.0.0.1:32768 (LISTEN)
osms-agen  2429               root   10u  IPv4  41722      0t0  TCP 127.0.0.1:9003 (LISTEN)
pmcd       2469                pcp    0u  IPv4  35603      0t0  TCP 127.0.0.1:44321 (LISTEN)
pmcd       2469                pcp    3u  IPv6  35604      0t0  TCP [::1]:44321 (LISTEN)
pmlogger   3188                pcp    7u  IPv4  42005      0t0  TCP 127.0.0.1:4330 (LISTEN)
pmlogger   3188                pcp    8u  IPv6  42006      0t0  TCP [::1]:4330 (LISTEN)
sshd       6745               root    3u  IPv4  54797      0t0  TCP *:22 (LISTEN)
sshd       6745               root    4u  IPv6  54799      0t0  TCP *:22 (LISTEN)
nginx     54944               root    6u  IPv4 219674      0t0  TCP *:80 (LISTEN)
nginx     54944               root    7u  IPv6 219675      0t0  TCP *:80 (LISTEN)
nginx     54945              nginx    6u  IPv4 219674      0t0  TCP *:80 (LISTEN)
nginx     54945              nginx    7u  IPv6 219675      0t0  TCP *:80 (LISTEN)
nginx     54946              nginx    6u  IPv4 219674      0t0  TCP *:80 (LISTEN)
nginx     54946              nginx    7u  IPv6 219675      0t0  TCP *:80 (LISTEN)
[opc@ih-webserver-01 conf.d]$
我们将使用相同的 IPv6 Online Port Scanner 网站从 Internet 执行相同的测试,现在端口为 IPv6 的 OPEN 。

另一个快速检查,我们向本地 Web 服务器进行卷曲,看看我们是否可以使用 IPv6 查看默认的 NGINX Web 服务器。
[opc@ih-webserver-01 conf.d]$ curl -6 "http://[::1]:80" <!DOCTYPE html> <html> <head> <title>Welcome to nginx!</title> <style> html { color-scheme: light dark; } body { width: 35em; margin: 0 auto; font-family: Tahoma, Verdana, Arial, sans-serif; } </style> </head> <body> <h1>Welcome to nginx!</h1> <p>If you see this page, the nginx web server is successfully installed and working. Further configuration is required.</p> <p>For online documentation and support please refer to <a href="http://nginx.org/">nginx.org</a>.<br/> Commercial support is available at <a href="http://nginx.com/">nginx.com</a>.</p> <p><em>Thank you for using nginx.</em></p> </body> </html> [opc@ih-webserver-01 conf.d]$ -
最后的测试是使用 IPv6 测试是否可以使用远程浏览器访问网站或 Web 服务器。使用的 URL 为
http://[2603:xxxx:xxxx:xxxx:xxxx:xxxx:xxxx:xxxx]
注:在浏览器中使用 IPv6 地址时,需要将其放在方括号之间。
任务 7:配置 DNS 记录
注:本教程中使用的域已创建并配置为仅用于测试。
现在,可从 Internet 访问网站或 Web 服务器。我们将进一步配置一个 FQDN,该 FQDN 比 IPv4 地址或 IPv6 地址更容易记住。对于本教程,我们使用以下子域作为示例:oci.iwanhoogendoorn.nl 表示新 Web 服务器。
-
我们将登录到域名注册商的域管理面板
iwanhoogendoorn.nl。- 请注意,我们已选择要配置的正确域。
- 选择 DNS Management 。

-
列出了域 iwanhoogendoorn.nl 的所有 DNS 记录,如下图中所示。

- 将
oci子域添加到 IPv4 的域,然后选择实例的公共 IPv4 地址。 - 单击添加。
- 现在,我们将
oci子域添加到 IPv6 的域,然后选择实例的 IPv6 地址。 - 单击添加。

- 在 DNS 概述页面中,查看 IPv4 的 oci.iwanhoogendoorn.nl DNS 记录。
- 在 DNS 概述页面中,查看 IPv6 的 oci.iwanhoogendoorn.nl DNS 记录。

- 将
-
使用
nslookup命令测试 oci.iwanhoogendoorn.nl 是否解析为正确的 IPv4 地址。iwanhoogendoorn@Iwans-MacBook-Pro ~ % nslookup oci.iwanhoogendoorn.nl
-
使用
nslookup命令测试 oci.iwanhoogendoorn.nl 是否解析为正确的 IPv6 地址。iwanhoogendoorn@Iwans-MacBook-Pro ~ % nslookup -q=AAAA oci.iwanhoogendoorn.nl
任务 8:使用 NGINX 和 PHP 创建自定义网站
我们将创建一个定制的 PHP 网站或脚本,提供有关 NGINX 的网络和 IP 地址的更多信息。
-
安装 PHP FastCGI Process Manager (PHP-FPM)。PHP-FPM 是 PHP 的替代 FastCGI 守护进程,允许网站处理高负载。
sudo dnf install php-fpm -
检查已安装的 PHP 版本。
[opc@ih-webserver-01 /]$ php -v PHP 7.2.24 (cli) (built: Oct 22 2019 08:28:36) ( NTS ) Copyright (c) 1997-2018 The PHP Group Zend Engine v3.2.0, Copyright (c) 1998-2018 Zend Technologies [opc@ih-webserver-01 /]$ -
为了让 NGINX 与 PHP 协同工作,另一方面需要完成某些配置。PHP 端和 NGNIX 端的一个配置文件。
根据您的 Linux 发行版、NGINX 和 PHP-FPM 版本,配置文件名和路径名可能会有所不同,这使得 NGINX 和 PHP 的集成部分变得更加困难。
PHP-FPM 和 NGINX 的重要文件和目录。
说明 Oracle Linux 8 其他安装/分发 NGINX Web 根路径 /usr/share/nginx/html /usr/share/nginx/www PHP FPM 配置文件 /etc/php-fpm.d/www.conf php-fpm.conf NGINX 配置文件 /etc/nginx/conf.d/default.conf nginx.conf PHP FPM 套接字文件 /run/php-fpm/www.sock php-fpm.sock、phpx.x-fpm.sock(x.x = 版本) FastCGI 设置文件 /etc/nginx/fastcgi_params fastcgi.conf PHP 配置文件 /etc/php.ini
要将 NGINX 与 PHP 集成,请执行以下步骤:
-
编辑 PHP-FPM 配置文件以集成 NGINX 。
编辑
/etc/php-fpm.d/www.conf文件。sudo nano /etc/php-fpm.d/www.conf-
更改前
/etc/php-fpm.d/www.conf文件的内容。; Unix user/group of processes ; Note: The user is mandatory. If the group is not set, the default user's group ; will be used. ; RPM: apache user chosen to provide access to the same directories as httpd **user =** apache ; RPM: Keep a group allowed to write in log dir. **group =** apache -
更改后
/etc/php-fpm.d/www.conf文件的内容。; Unix user/group of processes ; Note: The user is mandatory. If the group is not set, the default user's group ; will be used. ; RPM: apache user chosen to provide access to the same directories as httpd **user = nginx** ; RPM: Keep a group allowed to write in log dir. **group = nginx**
-
-
编辑 NGINX 配置文件以集成 PHP-FPM 。
-
编辑
/etc/nginx/conf.d/default.conf文件。[opc@ih-webserver-01 html]$ sudo nano /etc/nginx/conf.d/default.conf -
添加以下配置。
location / {
**# where is the NGINX root www folder?**
    root   /usr/share/nginx/html;
# what are the default index files to look for in the directory?
    index **index.php** index.html index.htm;
}

# tell NGINX what to do when it sees PHP-FPM giving a 404 HTTP status in the response
**location = /404.php {
# where is the NGINX root www folder?
  root   /usr/share/nginx/html;
# not return error responses with relevant status codes
  fastcgi_intercept_errors off;
# where is PHP-FPM listening? the socket
  fastcgi_pass unix:/var/run/php-fpm/www.sock;
# everytime we're in this location, tell PHP-FPM the complete script filename to be executed
  fastcgi_param SCRIPT_FILENAME $document_root$fastcgi_script_name;
# and don't forget to tell PHP-FPM stuff like SERVER_NAME:
  include fastcgi_params;
}**

# tell NGINX what to do when it sees PHP-FPM a .php file
**location ~ \.php$ {
# where is the NGINX root www folder?
  root   /usr/share/nginx/html;
# define custom error pages
  error_page 404 /404.php;
# return error responses with relevant status codes
  fastcgi_intercept_errors on;
# where is PHP-FPM listening? the socket
  fastcgi_pass unix:/var/run/php-fpm/www.sock;
# everytime we're in this location, tell PHP-FPM the complete script filename to be executed
  fastcgi_param SCRIPT_FILENAME $document_root$fastcgi_script_name;
# and don't forget to tell PHP-FPM stuff like SERVER_NAME:
  include fastcgi_params;
}**
-
-
编辑
php.ini配置文件。-
编辑
/etc/php.ini文件。[opc@ih-webserver-01 /]$ sudo nano /etc/php.ini -
确保存在、更改或未注释以下行。
cgi.fix_pathinfo = 0;
-
-
重新启动 PHP-FPM 和 NGINX 服务。
-
重新启动 PHP-FPM 服务。
sudo systemctl start php-fpm -
重新启动 NGINX 服务。
sudo systemctl restart nginx
-
-
为适当的网页创建定制页面以进行处理和测试。
-
创建定制
404.php页。如果该页面不存在,则需要正确处理指向定制 404 页面的重定向,并尝试访问该页面。[opc@ih-webserver-01 html]$ sudo nano 404.php自定义
404.php页面的代码。<?php header("HTTP/1.0 404 Not Found"); ?> <html> <head> <title>404 Error - Page Not Found</title> </head> <body>404 Error - Page Not Found!</body> </html> -
创建定制
info.php页。[opc@ih-webserver-01 html]$ sudo nano info.phpinfo.php页的代码。<?php phpinfo(); -
测试
info.php网站,该网站提供了 PHP 正在使用 NGNIX 的证明。
安装并正确配置网站后,将显示以下网页。此页将提供有关本地和远程 IPv4 或 IPv6 地址的信息,具体取决于您使用的 IP 版本。此页面还将介绍您正在使用的协议(HTTP 或 HTTPS)。

-
任务 9:从 Internet 测试 Web 服务器
注:本教程中使用的域已创建并配置为仅用于测试。
尽管我们已经使用多种方法测试了网站或 Web 服务器的可访问性。我们喜欢使用以下网站来执行最终测试,一次即可测试可访问性和 DNS 记录配置。您的网站 IPv6 准备好了吗?
- 使用 FQDN oci.iwanhoogendoorn.nl 进行测试。
- 验证是否正确配置了 IPv4 DNS 记录。
- 验证是否正确配置了 IPv6 DNS 记录。
- 验证网站是否可在 IPv4 上访问。
- 验证网站是否可在 IPv6 上访问。

确认
- 作者 - Iwan Hoogendoorn(OCI 网络专家)
更多学习资源
浏览 docs.oracle.com/learn 上的其他实验室,或者通过 Oracle Learning YouTube 频道访问更多免费学习内容。此外,请访问 education.oracle.com/learning-explorer 以成为 Oracle Learning Explorer。
有关产品文档,请访问 Oracle 帮助中心。
Use Oracle Cloud Infrastructure to Publish a Webserver Accessible from the Internet with IPv6
F93543-01
February 2024
Copyright © 2024, Oracle and/or its affiliates.