注意:
- 此教程需要访问 Oracle Cloud。要注册免费账户,请参阅开始使用 Oracle Cloud Infrastructure Free Tier 。
- 它使用 Oracle Cloud Infrastructure 身份证明、租户和区间示例值。完成实验室时,请将这些值替换为特定于云环境的值。
使用 OCI API 网关、函数和可观察性验证 JSON 内容并监视 API 标头和正文
简介
当我们开发分布式应用程序时,特别是在基于微服务的架构中,我们希望组件能够在执行中很好地扩展和执行。它们具有非常复杂的体系结构,执行其他组件的组件,执行其他组件,等等在无限数量的无休止调用。
规划如何开发每个应用程序是一项艰巨的任务。您可以通过 Oracle Cloud Infrastructure API Gateway(OCI API Gateway) 公开基于 Kubernetes 集群构建的微服务。有一系列功能,如执行呼叫验证和授权,数据验证和呼叫优化,仅举几例。当现有方法不足以满足需求时,还可以使用 OCI Functions 执行调用,以创建个性化身份验证和授权机制。
本教程将介绍如何使用自定义机制来验证一些用例,例如:
-
验证 JSON 参数数据的大小。
-
验证 JSON 项的最大数量。
尽管它是 OCI API 网关中的身份验证和授权机制,但它可以帮助满足其他一些需求,例如:
-
从 HEADER、查询参数或 REST 调用主体中获取数据。
-
将这些数据发送到 OCI 可观察性,以便于调试问题,如果没有这些信息,通常无法检测到这些问题。
注:如果要将数据发送到可观察性,请在代码中考虑对 HEADER 或 BODY 内容(如密码或敏感数据)使用编写。另一种方法是出于调试目的打开/关闭函数。
目标
-
配置 API 部署。
-
开发 OCI 函数,从 API 请求捕获 HEADER 和 BODY。
-
验证正文 JSON 数据。
-
将 HEADER 和 BODY 信息发送到 OCI 可观察性。
先决条件
-
可操作的 Oracle Cloud 租户。您可以创建一个每月 300.00 美元的免费 Oracle Cloud 账户来试用本教程,请参阅创建免费 Oracle Cloud 账户。
-
创建并公开到 Internet 的 OCI API 网关实例,请参阅在 Oracle Cloud 中创建第一个 API 网关。
任务 1:配置 OCI 可观察性
-
在 OCI 租户中创建日志以从函数摄取日志。导航到观测和管理,然后在 OCI 控制台中选择日志。

-
单击创建定制日志。

-
在定制日志名称字段中输入名称,然后选择适当的区间和日志组。

注:捕获日志的 OCID 非常重要,这需要用于代码。

任务 2:创建 OCI 函数以从 API 请求捕获 HEADER 和 BODY
要执行以下步骤,请从此处下载代码 function.zip 。
-
从 API 请求捕获 HEADER 和 BODY。
-
验证正文 JSON 数据,有一个用于验证每个数组上的项数的方法。
-
将 HEADER 和 BODY 信息发送到 OCI 可观察性。
import io
import json
import logging
import requests
import oci

from fdk import response
from datetime import timedelta

def count_items(dictData):
    counting = 0
    for item in dictData:
        if type(dictData[item]) == list:
            counting += len(dictData[item])
        else:
            if not type(dictData[item]) == str:
                counting += count_items(dictData[item])
    return counting

def handler(ctx, data: io.BytesIO = None):
    jsonData = "API Error"
    c = 0
    try:
        config = oci.config.from_file("./config","DEFAULT")
        logging = oci.loggingingestion.LoggingClient(config)
        rdata = json.dumps({
            "active": True,
            "context": {
                "requestheader": data.getvalue().decode('utf-8'),
            },
        })

        jsonData = data.getvalue().decode('utf-8')
        # Get the body content from the API request
        body = dict(json.loads(data.getvalue().decode('utf-8')).get("data"))["body"]
        body = dict(json.loads(body))
        # Count the number of items on arrays inside the JSON body
        c = count_items(body)

        # If JSON body content has more than 1 item in arrays, block the authorization for the API backend
        if (c > 1):
            # Send a log to observability with out of limit of items in array
            put_logs_response = logging.put_logs(
                log_id="ocid1.log.oc1.iad.xxxxxxxxxxxxxxxxxxxxxxxxxxxxxxxxxxxxxxxxxxxxxxxx",
                put_logs_details=oci.loggingingestion.models.PutLogsDetails(
                    specversion="EXAMPLE-specversion-Value",
                    log_entry_batches=[
                        oci.loggingingestion.models.LogEntryBatch(
                            entries=[
                                oci.loggingingestion.models.LogEntry(
                                    data="out of limit of items in array " + str(c),
                                    id="ocid1.test.oc1..00000001.EXAMPLE-id-Value")],
                            source="EXAMPLE-source-Value",
                            type="EXAMPLE-type-Value")]))

            return response.Response(
                ctx,
                status_code=401,
                response_data=json.dumps({"active": False, "wwwAuthenticate": "API Gateway JSON"})
            )

        # Send a log to observability with HEADERs and BODY content
        put_logs_response = logging.put_logs(
            log_id="ocid1.log.oc1.iad.xxxxxxxxxxxxxxxxxxxxxxxxxxxxxxxxxxxxxxxx",
            put_logs_details=oci.loggingingestion.models.PutLogsDetails(
                specversion="EXAMPLE-specversion-Value",
                log_entry_batches=[
                    oci.loggingingestion.models.LogEntryBatch(
                        entries=[
                            oci.loggingingestion.models.LogEntry(
                                data=jsonData,
                                id="ocid1.test.oc1..00000001.EXAMPLE-id-Value")],
                        source="EXAMPLE-source-Value",
                        type="EXAMPLE-type-Value")]))

        return response.Response(
            ctx, response_data=rdata,
            status_code=200,
            headers={"Content-Type": "application/json"}
        )
    except(Exception) as ex:
        jsonData = 'error parsing json payload: ' + str(ex) + ", " + json.dumps(jsonData)
        pass

    return response.Response(
        ctx,
        status_code=401,
        response_data=json.dumps({"active": False, "wwwAuthenticate": jsonData})
    )
了解代码
此代码位于 function.zip 。
注:如果您不知道如何开发函数并在 API 网关中调用它,请参阅使用 API 网关调用函数。
-
count_items 方法,用于对 JSON 结构内的任何数组中的项进行计数。

-
此代码部分使用适用于 Python 的 OCI SDK 加载配置文件和私钥来访问 OCI 租户。

-
rdata 将从请求捕获参数并准备响应以授权函数调用 API 网关配置的后端。
active=True将执行授权。
-
jsonData 将用于将 HEADER 和 BODY 内容生成到 OCI Observability 。

-
此代码将仅从请求捕获 BODY JSON 结构。

-
以下代码将计算 BODY JSON 结构内的数组上的项。如果货品计数超过 1 个货品,则活动将设置为 False ,并向 OCI Observability 发送错误日志。要发送日志,您需要使用 Python OCI SDK 。
注:将 log_id 变量替换为在任务 1 中生成的 OCID 日志。

如果计数小于或等于 1,将在 OCI 观测中生成包含请求 HEADERs 和 BODY 内容的日志。请记住将 log_id 变量替换为 OCID 日志。
注意:您可以在不同的 OCI 日志中生成日志。在本教程中,仅创建一个日志,但您可以创建更多日志。

-
如果出现错误,将在此处生成包含错误的消息。

配置 OCI 的 SDK 验证
在将配置文件部署到 OCI 之前,您需要配置配置文件并将 OCI 私有密钥和指纹与您的功能一起使用。必须在 Oracle Cloud Infrastructure 命令行界面 (OCI CLI) 安装和配置上生成 config 和 private key 文件。
要安装和配置 OCI CLI,请参阅安装 OCI CLI 。此安装和配置将为您生成两个文件。查找 config 和 private key 文件(缺省值为 oci_api_key.pem )。将在安装说明中通知文件夹路径。

下载 function.zip 可查看代码、配置文件和私钥。将配置和私钥文件替换为 OCI CLI 文件。
构建和部署 OCI 函数
在此步骤中,我们需要使用 OCI CLI 创建 OCI 函数并将代码部署到您的租户中。要创建 OCI 函数,请参阅 OCI Functions QuickStart 并搜索 Python 选项。您需要使用以下信息创建函数:
- 应用程序:fn_apigw_json
请记住部署了函数的区间。您将需要此信息来配置 OCI API Gateway 部署。
任务 3:在 API 网关中配置 OCI 函数
让我们部署您的 API 并与您的 OCI Functions 集成,以验证请求参数(标头和 BODY)并将其发送到 OCI Observability 。如果您不知道如何在 OCI API Gateway 中公开后端,请参阅 OCI API Gateway:设置、创建和部署 API 。
-
打开编辑部署。

-
单击验证部分。

-
单击单个验证,然后选择授权程序函数。

-
选择函数区间(在其中部署了函数),选择 fn_apigw_json 应用程序和函数 python-json-header 。

-
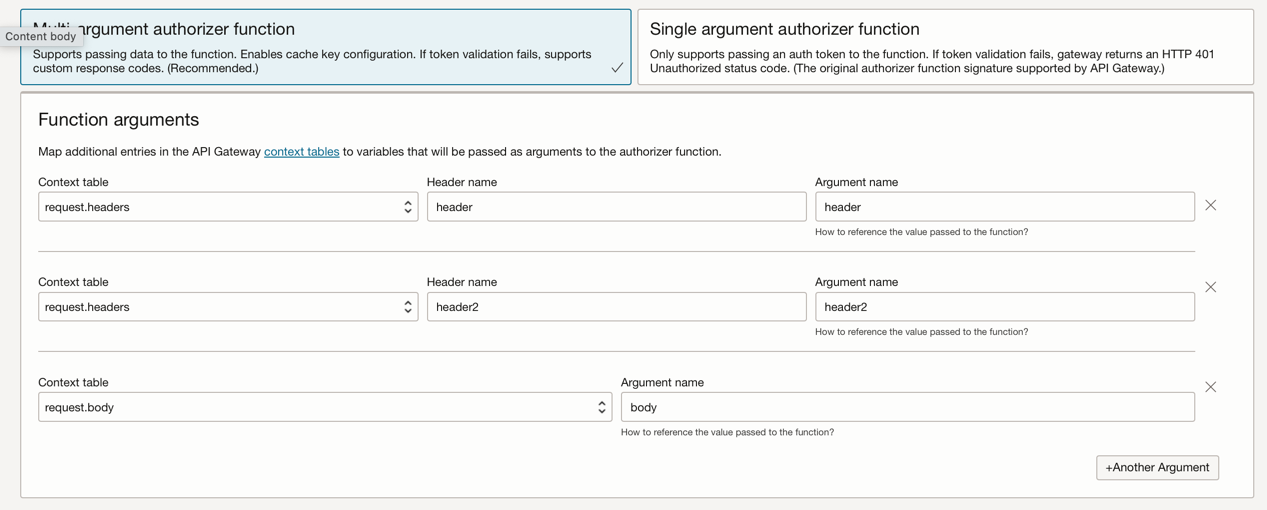
配置函数参数以捕获 HEADER 和 BODY 。获取名为 header 和 header2 的 HEADER 以及将命名为 body 的 BODY 内容。

-
单击路由并配置标题转换。此配置是可选的,仅用于查看包含请求数据(HEADER 和 BODY 内容)的响应内容或针对请求生成的错误。调试函数会很有用。

任务 4:测试您的请求
注:在 API 部署中,如果配置授权程序函数并设置函数参数,将激活函数参数的高速缓存。您可以确定要高速缓存的数据类型。您可以为查询参数或标头配置高速缓存,但不能为正文内容配置高速缓存。
我们可以测试 API 请求。让我们在正文中的数组上仅测试一项。
curl --location 'https://xxxxxxxxxxxxxxxxxxxx.apigateway.us-ashburn-1.oci.customer-oci.com/path_index/path' \
    --header 'Content-Type: text/plain' \
    --header 'header: header' \
    --header 'header2: header2' \
    --header 'header3: header3' \
    --data '{"data": {"clientID": "xxxxxxxxxxxxxxxxxxx", "secretID": "xxxxxxxxxxxxxxxxxxx", "jList":[{"added_by":"Ani","description":"example description.","start_date":"2014-10-10","mark":255,"id":975}]}}' -i
header3 已发送,但显示在日志中,因为它未配置为 OCI API 网关中的函数参数。BODY JSON 数组上只有 1 项,因此它是有效的授权请求。

让我们在数组和测试中再放一个项目。
curl --location 'https://xxxxxxxxxxxxxxxxxxxx.apigateway.us-ashburn-1.oci.customer-oci.com/path_index/path' \
--header 'Content-Type: text/plain' \
--header 'header: header' \
--header 'header2: header2' \
--header 'header3: header3' \
--data '{"data": {"clientID": "xxxxxxxxxxxxxxxxxxx", "secretID": "xxxxxxxxxxxxxxxxxxx", "jList":[{"added_by":"Ani","description":"example description.","start_date":"2014-10-10","mark":255,"id":975}, {"added_by":"Ani","description":"example description.","start_date":"2014-10-10","mark":255,"id":975}]}}' -i

相关链接
确认
- 作者 - Cristiano Hoshikawa(Oracle LAD A 团队解决方案工程师)
更多学习资源
浏览 docs.oracle.com/learn 上的其他实验室,或者通过 Oracle Learning YouTube 频道访问更多免费学习内容。此外,请访问 education.oracle.com/learning-explorer 以成为 Oracle Learning Explorer。
有关产品文档,请访问 Oracle 帮助中心。
Use OCI API Gateway, Functions and Observability to Validate JSON Content and Monitor API Headers and Body
F89782-01
November 2023
Copyright © 2023, Oracle and/or its affiliates.