创建全局函数
全局函数用于围绕 Web 服务包装业务逻辑,以便可以在其他位置轻松使用它们。
OCMCreateRepositoryCollectionFunction
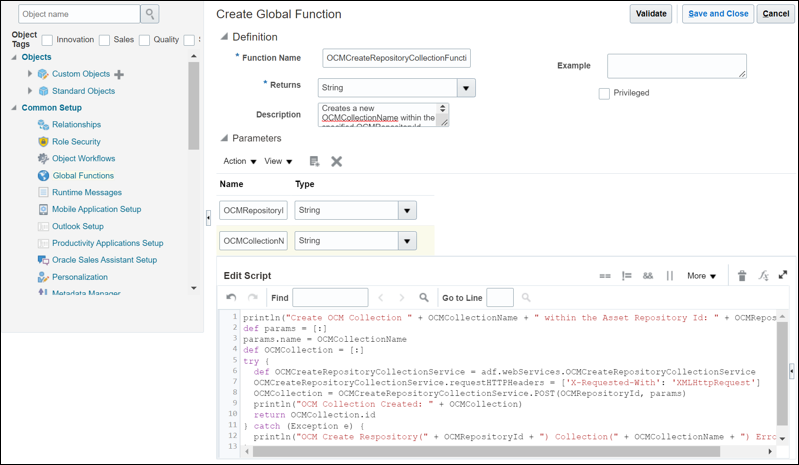
要创建将用于访问 OCMCreateRepositoryCollectionService Web 服务的 OCM 创建资料档案库集合全局函数,请执行以下操作:
- 从左侧导航菜单中选择公用设置,然后选择全局功能。
- 在“全局函数”页上,单击添加全局函数图标。
- 在“Create Global Function(创建全局函数)”页面上,填写以下字段:
- 在函数名称字段中,将函数的名称指定为 OCMCreateRepositoryCollectionFunction 。
- 从返回下拉菜单中选择字符串。
- 在说明字段中,输入文本“在指定的 OCMRepositoryId 中创建新 OCMCollectionName 并返回新创建的集合 ID”。
- 在“参数”部分中,单击添加参数图标并添加以下字段:
名称 Type OCMRepositoryId 字符串 OCMCollectionName 字符串 - 在编辑脚本字段中,粘贴以下脚本:
println("Create OCM Collection " + OCMCollectionName + " within the Asset Repository Id: " + OCMRepositoryId); def params = [:] params.name = OCMCollectionName def OCMCollection = [:] try { def OCMCreateRepositoryCollectionService = adf.webServices.OCMCreateRepositoryCollectionService OCMCreateRepositoryCollectionService.requestHTTPHeaders = ['X-Requested-With': 'XMLHttpRequest'] OCMCollection = OCMCreateRepositoryCollectionService.POST(OCMRepositoryId, params) println("OCM Collection Created: " + OCMCollection) return OCMCollection.id } catch (Exception e) { println("OCM Create Respository(" + OCMRepositoryId + ") Collection(" + OCMCollectionName + ") Error: " + e) } - 单击保存和关闭。
OCMGetDocumentsByFolderIdFunction
要在将用于访问 OCMGetDocumentsByFolderIdService Web 服务的新“创建全局函数”页中创建“按文件夹 ID 获取文档”全局功能,请填写以下字段:
注:
仅当 Oracle Sales and Service 业务对象具有解析选项并且已配置了 OCM 文档集成时,才需要此全局功能。有关文档集成的更多信息,请参阅了解如何使用文档协作扩展 Oracle Sales and Service Business Objects。- 在函数名称字段中,将函数的名称指定为 OCMGetDocumentsByFolderIdFunction 。
- 从返回下拉菜单中选择列表。
- 在说明字段中,输入文本“返回基于指定 OCMFolderId(也包括子文件夹)的 OCM 文档 ID 列表”。
- 在“参数”部分中,单击添加参数图标。
在名称字段中,将名称指定为 OCMFolderId ,然后从类型下拉菜单中选择字符串。
- 在编辑脚本字段中,粘贴以下脚本:
def response = [:] def items = [] try { response = adf.webServices.OCMGetDocumentsByFolderIdService.GET(OCMFolderId) for(item in response.items){ items.add(item["id"]) } println("OCM Get Documents By Folder Id " + OCMFolderId + " Result(" + items.size() + "): " + items) return items } catch (Exception e) { println("Get OCM Documents By Folder Id Error: " + e) } - 单击保存和关闭。
OCMCopyDocumentsToRepositoryCollectionFunction
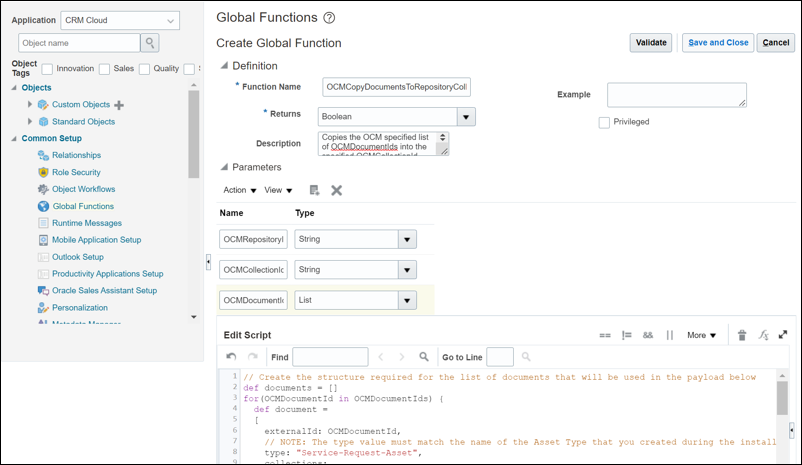
要在将用于访问 OCMBulkOperationsService Web 服务的新“创建全局函数”页中创建 OCM 将文档复制到资源库集合全局函数,请填写以下字段:
注:
仅当 Oracle Sales and Service 业务对象具有解析选项并且已配置了 OCM 文档集成时,才需要此全局功能。有关文档集成的更多信息,请参阅了解如何使用文档协作扩展 Oracle Sales and Service Business Objects。- 在函数名称字段中,将函数的名称指定为 OCMCopyDocumentsToRepositoryCollectionFunction 。
- 从返回下拉菜单中选择布尔值。
- 在说明字段中,在指定的 OCMRepositoryId 中将 OCM 指定的 OCMDocumentIds 列表复制到指定的 OCMCollectionId 中。
- 在“参数”部分中,单击添加参数图标并添加以下字段:
名称 Type OCMRepositoryId 字符串 OCMCollectionId 字符串 OCMDocumentIds 列表 - 在编辑脚本字段中,粘贴以下脚本:
// Create the structure required for the list of documents that will be used in the payload below
def documents = []
for(OCMDocumentId in OCMDocumentIds) {
  def document =
  [
    externalId: OCMDocumentId,
    // NOTE: The type value must match the name of the Asset Type that you created during the installation
    type: "Service-Request-Asset",
    collections:
    [
      data: [OCMCollectionId]
    ]
  ]

  documents.add(document)
}

// Create the payload required to make the addToRepository bulk operation call
def payload =
[
  operations:
  [
    addToRepository:
    [
      connectorId: "Documents",
      repositoryId: OCMRepositoryId,
      externalItems: documents
    ]
  ]
]

try {
  def OCMBulkOperationsService = adf.webServices.OCMBulkOperationsService
  OCMBulkOperationsService.requestHTTPHeaders = ['X-Requested-With': 'XMLHttpRequest']
  OCMBulkOperationsService.POST(payload)
  println("OCM Documents Copied To Repository: " + OCMRepositoryId + "(" + OCMCollectionId + "): (" + OCMDocumentIds + ")")
  return true
} catch (Exception e) {
  println("Copy OCM Documents To Repository Error: " + e)
  return false
}
注:
上面的脚本中的类型值必须与您之前创建的资产类型的名称匹配。 - 单击保存和关闭。
OCMIsRepositoryCollectionSharedAsContributorFunction
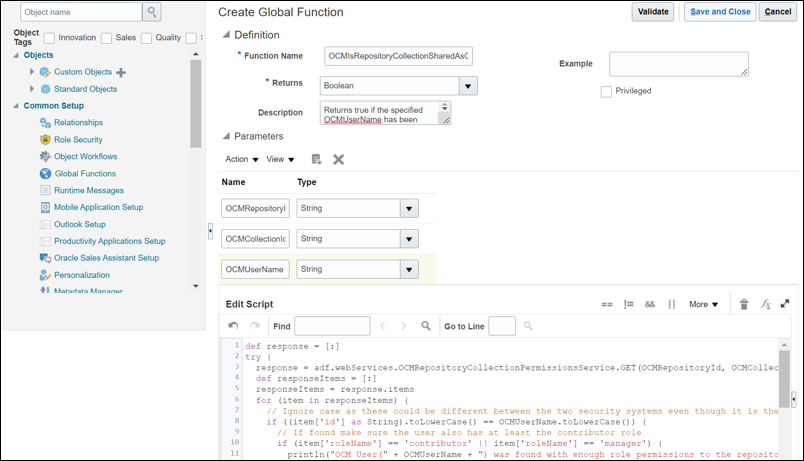
要在将用于访问 OCMRepositoryCollectionPermissionsService Web 服务的新“创建全局函数”页中创建将作为贡献者共享的 OCM 资料档案库集合全局函数,请填写以下字段:
- 在函数名称字段中,将函数的名称指定为 OCMIsRepositoryCollectionSharedAsContributorFunction 。
- 从返回下拉菜单中选择布尔值。
- 在说明字段中,输入文本“如果指定的 OCMUserName 已与指定 OCMRespositoryId 中的指定 OCMCollectionId 共享,且至少具有一个贡献者角色,则返回真”。
- 在“参数”部分中,单击添加参数图标并添加以下字段:
名称 Type OCMRepositoryId 字符串 OCMCollectionId 字符串 OCMUserName 字符串 - 在编辑脚本字段中,粘贴以下脚本:
def response = [:] try { response = adf.webServices.OCMRepositoryCollectionPermissionsService.GET(OCMRepositoryId, OCMCollectionId) def responseItems = [:] responseItems = response.items for (item in responseItems) { // Ignore case as these could be different between the two security systems even though it is the same user if ((item['id'] as String).toLowerCase() == OCMUserName.toLowerCase()) { // If found make sure the user also has at least the contributor role if (item['roleName'] == 'contributor' || item['roleName'] == 'manager') { println("OCM User(" + OCMUserName + ") was found with enough role permissions to the repository collection: " + OCMRepositoryId + "(" + OCMCollectionId + ")") return true } else { println("OCM User(" + OCMUserName + ") was found but without enough role permissions to the repository collection: " + OCMRepositoryId + "(" + OCMCollectionId + ")") return false } } } println("OCM User(" + OCMUserName + ") does not have permissions to the repository: " + OCMRepositoryId) return false } catch (Exception e) { println("OCM Is Repository Collection Shared As Contributor Error: " + e) return false } - 单击保存和关闭。
OCMShareCollectionFunction
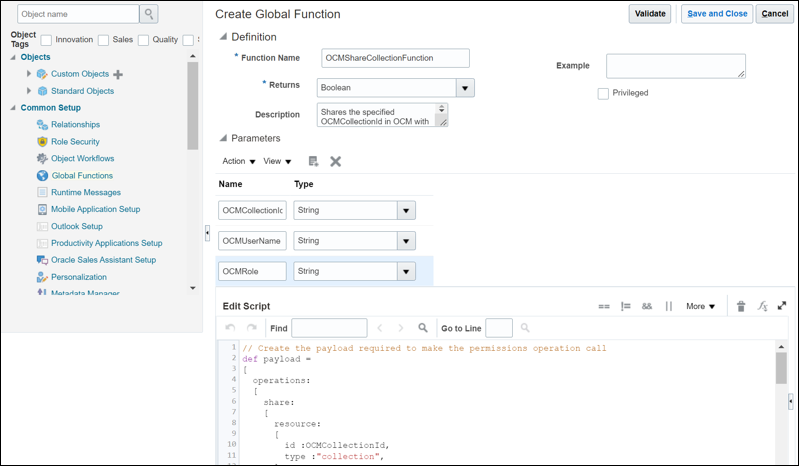
要在将用于访问 OCMPermissionOperationsService Web 服务的新“创建全局函数”页中创建 OCM 共享集合全局函数,请填写以下字段:
- 在函数名称字段中,将函数的名称指定为 OCMShareCollectionFunction 。
- 从返回下拉菜单中选择布尔值。
- 在说明字段中,输入文本“共享 OCM 中指定的 OCMCollectionId,并指定 OCMUserName 和 OCMRole”。
- 在“参数”部分中,单击添加参数图标并添加以下字段:
名称 Type OCMCollectionId 字符串 OCMUserName 字符串 OCMRole 字符串 - 在编辑脚本字段中,粘贴以下脚本:
// Create the payload required to make the permissions operation call def payload = [ operations: [ share: [ resource: [ id :OCMCollectionId, type :"collection", ], roles: [[ name :OCMRole, users: [[ name :OCMUserName, type :"user", ]], ]], ], ] ] def response = [:] try { def OCMPermissionOperationsService = adf.webServices.OCMPermissionOperationsService OCMPermissionOperationsService.requestHTTPHeaders = ['X-Requested-With': 'XMLHttpRequest', 'content-type': 'application/json'] response = OCMPermissionOperationsService.POST(payload) // Check the response to make sure we do not have a failure def hasFailedRoles = response?.operations?.share?.failedRoles if (hasFailedRoles == null) { println("OCM Collection Shared: " + OCMCollectionId + "(" + OCMUserName + ":" + OCMRole + ")") return true } else { println("Share OCM Collection Failed: " + response) return false } } catch (Exception e) { println("Share OCM Collection Error: " + e) return false } - 单击保存和关闭。


