注意:
- 此教學課程需要存取 Oracle Cloud。若要註冊免費帳戶,請參閱開始使用 Oracle Cloud Infrastructure Free Tier 。
- 它會使用 Oracle Cloud Infrastructure 證明資料、租用戶及區間的範例值。完成實驗室時,請將這些值替代為您雲端環境特定的值。
使用 Oracle Cloud API Gateway 建立具備函數認證的安全物件儲存下載服務
簡介
Oracle Cloud Object Storage 是非常便宜的有效地儲存大型或小型檔案。物件儲存體允許在事件導向架構中運作,讓流程以接近即時的方式執行。您可以在物件儲存中設定事件以觸發事件,也可以建立 REST 服務,以安全、快速且低廉地從物件儲存寫入或讀取檔案。
如果您有興趣瞭解如何導入事件導向架構,請參閱使用 Oracle Cloud Infrastructure Data Flow 在 Autonomous Database 和 Kafka 中處理大型檔案。
架構
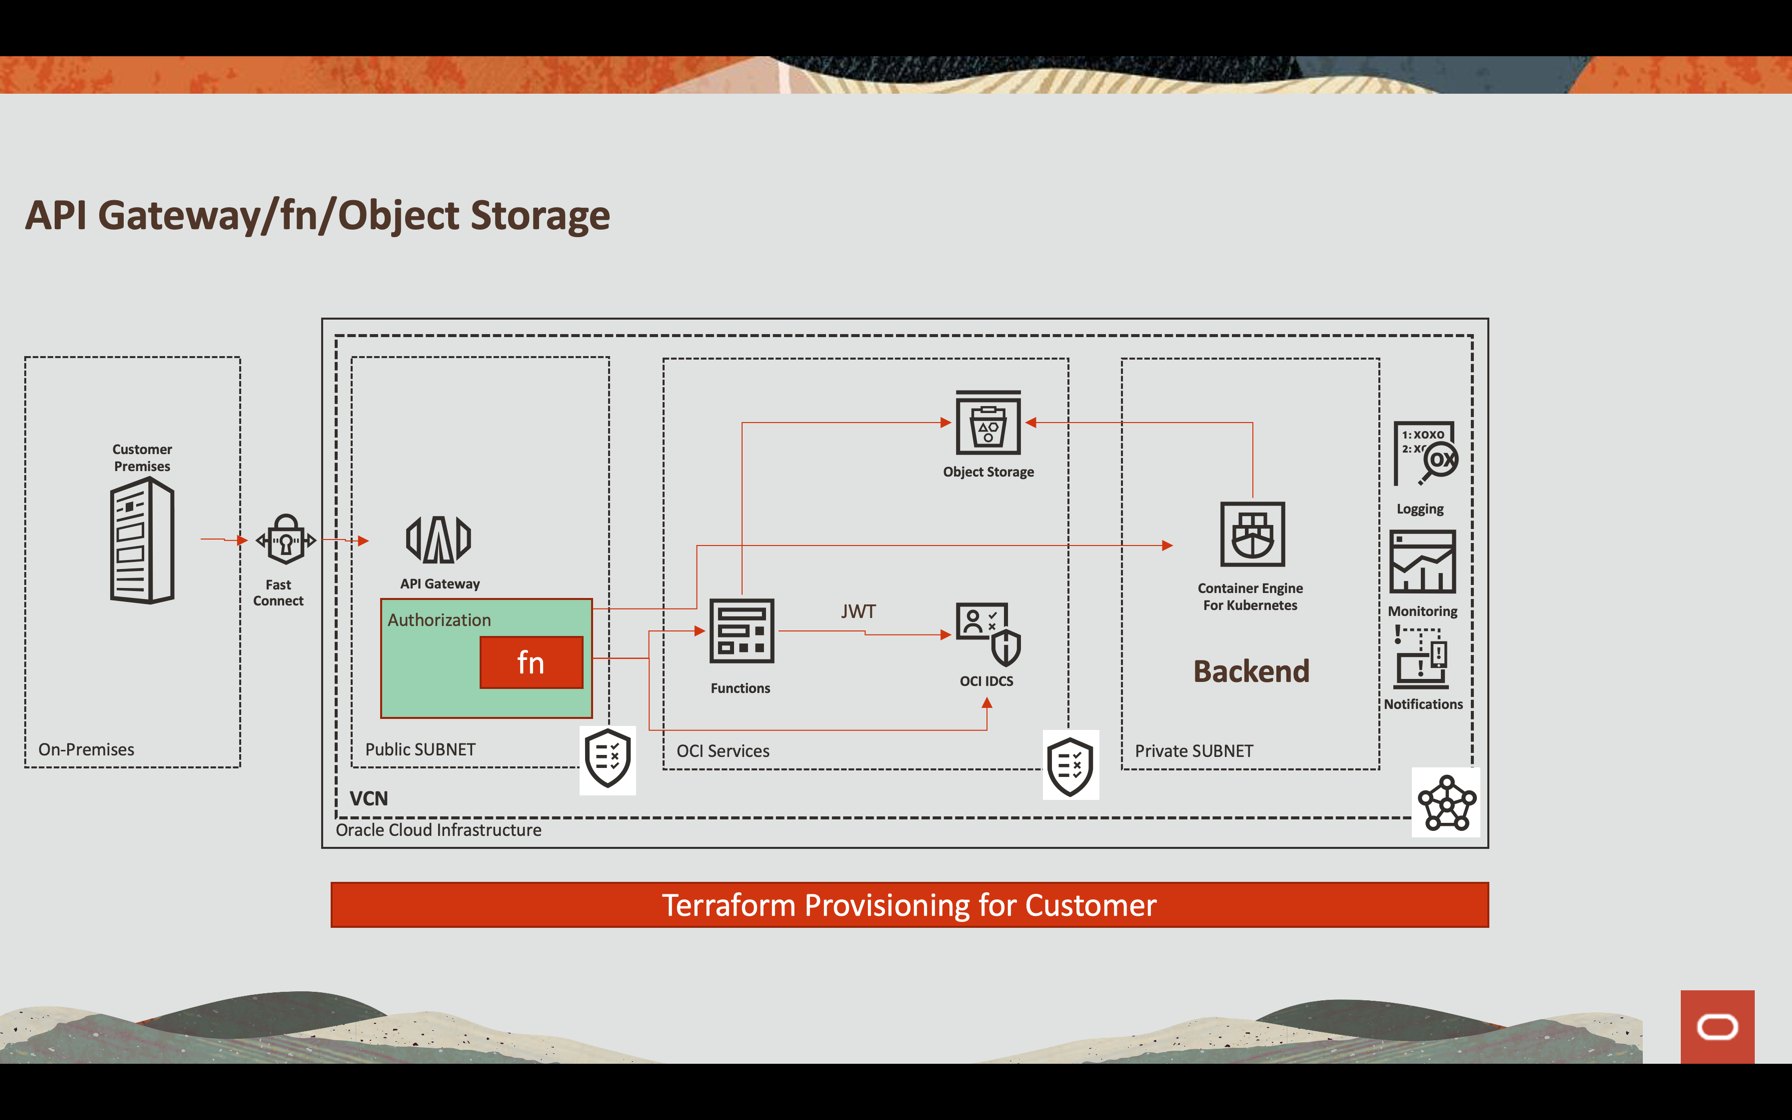
Oracle API Gateway 整合
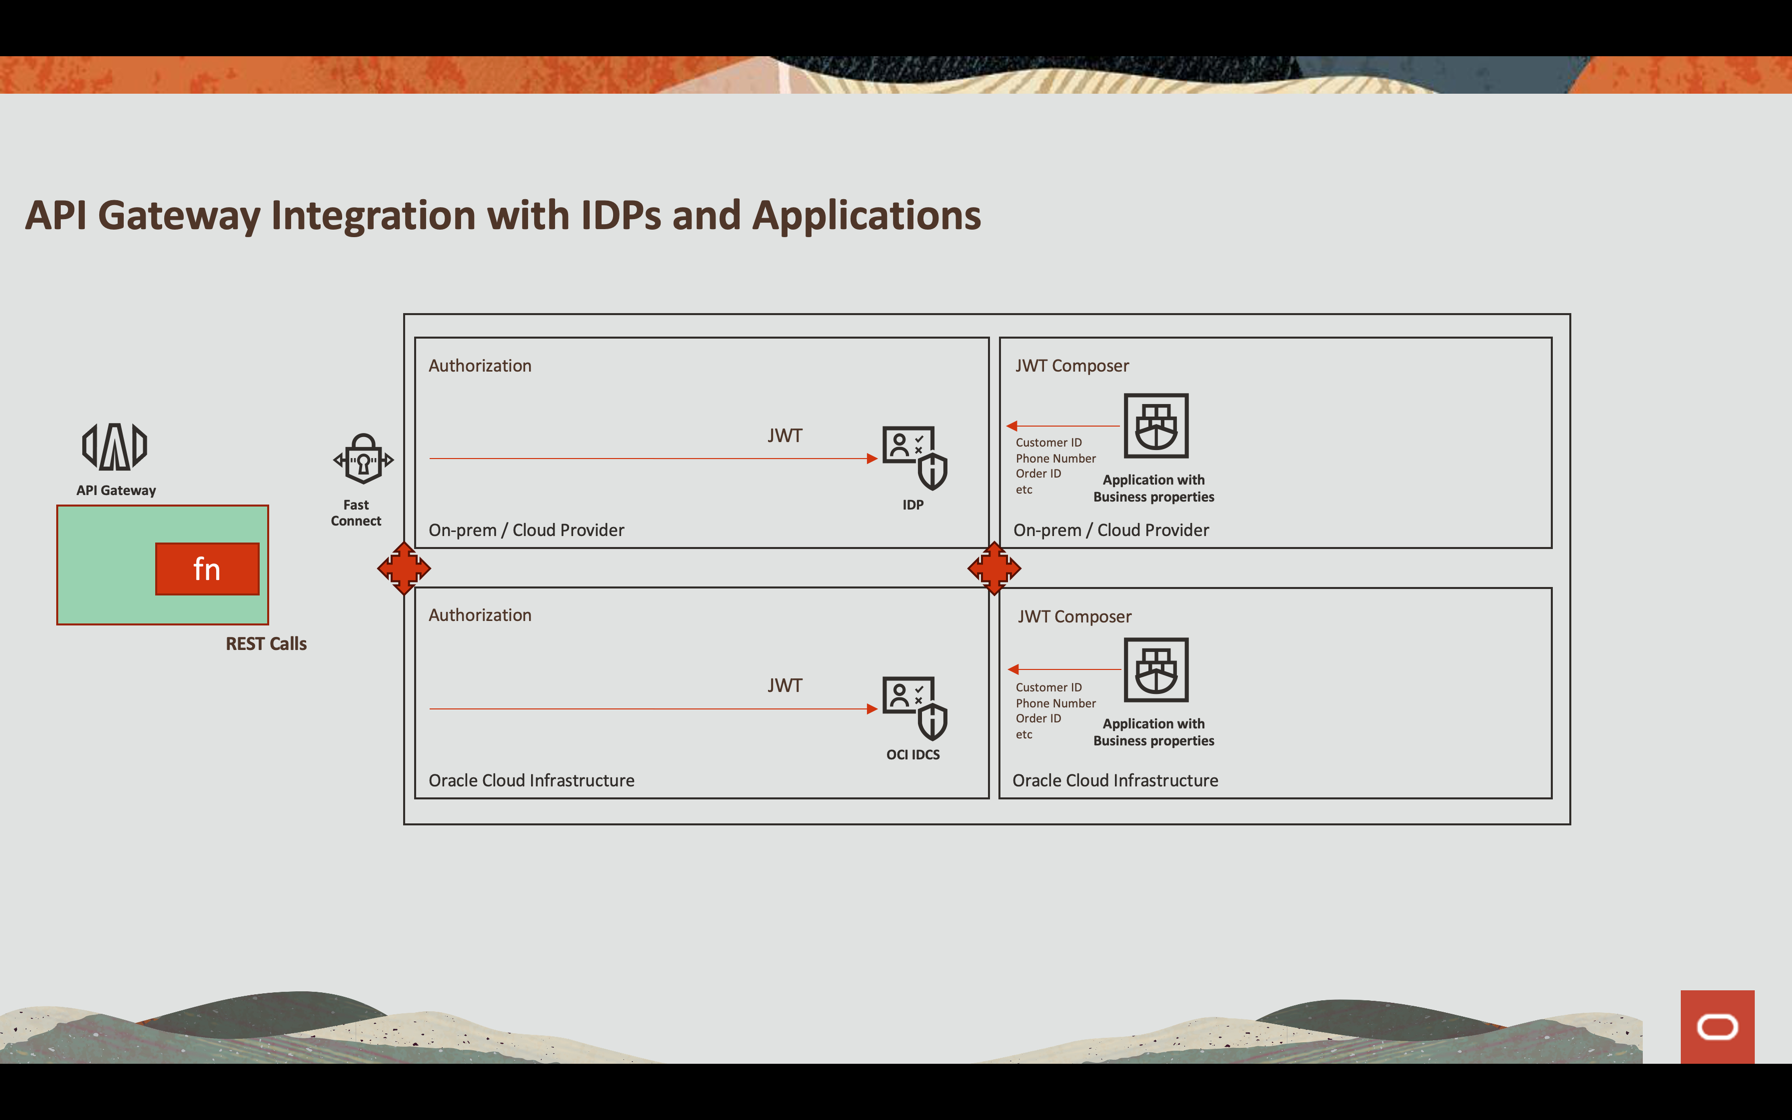
本教學課程將說明如何設定 Oracle API Gateway 以透過允許 (以靈活的方式) 透過外部身分識別提供者或 Oracle Cloud Infrastructure (OCI) 本身 (Oracle Identity Cloud Service) 認證 JWT 權杖的功能導入 REST 服務。無論流程為何,您可以驗證 JWT 權杖 (因為屬性可以是檔案名稱的一部分),透過其 SDK 和其他可自訂的處理作業來使用 OCI 服務。
目標
- 顯示 API REST 服務,以安全的方式從物件儲存下載檔案
- 使用 OCI API 閘道與 OCI 函數認證
- 傳回一個預先認證連結,其下載時間為 60 秒
- 設定可觀察性以監督檔案寫入與讀取
必要條件
-
已建立並設定 OCI 物件儲存的儲存桶,其中包含寫入和讀取檔案所需的原則。請參閱物件儲存體安全。
-
操作 Oracle Cloud 租用戶:您可以建立一個每月 $ 300.00 的免費 Oracle Cloud 帳戶,試用本教學課程。請參閱建立免費 Oracle Cloud 帳戶。
-
您本機機器上安裝的 Oracle Cloud 命令行介面 (OCI CLI):這是安裝 OCI CLI 的連結。
-
OCI 函數和為開發設定的原則。此範例是在 Python 中導入的。如需詳細資訊,請參閱 Functions QuickStart Guides 。
-
已建立並公開至網際網路的 OCI API 閘道執行處理。請參閱在 Oracle Cloud 中建立您的第一個 API 閘道。
-
存取您的 Oracle Identity Cloud Service。
作業 1:在 Oracle Identity Cloud Service 中設定應用程式
您可以設定任何 REST API 外部身分識別提供者,以使用 JWT (例如 Auth0 和 Oracle Identity Cloud Service)。
在本教學課程中,我們將使用 Oracle Identity Cloud Service 並呼叫函數內部的認證。
-
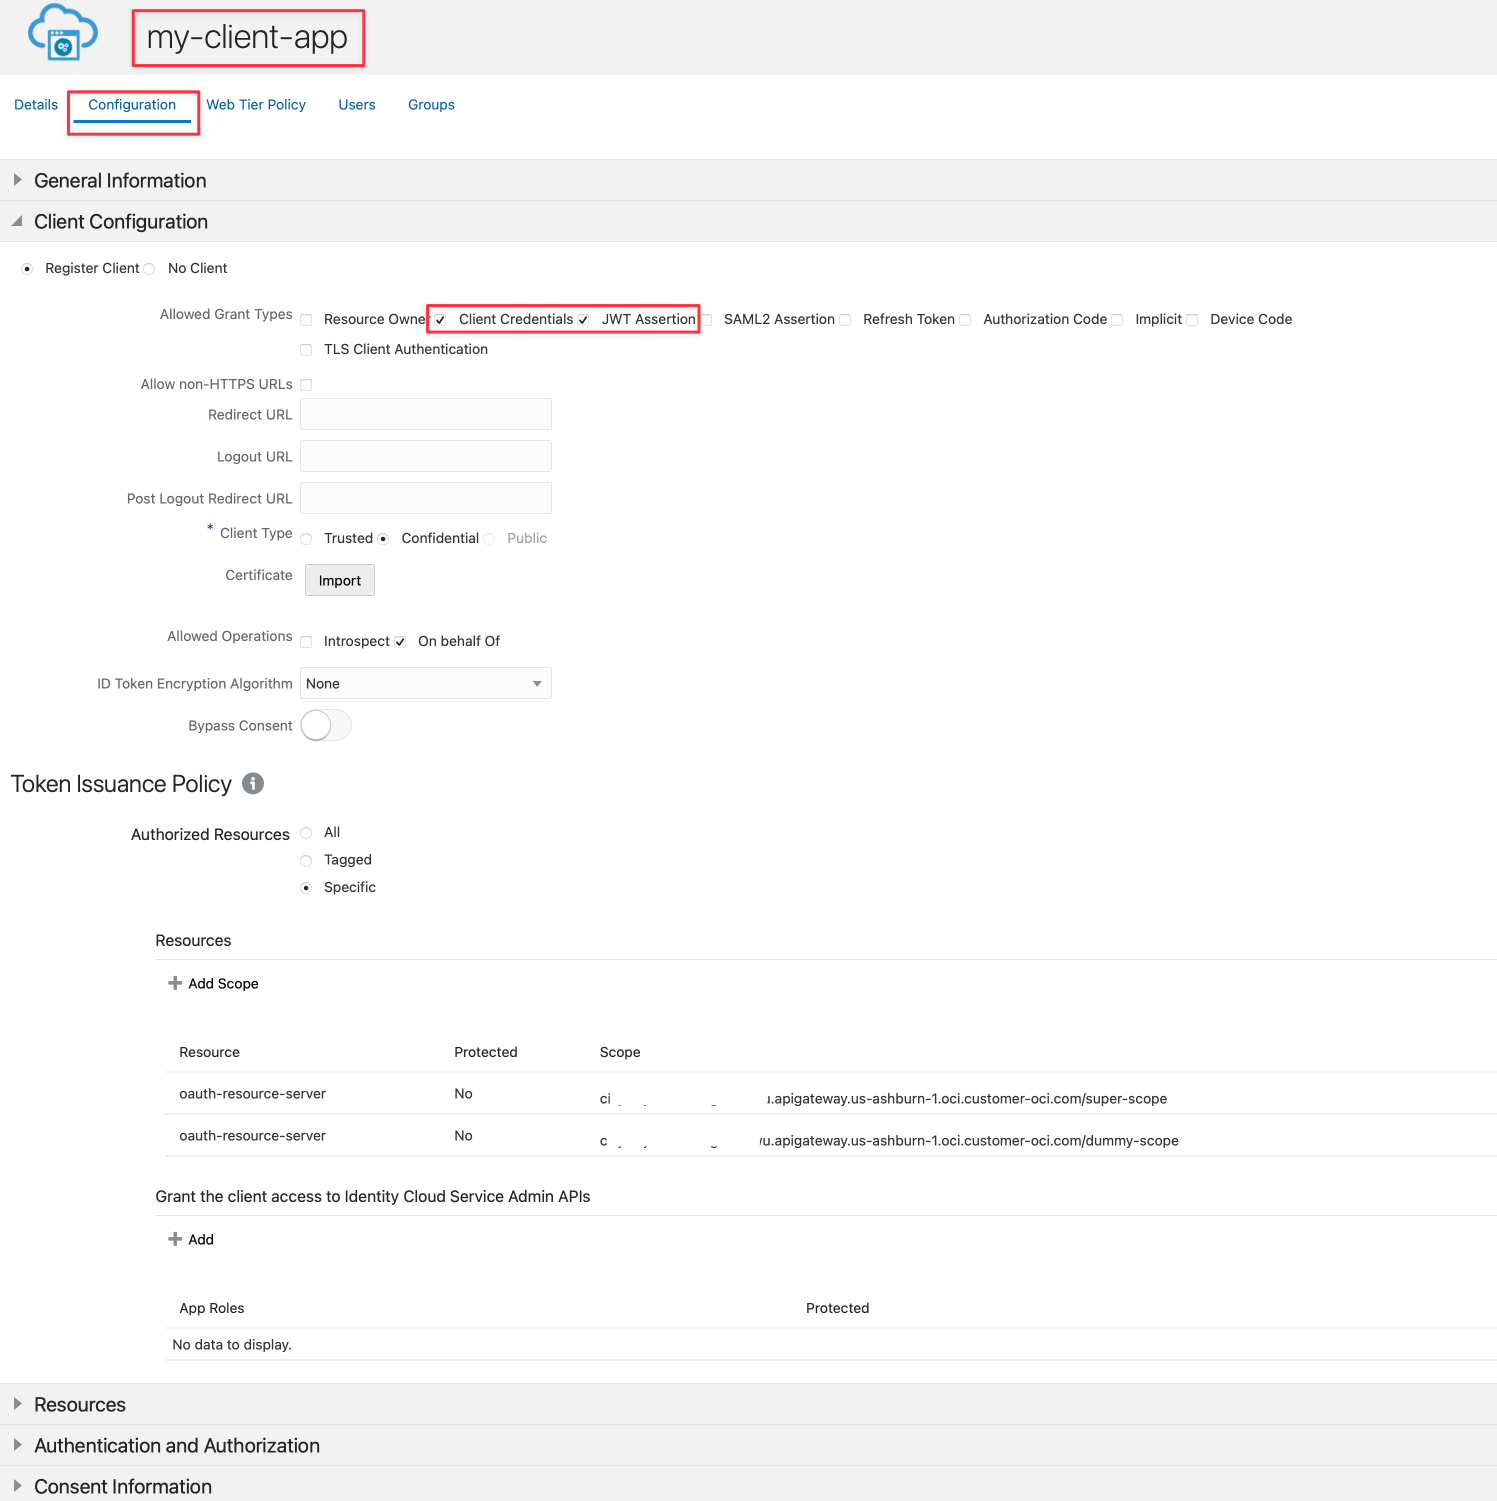
在 Oracle Identity Cloud Service 中建立名為 my-client-app 的應用程式。
-
選取從屬端證明資料 (Client Credentials) 和 JWT Assertion 選項。
-
如需組態詳細資訊,請參閱使用 Oracle Identity Cloud Service/IAM JWT 搭配 Scopes and Claims 來保護 API 閘道的 API 。
注意:此認證範例只反映出識別使用者與儲存桶其他相關資訊的假設情況。這可能無法反映驗證和授權應用程式的最佳方式,建議您根據公司的標準進行評估。
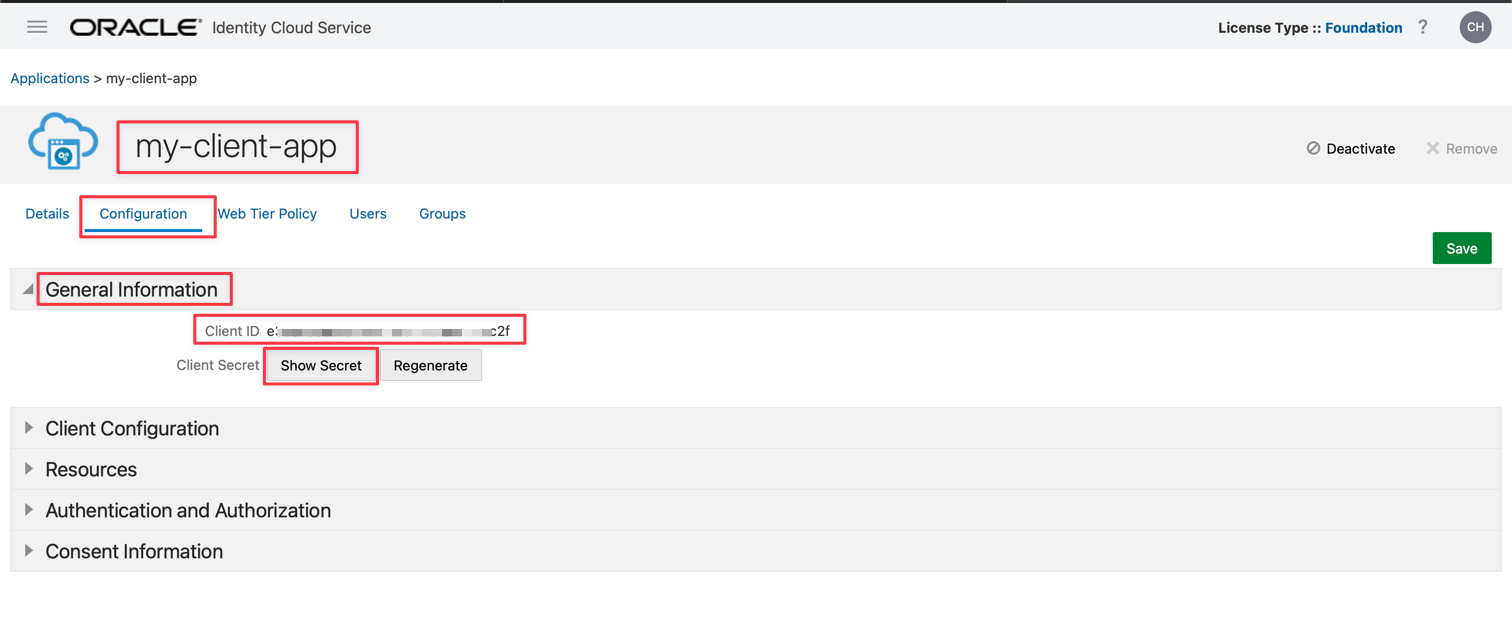
-
儲存並啟用您的應用程式。您可以取得要在下一節使用的 clientID 和 secretID 。
作業 2:複查代碼
這是 API 閘道部署中使用的 Python 程式碼,用來授權預先認證連結以下載物件儲存中的檔案。
您可以在這裡下載 Python 程式碼:Python fn 專案。
python
import io
import json
import logging
import datetime
import jwt
import requests
import base64
import oci

from datetime import timedelta
from fdk import response
from py_zipkin import Encoding #import Zipkin package
from py_zipkin.zipkin import zipkin_span #import Zipkin package
from transport import http_transport #import Zipkin transport

@zipkin_span(service_name='Status: Load File', span_name='statusGetFile')
def auth(ctx, data: io.BytesIO = None):
    auth_token = "invalid"
    token = "invalid"
    apiKey = "invalid"
    expiresAt = (datetime.datetime.utcnow() + timedelta(seconds=60)).replace(tzinfo=datetime.timezone.utc).astimezone().replace(microsecond=0).isoformat()

    config = oci.config.from_file("config")
    object_storage = oci.object_storage.ObjectStorageClient(config)
    namespace = object_storage.get_namespace().data

    try:
        auth_token = json.loads(data.getvalue())
        secretID = auth_token.get("secretID")
        clientID = auth_token.get("clientID")

        details = oci.object_storage.models.CreatePreauthenticatedRequestDetails(name="data", access_type="AnyObjectReadWrite", bucket_listing_action="ListObjects", time_expires=expiresAt)

        preauth = object_storage.create_preauthenticated_request(namespace_name=namespace, bucket_name="data", create_preauthenticated_request_details=details)
        preauthstr = str(preauth.data)

        auth = clientID + ":" + secretID
        auth_bytes = auth.encode("ascii")
        auth_base64_bytes = base64.b64encode(auth_bytes)
        auth_base64_message = auth_base64_bytes.decode("ascii")

        headers = {"Authorization": "Basic " + auth_base64_message, "Content-Type": "application/x-www-form-urlencoded"}

        scope = "cihxxxxxxxxxxxxxxxxxowu.apigateway.us-ashburn-1.oci.customer-oci.com/super-scope"
        grant_type = "client_credentials"

        body = {"scope": scope, "grant_type": grant_type}

        url_post = "https://Oracle Identity Cloud Service-4fxxxxxxxxxxxxxxxxxxxxxx9.identity.oraclecloud.com/oauth2/v1/token"
        post_response = requests.post(url_post, headers=headers, data=body)

        jwtTokenDecoded = jwt.decode(post_response.json()['access_token'], options={"verify_signature": False})

        return response.Response(
            ctx,
            status_code=200,
            response_data=json.dumps({"active": True, "principal": "foo", "scope": "bar", "clientId": "1234", "expiresAt": expiresAt, "context": {"username": "wally", "token":
post_response.json()['access_token'], "jwtTokenDecoded": jwtTokenDecoded, "objectID": preauthstr}})
        )

    except (Exception, ValueError) as ex:
        logging.getLogger().info('error parsing json payload: ' + str(ex))
        pass

    return response.Response(
        ctx,
        status_code=401,
        response_data=json.dumps({"active": False, "wwwAuthenticate": "API-key"})
    )

@zipkin_span(service_name='Status: Load File', span_name='statusGetFile')
def handler(ctx, data: io.BytesIO = None):
    with zipkin_span(
            service_name="Status: Load File", #You can change it as you need
            span_name="statusGetFile", #You can change it as you need
            transport_handler=http_transport, #zipkin transport, will use it to upload trace data to OCI APM
            encoding = Encoding.V2_JSON,
            binary_annotations = {"status":"Load File", "objectID":json.loads(data.getvalue()).get("objectID")}, #Custom tag
            sample_rate=100 # this is optional and can be used to set custom sample rates
    ):
        return auth(ctx, data)
讓我們分析部分的程式碼,以瞭解如何:
- 依照 OCI 可觀測性中的程序
- 設定用於下載物件儲存中檔案的預先認證連結
- 與身分識別提供者認證並取得 JWT 權杖
- 解碼 JWT 記號並使用程序中的資訊
- 傳回 API 閘道部署中的成功或失敗狀態
這部分的程式碼會儲存 OCI Observability 中的狀態位置。它使用 Zipkin 架構來發佈至 OCI APM 可觀察性
python
@zipkin_span(service_name='Status: Load File', span_name='statusGetFile')
def handler(ctx, data: io.BytesIO = None):
    with zipkin_span(
            service_name="Status: Load File", #You can change it as you need
            span_name="statusGetFile", #You can change it as you need
            transport_handler=http_transport, #zipkin transport, will use it to upload trace data to OCI APM
            encoding = Encoding.V2_JSON,
            binary_annotations = {"status":"Load File", "objectID":json.loads(data.getvalue()).get("objectID")}, #Custom tag
            sample_rate=100 # this is optional and can be used to set custom sample rates
    ):
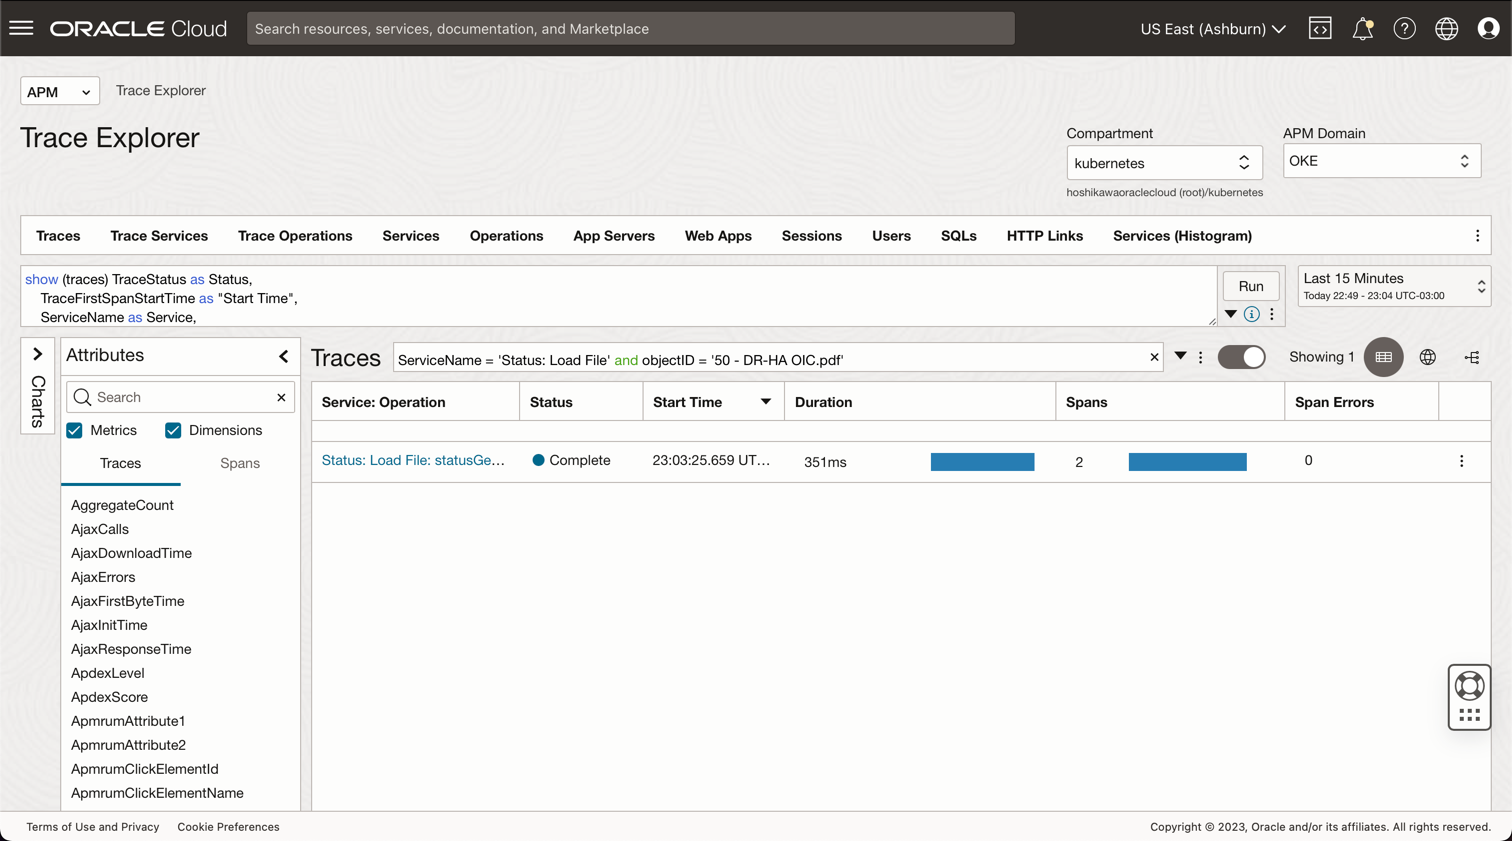
這是程式碼的 OCI APM 主控台檢視,您可以在下列查詢找到您的檔案:
**ServiceName** = 'Status: Load File' and **objectID** = '50 - DR-HA OIC.pdf'
下一個程式碼會儲存 Object Storage 檔案的到期日和時間。此目標將產生預先認證,並且將使用屬性 expiresAt 。 timedelta 從目前下載檔案的時間增加 60 秒。
python
expiresAt = (datetime.datetime.utcnow() + timedelta(seconds=60)).replace(tzinfo=datetime.timezone.utc).astimezone().replace(microsecond=0).isoformat()
現在,我們必須根據 OCI CLI 安裝中儲存的證明資料初始化 OCI Object Storage 架構。OCI CLI 配置使用 ~/.oci/config 和憑證 .pem 檔案。因此,您可以在本機安裝 OCI CLI 並設定使用者存取物件儲存 (請參閱 OCI 文件以在「相關連結」段落中安裝 OCI CLI 與物件儲存原則),然後將這 2 個檔案複製到此 fn 專案中。
python
config = oci.config.from_file("config")
object_storage = oci.object_storage.ObjectStorageClient(config)
namespace = object_storage.get_namespace().data
下一步將從 Body 參數值取得:secretID 、clientID 和 objectID 。
#secretID = the Oracle Identity Cloud Service secretID from the application created to validate the JWT Token
#clientID = the Oracle Identity Cloud Service clientID from the application created to validate the JWT Token
#objectID = the file name in the Object Storage
python
try:
    auth_token = json.loads(data.getvalue())
    secretID = auth_token.get("secretID")
    clientID = auth_token.get("clientID")
    objectID = auth_token.get("objectID")
OCI SDK 可支援許多服務的物件儲存,例如讀取和 (或) 寫入檔案、列出儲存桶的內容以及其他項目。例如,您可以讓使用者列出此程式碼部分將產生包含預先認證 URL 之儲存桶的所有內容。bucket_name 變數包含先前建立的物件儲存中儲存桶的名稱,而 time_expires 代表下載檔案的日期與時間到期。
python
details = oci.object_storage.models.CreatePreauthenticatedRequestDetails(name="data", access_type="AnyObjectReadWrite", bucket_listing_action="ListObjects", time_expires=expiresAt)

preauth = object_storage.create_preauthenticated_request(namespace_name=namespace, bucket_name="data", create_preauthenticated_request_details=details)
preauthstr = str(preauth.data)
這部分的程式碼會呼叫 Oracle Identity Cloud Service 來驗證 clientID 和 secretID 以取得 JWT 記號。在此情況下,JWT 不需簽章即可解碼為 JSON 字串,但可以透過憑證輕鬆驗證簽章。
python
auth = clientID + ":" + secretID
auth_bytes = auth.encode("ascii")
auth_base64_bytes = base64.b64encode(auth_bytes)
auth_base64_message = auth_base64_bytes.decode("ascii")

headers = {"Authorization": "Basic " + auth_base64_message, "Content-Type": "application/x-www-form-urlencoded"}

scope = "xxxxxxxxxxxxxxxxxxxx.apigateway.us-ashburn-1.oci.customer-oci.com/super-scope"
grant_type = "client_credentials"

body = {"scope": scope, "grant_type": grant_type}

url_post = "https://Oracle Identity Cloud Service-xxxxxxxxxxxxxxxxxxxxxxx.identity.oraclecloud.com/oauth2/v1/token"
post_response = requests.post(url_post, headers=headers, data=body)

jwtTokenDecoded = jwt.decode(post_response.json()['access_token'], options={"verify_signature": False})
這是最後一個部分,其中所有資料都會以代碼 200 傳回。您可以傳回應用程式所需的所有資訊,程式碼的這個部分會驗證認證,進而產生程式碼 200 (授權 / 成功) 或 401 (未授權)。
python
    return response.Response(
        ctx,
        status_code=200,
        response_data=json.dumps({"active": True, "principal": "foo", "scope": "bar", "clientId": "1234", "expiresAt": expiresAt, "context": {"username": "wally", "token": post_response.json()['access_token'], "jwtTokenDecoded": jwtTokenDecoded, "objectID": preauthstr}})
    )

except (Exception, ValueError) as ex:
    logging.getLogger().info('error parsing json payload: ' + str(ex))
    pass

return response.Response(
    ctx,
    status_code=401,
    response_data=json.dumps({"active": False, "wwwAuthenticate": "API-key"})
)
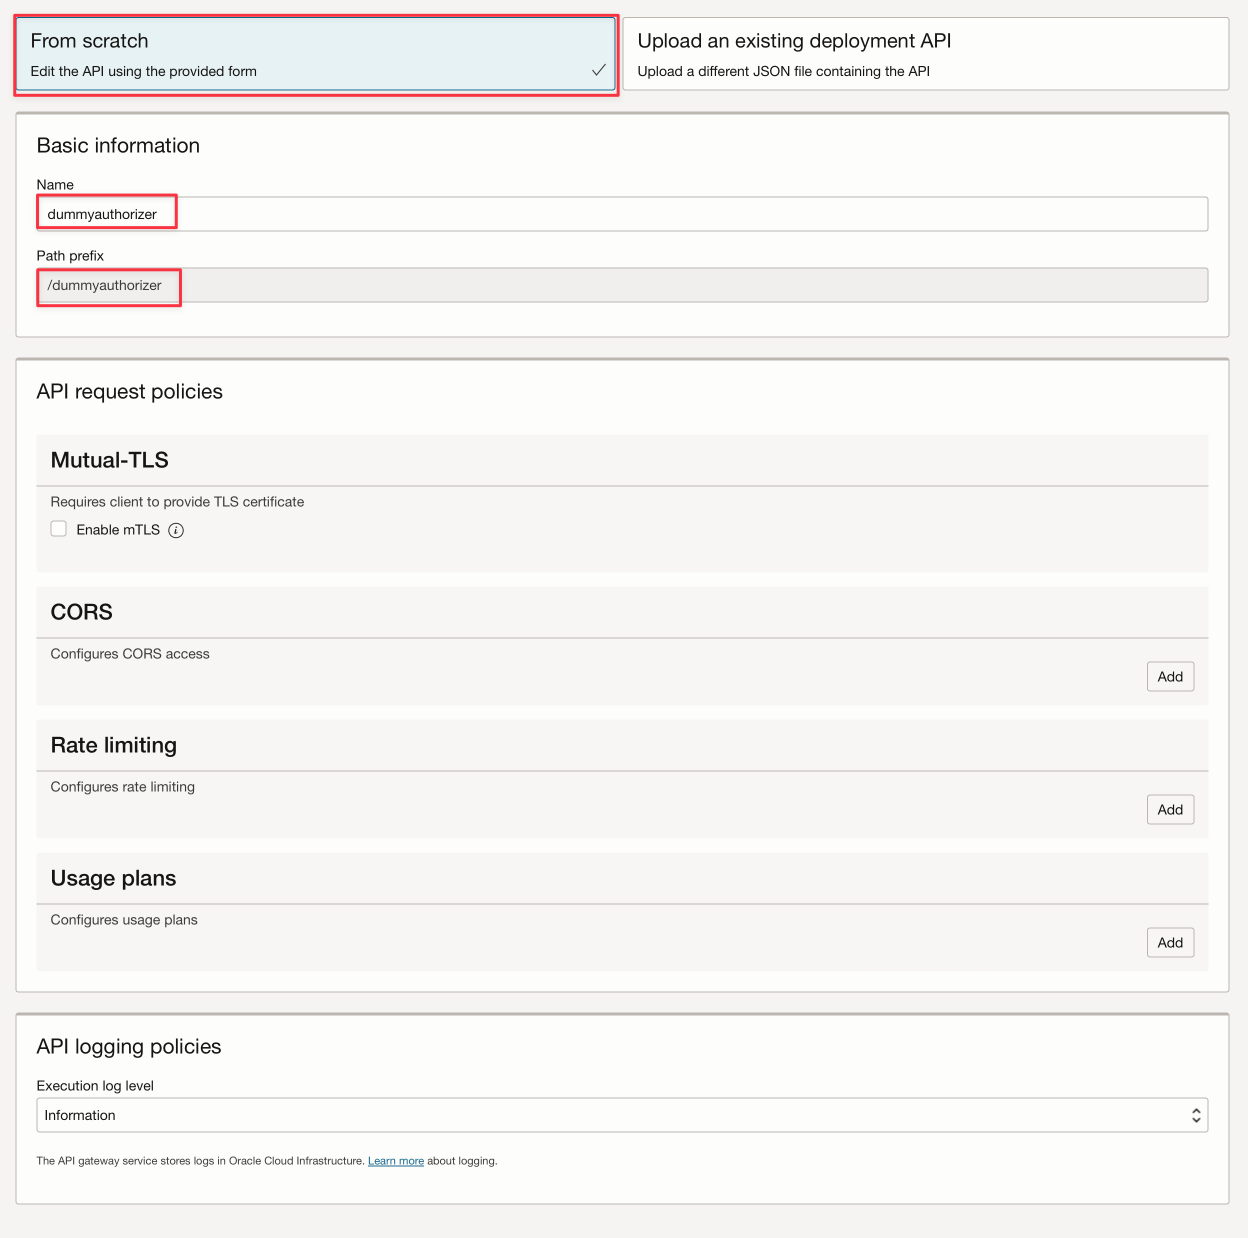
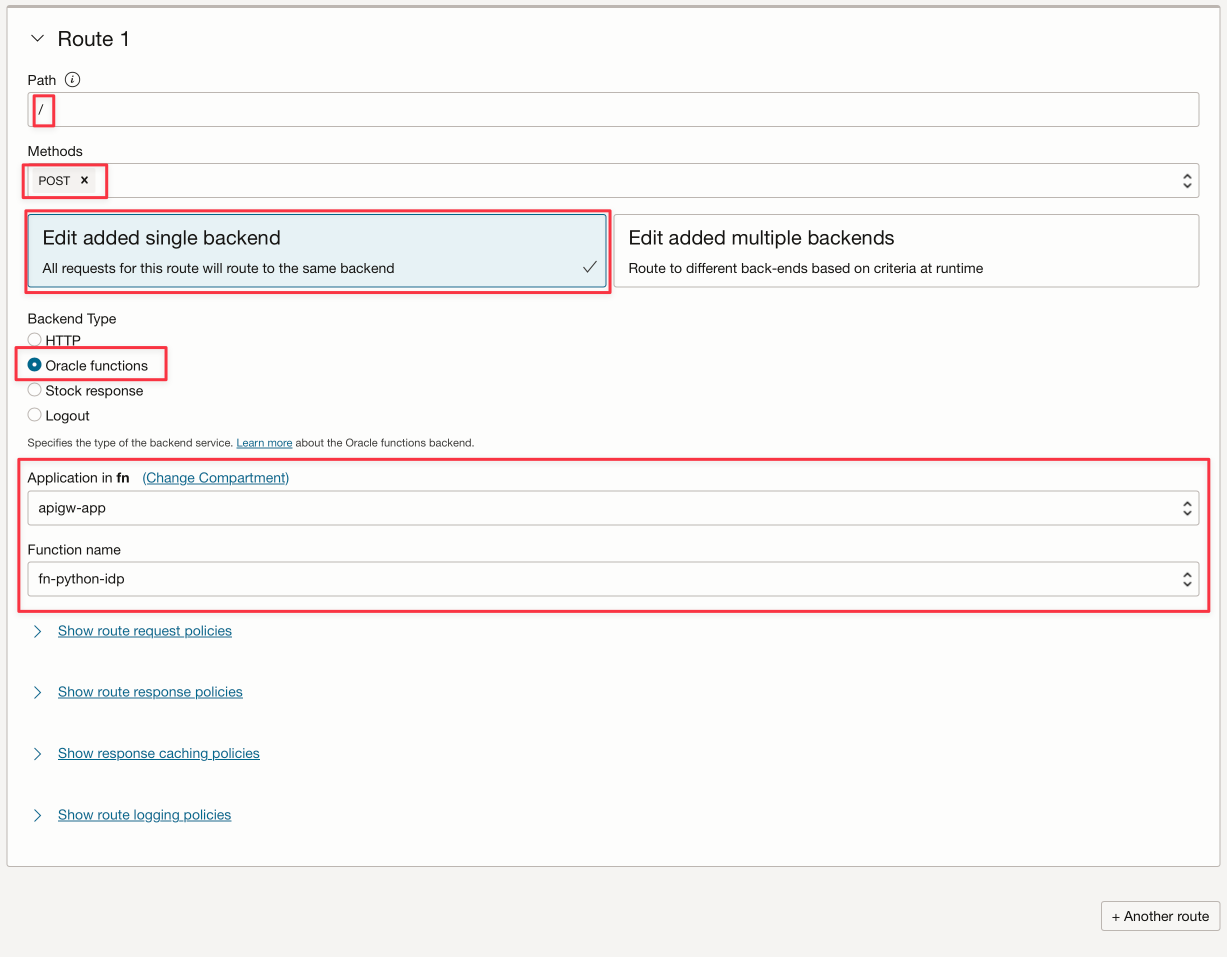
作業 3:設定 OCI API 閘道以使用 fn 進行認證
OCI API 閘道可以將 API 部署為 OCI 函數。如先前所見,程式碼使用由 API 閘道組態傳送的 body ,其中包含 clientID 、secretID 以及 objectID 資訊。您可以設定部署:

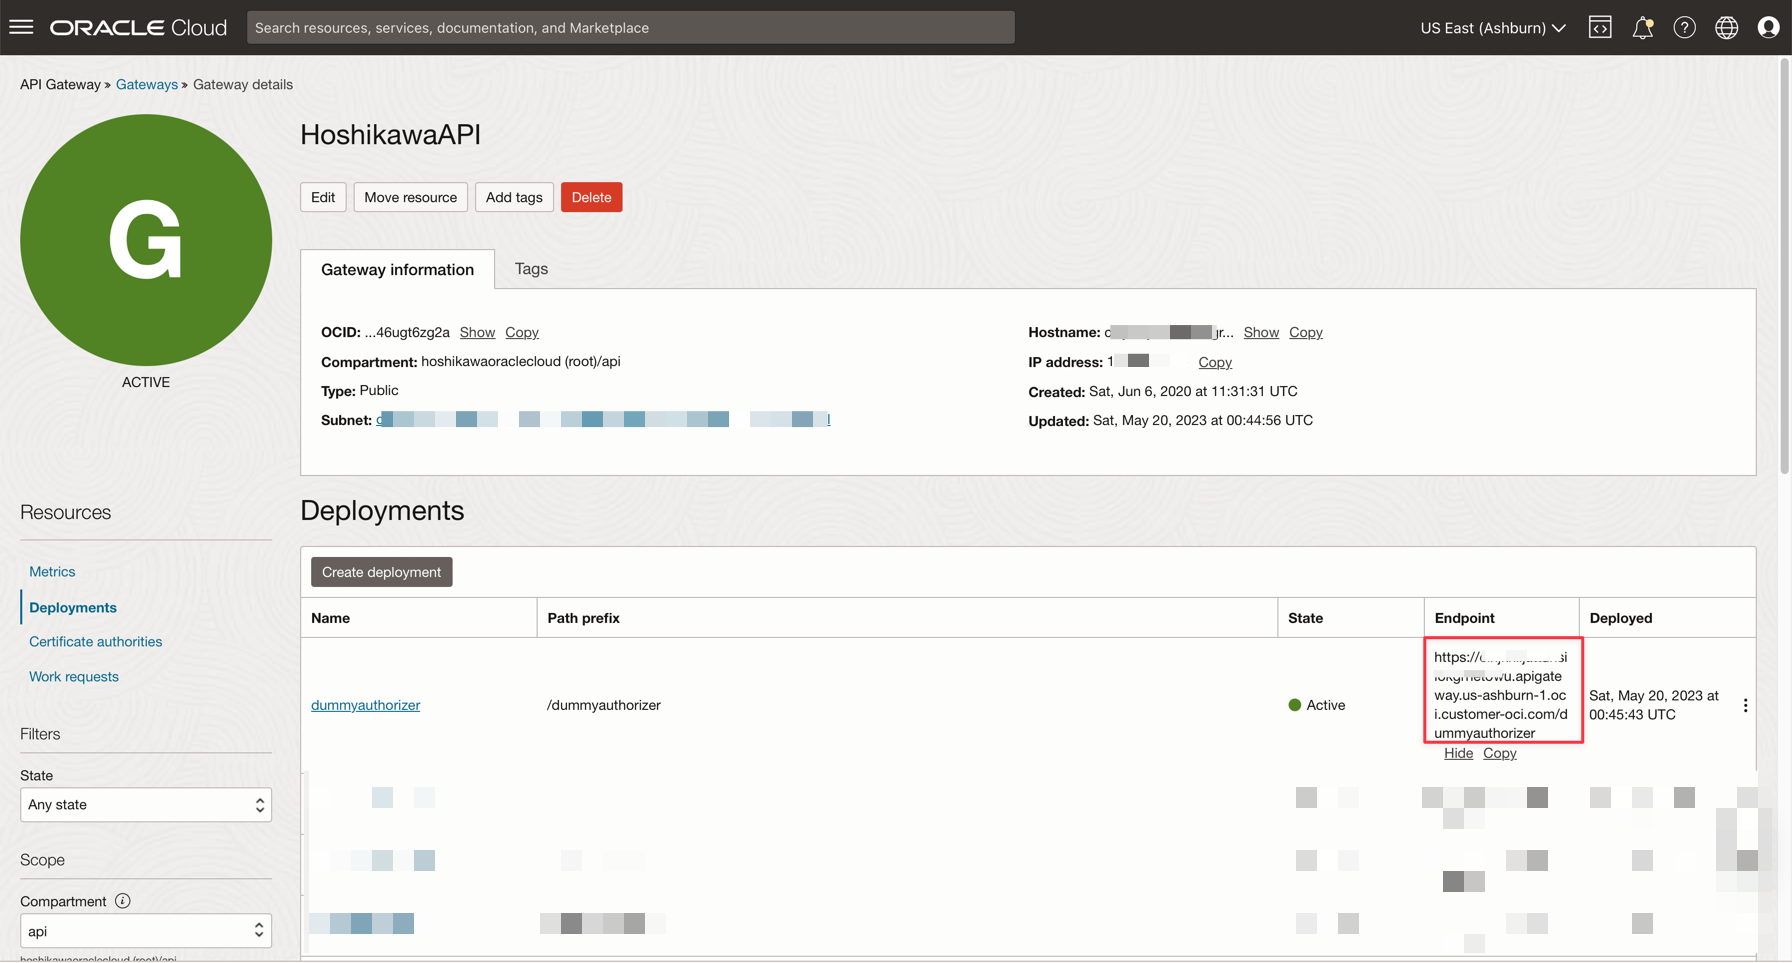
儲存部署之後,您可以在此處取得 REST 端點。請記住,您物件儲存 REST API 服務的完整端點是這個端點,再加上結尾的 "/" (事先宣告 / 作為您的路徑)。
作業 4:測試 API 閘道部署
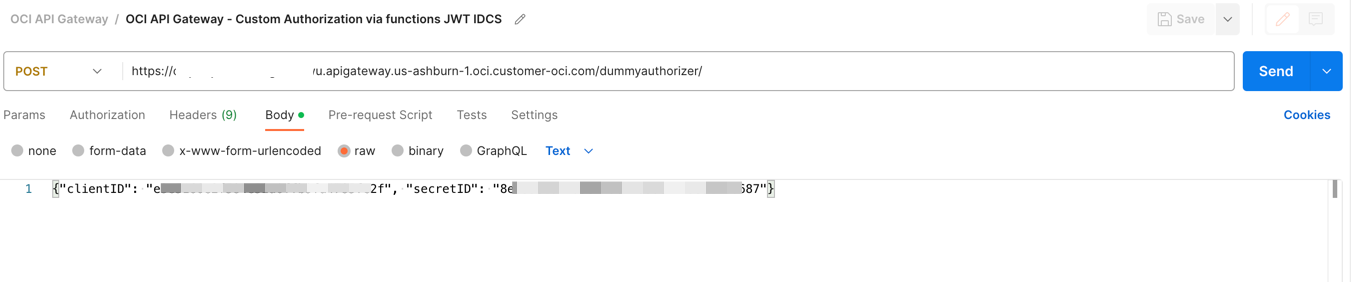
您可以使用 CURL 或 Postman 來測試應用程式:
bash
curl --location 'https://xxxxxxxxxxxxxxxxxxx.apigateway.us-ashburn-1.oci.customer-oci.com/dummyauthorizer/' \
--header 'Content-Type: text/plain' \
--data '{"clientID": "e3exxxxxxxxxxxxxxxxxc2f", "secretID": "8exxxxxxx-fa5e-xxcf-8xxxc-xxxxxxxxxxx87", "objectID": "any-file.txt"}'
注意:此處使用屬性
objectID來說明「可觀察性」,以及如何在 OCI 主控台的追蹤總管上顯示狀態。
如果一切沒問題,您可以看到成功代碼 200:
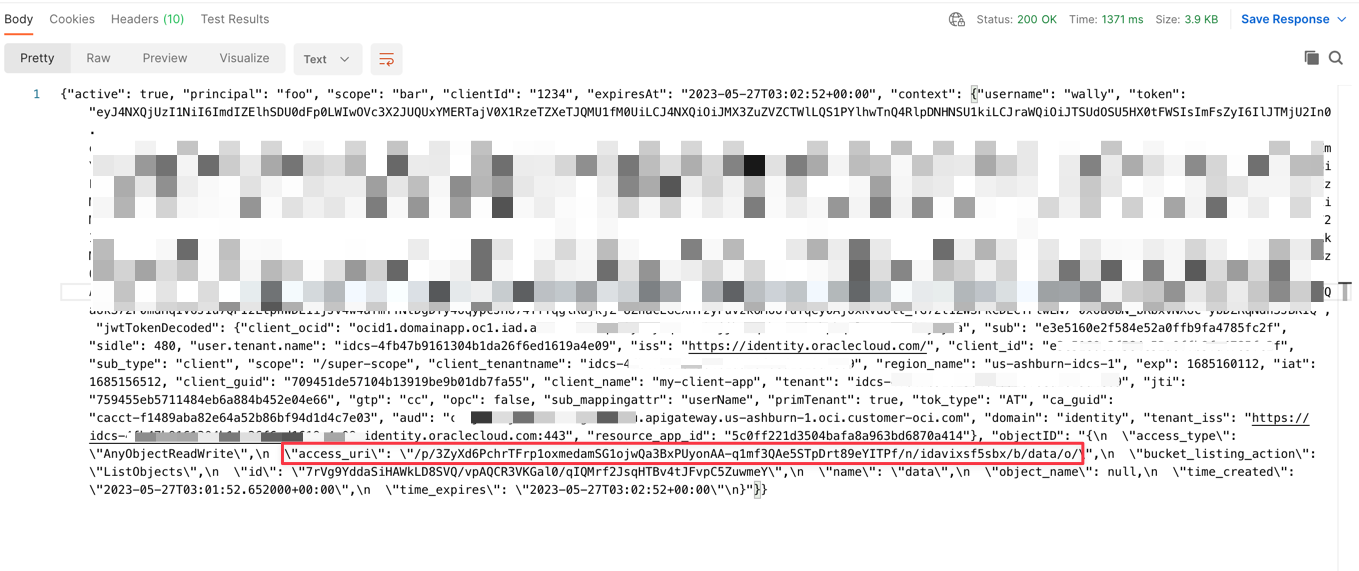
系統將會產生一個用於預先認證物件儲存的 URL ,您可以在接下來 60 秒內下載該檔案。您可以在此處下載下列範例的檔案:
https://objectstorage.us-ashburn-1.oraclecloud.com + [access_uri]

or

https://objectstorage.us-ashburn-1.oraclecloud.com/p/eL5C0R0luN_cTNn-vUF7_Dx_z2N4w7IXemKr5y61cSRxZZPRXcR2Yj1dNCaJBDK8/n/idavixsf5sbx/b/data/o/calico.yaml
您可以使用下列命令行下載、上傳或檢視儲存桶檔案:
- TO UPLOAD A FILE: `curl https://objectstorage.us-ashburn-1.oraclecloud.com/p/HoPudIF45Bj6J5-Qy3J1D9dOplLuKtECRFhvOTkKAtBjJXkOTDx0Pt8gXbOOEoRx/n/idavixsf5sbx/b/data/o/ --upload-file func.py`

- TO DOWNLOAD A FILE: `curl https://objectstorage.us-ashburn-1.oraclecloud.com/p/3ZyXd6PchrTFrp1oxmedamSG1ojwQa3BxPUyonAA-q1mf3QAe5STpDrt89eYITPf/n/idavixsf5sbx/b/data/o/func.py`

- TO LIST BUCKET: `curl https://objectstorage.us-ashburn-1.oraclecloud.com/p/ODVRMB71kD0SHWuoY4ojVd93nmIiy8u0zrxA56T7FBaohAgA7k8KOLAIlhxjcveE/n/idavixsf5sbx/b/data/o/``
作業 5:設定可觀察性儀表板
基本上,每個 OCI 資源都可以在儀表板中顯示度量,而這些資源上的許多事件都可觸發一個動作。在這個示範中,您可以設定儀表板,以顯示已經在物件儲存上寫入或讀取多少檔案:
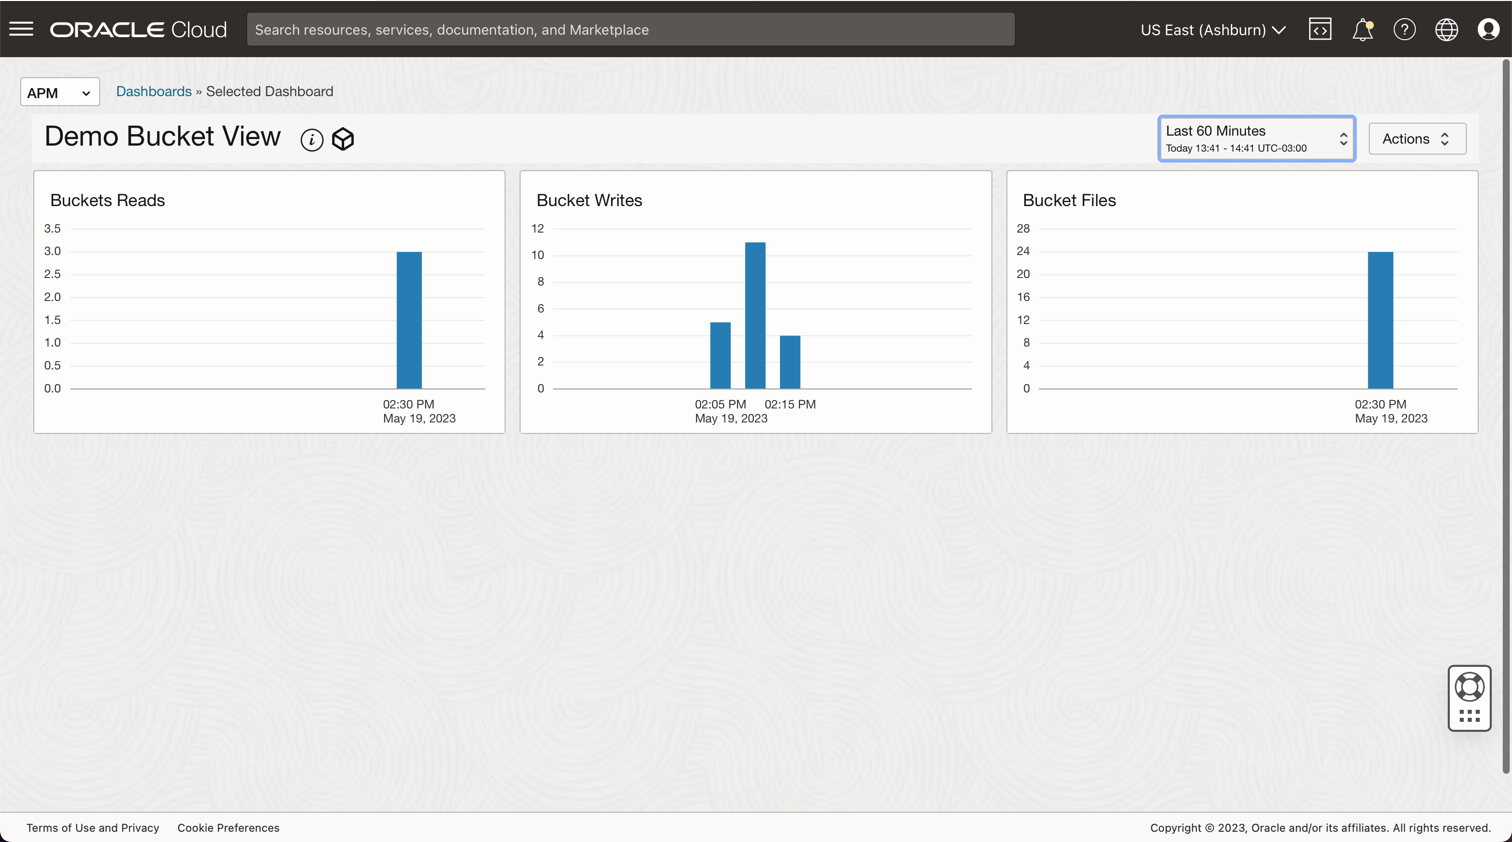
您可以依照下列方式設定儀表板查詢:
- 儲存桶檔案 = ObjectCount[1d].groupby (resourceID) .count()
- 儲存桶寫入 = PutRequests[5m].grouping().count()
- 儲存桶讀取 = GetRequests[5m].grouping().count()
相關連結
- 安裝 OCI CLI
- 物件儲存安全
- 在 Oracle Cloud 中建立您的第一個 API 閘道
- 函數 QuickStart 指南
- Oracle Functions 範例
- 將權杖傳送給授權者函數,以新增認證和授權至 API 部署
- 在 Java 中建立 Oracle Identity Cloud Service 的 JWT 權杖
- 物件儲存度量
- 監控查詢語言 (MQL) 參考
- 使用 Oracle Identity Cloud Service/IAM JWT 搭配範圍和索賠,透過 API 閘道保護 API
- 使用 Oracle Cloud Infrastructure Data Flow 處理 Autonomous Database 和 Kafka 中的大型檔案
- 物件儲存體 - 限制及使用多段上傳
確認書
- 作者 - Cristiano Hoshikawa (Oracle LAD A-Team Solution Engineer)
其他學習資源
探索 docs.oracle.com/learn 的其他實驗室,或者存取更多 Oracle Learning YouTube 頻道上的免費學習內容。此外,請瀏覽 education.oracle.com/learning-explorer 以成為 Oracle Learning 檔案總管。
如需產品文件,請造訪 Oracle Help Center 。
Use Oracle Cloud API Gateway to create a secure Object Storage download service with function authentication
F84019-01
July 2023
Copyright © 2023, Oracle and/or its affiliates.