附註:
- 此教學課程需要存取 Oracle Cloud。若要註冊免費帳戶,請參閱 Oracle Cloud Infrastructure Free Tier 入門。
- 它使用 Oracle Cloud Infrastructure 證明資料、租用戶及區間的範例值。完成實驗室時,請將這些值取代為您雲端環境特定的值。
使用 OKE 上的 Spring Boot 建立以 Oracle GraalVM 為基礎的 Java 應用程式,將 SOAP 訊息儲存在可承諾量並傳送至 OCI 佇列
簡介
我們的許多客戶都仰賴傳統的簡單物件存取通訊協定 (SOAP) 訊息傳遞,以便在應用系統之間進行通訊。他們通常需要儲存交易資料、確保服務分離、實現內送要求負載平衡,以及啟用這些訊息的非同步通訊。
在本教學課程中,我們將瞭解如何使用部署在 Oracle Cloud Infrastructure Kubernetes Engine (OKE) 基礎架構上的 Spring Boot 建立以 Oracle GraalVM 為基礎的 Java 應用程式,這些基礎架構將作為具有不同 Oracle Cloud Infrastructure (OCI) 服務 (例如 Oracle Autonomous Transaction Processing (ATP) 和 OCI Queue) 的交易整合器。此設定可讓系統在沒有直接連線的情況下進行互動,以促進不同處理速度的應用程式之間的通訊。此外,一旦資訊儲存在資料庫中,便可加以諮詢或分析。
我們將採用以下技術:
Oracle Cloud Infrastructure Services (OCI): OCI 是一個安全、高效能的雲端平台,提供超過 150 多個雲端服務。專為擴展性、安全性和效能而設計。
-
Oracle Cloud Infrastructure Kubernetes Engine (OKE): OKE 是一項託管服務,可用於在 OCI 上部署、管理及調整容器化應用程式。它可將佈建、調整規模及監控等作業自動化,同時確保健全的安全性和 OCI 整合。OKE 支援無狀態和具狀態的工作負載,可為現代化應用程式開發提供彈性的平台。
-
OCI Container Registry Classic:這是 OCI 中受管理的 Docker 相容登錄,可讓使用者安全地儲存、管理及部署容器映像檔。它與 OKE 和其他 OCI 服務緊密整合,可實現有效率的容器化應用程式部署。
-
Oracle Autonomous Transaction Processing (ATP):可承諾量是一項雲端資料庫服務,可自動執行佈建、打補丁、擴展及備份等作業,確保高可用性和安全性。它可以為交易導向的工作負載提供強大的效能,並運用機器學習進行自主操作和效能最佳化。透過應用程式開發等功能變得簡單、生成式 AI、完整的資料保護和安全性,ATP 可確保持續的高效能和最大可用性。
-
OCI 佇列:這是完全受管理的無伺服器訊息佇列服務,可在分散式應用程式之間啟用非同步、分離的通訊。透過自動調整規模、訊息持續性及公平處理等功能,確保訊息傳遞可靠。OCI Queue 與其他 OCI 服務整合,並支援業界標準協定,適用於可擴展的事件導向架構。
Oracle 技術:
- Oracle GraalVM 它是支援多種程式設計語言的高效能多語言虛擬機器 (VM),例如 Java、JavaScript、Python 等。它使用及時 (JIT) 和提前 (AOT) 編譯來改善效能,從而加快啟動速度並降低資源使用量。Oracle GraalVM 也提供最佳化和分析的工具,因此適用於微服務和雲端原生應用程式。
其他技術:
- Spring Boot:它是一個 Java 架構,透過自動配置和嵌入式 Web 伺服器簡化了建立獨立、生產就緒的應用程式。它提供狀況檢查和度量等內建功能,因此非常適合快速建置微服務和可擴展的應用程式。
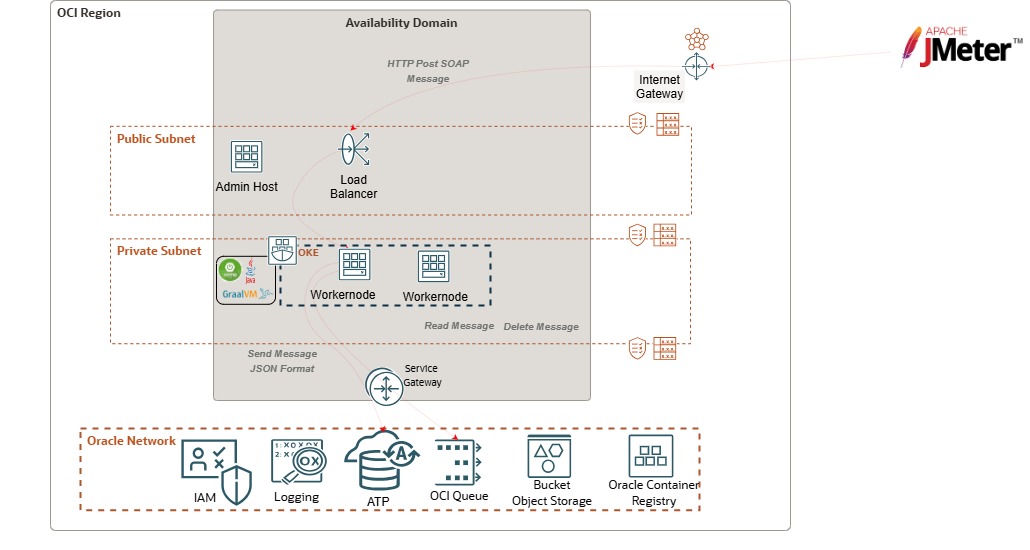
OCI 高層級架構:


注意:
- 請務必釐清 JMeter 將模擬客戶應用程式所產生的 SOAP 訊息。
- 本教學課程的適用對象為教育用途,為學生提供受控制的環境以探索並取得實際體驗。請注意,示範的安全組態和實務是專為學習而設計,可能不適用於生產環境或實際應用系統。
目標
-
使用 Spring Boot 架構建置 Oracle GraalVM 型 Java 應用程式,並佈建將交易訊息儲存在 ATP 中並傳送至 OCI Queue 所需的整個 OCI 服務。
-
佈建及設定 OKE 叢集。
-
佈建、設定及存取 OCI Container Registry Classic。
-
佈建並設定 ATP 無伺服器資料庫。
-
在可承諾量中連接與建立專案表格。
-
佈建並設定 OCI 佇列。
-
使用 Spring Boot 建置 Oracle GraalVM 型 Java 應用程式並部署於 OKE。
-
使用 JMeter 來測試 Spring Boot Oracle GraalVM 應用程式。
-
必要條件
-
OCI 環境:本教學課程提供必要的雲端基礎架構、服務和安全組態,可有效部署、管理及擴展應用程式。
-
存取 OCI 租用戶。若要建立免費的 Oracle Cloud 帳戶,請參閱建立免費的 Oracle Cloud 帳戶。
-
建立可將 OCI 服務分組的區間。如需詳細資訊,請參閱建立區間。
-
-
管理主機:必須要有管理主機 (在本教學課程中,我們使用 Oracle Linux 8),如高層次架構所示。必須使用 OCI CLI、kubectl 和 Docker 設定管理主機,才能監督、檢視及控制 OKE 叢集和 OCI Container Registry Classic。
-
正在啟動設定管理主機。如需詳細資訊,請參閱建立執行處理。
-
安裝 Oracle Cloud Infrastructure 命令行介面 (OCI CLI)。如需詳細資訊,請參閱安裝 OCI CLI 。
-
在 Oracle Linux 8/7 上安裝 Docker。如需詳細資訊,請參閱安裝 Docker 。
-
在 Linux 上安裝並設定 kubectl。如需詳細資訊,請參閱安裝 kubectl 。
-
-
開發環境:我們需要一個開發環境來編寫、測試和除錯程式碼。安裝 Apache Maven 和 Oracle GraalVM。
-
安裝 Oracle GraalVM。如需詳細資訊,請參閱開始使用 Oracle GraalVM 。
-
開發 Spring Boot 應用程式。如需更多資訊,請參閱 Developing Your First Spring Boot Application 和 Spring Quickstart Guide 。
-
作業 1:啟動設定及設定 OKE 叢集
在這項任務中,我們將佈建 Kubernetes 平台,應用程式將支援所有要儲存在 ATP 中的 SOAP 高交易性訊息,並即時將每個訊息傳送至 OCI Queue。
-
登入 OCI 主控台,瀏覽至開發人員服務、Kubernetes 叢集 (OKE) ,然後選取您偏好的區間。
建立 OKE 叢集的方法有兩種:
- 快速建立。
- 自訂建立。
-
選取快速建立,因為此方法較簡單、更快且會自動部署 OKE 所需的所有元素以進行作業,例如:
- 虛擬雲端網路 (VCN)。
- 網際網路閘道。
- 網路位址轉譯 (NAT) 閘道。
- 服務閘道。
- Kubernetes 叢集。
- Kubernetes 工作節點與節點集區。
注意:對於已經有客戶的服務、網路、基礎架構的企業環境,請務必自訂符合規範的 OKE 部署,並符合用戶端架構、資源和遵循最佳實務。

-
按一下建立叢集,然後輸入下列資訊。
- 名稱:輸入 OKE 叢集的名稱。
- 區間: 選取為此專案建立的區間。
- Kubernetes 版本:選取可用的最新 Kubernetes 版本。
- Kubernetes API 端點:在此教學課程中,選取公用端點,但您也可以選取專用端點。
- 節點類型:選取受管理節點。
- Kubernetes 工作節點: 選取專用工作節點。
- 資源配置和影像:選取 VM.Standard.E5。Flex 、自訂 OCPU 數目 (2) 和記憶體 (16GB),並保留預設 Oracle Linux 8 影像。
- 節點計數:輸入要在 OKE 節點集區部署的 2 個工作節點。

複查 OKE 叢集正在運作。

作業 2:佈建、設定及存取 OCI Container Registry Classic
我們需要管理儲存區域中的專案映像檔。為了達到此目的,我們將佈建 OCI Container Registry Classic。將映像檔儲存在 OCI Container Registry Classic 之後,便能夠在 OKE 中進行部署。
-
移至 OCI 主控台,瀏覽至開發人員服務、容器與使用者自建物件、容器登錄,然後按一下建立儲存區域。
-
輸入下列資訊,然後按一下建立。
- 在區間中建立: 選取為此專案建立的區間。
- 存取:選取公用。
- 儲存庫名稱:輸入
springboot/tutorialapp。

-
儲存區域建立之後,從您的 Oracle 管理主機使用下列命令來存取儲存區域。
docker login -u 'tenancy_namespace/domain/username' regionID.ocir.ioPassword: xxxxxx

作業 3:佈建及設定 Oracle Autonomous Transaction Processing (ATP) 無伺服器資料庫
在 ATP 資料庫中,我們將儲存每筆交易收到的每個 SOAP 訊息的資料,大約每一則訊息會以毫秒為順序,並進行平行與循序插入。
-
移至 OCI 主控台,瀏覽至 Oracle Database 並按一下 Autonomous Transaction Processing 。
-
按一下建立 Autonomous Database ,然後輸入下列資訊。
- 選取區間: 選取為此專案建立的區間。
- 顯示名稱:輸入顯示名稱。
- 顯示資料庫名稱:輸入資料庫名稱。
- 選擇工作負載類型:選取交易處理。
- 選擇部署類型:選取無伺服器。
- 設定資料庫:
- 開發人員:取消選取。
- 選擇資料庫版本:選取 23ai 。
- ECPU 計數:輸入 2 。
- 計算自動調整:選取它。
- 儲存體 (Storage):輸入 1024GB 。
- 自動備份保留期間 (天):保留預設選項 60 天。
- 建立管理員證明資料:
- 使用者名稱:預設為
ADMIN,無法編輯。 - 密碼:輸入您偏好的密碼。
- 確認密碼:再次輸入密碼。
- 使用者名稱:預設為
- 選擇網路存取: 選取僅限專用端點存取,然後選擇為此專案建立的 VCN 和子網路。這項設定只會限制與指定專用網路 (VCN) 的連線。不過,您可以選擇其他選項,這取決於公司的需求。


複查 ATP 資料庫正在執行。

作業 4:在 Oracle Autonomous Transaction Processing (ATP) 中連線及建立專案表格
現在,我們需要在「任務 3」中產生的 ATP 資料庫中設定、連接及建立專案表格。
-
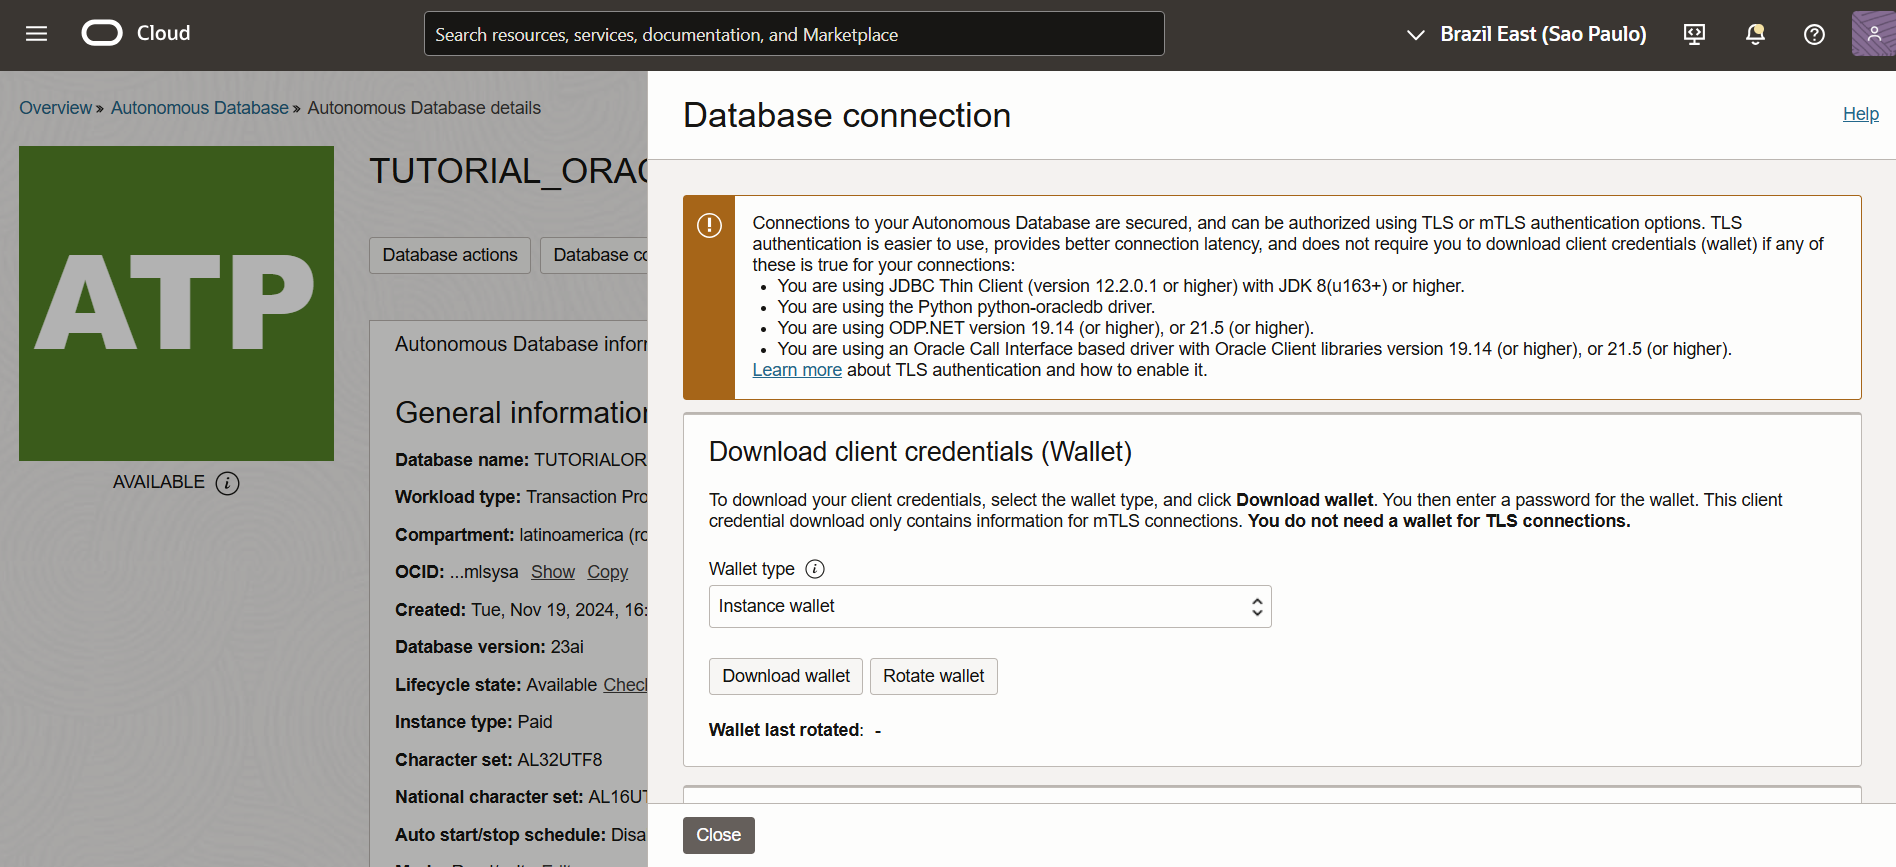
移至 OCI 主控台,瀏覽至 Oracle Database ,Autonomous Transaction Processing ,然後按一下資料庫連線。選取 TLS 認證、 TLS ,然後按一下下載公事包。

-
解壓縮公事包
.zip檔案和tnsnames.ora中,您可以取得資料來源 URL 以取得此資料庫的連線。儲存此資料來源 URL。舉例而言:
tutorialoracleatp_medium = (description= (retry_count=20)(retry_delay=3)(address=(protocol=tcps)(port=1522)(host=xxxxxxxx.adb.sa-saopaulo-1.oraclecloud.com))(connect_data=(service_name=xxxxxxxxxxxxxxx_tutorialoracleatp_medium.adb.oraclecloud.com))(security=(ssl_server_dn_match=no))) -
現在需要存取資料庫。佈建 ATP 時,已啟用 Oracle REST Data Services (ORDS) 存取。如需詳細資訊,請參閱 Oracle REST Data Services 。
移至 Autonomous Database 詳細資訊頁面,按一下資料庫動作。請注意,您只能從在相同虛擬雲端網路 (VCN) 中執行的運算執行處理存取。

-
在瀏覽器中貼上 URL,並使用先前在 ATP 資料庫中輸入的使用者與密碼來存取 ORDS,並存取 Oracle SQL Developer Web 模組。

-
使用下列查詢來建立與將收到的 SOAP 訊息相關的
USERS、CARS和HOUSES表格。CREATE TABLE USERS ( username varchar(50) NOT NULL, userlastname varchar(50) NOT NULL, id int NOT NULL, email varchar(50) NOT NULL, dateuser varchar(50) NOT NULL, attributeuser varchar(50) NOT NULL ); CREATE TABLE CARS ( userid int NOT NULL, brand varchar(50) NOT NULL, color varchar(50) NOT NULL, plate varchar(50) NOT NULL ); CREATE TABLE HOUSES ( userid int NOT NULL, floors int NOT NULL, locationhouse varchar(50) NOT NULL, rooms int NOT NULL, bathrooms int NOT NULL );
作業 5:佈建並設定 OCI 佇列
在 OCI Queue 中,我們將在特定期間透過 RESTful HTTP API 儲存高度交易訊息。然後消費者可以立即或方便地讀取和刪除訊息,確保解除耦合並防止資料遺失。
-
移至 OCI 主控台,瀏覽至開發人員服務、應用程式整合,然後按一下佇列。
-
按一下建立佇列,輸入下列資訊,然後按一下建立佇列。
- 名稱:輸入佇列適用的名稱。
- 區間: 選取您的工作區間。
- 佇列設定值:在此教學課程中,我們將選取預設組態,但您也可以根據業務需求自訂多個選項,例如:可見性逾時、保留期間上限、通道使用量上限及信函佇列設定值。
- 設定加密設定值:選取 Oracle 管理的金鑰,但客戶管理的金鑰也是一個選項。

複查 OCI 佇列是否在執行中。

作業 6:使用 Spring Boot 隊建置 Oracle GraalVM 型 Java 應用程式,並部署到 OKE
現在,我們將在 Spring Boot 上開發並部署基於 Oracle GraalVM 的 Java 應用程式,以執行下列任務:
-
從每個 HTTP Post 要求中收到的 XML SOAP 訊息取得資料。
-
在 ATP 中插入從每一交易 XML SOAP 訊息擷取的資料。
-
從 SOAP XML 格式轉換為 JSON 格式。
-
將每個轉換的訊息放入 OCI 佇列。
注意:開始之前,請務必先建立管理主機和開發環境,如先決條件 - 管理主機和先決條件 - 開發環境段落所示。
一旦您的管理主機和開發環境已設定好,您就可以開始開發 Spring Boot 專案。
-
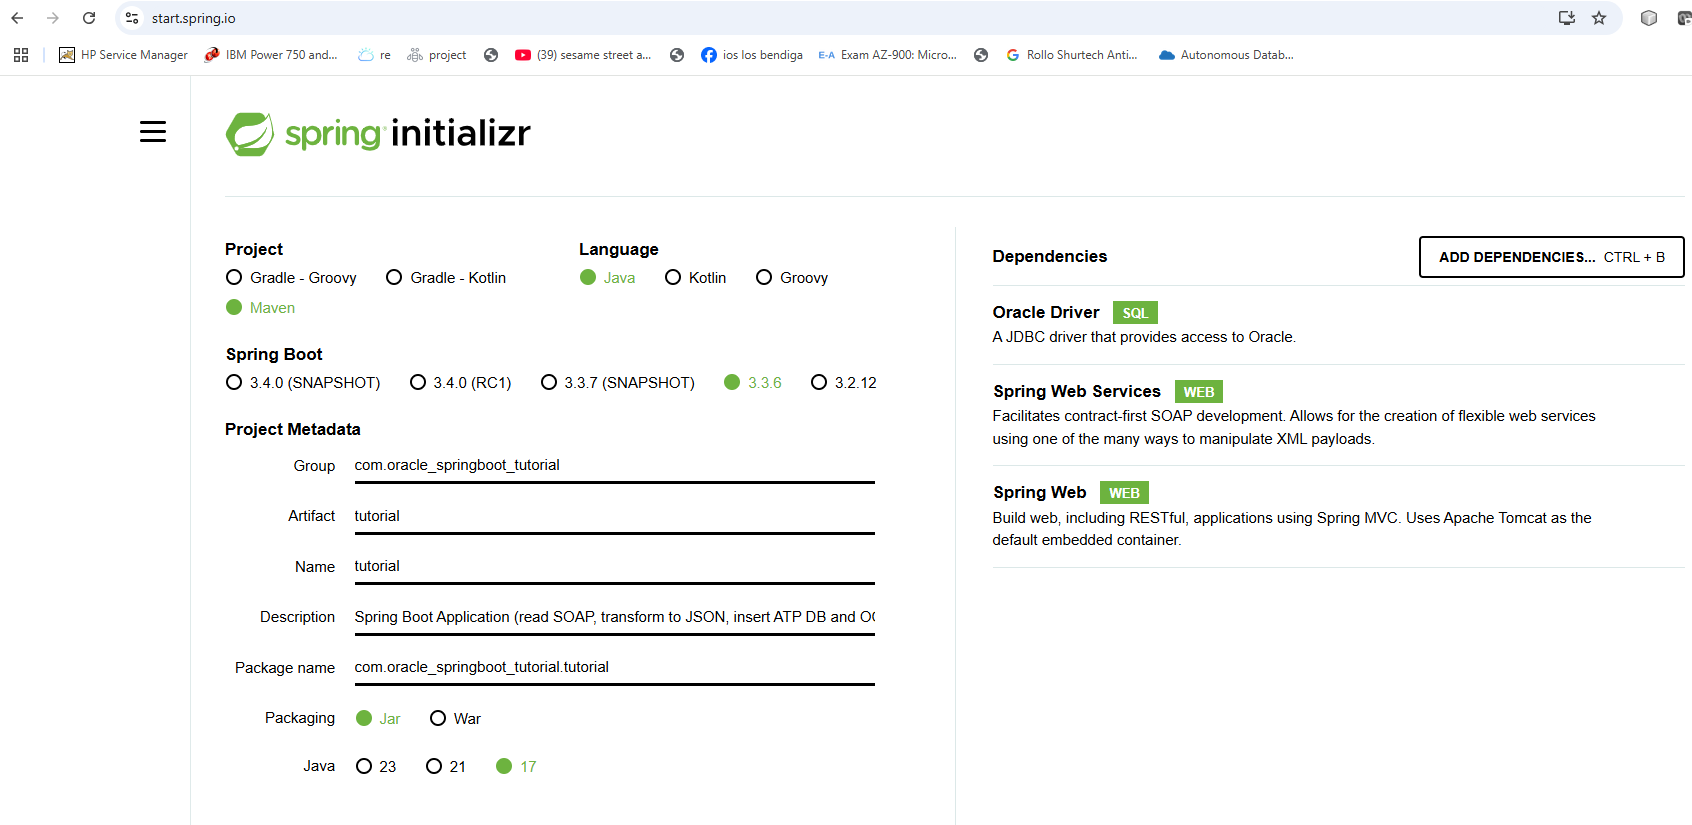
請前往 Spring initializr ,並建立第一個計劃,為我們提供 Spring Boot 專案的資料夾結構和基礎檔案,稍後再根據我們的需求進行修改。輸入下列資訊並按一下產生,這將會自動下載 Spring Boot 專案,並儲存並解壓縮到您的開發主機中。
- 專案:選取 Maven 。
- 語言:選取 Java 。
- Spring 啟動:選取 3.3.6 。
- 專案描述資料:
- 群組:輸入
com.tutorial_springboot。 - 物件:輸入教學課程。
- 名稱:輸入教學課程。
- 描述:輸入 Spring Boot Application (讀取 SOAP,轉換成 JSON,插入 ATP 並放入 OCI 佇列) 。
- 群組:輸入
- 封裝:選取 Jar 。
- Java:選取 17 。
- 相依性:選取 Oracle 驅動程式、 Spring Web 服務及 Spring Web 。
注意:我們可以根據需求,在專案中新增一些相依性,之後可以直接在
pom.xml檔案中新增更多相依性。
-
現在我們有彈簧開機結構專案。

複查
pom.xml檔案,我們將開始使用該檔案。
根據本教學課程中建議的範圍更新 pom.xml 檔案。
-
新增
oci sdk版本和下列相依性。oci-java-sdk-common.oci-java-sdk-queue.oci-java-sdk-addons-oke-workload-identity.oci-java-sdk-common-httpclient-jersey3.
應用程式需要使用 OCI 進行認證、連線及管理 OCI 服務 (例如 OCI Queue)。
-
已經是我們的
pom.xml檔案具有spring-boot-starter-web-services相依性,因此我們必須增加wsdl4j相依性。主要目的是取得從 SOAP 訊息接收的資料,並將其放入 Java 物件中,建立操控 XML 有效負載的彈簧 Web 服務,以促進合約優先的 SOAP 服務開發。也允許設定從 XML 綱要定義 (XSD) 檔案載入的連接埠、URI 及設定 XML 綱要。 -
新增 JSON 相依性。此程式庫將用於使用從 SOAP 訊息擷取的資料產生 JSON 格式。
-
在「組建」段落中新增
spring-boot-maven-pluginPlugin。此外掛程式將允許我們產生 jar 執行檔的 Spring Boot 專案檔。 -
在「組建」段落中新增
jaxb2-maven-pluginPlugin。此外掛程式將使用 Java API for XML 連結 (JAXB),從 XML 綱要產生 Java 類別,如此一來,我們就可以將資料從 SOAP 訊息傳送至我們建立的 Java 類別物件。此外掛程式區段中,請務必放置可在 Spring Boot 專案中包含 XSD 檔案的路徑組態。
<configuration> <sources> <source>${project.basedir}/src/main/resources/messages.xsd<source> </sources> </configuration> -
在「組建」段落的「相依性」段落和
jasypt-maven-pluginPlugin 中新增jasypt-spring-boot-starter相依性,讓我們能夠加密application.properties檔案中的機密參數,確保應用程式內的安全使用。
複查
pom.xml檔案中新增的下列相依性。

-
-
下載程式庫並執行下列命令。
-
在您的開發環境中,執行下列命令以存取您的專案。
cd tutorial
-
清除專案並移除上一個組建產生的所有檔案。
mvn clean
-
從本機 maven 儲存區域永久清除 (刪除並選擇性重新解析) 使用者自建物件。
mvn dependency:purge-local-repository

-
-
在專案中已設定相依性與
pom.xml檔案,我們將繼續檢查 SOAP XML 檔案,因為它代表用戶端的要求,以及解譯 Spring Boot 專案端要求的 XSD 檔案。-
此 SOAP XML 檔案有兩則訊息,其中包含個人資訊以及我們根據要求傳送的兩個不同用戶端的其他各種屬性,如下圖所示。

-
現在在我們的 Spring Boot 專案端,需要 XML 綱要來定義 Spring Web 服務自動匯出為 WSDL 的 Web 服務網域,以下影像顯示為此教學課程定義的
messages.xsd檔案。messages.xsd:
-
將
messages.xsd檔案儲存在 Spring Boot 專案的資源資料夾中。
-
-
以 jar 檔案建立及安裝專案檔案。執行下列指令,並確定您位於 Spring Boot 專案資料夾中。
mvn install注意:執行 maven install 命令之後,會自動產生目標資料夾,並且以相同的方式產生 Java 類別 (根據先前建立的 XSD 檔案和專案的可執行
.jar檔案)。
-
現在,我們可以在 Spring Boot 專案中加入必要的 Java 類別。
WebServiceConfig.java Class:此 Java 類別是開發來建立 SOAP Web 服務:- 設定 Servlet 來處理 SOAP 要求。
- 根據 XML 綱要產生 WSDL 定義。
- 定義 SOAP Web 服務的存取端點。
- 使用來自類別路徑的
messages.xsd綱要檔案。
//Imports import org.springframework.boot.web.servlet.ServletRegistrationBean; //import the ServletRegistrationBean class import org.springframework.context.ApplicationContext; //import the ApplicationContext class import org.springframework.context.annotation.Bean; //import the Bean class import org.springframework.context.annotation.Configuration; //import the Configuration class import org.springframework.core.io.ClassPathResource; //import the ClassPathResource class import org.springframework.ws.config.annotation.EnableWs; //import the EnableWs class import org.springframework.ws.config.annotation.WsConfigurerAdapter; //import the WsConfigurerAdapter class import org.springframework.ws.transport.http.MessageDispatcherServlet; //import the MessageDispatcherServlet class import org.springframework.ws.wsdl.wsdl11.DefaultWsdl11Definition; //import the DefaultWsdl11Definition class import org.springframework.xml.xsd.SimpleXsdSchema; //import the SimpleXsdSchema class import org.springframework.xml.xsd.XsdSchema; //import the XsdSchema class //Configuration class for the Web Service configuration @EnableWs //Enable the Web Service @Configuration //Define the class as a Configuration class public class WebServiceConfig extends WsConfigurerAdapter { //Create a ServletRegistrationBean object to register the MessageDispatcherServlet object with the application context @Bean public ServletRegistrationBean<MessageDispatcherServlet> messageDispatcherServlet(ApplicationContext applicationContext) { MessageDispatcherServlet servlet = new MessageDispatcherServlet(); //Create a MessageDispatcherServlet object servlet.setApplicationContext(applicationContext); //Set the application context for the MessageDispatcherServlet object servlet.setTransformWsdlLocations(true); //Set the transformWsdlLocations property to true return new ServletRegistrationBean<>(servlet, "/ws/*"); //Return a new ServletRegistrationBean object with the MessageDispatcherServlet object and the URL pattern } //Create a DefaultWsdl11Definition object to define the WSDL @Bean(name = "messages") public DefaultWsdl11Definition defaultWsdl11Definition(XsdSchema messagesSchema) { DefaultWsdl11Definition wsdl11Definition = new DefaultWsdl11Definition(); //Create a DefaultWsdl11Definition object wsdl11Definition.setPortTypeName("MessagesPort"); //Set the port type name wsdl11Definition.setLocationUri("/ws"); //Set the location URI wsdl11Definition.setTargetNamespace("http://tutorial_example.com/ns0"); //Set the target namespace wsdl11Definition.setSchema(messagesSchema); //Set the schema return wsdl11Definition; //Return the DefaultWsdl11Definition object } //Create a XsdSchema object to define the schema @Bean public XsdSchema messagesSchema() { return new SimpleXsdSchema(new ClassPathResource("messages.xsd")); //Return a new SimpleXsdSchema object with the messages.xsd file } }注意:如果您要測試 Web 服務,可以在相同的本機開發環境桌面中執行 Spring Boot 專案,並利用
curl傳送 HTTP 要求,如下所示:mvn spring-boot:run

專案執行並啟動 Web 服務之後,請使用
curl執行本機 SOAP HTTP 要求,如下所示:curl --location 'http://localhost:8080/ws/'您將從 Spring Boot 專案中公開的 Web 服務得到回應。

-
建立一個名為
model的資料夾,我們將在此資料夾中新增下列 Java 類別。
注意:這些 Java 類別
Car、House和User會根據從 HTTP SOAP 要求擷取之每個 SOAP 訊息中的資料來擷取資訊。-
Car.java class:此 Java 類別代表一個 Car 物件,其屬性會連結至每個使用者。``` //Imports import org.springframework.stereotype.Component; // For component scanning import org.springframework.context.annotation.Scope; // For defining bean scope @Component // Marks a class as a Spring-managed component @Scope("prototype") //A new instance is created every time the bean is requested public class Car { //Attributes private String brand; private String color; private String plate; //"getter" and "setter" methods to get and set the information in each object public String getBrand(){ return brand; } public void setBrand(String brand){ this.brand = brand; } public String getColor(){ return color; } public void setColor(String color){ this.color = color; } public String getPlate(){ return plate; } public void setPlate(String plate){ this.plate = plate; } } ```-
House.java class:此 Java 類別代表一個 House 物件,其屬性會連結至每個使用者。//Imports import org.springframework.stereotype.Component; // For component scanning import org.springframework.context.annotation.Scope; // For defining bean scope @Component // Marks a class as a Spring-managed component @Scope("prototype") //A new instance is created every time the bean is requested public class House { //Attributes private int floors; private String location; private int rooms; private int bathrooms; //"getter" and "setter" methods to get and set the information in each object public int getFloors(){ return floors; } public void setFloors(int floors){ this.floors = floors; } public String getLocation(){ return location; } public void setLocation(String location){ this.location = location; } public int getRooms(){ return rooms; } public void setRooms(int rooms){ this.rooms = rooms; } public int getBathRooms(){ return bathrooms; } public void setBathRooms(int bathrooms){ this.bathrooms = bathrooms; } } -
User.java class:此 Java 類別代表一個含有 Car 和 House 物件之屬性的 User 物件。//Imports import org.springframework.stereotype.Component; // For component scanning import org.springframework.context.annotation.Scope; // For defining bean scope @Component // Marks a class as a Spring-managed component @Scope("prototype") //A new instance is created every time the bean is requested public class User { //Attributes private String username; private String userlastname; private int id; private String email; private String date; private String attribute; private Car car; private House house; //"getter" and "setter" methods to get and set the information in each object public String getUserName(){ return username; } public void setUserName(String username){ this.username = username; } public String getUserLastName(){ return userlastname; } public void setUserLastName(String userlastname){ this.userlastname = userlastname; } public int getID(){ return id; } public void setID(int id){ this.id = id; } public String getEmail(){ return email; } public void setEmail(String email){ this.email = email; } public String getDate(){ return date; } public void setDate(String date){ this.date = date; } public String getAttribute(){ return attribute; } public void setAttribute(String attribute){ this.attribute = attribute; } public Car getCar(){ return car; } public void setCar(Car car){ this.car = car; } public House getHouse(){ return house; } public void setHouse(House house){ this.house = house; } }
-
-
-
現在,我們將在 Spring Boot 專案中設定必要參數,以將取得的資料儲存在 OCI ATP 資料庫中。在
resources資料夾中,您必須找到用來新增應用程式所需參數的application.properties檔案。它會自動產生,並在應用程式啟動時由 Spring Boot 載入。注意:管理加密和安全方法非常重要,以確保機密資訊 (例如密碼或相關資料) 無法被駭客擷取或檢視。在本教學課程中,我們使用
pom.xml檔案中設定的jasypt程式庫。如需更多資訊,請參閱 How to encrypt passwords in a Spring Boot project using Jasypt 。此外,在 Spring Boot 上的 Java 類別中,也記錄了如何新增與此程式庫相關的註解和原始程式碼,以解密application.properties參數。在
application.properties檔案中新增 ATP 資料庫所需的適當參數,如下圖所示。
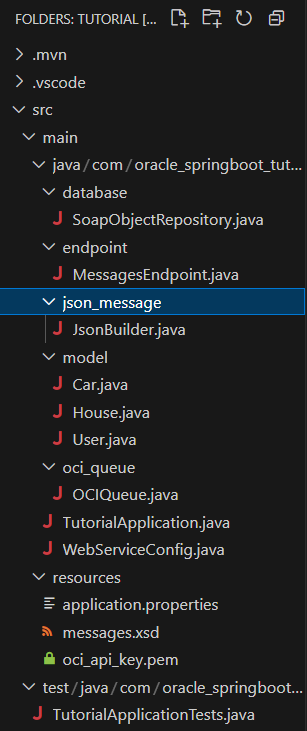
建立 Spring Boot Java 類別以將每則訊息儲存在資料庫中,並如下列影像所示,它將位於
database資料夾中。
-
SoapObjectRepository.java:此 Spring Boot Java 類別可讓您使用 JDBC 驅動程式,以即時交易形式 (ATP 中的每個訊息) 插入。//Java Classes USER, CAR, HOUSE Imports import com.oracle_springboot_tutorial.tutorial.model.*; //Spring Boot Imports import org.springframework.stereotype.Repository; import org.springframework.jdbc.core.JdbcTemplate; import org.springframework.beans.factory.annotation.Autowired; //Repository Class to save SOAP Messages in the Database @Repository public class SoapObjectRepository { private JdbcTemplate template; private User user; //Getters and Setters for JdbcTemplate template object public JdbcTemplate getTemplate(){ return template; } //Autowired annotation to inject JdbcTemplate object into the template object @Autowired public void setTemplate(JdbcTemplate template){ this.template = template; } //Method to save User SOAP Message in the Database public void saveUserSOAPMessage(User user){ this.user = user; String sql = "INSERT INTO USERS (username, userlastname, id, email, dateuser, attributeuser) VALUES(?, ?, ?, ?, ?, ?)"; template.update(sql, user.getUserName(), user.getUserLastName(), user.getID(), user.getEmail(), user.getDate(), user.getAttribute()); } //Method to save Car SOAP Message in the Database public void saveCarSOAPMessage(Car car){ String sql = "INSERT INTO CARS (userid, brand, color, plate) VALUES(?, ?, ?, ?)"; template.update(sql, user.getID(), car.getBrand(), car.getColor(), car.getPlate()); } //Method to save House SOAP Message in the Database public void saveHouseSOAPMessage(House house){ String sql = "INSERT INTO HOUSES (userid, floors, locationhouse, rooms, bathrooms) VALUES(?, ?, ?, ?, ?)"; template.update(sql, user.getID(), house.getFloors(), house.getLocation(), house.getRooms(), house.getBathRooms()); } }現在新增 JSON 軟體程式碼,請先建立
json_message資料夾及其 Java Spring Boot 類別,如下圖所示。
-
JsonBuilder.java:此 Spring Boot Java 類別會從 SOAP XML 格式轉換為 JSON 格式。//Imports to be used for JSON import org.json.JSONArray; import org.json.JSONObject; //Imports to be used for the User class import com.oracle_springboot_tutorial.tutorial.model.*; //Imports to be used for the ArrayList class import java.util.ArrayList; public class JsonBuilder { //The buildJsonMessage method creates a JSON object from the ArrayList of User objects public JSONObject buildJsonMessage(ArrayList<User> usersMessageArray) { JSONObject rootJson = new JSONObject(); //Create a new JSON object called rootJson JSONObject messagesJson = new JSONObject(); //Create a new JSON object called messagesJson JSONArray messageArray = new JSONArray(); //Create a new JSON array called messageArray //Iterate through the ArrayList of User objects and create a JSON object for each User object in the ArrayList for (User user : usersMessageArray) { JSONObject messageJson = new JSONObject(); messageJson.put("username", user.getUserName()); //Add the username of the user to the messageJson object messageJson.put("userlastname", user.getUserLastName()); //Add the userlastname of the user to the messageJson object messageJson.put("id", user.getID()); //Add the id of the user to the messageJson object messageJson.put("email", user.getEmail()); //Add the email of the user to the messageJson object messageJson.put("date", user.getDate()); //Add the date of the user to the messageJson object messageJson.put("attribute", user.getAttribute()); //Add the attribute of the user to the messageJson object // JSONObject bodyJson = new JSONObject(); //Create a new JSON object called bodyJson JSONObject envelopeJson = new JSONObject(); //Create a new JSON object called envelopeJson //Switch statement to check the attribute of the User object switch (user.getAttribute()) { case "CAR": Car car = user.getCar(); envelopeJson.put("brand", car.getBrand()); //Add the brand of the car to the envelopeJson object envelopeJson.put("color", car.getColor()); //Add the color of the car to the envelopeJson object envelopeJson.put("plate", car.getPlate()); //Add the plate of the car to the envelopeJson object break; case "HOUSE": House house = user.getHouse(); envelopeJson.put("floors", house.getFloors()); //Add the floors of the house to the envelopeJson object envelopeJson.put("location", house.getLocation()); //Add the location of the house to the envelopeJson object envelopeJson.put("rooms", house.getRooms()); //Add the rooms of the house to the envelopeJson object envelopeJson.put("bathrooms", house.getBathRooms()); //Add the bathrooms of the house to the envelopeJson object break; default: System.out.println("Unknown subject: " + user.getAttribute()); } bodyJson.put("envelope", envelopeJson); //Add the envelopeJson object to the bodyJson object messageJson.put("body", bodyJson); //Add the bodyJson object to the messageJson object messageArray.put(messageJson); //Add the messageJson object to the messageArray array } messagesJson.put("message", messageArray); //Add the messageArray array to the messagesJson object rootJson.put("messages", messagesJson); //Add the messagesJson object to the rootJson object return rootJson; } }
-
-
現在,我們可以將 JSON 格式的訊息傳送至 OCI Queue。建立
oci_queue資料夾及其 Java Spring Boot 類別,如下圖所示。
注意:在
OCIQueue.java類別中,我們需要定義從 OKE 到 OCI Queue 的存取權。在本教學課程中,我們將使用工作負載存取授予 OCI 資源的存取權,無須處理與您租用戶關聯的使用者、密碼、OCID 等機密資訊。如需詳細資訊,請參閱將工作負載授予 OCI 資源的存取權。開始開發
OCIQueue.java類別之前,我們將設定租用戶的工作負載存取權。首先,我們需要建立一個與 Oracle GraalVM 型 Java 應用程式關聯的命名空間。確定您位於管理主機中。kubectl create ns-tutorial接著,建立應用程式的 Kubernetes 服務帳戶。
kubectl create serviceaccount tutorialserviceaccount --namespace ns-tutorial現在,請定義 OCI IAM 原則,以允許工作負載存取必要的 OCI 資源。在本教學課程中,OCI Queue。
移至 OCI 主控台,瀏覽至識別與安全的原則,然後按一下建立原則。輸入下列資訊,然後按一下建立。
- 名稱:輸入偏好的原則名稱。
- 描述:輸入從 oke 到 oci 佇列的存取。
-
原則產生器:
Allow any-user to use queues in compartment id ocid1.compartment.oc1..xxxxxxxxxxxxxxxxxxxxxxxxxxxxxxxxxxxxxxxxxxxxxxxxxxxxxxxxxxxx where all {request.principal.type = 'workload', request.principal.namespace = 'ns-tutorial', request.principal.service_account = 'tutorialserviceaccount', request.principal.cluster_id = 'ocid1.cluster.oc1.sa-saopaulo-1.xxxxxxxxxxxxxxxxxxxxxxxxxxxxxxxxxxxxxxxxxxxx'}

設定工作負載存取原則、命名空間和服務帳戶之後,即可繼續進行作業。
在
application.properties檔案中,新增連線和管理在任務 5 中建立之特定 OCI 佇列所需的佇列參數。
-
OCIQueue.java:此 Spring Boot Java 類別可讓您存取訊息,並將訊息放入 OCI Queue。//Imports import com.oracle.bmc.auth.okeworkloadidentity.OkeWorkloadIdentityAuthenticationDetailsProvider; //Import OkeWorkloadIdentityAuthenticationDetailsProvider to enable access and use OCI Workload Identity import com.oracle.bmc.queue.QueueClient; //Import QueueClient to have access and manage of OCI Queue import com.oracle.bmc.queue.model.PutMessagesDetails; //Import PutMessagesDetails to send messages to the OCI Queue import com.oracle.bmc.queue.model.PutMessagesDetailsEntry; //Import PutMessagesDetailsEntry to send messages to the OCI Queue import com.oracle.bmc.queue.requests.PutMessagesRequest; //Import PutMessagesRequest to send messages to the OCI Queue //Imports for the ArrayList and List import java.util.ArrayList; import java.util.List; public class OCIQueue { //Set the required parameters to access to OCI and the Queue //Variables private String queueId; private String endPoint; private String region; //Constructor to initialize the OCI Queue object with the required parameters public OCIQueue(String queueId, String endPoint, String region){ this.queueId = queueId; this.endPoint = endPoint; this.region = region; } //The sendMessages method sends a message to the OCI Queue public void sendMessages(String jsonMessage){ try{ //Create an OkeWorkloadIdentityAuthenticationDetailsProvider object to authenticate the OCI Queue OkeWorkloadIdentityAuthenticationDetailsProvider provider = new OkeWorkloadIdentityAuthenticationDetailsProvider.OkeWorkloadIdentityAuthenticationDetailsProviderBuilder().build(); //Create a QueueClient object to send the message to the OCI Queue QueueClient queueClient = QueueClient.builder().build(provider); queueClient.setRegion(region); queueClient.setEndpoint(endPoint); //Create a PutMessagesDetailsEntry object to send the message PutMessagesDetailsEntry message = PutMessagesDetailsEntry.builder() .content(jsonMessage) .build(); //Create a List of PutMessagesDetailsEntry objects to send the message List<PutMessagesDetailsEntry> messages = new ArrayList<>(); messages.add(message); //Create a PutMessagesDetails object to send the message PutMessagesDetails putMessagesDetails = PutMessagesDetails.builder() .messages(messages) .build(); // Create a PutMessagesRequest object to send the message PutMessagesRequest putMessagesRequest = PutMessagesRequest.builder() .queueId(queueId) .putMessagesDetails(putMessagesDetails) .build(); // Send the request and get the response queueClient.putMessages(putMessagesRequest); }catch(Exception e){ System.out.println("Exception sending message to OCI Queue: "+e); } } }
-
取得適用於資料庫、JSON 和 OCI 佇列的 Spring Boot Java 類別之後,即可繼續進行
MessagesEndpoint.java類別。因此,我們將建立一個名為
endpoint的資料夾及其 Spring Boot Java 類別。
注意:在
MessagesEndpoint.java中,我們需要匯入一些自動產生的類別。若要這麼做,請在pom.xml檔案的「組態」區段中新增下列來源:<configuration> <sources> <source>${project.build.directory}/generated-sources</source> </sources> </configuration>pom.xml檔案應該類似。
-
MessagesEndpoint.java:此 Spring Boot Java 類別的用途是擷取 SOAP HTTP 要求,並將其值對應至每個訊息的 User、Car 和 House Java 物件。然後,它會針對每個 SOAP XML 交易,將擷取的資料儲存在 ATP 資料庫中、將資料從 XML 轉換為 JSON 格式,並將訊息置於 OCI 佇列中。這些訊息稍後可由用戶從佇列中擷取和刪除。//Imports import com.oracle_springboot_tutorial.tutorial.model.*; //Import all the classes from the model package import com.oracle_springboot_tutorial.tutorial.oci_queue.OCIQueue; //Import the OCIQueue class from the oci_queue package import com.tutorial_example.ns0.Messages;//Import the Messages class from the tutorial_example.ns0 package (Auto generated Java Classes from the WSDL) import com.tutorial_example.ns0.MessageType; //Import the MessageType class from the tutorial_example.ns0 package (Auto generated Java Classes from the WSDL) //Import the ArrayList class from the java.util package import java.util.ArrayList; //Spring Boot imports to be used for the SOAP Web Service import org.springframework.beans.factory.annotation.Autowired; //Import the @Autowired annotation to inject the SoapObjectRepository object import org.springframework.beans.factory.annotation.Value; //Import the @Value annotation to inject the values from the application.properties file import org.springframework.stereotype.Component; //Import the @Component annotation to register the class with Spring //Spring Boot imports import org.springframework.ws.server.endpoint.annotation.Endpoint; //Import the @Endpoint annotation to register the class with Spring WS import org.springframework.ws.server.endpoint.annotation.PayloadRoot; //Import the @PayloadRoot annotation to specify the namespace URI and local part of the request payload import org.springframework.ws.server.endpoint.annotation.RequestPayload; //Import the @RequestPayload annotation to map the request payload to the method parameter import org.springframework.ws.server.endpoint.annotation.ResponsePayload; //Import the @ResponsePayload annotation to map the returned value to the response payload //Imports to be used storing SOAP information in the database import com.oracle_springboot_tutorial.tutorial.database.SoapObjectRepository; //Import the SoapObjectRepository class from the database package //Imports to be used for JSON import com.oracle_springboot_tutorial.tutorial.json_message.JsonBuilder; //Import the JsonBuilder class from the json_message package import org.json.JSONObject; //Import the JSONObject class from the org.json package //The @Endpoint annotation registers the class with Spring WS. //The @Component annotation registers the class with Spring to be used as a Spring Bean. @Endpoint @Component public class MessagesEndpoint { //Inject not encrypted and decrypted values using jasypt library from the application.properties file @Value("${oci.queue.queueId}") private String queueId; @Value("${oci.queue.endPoint}") private String endPoint; @Value("${oci.queue.region}") private String region; @Value("${spring.datasource.password}") private String datasourcePassword; //The @Autowired loads JDBC template in SoapObjectRepository. @Autowired private SoapObjectRepository soapObjectRepository = new SoapObjectRepository(); //Create a new instance of the JsonBuilder class JsonBuilder jsonBuilder = new JsonBuilder(); //The namespace URI private static final String NAMESPACE_URI = "http://tutorial_example.com/ns0"; //The handleMessagesRequest method is annotated with @PayloadRoot, which means that it is invoked when a request with the specified namespace URI and local part is received. @PayloadRoot(namespace = NAMESPACE_URI, localPart = "messages") //The @ResponsePayload annotation makes Spring WS map the returned value to the response payload. @ResponsePayload //The handleMessagesRequest method processes the request and sends the message to the OCI Queue. public void handleMessagesRequest(@RequestPayload Messages request) { OCIQueue ociQueue = new OCIQueue(queueId, endPoint, region); //Create an ArrayList to store the users ArrayList<User> usersMessageArray = new ArrayList<User>(); //Iterate over the messages, extracting the SOAP Messages and storing in the Java Objects (Car, House, User) for (MessageType message : request.getMessage()) { User user = new User(); user.setUserName(message.getUsername()); user.setUserLastName(message.getUserlastname()); user.setID(message.getId()); user.setEmail(message.getEmail()); user.setDate(message.getDate()); user.setAttribute(message.getAttribute()); //Insert User in Oracle ATP soapObjectRepository.saveUserSOAPMessage(user); //Process the attributes Car or House depending of the kind of User processMessage(user, message); //Add the user to the ArrayList usersMessageArray.add(user); } //Convert to JSON format JSONObject jsonObject = jsonBuilder.buildJsonMessage(usersMessageArray); //Send the JSON message to OCI Queue ociQueue.sendMessages(jsonObject.toString()); } //The processMessage method processes the message based on the user's attribute. private void processMessage(User user, MessageType message) { String subject = user.getAttribute(); switch (subject) { case "CAR": handleCAR(user, message); break; case "HOUSE": handleHouse(user, message); break; default: System.out.println("Unknown subject: " + subject); } } //The handleCAR method processes the CAR message. private void handleCAR(User user, MessageType message) { Car car = new Car(); car.setBrand(message.getBody().getEnvelope().getBrand()); car.setColor(message.getBody().getEnvelope().getColor()); car.setPlate(message.getBody().getEnvelope().getPlate()); user.setCar(car); //Insert Car in Oracle ATP soapObjectRepository.saveCarSOAPMessage(user.getCar()); } //The handleHouse method processes the HOUSE message. private void handleHouse(User user, MessageType message) { House house = new House(); house.setFloors(message.getBody().getEnvelope().getFloors()); house.setLocation(message.getBody().getEnvelope().getLocation()); house.setRooms(message.getBody().getEnvelope().getRooms()); house.setBathRooms(message.getBody().getEnvelope().getBathrooms()); user.setHouse(house); //Insert Houses in Oracle ATP soapObjectRepository.saveHouseSOAPMessage(user.getHouse()); } }
-
-
現在已完成 Spring Boot 專案的整個建構作業,我們將在專案資料夾中建立
Dockerfile。
-
Dockerfile:FROM container-registry.oracle.com/graalvm/jdk:17 WORKDIR /app COPY target/*.jar app.jar EXPOSE 8080 ENTRYPOINT ["java", "-jar", "/app/app.jar"]注意:Docker 檔案的第一行會從 Oracle 的容器登錄中提取並設定 GraalVM JDK 映像檔作為基礎映像檔。從一開始,我們提供高效能的 JDK,運用即時 (JIT) 編譯來最佳化執行。
-
執行下列命令,在本機 Docker 儲存區域中建立及推送專案映像檔。
docker build . -t springbootapp:latest
-
執行下列命令以驗證本機 Docker 儲存區域中的映像檔。
docker images
-
您可以使用 OCI Container Registry Classic 儲存區域的完整路徑來標記 Spring Boot 應用程式映像檔。
docker tag springbootapp:latest gru.ocir.io/xxxxxxxxxx/springboot/tutorialapp:latest -
執行下列命令以在本機 Docker 儲存區域中進行驗證。
docker images
-
執行下列命令,將映像檔推送至 OCI 容器登錄 (經典)。
docker push gru.ocir.io/xxxxxxxxxx/springboot/tutorialapp:latest
-
若要複查 OCI Container Registry Classic 中的 OKE 映像檔應用程式,請前往開發人員服務、容器與使用者自建物件,然後按一下容器登錄。

映像檔在 OCI Container Registry Classic 中之後,即可前往我們的開發環境,並在 OKE 中部署此映像檔。對於此教學課程,請執行下列命令來建立必要的組態。
注意:命名空間和服務帳戶之前已經設定過,因此需要加密密碼。
-
執行下列命令以存取專案資料夾。
cd tutorial/ -
執行下列命令以建立 OKE 的加密密碼。
kubectl create secret -n ns-tutorial generic ocir --from-file=.dockerconfigjson=../.docker/config.json --type=kubernetes.io/dockerconfigjson
-
-
我們已經準備好 OKE 環境,因此請將應用程式映像檔從 OCI Container Registry Classic 部署至 OKE。
注意:若要部署應用程式影像,必須要有資訊清單檔案。在本教學課程中,下列
yaml檔案是資訊清單檔案,可用來部署應用程式,並建立 OCI Load Balancer 中使用80連接埠監聽的傳入服務。-
springboot_application.yaml:apiVersion: apps/v1 kind: Deployment metadata: name: soap-oci-queue-app namespace: ns-tutorial labels: app: soap-oci-queue-app spec: replicas: 6 selector: matchLabels: app: soap-oci-queue-app template: metadata: labels: app: soap-oci-queue-app spec: serviceAccountName: tutorialserviceaccount automountServiceAccountToken: true containers: - name: soap-oci-queue-app image: gru.ocir.io/xxxxxxxxxxxx/springboot/tutorialapp:latest ports: - containerPort: 8080 imagePullSecrets: - name: ocir-docker-config --- apiVersion: v1 kind: Service metadata: name: svc-dev-app namespace: ns-tutorial spec: selector: app: soap-oci-queue-app ports: - port: 80 targetPort: 8080 type: LoadBalancer
-
-
在您儲存清單檔案的資料夾中執行
kubectl指令。kubectl apply -f springboot_application.yaml現在,系統會部署應用程式,並在 OKE 中建立傳入負載平衡器服務。

-
若要驗證在 OKE 中建立的 Pod 與服務,請執行下列指令。
kubectl get pods -A
kubectl get svc -A
注意:請從此處下載 Spring Boot Oracle GraalVM 型 Java 應用程式專案:tutorial.zip 。
作業 7:使用 JMeter 測試 Spring Boot Oracle Graal VM 應用程式
如需有關 JMeter 安裝的詳細資訊,請參閱 JMeter 入門。
安裝並設定 JMeter 之後,您就可以傳送 HTTP POST SOAP 要求。例如,將繫線數目設為 2 代表 2 個同時的使用者或應用程式,並將迴圈計數設為 3000,表示每位使用者或應用程式將傳送 3000 個要求,總計為 6000 個 SOAP 要求。

在 JMeter 中設定 OCI Load Balancer IP,在 Spring Boot 專案和主體中設定 SOAP XML 的路徑。

執行含有 6000 個 SOAP 交易的 JMeter,然後進行驗證。
注意:由於我們正在模擬從屬端應用程式的 SOAP 訊息傳遞,因此對於每個 SOAP HTTP 要求,資訊會與上面顯示的 SOAP XML 檔案中看到的資訊相同,而且不會變更,但在實際的客戶環境中,資訊一定會有所不同。
執行下列敘述句:
-
查看 ATP 中儲存的資料總計。

-
查看 ATP 中每個表格中儲存的資料明細。
-
CARS:

-
在家:

-
USERS:

-
-
查看儲存在 OCI 佇列中的 OCI 佇列要求總計。

-
查看 OCI 佇列中 JSON 格式的訊息詳細資訊。

認可
- 作者 - Iván Alexander Vásquez Chinome (Oracle LAD A-Team Cloud 解決方案專家)
其他學習資源
探索 docs.oracle.com/learn 上的其他實驗室,或存取 Oracle Learning YouTube 頻道上的更多免費學習內容。此外,請造訪 education.oracle.com/learning-explorer 以成為 Oracle Learning Explorer。
如需產品文件,請造訪 Oracle Help Center 。
Create an Oracle GraalVM based Java Application using Spring Boot on OKE to Store SOAP Messages in ATP and Send to OCI Queue
G27171-01
February 2025
Copyright ©2025, Oracle and/or its affiliates.