附註:
- 此教學課程需要存取 Oracle Cloud。若要註冊免費帳戶,請參閱開始使用 Oracle Cloud Infrastructure Free Tier 。
- 它使用 Oracle Cloud Infrastructure 憑證、租用戶及區間的範例值。完成實驗室時,請將這些值取代為您雲端環境特有的值。
使用 Oracle Cloud Infrastructure 發布可透過 IPv6 從網際網路存取的 Web 伺服器
簡介
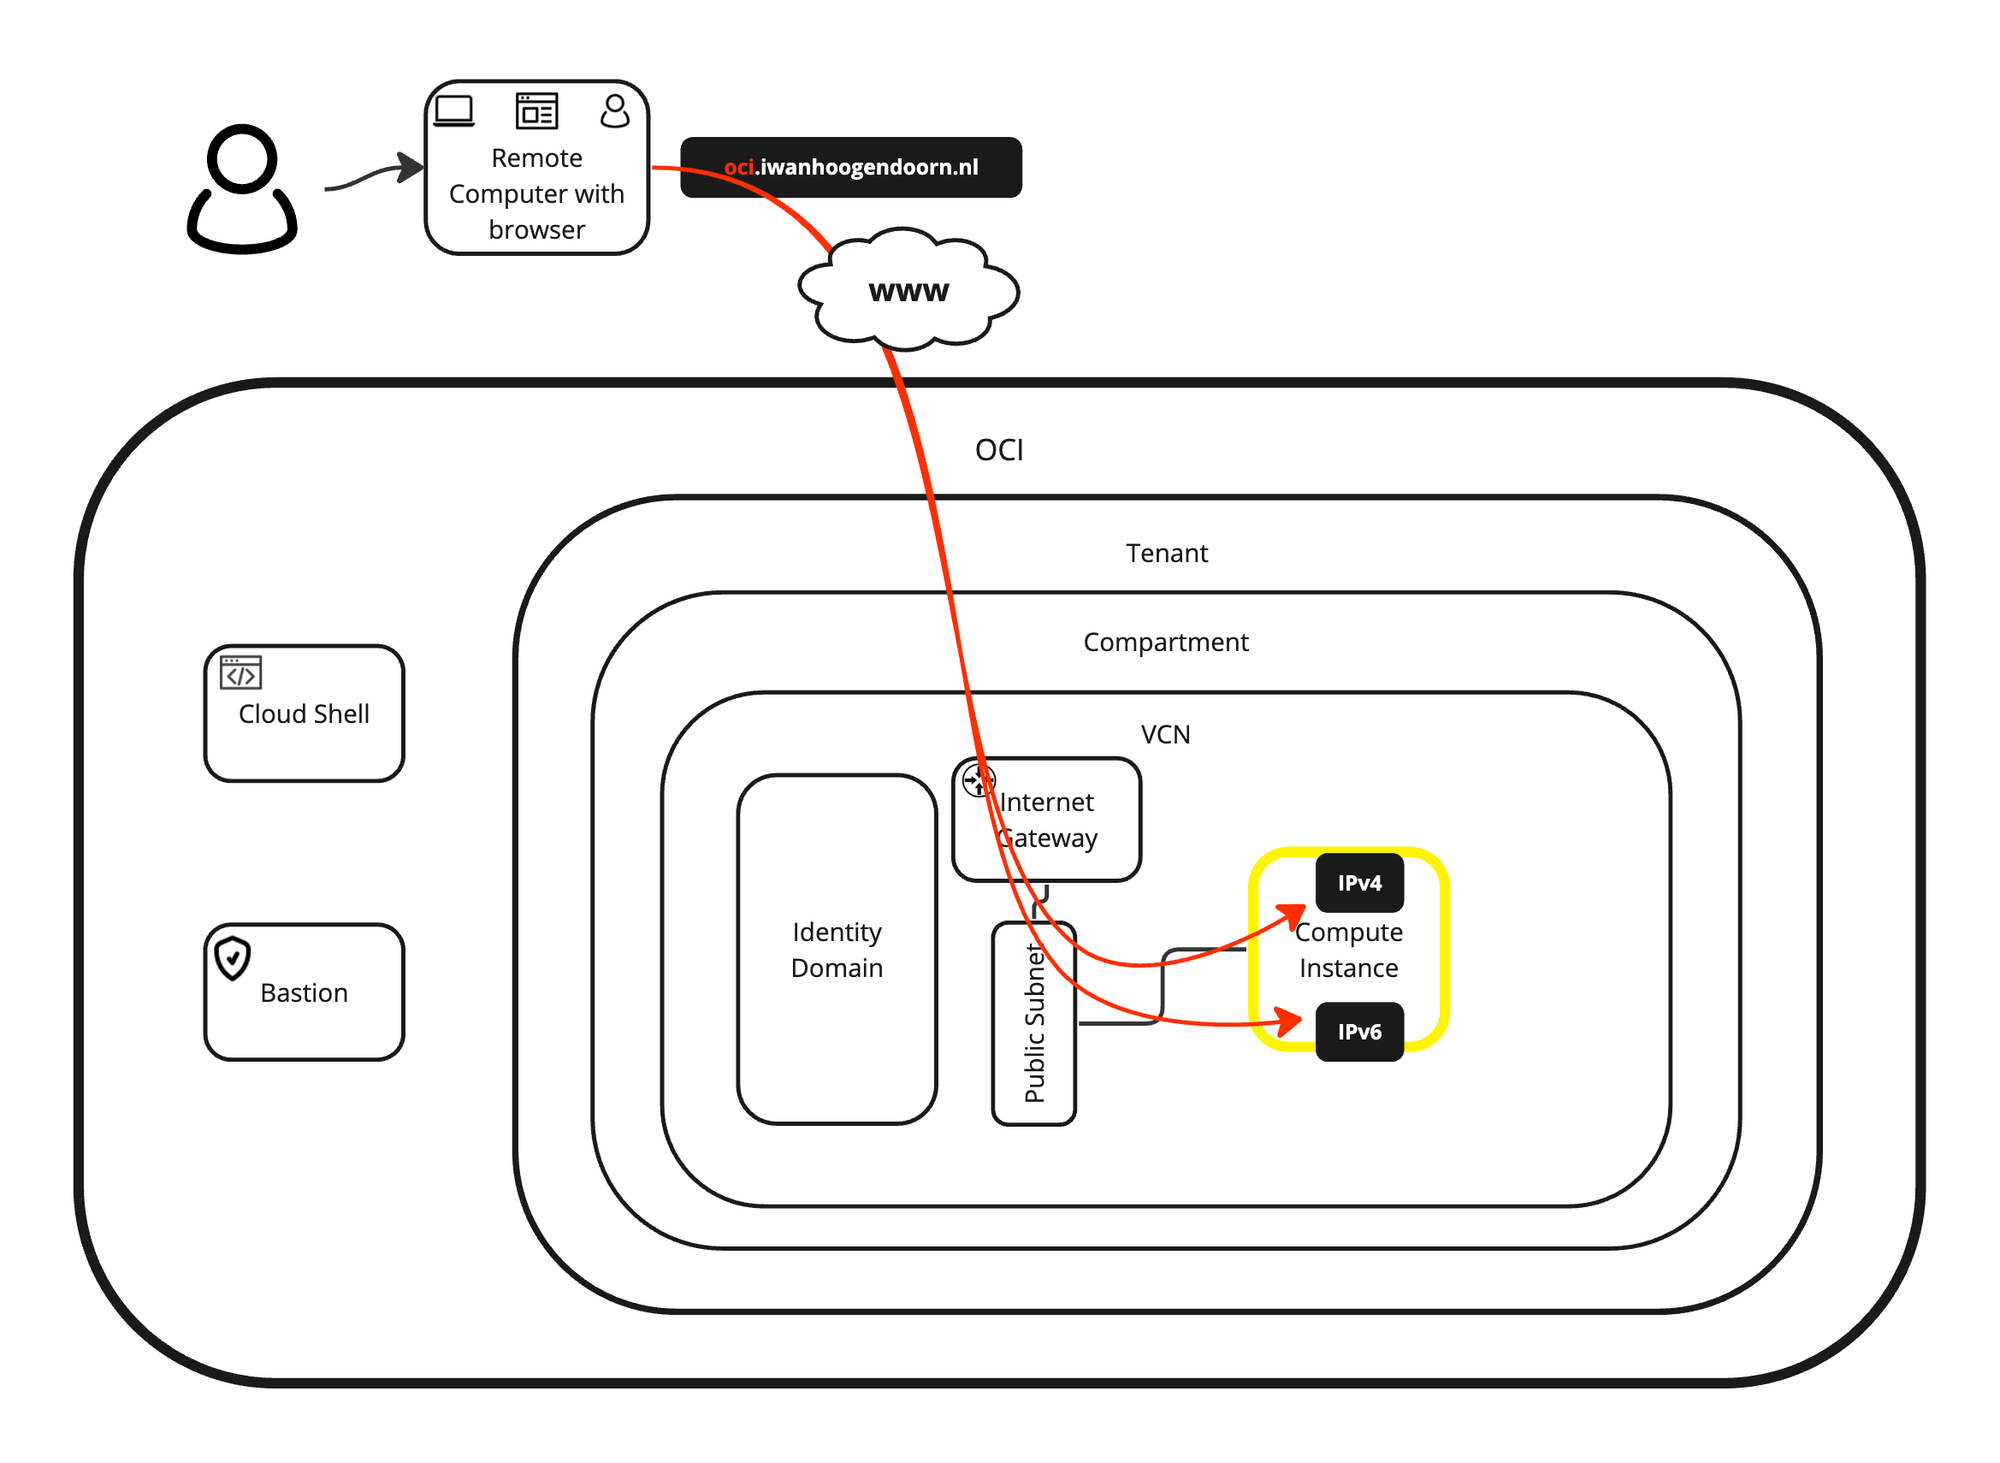
在本教學課程中,我們將說明如何在 Oracle Cloud Infrastructure (OCI) 內建立 Web 伺服器 (OCI 執行處理),並讓此 Web 伺服器能夠從網際網路存取。我們不僅可以從公用 IPv4 位址存取此 Web 伺服器,還可以從已完全設定 DNS 記錄 (FQDN) 的公用 IPv6 位址存取。
注意:我們在此教學課程中使用的網域已建立並設定為僅供測試之用。
目標
-
使用可透過 IPv6 連線的 OCI 執行處理建立網站。我們也說明如何建立及設定讓網站最終可供使用的所有其他先決條件。此外,我們也解釋了 NGINX 網路伺服器的安裝方式,以及 PHP 的整合方式。最後,我們將提供自訂的 PHP 網站或指令碼,用於驗證與 Web 伺服器的 IPv4 或 IPv6 連線,以及您是否使用 HTTP 或 HTTPS 連線。
- 作業 1:建立啟用 IPv6 的新 VCN。
- 作業 2:建立啟用 IPv6 的新子網路。
- 工作 3:建立啟用 IPv6 的新執行處理。
- 作業 4:建立新的網際網路閘道並設定路由。
- 作業 5:預設安全清單上的開啟 HTTP 和 HTTPS。
- 工作 6:在此執行處理上安裝 Web 伺服器。
- 作業 7:設定 DNS 記錄。
- 任務 8:使用 NGINX 和 PHP 創建自訂網站。
- 工作 9:從網際網路測試 Web 伺服器。
作業 1:建立啟用 IPv6 的新 VCN
-
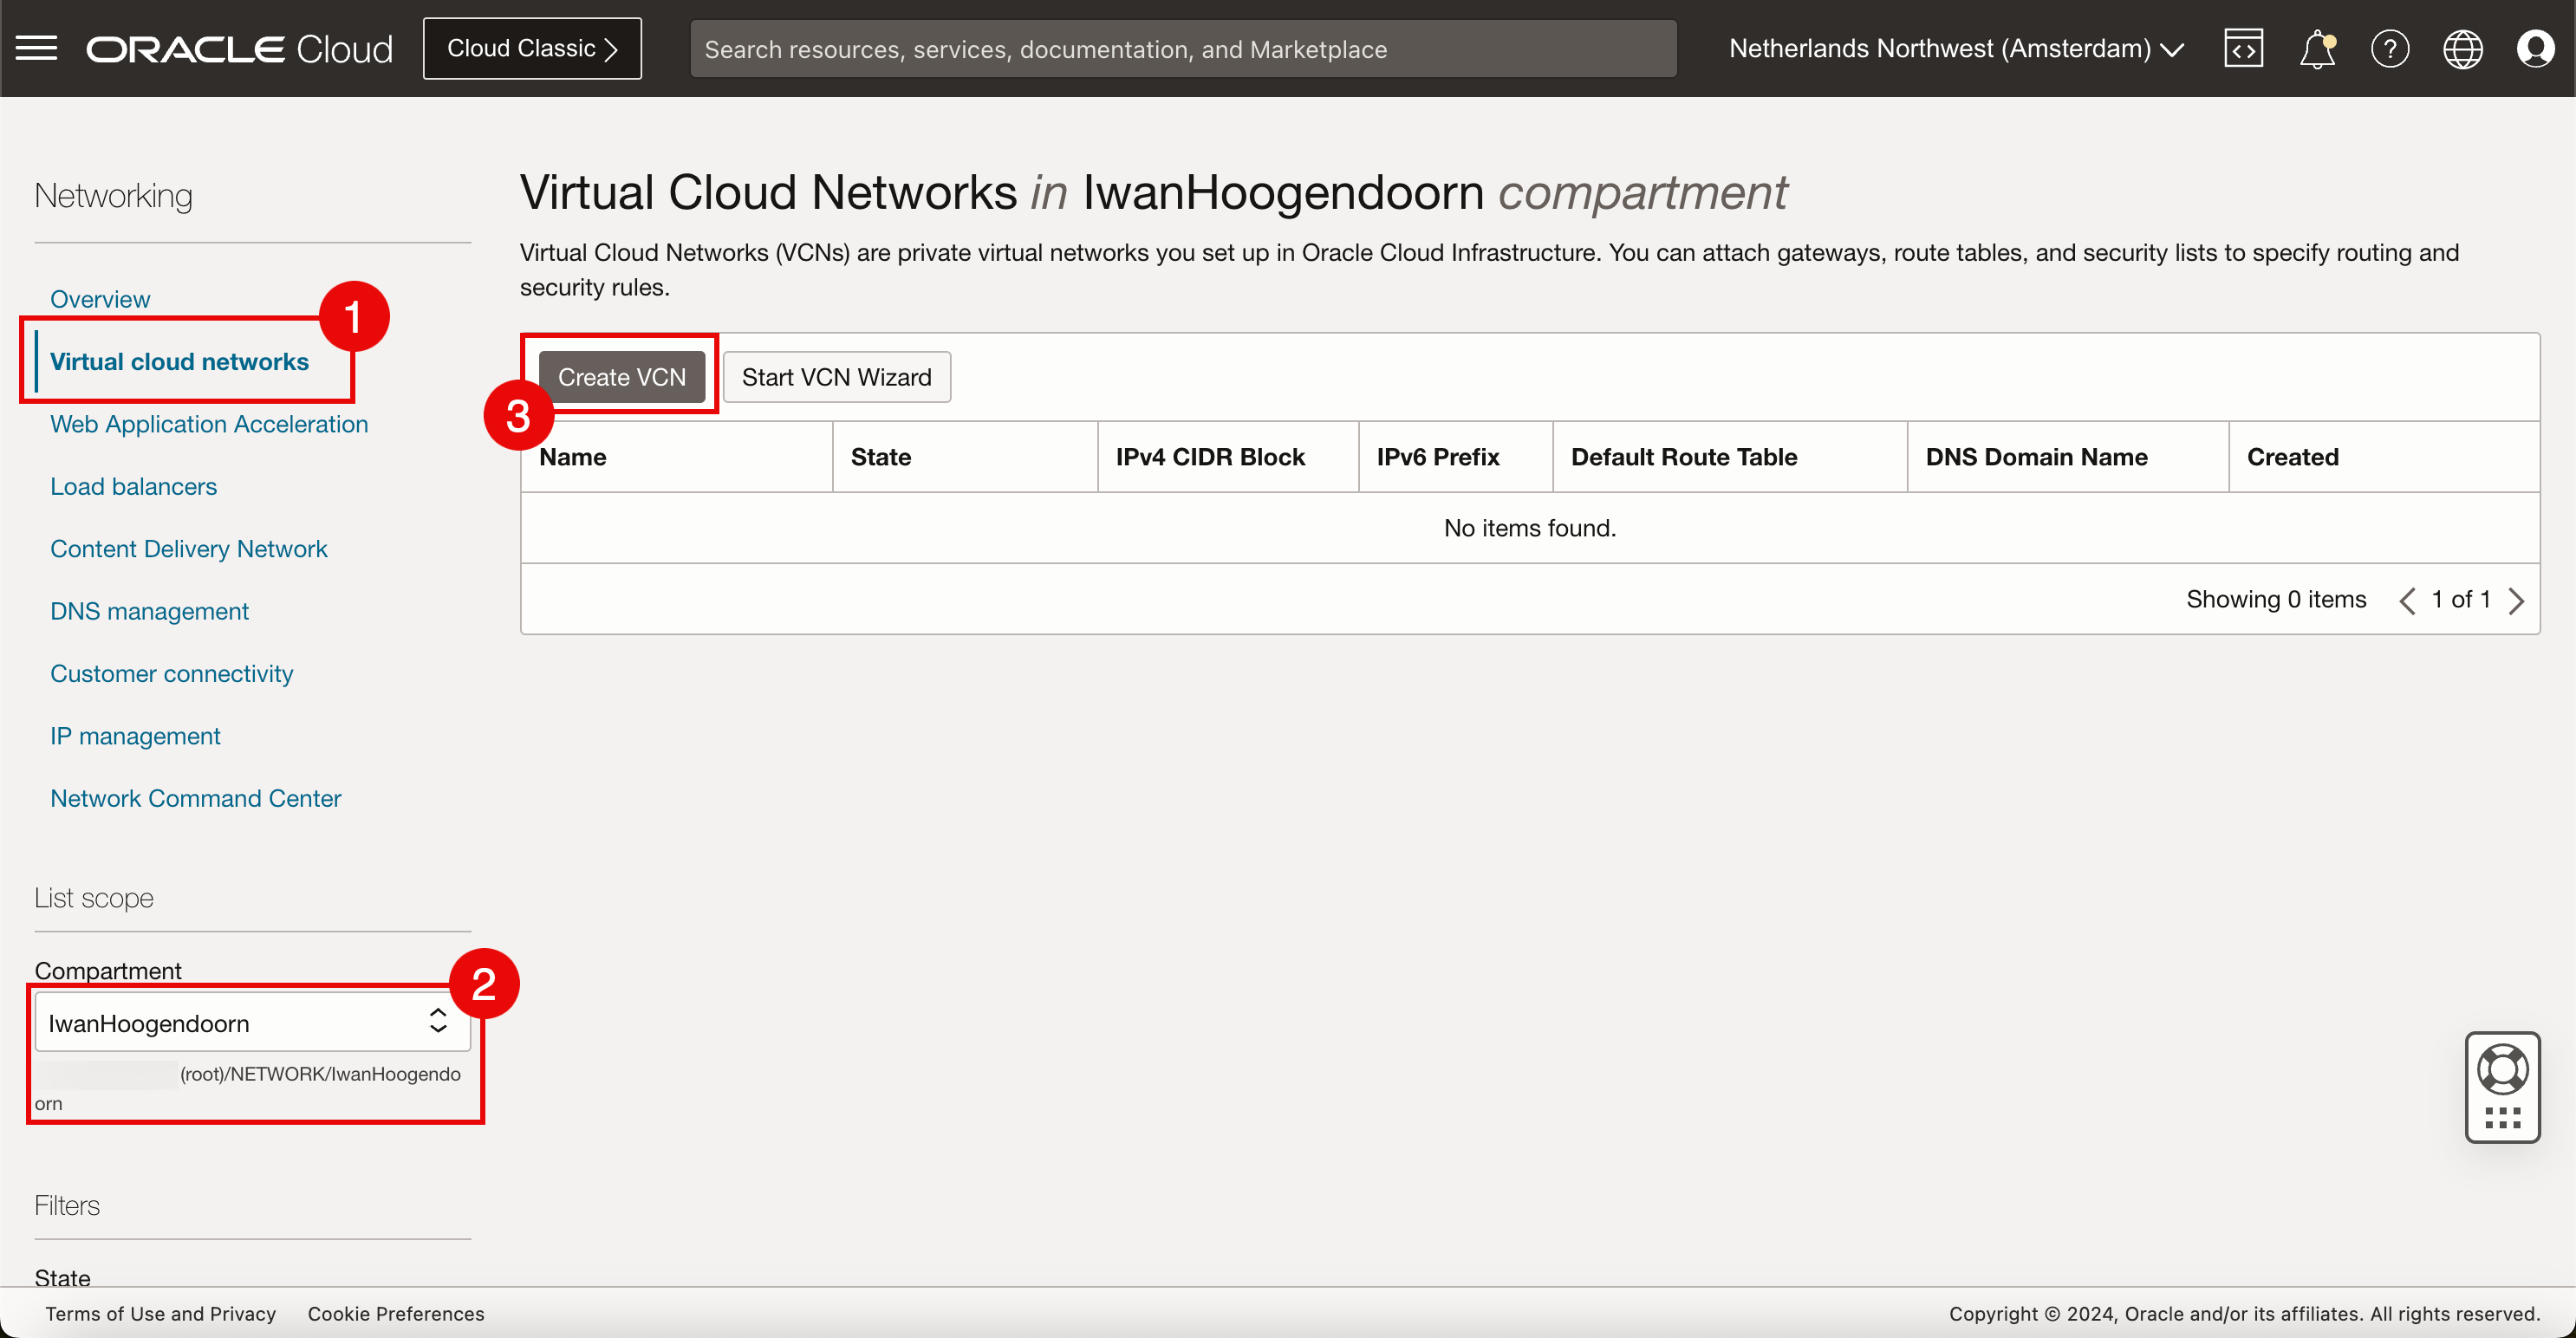
開啟漢堡功能表,然後按一下虛擬雲端網路。

- 請確定選取功能表中的虛擬雲端網路。
- 選取想要使用的區間。如果您尚未設定區間,請使用根區間。
- 按一下建立 VCN 。
-
在建立虛擬雲端網路中,輸入下列資訊。
- 輸入 VCN 名稱。
- 若尚未預先填入區間,請再次選取該區間。
- 選取要在此 VCN 內使用的 IPv4 CIDR。在本教學課程中,我們使用了 /16 CIDR,因為 IPv4 子網路 (通常是 /24) 將從此 CIDR 時鐘傳出。
- 向下拉清單。
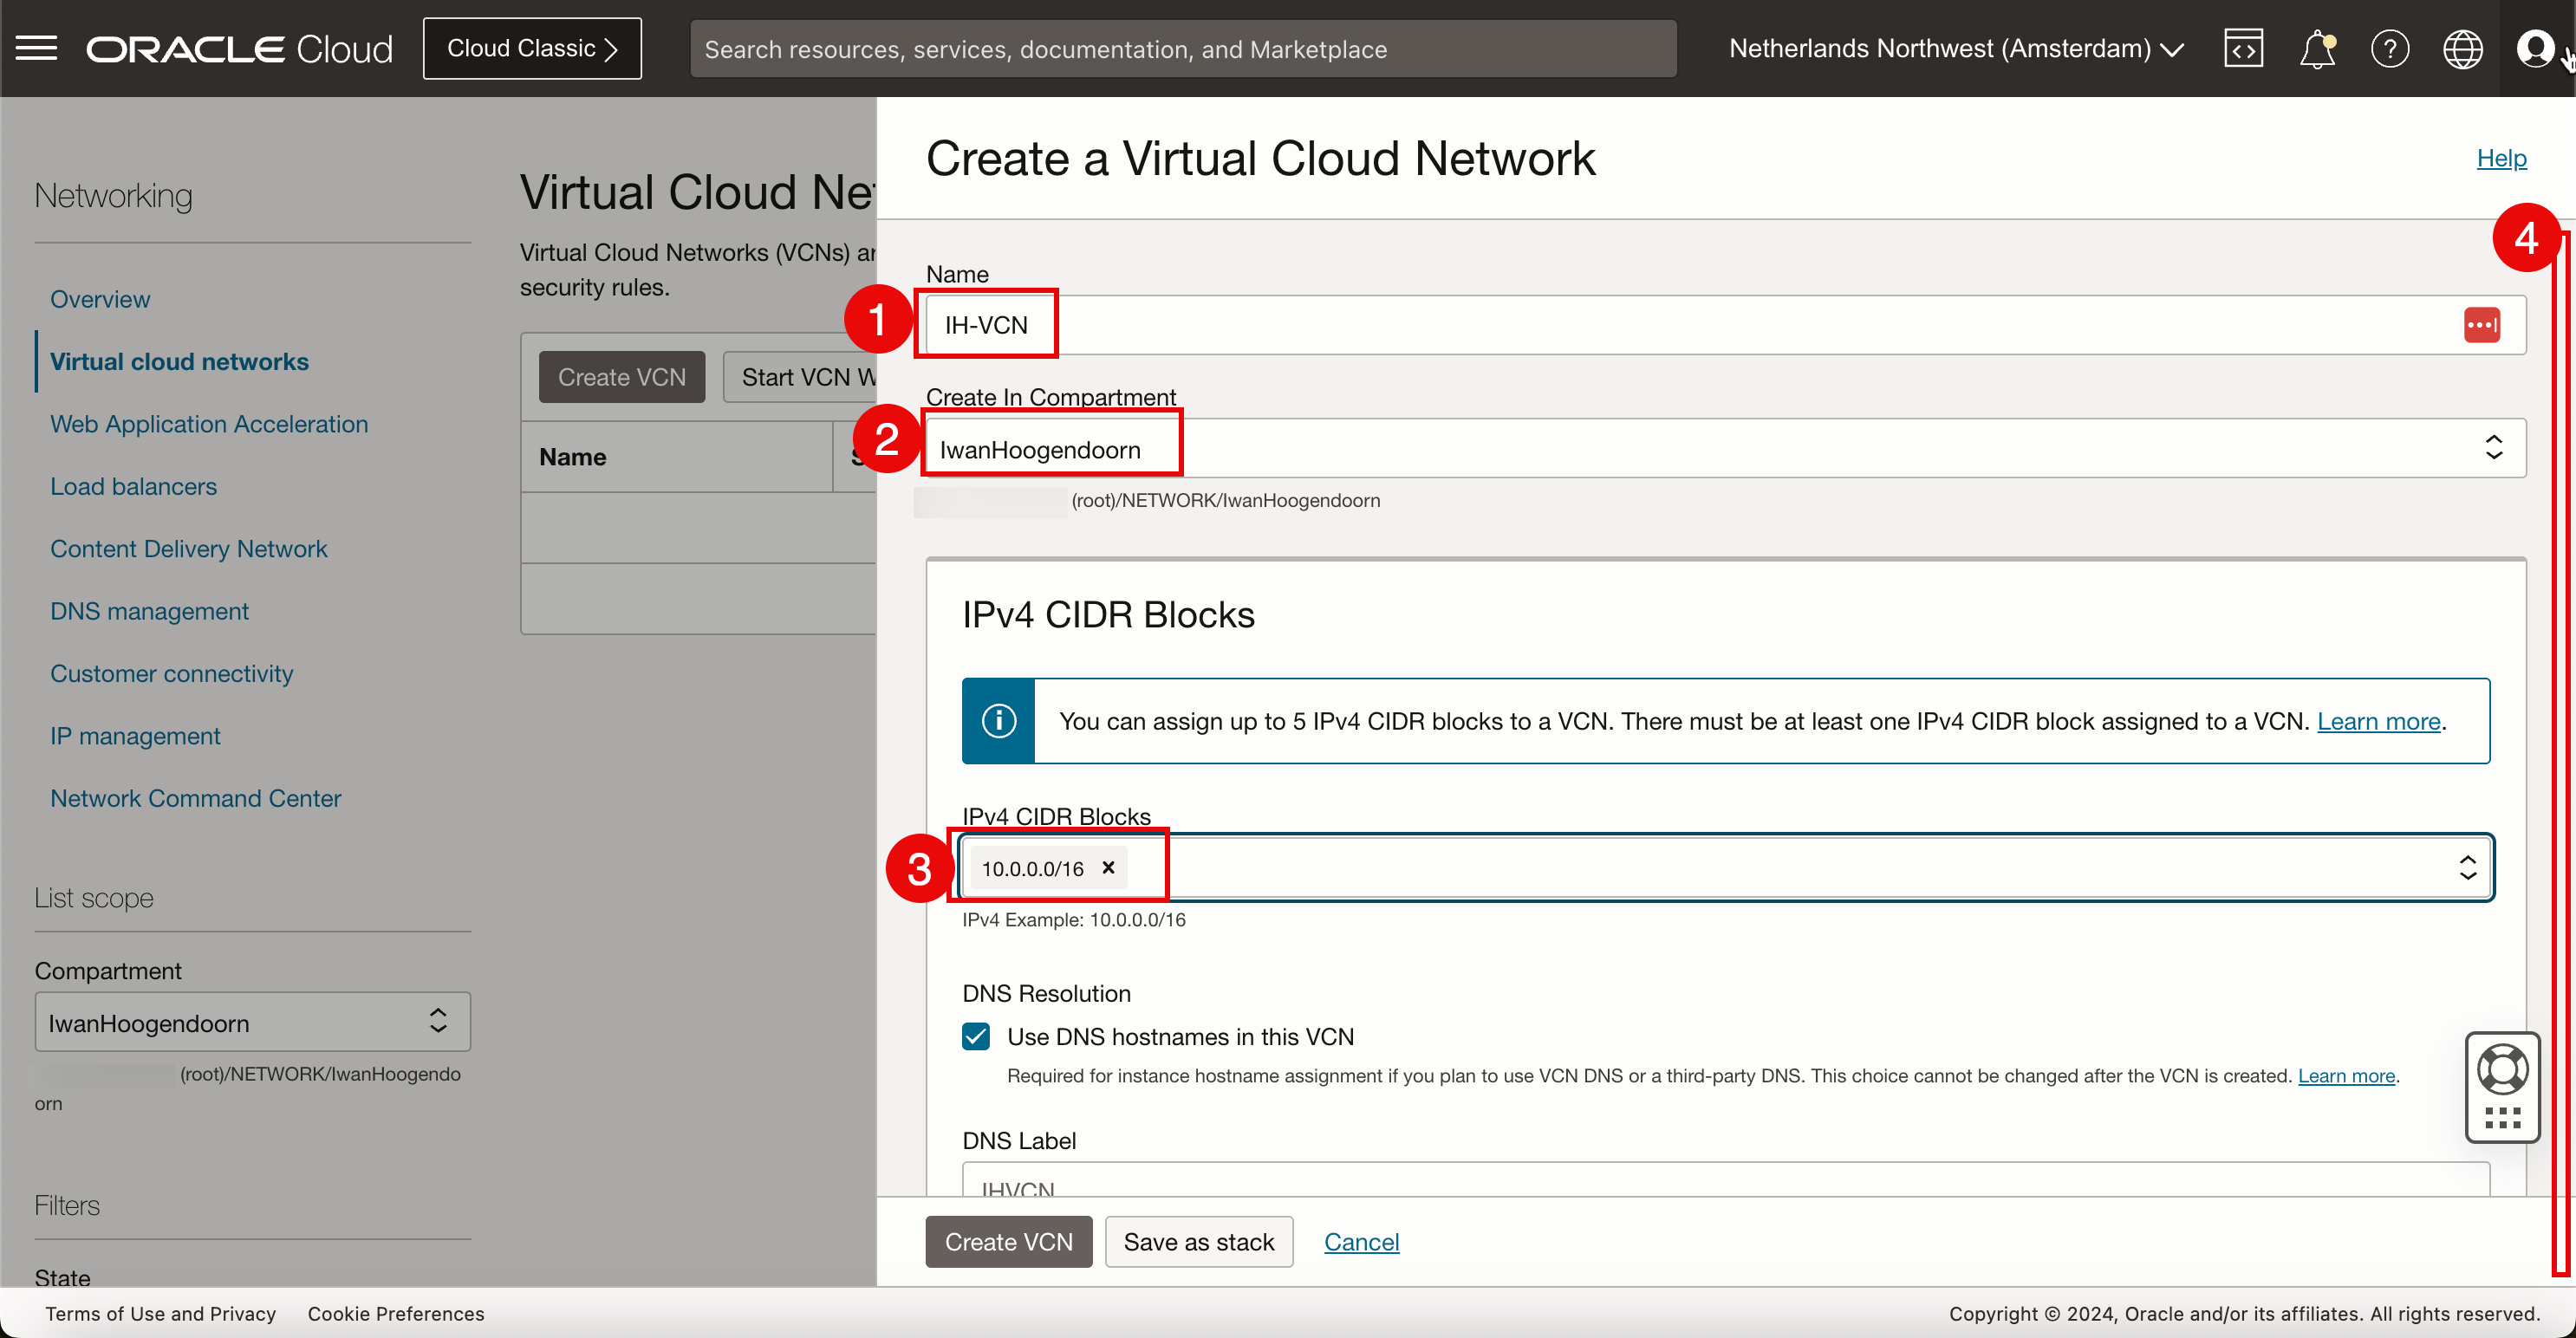
- 若為 IPv6,將會指定 Oracle 配置的前置碼。選取指派 Oracle 配置的 /56 前置碼。
- 按一下建立 VCN 。
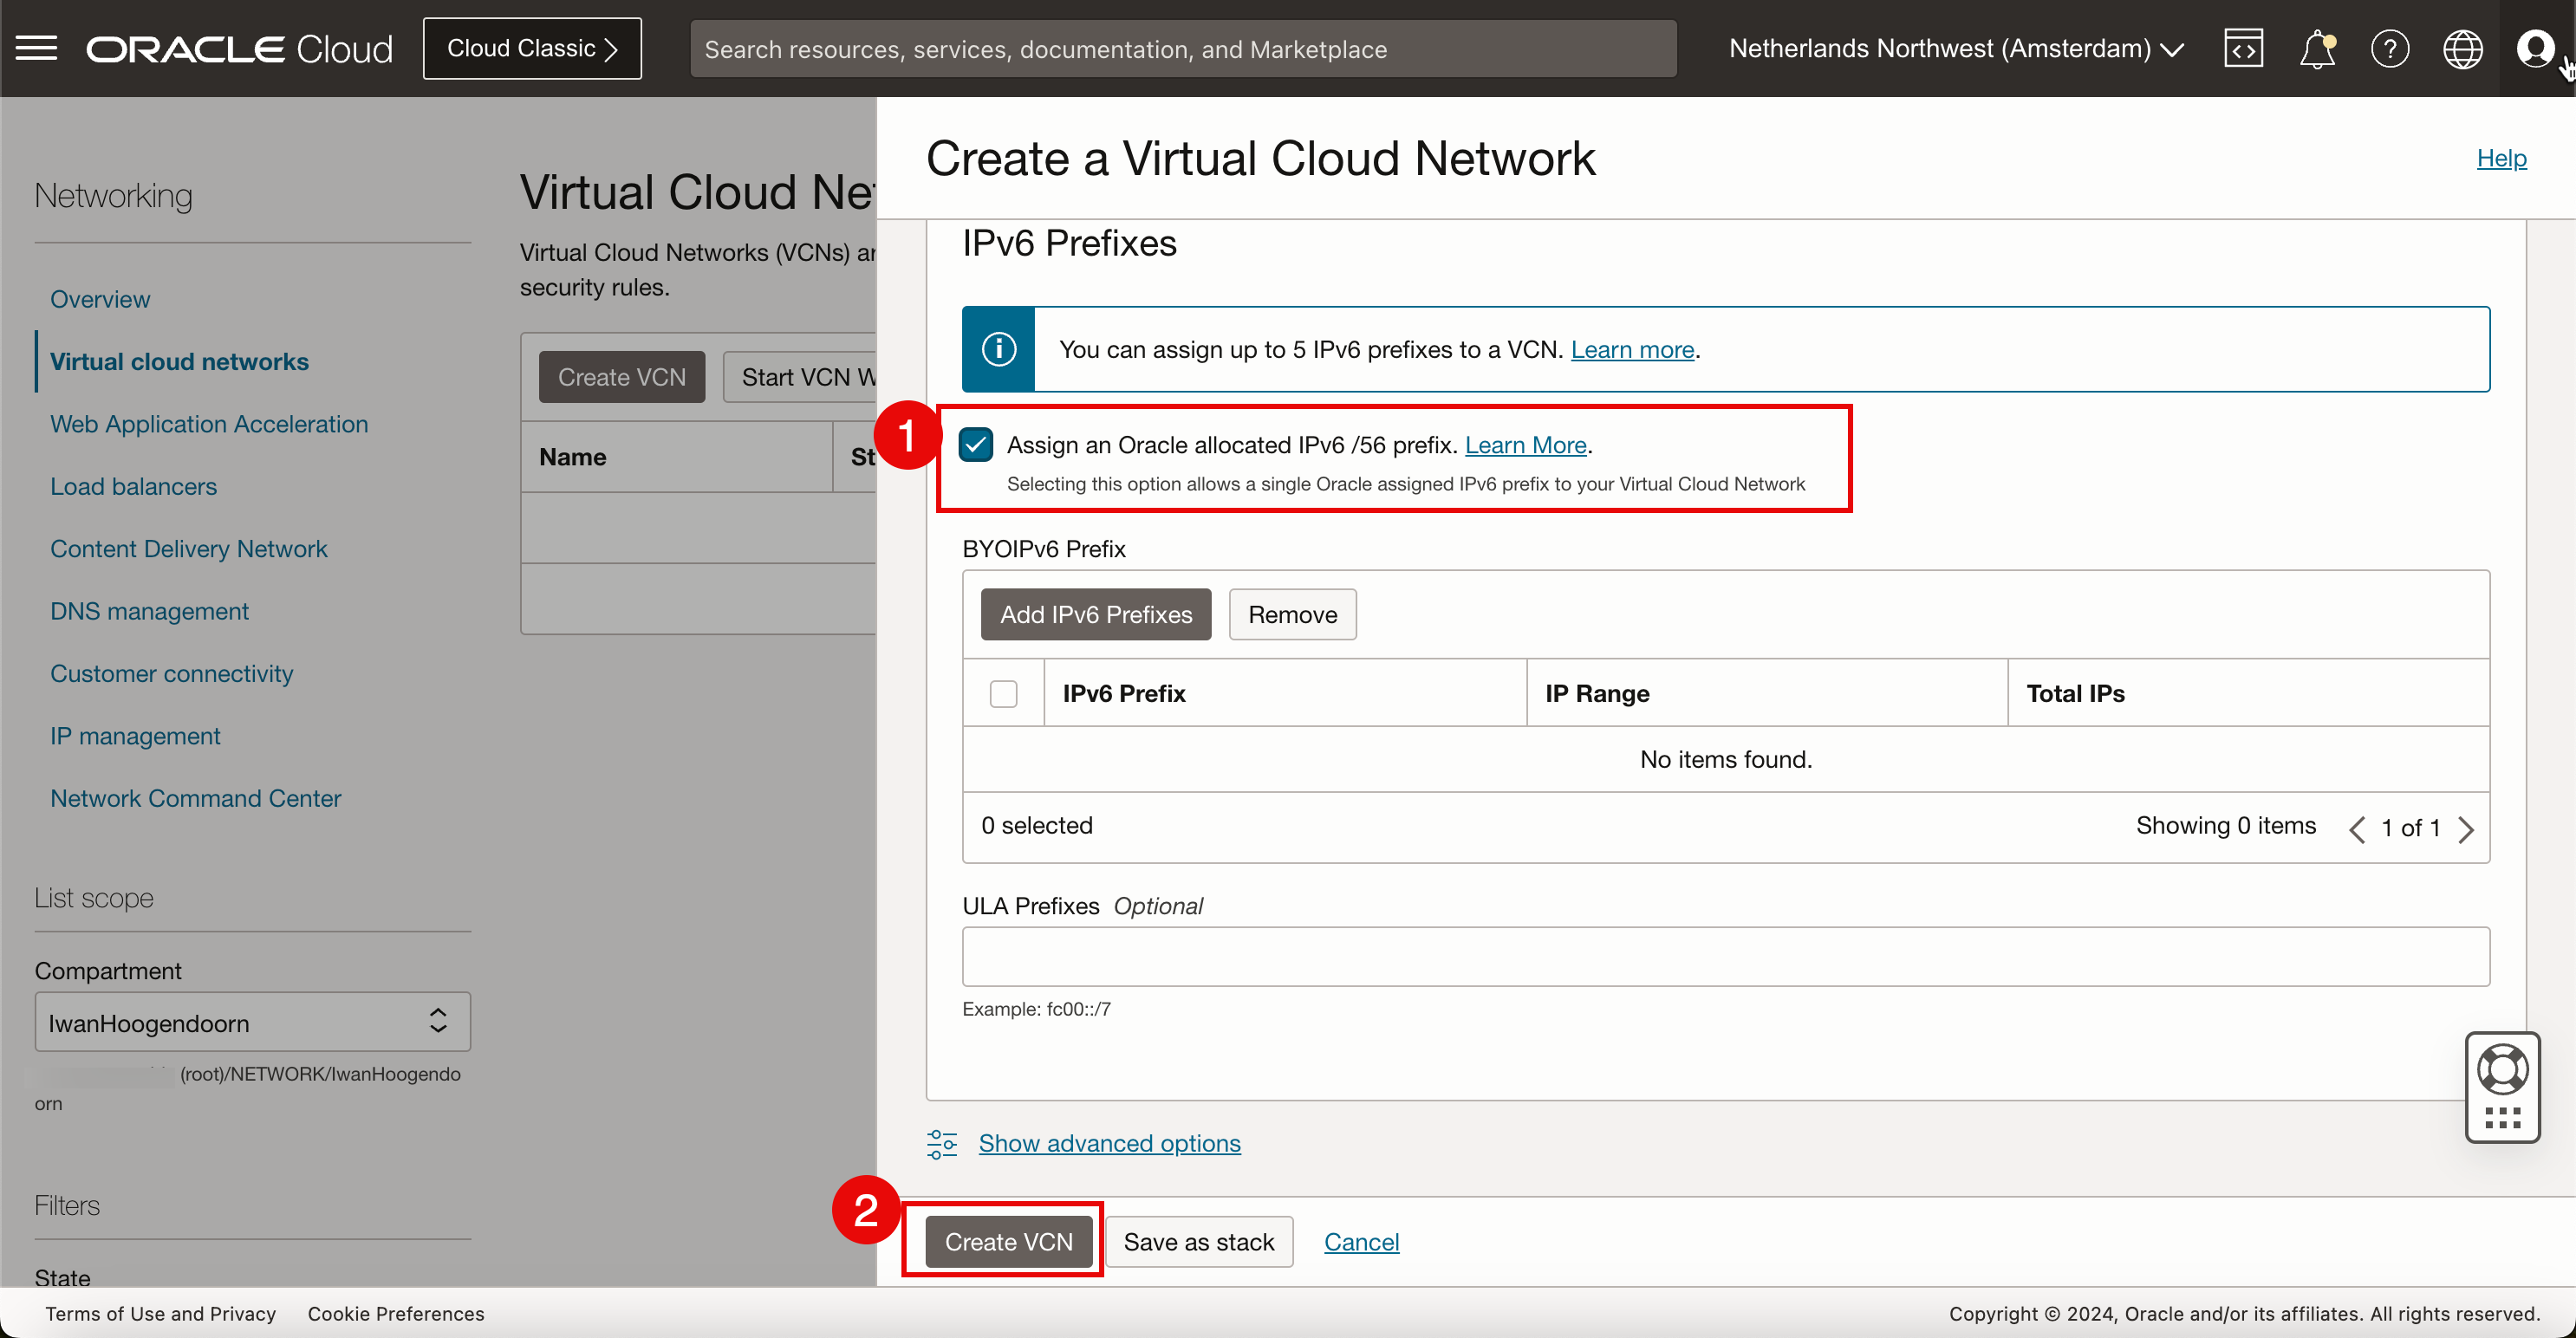
我們現在已建立一個新的 VCN,其中包含新的 IPv4 和 IPv6 網路空間,可用來分割 IPv4 和 IPv6 子網路。
作業 2:建立啟用 IPv6 的新子網路
-
按一下建立子網路。
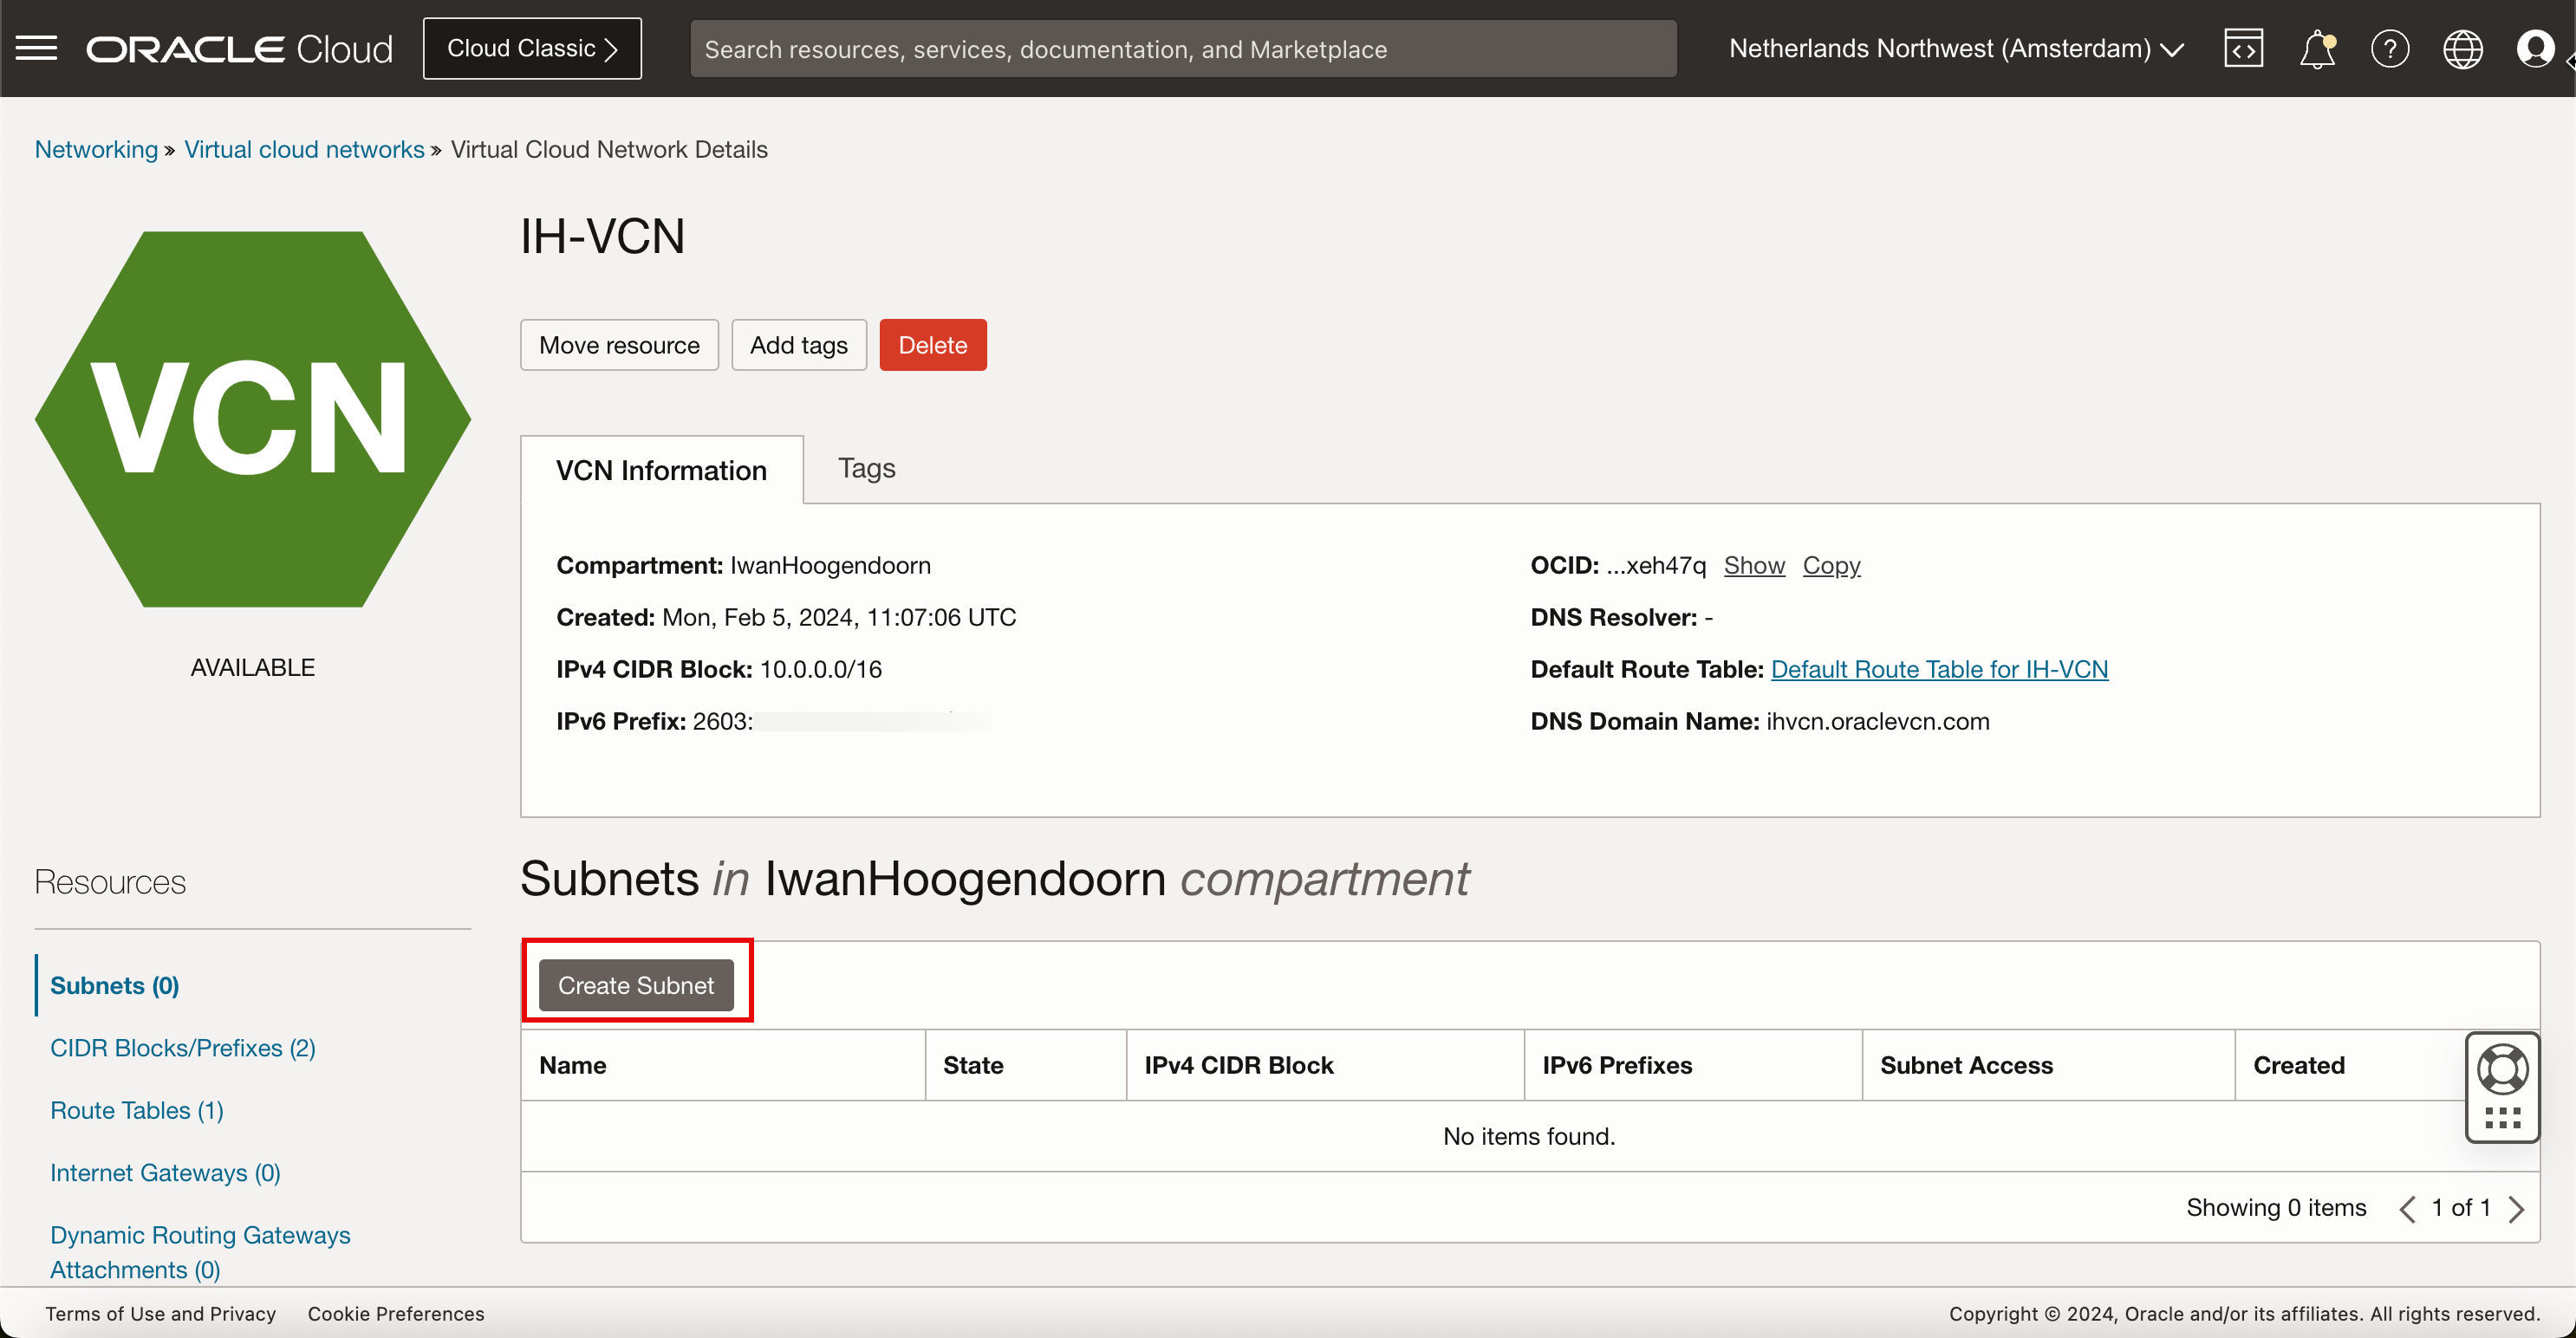
-
在子網路中,輸入下列資訊。
- 輸入子網路的名稱。
- 如果此子網路尚未預先填入,請選取此子網路需要所在的區間。
- 針對子網路類型,我們將立即選取區域。
- 輸入我們將從 VCN 中指定的 CIDR 區塊分割出來的 IPv4 子網路。確定新的 /24 CIDR 區塊落在 VCN 中決定的 /16 內。
- 向下拉清單。
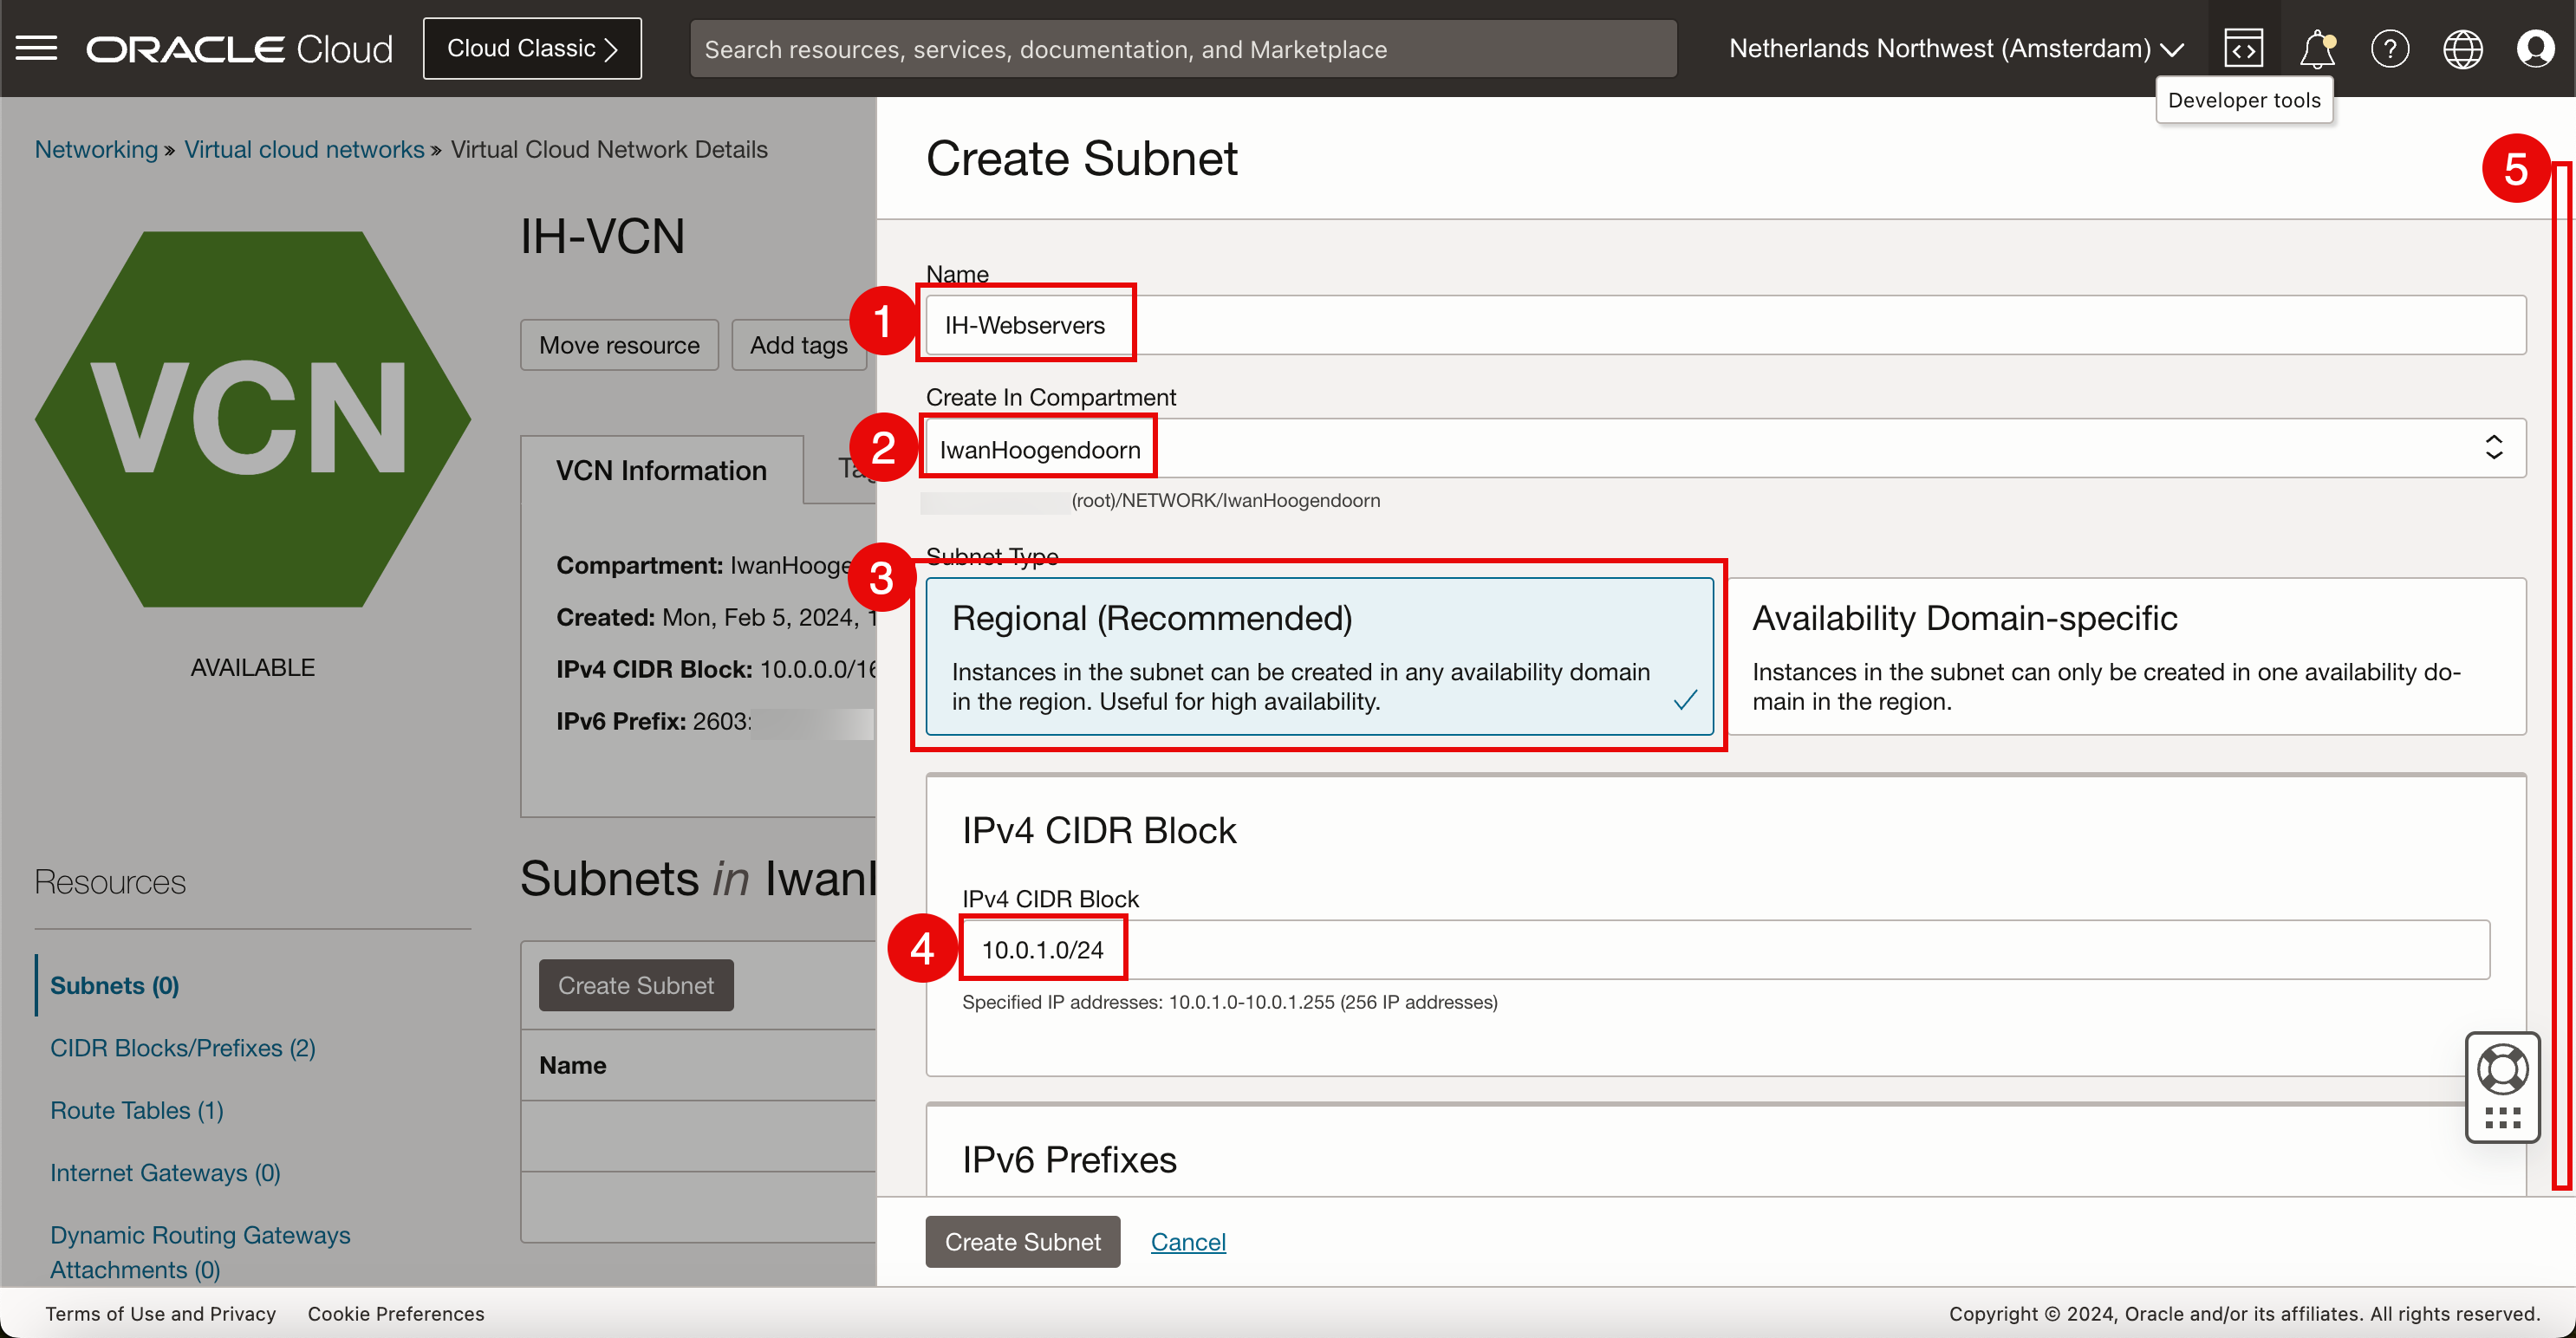
- 若為 IPv6,將會指定 Oracle 配置的前置碼。選取指派 Oracle 配置的 /64 前置碼。
- 選取新的 HEX 小數以完成 Oracle 配置的前置碼。
- 選取 VCN 預設的路由表。
- 將子網路設為公用,以便在需要時取得公用 IP 位址,讓 Web 伺服器能夠從網際網路存取。
- 向下拉清單。

- 選取 VCN 的預設 DHCP。
- 選取 VCN 預設安全清單。
- 按一下建立子網路。
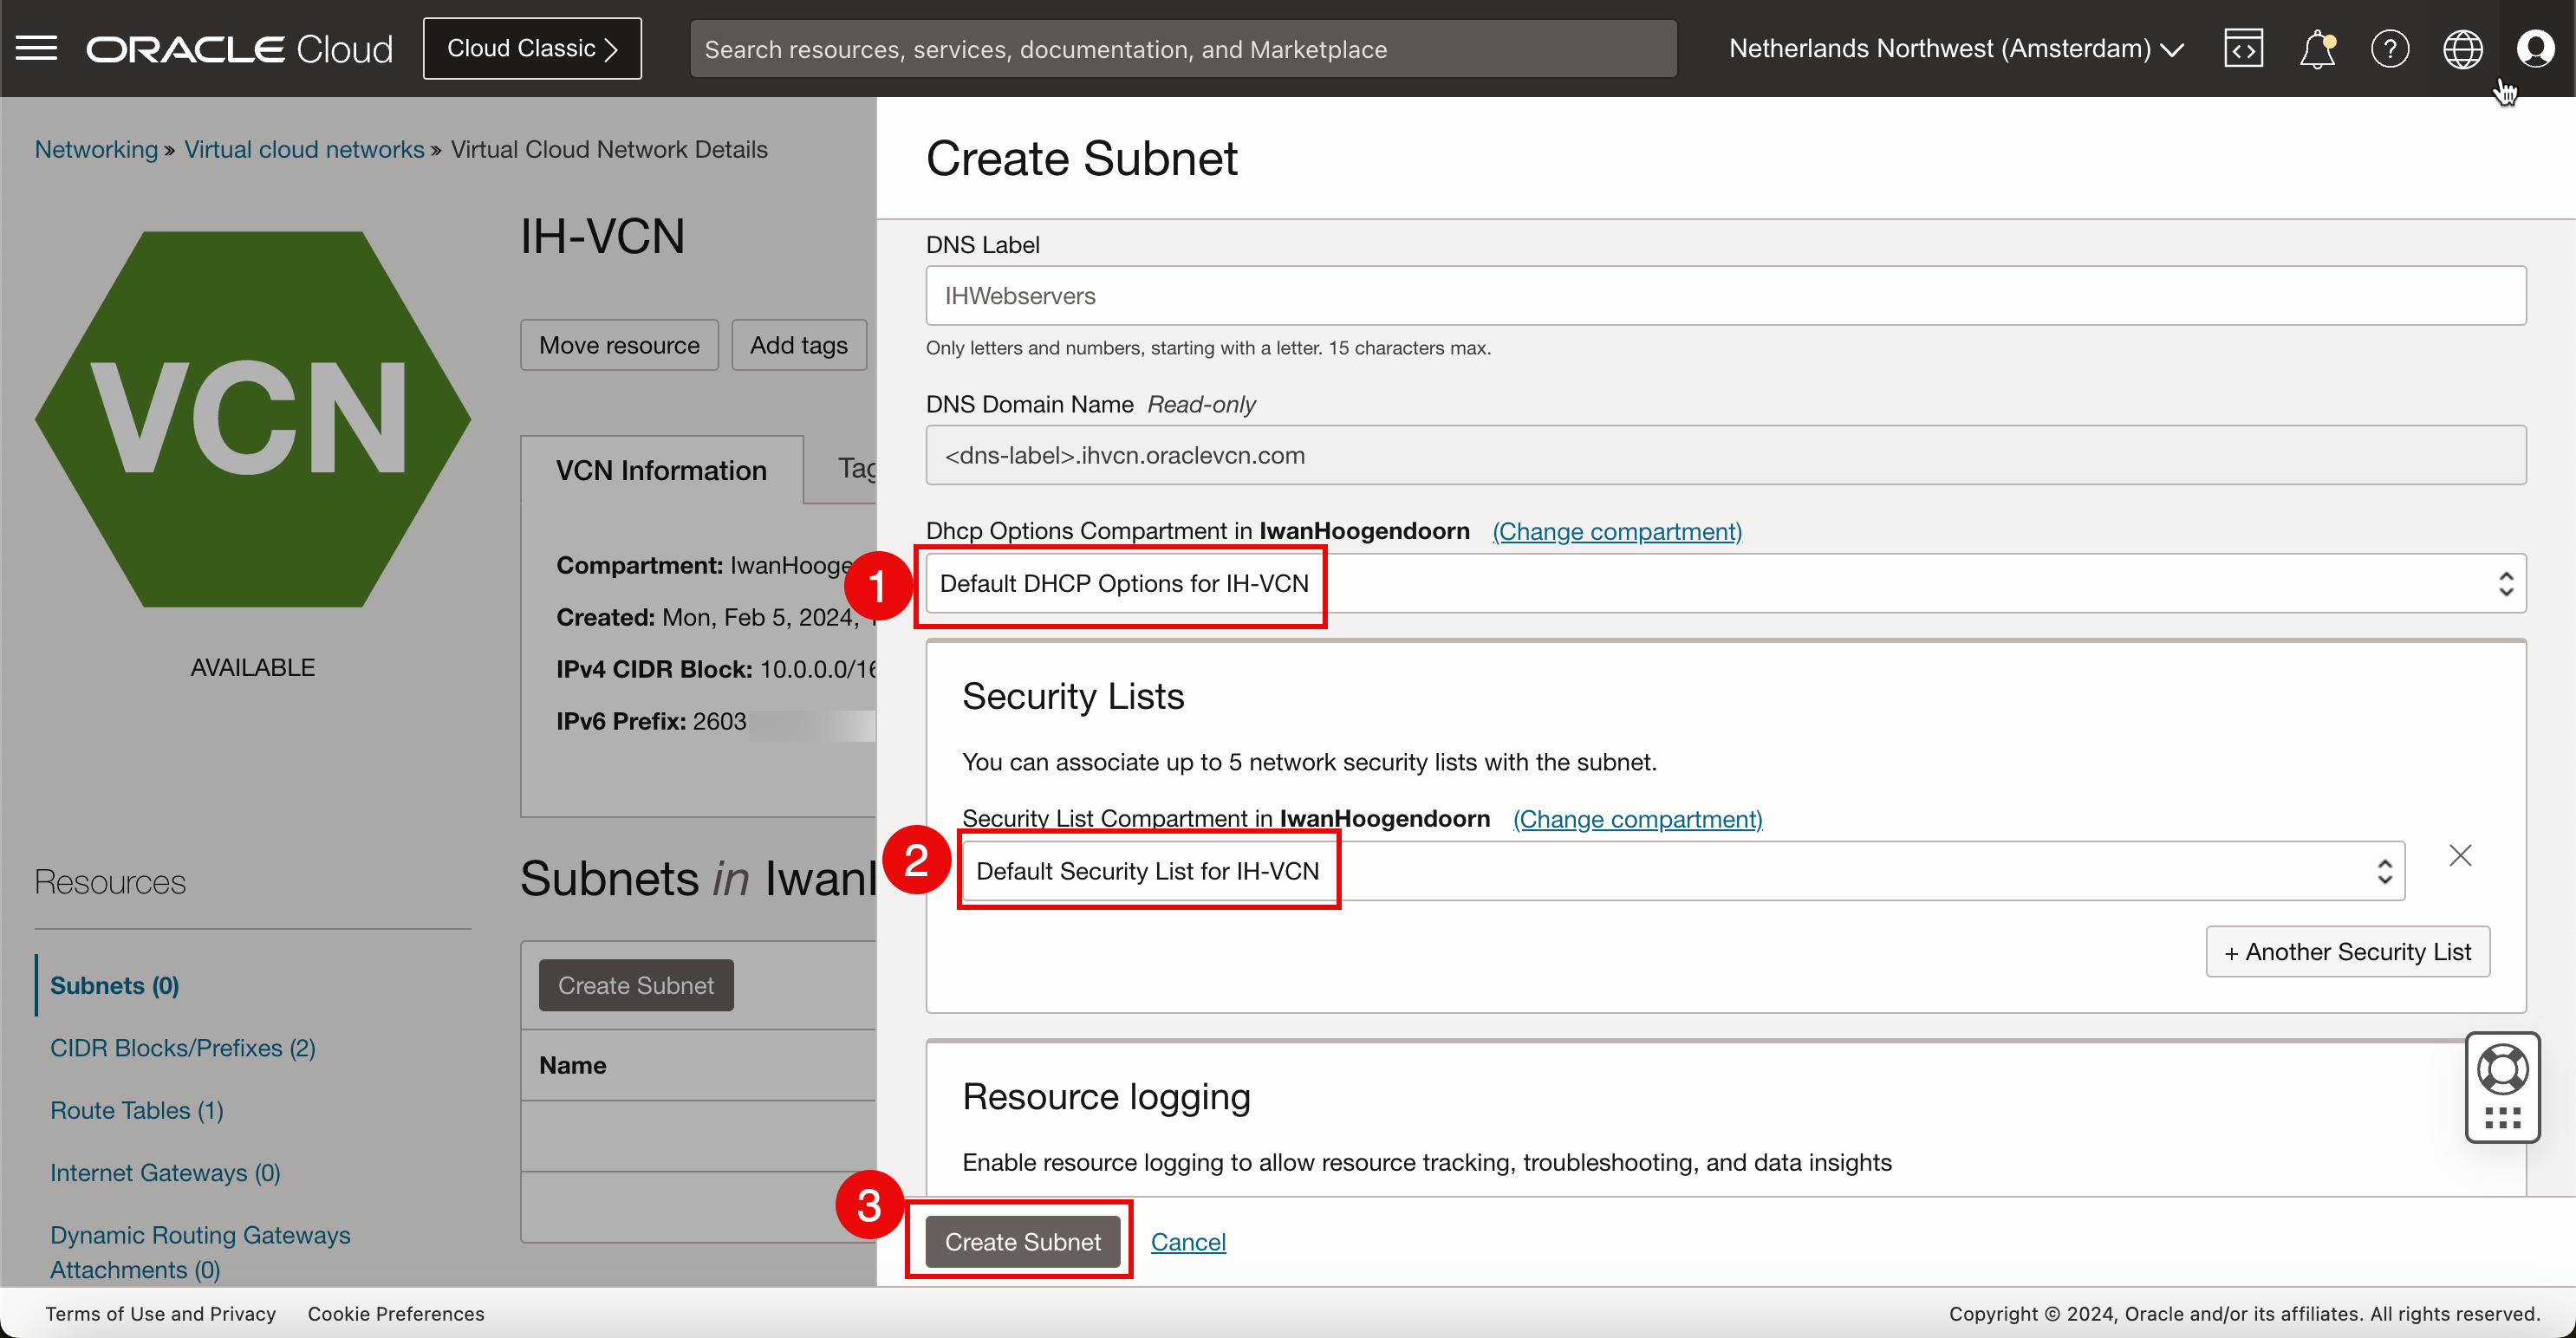
-
請注意,新建立之子網路的狀態為啟動設定。
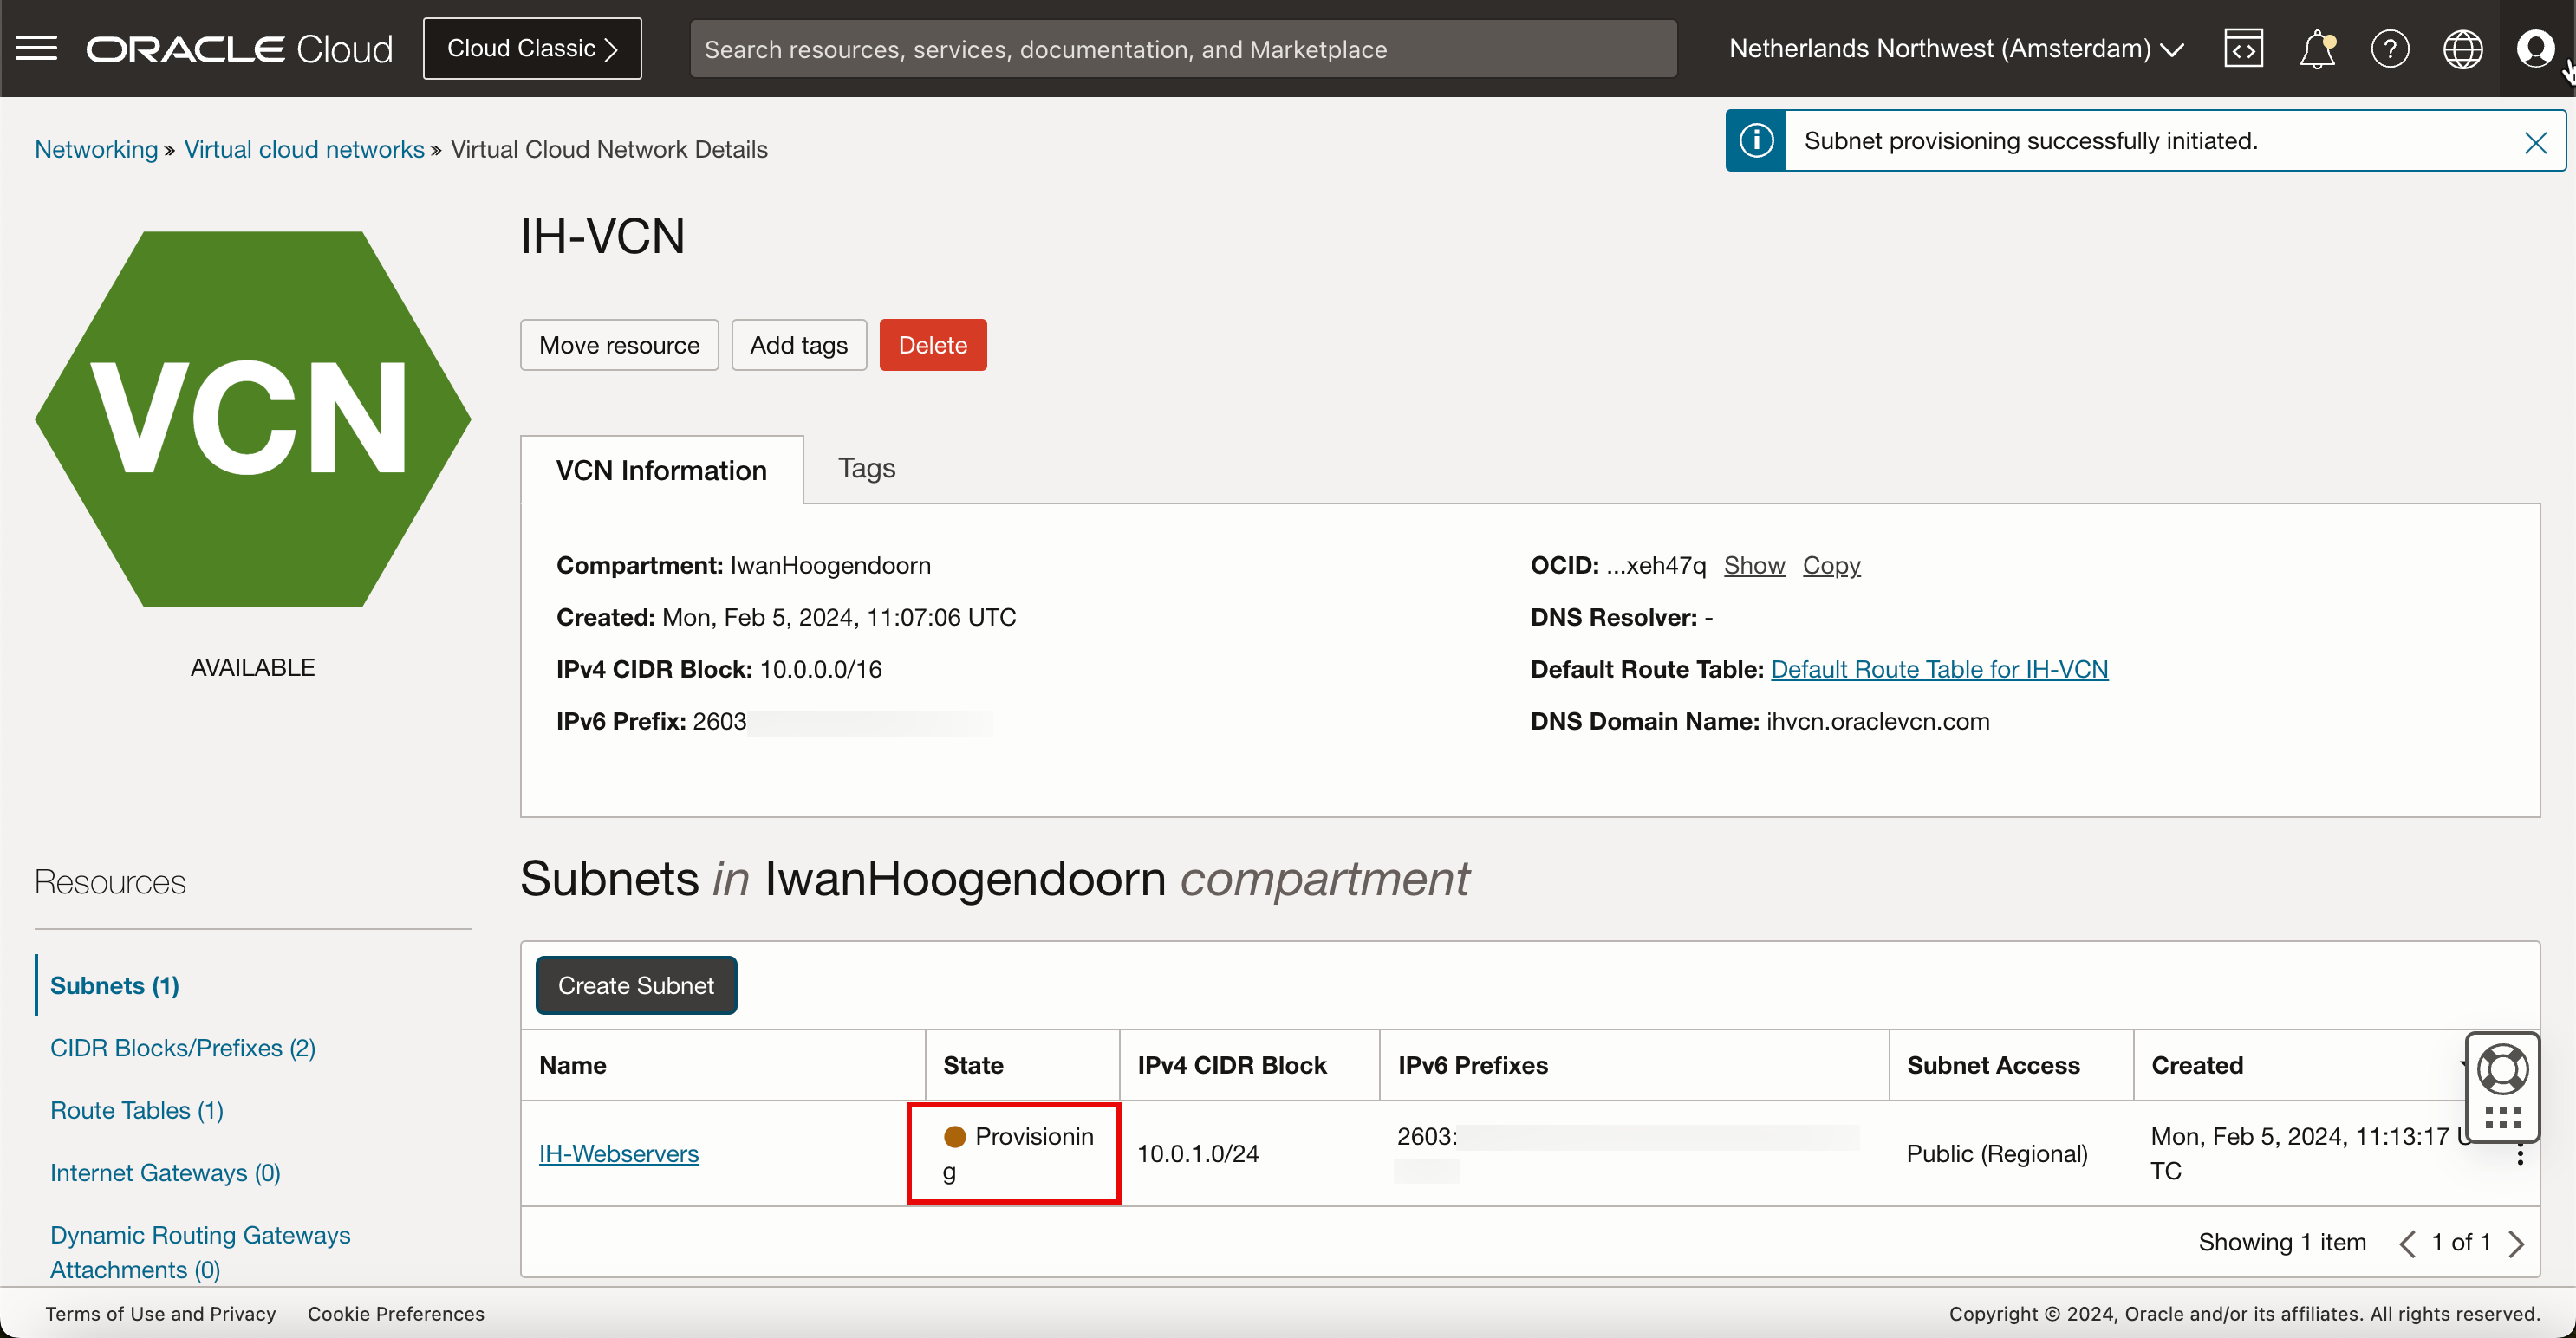
幾分鐘之後,新子網路的狀態將會是可用。
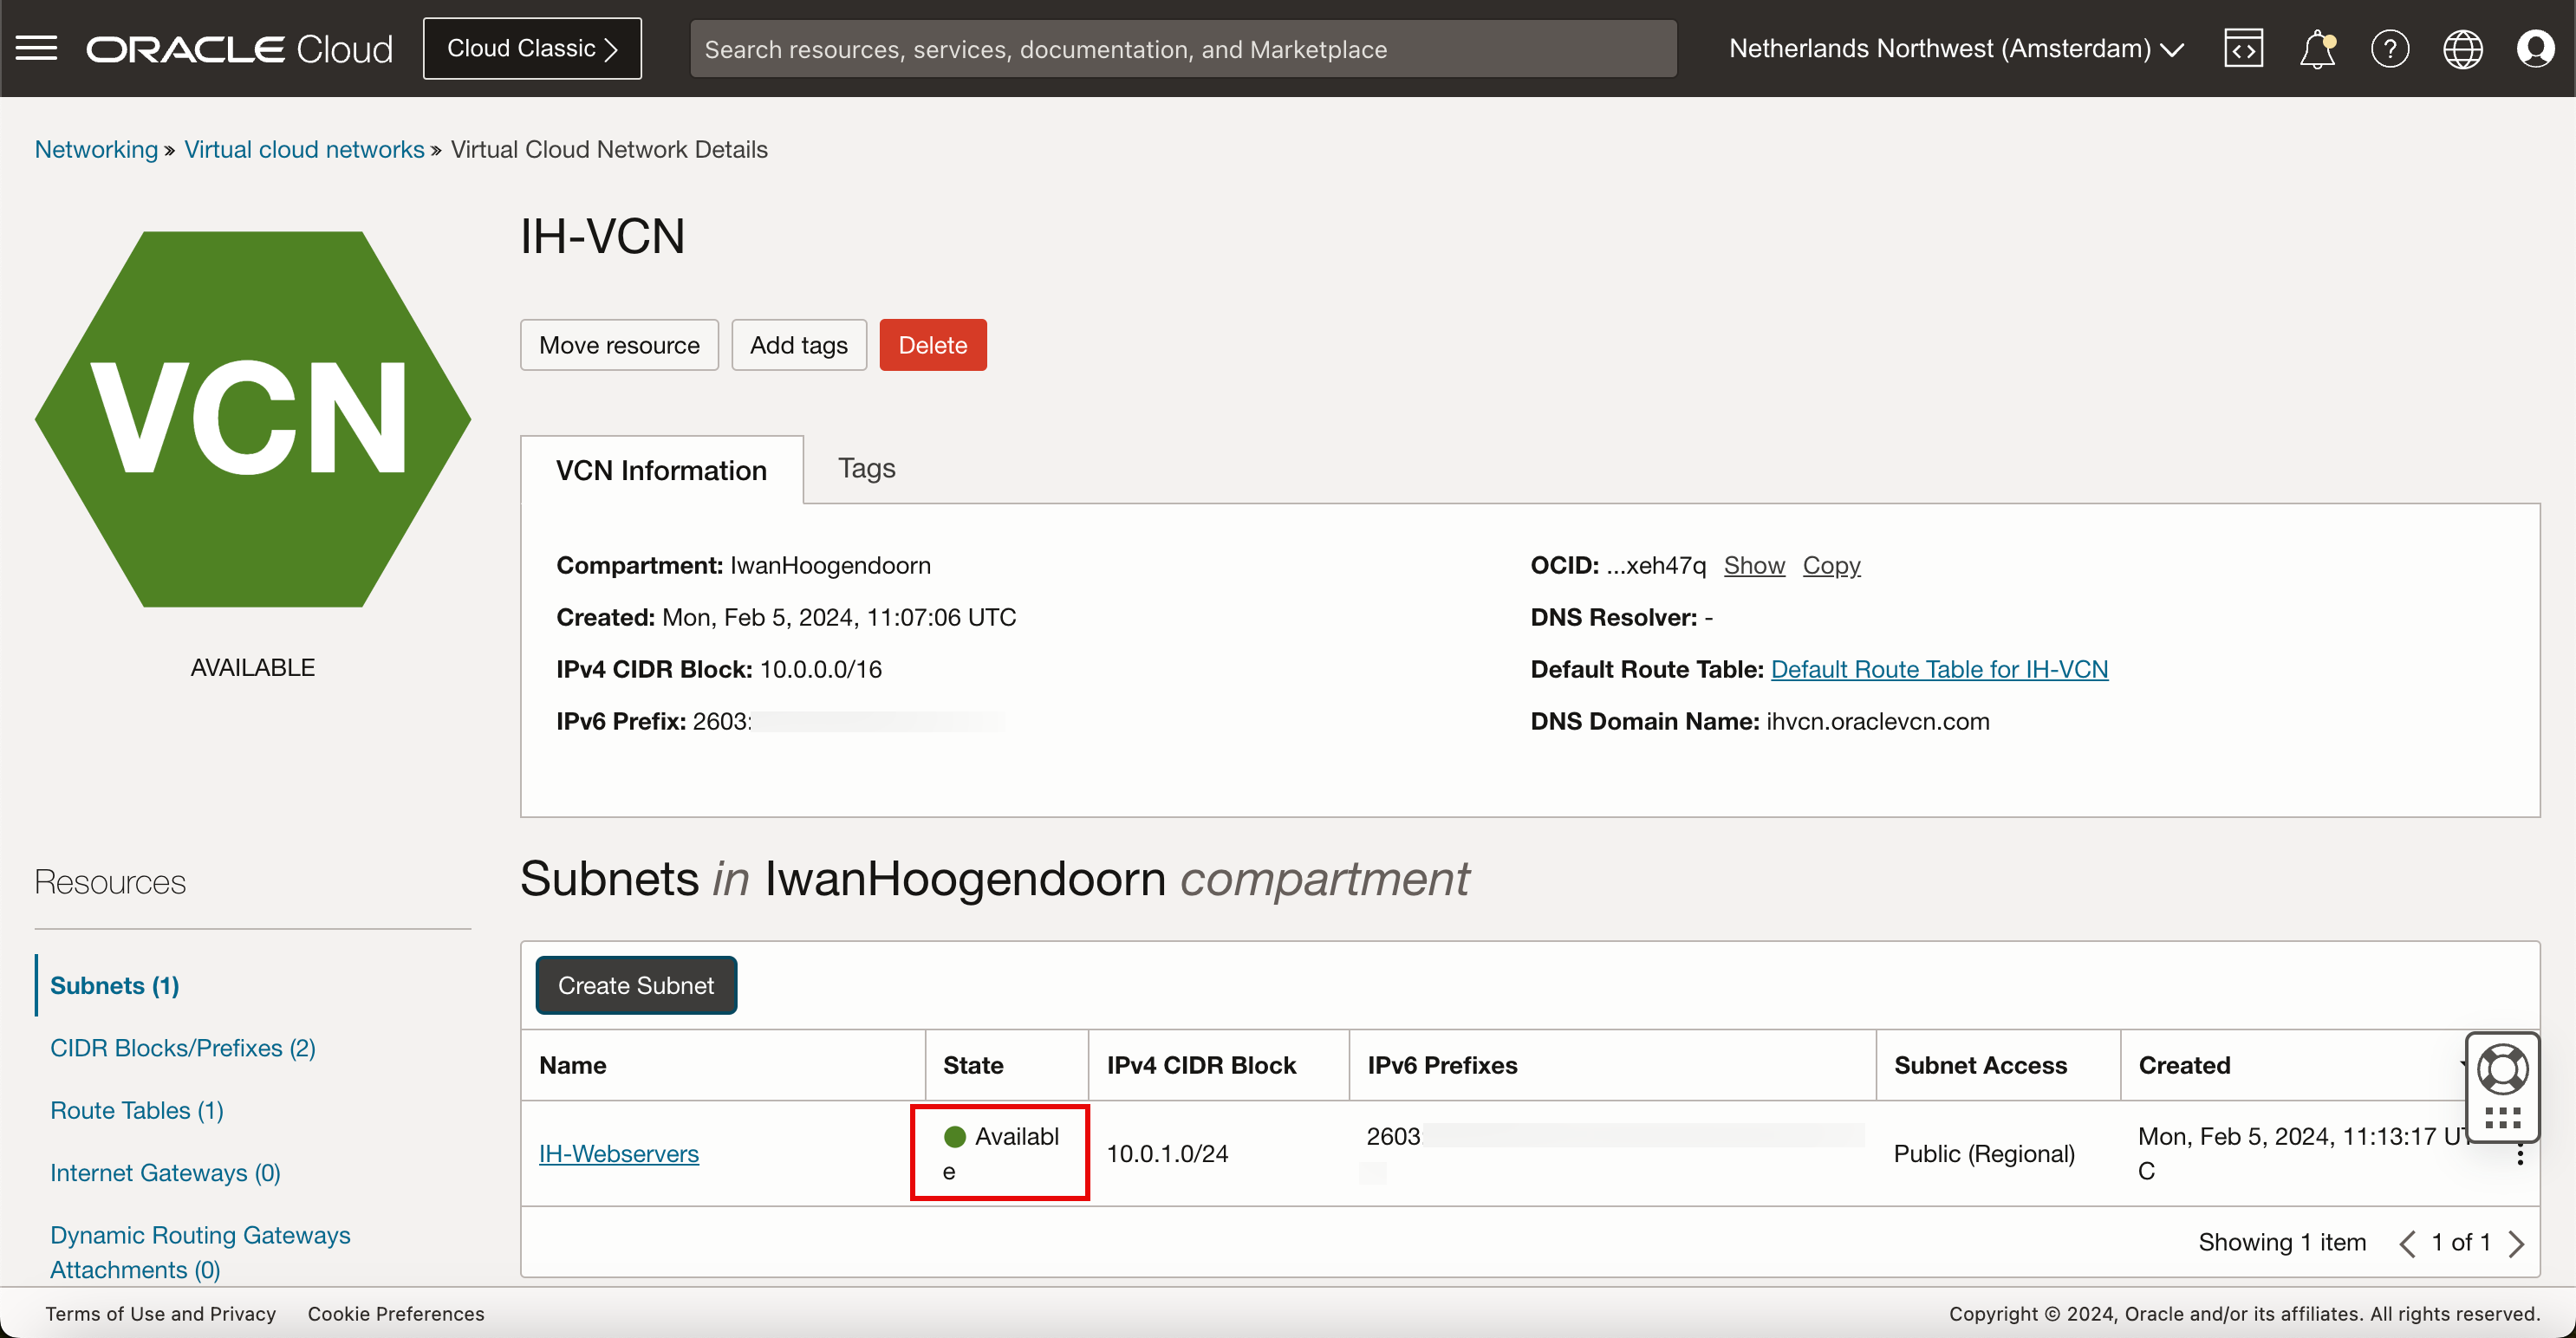
子網路現在已可供 IPv4 和 IPv6 位址使用。
作業 3:建立啟用 IPv6 的新執行處理
-
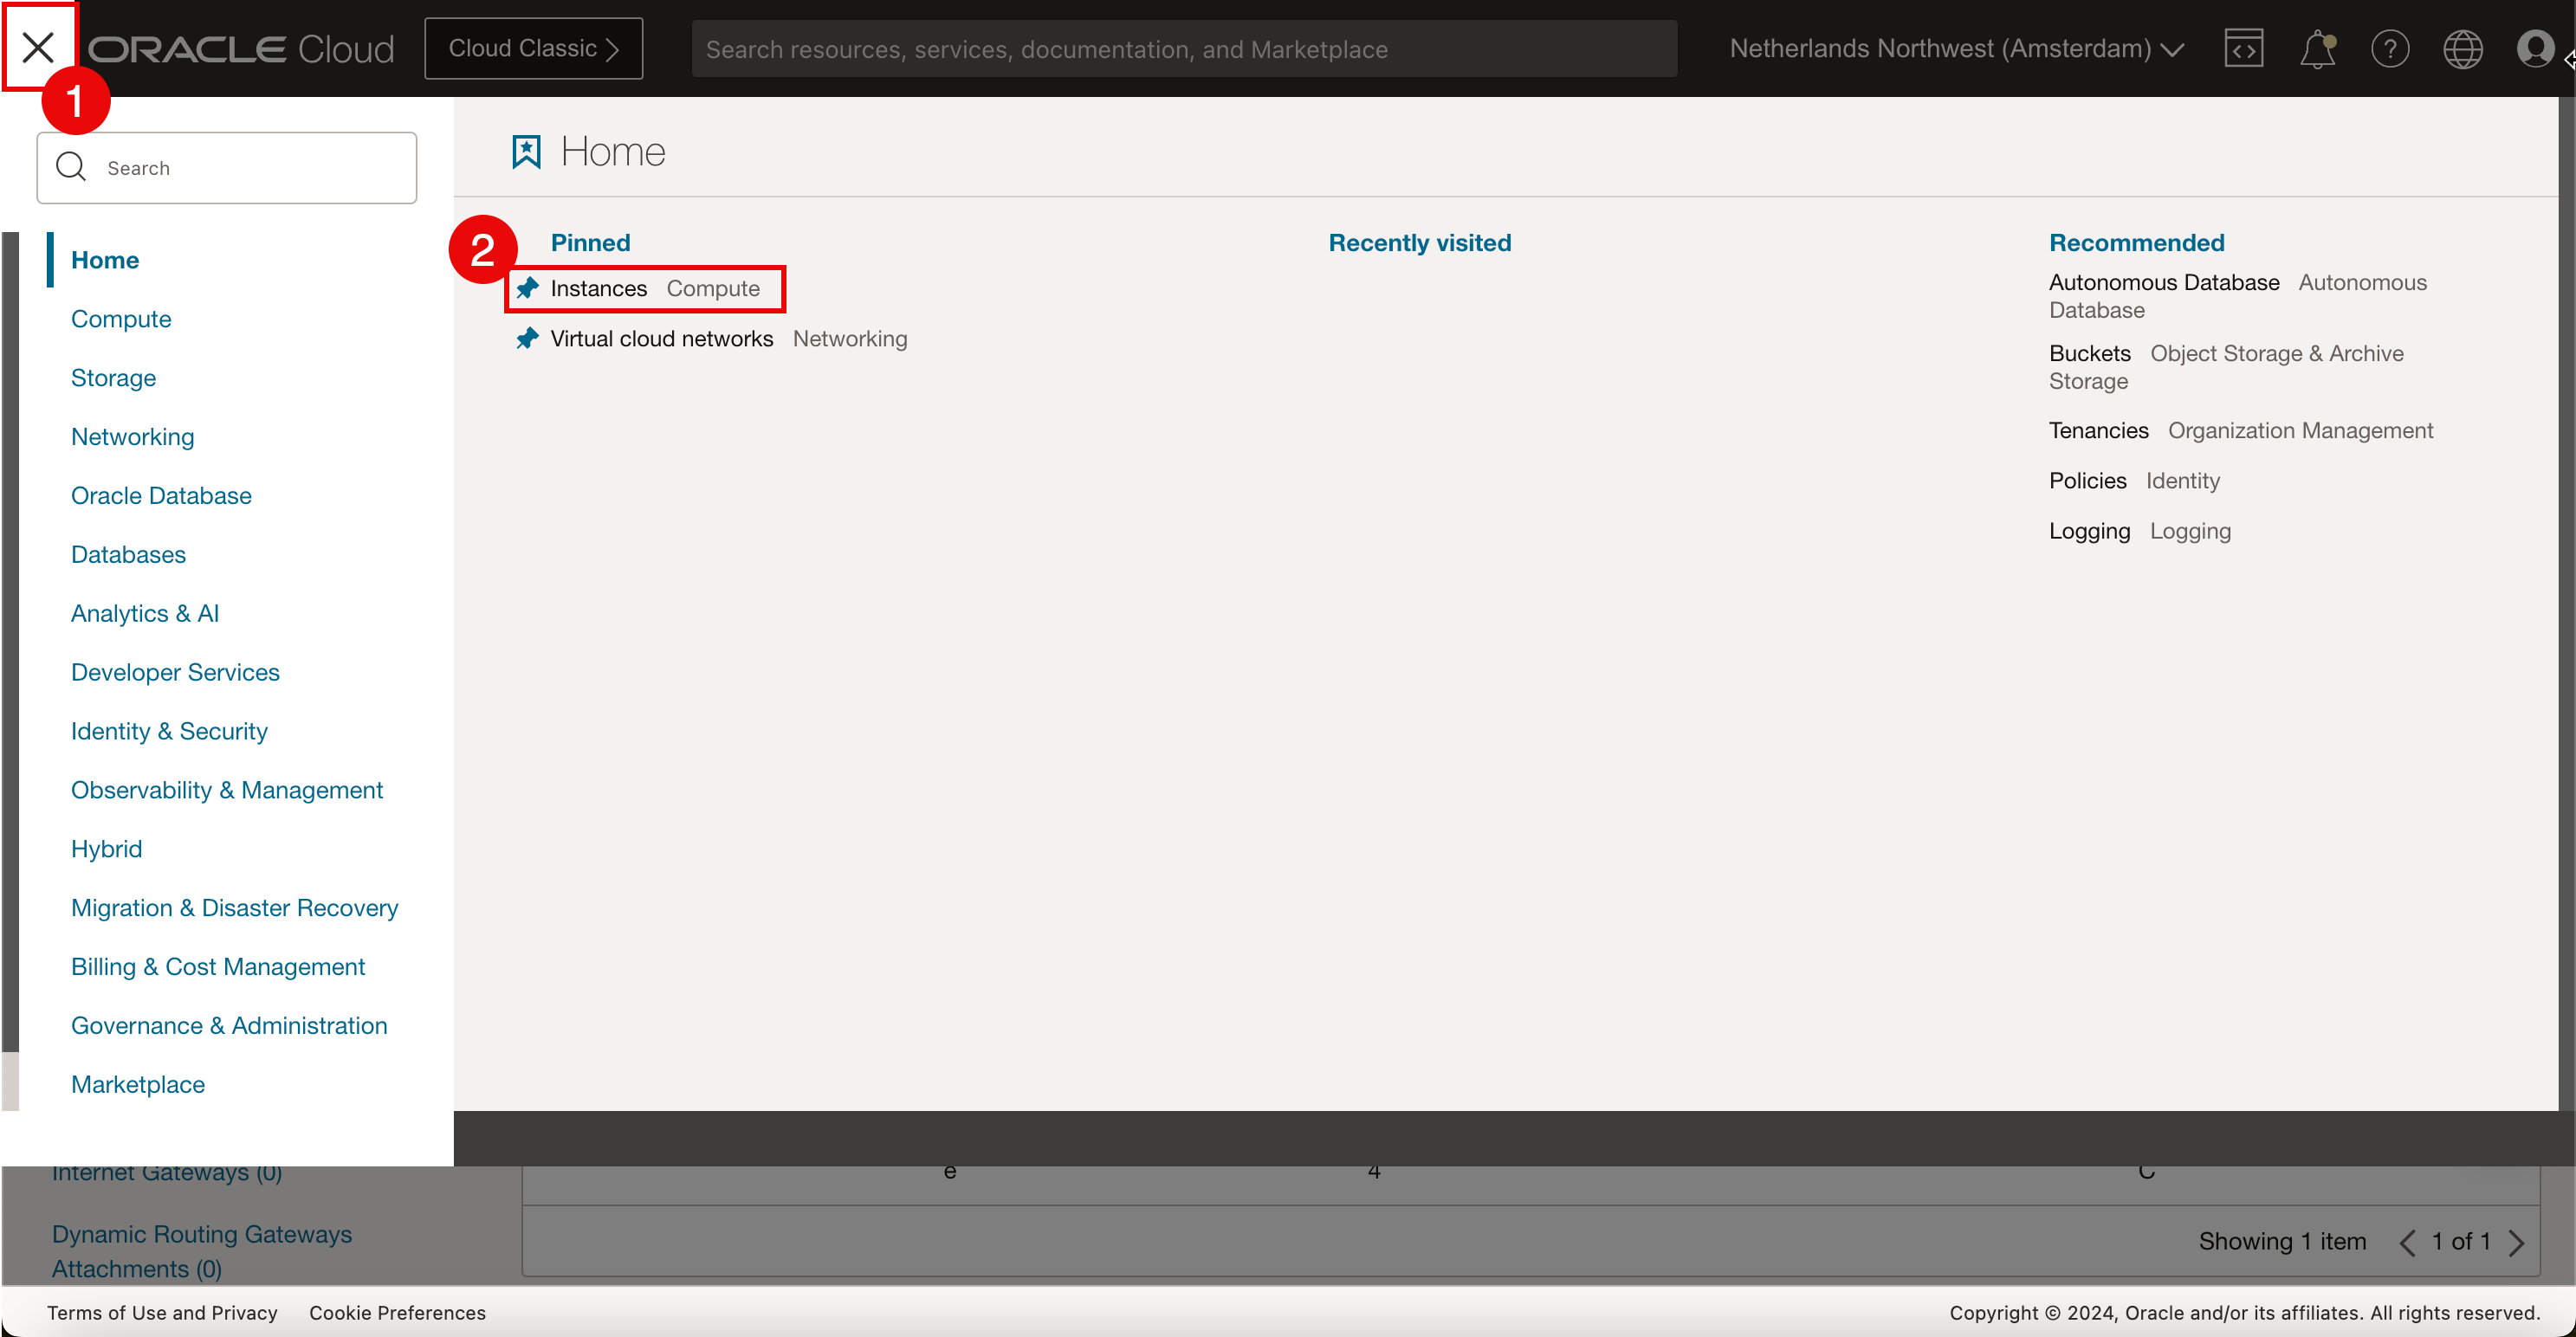
開啟 OCI 主控台。
- 按一下左上角的漢堡功能表。
- 按一下固定區段中的執行處理。
-
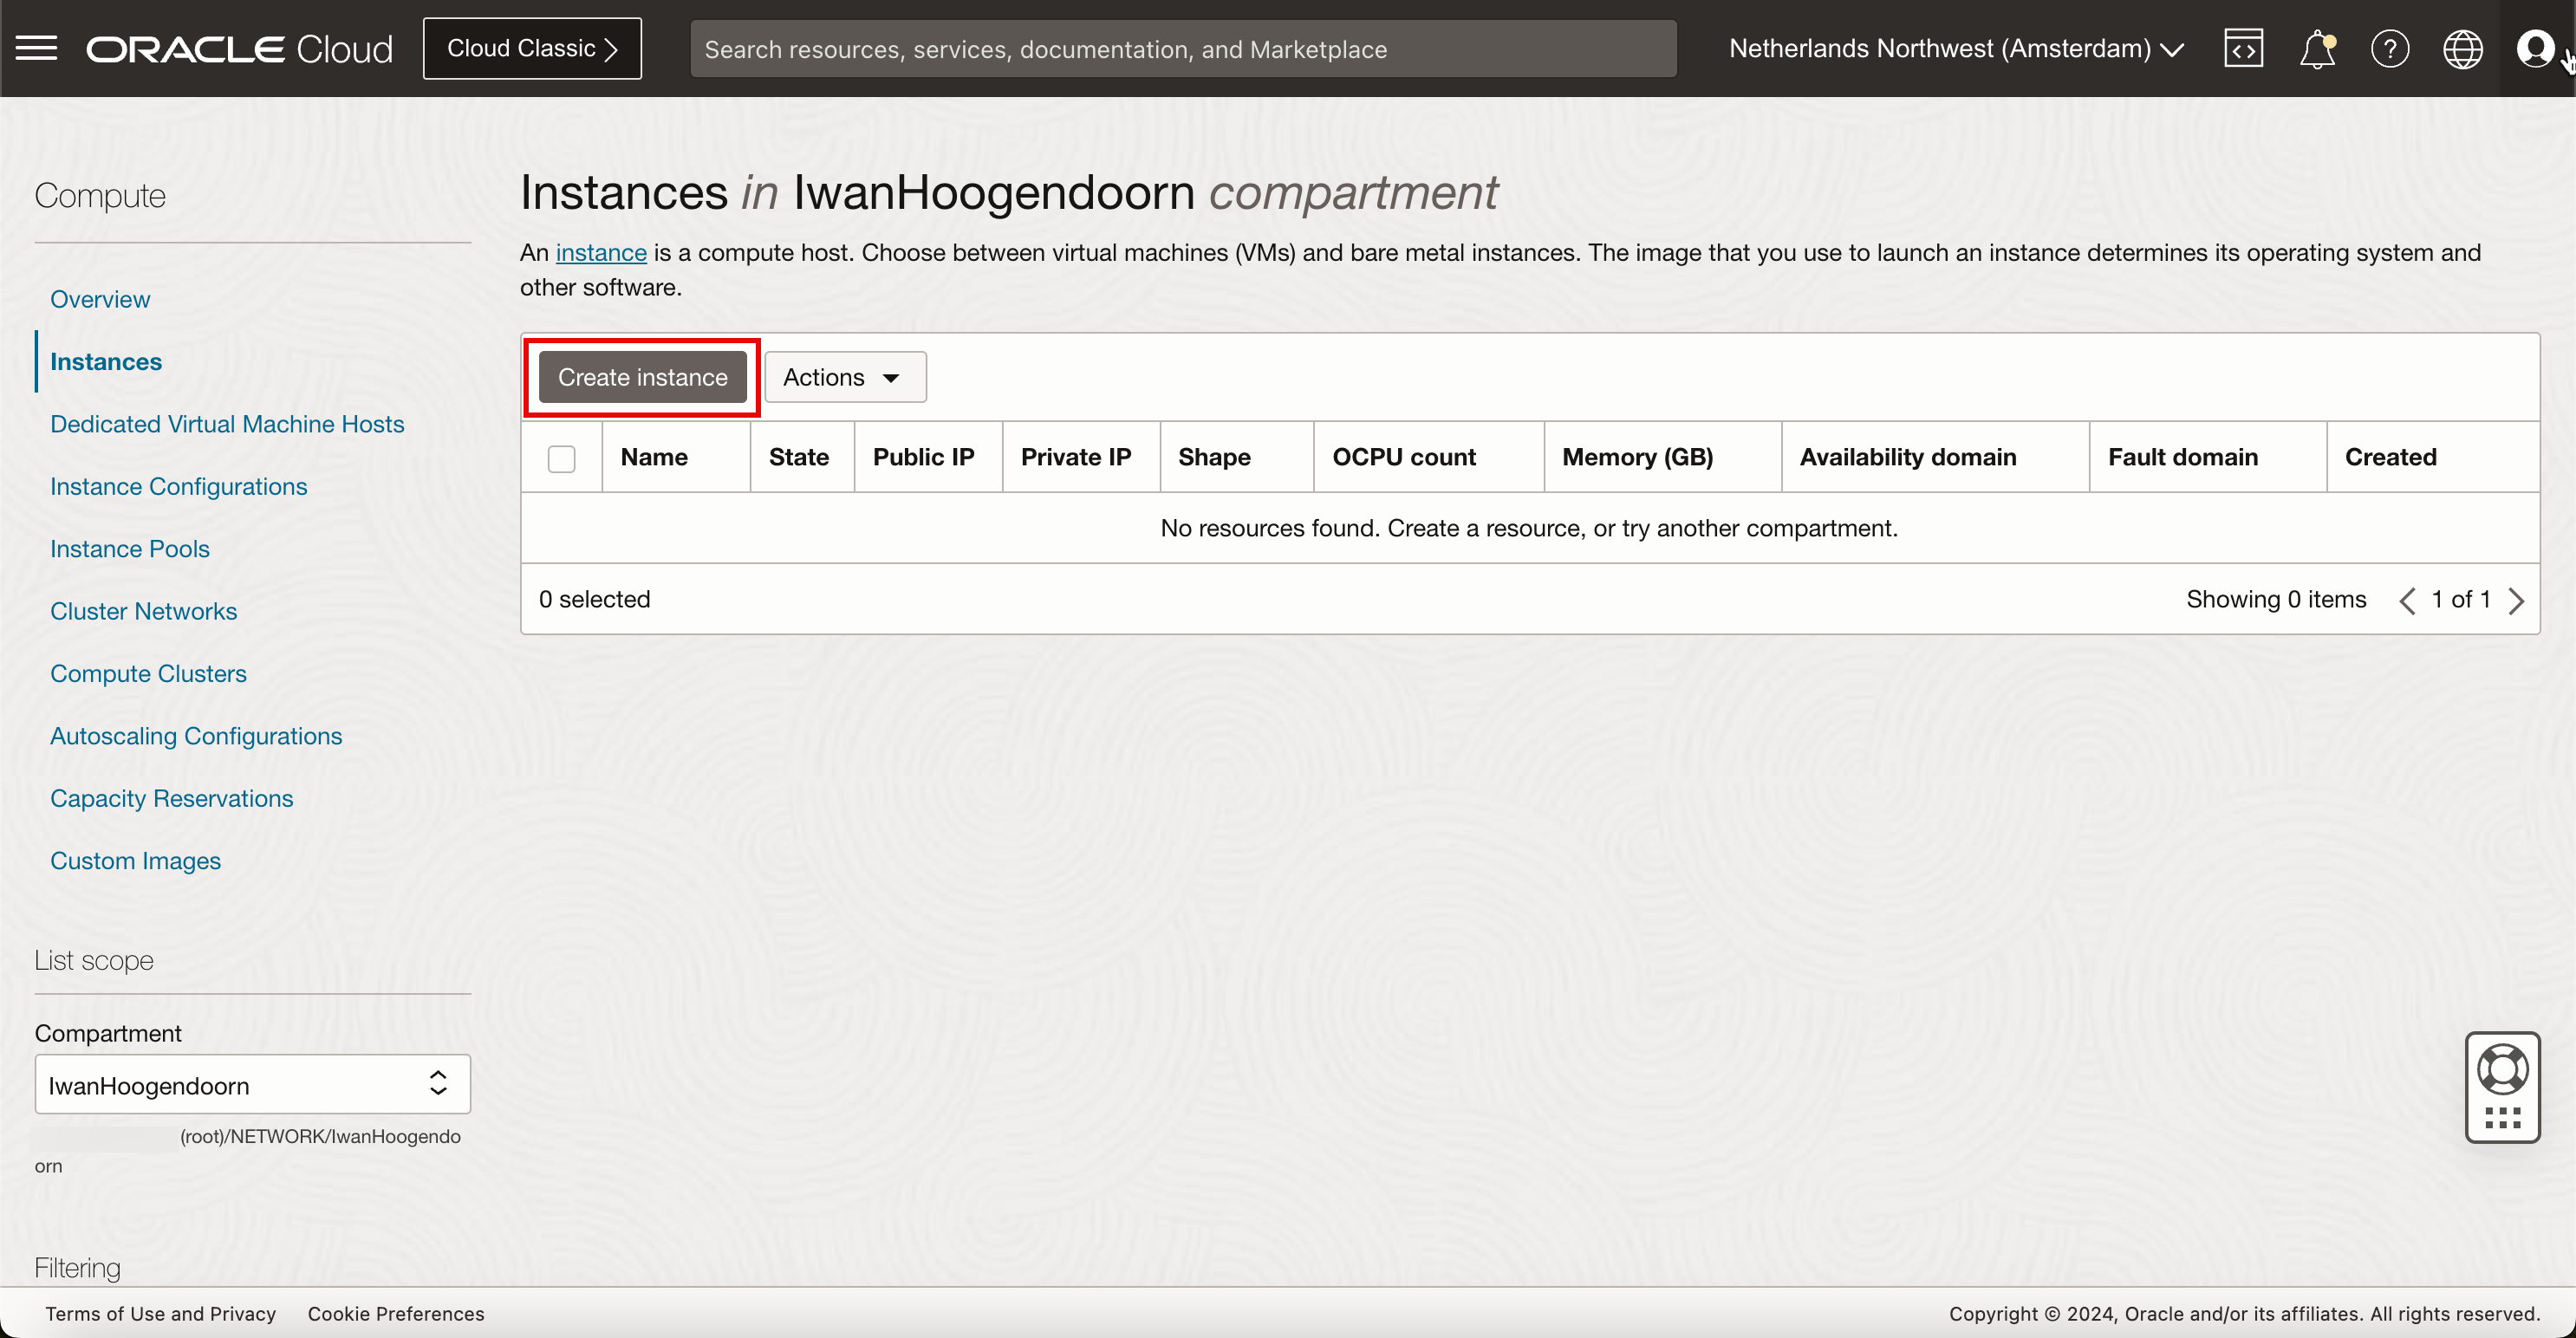
按一下建立執行處理。
-
在建立運算執行處理中,輸入下列資訊。
- 輸入執行處理的名稱。
- 選取執行處理需要所在的區間。
- 選取您要放置此執行處理的可用性網域。在本自學課程中,身為荷蘭西北部地區,我們只有一個可用性網域。
- 向下拉清單。
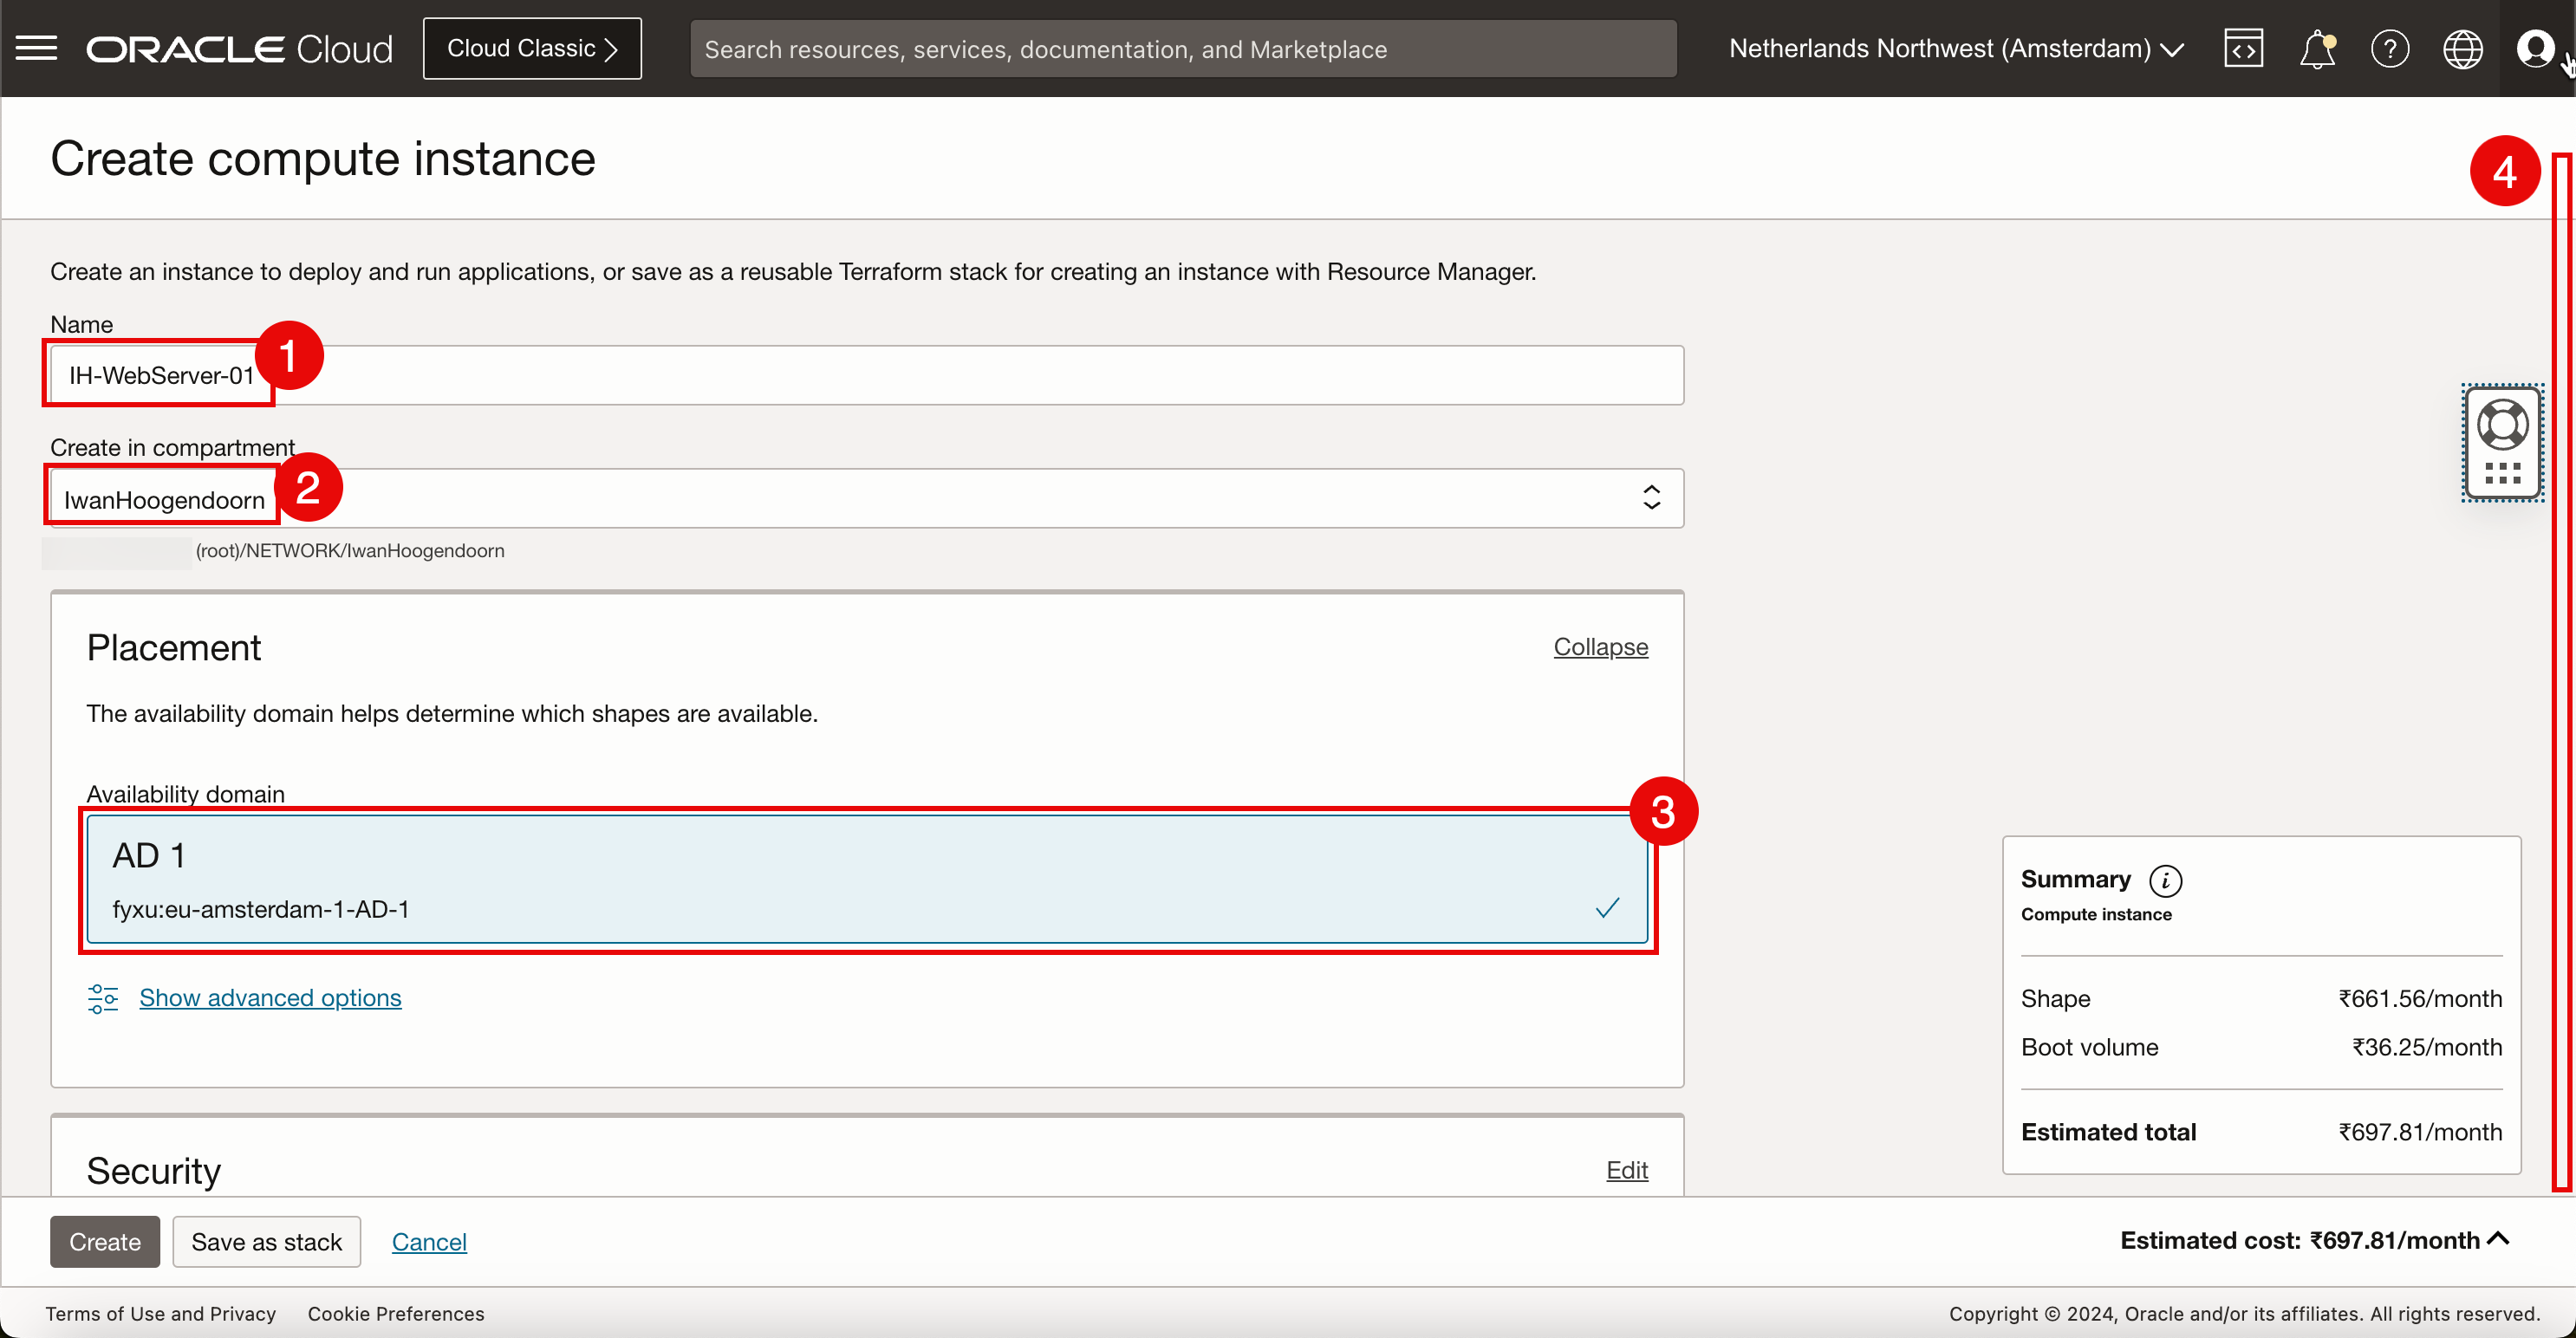
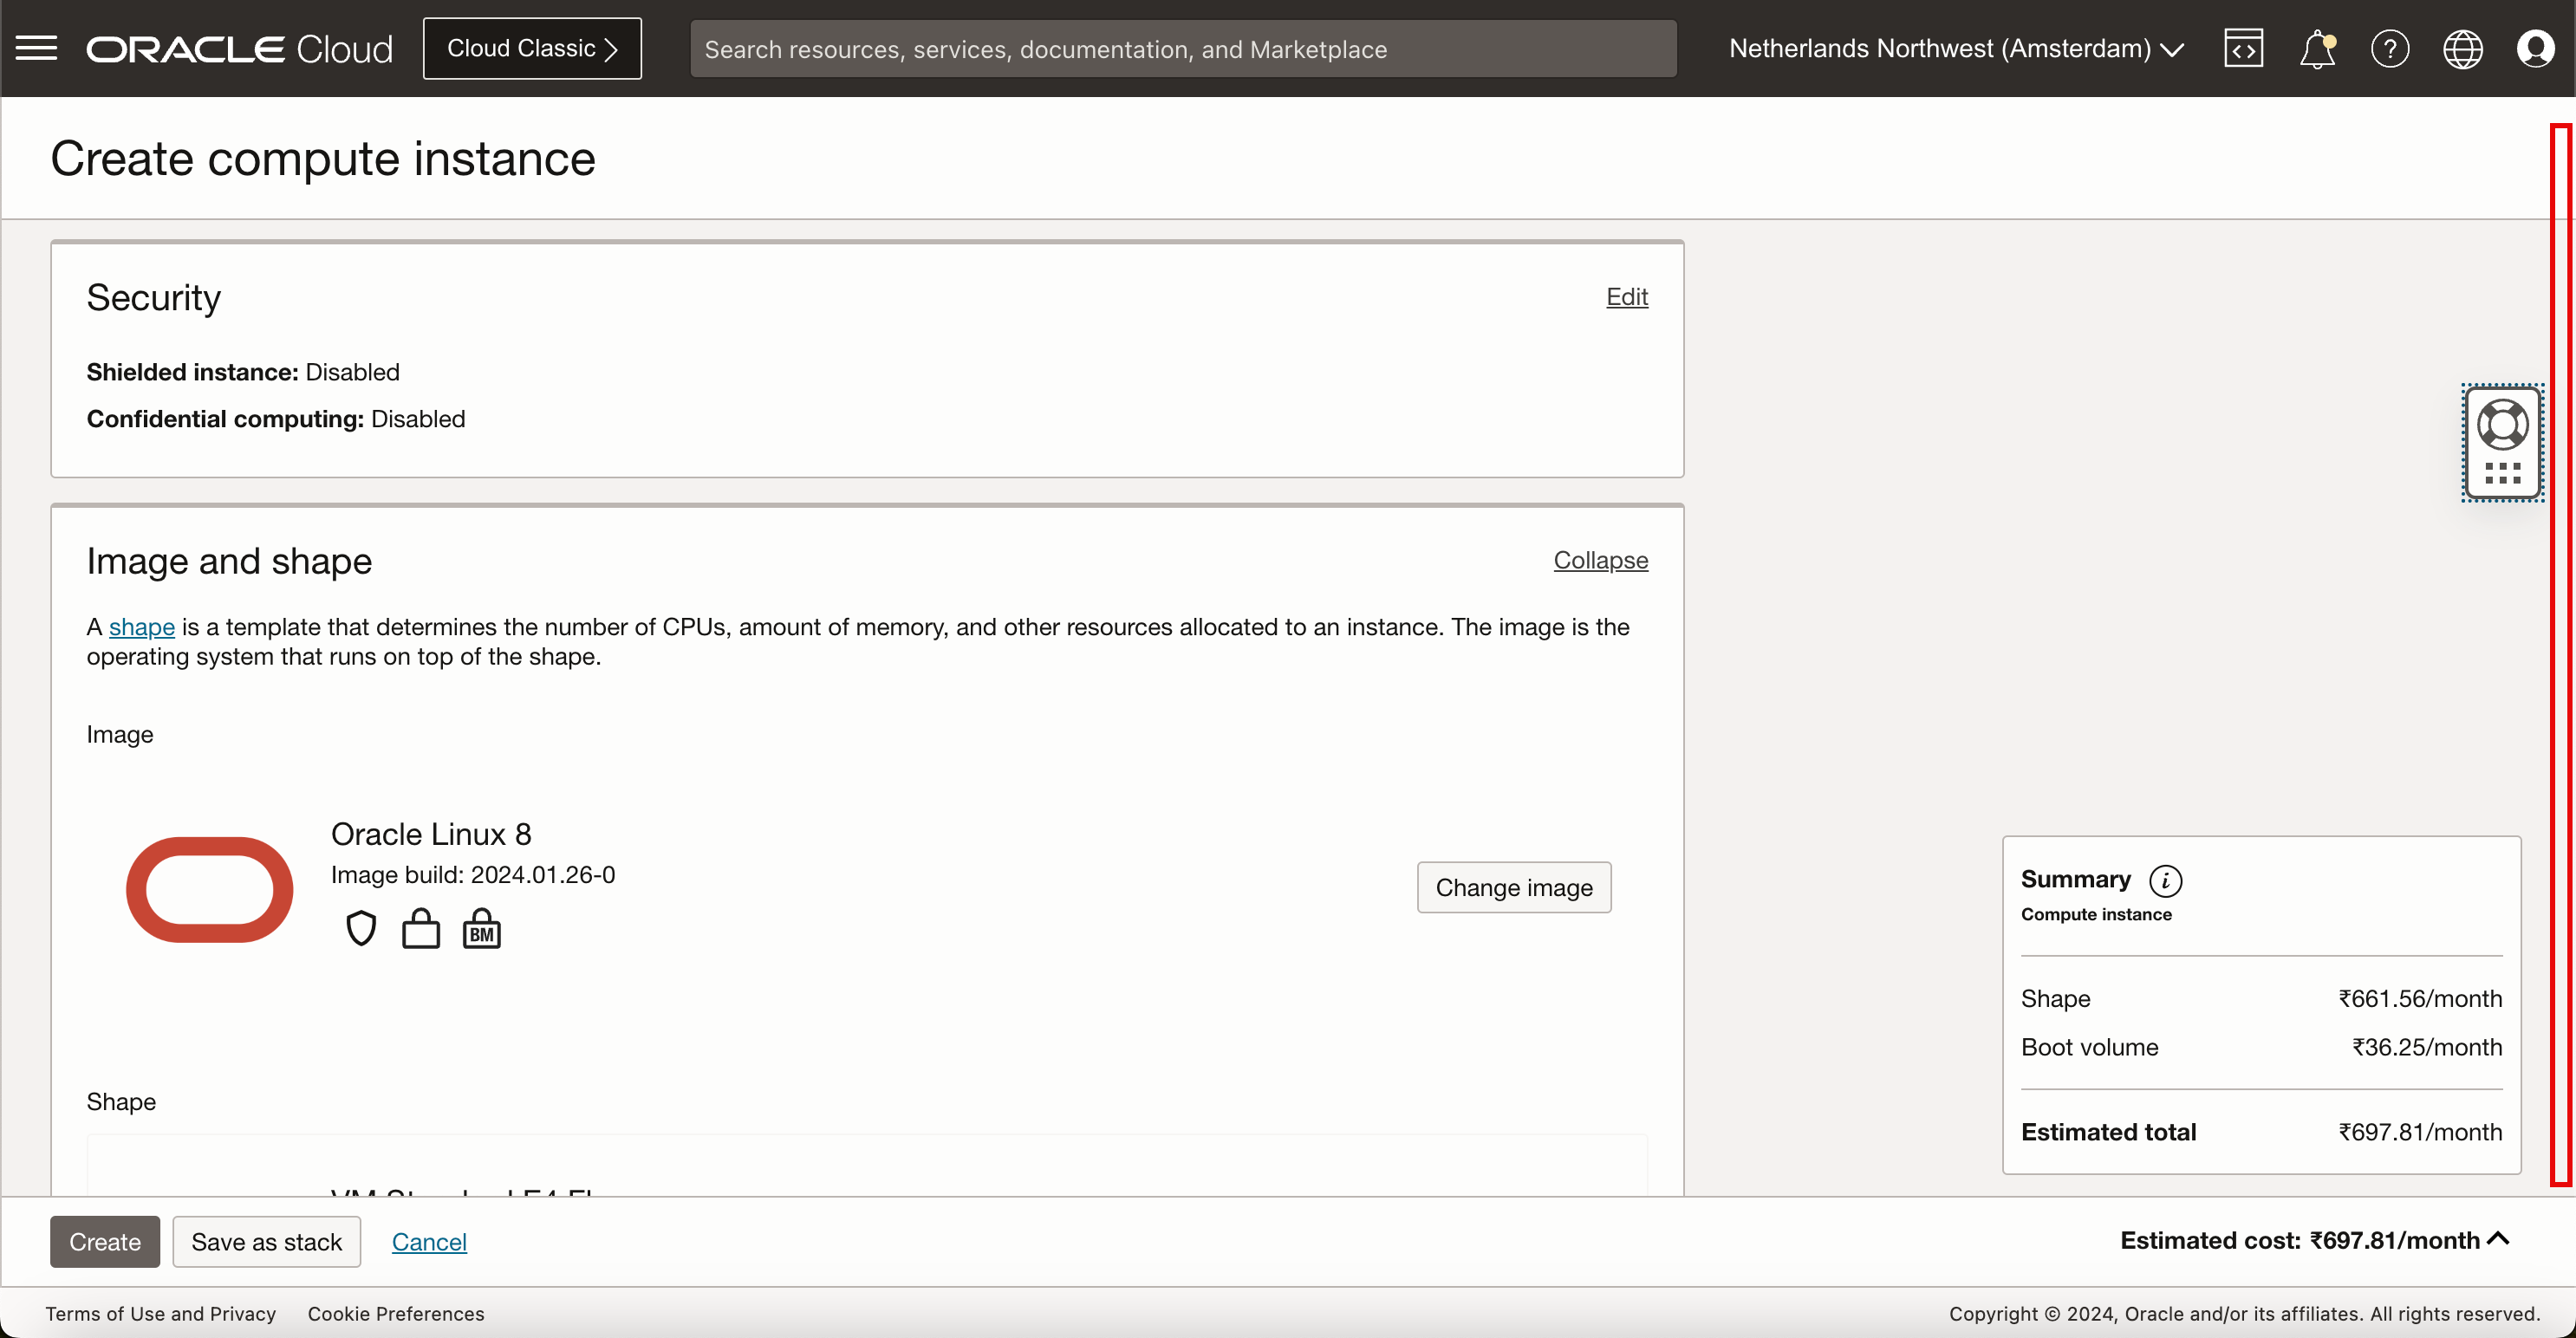
保留所有預設值並向下捲動。
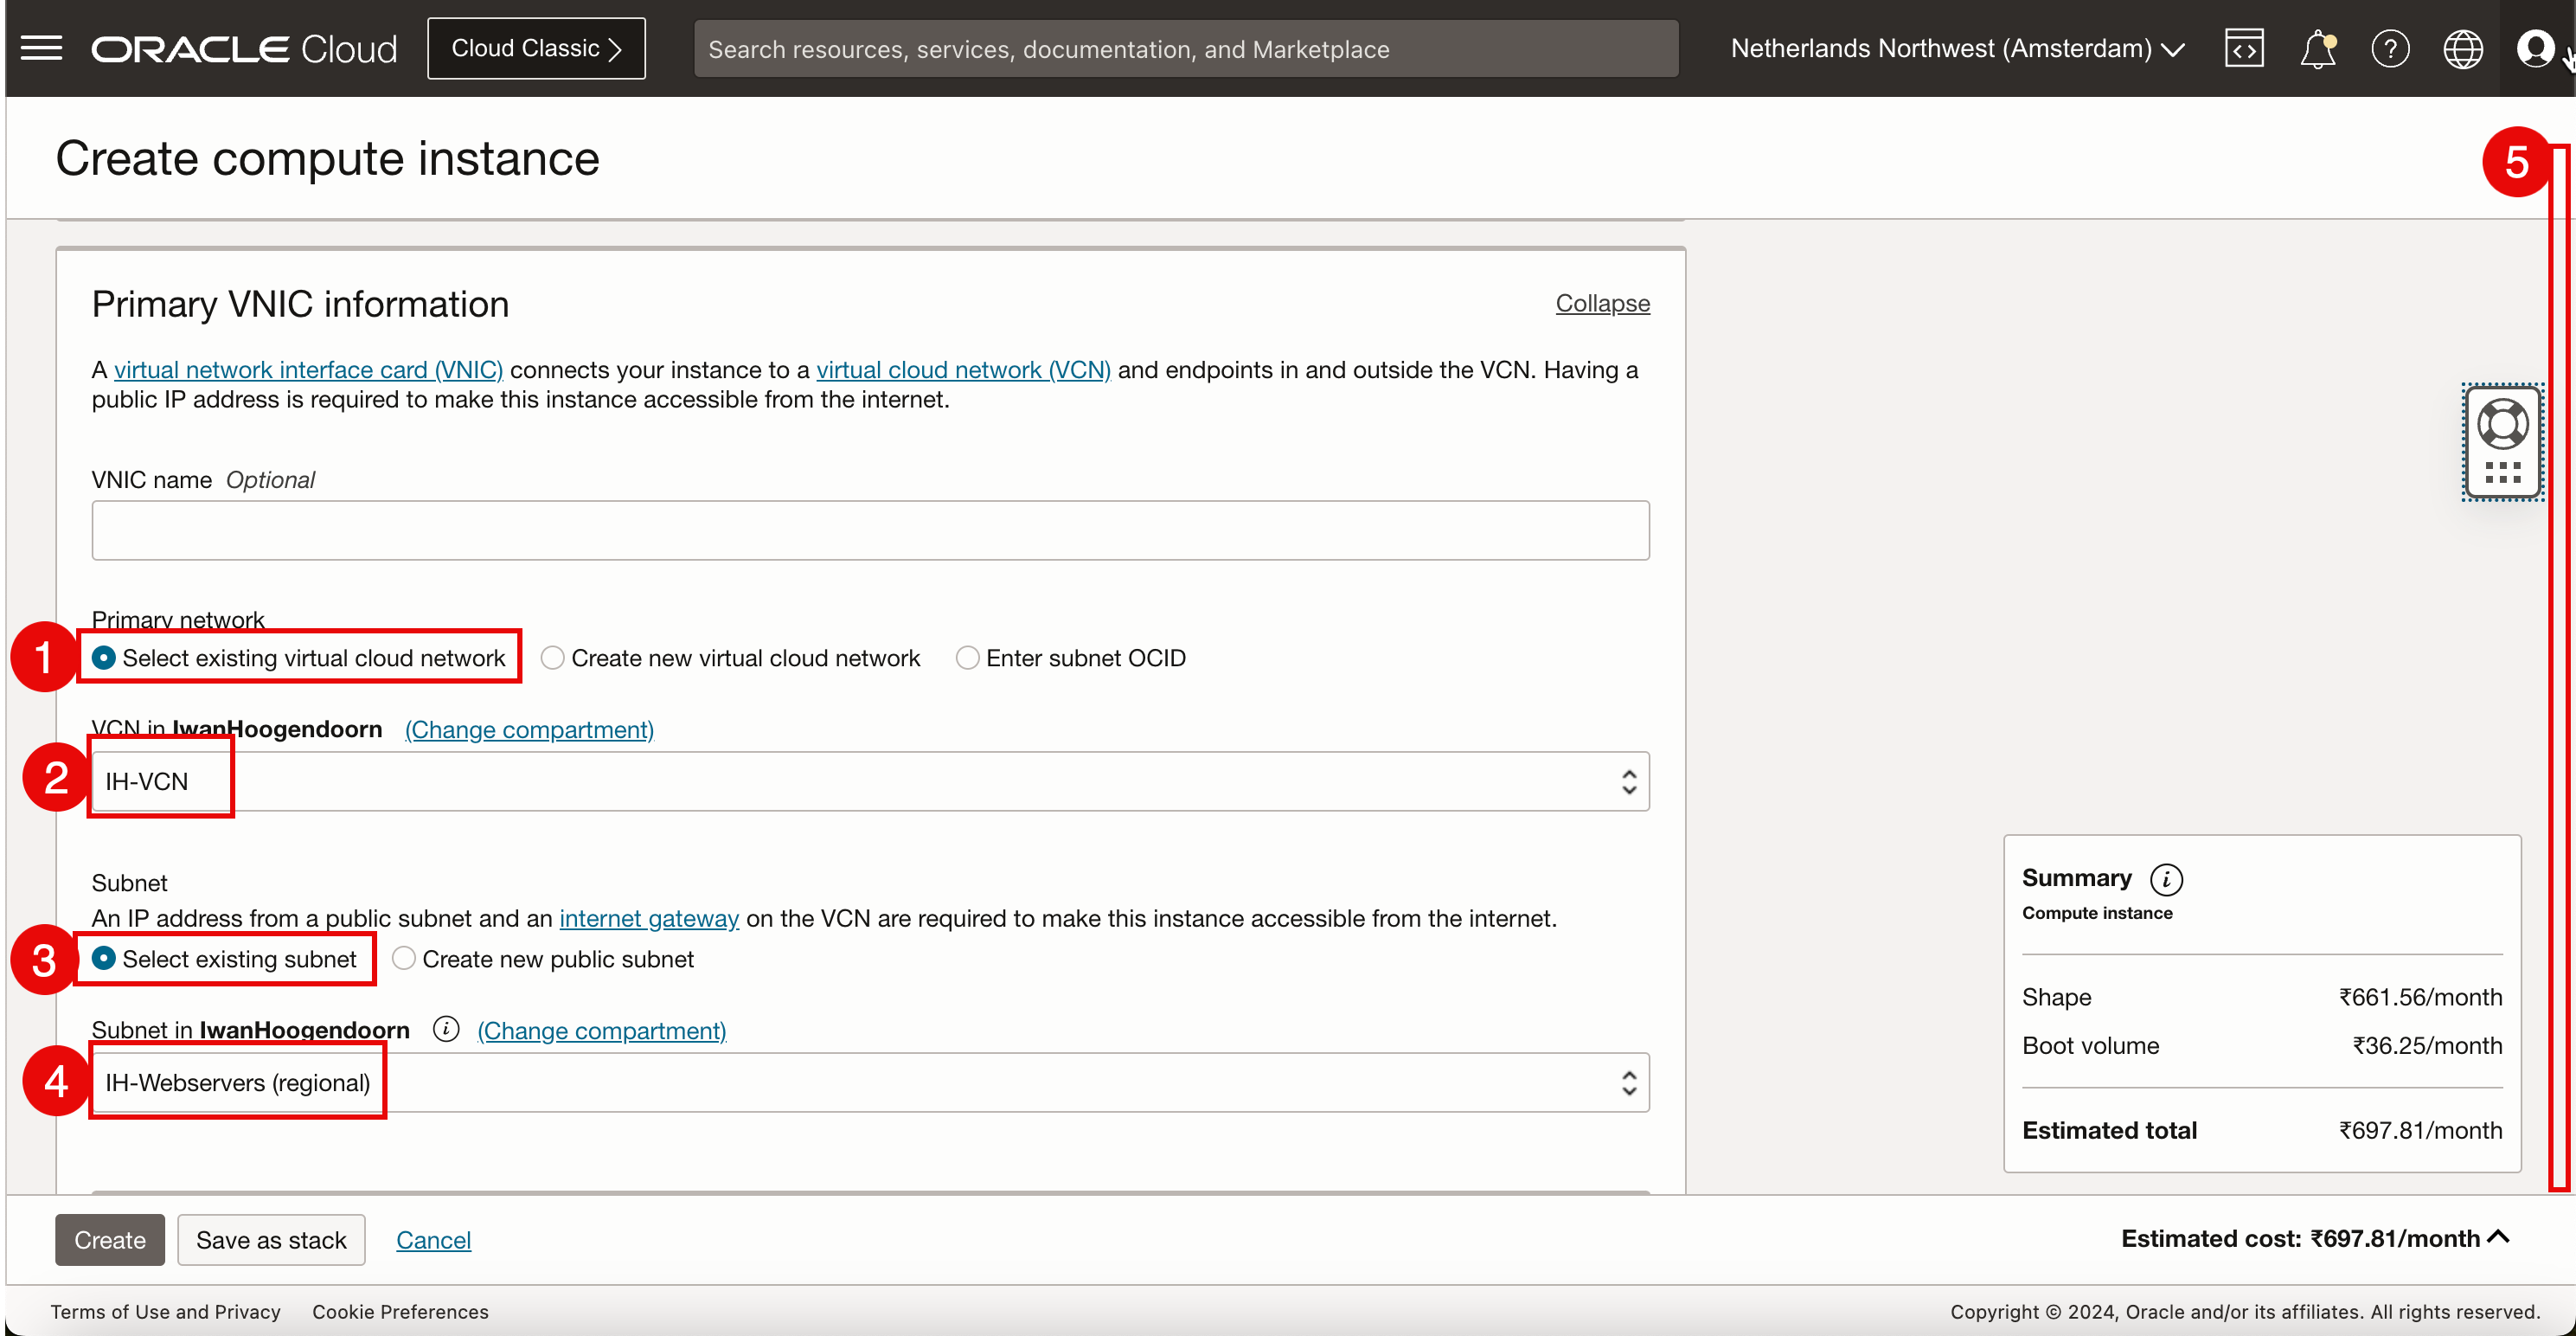
- 在主要網路中,選取選取現有的虛擬雲端網路。
- 選取在作業 1 中建立的 VCN。
- 對於子網路,請選取選取現有的子網路。
- 選取在作業 2 中建立的子網路。
- 向下拉清單。
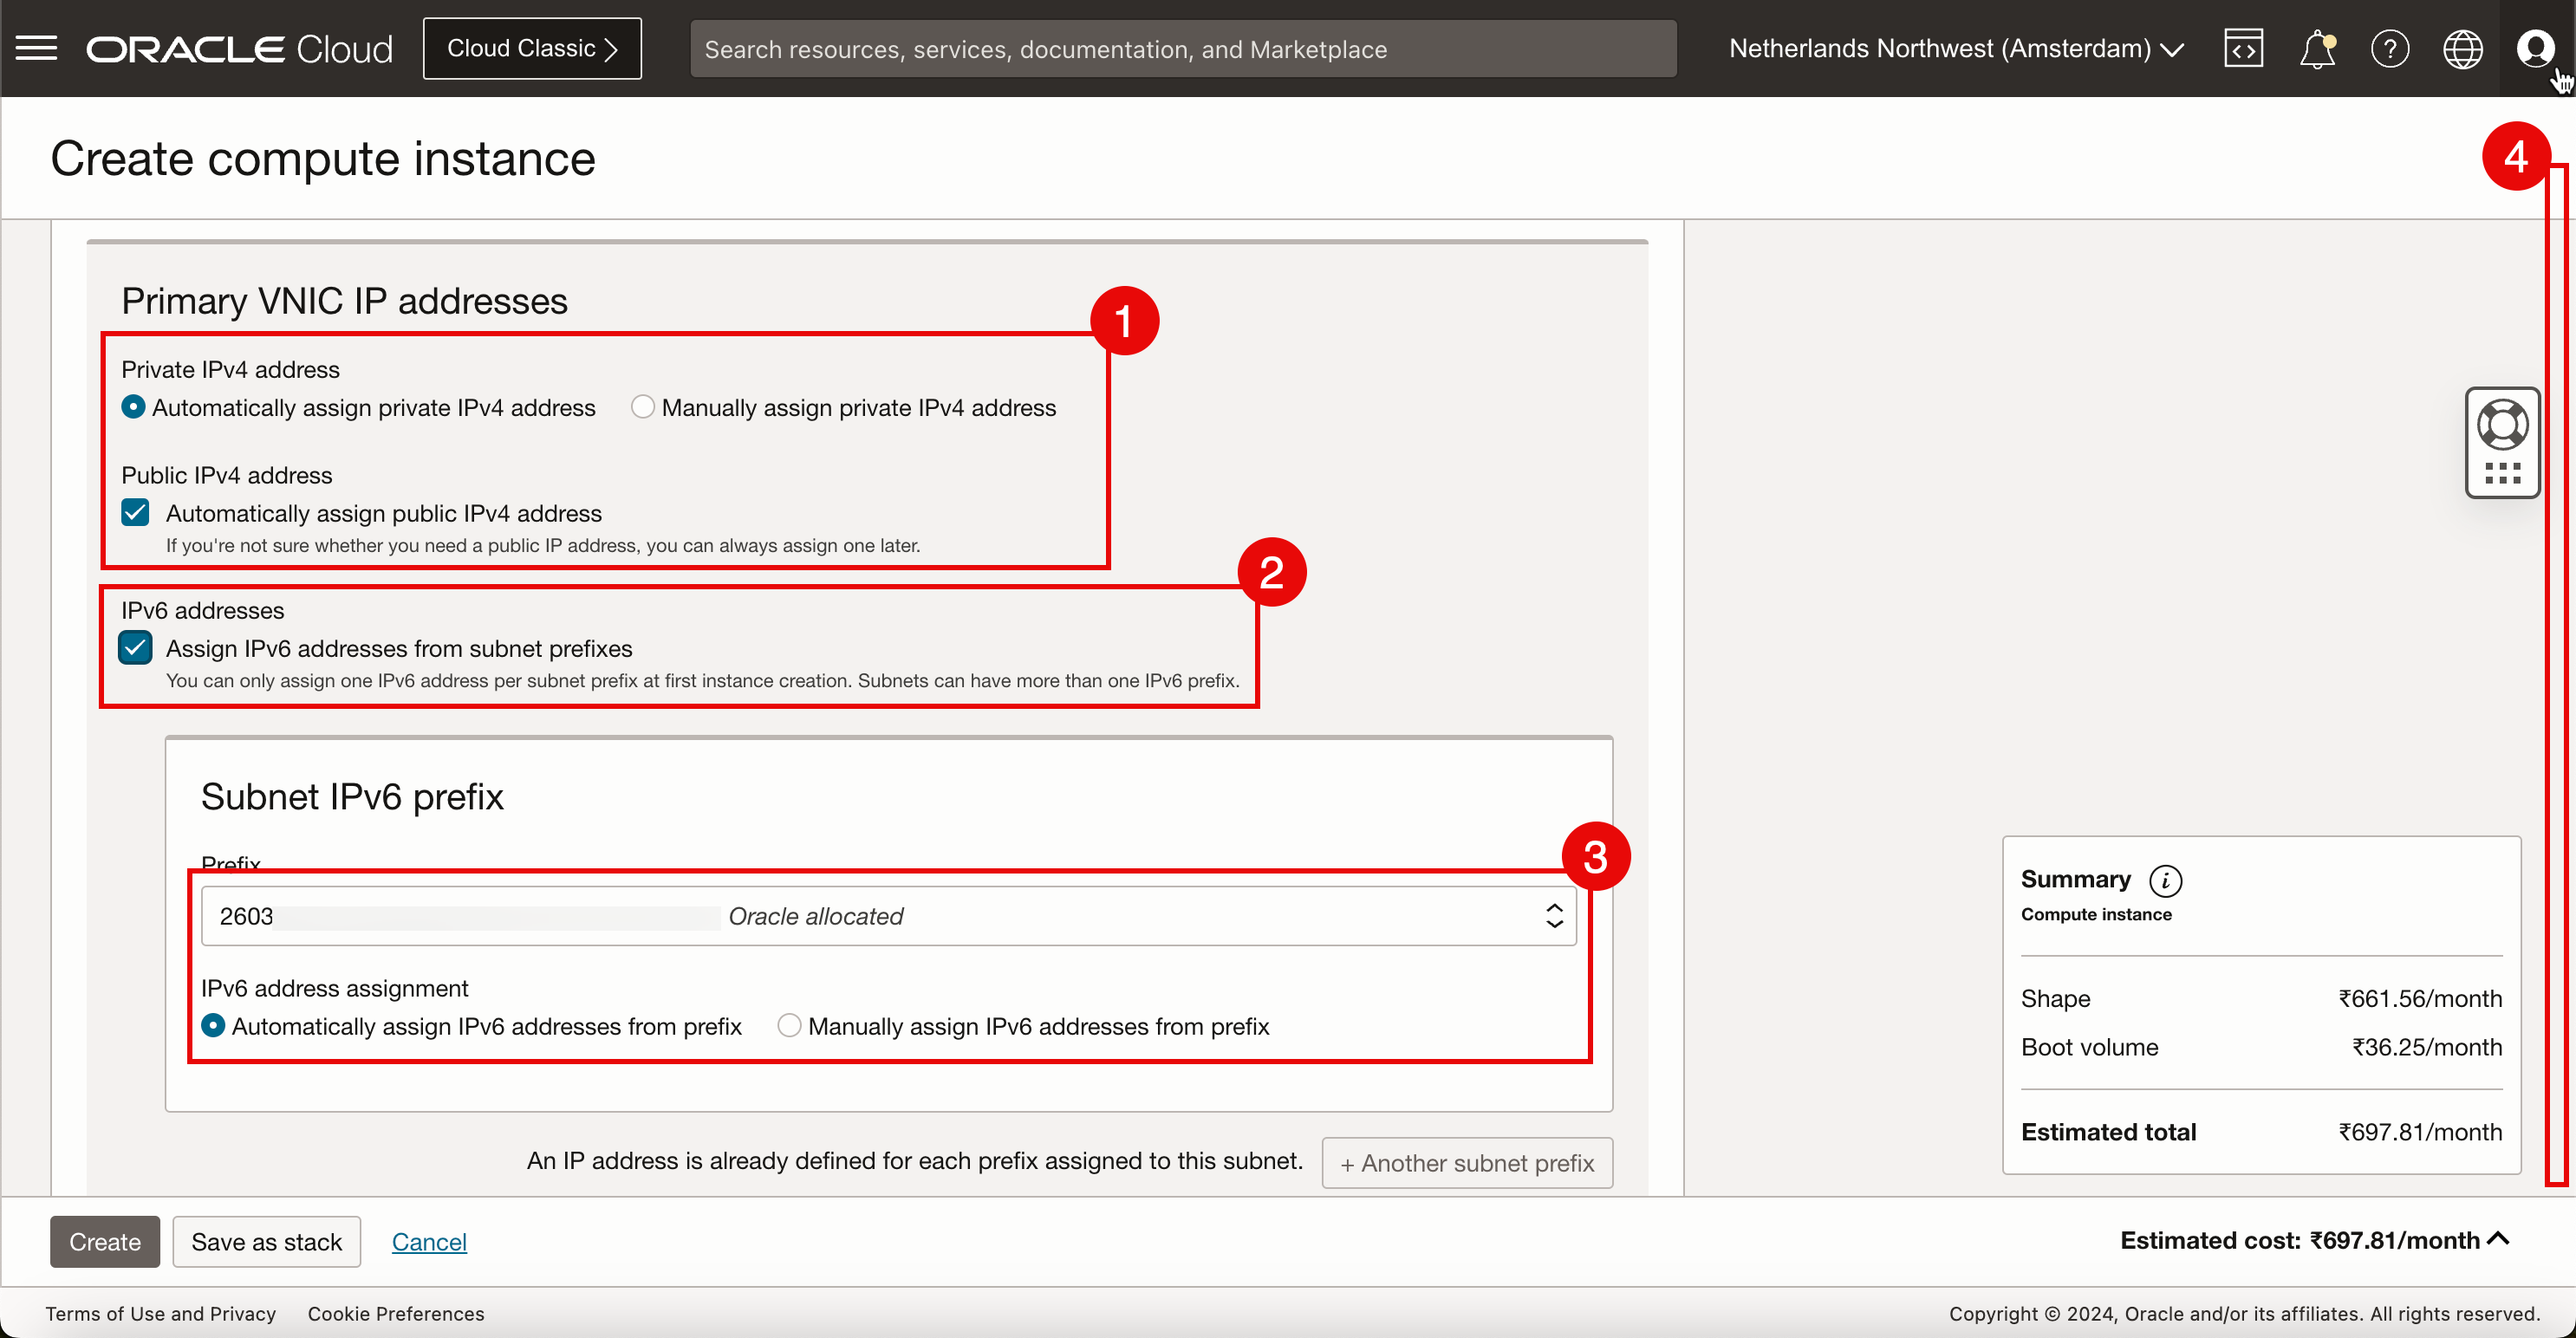
- 專用 IPv4 位址:選取自動指定專用 IPv4 位址。
- IPv6 位址:選取從子網路前置碼指定 IPv6 位址 (在 Task 2 中建立子網路時設定此位址)。
- IPv6 位址指定:選取從前置碼自動指定專用 IPv6 位址。
- 向下拉清單。
- 若要存取及管理此 Linux 執行處理,我們必須使用 SSH 金鑰。在本教學課程中,我們將讓 OCI 產生新的 SSH 金鑰組。
- 下載本機電腦上的私密金鑰和公用金鑰,以便在建立之後,使用這些金鑰存取及管理此 Linux 執行處理。

-
按一下建立即可建立執行處理。
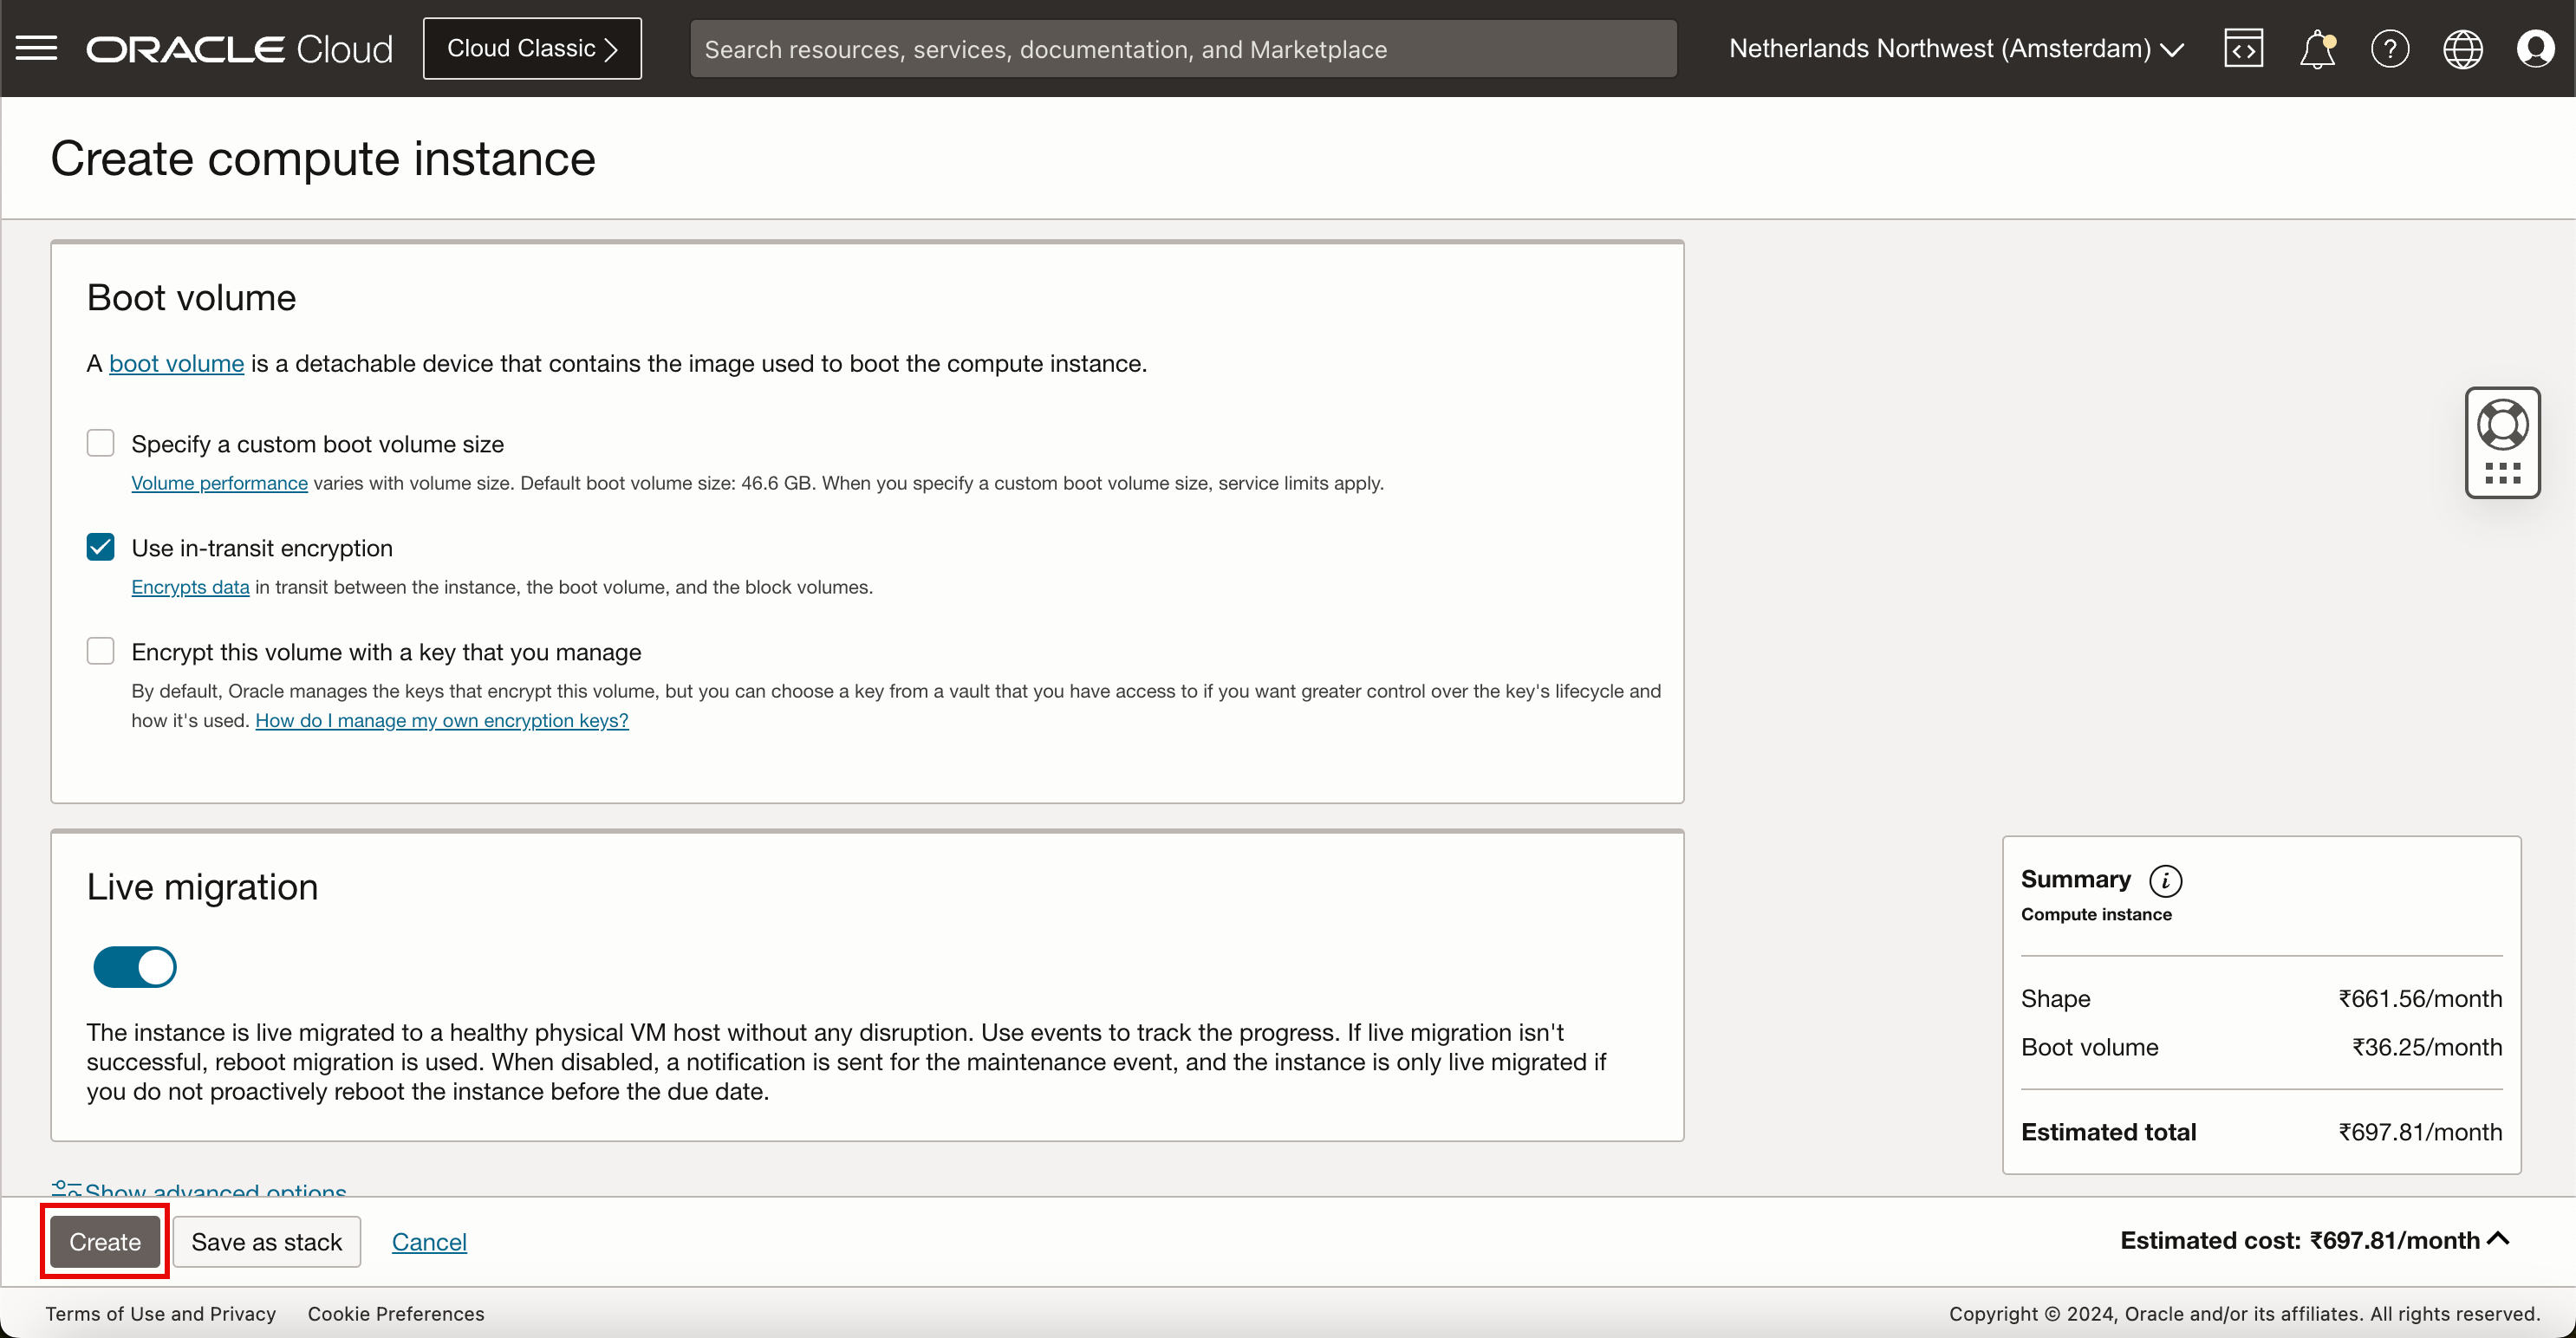
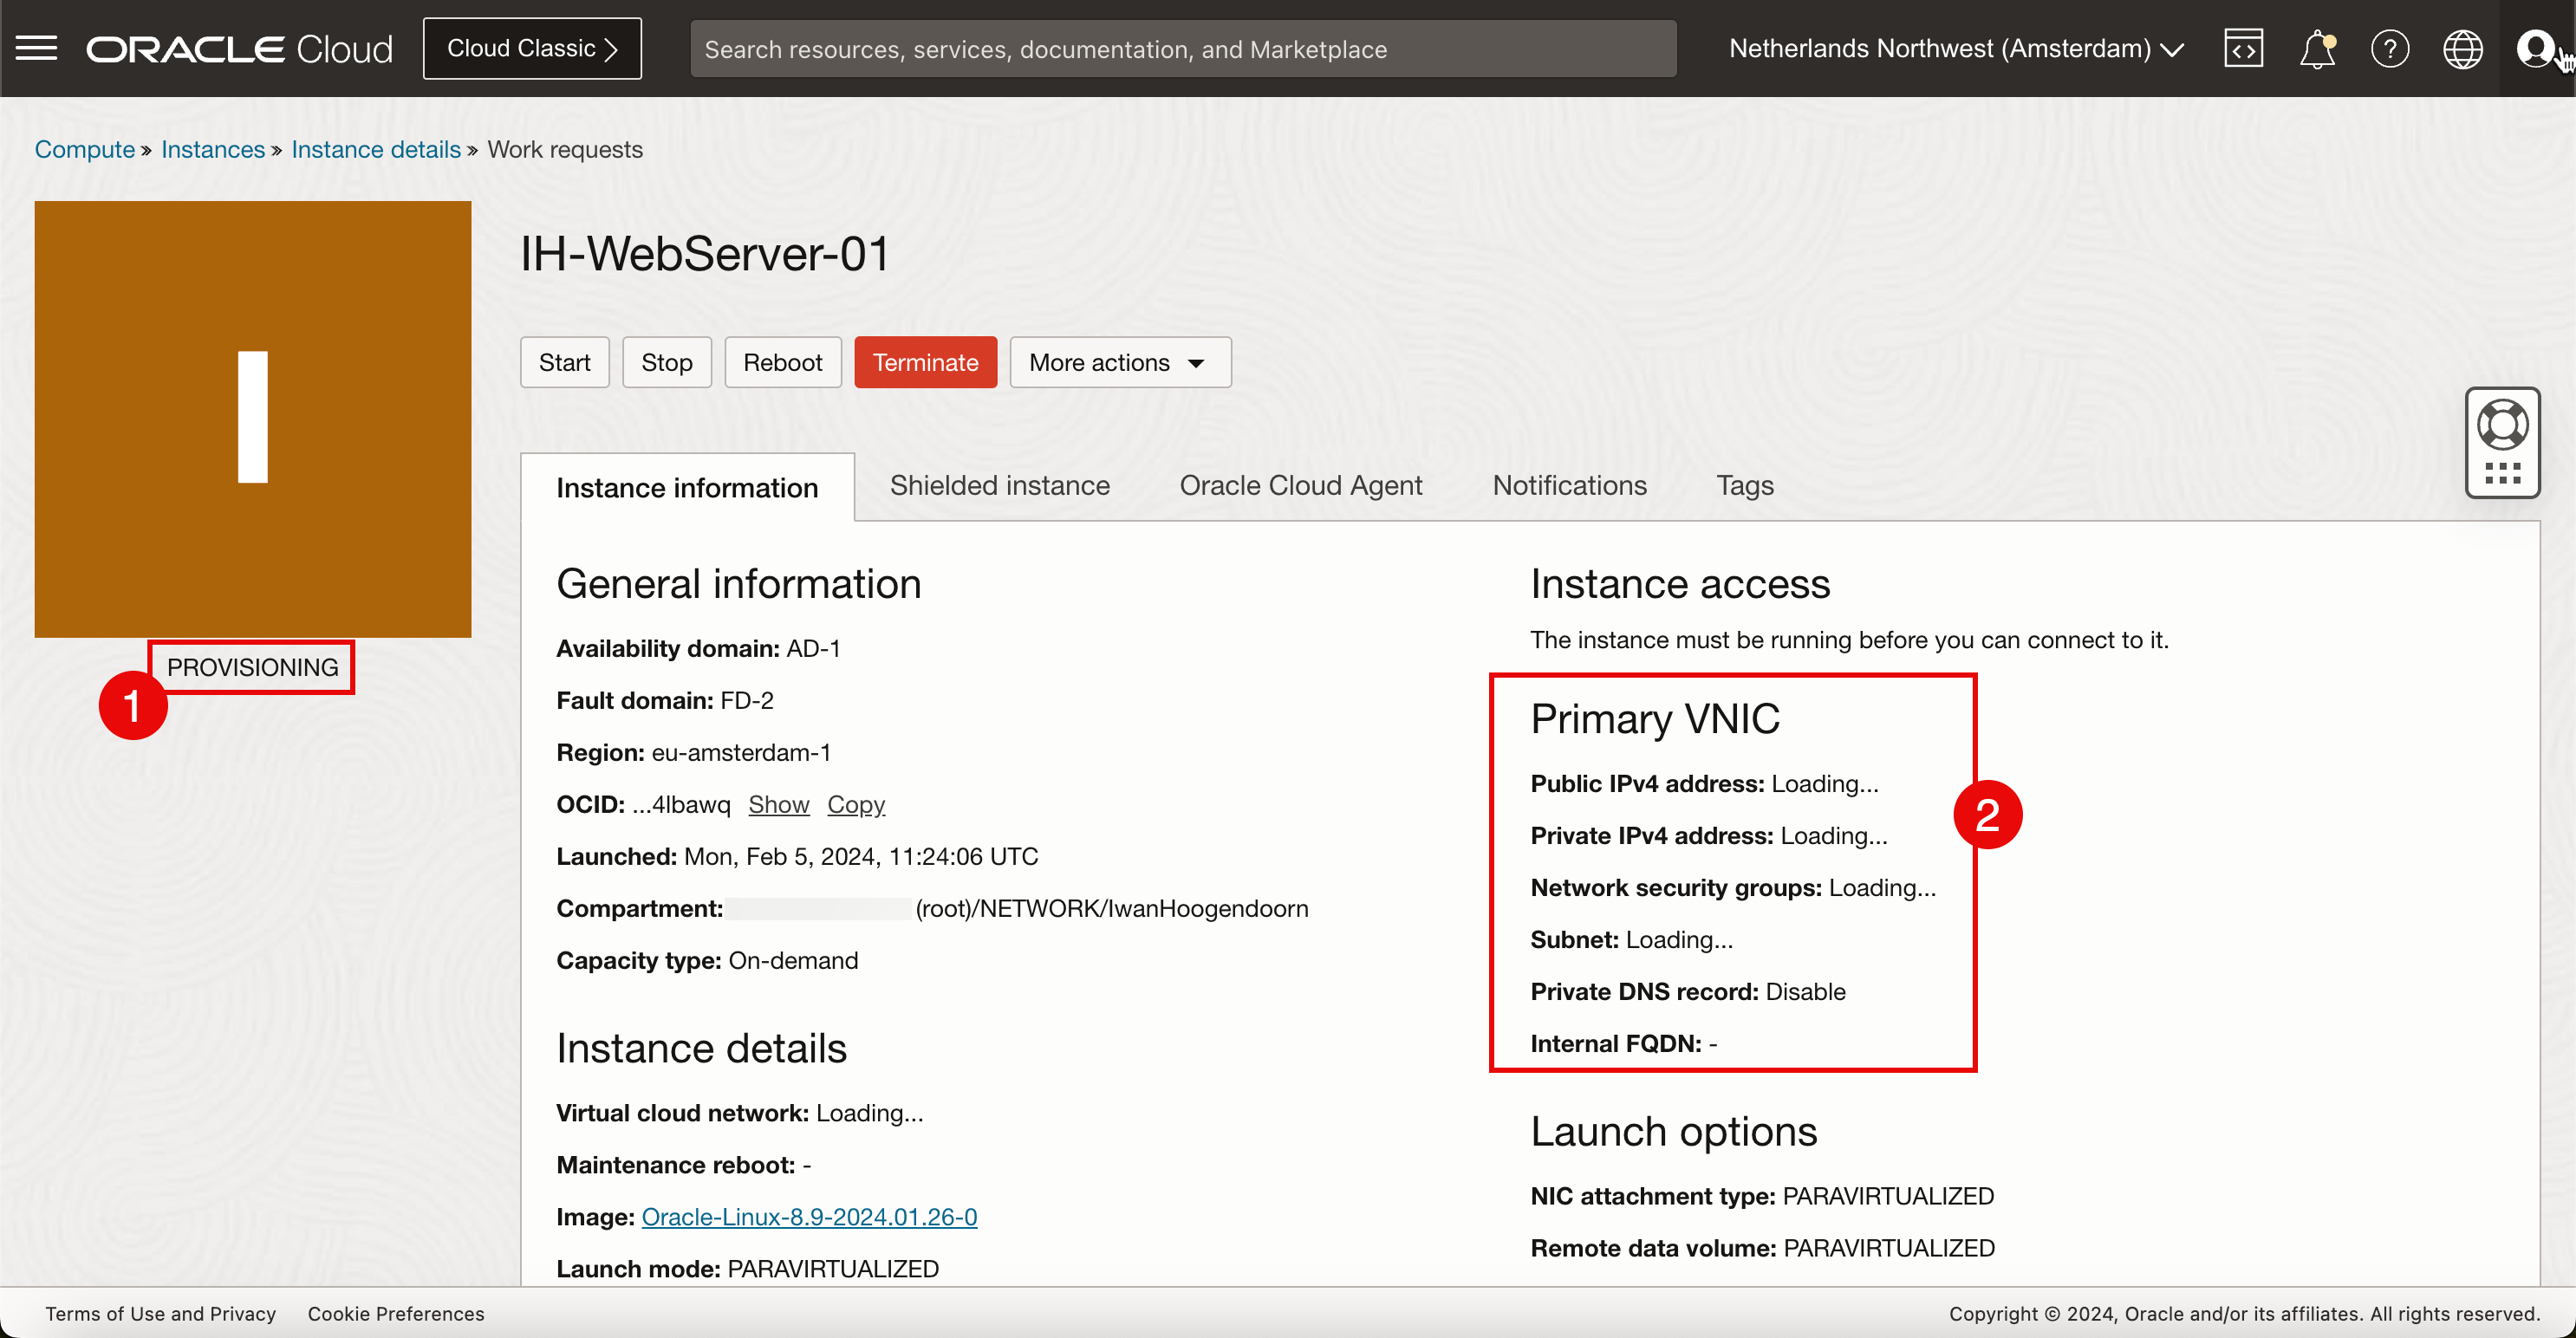
- 在建立期間,執行處理的狀態將會是 PROVISIONING 。
- 請注意,尚無可用的 IP 位址詳細資訊。
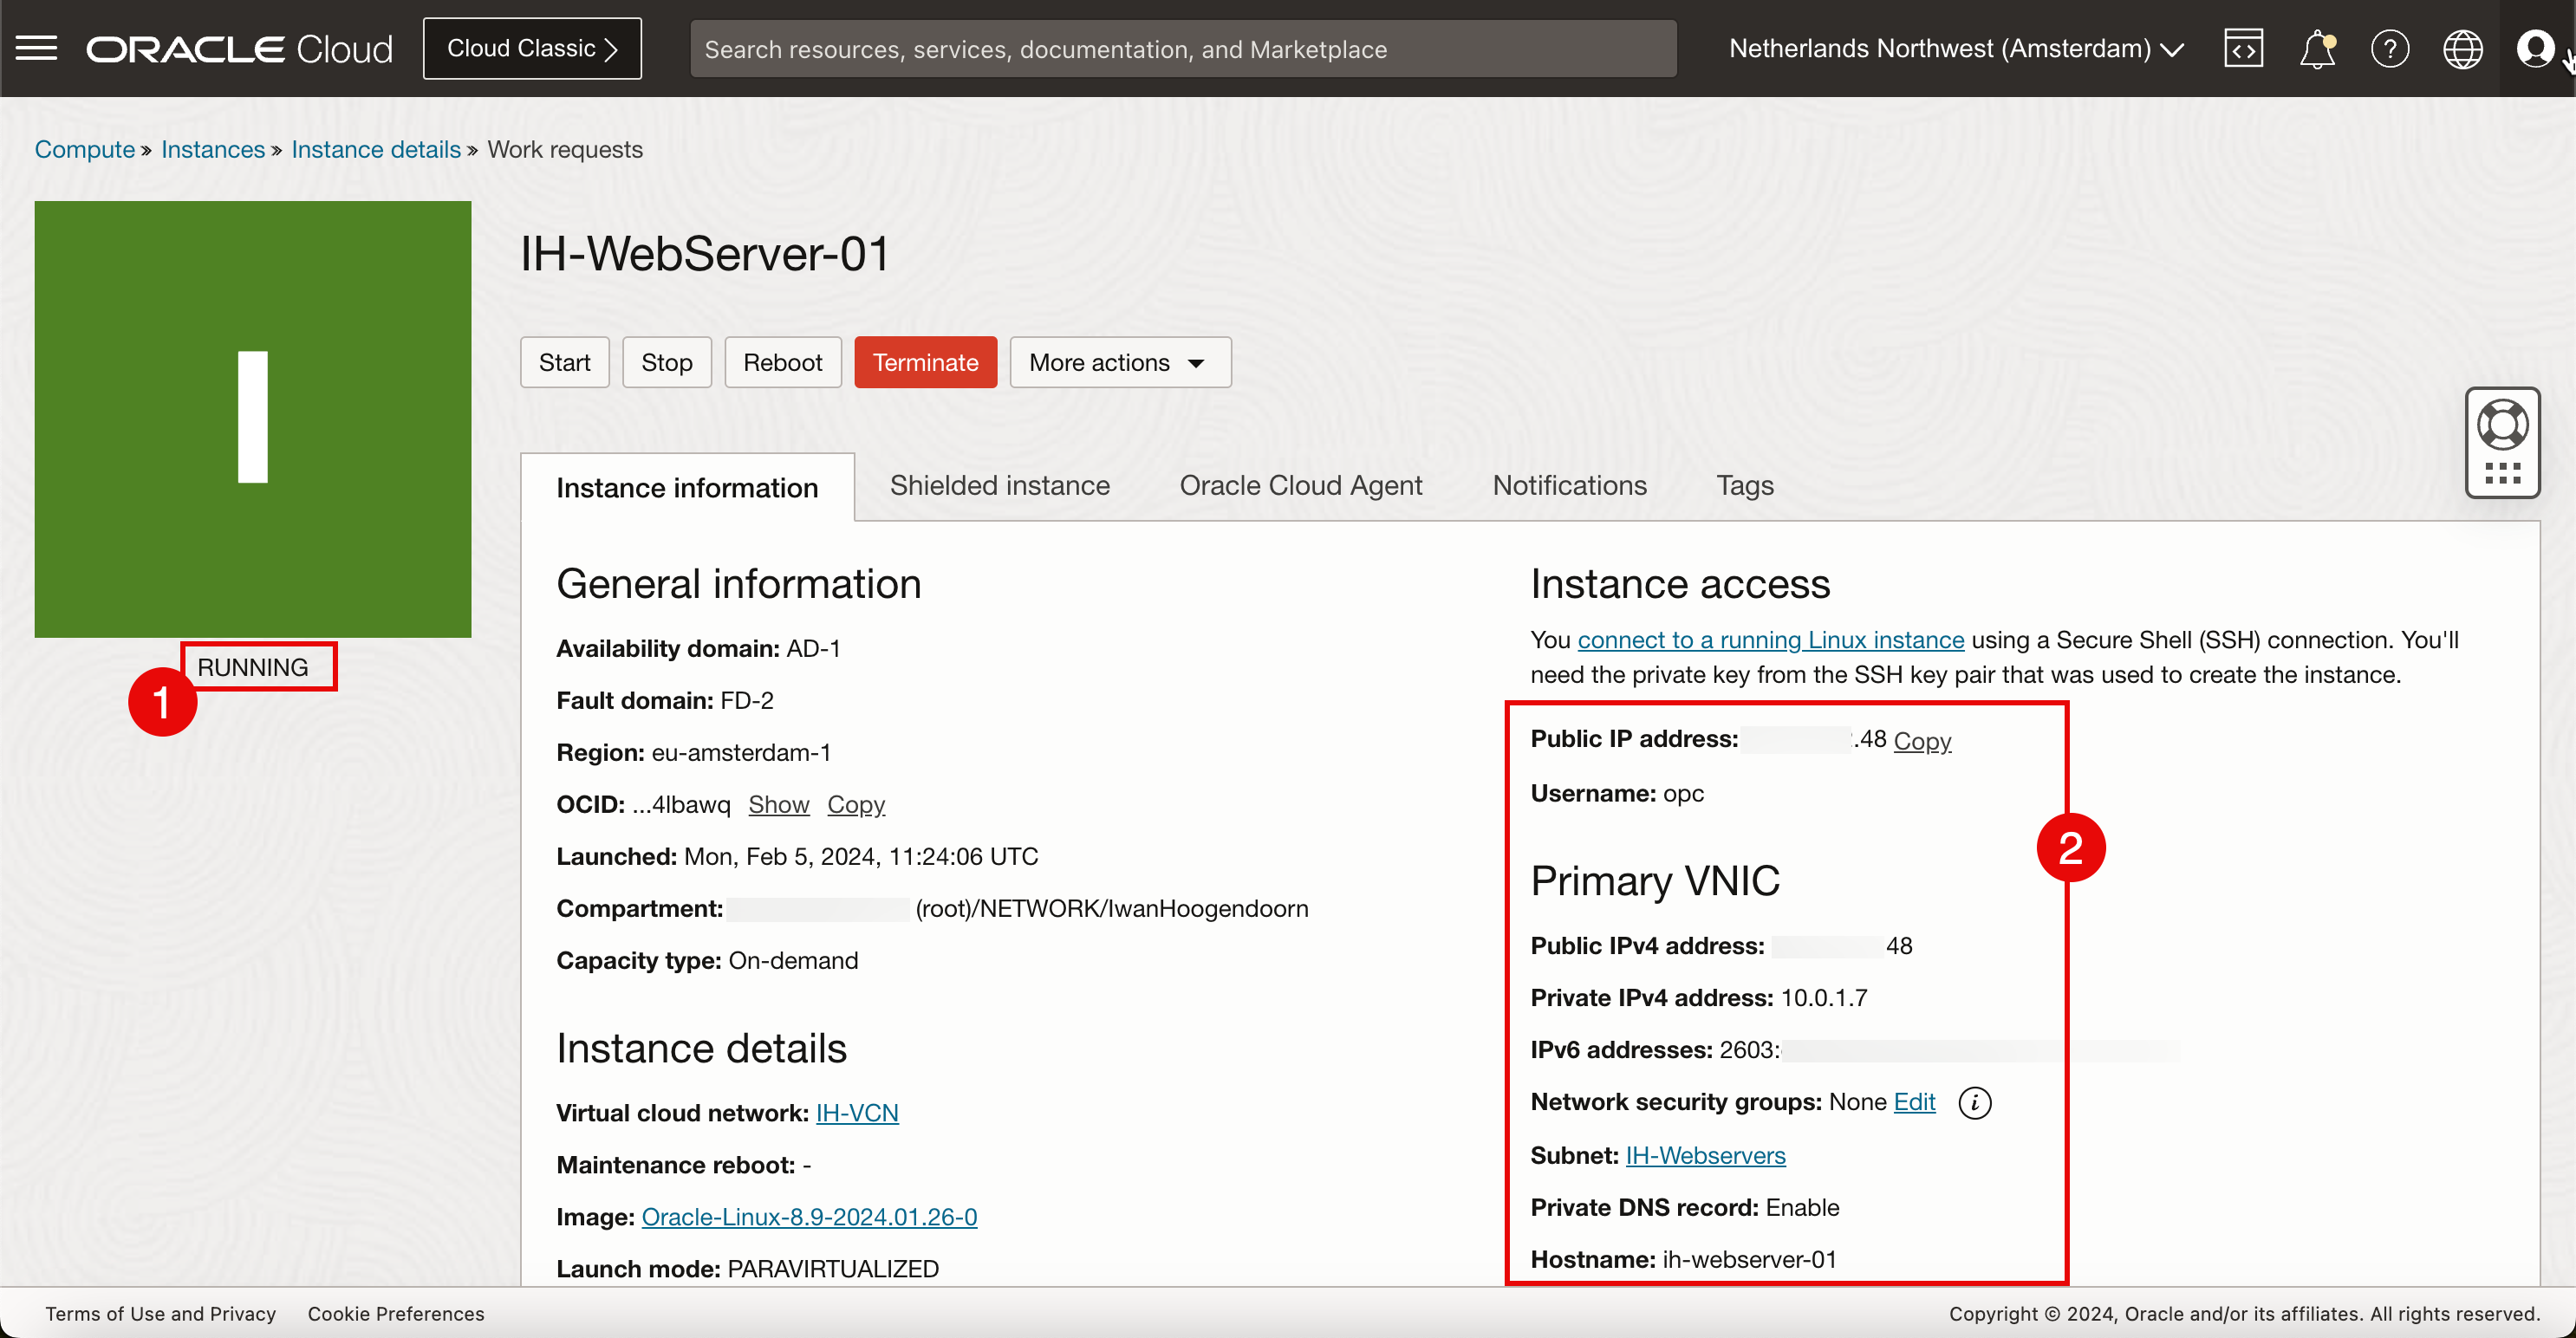
- 當執行處理已完整建立且就緒時,狀態將會設為執行。
- 請注意,IP 位址詳細資訊現已可供使用。
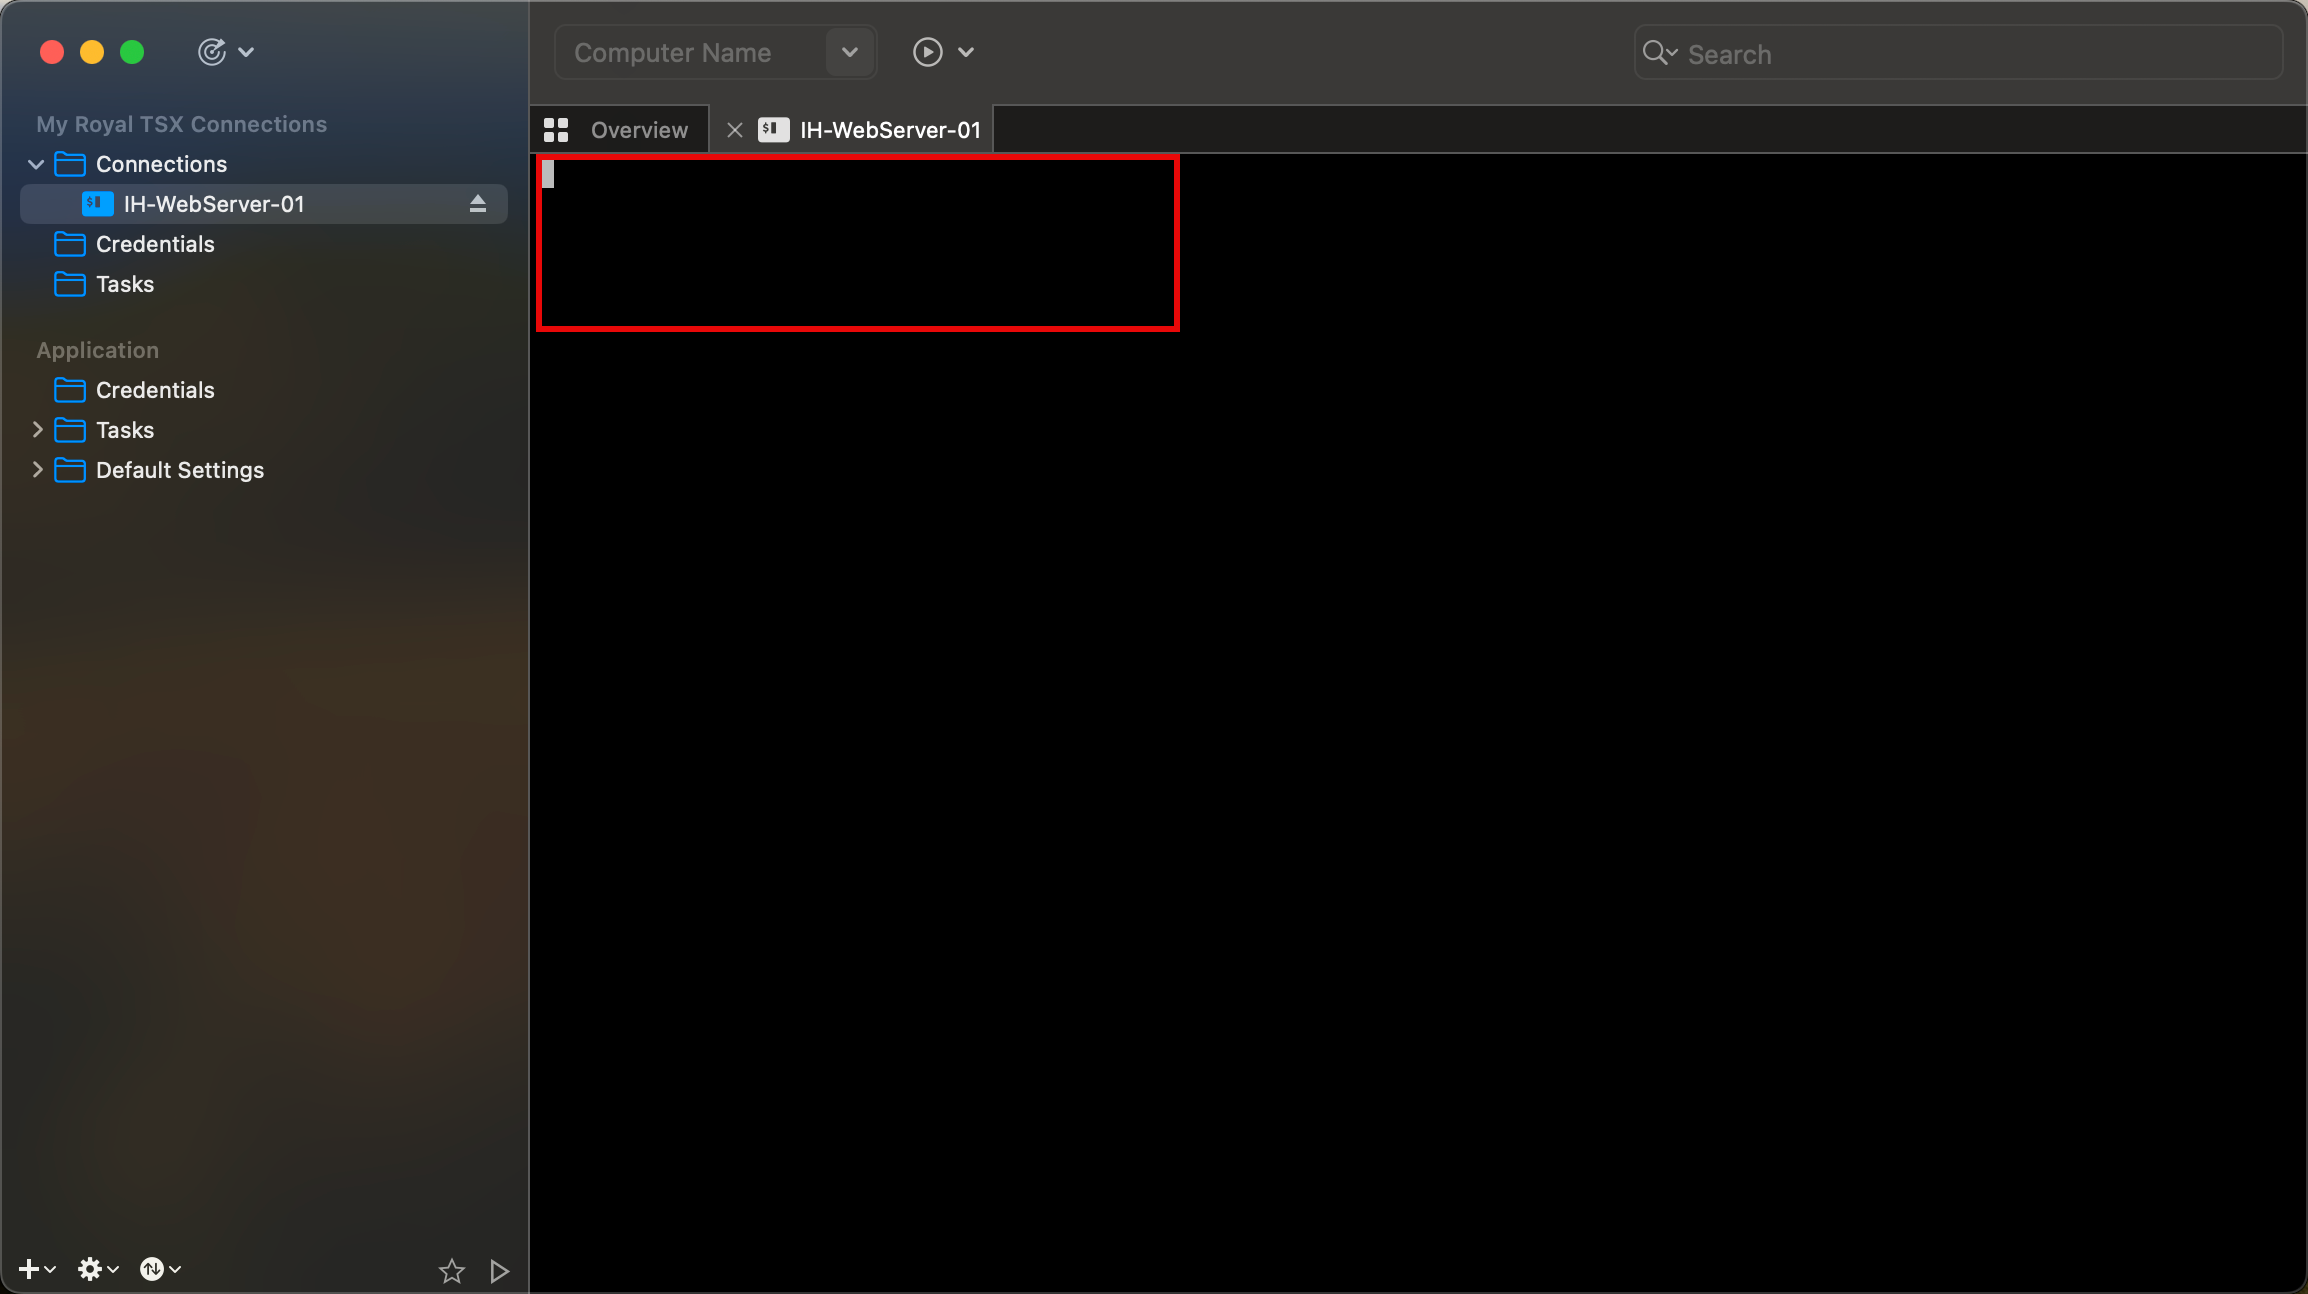
下一個邏輯工作將使用 SSH 存取執行處理,因此我們可以開始安裝並設定 Web 伺服器。嘗試使用公用 IPv4 位址和私密金鑰連線至 Web 伺服器時,無法連線,因為在任務 1 中建立的 VCN 沒有網際網路閘道,現在我們需要先在 VCN 中建立該網際網路閘道,然後再設定路由。
作業 4:建立新的網際網路閘道並設定路由
若要能夠從網際網路存取新的執行處理 (Web 伺服器),一開始使用 SSH 並最終轉換成 HTTP,我們必須建立網際網路閘道。
-
開啟 OCI 主控台。
- 前往虛擬雲端網路。
- 選取在作業 1 中建立的 VCN。
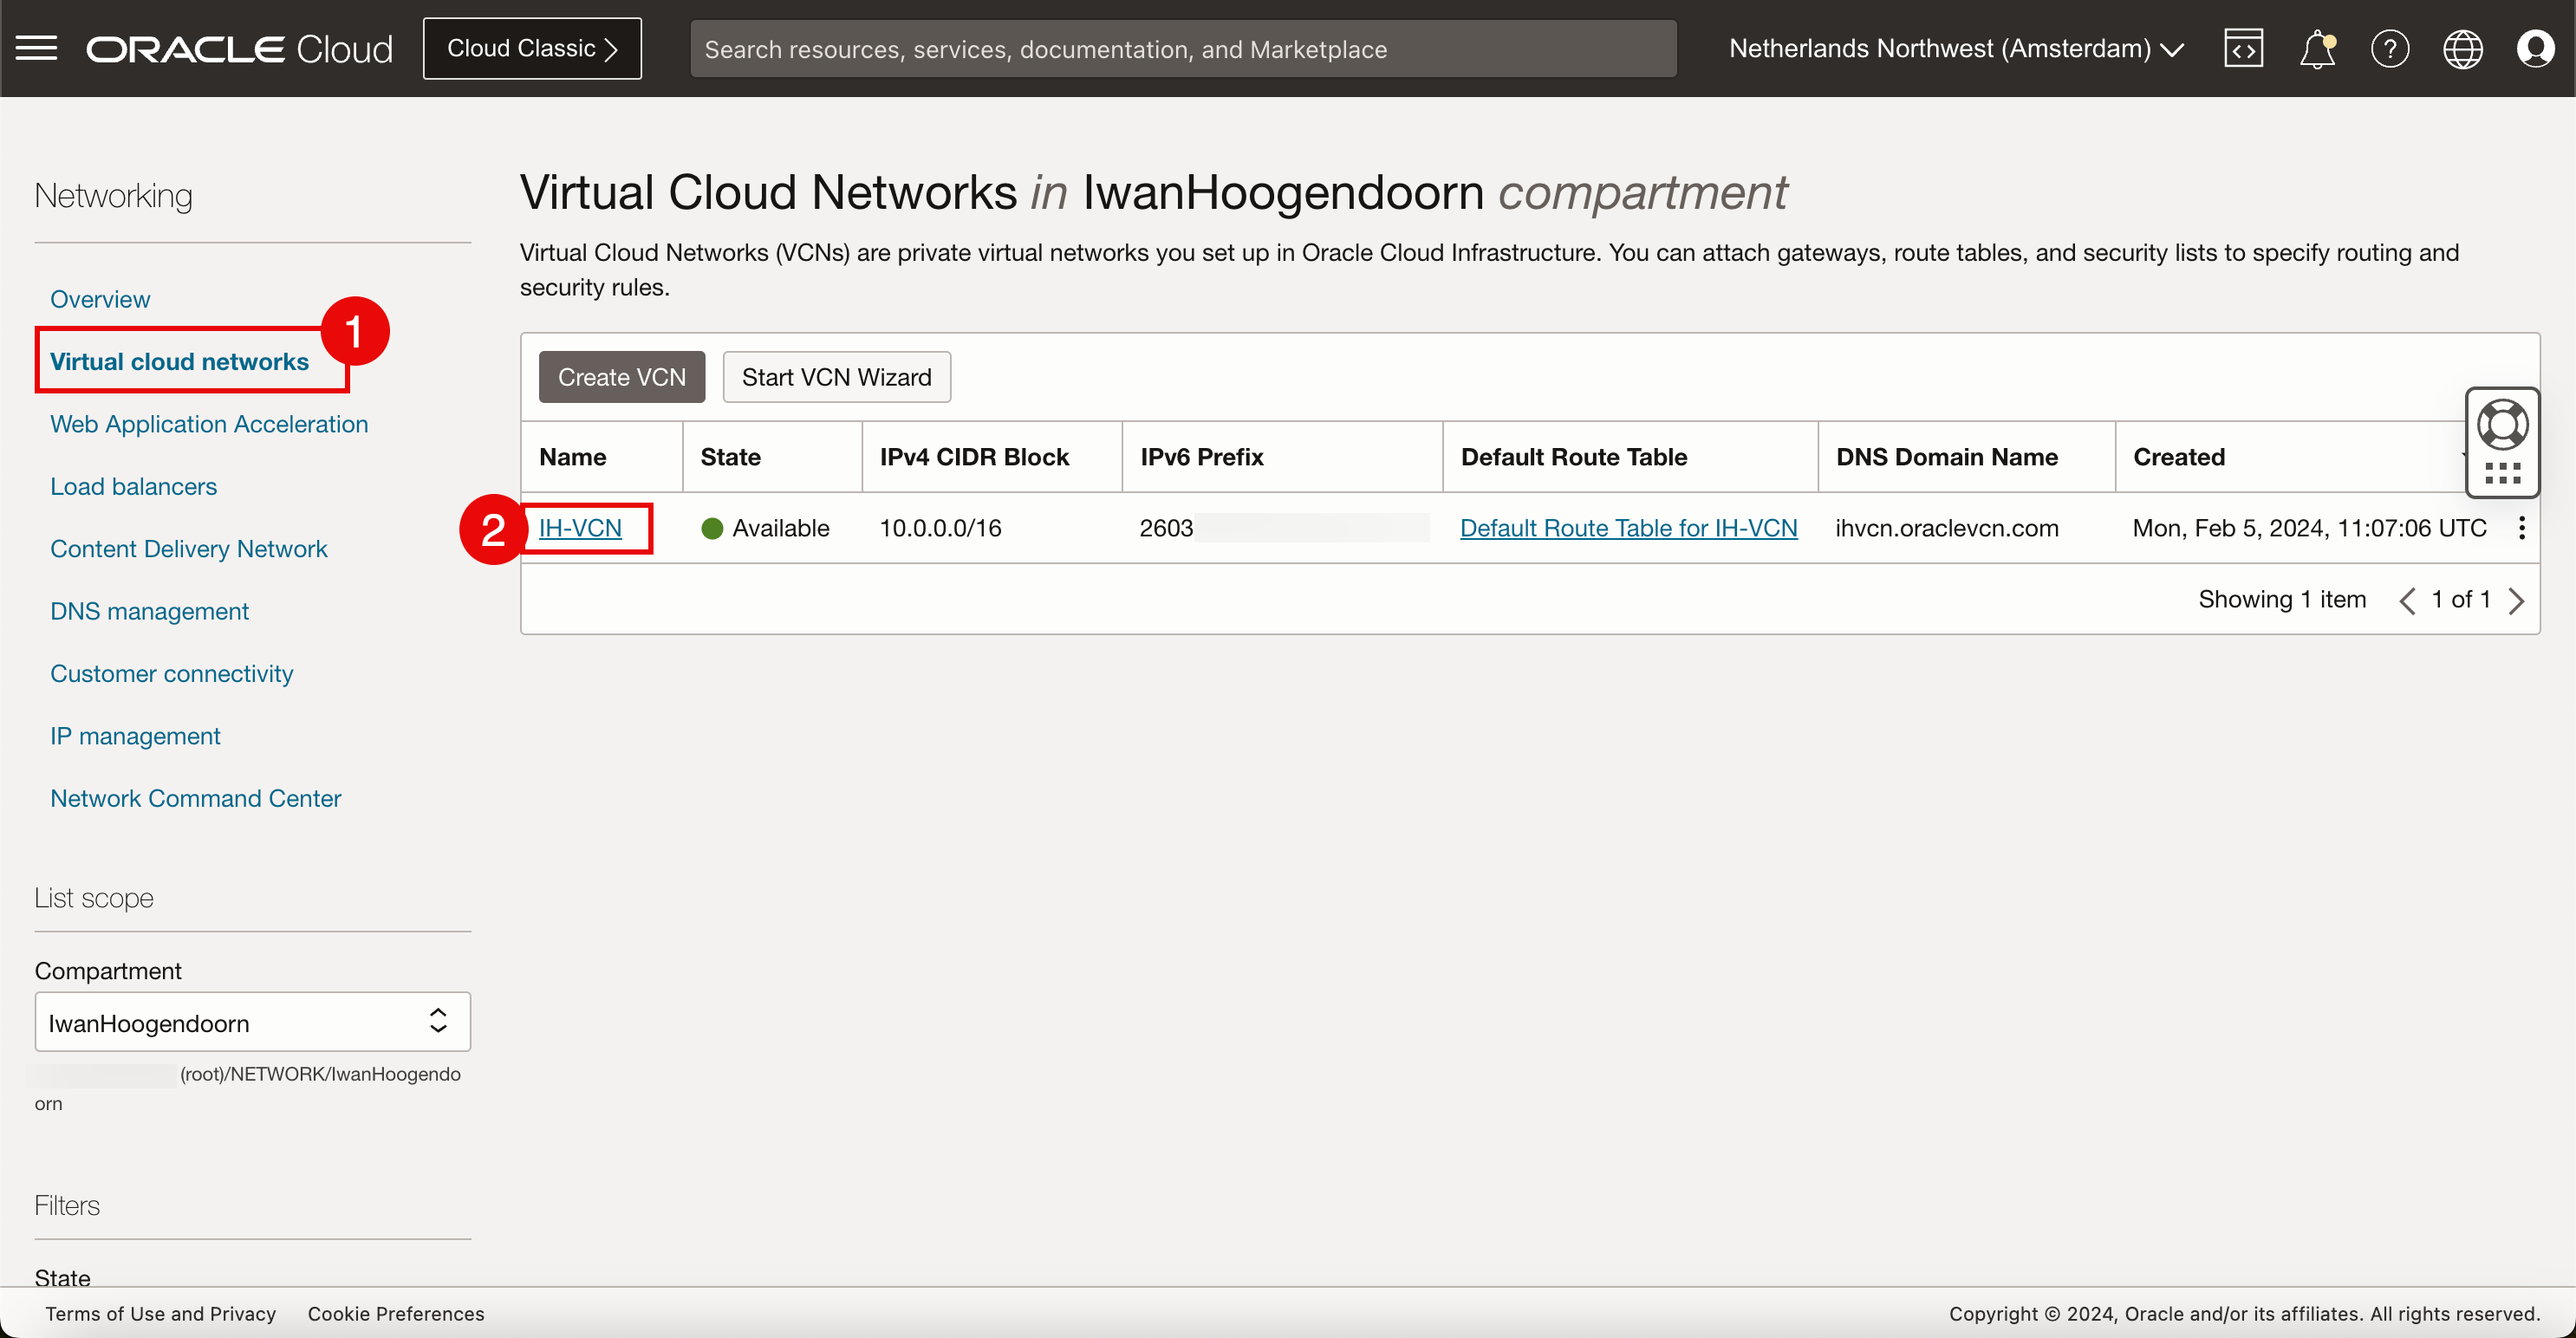
-
在 VCN 詳細資訊頁面中,按一下網際網路閘道。
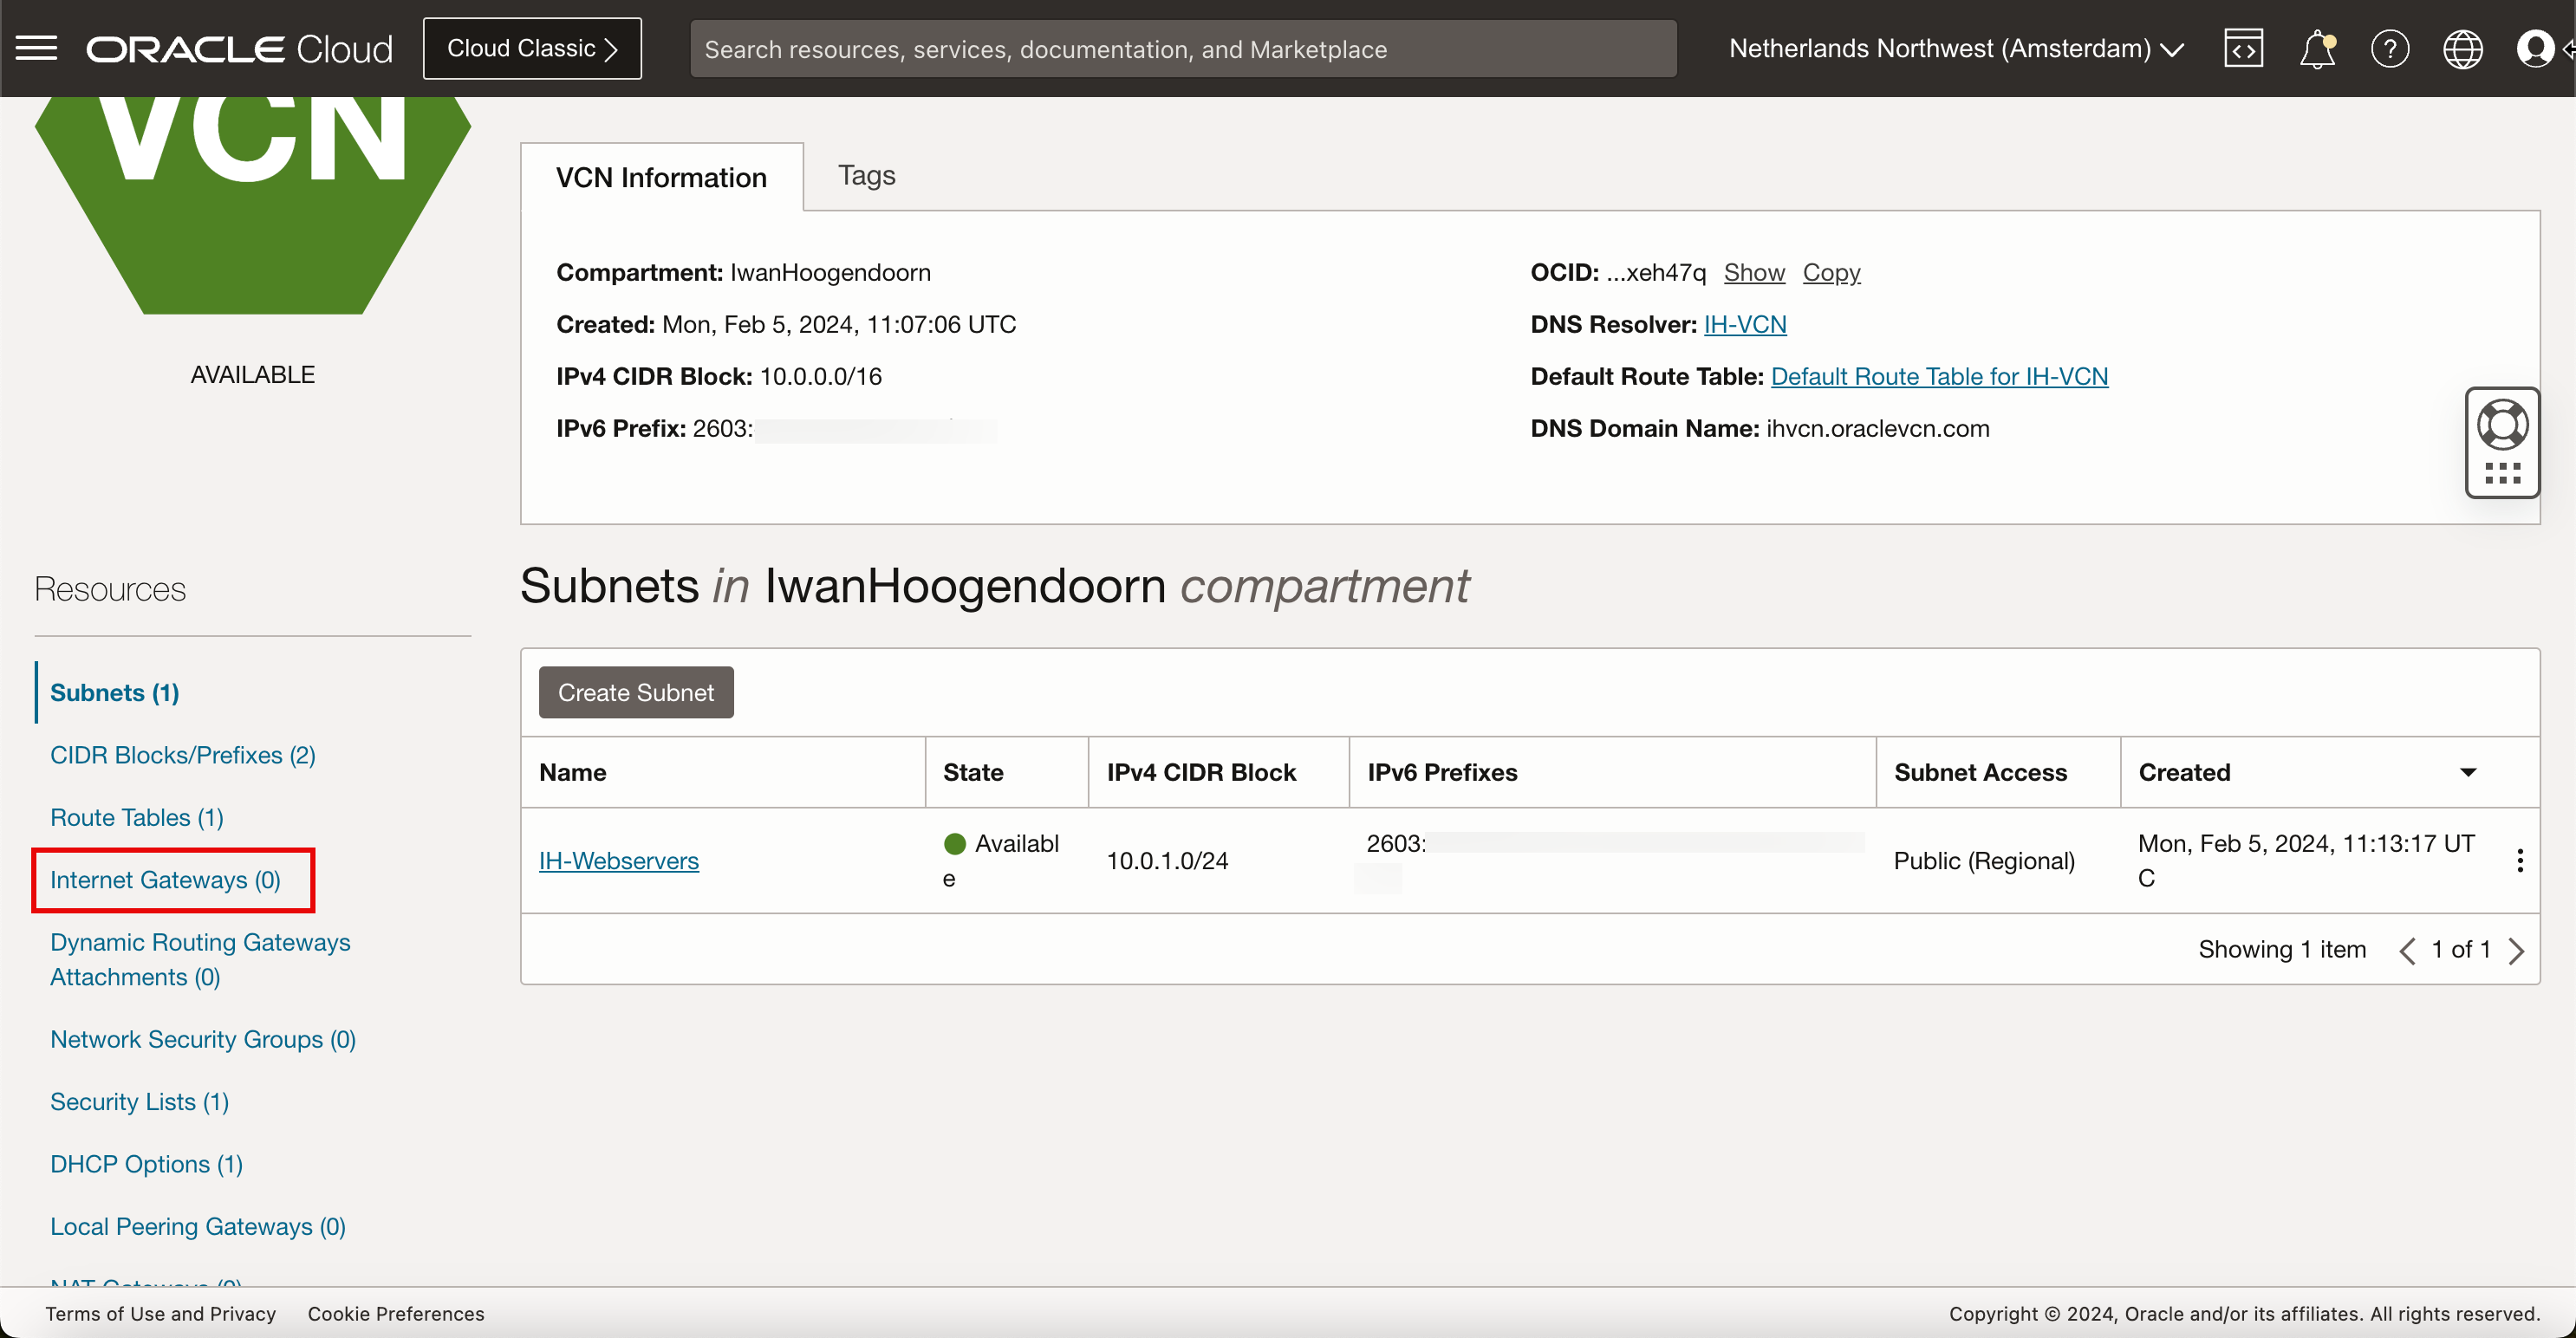
-
按一下建立網際網路閘道。
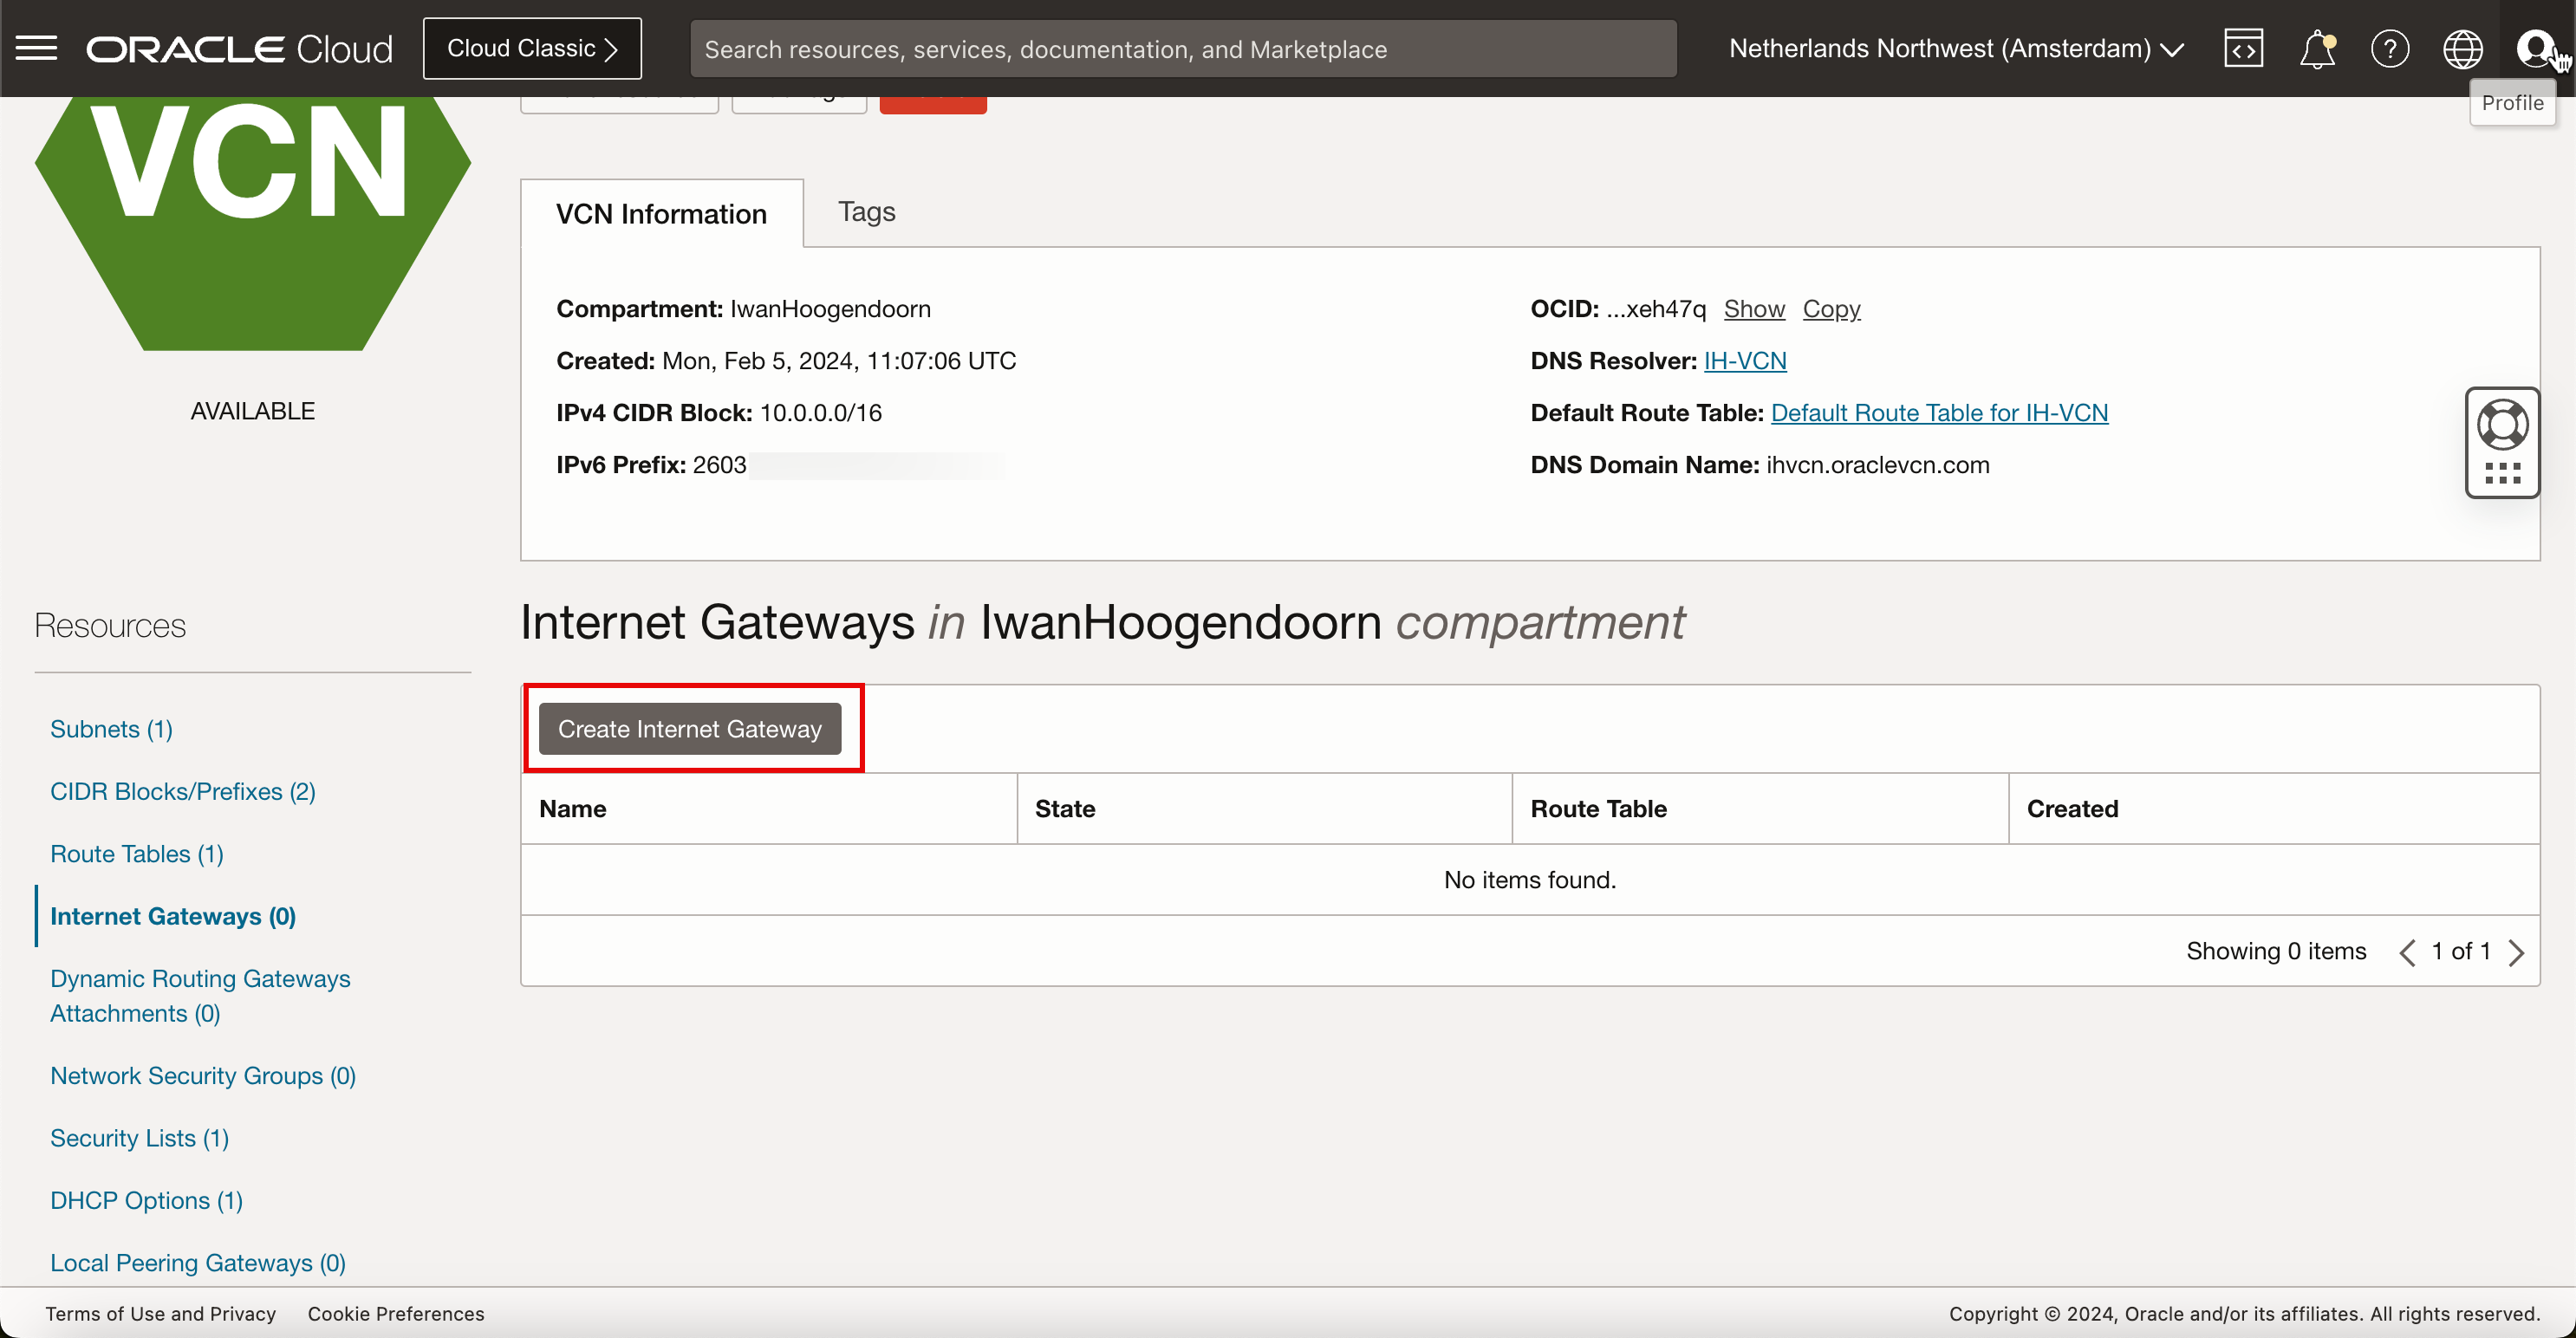
-
在建立網際網路閘道中,輸入下列資訊。
- 輸入名稱。
- 請選取區間。
- 按一下建立網際網路閘道。
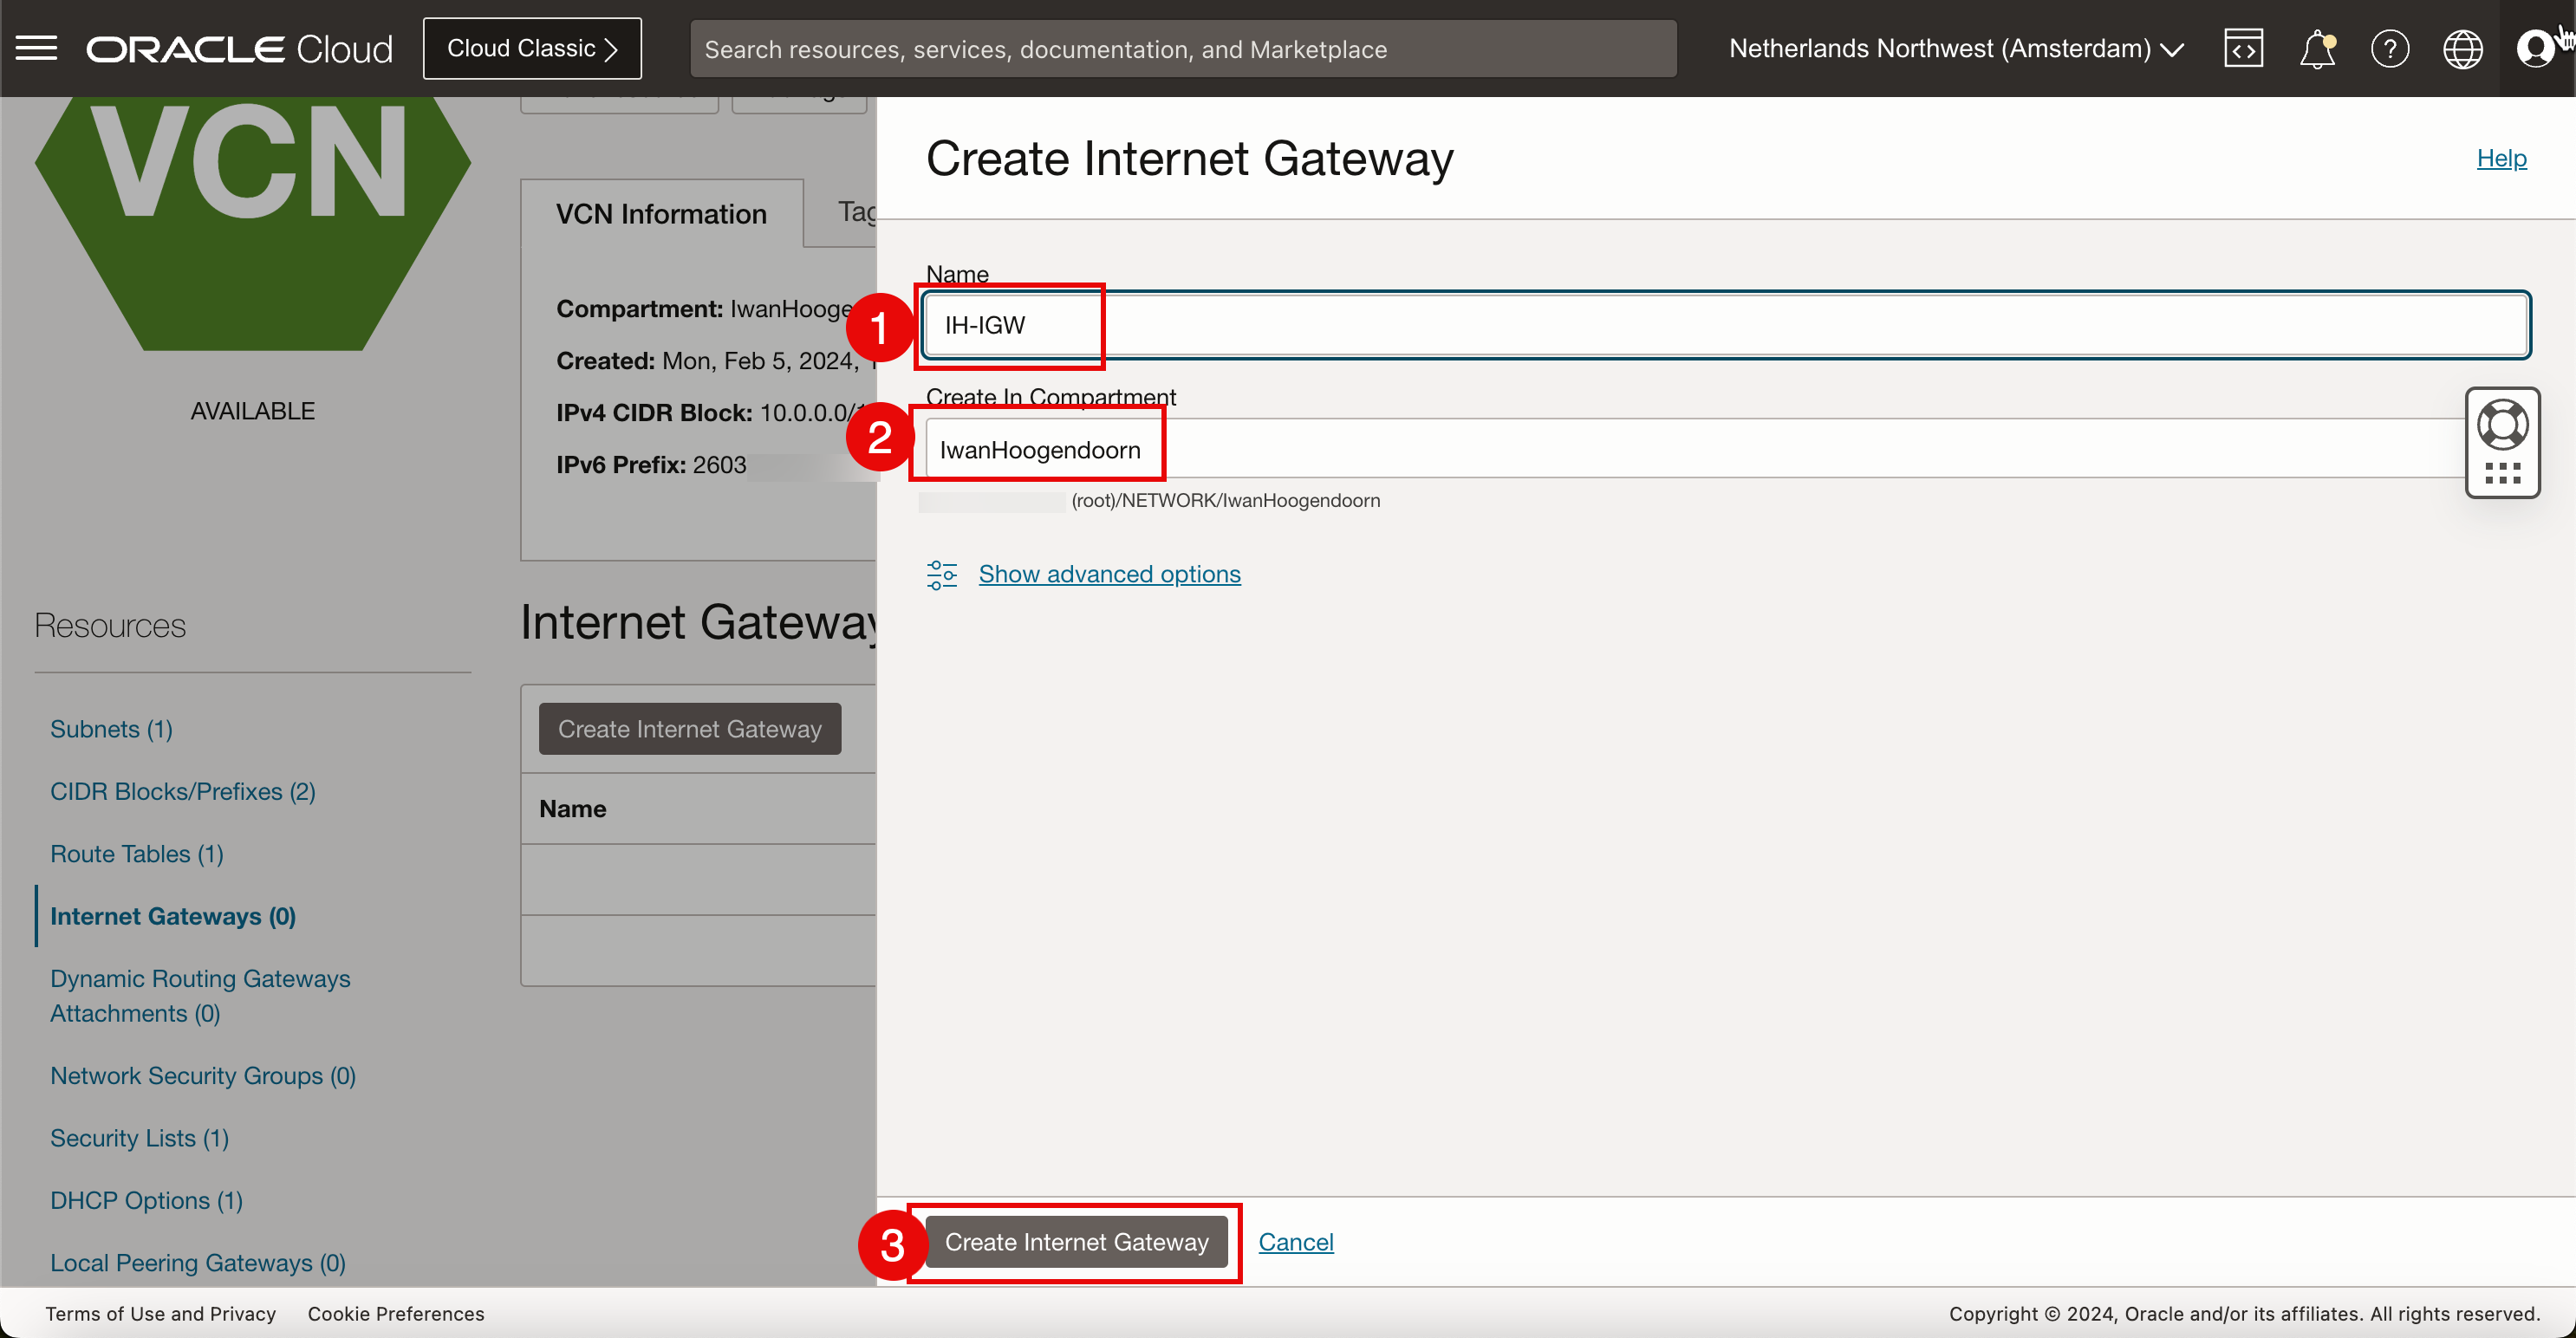
-
新增路由規則。
- 請注意,網際網路閘道為可用。
- 按一下路由表。
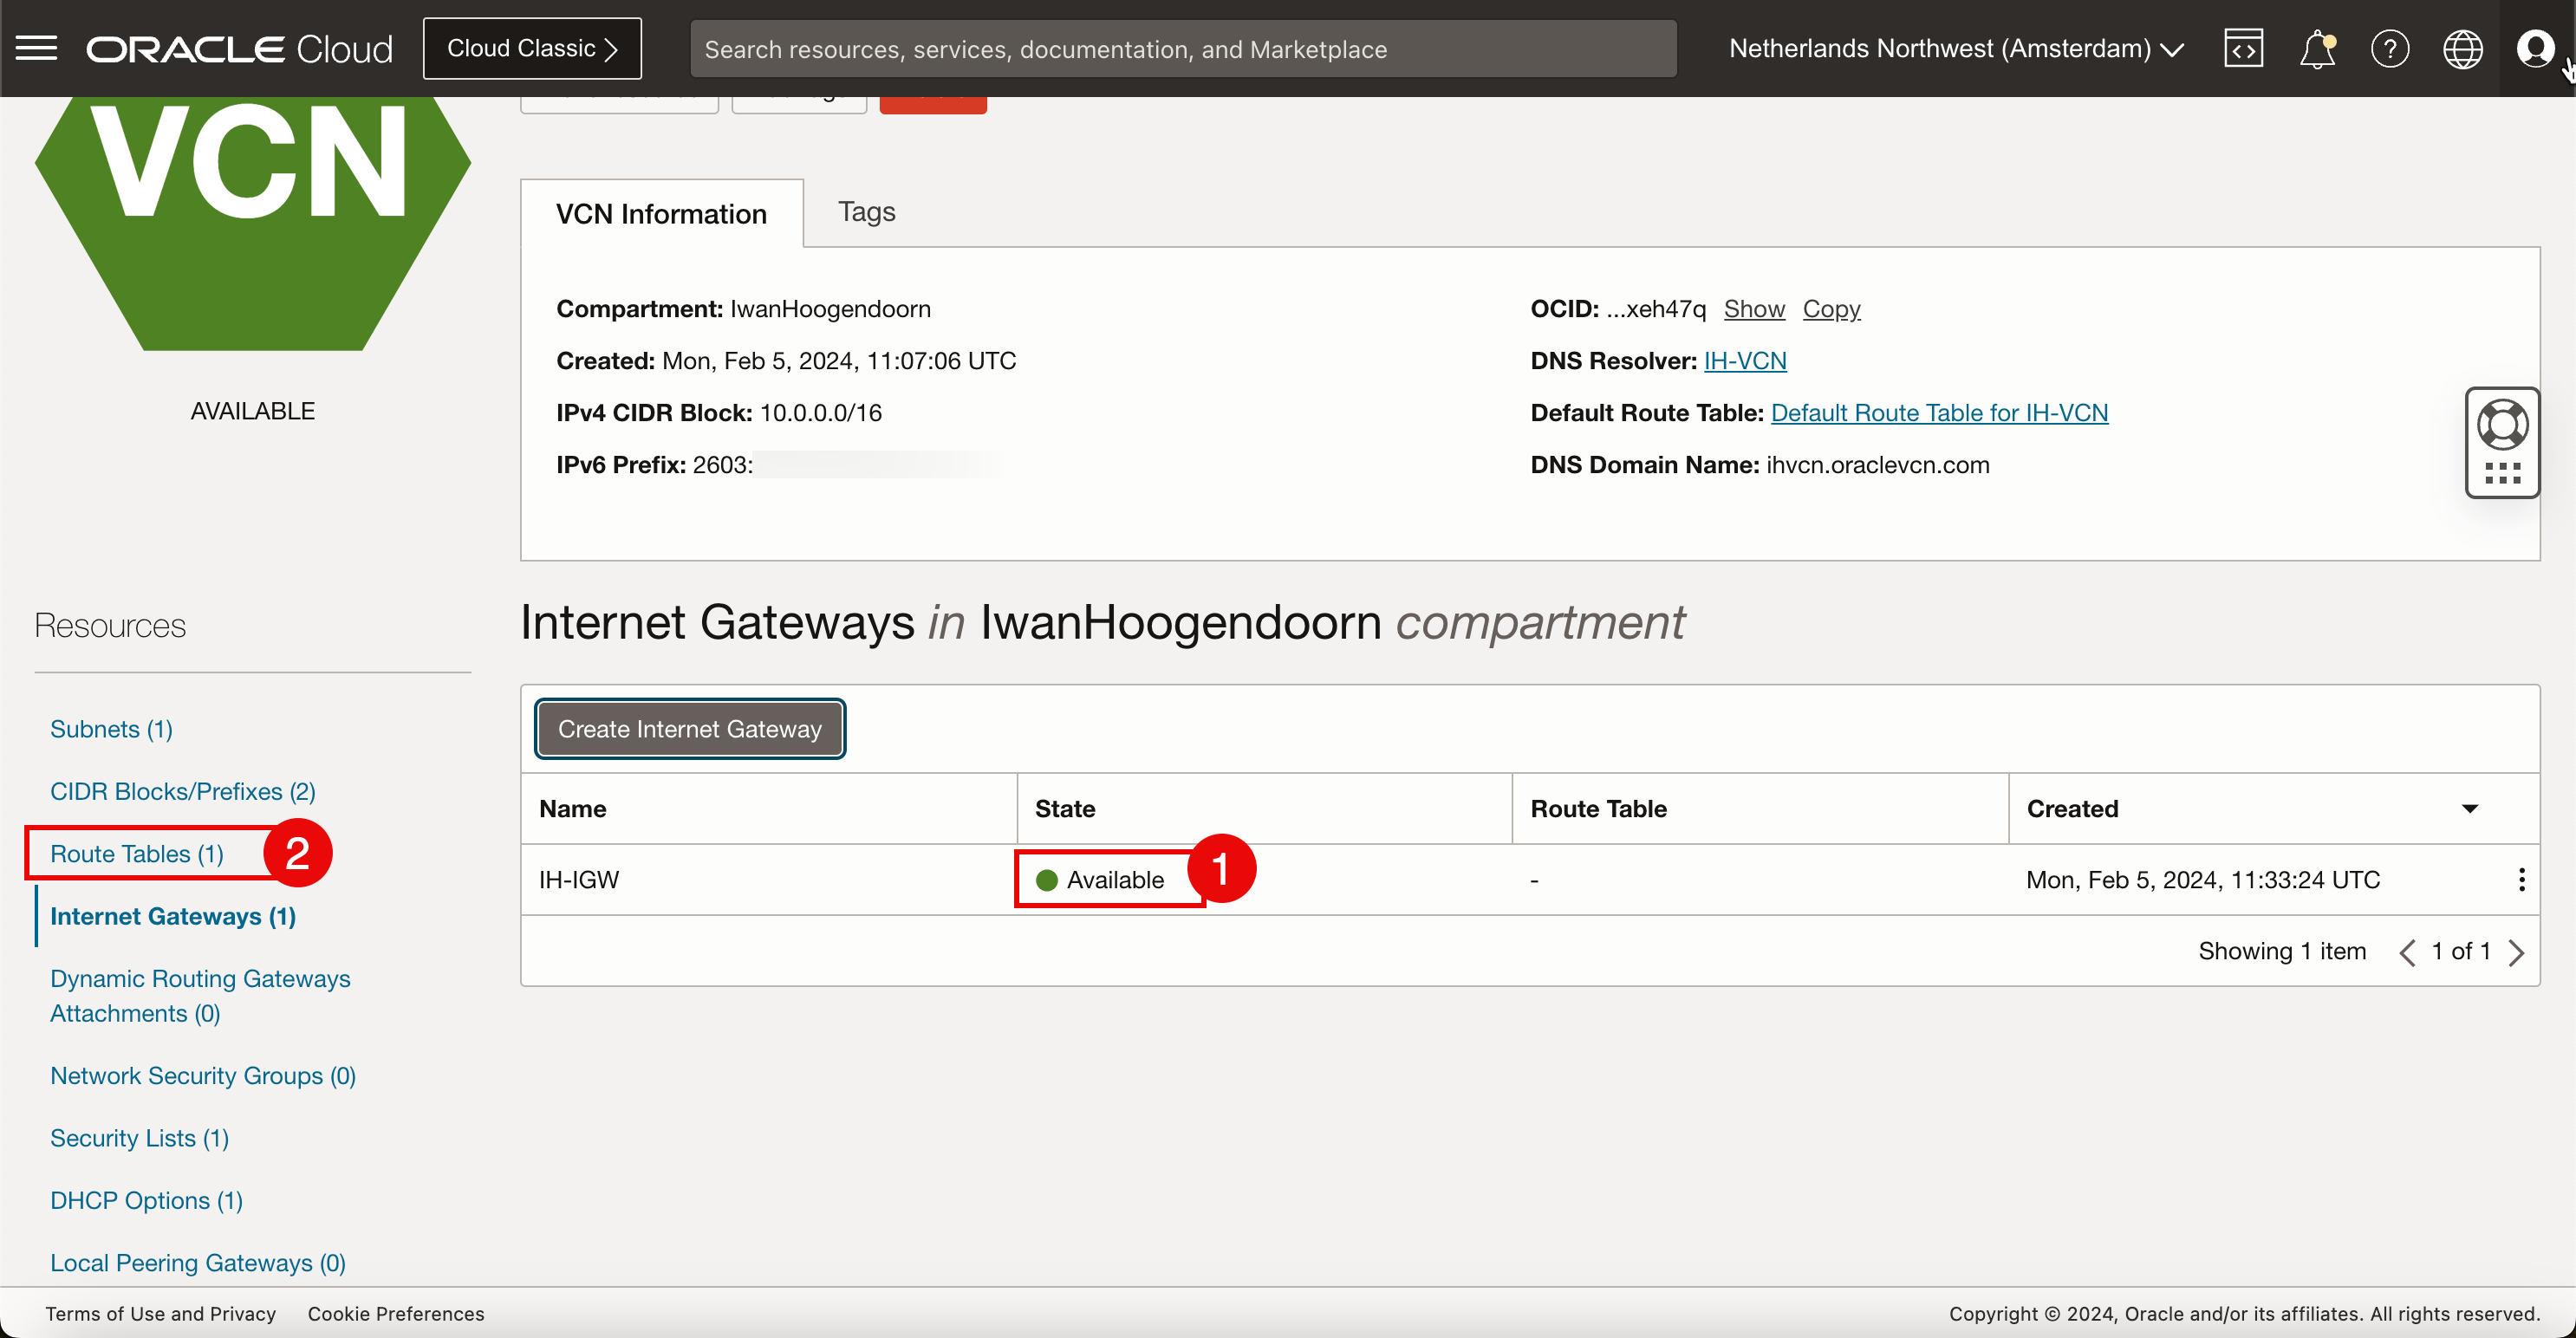
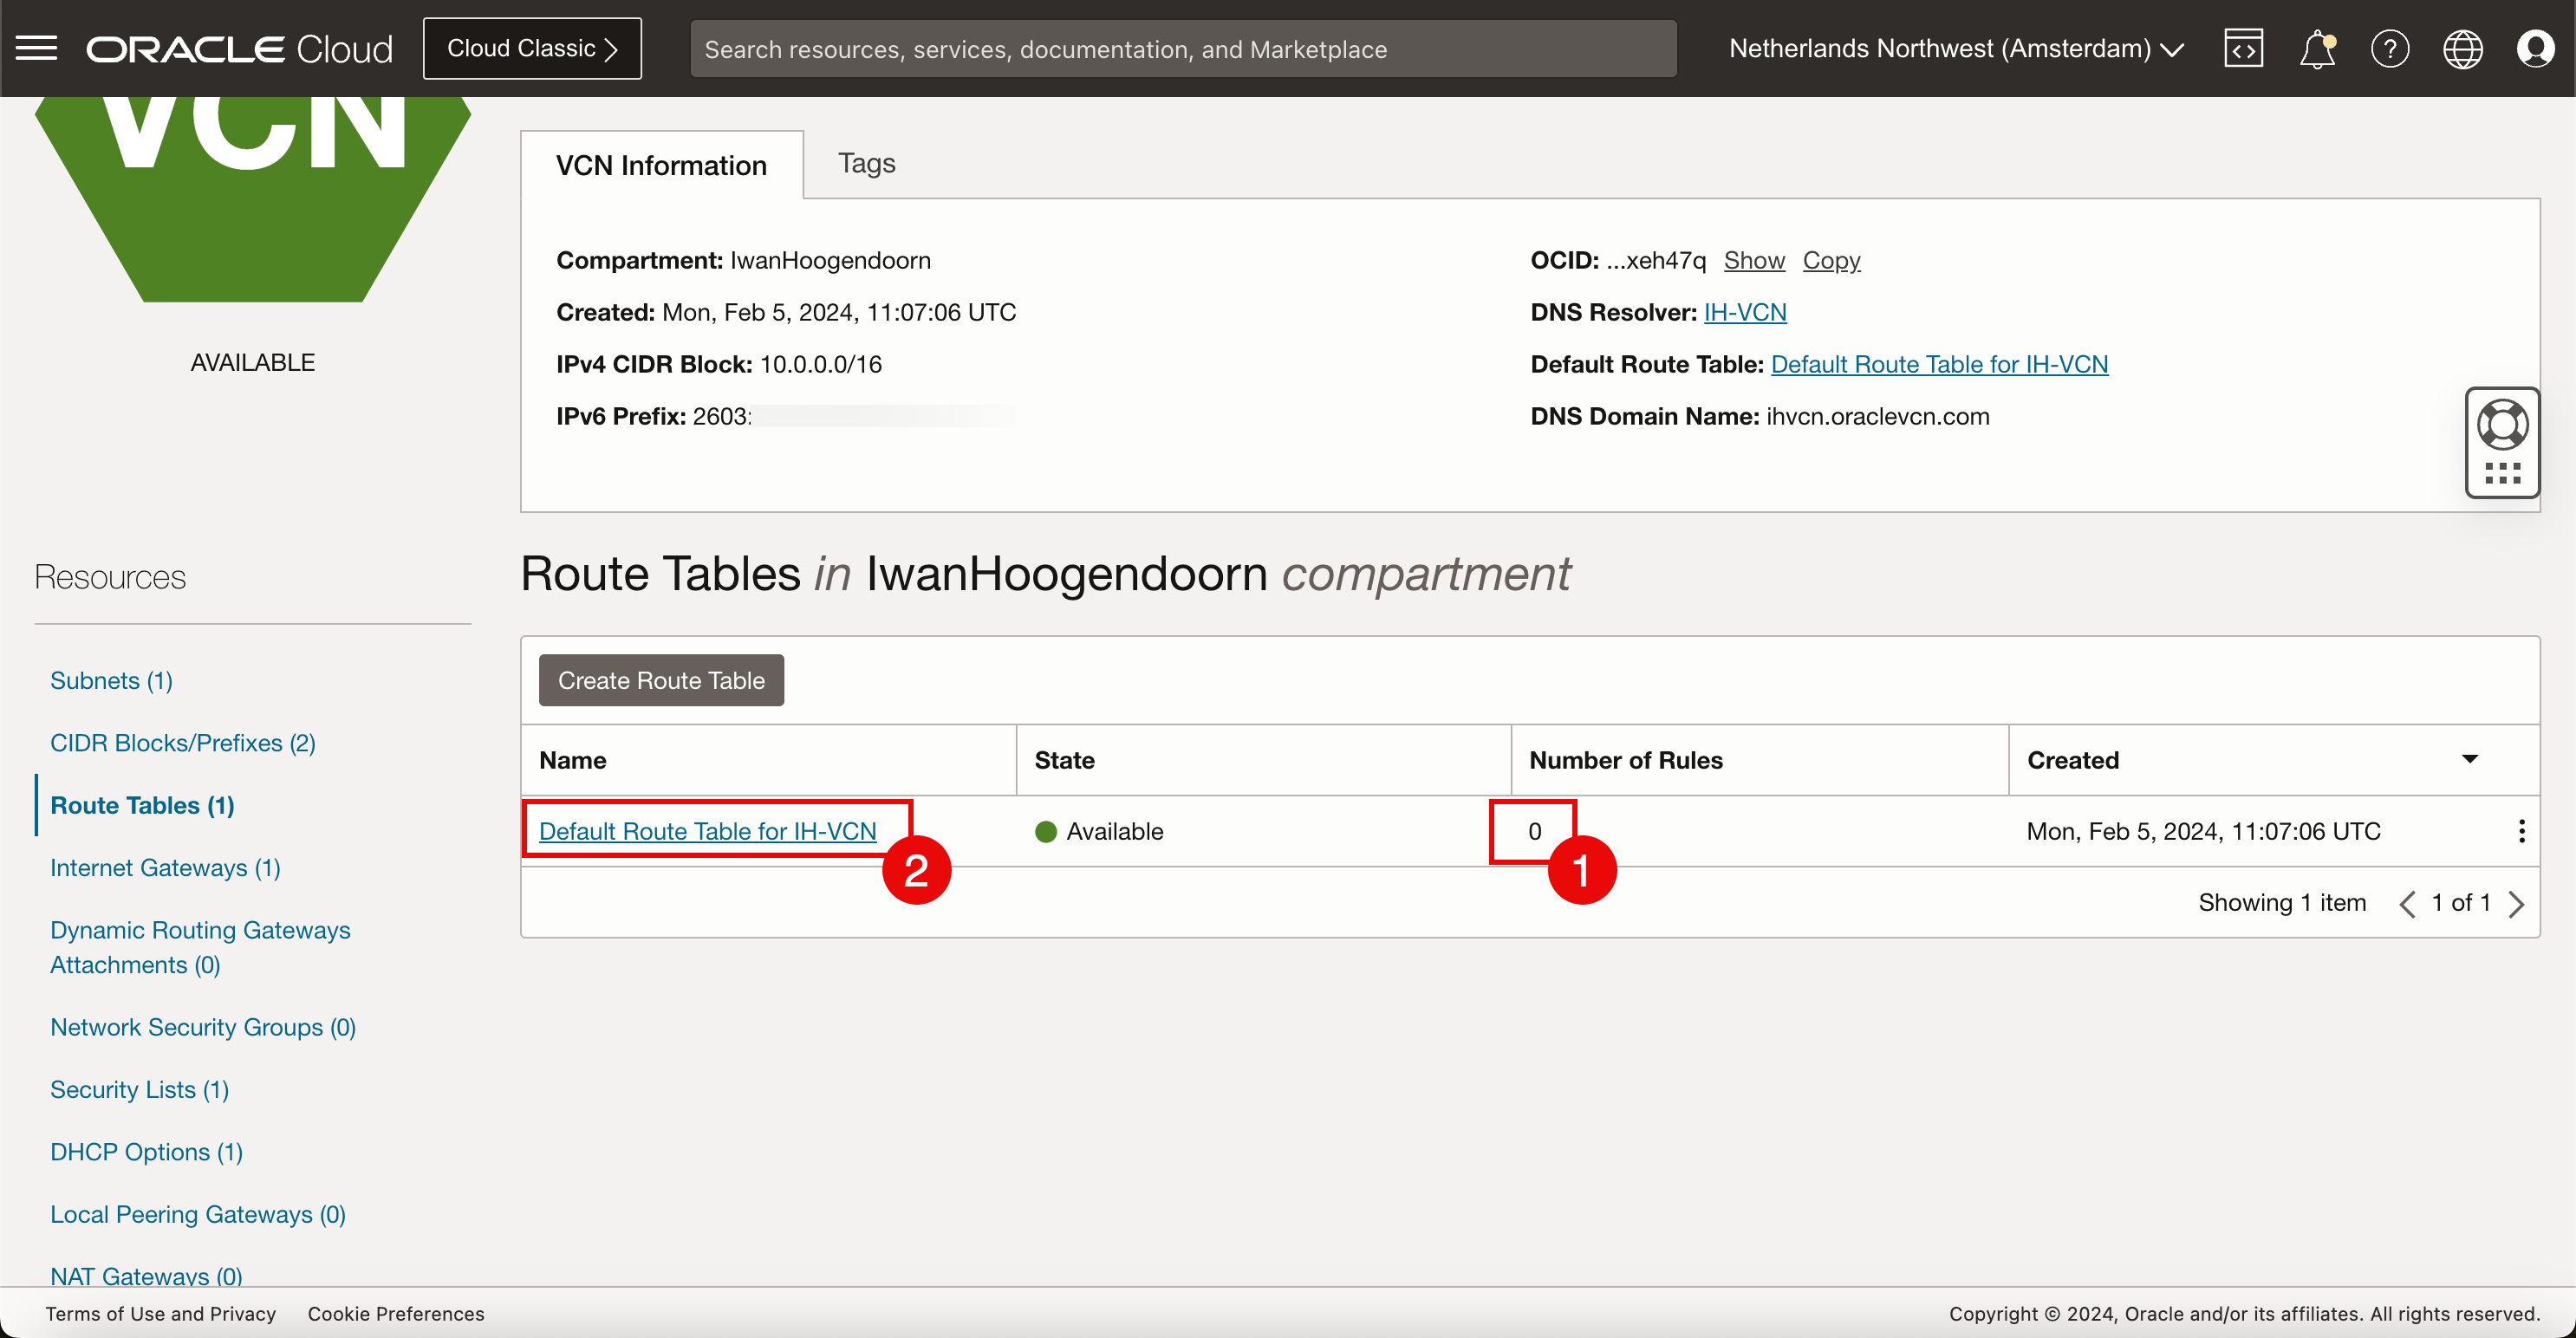
- 請注意,預設路由表在規則數目中有
0。 - 按一下預設路由表。
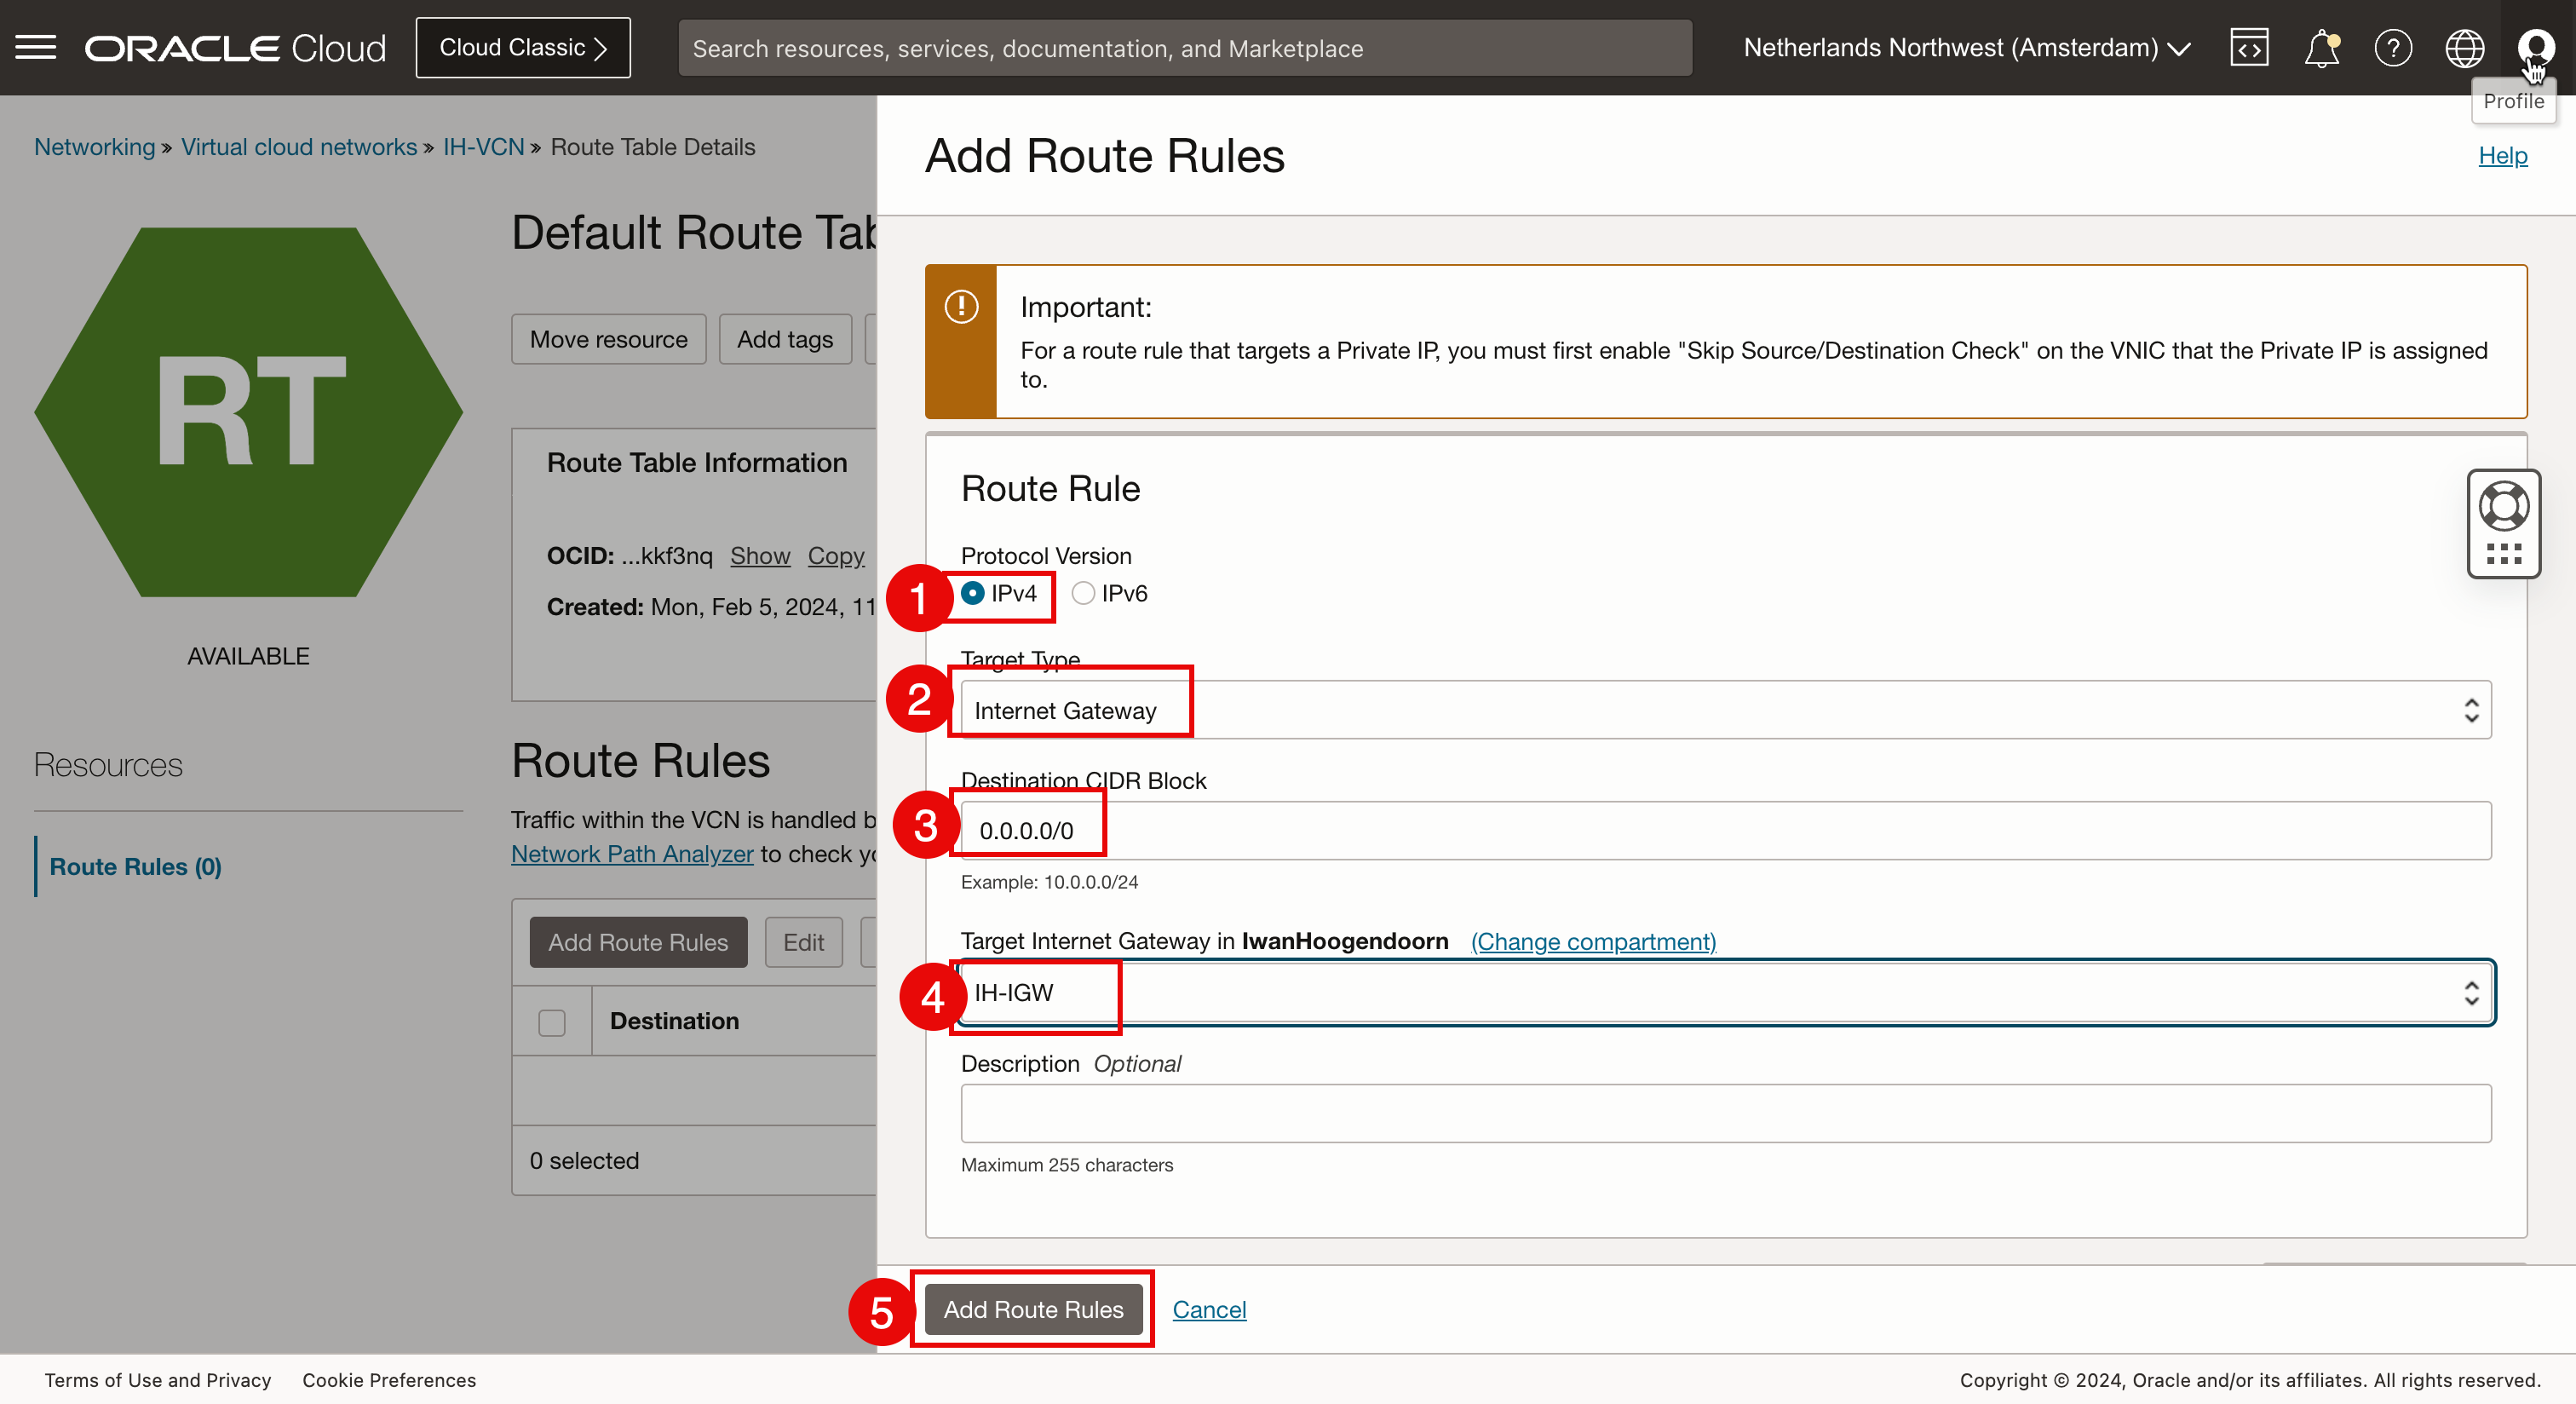
- 協定版本:選取 IPv4 。
- 目標類型:選取網際網路閘道。
- 目的地 CIDR 區塊:對於此教學課程,請選取
0.0.0.0/0,因為我們希望所有預設的 IPv4 網路流量都會移至網際網路閘道。 - 選取上方在此工作中建立的目標網際網路閘道。
- 按一下新增路由規則。
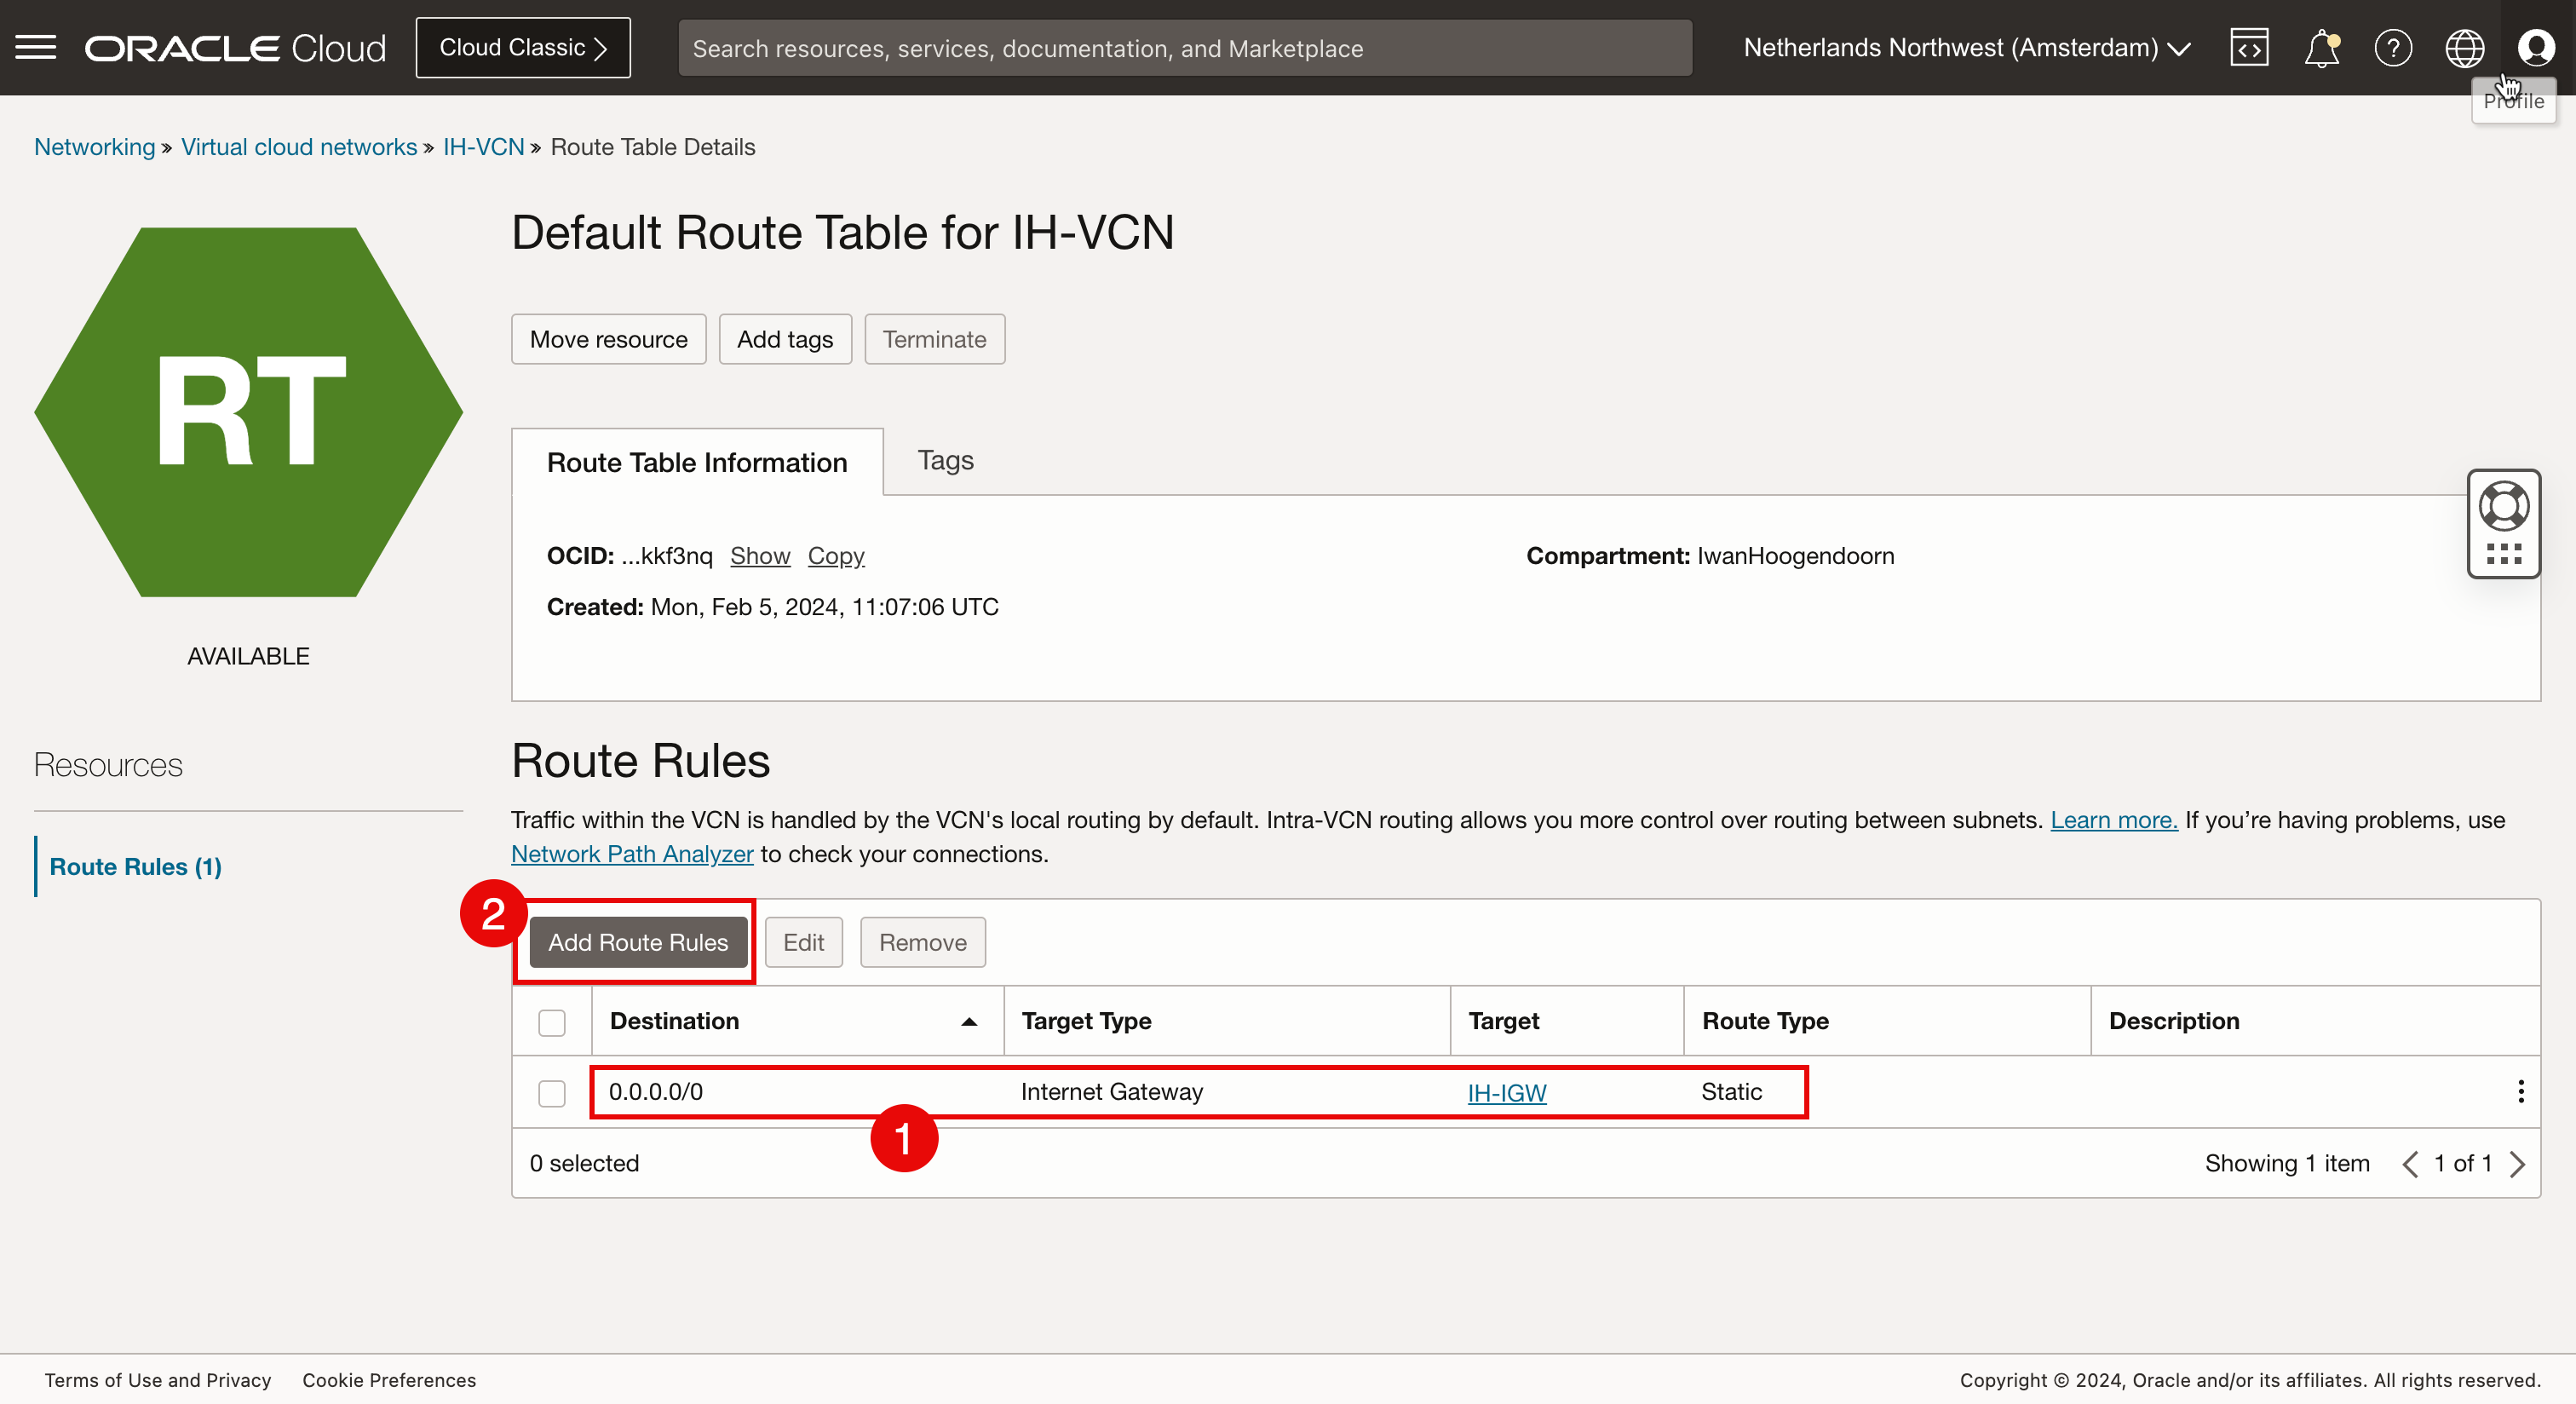
- 請注意,已建立新的 IPv4 預設路由規則。
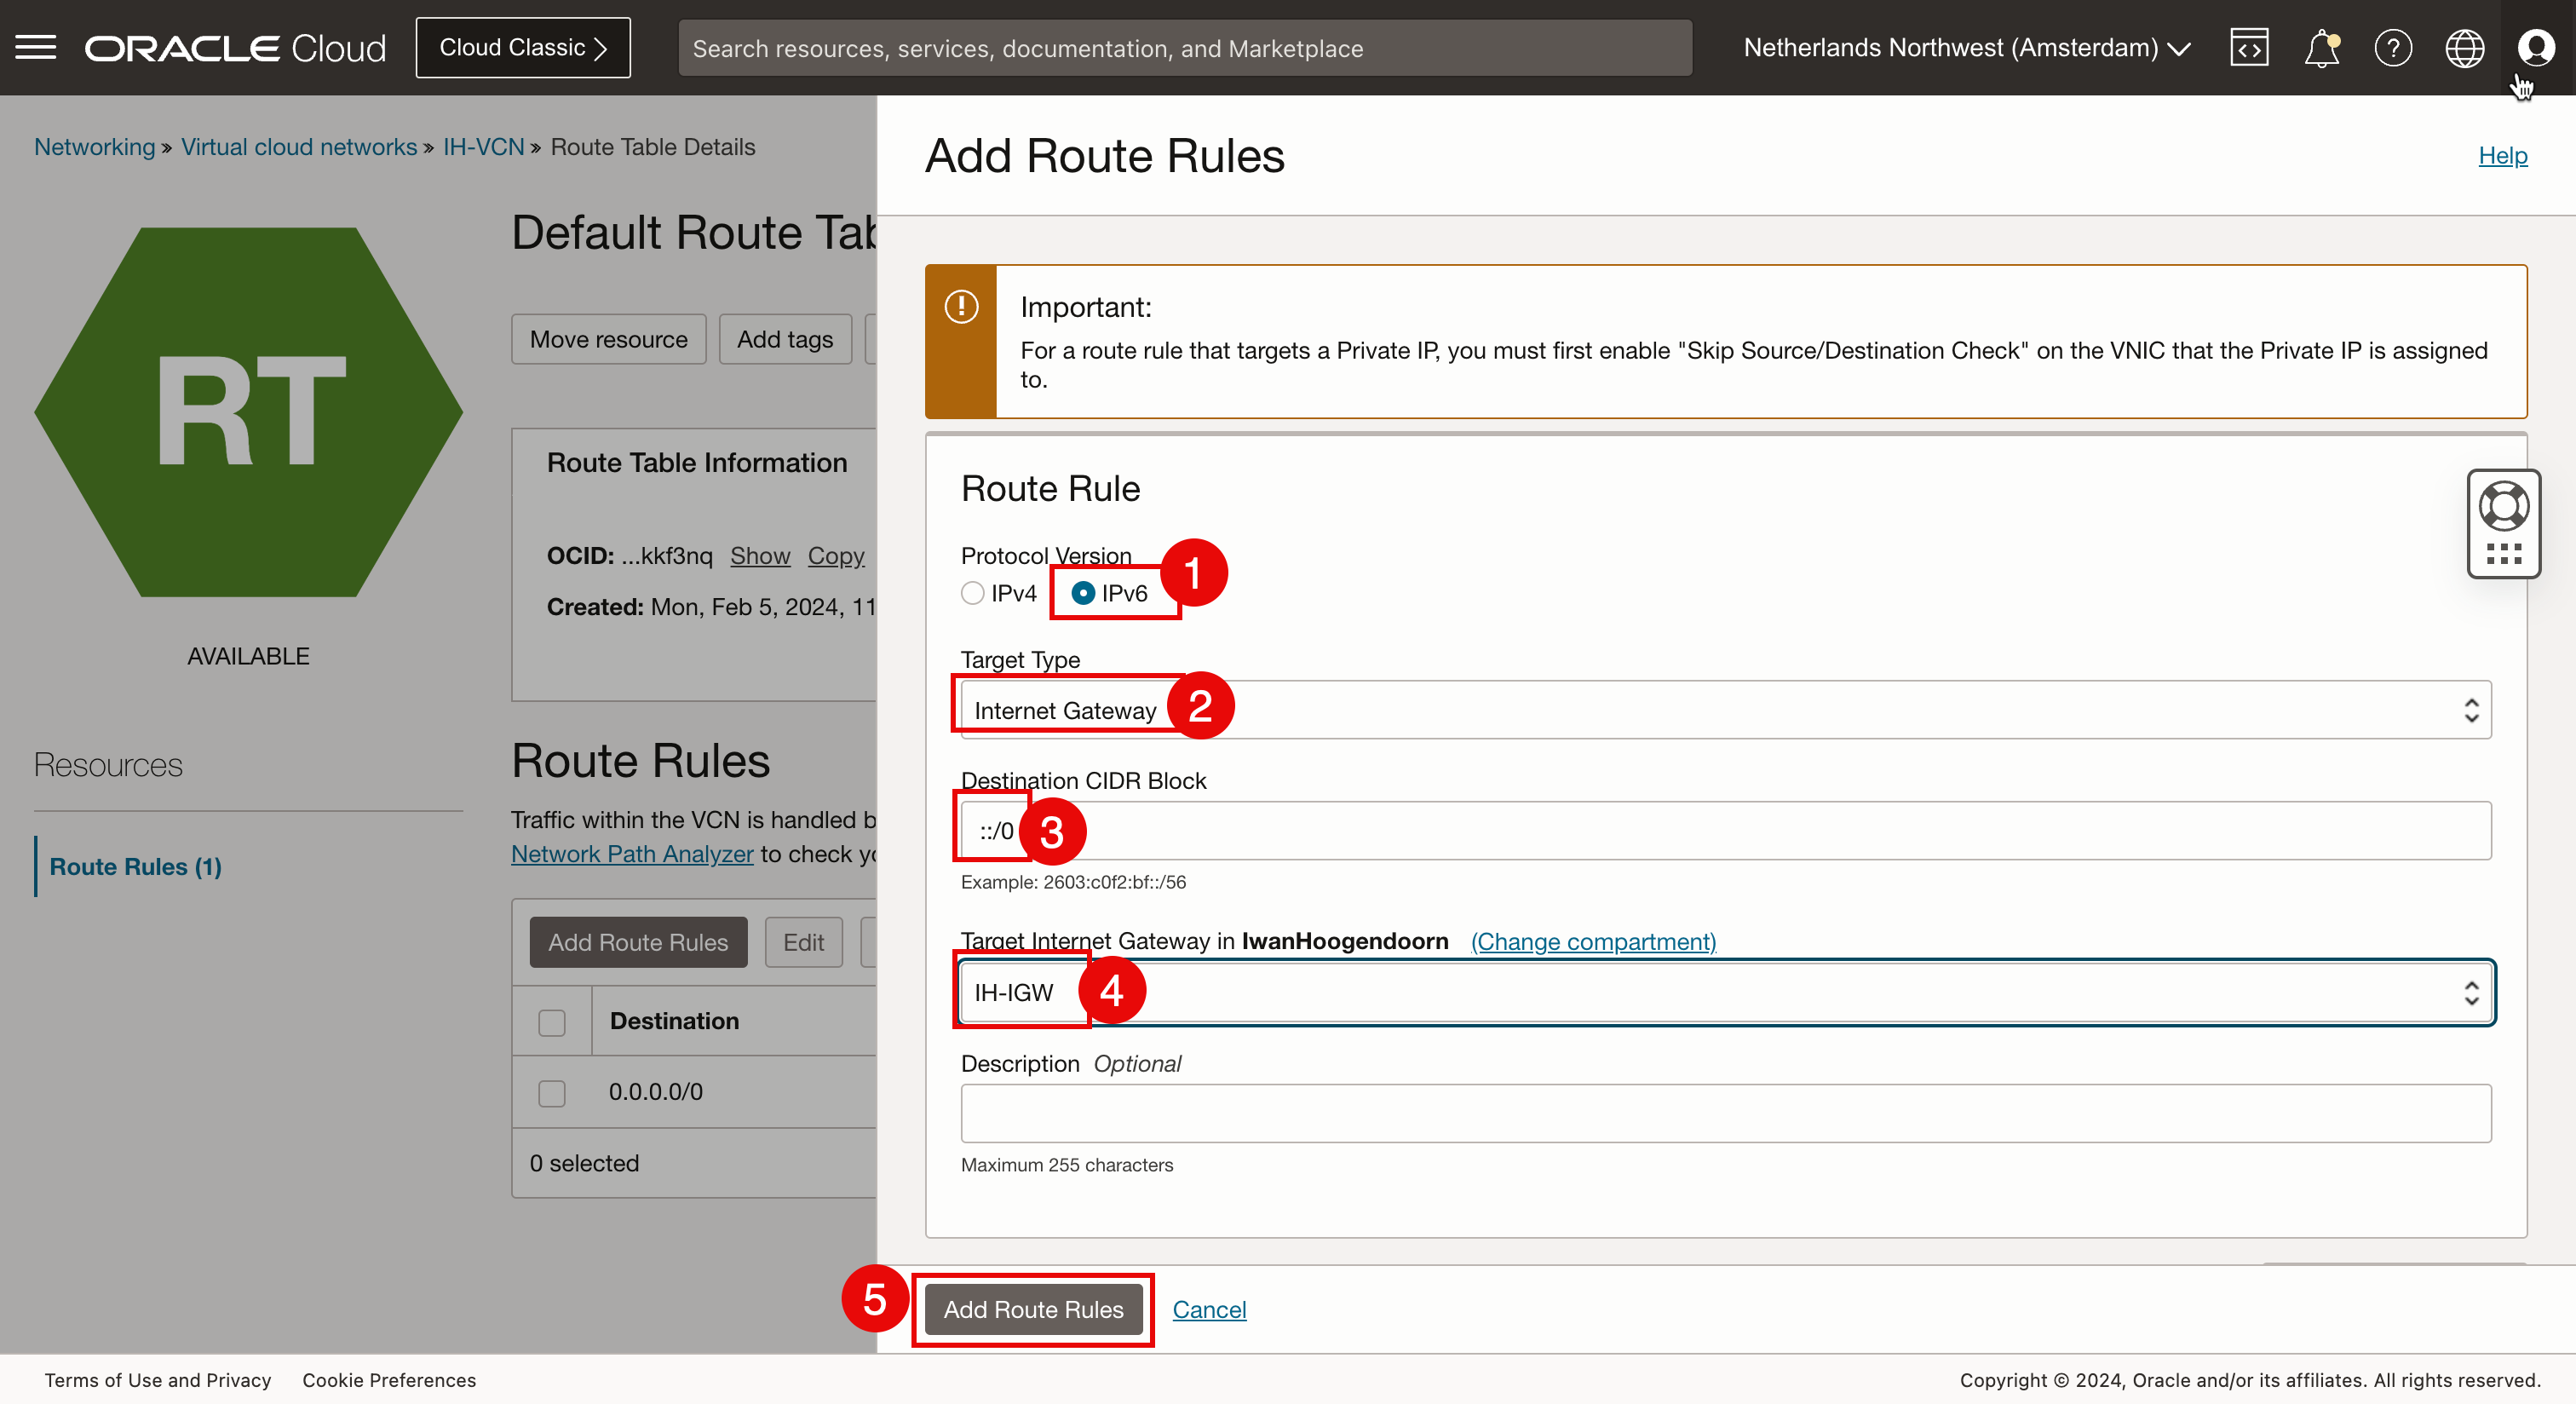
- 若要遞送 IPv6 網際網路流量,我們還需要建立新的 IPv6 預設網際網路規則。再按一下新增路由規則。
- 協定版本:選取 IPv6 。
- 目標類型:選取網際網路閘道。
- 目的地 CIDR 區塊:對於此教學課程,請選取
:/0,因為我們希望所有預設的 IPv6 網路流量都會移至網際網路閘道。 - 選取上方在此工作中建立的目標網際網路閘道。
- 按一下新增路由規則。
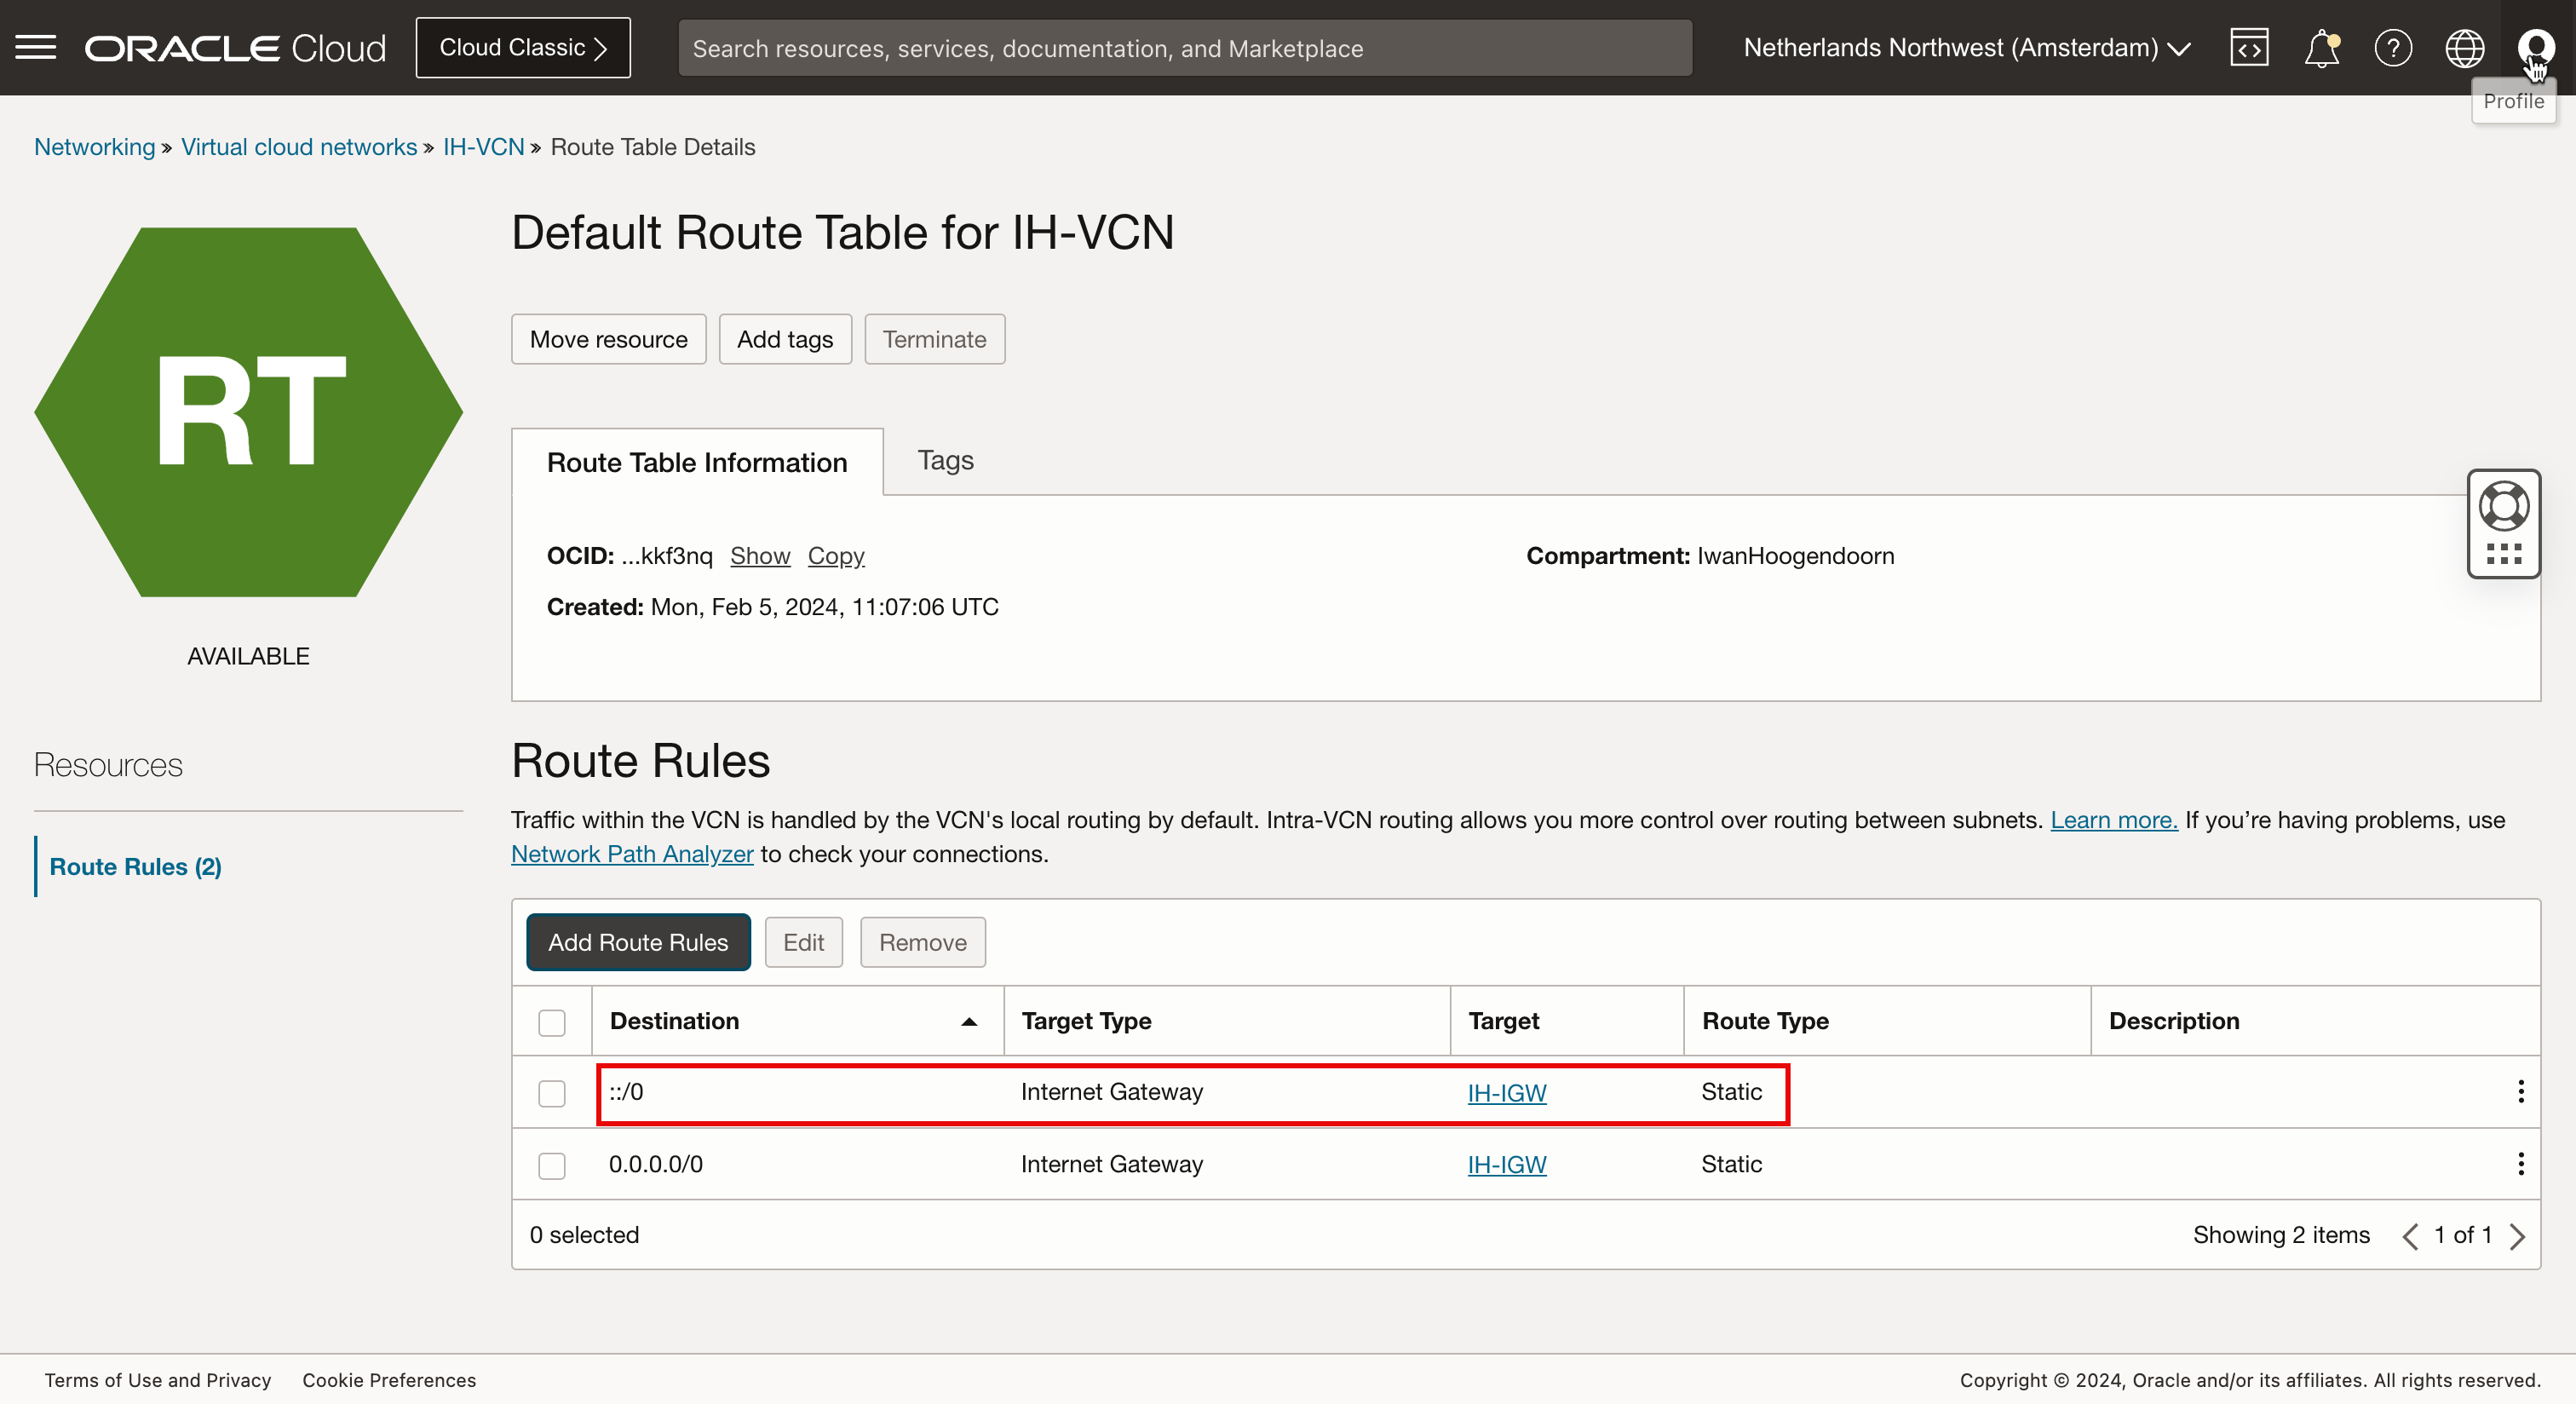
-
請注意,已建立新的 IPv6 預設路由規則。
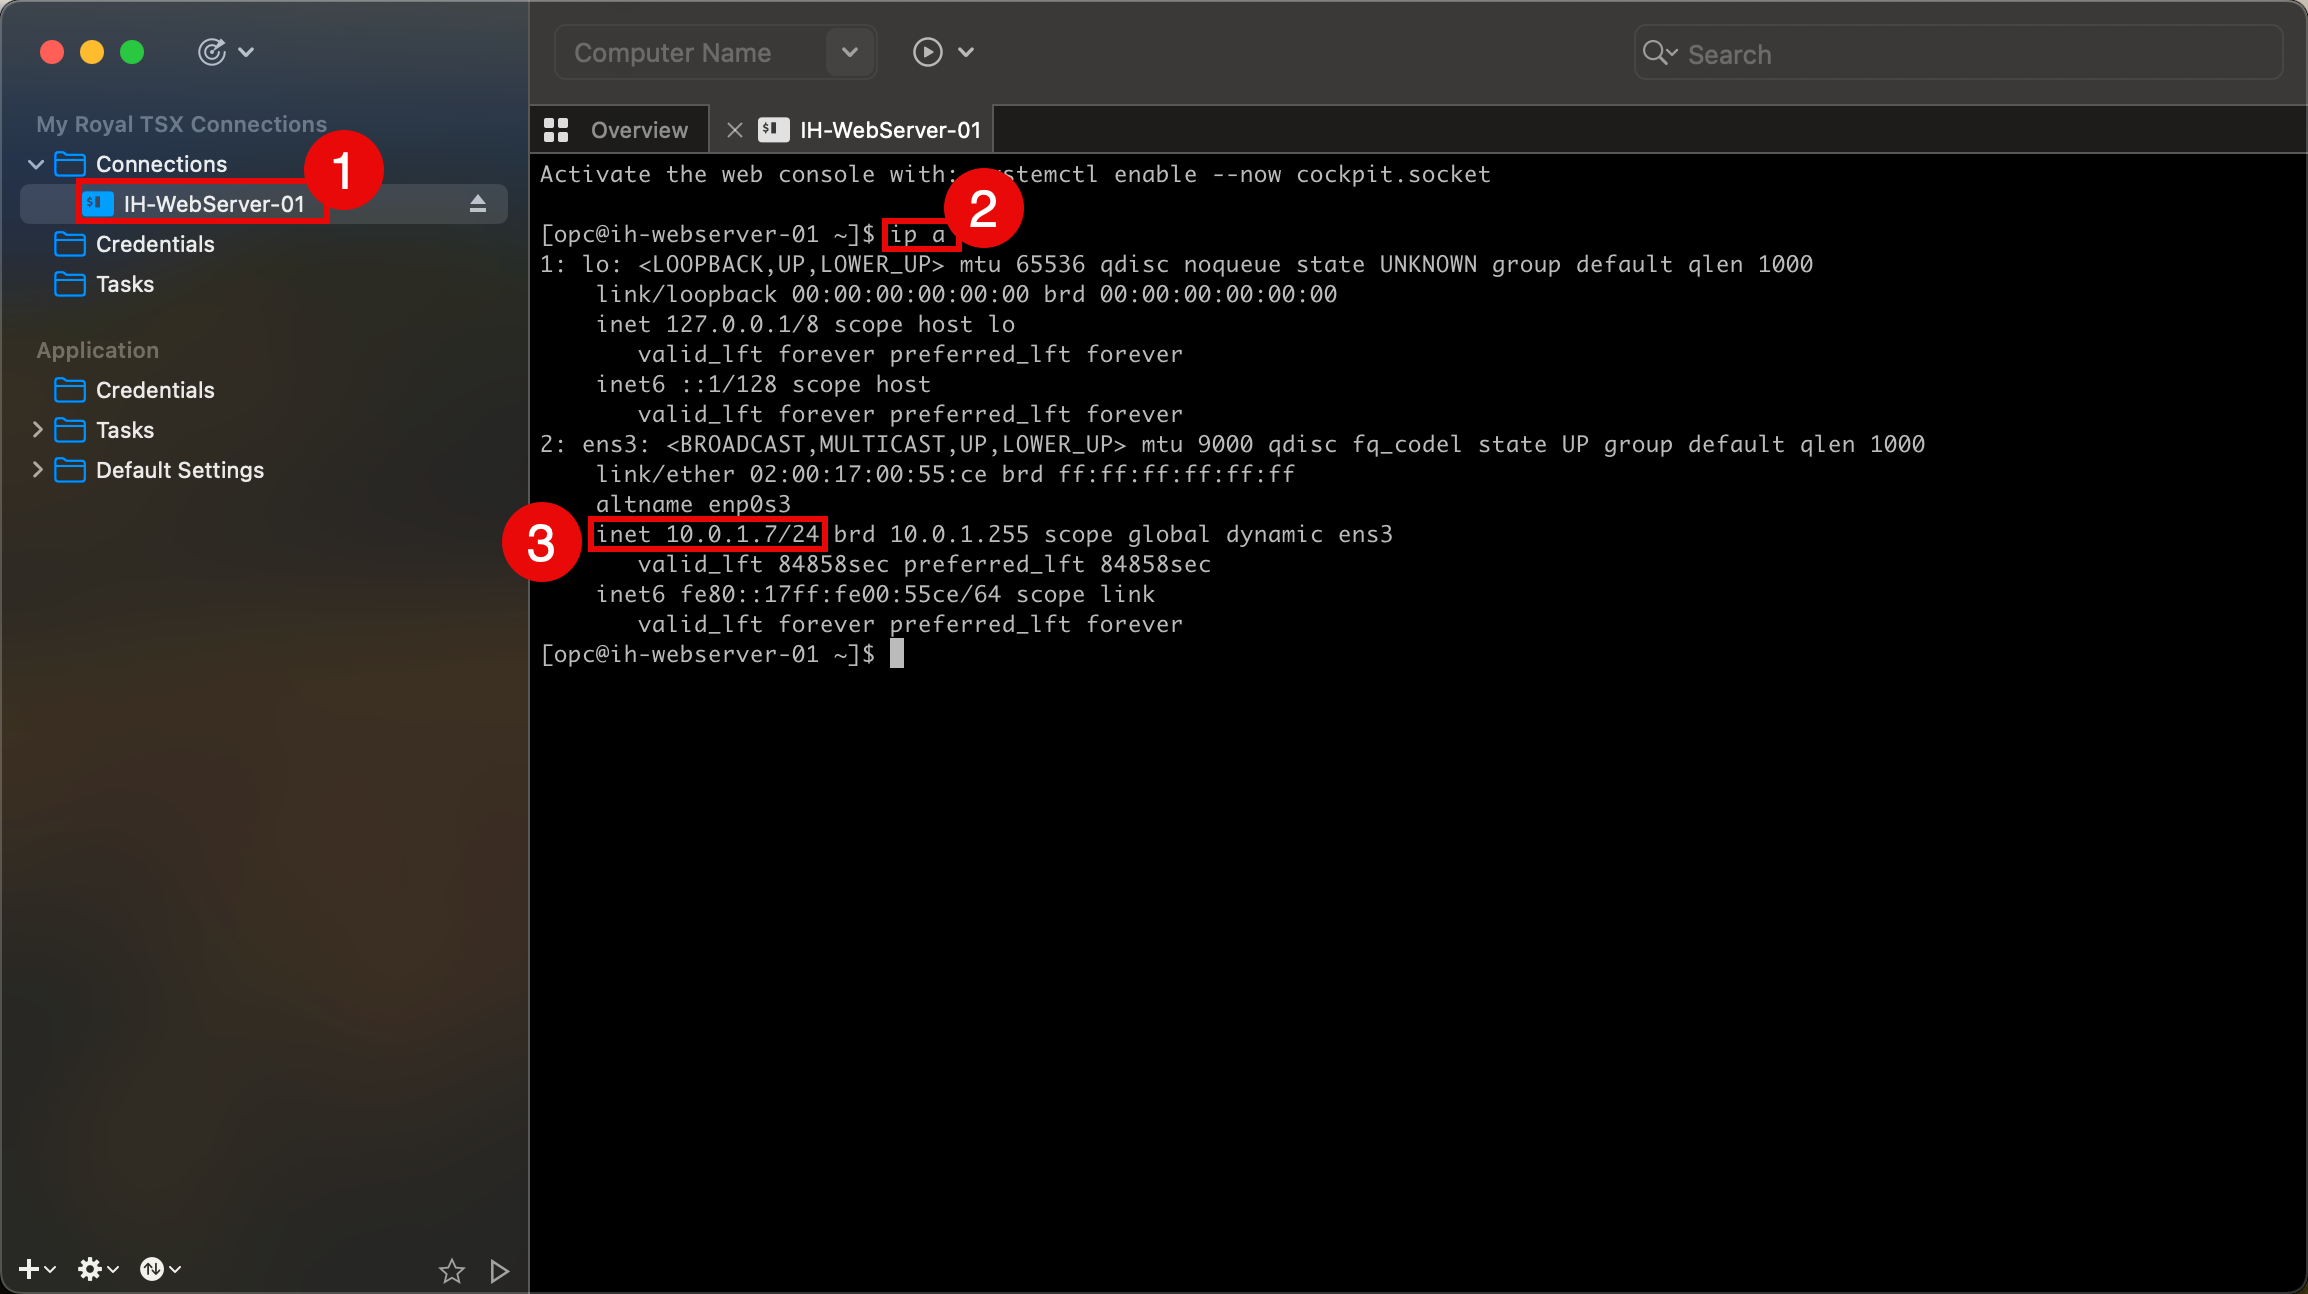
- 我們使用私密金鑰透過 SSH 連線到新建立的執行處理。
- 順利建立連線之後,請執行
ip a命令來驗證 IP 位址。 - 請注意,專用 IPv4 位址與提供給執行處理詳細資訊的位址相同。
- 我們也使用 macOS CLI 終端機測試連線,然後執行
ssh -i ssh-key-2024-02-05.key opc@xxx.xxx.xxx.48命令。 - 順利建立連線之後,請執行
ip a命令來驗證 IP 位址。 - 請注意,專用 IPv4 位址與提供給 OCI 主控台中執行處理詳細資訊的位址相同。
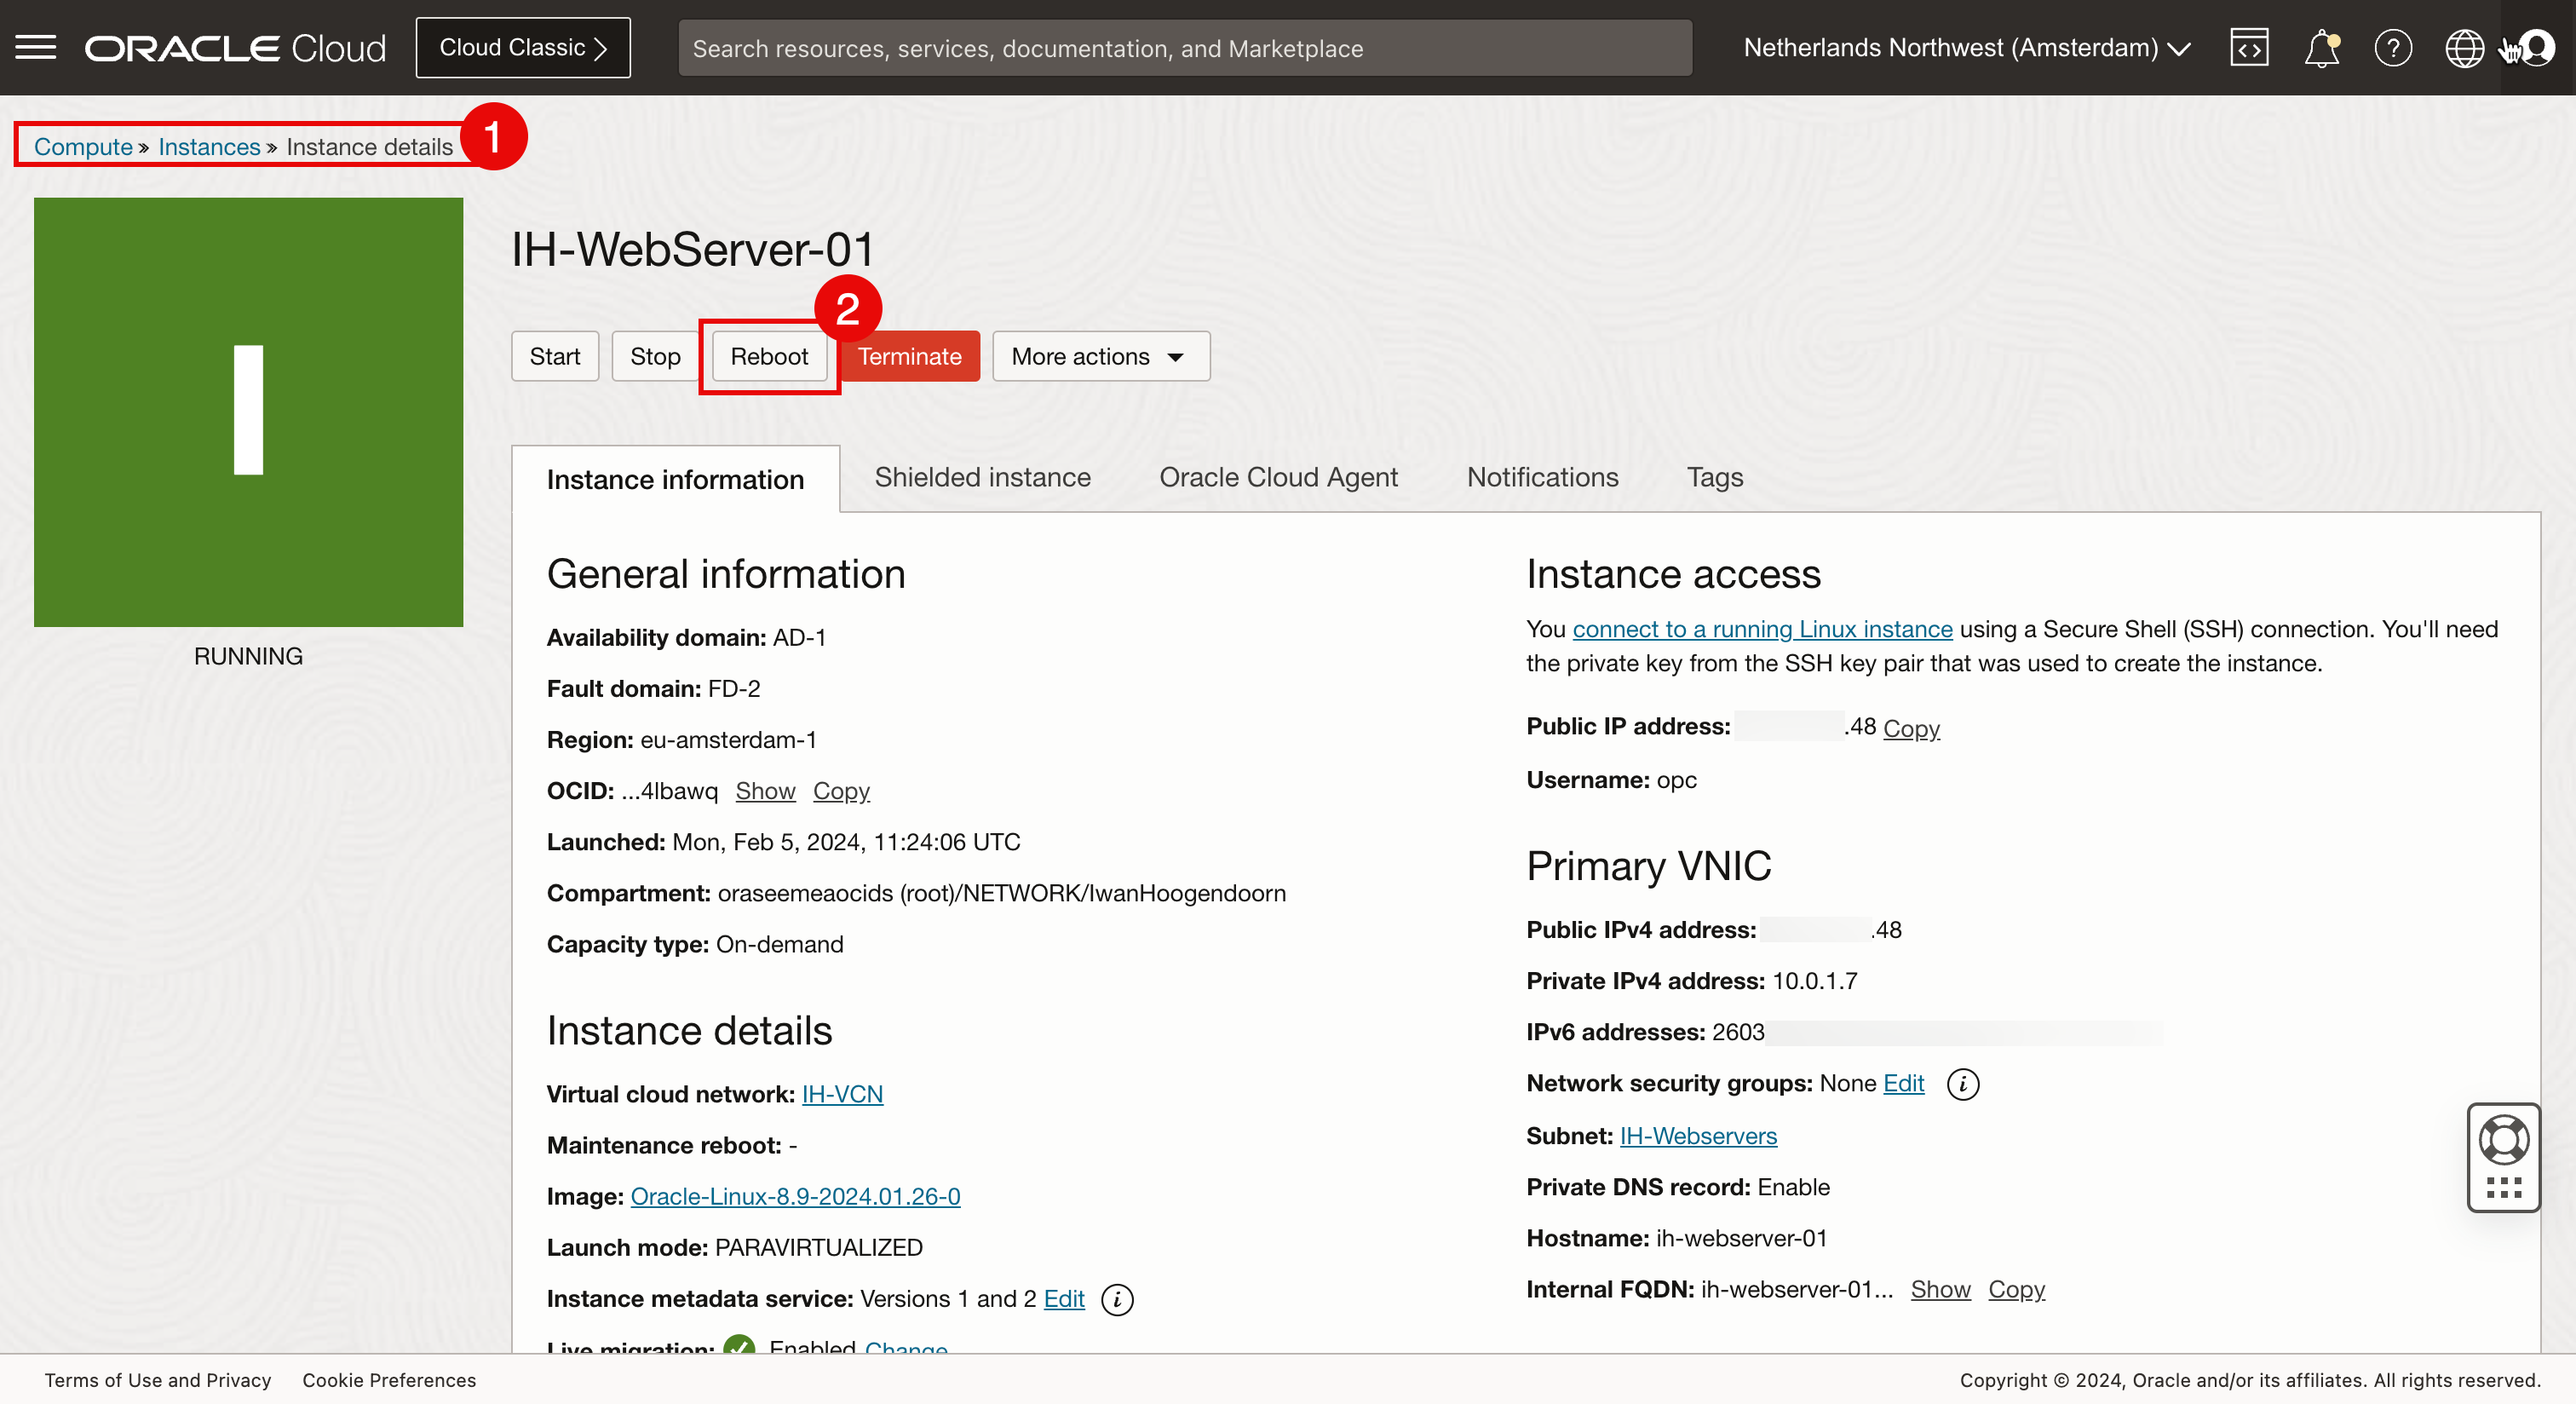
請注意,執行處理沒有為 OCI 主控台中的執行處理詳細資訊提供的 IPv6 位址。

-
執行執行處理重新啟動即可修正此問題。
- 瀏覽至執行處理。
- 按一下重新開機。
- 使用私密金鑰透過 SSH 再次連線至執行處理。
- 順利建立連線之後,請執行
ip a命令來驗證 IP 位址。 - 請注意,專用 IPv4 位址與執行處理詳細資訊中提供的位址相同。
- 請注意,專用 IPv6 位址與執行處理詳細資訊中提供的位址相同。
- 為了測試與網際網路的連線,我們也會偵測 Google DNS 伺服器之一的 IPv6 IP 位址。
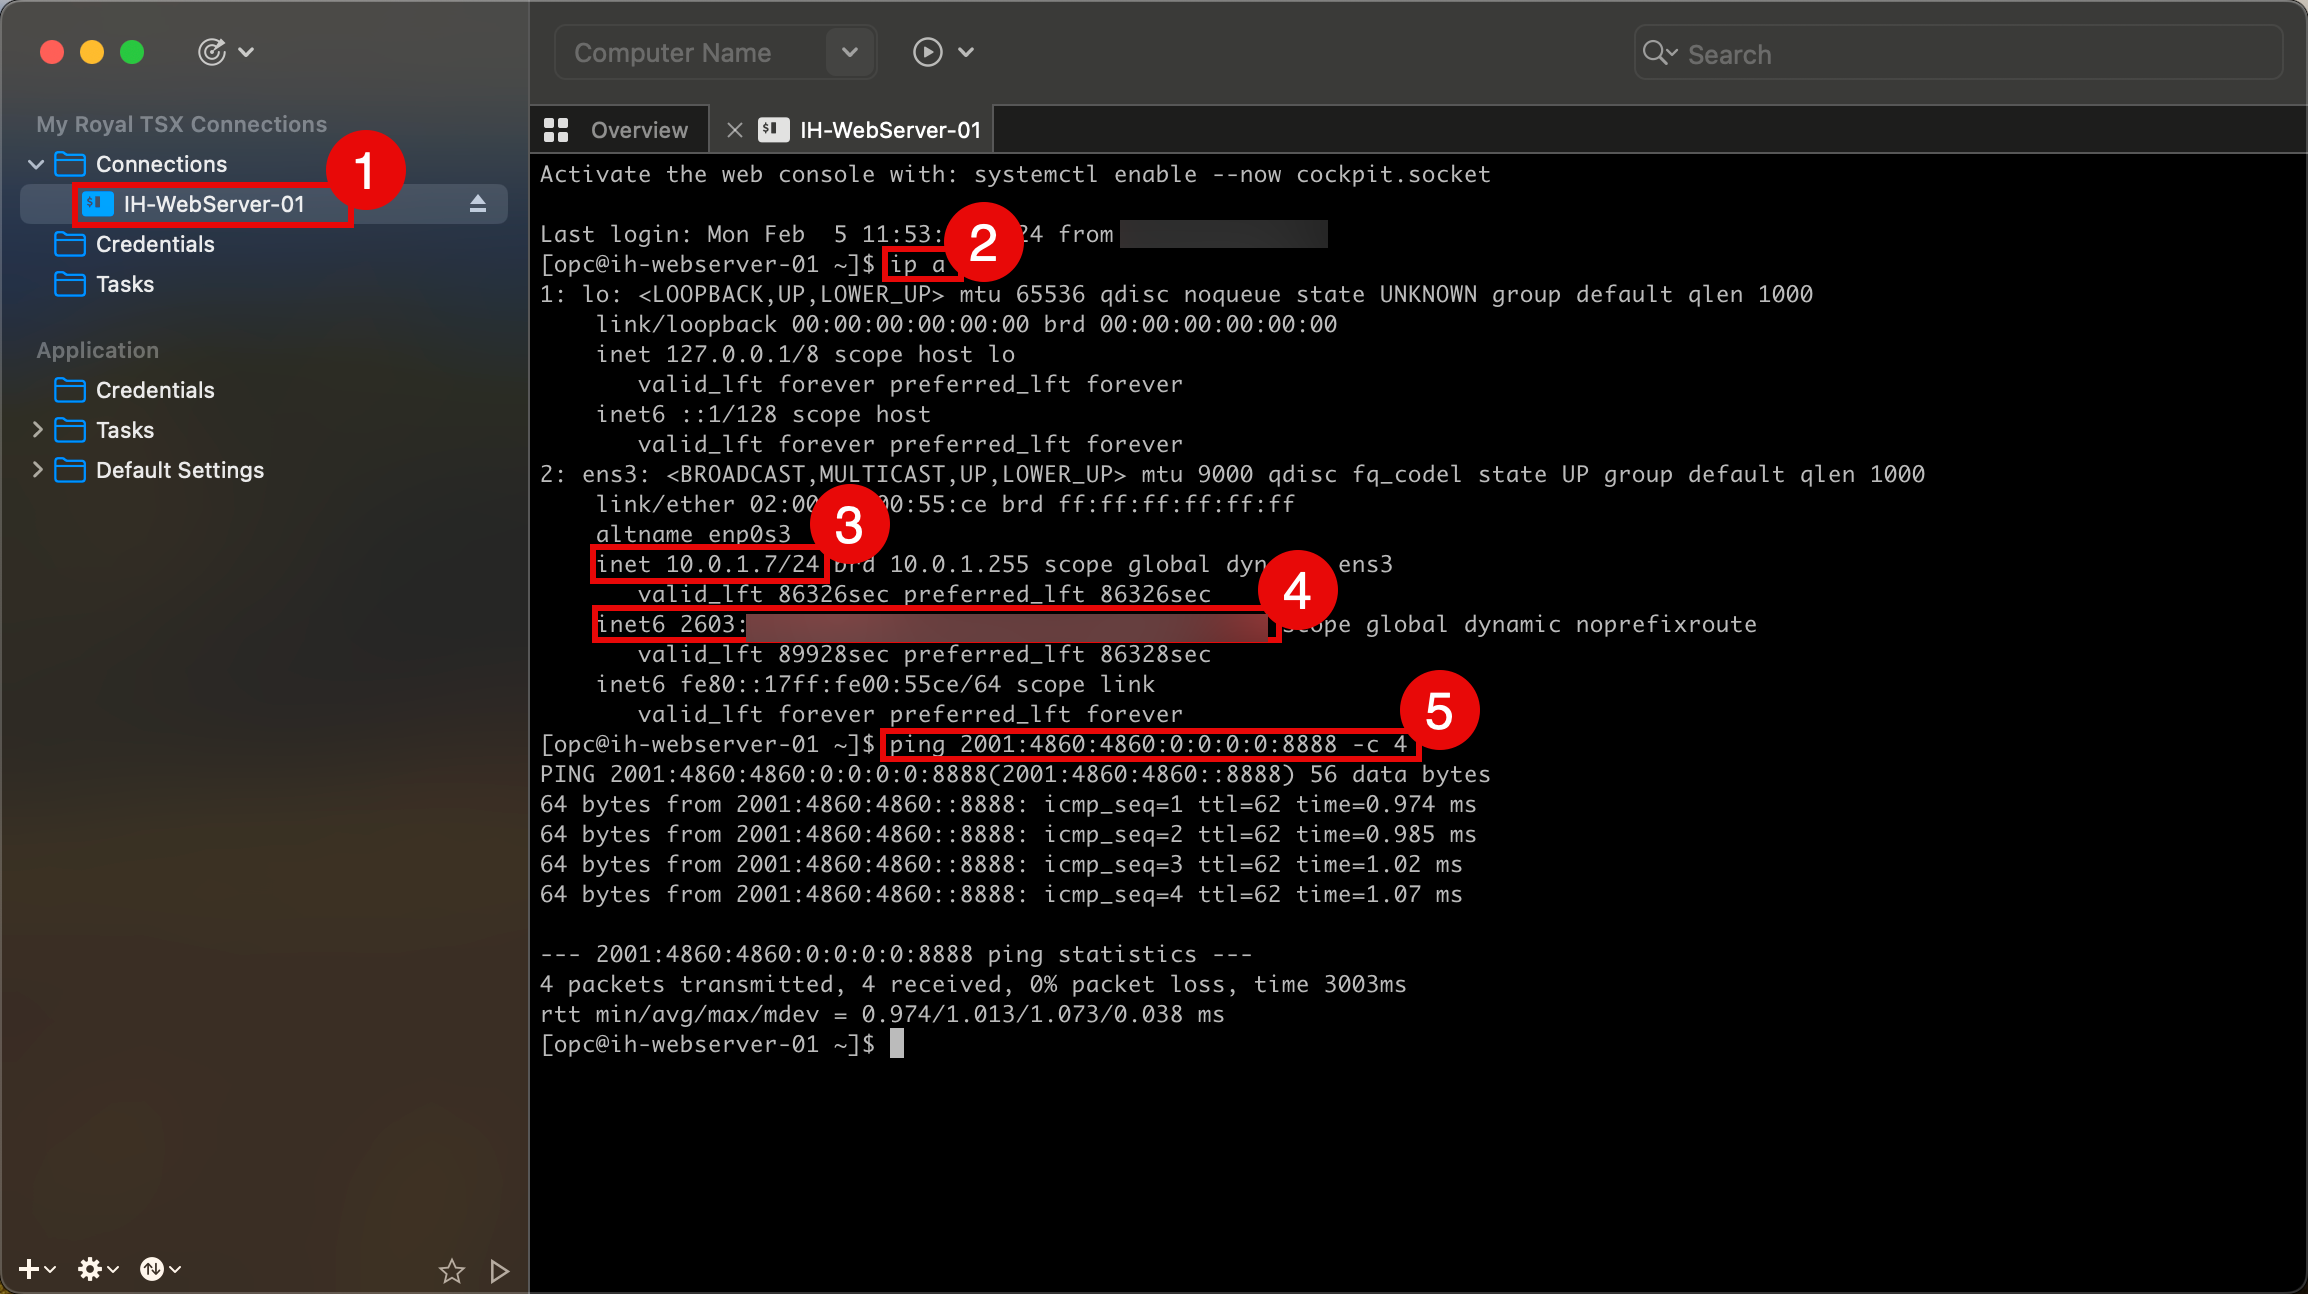
- 進行快速測試,以查看是否可以使用 IPv6 位址連線至執行處理。執行要測試的
ssh -i ssh-key-2024-02-05.key opc@2603:xxxx:xxxx:xxxx:xxxx:xxxx:xxxx:xxxx命令。 - 順利建立連線之後,請執行
ip a命令來驗證 IP 位址。 - 請注意,專用 IPv4 位址與執行處理詳細資訊中提供的位址相同。
- 請注意,專用 IPv6 位址與執行處理詳細資訊中提供的位址相同。

作業 5:預設安全清單上的開啟 HTTP 與 HTTPS
建立新的 VCN 時,會在該 VCN 內的子網路套用預設安全清單。依照預設,ICMP 和 SSH 允許內送 (傳入)。我們必須將 HTTP 和 HTTPS 新增至該清單,以允許 Web 伺服器的內送流量。
-
按一下漢堡功能表,然後選取虛擬雲端網路。
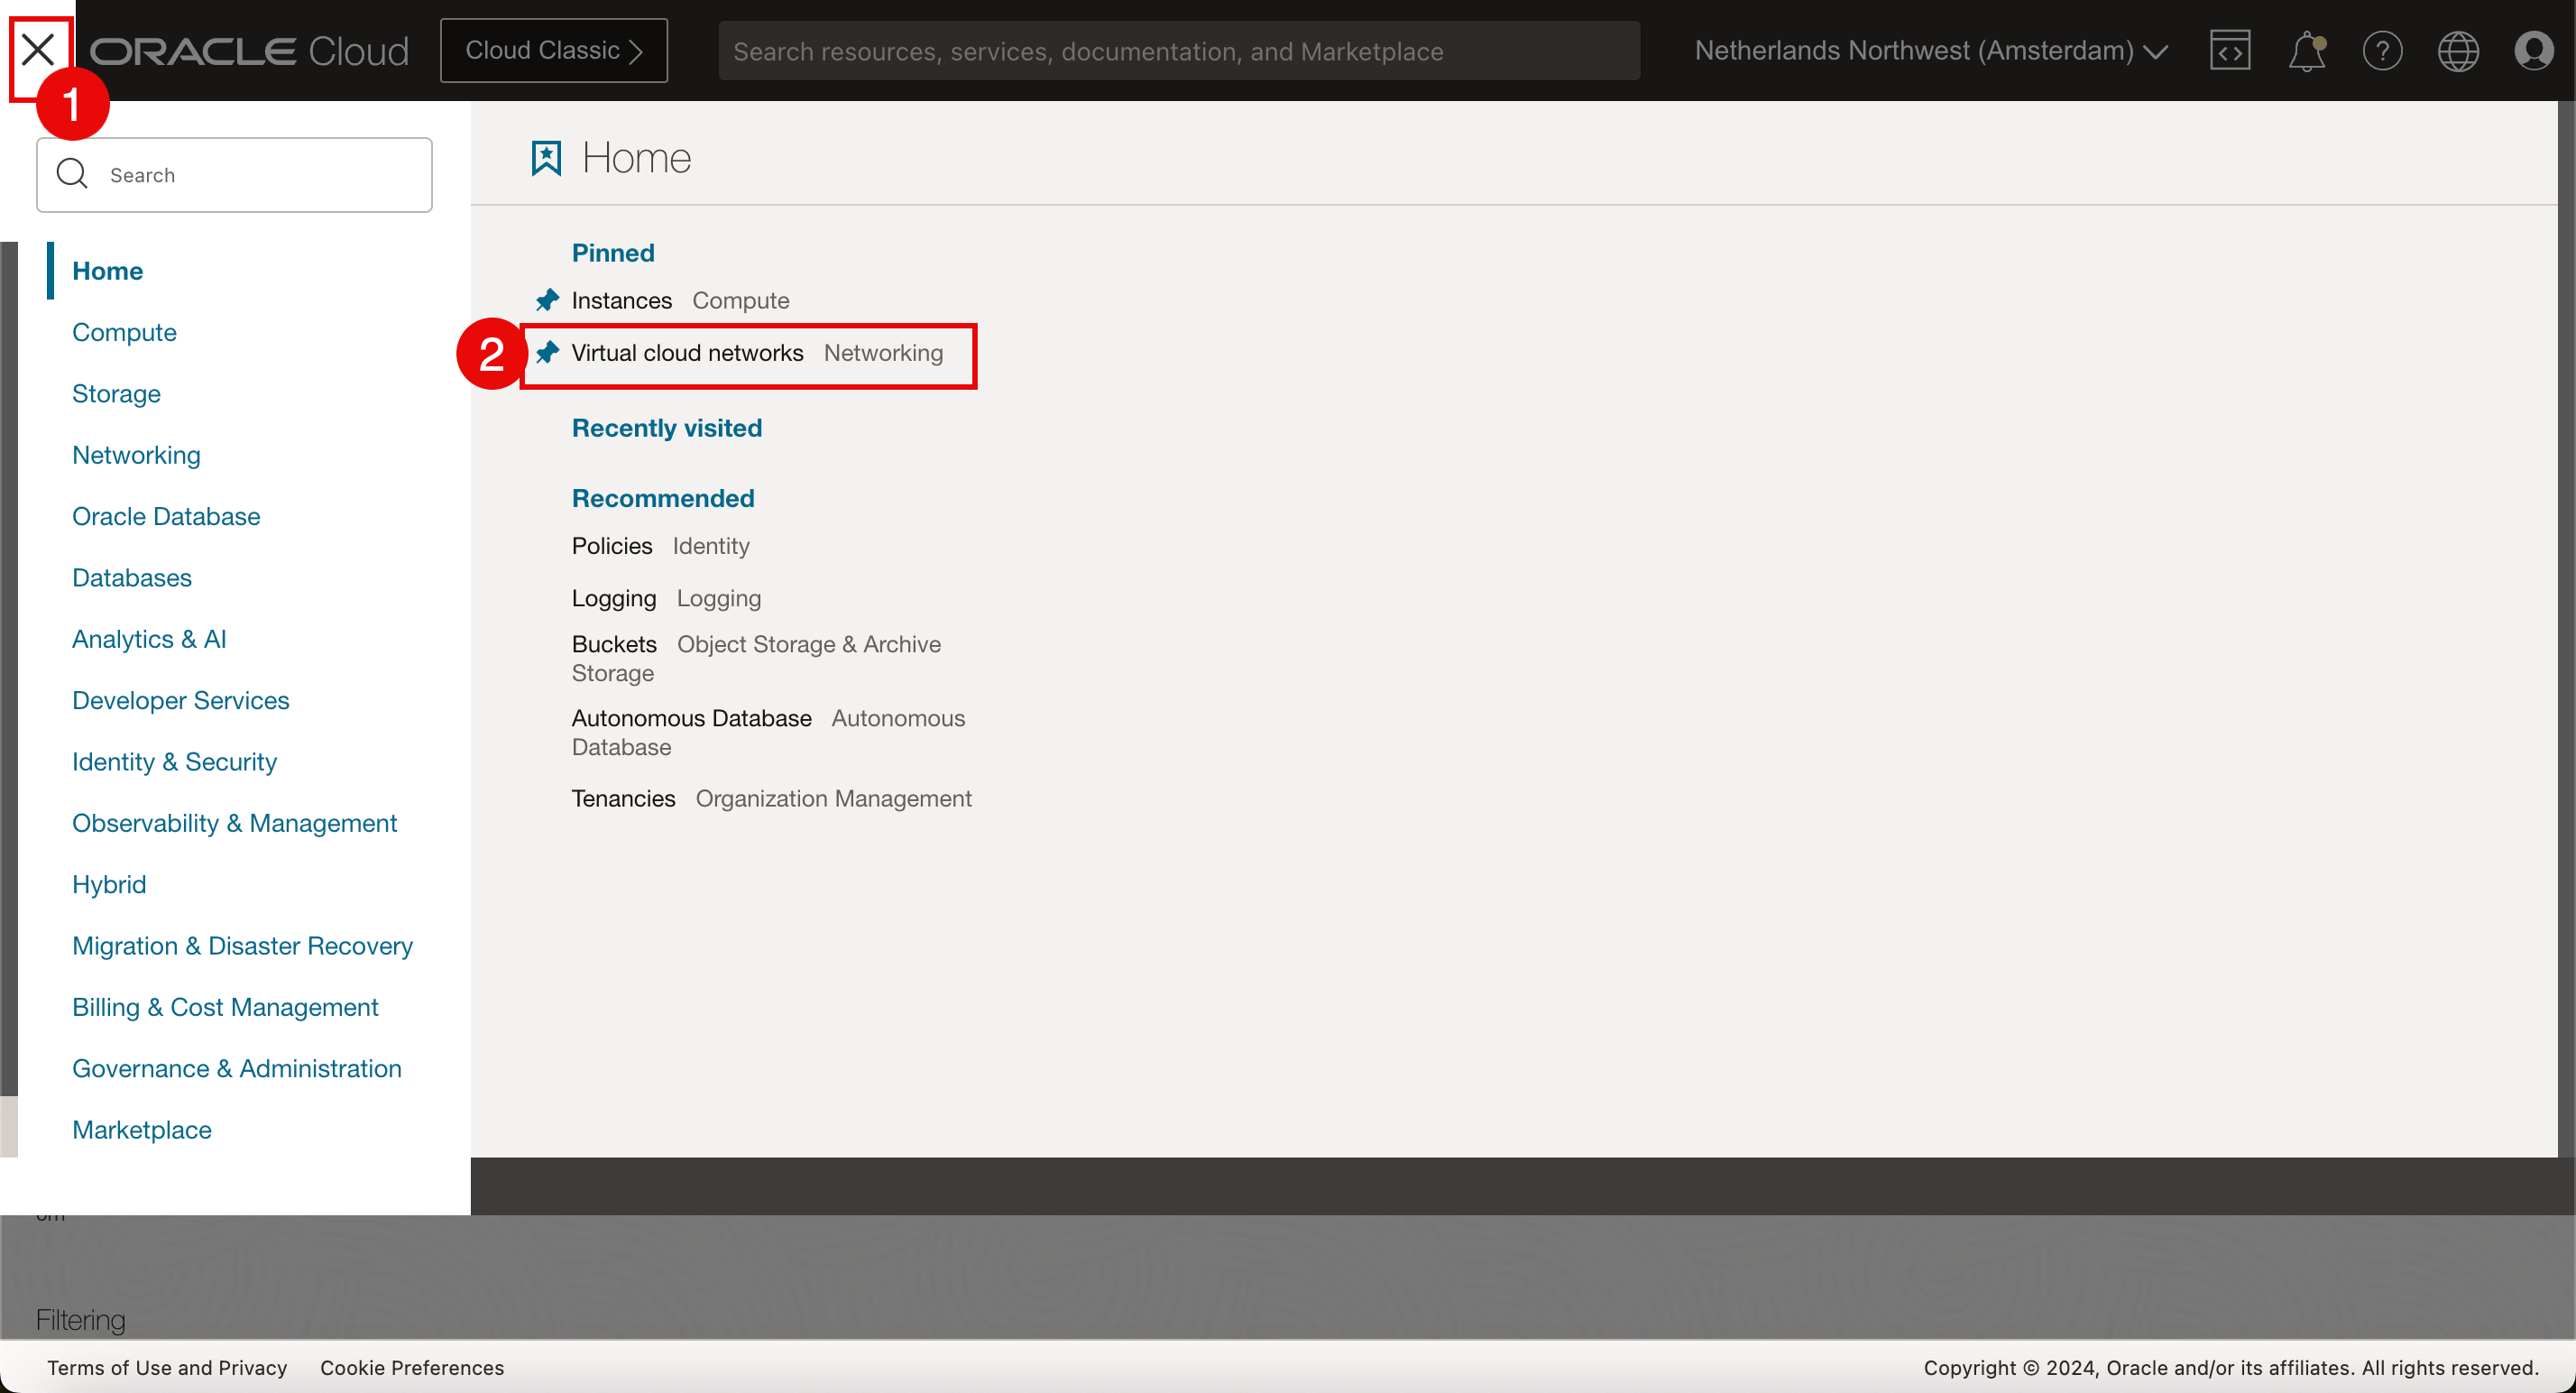
-
按一下作業 1 中建立的 VCN。

-
向下拉清單。

-
按一下安全清單。

-
按一下預設安全清單。
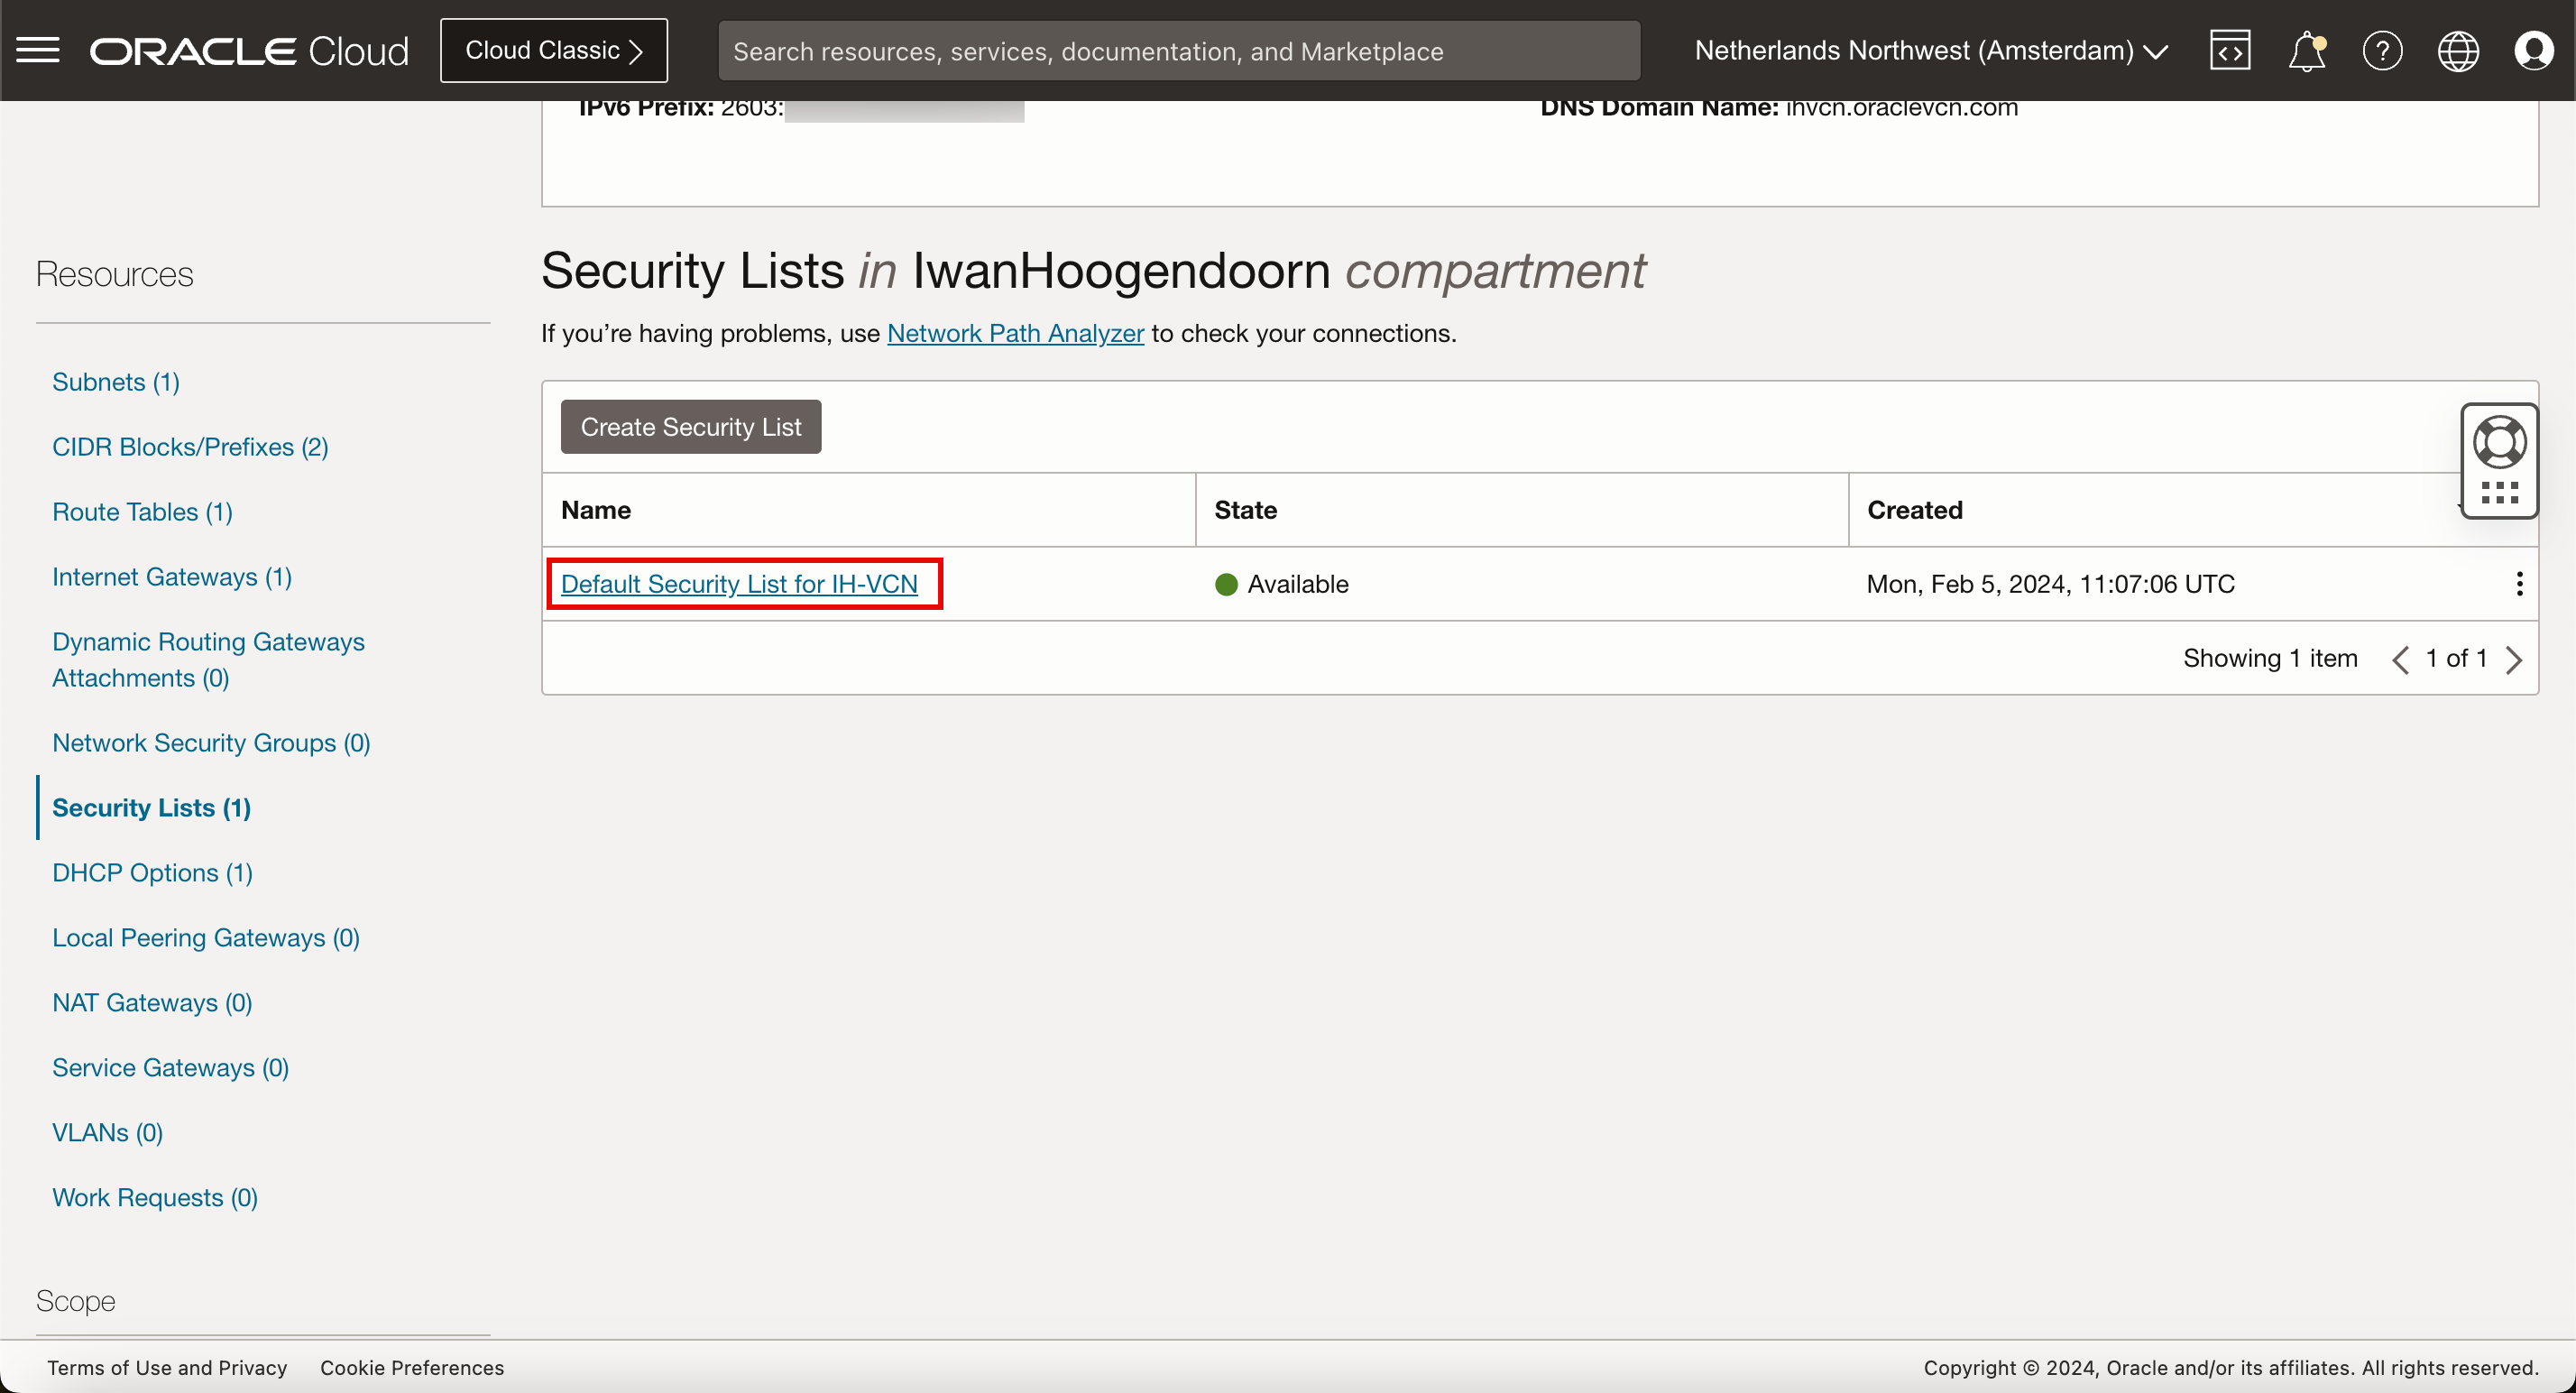
-
按一下新增傳入規則。
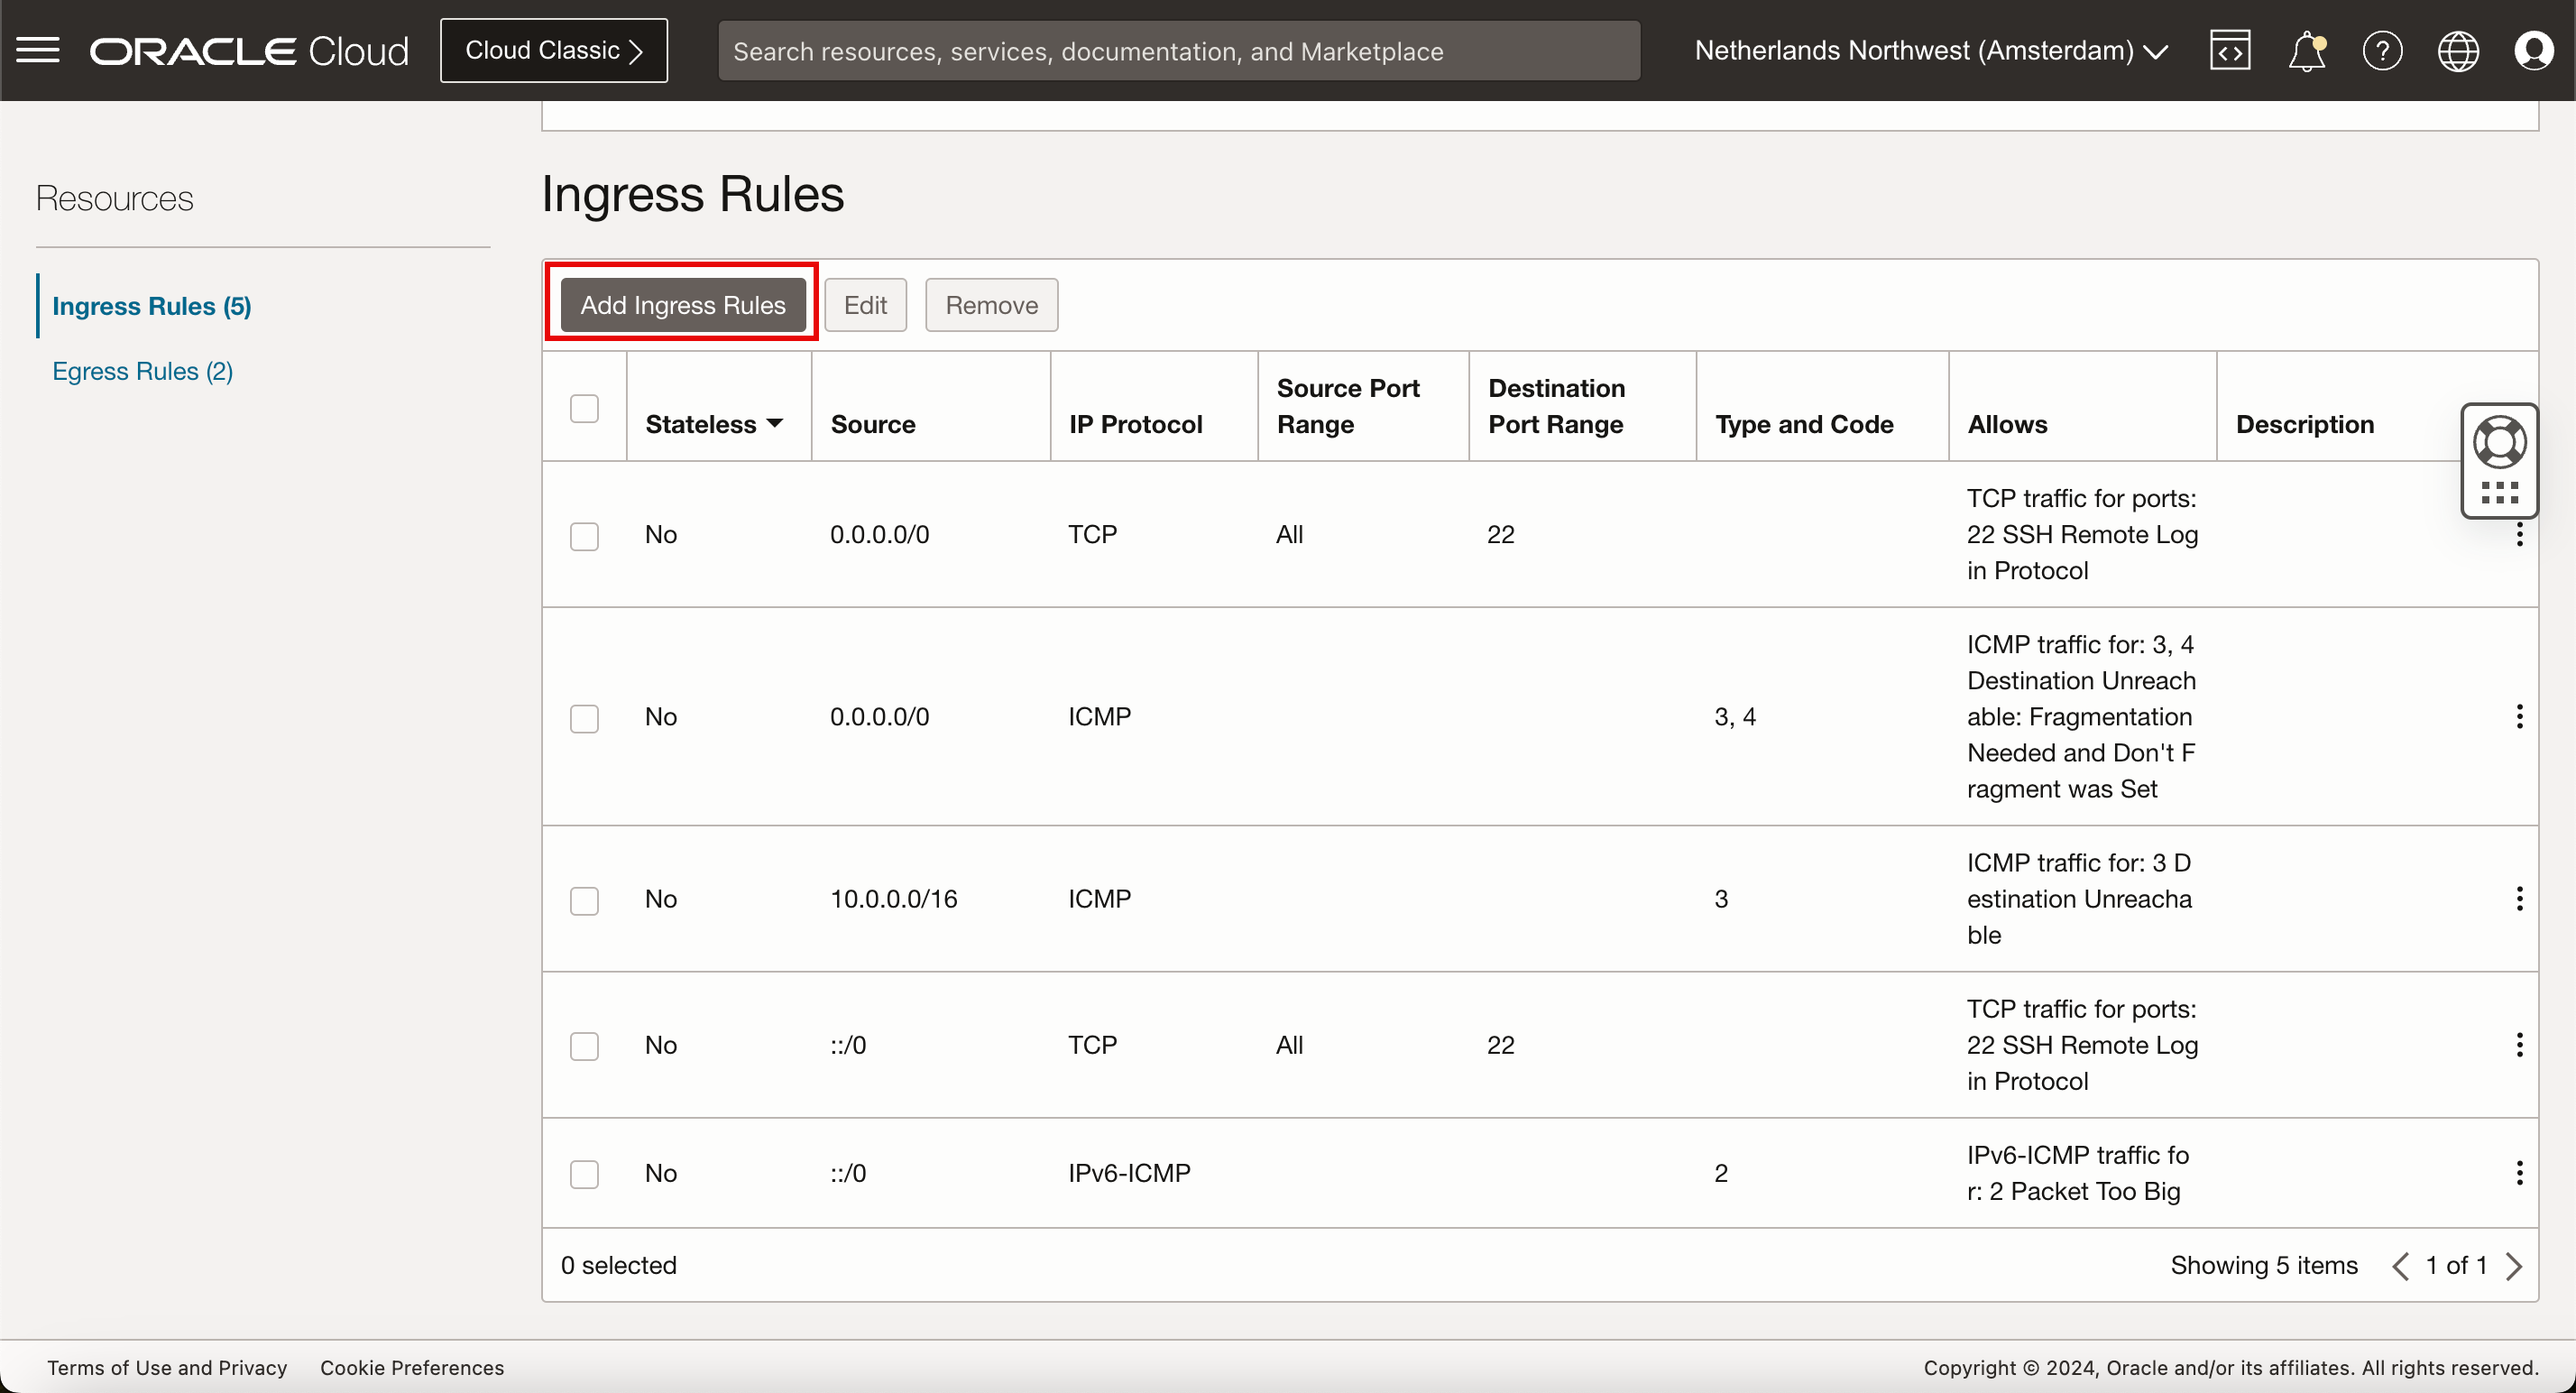
-
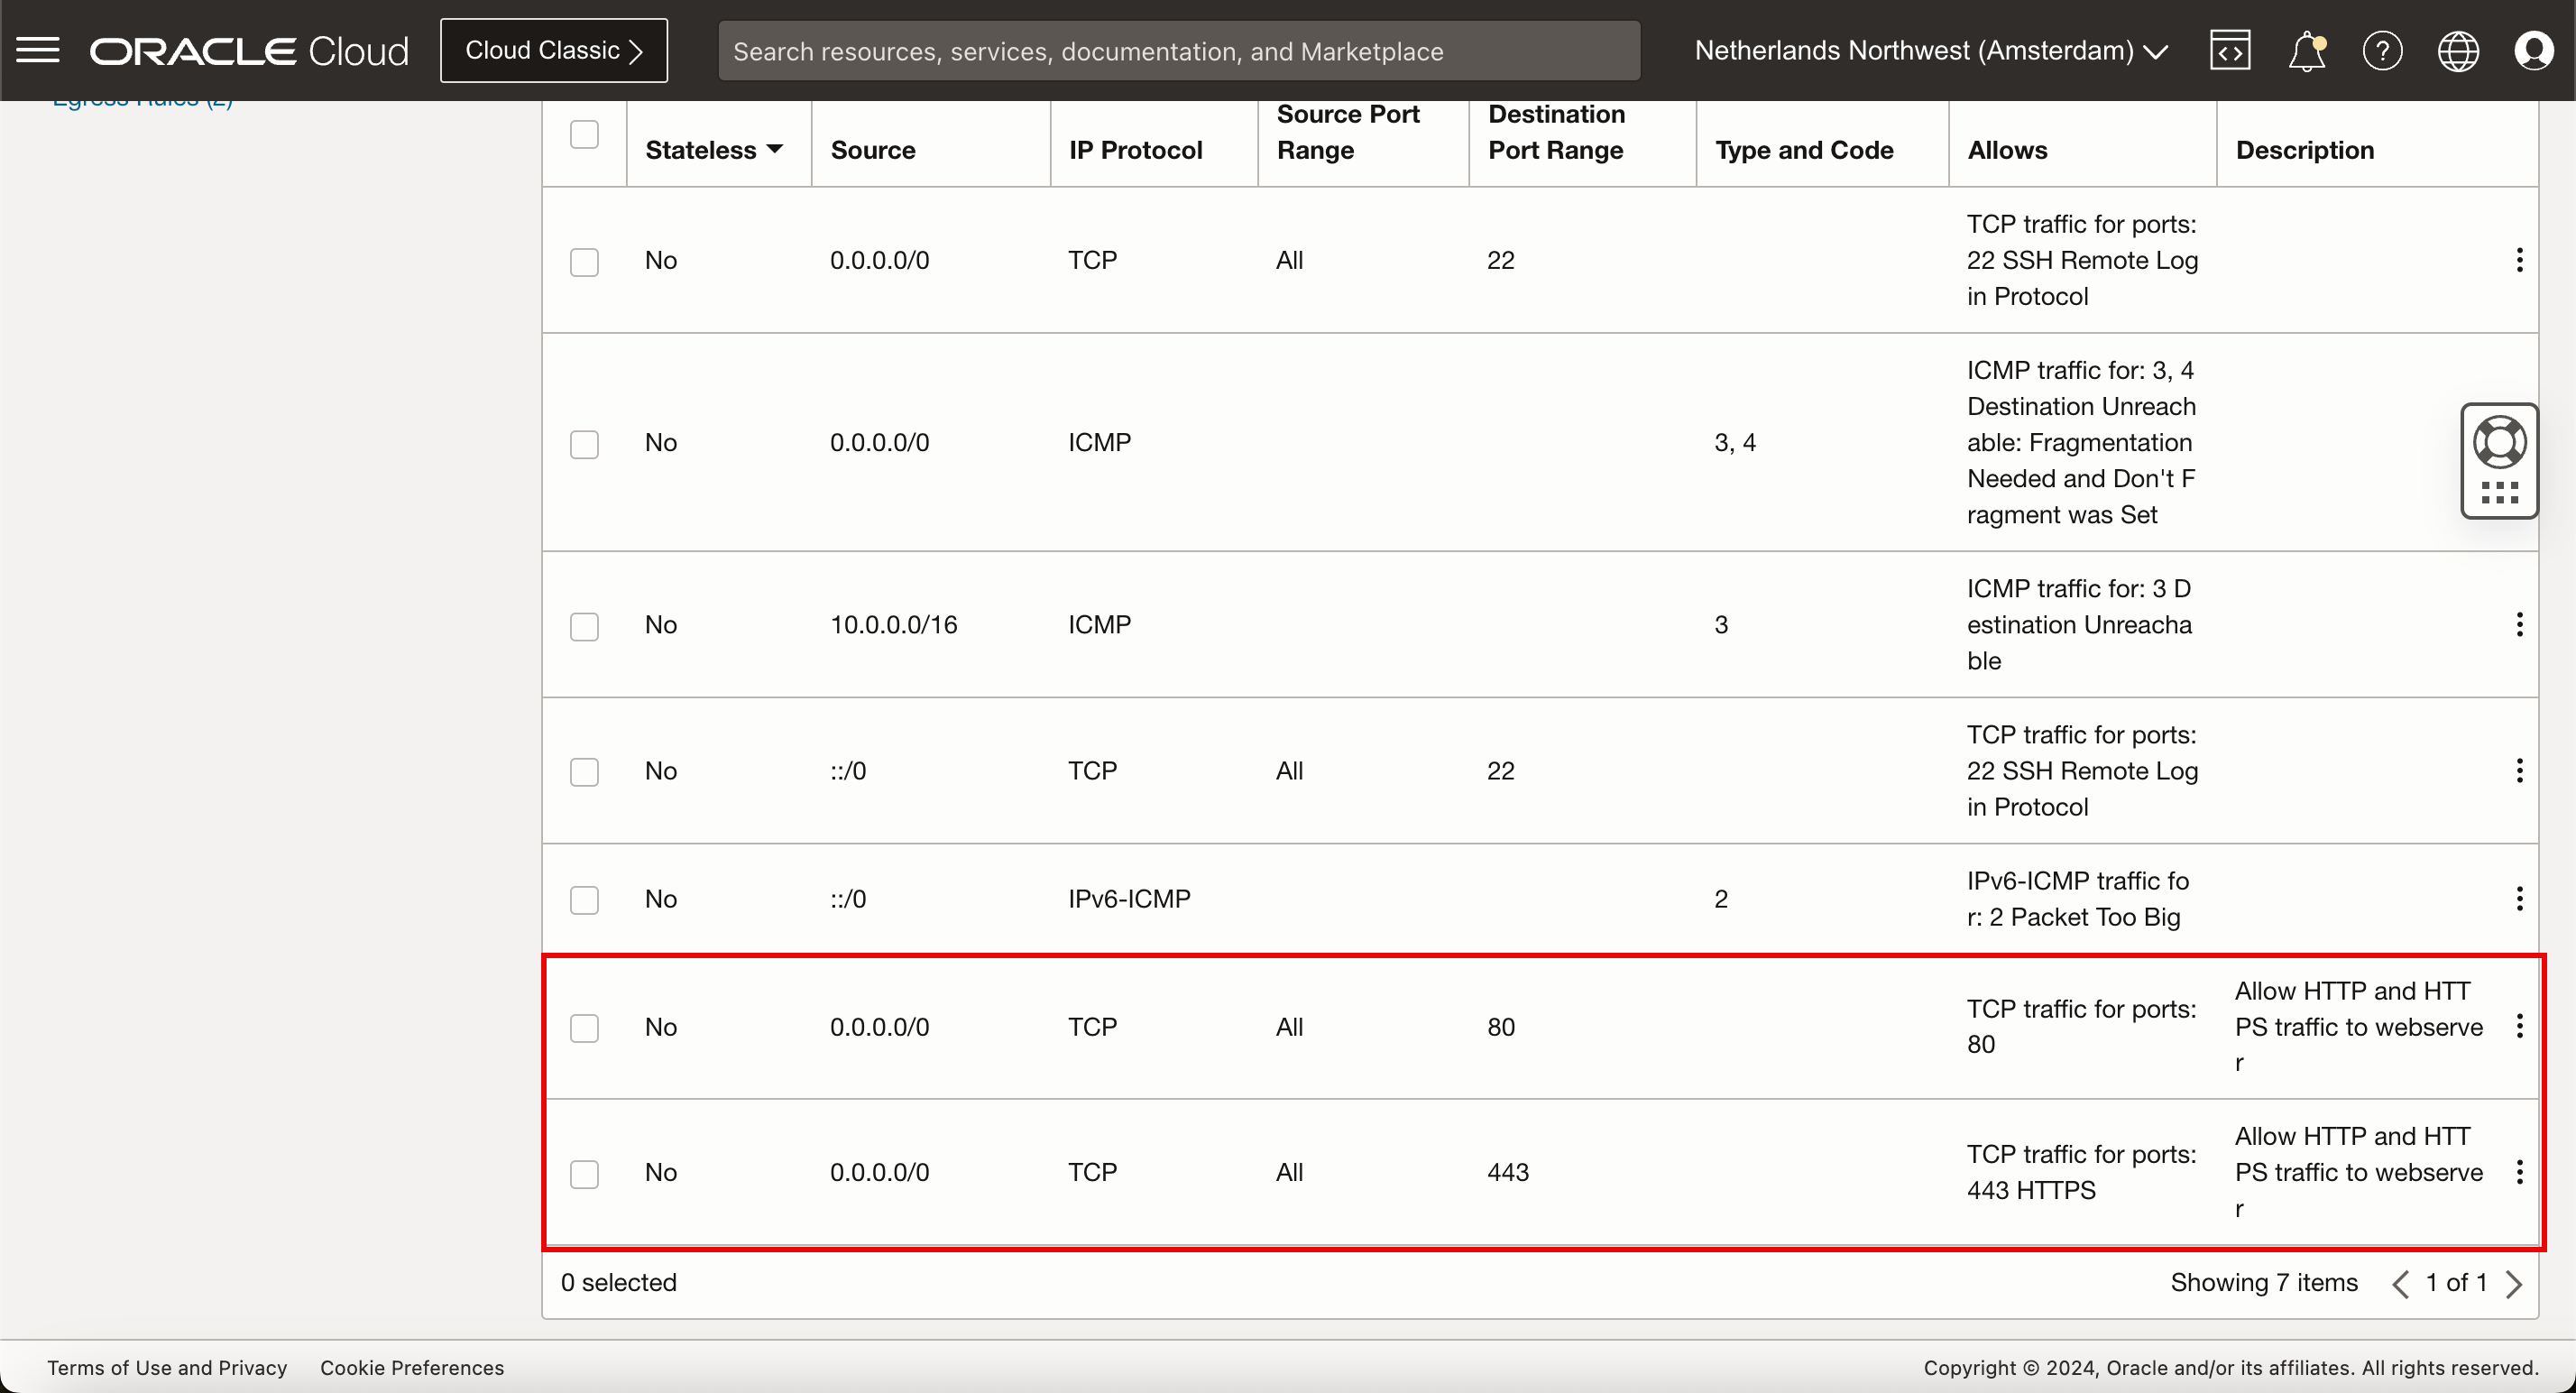
為 IPv4 網路流量新增安全規則。
- 來源類型:選取 CIDR 。
- 來源 CIDR:輸入
0.0.0.0/0。 - IP 協定:選取 TCP 。
- 來源連接埠範圍:保留預設值 (全部)。
- 目的地連接埠範圍:選取
80,443(HTTP 和 HTTPS)。 - 輸入說明。
- 按一下新增傳入規則。

-
請複查 IPv4 安全規則以允許 HTTP 和 HTTPS 流量內送。
-
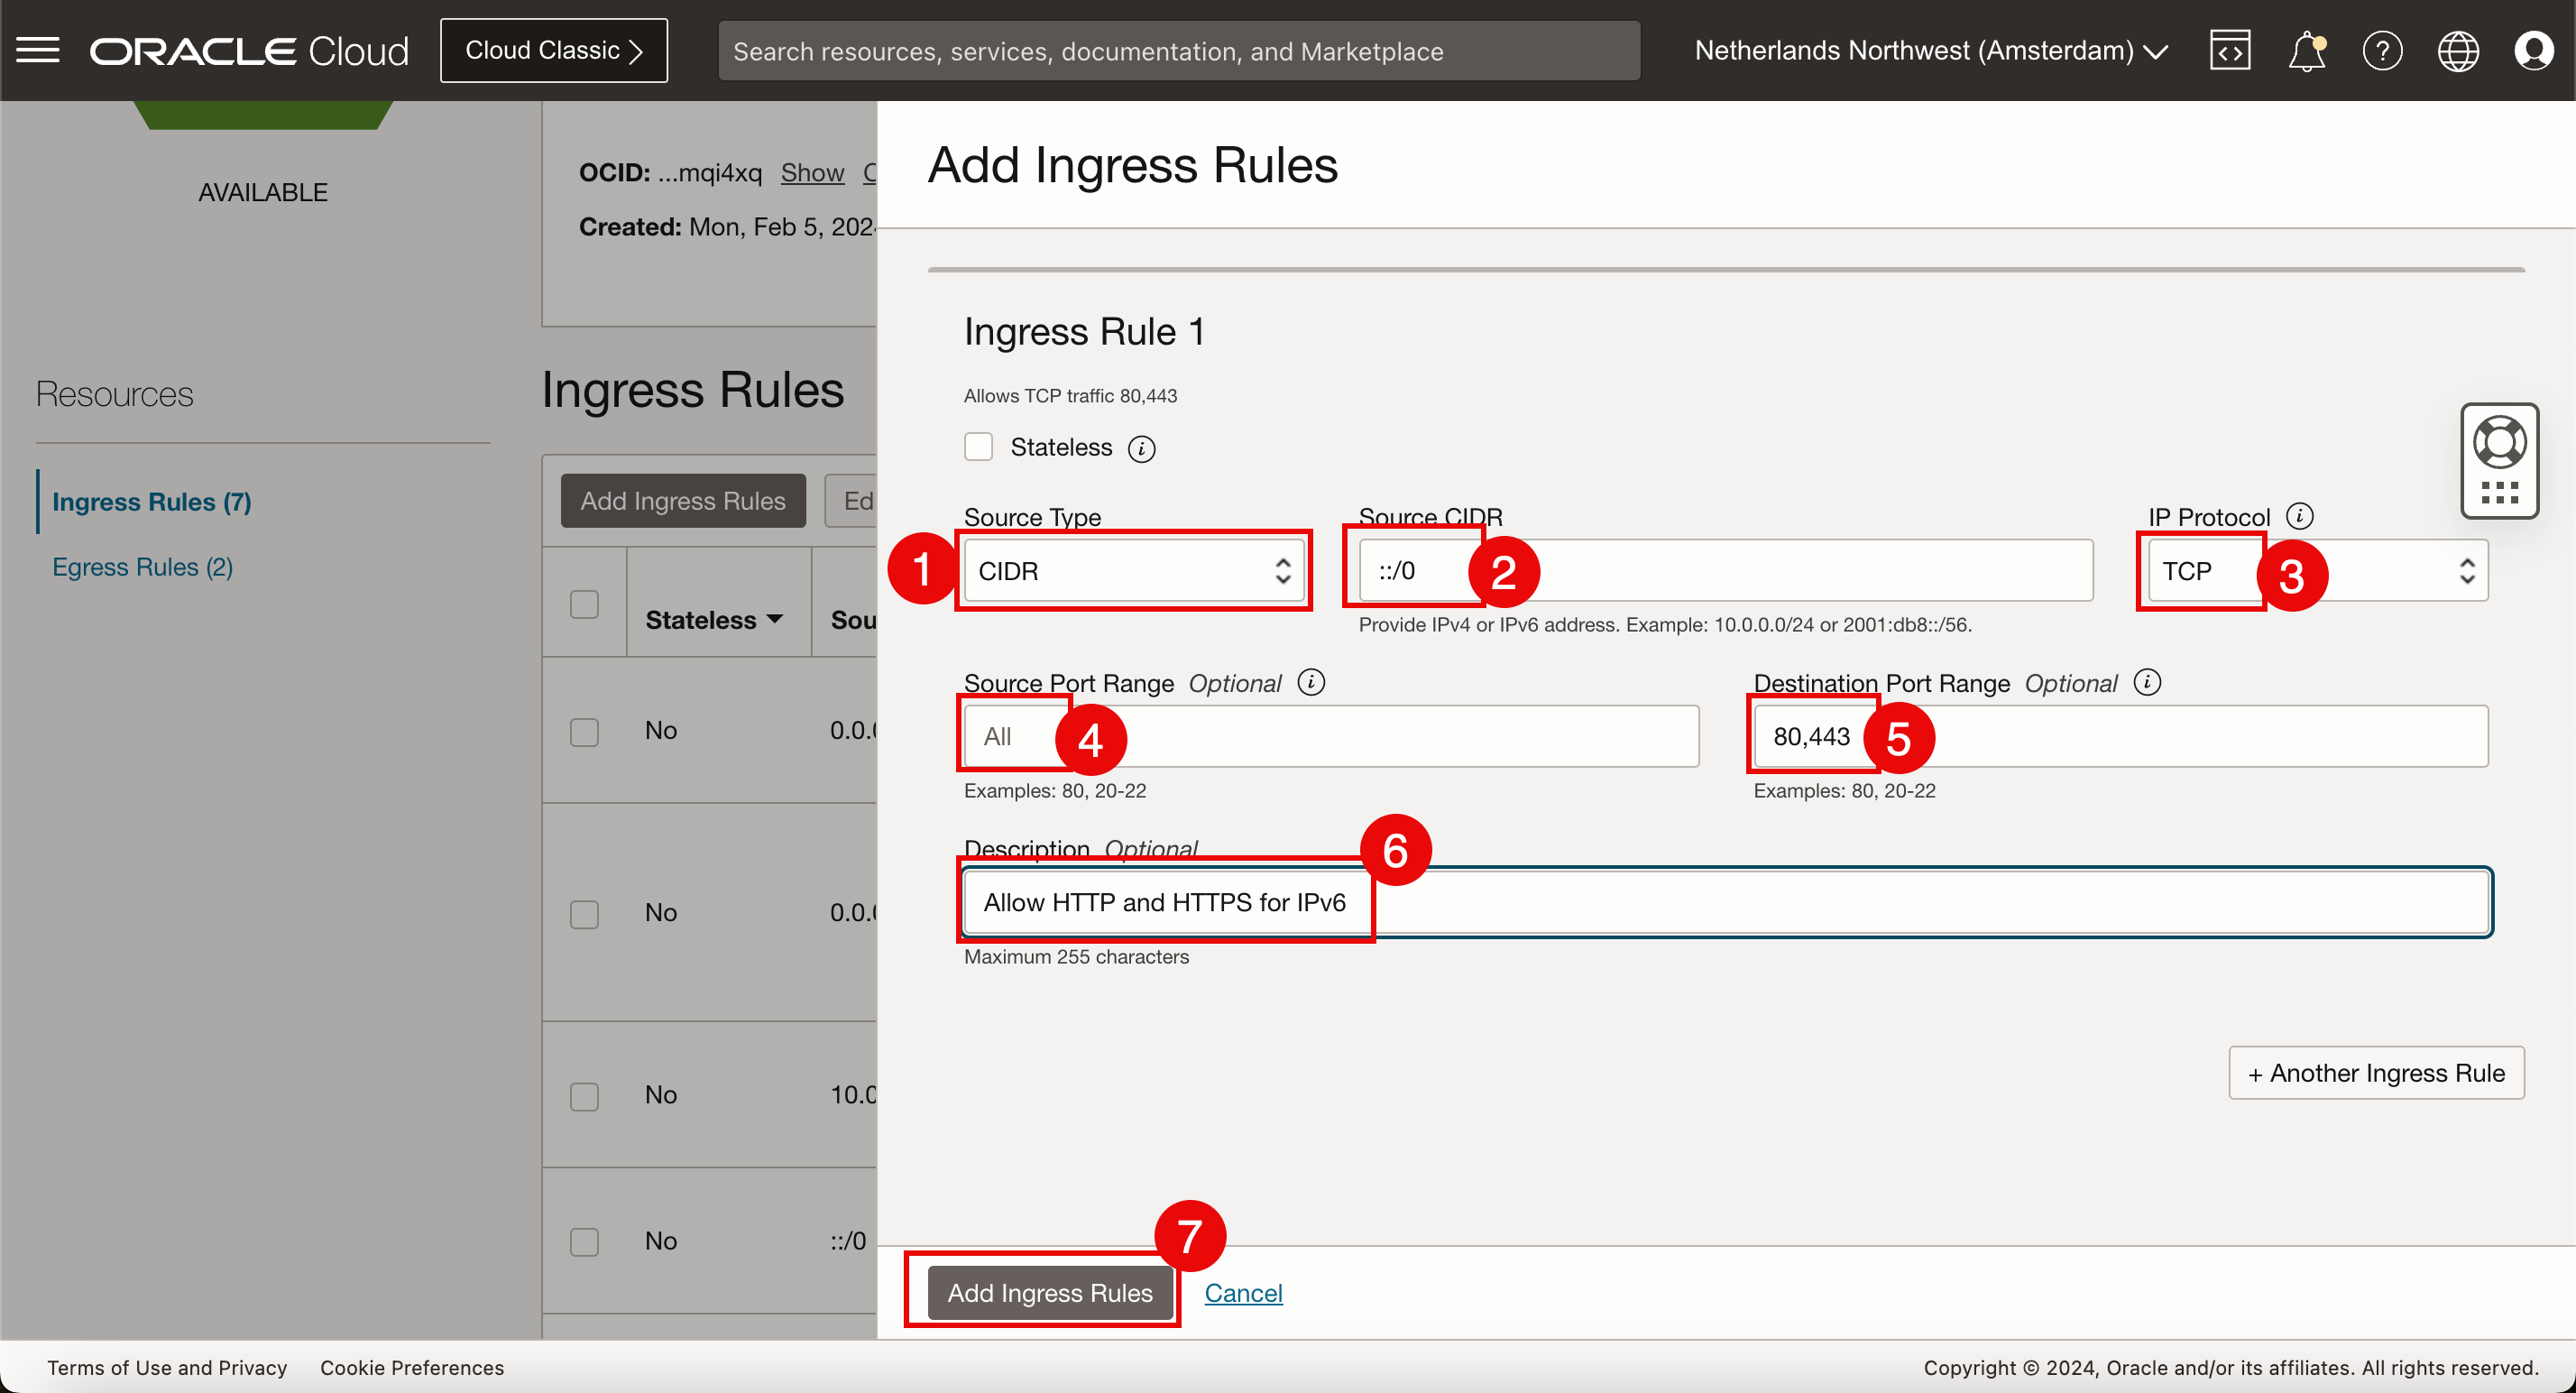
若要為 IPv6 網路流量新增安全規則,請建立新的輸入規則。再按一下新增輸入規則。
- 來源類型:選取 CIDR 。
- 來源 CIDR:輸入
::/0。 - IP 協定:選取 TCP 。
- 來源連接埠範圍:保留預設值 (全部)。
- 目的地連接埠範圍:選取
80,443(HTTP 和 HTTPS)。 - 輸入說明。
- 按一下新增傳入規則。
-
請複查 IPv6 安全規則以允許 HTTP 和 HTTPS 流量內送。
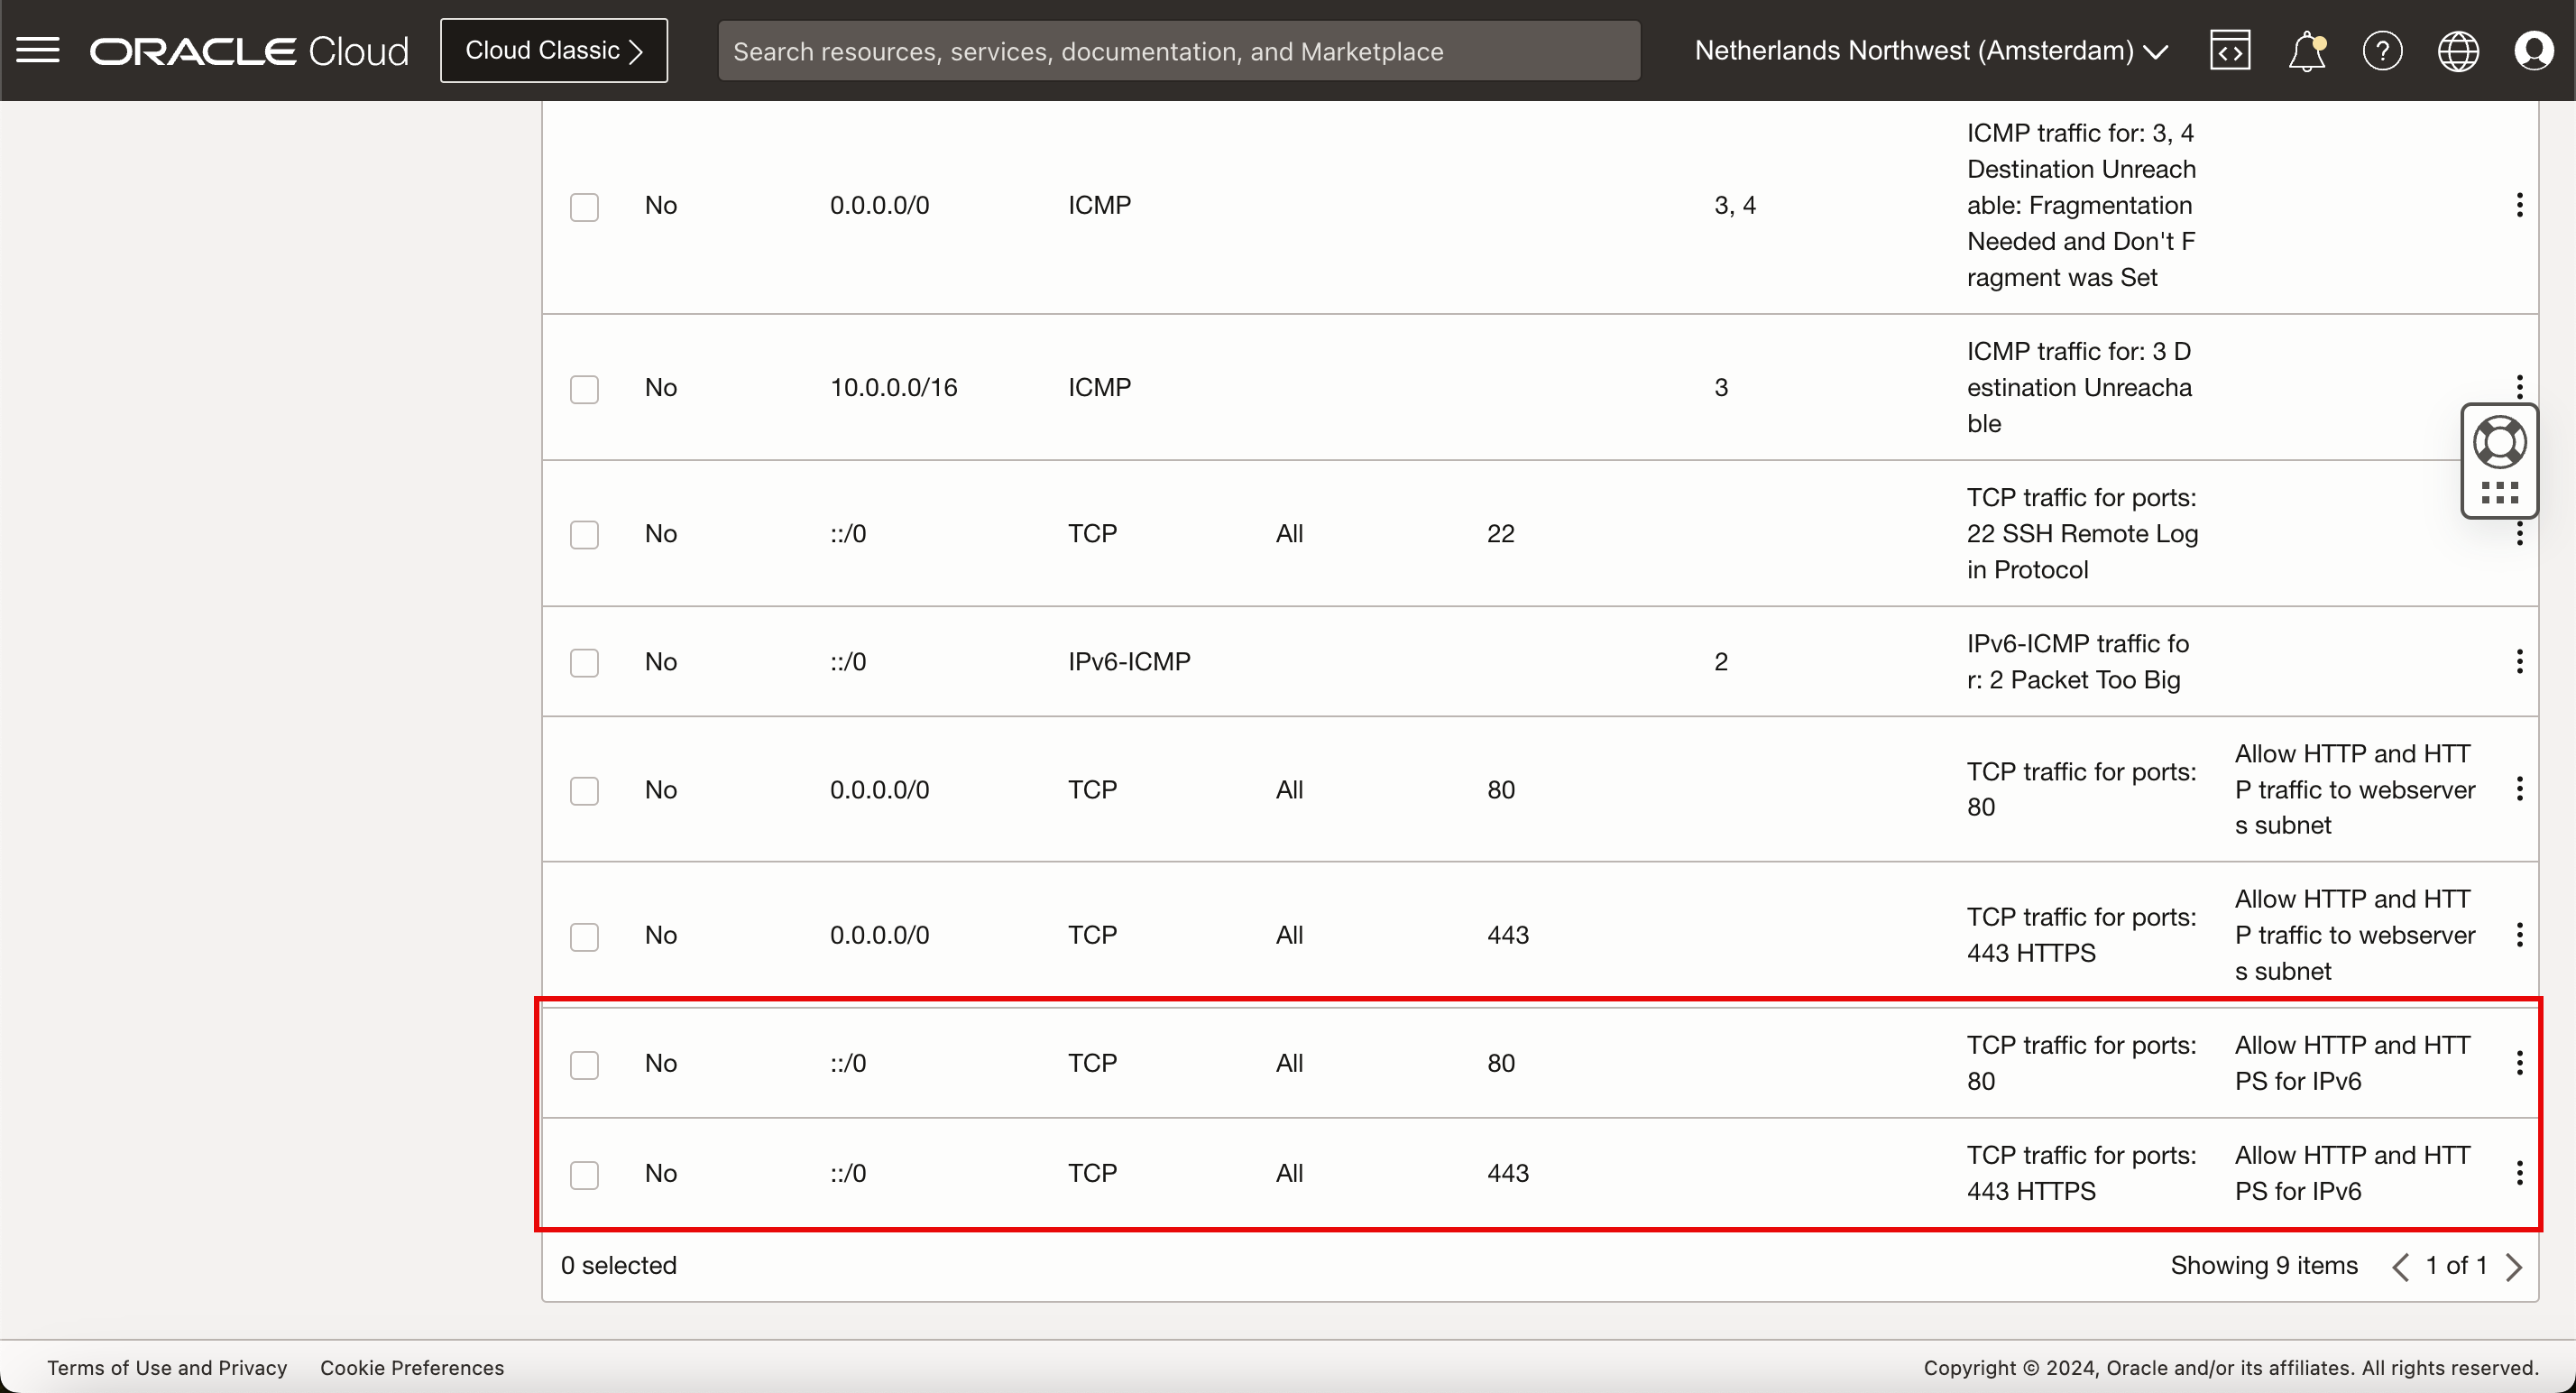
安全規則已就緒,且 VCN 子網路上允許使用 IPv4 和 IPv6 流量,我們將在執行處理上安裝 Web 伺服器應用程式。
作業 6:在執行處理上安裝 Web 伺服器
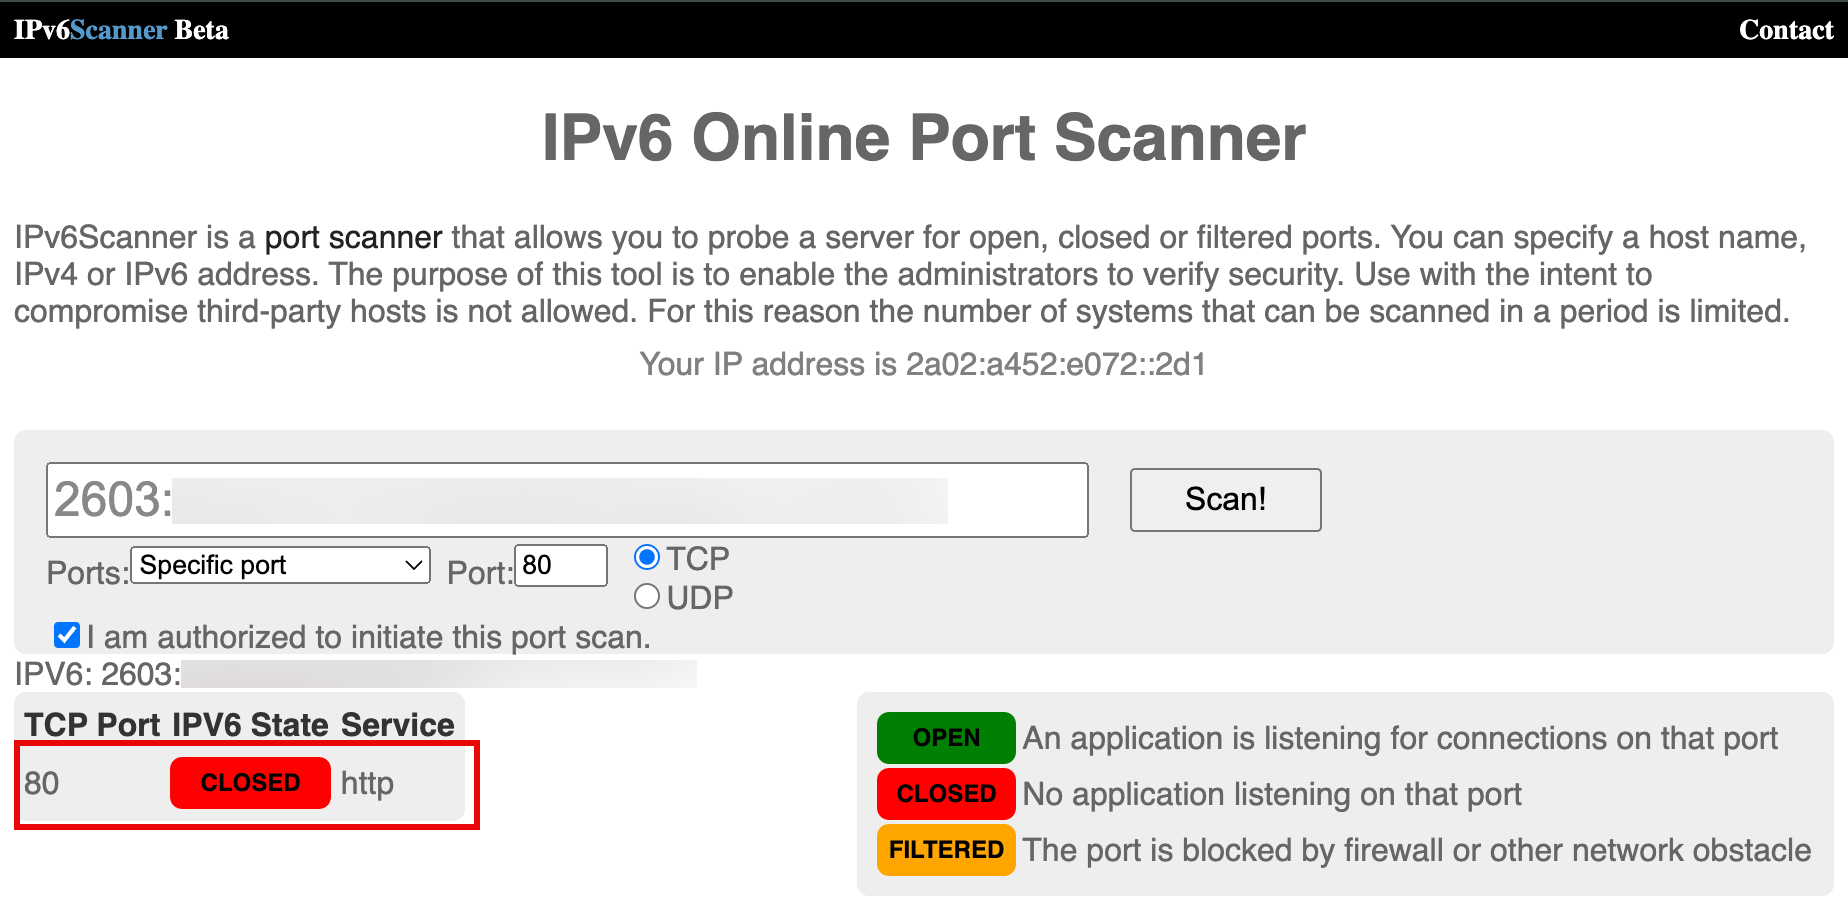
在安裝 Web 伺服器應用程式之前,請先快速驗證防火牆連接埠是否正確設定。請使用下列網站 IPV6 Online Port Scanner 。此網站有 IPv6 連接埠掃描器,但您也可以輸入 IPv4 位址。
-
輸入包含詳細資訊的 IPv4 位址,以在 TCP 連接埠
80上執行掃描。請注意,此狀態為 CLOSED ,因為 Web 伺服器應用程式尚未安裝,且狀態不是 FILTERED ,因為我們已將規則新增至預設安全清單。
-
對於 IPv6 位址,請輸入下列詳細資訊。由於相同原因,輸出與 IPv4 相同。
-
在 Web 伺服器執行處理終端機主控台或 SSH 上。輸入下列命令以更新 DNF 套裝軟體管理員並安裝 DNF 公用程式。
[opc@ih-webserver-01 ~]$ sudo dnf update -y [opc@ih-webserver-01 ~]$ sudo dnf install dnf-utils -y -
更新
nginx.repo檔案以指定要下載與安裝 NGINX Web 伺服器應用程式的詳細資訊。[opc@ih-webserver-01 ~]$ sudo nano /etc/yum.repos.d/nginx.repo複製並貼上
nginx.repo檔案中的下列內容。[nginx-stable] name=nginx stable repo baseurl=http://nginx.org/packages/centos/$releasever/$basearch/ gpgcheck=1 enabled=1 gpgkey=https://nginx.org/keys/nginx_signing.key module_hotfixes=true [nginx-mainline] name=nginx mainline repo baseurl=http://nginx.org/packages/mainline/centos/$releasever/$basearch/ gpgcheck=1 enabled=0 gpgkey=https://nginx.org/keys/nginx_signing.key module_hotfixes=true驗證
nginx.repo檔案的內容。[opc@ih-webserver-01 ~]$ sudo more /etc/yum.repos.d/nginx.repo [nginx-stable] name=nginx stable repo baseurl=http://nginx.org/packages/centos/$releasever/$basearch/ gpgcheck=1 enabled=1 gpgkey=https://nginx.org/keys/nginx_signing.key module_hotfixes=true [nginx-mainline] name=nginx mainline repo baseurl=http://nginx.org/packages/mainline/centos/$releasever/$basearch/ gpgcheck=1 enabled=0 gpgkey=https://nginx.org/keys/nginx_signing.key module_hotfixes=true [opc@ih-webserver-01 ~]$ -
預設會使用穩定 Nginx 套裝軟體的儲存庫。若要使用主行 Nginx 套裝軟體,請執行下列指令。
[opc@ih-webserver-01 ~]$ sudo yum-config-manager --enable nginx-mainline -
使用下列指令來安裝 NGINX Web 伺服器應用程式。
[opc@ih-webserver-01 ~]$ sudo dnf install nginx -
若要啟動 NGINX Web 伺服器應用程式,請執行下列命令。
[opc@ih-webserver-01 ~]$ sudo systemctl start nginx -
安裝完成後,啟用 NGINX 以在系統啟動時自動啟動,並啟動 Web 伺服器。
[opc@ih-webserver-01 ~]$ sudo systemctl enable nginx Created symlink /etc/systemd/system/multi-user.target.wants/nginx.service → /usr/lib/systemd/system/nginx.service. -
使用下列命令來驗證 NGINX Web 伺服器應用程式的執行狀態。
[opc@ih-webserver-01 ~]$ systemctl status nginx ● nginx.service - nginx - high performance web server Loaded: loaded (/usr/lib/systemd/system/nginx.service; enabled; vendor preset: disabled) Active: active (running) since Tue 2024-02-06 08:58:43 GMT; 2min 47s ago Docs: http://nginx.org/en/docs/ Main PID: 43323 (nginx) Tasks: 3 (limit: 99901) Memory: 2.8M CGroup: /system.slice/nginx.service ├─43323 nginx: master process /usr/sbin/nginx -c /etc/nginx/nginx.conf ├─43324 nginx: worker process └─43325 nginx: worker process Feb 06 08:58:43 ih-webserver-01 systemd[1]: Starting nginx - high performance web server... Feb 06 08:58:43 ih-webserver-01 systemd[1]: Started nginx - high performance web server. [opc@ih-webserver-01 ~]$ -
使用下列命令來驗證 NGINX Web 伺服器應用程式的版本。
[opc@ih-webserver-01 ~]$ nginx -v nginx version: nginx/1.25.3 [opc@ih-webserver-01 ~]$ -
firewalld是安裝在 OCI 上 Oracle Linux 部署的區域型個人防火牆。我們已經透過 VCN 子網路上的預設安全清單設定防火牆。將會停用內部firewalld服務。執行下列命令。[opc@ih-webserver-01 nginx]$ sudo systemctl stop firewalld [opc@ih-webserver-01 nginx]$ sudo systemctl disable firewalld Removed /etc/systemd/system/multi-user.target.wants/firewalld.service. Removed /etc/systemd/system/dbus-org.fedoraproject.FirewallD1.service. [opc@ih-webserver-01 nginx]$ sudo setenforce 0 [opc@ih-webserver-01 nginx]$ -
若要驗證 Web 伺服器服務是否正在執行,請檢查監聽器是否正在執行。執行下列命令。請注意,這三個 NGINX 服務正在執行 IPv4 和連接埠
80上的所有監聽作業。這裡顯示的是遺漏 IPv6 監聽器。[opc@ih-webserver-01 ~]$ sudo lsof -i -P -n | grep LISTEN systemd 1 root 71u IPv4 19039 0t0 TCP *:111 (LISTEN) systemd 1 root 82u IPv6 19041 0t0 TCP *:111 (LISTEN) rpcbind 1421 rpc 4u IPv4 19039 0t0 TCP *:111 (LISTEN) rpcbind 1421 rpc 6u IPv6 19041 0t0 TCP *:111 (LISTEN) osms-agen 2429 root 7u IPv6 41713 0t0 TCP 127.0.0.1:32768 (LISTEN) osms-agen 2429 root 10u IPv4 41722 0t0 TCP 127.0.0.1:9003 (LISTEN) pmcd 2469 pcp 0u IPv4 35603 0t0 TCP 127.0.0.1:44321 (LISTEN) pmcd 2469 pcp 3u IPv6 35604 0t0 TCP [::1]:44321 (LISTEN) pmlogger 3188 pcp 7u IPv4 42005 0t0 TCP 127.0.0.1:4330 (LISTEN) pmlogger 3188 pcp 8u IPv6 42006 0t0 TCP [::1]:4330 (LISTEN) sshd 6745 root 3u IPv4 54797 0t0 TCP *:22 (LISTEN) sshd 6745 root 4u IPv6 54799 0t0 TCP *:22 (LISTEN) nginx 43323 root 6u IPv4 98324 0t0 TCP *:80 (LISTEN) nginx 43324 nginx 6u IPv4 98324 0t0 TCP *:80 (LISTEN) nginx 43325 nginx 6u IPv4 98324 0t0 TCP *:80 (LISTEN) -
另一項快速檢查,我們會對本機 Web 伺服器進行切換,以查看是否可以使用 IPv4 連線預設 NGINX Web 伺服器。
[opc@ih-webserver-01 ~]$ curl http://localhost <!DOCTYPE html> <html> <head> <title>Welcome to nginx!</title> <style> html { color-scheme: light dark; } body { width: 35em; margin: 0 auto; font-family: Tahoma, Verdana, Arial, sans-serif; } </style> </head> <body> <h1>Welcome to nginx!</h1> <p>If you see this page, the nginx web server is successfully installed and working. Further configuration is required.</p> <p>For online documentation and support please refer to <a href="http://nginx.org/">nginx.org</a>.<br/> Commercial support is available at <a href="http://nginx.com/">nginx.com</a>.</p> <p><em>Thank you for using nginx.</em></p> </body> </html> [opc@ih-webserver-01 ~]$ -
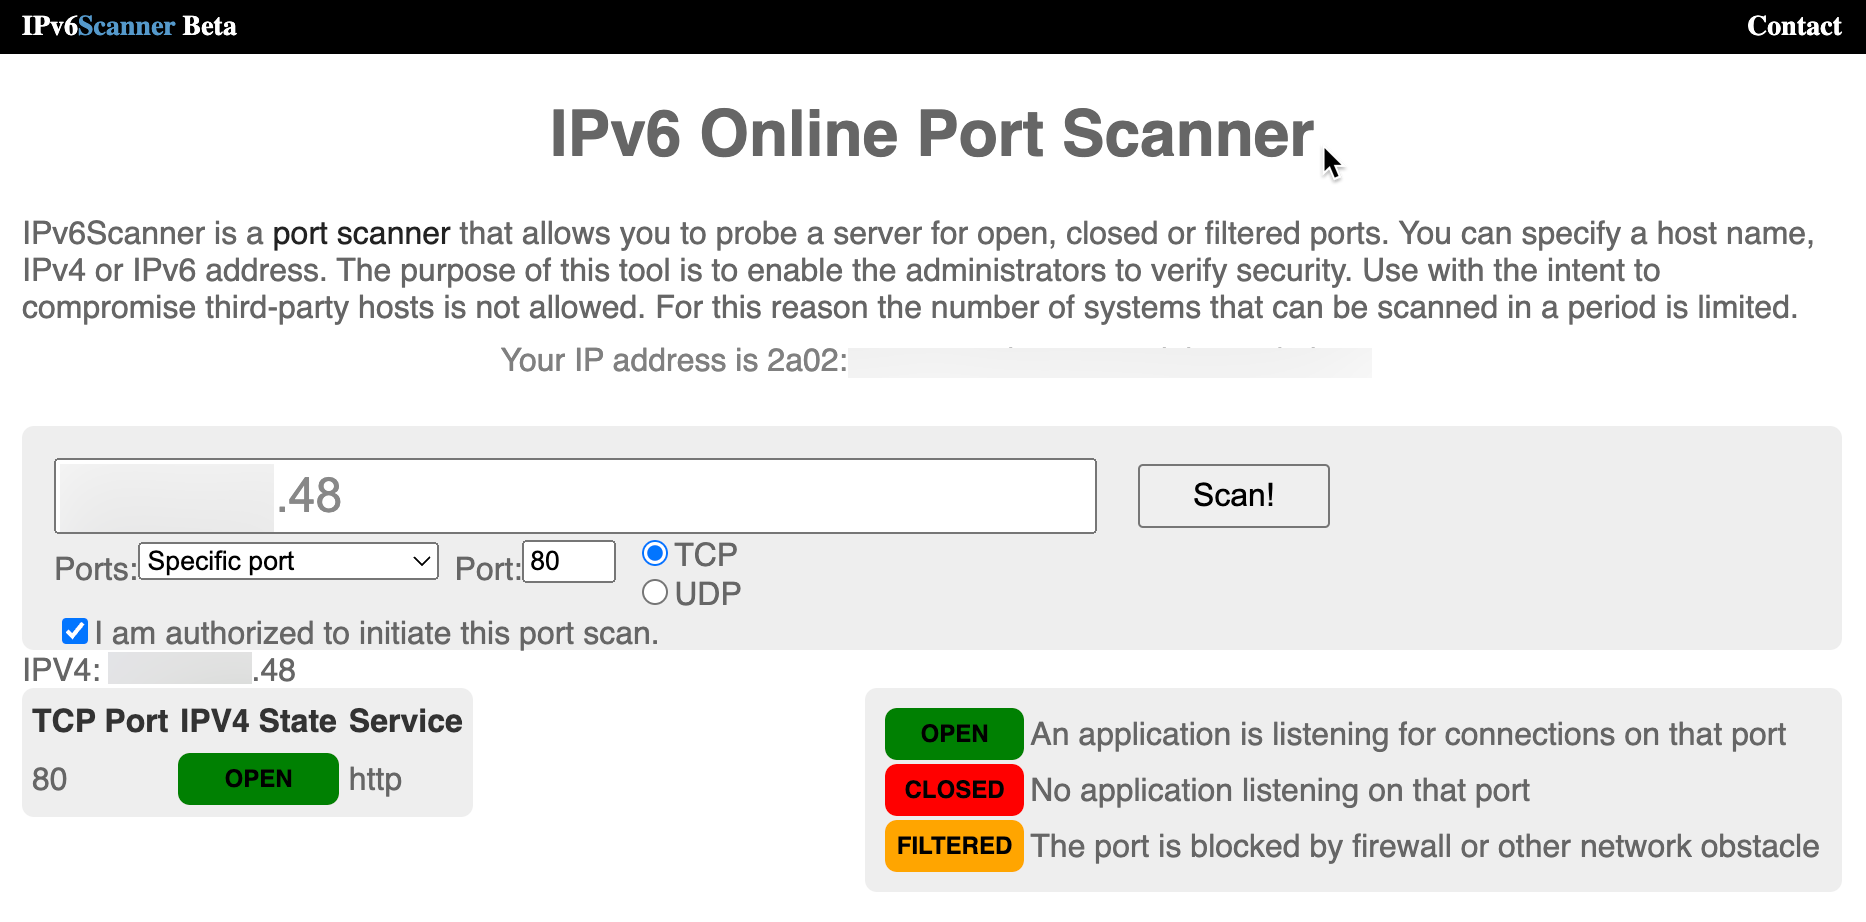
我們將使用相同的 IPv6 Online Port Scanner 網站從網際網路進行相同的測試,現在 IPv4 的連接埠是 OPEN 。
-
最後的測試將使用 IPv4 的遠端瀏覽器來測試網站或 Web 伺服器。使用的 URL 為
http://144.xxx.xxx.xxx。
-
即使我們已安裝 NGINX Web 伺服器應用程式,我們仍會取得 IPv6 位址的下列結果。
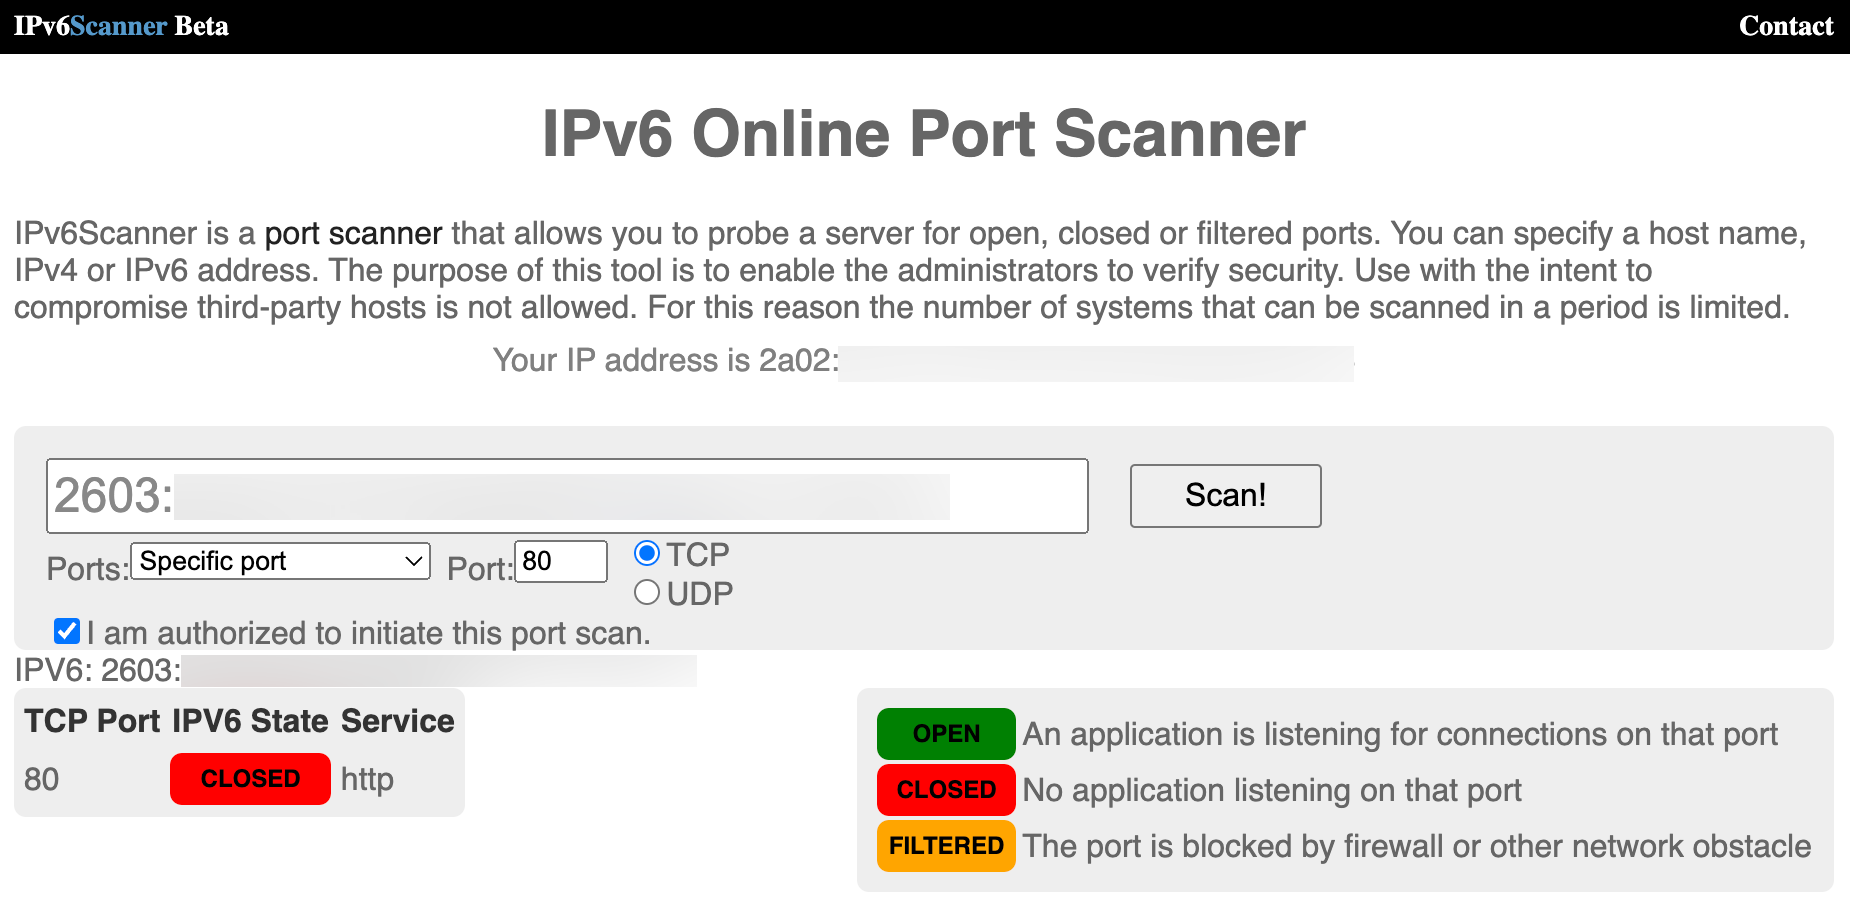
若要修正此問題,我們必須確定 Web 伺服器已設定為同時監聽 IPv6 位址。若要這麼做,請編輯
default.confnginx 檔案。[opc@ih-webserver-01 conf.d]$ sudo nano /etc/nginx/conf.d/default.conf組態檔的 server 區段如下所示。
server {
    listen       80;
    server_name  localhost;

    #access_log  /var/log/nginx/host.access.log  main;

    location / {
        root   /usr/share/nginx/html;
        index  index.html index.htm;
    }
增加下列行至伺服器區段。
**listen [::]:80;**server 區段將如下所示。
server {
    listen       80;
    **listen  [::]:80;**
    server_name  localhost;

    #access_log  /var/log/nginx/host.access.log  main;

    location / {
        root   /usr/share/nginx/html;
        index  index.html index.htm;
    }
更新之後,
default.conf檔案看起來會像這樣。[opc@ih-webserver-01 conf.d]$ sudo more /etc/nginx/conf.d/default.conf server { listen 80; **listen [::]:80;** server_name localhost; #access_log /var/log/nginx/host.access.log main; location / { root /usr/share/nginx/html; index index.html index.htm; } #error_page 404 /404.html; # redirect server error pages to the static page /50x.html # error_page 500 502 503 504 /50x.html; location = /50x.html { root /usr/share/nginx/html; } # proxy the PHP scripts to Apache listening on 127.0.0.1:80 # #location ~ \.php$ { # proxy_pass http://127.0.0.1; #} # pass the PHP scripts to FastCGI server listening on 127.0.0.1:9000 # #location ~ \.php$ { # root html; # fastcgi_pass 127.0.0.1:9000; # fastcgi_index index.php; # fastcgi_param SCRIPT_FILENAME /scripts$fastcgi_script_name; # include fastcgi_params; #} # deny access to .htaccess files, if Apache's document root # concurs with nginx's one # #location ~ /\.ht { # deny all; #} } [opc@ih-webserver-01 conf.d]$ -
請使用下列命令重新啟動 NGINX Web 伺服器。
[opc@ih-webserver-01 ~]$ sudo systemctl restart nginx -
請使用下列命令再次驗證監聽器。請注意,NGINX 現在也列在 IPv4 旁的 IPv6 上。
[opc@ih-webserver-01 conf.d]$ sudo lsof -i -P -n | grep LISTEN
systemd       1               root   46u  IPv4  19039      0t0  TCP *:111 (LISTEN)
systemd       1               root   48u  IPv6  19041      0t0  TCP *:111 (LISTEN)
rpcbind    1421                rpc    4u  IPv4  19039      0t0  TCP *:111 (LISTEN)
rpcbind    1421                rpc    6u  IPv6  19041      0t0  TCP *:111 (LISTEN)
osms-agen  2429               root    7u  IPv6  41713      0t0  TCP 127.0.0.1:32768 (LISTEN)
osms-agen  2429               root   10u  IPv4  41722      0t0  TCP 127.0.0.1:9003 (LISTEN)
pmcd       2469                pcp    0u  IPv4  35603      0t0  TCP 127.0.0.1:44321 (LISTEN)
pmcd       2469                pcp    3u  IPv6  35604      0t0  TCP [::1]:44321 (LISTEN)
pmlogger   3188                pcp    7u  IPv4  42005      0t0  TCP 127.0.0.1:4330 (LISTEN)
pmlogger   3188                pcp    8u  IPv6  42006      0t0  TCP [::1]:4330 (LISTEN)
sshd       6745               root    3u  IPv4  54797      0t0  TCP *:22 (LISTEN)
sshd       6745               root    4u  IPv6  54799      0t0  TCP *:22 (LISTEN)
nginx     54944               root    6u  IPv4 219674      0t0  TCP *:80 (LISTEN)
nginx     54944               root    7u  IPv6 219675      0t0  TCP *:80 (LISTEN)
nginx     54945              nginx    6u  IPv4 219674      0t0  TCP *:80 (LISTEN)
nginx     54945              nginx    7u  IPv6 219675      0t0  TCP *:80 (LISTEN)
nginx     54946              nginx    6u  IPv4 219674      0t0  TCP *:80 (LISTEN)
nginx     54946              nginx    7u  IPv6 219675      0t0  TCP *:80 (LISTEN)
[opc@ih-webserver-01 conf.d]$
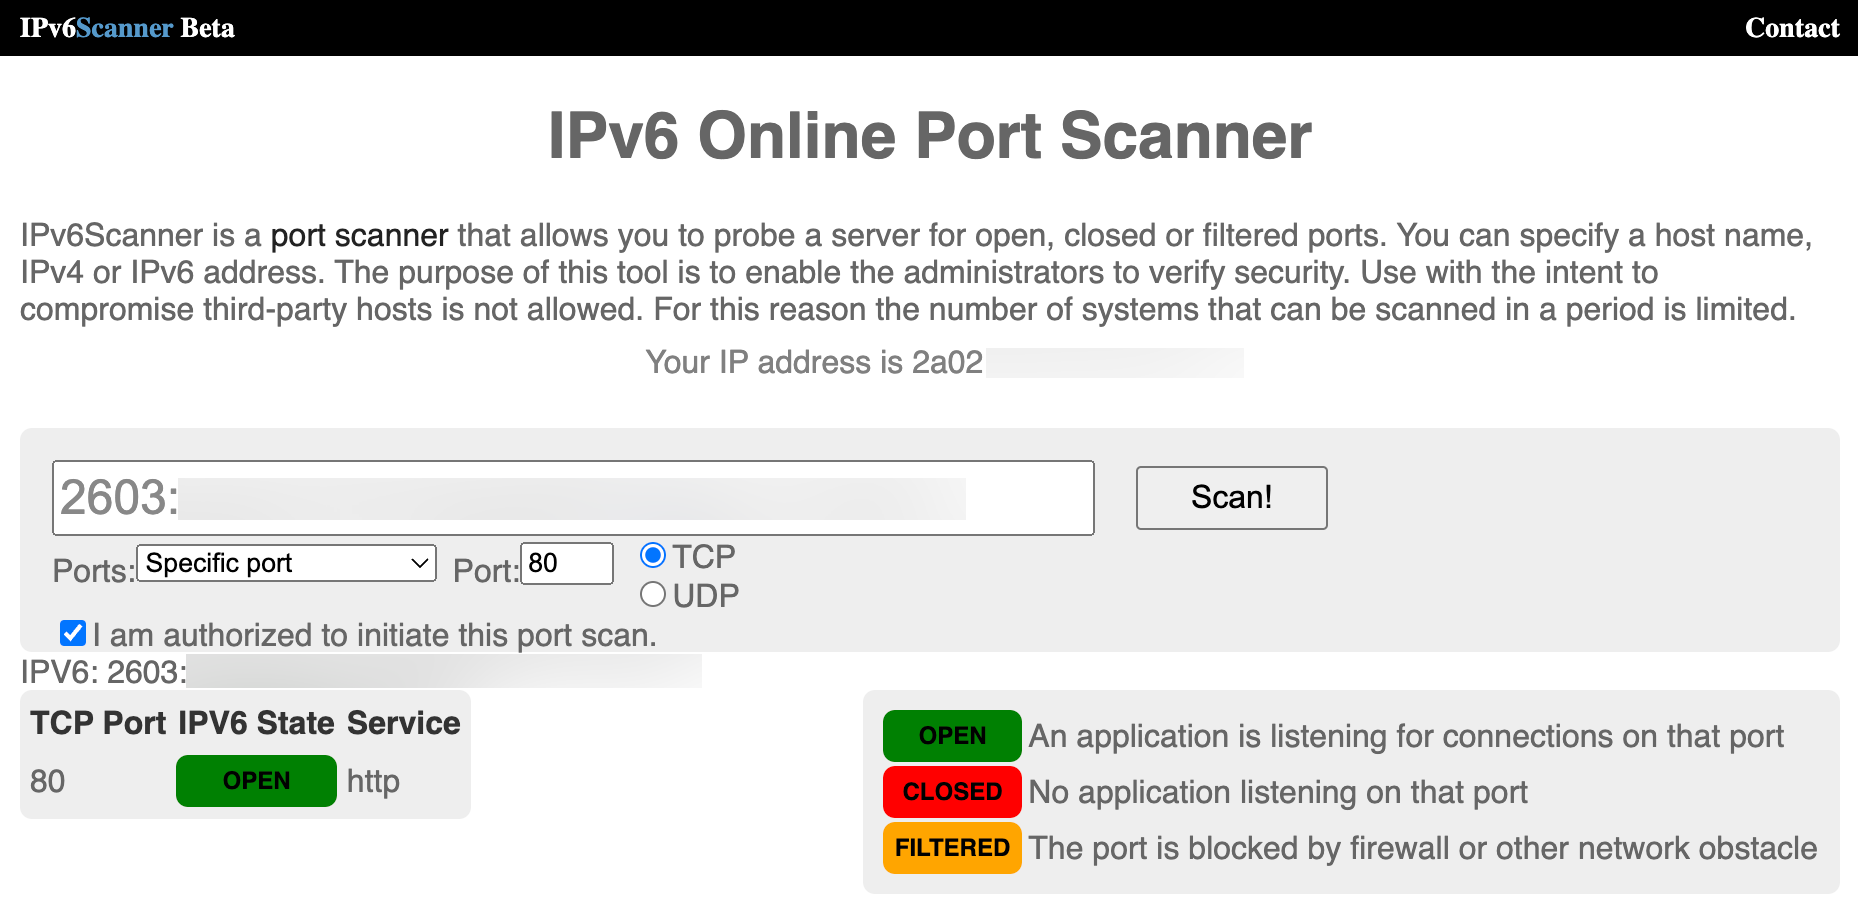
我們將使用相同的 IPv6 Online Port Scanner 網站從網際網路進行相同的測試,現在 IPv6 的連接埠是 OPEN 。
另一項快速檢查,我們會對本機 Web 伺服器進行切換,以查看是否可以使用 IPv6 連線預設 NGINX Web 伺服器。
[opc@ih-webserver-01 conf.d]$ curl -6 "http://[::1]:80" <!DOCTYPE html> <html> <head> <title>Welcome to nginx!</title> <style> html { color-scheme: light dark; } body { width: 35em; margin: 0 auto; font-family: Tahoma, Verdana, Arial, sans-serif; } </style> </head> <body> <h1>Welcome to nginx!</h1> <p>If you see this page, the nginx web server is successfully installed and working. Further configuration is required.</p> <p>For online documentation and support please refer to <a href="http://nginx.org/">nginx.org</a>.<br/> Commercial support is available at <a href="http://nginx.com/">nginx.com</a>.</p> <p><em>Thank you for using nginx.</em></p> </body> </html> [opc@ih-webserver-01 conf.d]$ -
最後的測試是使用 IPv6 的遠端瀏覽器來測試網站或 Web 伺服器是否可以連線。使用的 URL 為
http://[2603:xxxx:xxxx:xxxx:xxxx:xxxx:xxxx:xxxx]
注意:當我們在瀏覽器中使用 IPv6 位址時,必須將它放在方括號之間。
作業 7:設定 DNS 記錄
注意:我們在此教學課程中使用的網域已建立並設定為僅供測試之用。
現在,網站或 Web 伺服器可以從網際網路連線。我們將進一步設定一個可以比 IPv4 位址或 IPv6 位址更容易記住的 FQDN。本教學課程使用下列子網域作為新 Web 伺服器的範例:oci.iwanhoogendoorn.nl 。
-
我們會將網域
iwanhoogendoorn.nl登入註冊者的網域管理面板。- 請注意,我們已選取要設定的網域。
- 選取 DNS 管理。

-
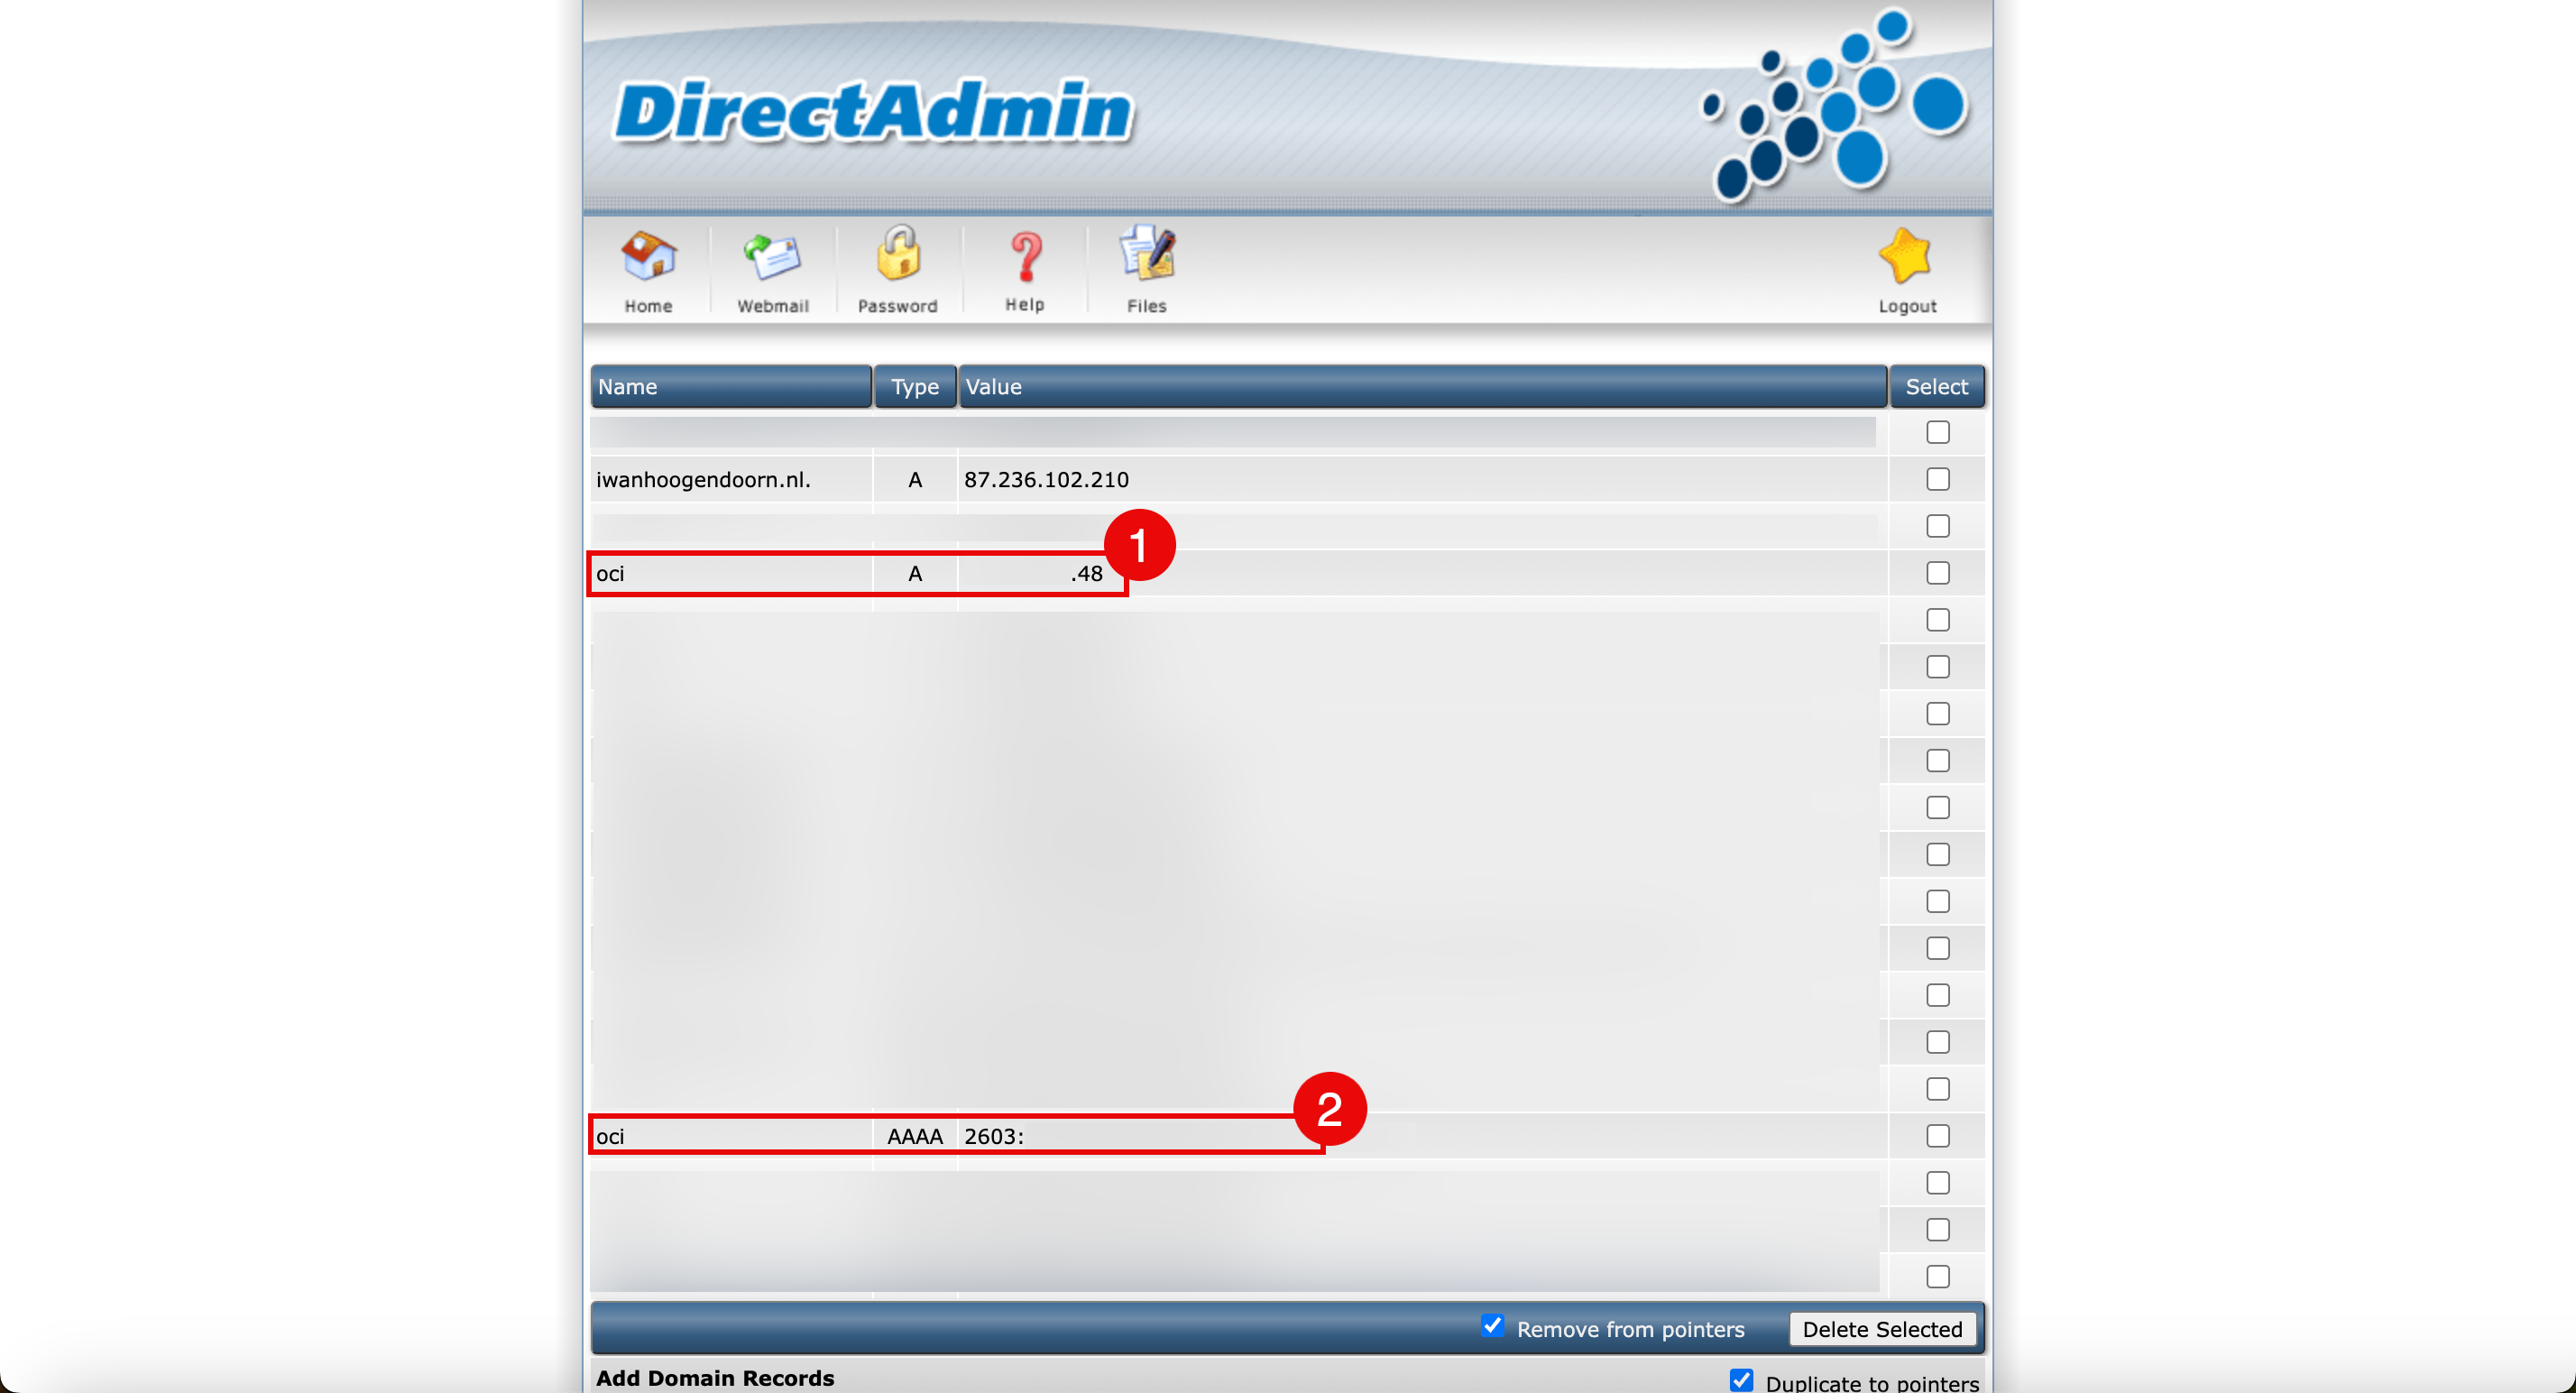
如下列影像所示,會列出網域 iwanhoogendoorn.nl 的所有 DNS 記錄。
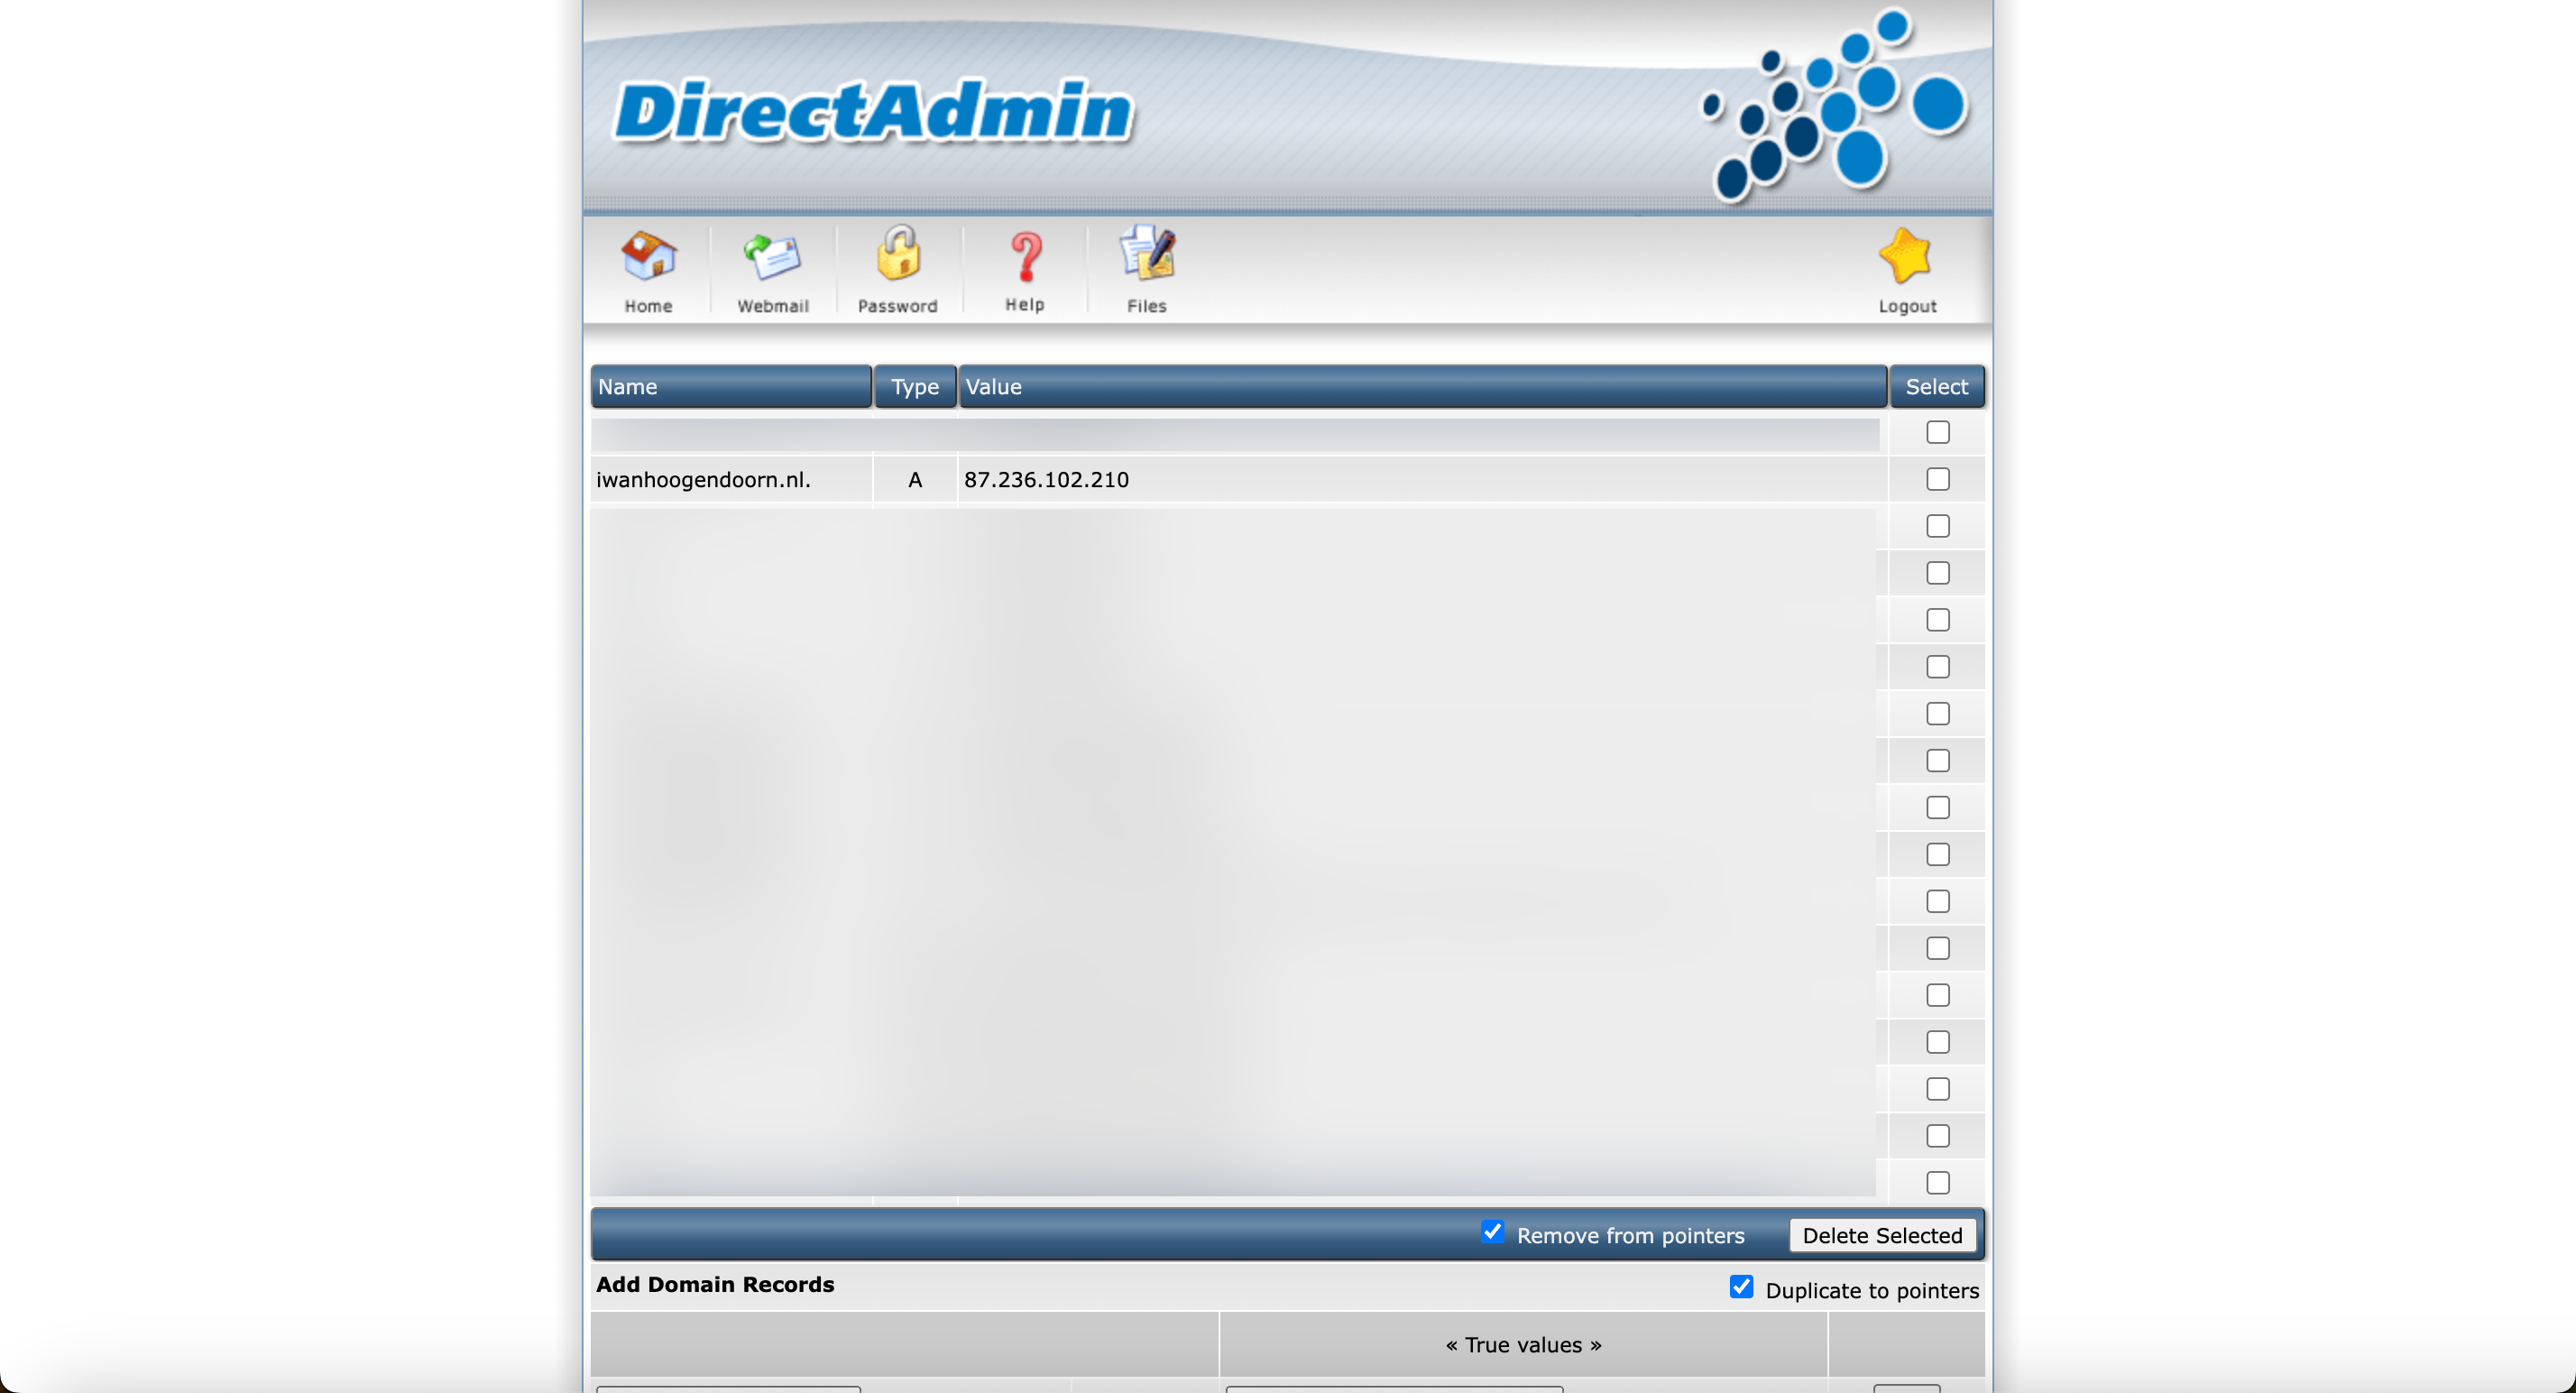
- 將
oci子網域新增至 IPv4 的網域,然後選取執行處理的公用 IPv4 位址。 - 按一下新增。
- 現在,我們會將
oci子網域新增至 IPv6 的網域,然後選取執行處理的 IPv6 位址。 - 按一下新增。

- 在 DNS 總覽頁面中,檢閱 IPv4 的 oci.iwanhoogendoorn.nl DNS 記錄。
- 在 DNS 總覽頁面中,檢閱 IPv6 的 oci.iwanhoogendoorn.nl DNS 記錄。
- 將
-
使用
nslookup指令來測試 oci.iwanhoogendoorn.nl 是否解析為正確的 IPv4 位址。iwanhoogendoorn@Iwans-MacBook-Pro ~ % nslookup oci.iwanhoogendoorn.nl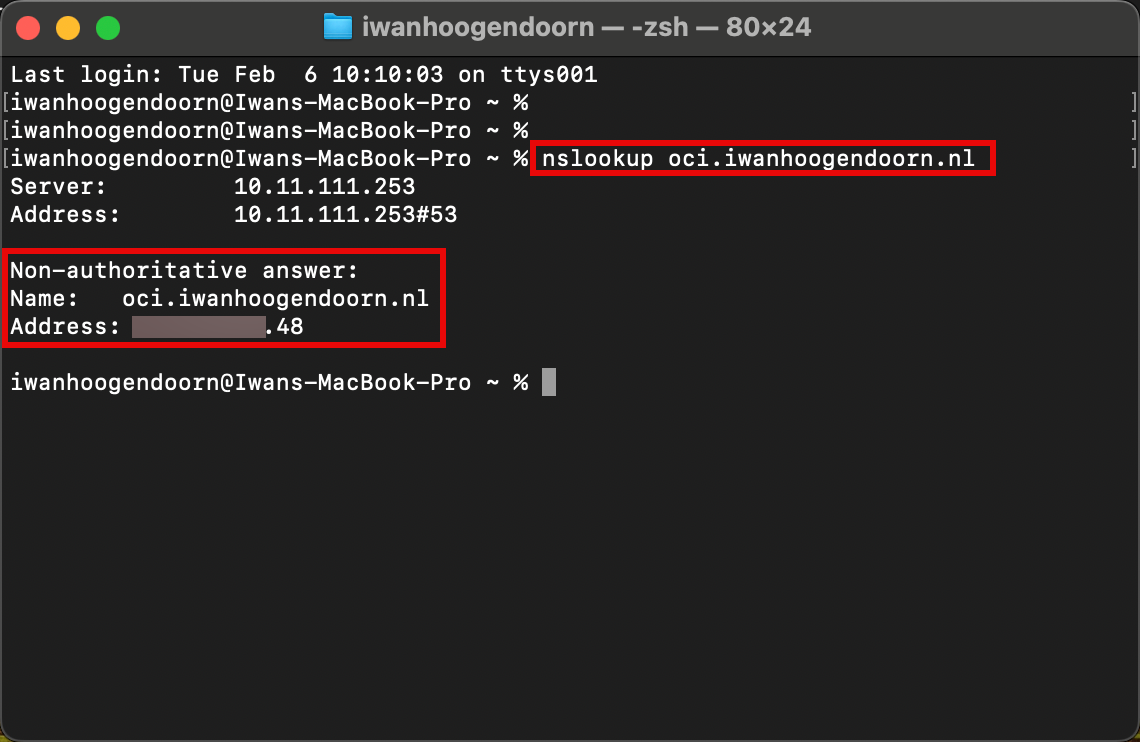
-
使用
nslookup指令來測試 oci.iwanhoogendoorn.nl 是否解析為正確的 IPv6 位址。iwanhoogendoorn@Iwans-MacBook-Pro ~ % nslookup -q=AAAA oci.iwanhoogendoorn.nl
工作 8:使用 NGINX 和 PHP 建立自訂網站
我們將建立自訂的 PHP 網站或腳本,提供更多有關 NGINX 網路和 IP 位址的資訊。
-
安裝 PHP FastCGI Process Manager (PHP-FPM)。PHP- FPM 是 PHP 的替代 FastCGI 伺服程式,允許網站處理高負載 。
sudo dnf install php-fpm -
檢查已安裝的 PHP 版本 。
[opc@ih-webserver-01 /]$ php -v PHP 7.2.24 (cli) (built: Oct 22 2019 08:28:36) ( NTS ) Copyright (c) 1997-2018 The PHP Group Zend Engine v3.2.0, Copyright (c) 1998-2018 Zend Technologies [opc@ih-webserver-01 /]$ -
若要讓 NGINX 與 PHP 搭配運作,需要完成某些配置的另一方面。PHP 端和 NGNIX 端的一個配置文件。
根據您的 Linux 發行版、NGINX 和 PHP-FPM 版本,配置檔案名稱和路徑名稱可能不同,這使 NGINX 和 PHP 的整合部分變得更加困難。
PHP-FPM 和 NGINX 的重要檔案和目錄。
描述 Oracle Linux 8 其他安裝 / 發行 NGINX Web 根路徑 /usr/share/nginx/html /usr/share/nginx/www PHP FPM 設定檔 /etc/php-fpm.d/www.conf php - fpm.conf NGINX 組態檔 /etc/nginx/conf.d/default.conf nginx.conf PHP FPM 插槽檔案 /run/php-fpm/www.sock php-fpm.sock、phpx.x-fpm.sock (x.x = 版本) FastCGI 設定值檔案 /etc/nginx/fastcgi_params fastcgi.conf PHP 設定檔 /etc/php.ini
若要整合 NGINX 與 PHP,請遵循下列步驟:
-
編輯 PHP-FPM 組態檔以整合 NGINX 。
編輯
/etc/php-fpm.d/www.conf檔案。sudo nano /etc/php-fpm.d/www.conf-
變更前的
/etc/php-fpm.d/www.conf檔案內容。; Unix user/group of processes ; Note: The user is mandatory. If the group is not set, the default user's group ; will be used. ; RPM: apache user chosen to provide access to the same directories as httpd **user =** apache ; RPM: Keep a group allowed to write in log dir. **group =** apache -
變更後
/etc/php-fpm.d/www.conf檔案的內容。; Unix user/group of processes ; Note: The user is mandatory. If the group is not set, the default user's group ; will be used. ; RPM: apache user chosen to provide access to the same directories as httpd **user = nginx** ; RPM: Keep a group allowed to write in log dir. **group = nginx**
-
-
編輯 NGINX 組態檔以整合 PHP-FPM 。
-
編輯
/etc/nginx/conf.d/default.conf檔案。[opc@ih-webserver-01 html]$ sudo nano /etc/nginx/conf.d/default.conf -
增加下列組態。
location / {
**# where is the NGINX root www folder?**
    root   /usr/share/nginx/html;
# what are the default index files to look for in the directory?
    index **index.php** index.html index.htm;
}

# tell NGINX what to do when it sees PHP-FPM giving a 404 HTTP status in the response
**location = /404.php {
# where is the NGINX root www folder?
  root   /usr/share/nginx/html;
# not return error responses with relevant status codes
  fastcgi_intercept_errors off;
# where is PHP-FPM listening? the socket
  fastcgi_pass unix:/var/run/php-fpm/www.sock;
# everytime we're in this location, tell PHP-FPM the complete script filename to be executed
  fastcgi_param SCRIPT_FILENAME $document_root$fastcgi_script_name;
# and don't forget to tell PHP-FPM stuff like SERVER_NAME:
  include fastcgi_params;
}**

# tell NGINX what to do when it sees PHP-FPM a .php file
**location ~ \.php$ {
# where is the NGINX root www folder?
  root   /usr/share/nginx/html;
# define custom error pages
  error_page 404 /404.php;
# return error responses with relevant status codes
  fastcgi_intercept_errors on;
# where is PHP-FPM listening? the socket
  fastcgi_pass unix:/var/run/php-fpm/www.sock;
# everytime we're in this location, tell PHP-FPM the complete script filename to be executed
  fastcgi_param SCRIPT_FILENAME $document_root$fastcgi_script_name;
# and don't forget to tell PHP-FPM stuff like SERVER_NAME:
  include fastcgi_params;
}**
-
-
編輯
php.ini組態檔。-
編輯
/etc/php.ini檔案。[opc@ih-webserver-01 /]$ sudo nano /etc/php.ini -
請確定下列行存在、已變更或未註釋。
cgi.fix_pathinfo = 0;
-
-
重新啟動 PHP-FPM 和 NGINX 服務。
-
重新啟動 PHP-FPM 服務。
sudo systemctl start php-fpm -
請重新啟動 NGINX 服務。
sudo systemctl restart nginx
-
-
建立自訂頁面以處理並測試適當的網頁。
-
建立自訂
404.php頁面。如果頁面不存在,並嘗試存取時,必須正確處理重新導向至自訂 404 頁面。[opc@ih-webserver-01 html]$ sudo nano 404.php自訂
404.php頁面的代碼。<?php header("HTTP/1.0 404 Not Found"); ?> <html> <head> <title>404 Error - Page Not Found</title> </head> <body>404 Error - Page Not Found!</body> </html> -
建立自訂
info.php頁面。[opc@ih-webserver-01 html]$ sudo nano info.phpinfo.php頁面的代碼。<?php phpinfo(); -
測試
info.php網站,提供 PHP 使用 NGNIX 的證明。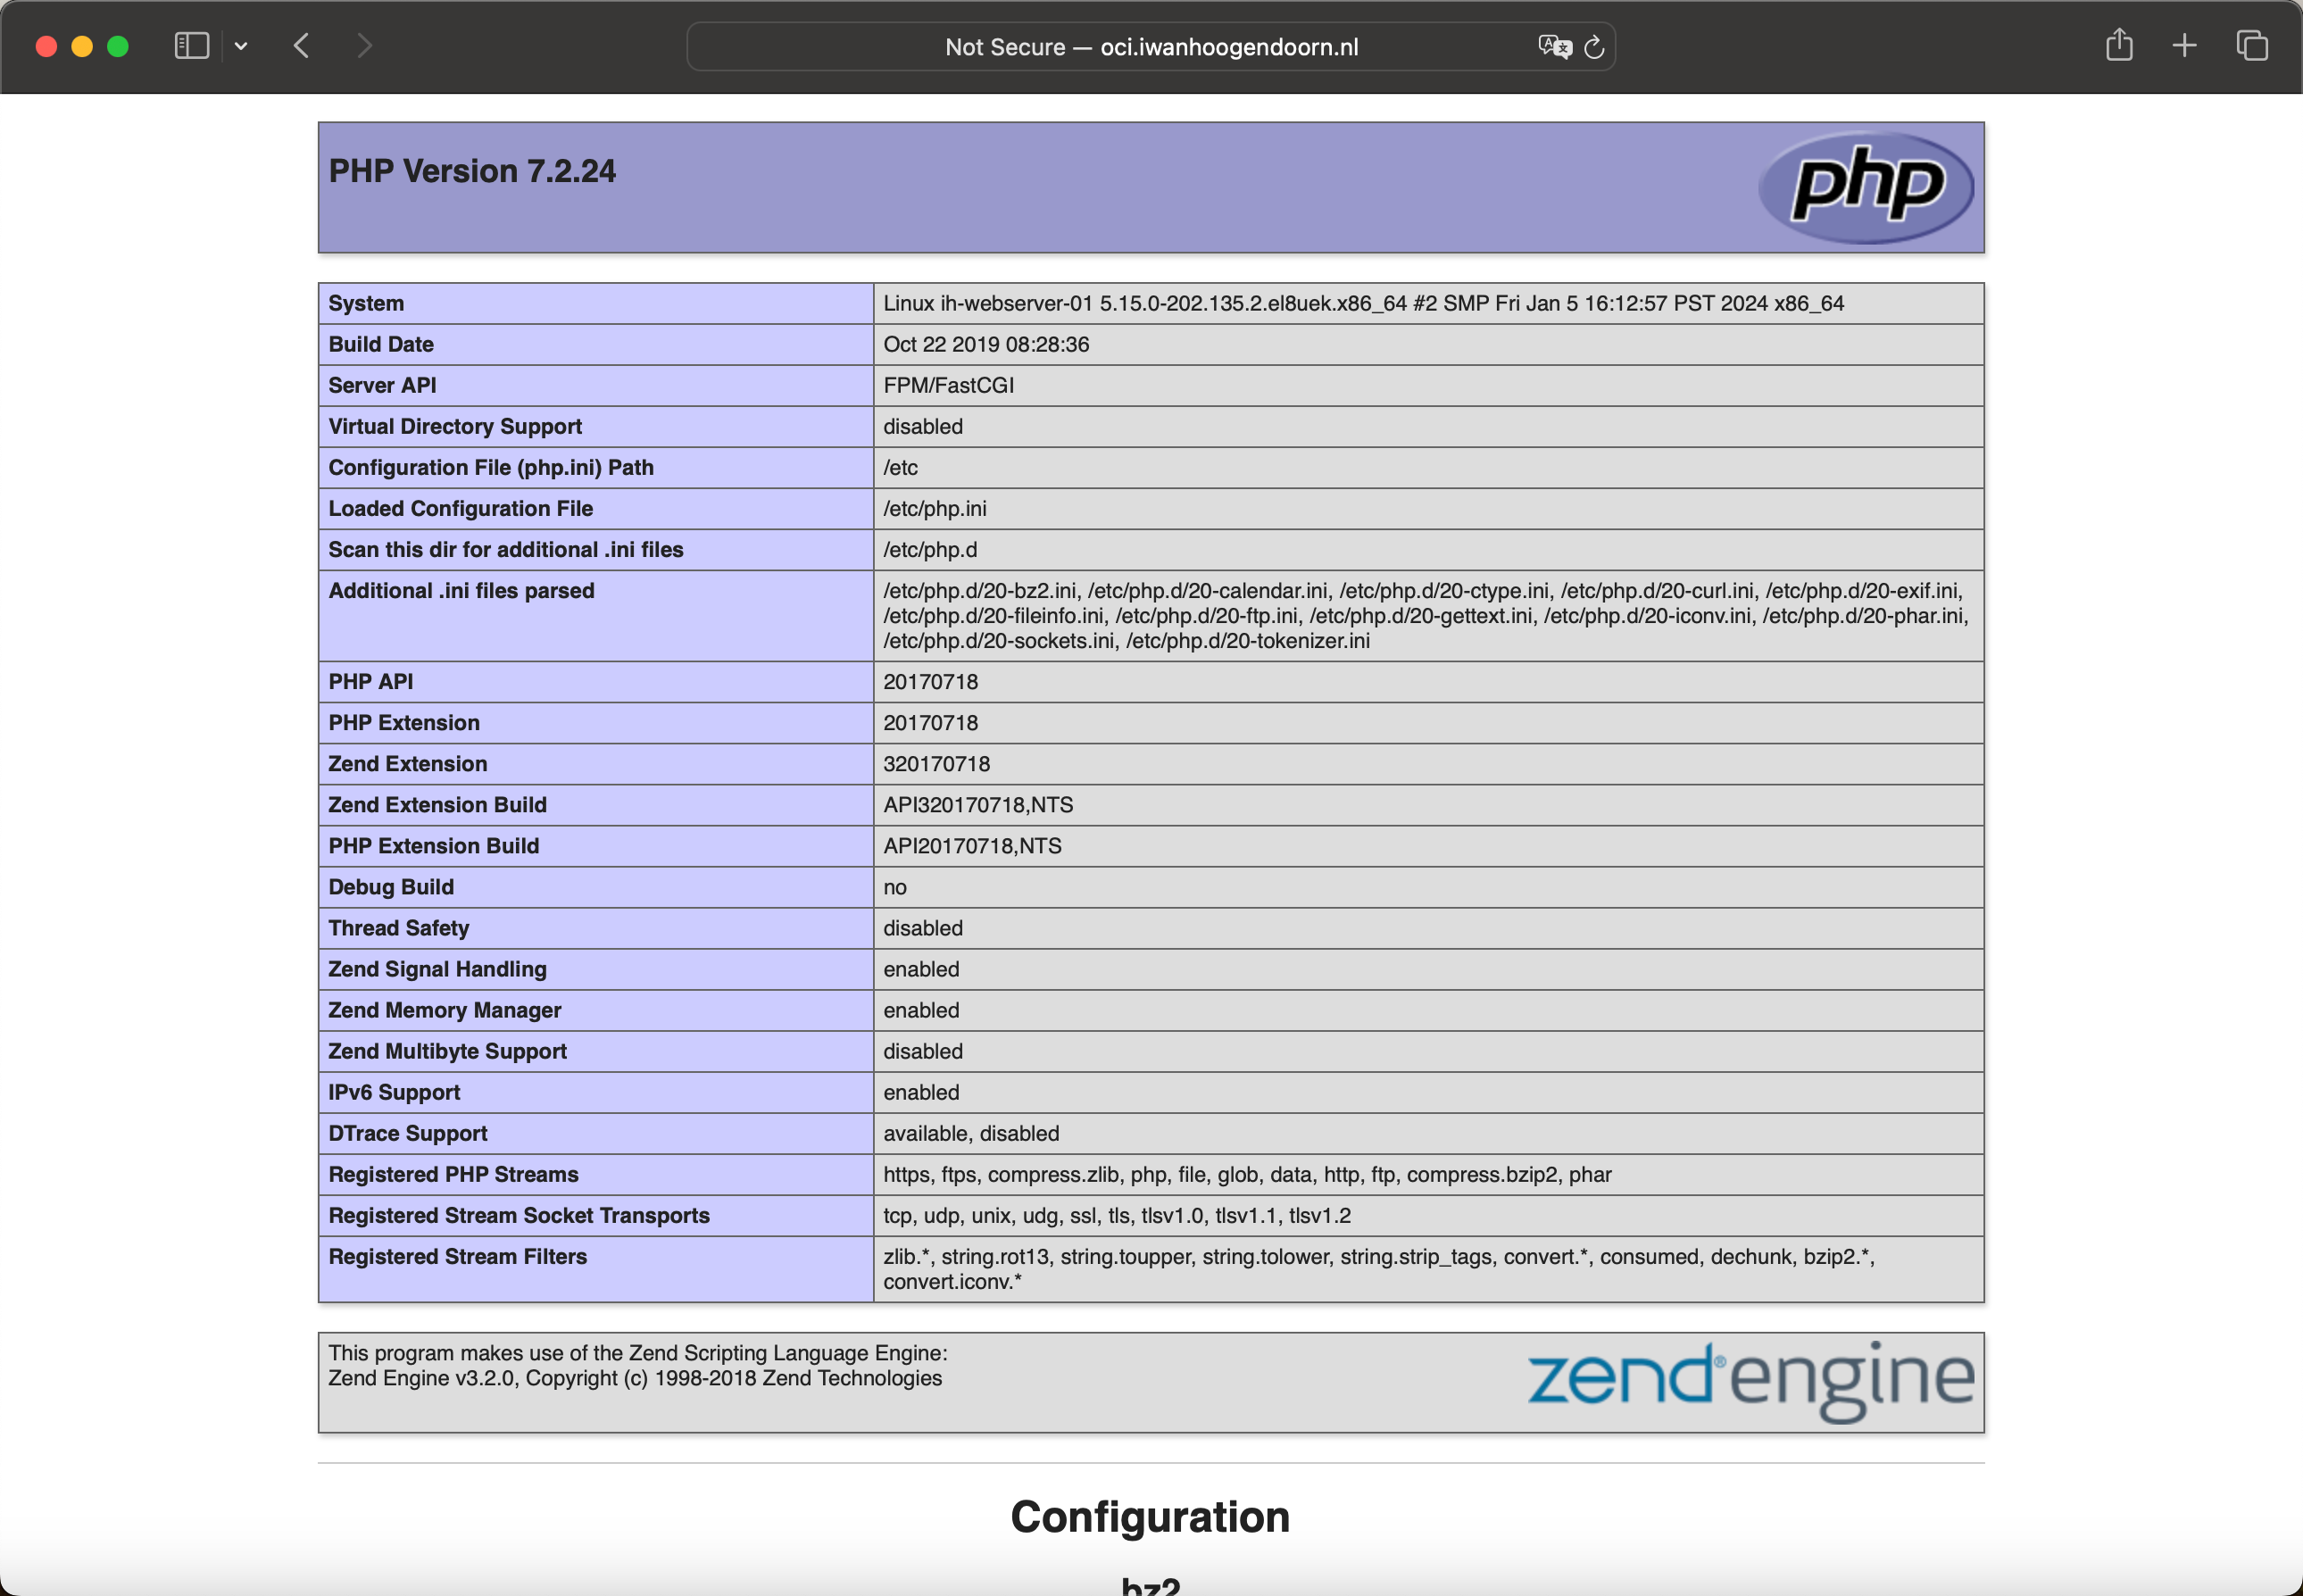
當網站安裝並正確設定時,會顯示下列網頁。此頁面將根據您用來連線的 IP 版本,提供本機和遠端 IPv4 或 IPv6 位址的相關資訊。此頁面也會說明您使用的通訊協定、HTTP 或 HTTPS。

-
工作 9:從網際網路測試 Web 伺服器
注意:我們在此教學課程中使用的網域已建立並設定為僅供測試之用。
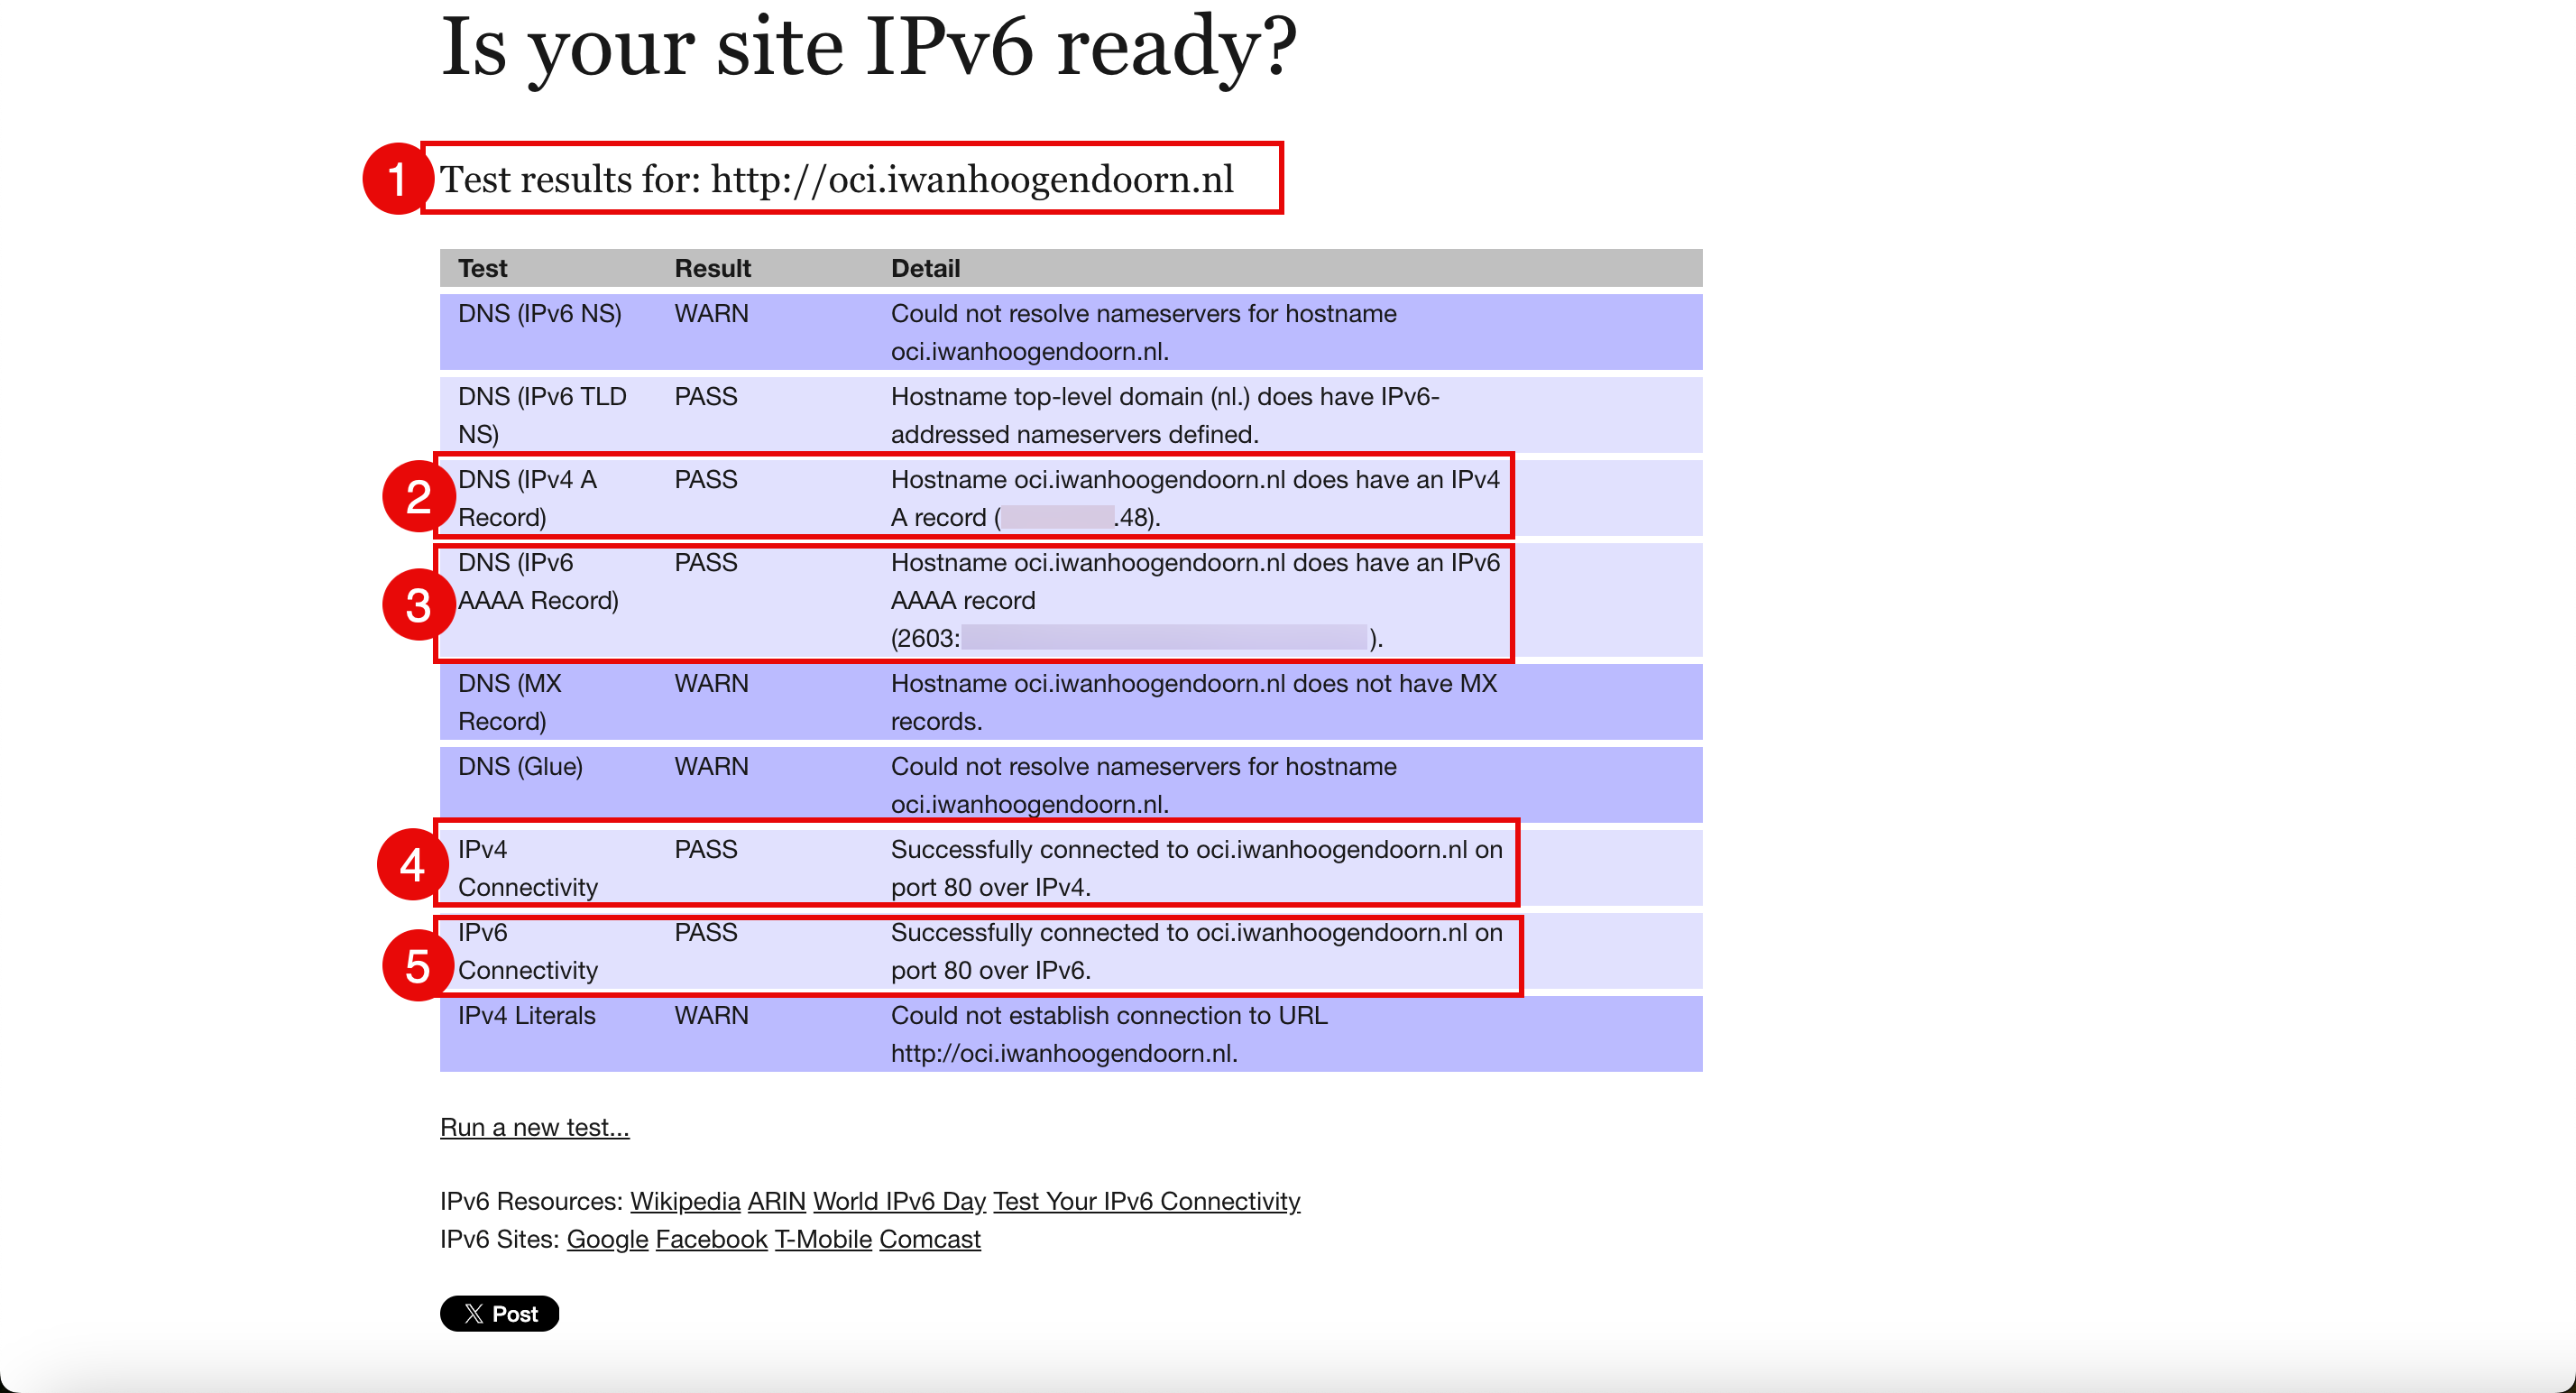
即使我們已經使用多種方法測試網站或 Web 伺服器的連線能力。我們想要使用下列網站執行最後的測試,以一次測試連線能力和 DNS 記錄組態。您的網站 IPv6 已就緒嗎?
- 使用 FQDN oci.iwanhoogendoorn.nl 進行測試。
- 驗證 IPv4 DNS 記錄是否正確設定。
- 驗證 IPv6 DNS 記錄是否正確設定。
- 確認網站可於 IPv4 連線。
- 確認網站可於 IPv6 連線。
認可
- 作者 - Iwan Hoogendoorn (OCI 網路專家)
其他學習資源
瀏覽 docs.oracle.com/learn 的其他實驗室,或前往 Oracle Learning YouTube 頻道存取更多免費學習內容。此外,請造訪 education.oracle.com/learning-explorer 以成為 Oracle Learning Explorer。
如需產品文件,請造訪 Oracle Help Center 。
Use Oracle Cloud Infrastructure to Publish a Webserver Accessible from the Internet with IPv6
F93547-01
February 2024
Copyright © 2024, Oracle and/or its affiliates.