Release 1 (9.0.1) for Windows
Part Number A90164-01
Home |
Book List |
Contents |
Index | Master Index | Feedback |
| Oracle9i Database Administrator's Guide Release 1 (9.0.1) for Windows Part Number A90164-01 |
|
![]()
![]()
This chapter describes how to administer Oracle9i for Windows.
This chapter contains these topics:
This section provides information on the following:
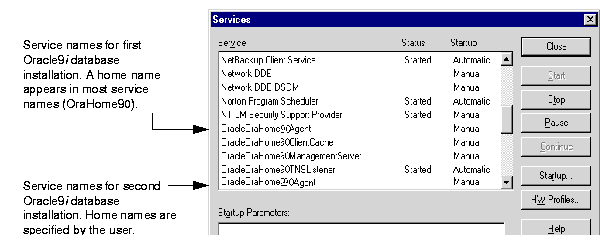
Oracle9i for Windows lets you have multiple, active Oracle home directories on a single computer.
The Database Tools Overview chapter of Oracle9i Database Getting Started for Windows describes this feature. Multiple Oracle homes affect the naming conventions for Oracle services. As you perform installations into Oracle home directories:
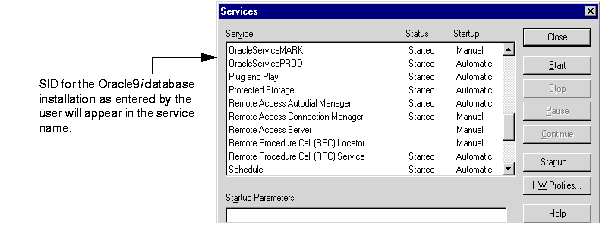
(SID) and global database name for each database installation
Figure 3-1 shows how the Services dialog box appears with two Oracle9i databases on a single computer:
Depending on the products that you have installed, a number of Oracle services are started when you restart your Windows NT computer. A user with a non-system account must have local administrative rights to run services on a Windows NT computer. The two main Oracle services are described in Table 3-1.
Table 3-2 lists additional Oracle services related to specific products or database features that are also available:
| Service Name | Description |
|---|---|
|
|
Listens for and responds to job and event requests sent from the Oracle Enterprise Manager console. |
Services for network products that are available are described in Table 3-3:
|
See Also:
Oracle9i Net Services Administrator's Guidefor general information on Oracle network services |
Oracle services must be started for you to use the Oracle9i database and its products.
Start Oracle services in either of three ways:
You can start the Oracle9i database when you start
Note:
OracleServiceSID. See "Starting and Shutting Down a Database Using Services" for information on registry parameters that enable you to do this.
To start Oracle services from the Control Panel:
The Control Panel window appears.
The Services dialog box appears.
If you cannot find OracleServiceSID in the list, use the ORADIM utility to create it.
To start Oracle services from the MS-DOS command prompt:
Enter the following command to start an Oracle service at the MS-DOS command prompt:
C:\> NET STARTservicewhere
serviceis a specific service name, such asOracleServiceORCL.
To start Oracle services from the Oracle Administration Assistant for Windows NT:
SID.
where SID is a specific instance name, such as orcl.
This starts the service OracleServiceORCL.
On occasion (for example, if you want to re-install the Oracle9i database), you must stop Oracle services. Stop Oracle services in either of three ways:
You can stop the Oracle9i database in normal, immediate, or abort mode when you stop
Note:
OracleServiceSID. See "Starting and Shutting Down a Database Using Services" for information on registry parameters that enable you to do this.
To stop Oracle services from the Control Panel:
The Control Panel window appears.
The Services dialog box appears.
Oraclehome_nameTNSListener and choose Stop.
Oraclehome_nameTNSListener is stopped.
OracleServiceSID and choose Stop.
OracleServiceSID is stopped.
To stop Oracle services from the MS-DOS command prompt:
Enter the following command to stop an Oracle service at the MS-DOS command prompt:
C:\> net STOPservicewhere
serviceis a specific service name, such asOracleServiceORCL.
To stop Oracle services from the Oracle Administration Assistant for Windows NT:
sid.
where sid is a specific instance name, such as orcl.
This stops the service OracleServiceORCL.
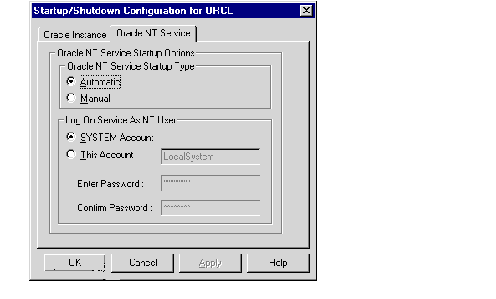
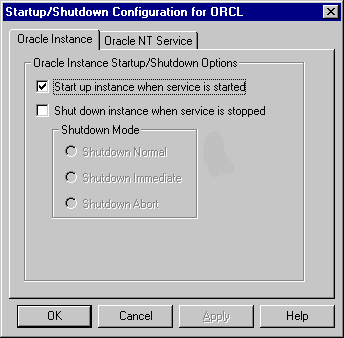
You can start Oracle services whenever the Windows computer is restarted. Use the Service dialog box to configure when and how the Oracle9i database is started.
To automatically start the Oracle9i database each time you restart Windows:
The Control Panel window appears.
The Services dialog box appears.
OracleServiceSID and choose the Startup button.
The Service dialog box appears.
To automatically start Oracle services from Oracle Administration Assistant for Windows NT:
sid.
where sid is a specific instance name, such as orcl.
These instructions assume that a database instance has been created.
|
Note:
The directory path examples in this chapter follow Optimal Flexible Architecture (OFA) guidelines (for example, |
To start or shut down an Oracle9i database:
C:\> SQLPLUS / NOLOG
SYSDBA username:
SQL> CONNECT / AS SYSDBA
|
See Also:
Oracle9i Database Getting Started for Windows for a list of other tools that can start the database and this guide for information on options you can specify when starting your database. |
You can start or shut down the Oracle9i database by starting or stopping the service OracleServiceSID in the Control Panel. This automated procedure is equivalent to using the STARTUP or SHUTDOWN commands or manually entering the following:
To start the database by starting OracleServiceSID:
See Oracle9i Database Getting Started for Windows for instructions on adding and editing registry parameters.
The exact location in which to set these parameters is determined by the number of Oracle home directories on your computer:
The Control Panel window appears.
The Services dialog box appears.
OracleServiceSID and choose Start.
This automatically starts the ORADIM utility and issues the -STARTUP command using the initialization parameter file identified by ORA_SID_PFILE.
To shut down the database by stopping OracleServiceSID:
true in the registry:
If either is set to false (the default setting), it is possible to shut down the database by stopping OracleServiceSID, but this is not recommended because it results in an abnormal shutdown of the database.
The exact location in which to set these parameters is determined by the number of Oracle home directories on your computer.
|
See Also:
See Oracle9i Database Getting Started for Windows for instructions on adding and editing registry parameters |
The Control Panel window appears.
The Services dialog box appears.
OracleServiceSID and choose Stop.
This automatically starts the ORADIM utility, which issues the -SHUTDOWN command in the mode indicated by ORA_SID_SHUTDOWNTYPE, and shuts down your Oracle9i database.
To start or stop a database using Oracle Services from the Oracle Administration Assistant for Windows NT:
SID.
where SID is a specific instance name, such as ORCL.
To run multiple instances, ensure that you have already created each instance and started the services for each instance using the ORADIM utility or the Services dialog box in Windows NT. You then run multiple instances by starting each of the instances using SQL*Plus.
To run multiple instances:
ORACLE_SID configuration parameter at the MS-DOS command prompt to the SID for each instance you want to run:
C:\> SET ORACLE_SID=SID
where SID is the name of the Oracle9i database instance.
C:\> SQLPLUS / NOLOG
SQL> CONNECT /ASSYSDBA
SQL>STARTUP PFILE=ORACLE_BASE\admin\db_name\pfile\init.ora
where ORACLE_BASE is c:\oracle by default (unless you changed it during installation) and db_name is the name of the instance.
Use the Password Utility to create password files. The Password Utility is automatically installed with the Oracle9i Utilities. Password files are located in the ORACLE_BASE\ORACLE_HOME\DATABASE directory and are named PWDsid.ORA, where SID identifies the Oracle9i database instance. Password files can be used for local or remote connections to an Oracle9i database. The following example describes how to perform a local connection.
To create a password file:
C:\> orapwd FILE=PWDsid.ora PASSWORD=password ENTRIES=max_users
The essential elements of a password file are:
| Element | Description |
|---|---|
|
|
Identifies the database instance. |
|
|
Specifies the password filename. |
|
|
Sets the password for the |
|
|
Sets the maximum number of entries in the password file. This corresponds to the maximum number of distinct users allowed to connect to the database with the |
init.ora file parameter REMOTE_LOGIN_PASSWORDFILE to exclusive or shared. Definitions for all possible values are described below:
C:\> SQLPLUS / NOLOG
SQL> CONNECT / AS SYSDBA
SQL> STARTUP
SQL> GRANT SYSDBA TO scott;
If successful, the following message displays:
Statement Processed.
This adds scott to the password file and enables scott to connect to the database with SYSDBA privileges. Use SQL*Plus to add or delete usernames, user passwords, and user privileges in password files.
scott:
SQL> CONNECT scott/tiger AS SYSDBA
You are connected to the Oracle9i database.
The password file is automatically hidden. This section describes two ways of viewing the password file:
Table 3-4 lists commands for viewing the password file from the MS-DOS command prompt:
Table 3-4 Viewing the Password File from the MS-DOS Command Prompt
To see the password file from Windows NT Explorer:
| To... | Choose... |
|
See the password file |
Show all files. |
|
Hide the password file |
Do not show hidden files. |
This section describes how to delete a password file.
To delete a password file:
When connecting to the starter database from a remote computer as SYS, you must use a different password from the one described in Oracle9i Database installation guide for Windows when logging on with SYSDBA privileges. This is because the password file enables database access in this situation and it requires the password oracle for this purpose.
With the Oracle9i database, you can encrypt the password used to verify a remote database connection.
To enable password encryption:
DBLINK_ENCRYPT_LOGIN to the initialization parameter init.ora file on the server computer.
DBLINK_ENCRYPT_LOGIN equal to true.
ORA_ENCRYPT_LOGIN configuration variable on the client computer to true. See Oracle9i Database Getting Started for Windows for instructions on adding and setting configuration parameters in the registry.
Once these parameters are set to true, whenever a user attempts a remote login, the Oracle9i database encrypts the password before sending it to the remote database. If the connection fails, the failure is noted in the audit log. The Oracle9i database then checks if either of these parameters is set to false. If so, the Oracle9i database attempts the connection again using an unencrypted version of the password. If the connection is successful, the success is noted in the audit log, and the connection proceeds.
Although it is possible for Oracle to access database files on remote computers using Universal Naming Convention (UNC), it is not recommended or supported because of performance and network reliability concerns.
UNC is a PC format for specifying the location of resources on a local area network. UNC uses the following format:
\\server-name\shared-resource-pathname
For example, to access the file system01.dbf in the directory C:\oracle\ora90\oradata\orcl on the shared server argon, you reference the file as:
\\argon\oracle\ora90\oradata\orcl\system01.dbf
Note that the location of archive log files cannot be specified using UNC. If you set the LOG_ARCHIVE_DEST_n initialization parameter to a UNC specification, the database does not start and you receive the following errors:
ORA-00256: error occurred in translating archive text string '\meldell\rmdrive'
ORA-09291: sksachk: invalid device specified for archive destination
OSD-04018: Unable to access the specified directory or device
O/S-Error: (OS 2) The system cannot find the file specified
Ensure that you set the LOG_ARCHIVE_DEST_n initialization parameter to a mapped drive.
Your Oracle9i database is created in NOARCHIVELOG mode if you installed your database through the Typical installation. If you created your database through the Custom option of Oracle Database Configuration Assistant, you had the choice of either ARCHIVELOG or NOARCHIVELOG.
In NOARCHIVELOG mode, redo logs are not archived. Setting your archive mode to ARCHIVELOG and enabling automatic archiving causes redo log files to be archived. This protects the database from both instance and disk failure.
This section describes how to change the archive mode to ARCHIVELOG and enable automatic archiving. See "Managing Archived Redo Logs" of Oracle9i Database Administrator's Guide for complete descriptions of the ARCHIVELOG and NOARCHIVELOG modes.
To change the archive mode to ARCHIVELOG:
C:\> SQLPLUS / NOLOG
SYSDBA username:
SQL> CONNECT / AS SYSDBA
SQL> SHUTDOWN
SQL> STARTUP MOUNT
SQL> ARCHIVE LOG LIST
The following output indicates the database is not in archive mode:
Database log mode              No Archive Mode
Automatic archival             Disabled
Archive destination            %RDBMS%\
Oldest online log sequence     34
Current log sequence           37
ARCHIVELOG:
SQL> ALTER DATABASE ARCHIVELOG;
SQL> ARCHIVE LOG LIST
The following output indicates the database is now in archive mode:
Database log mode              Archive Mode
Automatic archival             Disabled
Archive destination            %RDBMS%\
Oldest online log sequence     34
Current log sequence           37
SQL> ALTER DATABASE OPEN;
To enable automatic archiving:
ORACLE_BASE\ADMIN\db_name\pfile\init.ora file.
# LOG_ARCHIVE_START = true
# LOG_ARCHIVE_DEST_1 = %ORACLE_HOME%\database\archive
# LOG_ARCHIVE_FORMAT = "%%ORACLE_SID%%T%TS%S.ARC"
# sign from in front of each.
LOG_ARCHIVE_DEST_n value to identify an existing drive and directory in which to archive your filled redo logs.
LOG_ARCHIVE_FORMAT value to indicate the appropriate archiving format:
| Format | Description | Example |
|---|---|---|
|
|
Specifies the thread number. This number is padded to the left by zeroes. The default value is one with a range of up to three characters. |
|
|
|
Specifies the log sequence number. This number is padded to the left by zeroes. The default value is one with a range of up to five characters. |
|
|
|
Specifies the thread number. The number is not padded. The default value is one with no range limit on characters. |
|
|
|
Specifies the log sequence number. The number is not padded. The default value is one with no range limit on characters. |
|
SQL> SHUTDOWN
SQL> STARTUP
SQL> ARCHIVE LOG LIST
The following output indicates that automatic archiving of redo log files is enabled and an archiving destination is specified:
Database log mode              Archive Mode
Automatic archival             Enabled
Archive destination            C:\BACKUP
Oldest online log sequence     34
Current log sequence           37
The ORADEBUG utility is a debugging tool that sends debug commands through SQL*Plus to Oracle processes. It is primarily for use by developers and Oracle Support Services personnel. Only use this utility when instructed to do so by Oracle Support Services. You must have database administrator privileges to use the ORADEBUG utility.
To start the ORADEBUG utility:
SYSDBA. For example:
C:\> SQLPLUS / NOLOG
SQL> CONNECT / AS SYSDBA
SQL> ORADEBUG
The ORADEBUG utility runs and prompts you for parameters. To obtain a list of these parameters, enter the following at the SQL*Plus prompt:
SQL> ORADEBUG HELP
The output from most debug commands is written to a trace file. Trace files are created in the directory specified by the init.ora initialization parameters BACKGROUND_DUMP_DEST and USER_DUMP_DEST. By default, these parameters are set to ORACLE_BASE\ADMIN\db_name\bdump and ORACLE_BASE\ADMIN\db_name\udump, respectively. If you want to find the location of your trace file, enter the following at the SQL*Plus prompt:
SQL> ORADEBUG TRACEFILE_NAME
If the output from a debug command produces more than one line of output, the result is sent to a trace file, and a message indicating that the command has completed is relayed to SQL*Plus. If the output from a debug command produces only one line of output, the output is relayed directly to SQL*Plus.
|
|
 Copyright © 1996-2001, Oracle Corporation. All Rights Reserved. |
|