Release 2 (9.0.2)
Part Number A90852-02
Home |
Solution Area |
Contents |
Index |
| Oracle9iAS Portal Configuration Guide Release 2 (9.0.2) Part Number A90852-02 |
|
This chapter provides information on setting up the built-in Oracle Text search capabilities in Oracle9iAS Portal page groups.
This chapter contains the following sections:
For Oracle Text documentation, see your Oracle9i database documentation library, and for Oracle Text technical papers, training materials, code samples, and so on, visit:
See also:
This release of Oracle9iAS Portal includes the following new features for search:
To access these new features, click Search Settings in the Services portlet. By default, the Services portlet is located on the Oracle9iAS Portal home page's Administer tab. To access the new customization features, it is necessary to use the Edit Defaults customization settings on an instance of a search portlet.
You must be logged on as a portal administrator to configure Oracle Text (Formerly Intermedia Text), and create, alter, update, and drop Oracle Text indexes.
Before using Oracle Text in Oracle9iAS Portal, perform the following tasks:
Oracle9i installation documentation for more information about installing and configuring an Oracle9i database to use Oracle Text.
See also:
The main points to know when searching in Oracle9iAS Portal page groups include:
There are three levels and two modes of searching in Oracle9iAS Portal page groups depending on the type of search you use: basic search, advanced search, custom search and whether Oracle Text search is enabled. Only allows you to enter the main search term.
The basic search is available from the Search field on the navigation bar. It only allows you to enter the main search term.
This type of search looks for the specified words in the item attributes such as the display name, description, and keywords of items, as well as the display name and description of folders, categories, and perspectives. Depending on whether Oracle Text is enabled, the basic search can also look in the content of documents and URLs. A search results page displays all items that meet the search criteria.
|
See also:
The Oracle9iAS Portal Online Help topics: Performing a basic search, Setting up the search feature, and Editing navigation page properties. |
When Oracle Text is not enabled in the basic search:
When Oracle Text is enabled in the basic search:
With advanced search, which is always enabled, you can:
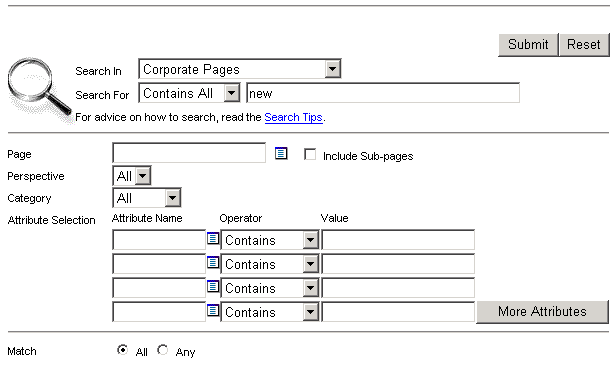
When Oracle Text is not enabled in the advanced search:
When Oracle Text is enabled in the advanced search:
The custom search is available from a Custom Search portlet. The custom search portlet is fully customizable and can be modified to search on any of the item, page, categories and perspective attributes.
|
See also:
For more information on custom searching, refer to the Oracle9iAS Portal Online Help topic Performing a custom search. |
When Oracle Text is not enabled in the custom search:
When Oracle Text is enabled in the custom search:
By default STEM searching is used when Oracle Text is enabled. However, STEM searching is only used when logged in to Oracle9iAS Portal in one of the languages where STEMing is supported in Oracle Text. STEMing is supported in the following languages:
AMERICAN
CANADIAN FRENCH
DUTCH
ENGLISH
FRENCH
GERMAN DIN
GERMAN
ITALIAN
LATIN AMERICAN SPANISH
MEXICAN SPANISH
SPANISH
In all other languages, the STEM operator is not used.
As discussed earlier, Oracle9iAS Portal has built-in support for Oracle Text indexing. It is worth repeating that search is enabled for all page groups created in your Oracle9iAS Portal installation. It cannot be enabled on one page group and disabled on another page group. The search is performed on the actual content in documents such as PDF, PowerPoint, and Word as well as the contents on URL pages, text, and HTML.
If Oracle Text is not enabled, end users can always perform a basic or advanced search in the page group.
If themes and gists are enabled from the Search Settings page (see Figure 7-3, "Services portlet Oracle Text properties"), then you can access the themes and gists for documents returned by a search from the search results. You can:
Oracle Text performance may be affected by the following query, indexing, and update considerations:
The speed at which the text index can deliver ROWIDs is not affected by the actual size of the data, but by the size of the Token Table which holds the list of words, and information about the rows in which they appear. Text query speed will be related to the number of rows that must be fetched from this Token Table, and the length of each row.
Thus, it should be nearly as fast to find a rare word in a large document set as it is to find a common word (or many uncommon words) in a smaller document set.
The format of the documents (for example, plain ASCII text, HTML or Microsoft Word) should make no difference to query speed. The documents are filtered to plain text at indexing time, not query time.
The "cleanliness" of the data makes a difference. Spell-checked and sub-edited text for publication tends to have a much smaller total vocabulary (and therefore size of token table) than informal text such as e-mails, which contain many spelling errors and abbreviations to bloat the token table.
Indexing text is a resource-intensive process. Obviously, the speed of indexing depends on the power of the hardware involved, but you should expect somewhere between 50MB per hour on workstation-class Windows NT/2000 machine (approximately 400MHz CPU, 128MB memory) to more than 1GB per hour on a large multi-CPU, multi-gigabyte server machine. The latter figure assumes you are using parallel indexing on a partitioned table.
For most real-life systems, the time to index a complete table of documents will be measured in hours, and in some cases days.
You can use the ctx_output.start_log filename command to log output from the indexing process. The filename will normally be written to ORACLE_HOME/ctx, but you can change the directory using the log_directory parameter in ctx_adm.set_parameter.
Otherwise, for a course-grained answer, you can count the number of rows in the DR$xxx$K table. There will be one row in here for each row that has been indexed. However, these rows are only committed when the indexing process runs out of indexing memory and does a "flush" to the database. It is even possible that this will never happen until indexing is complete.
The overhead (the amount of space needed for the DR$ index tables) varies between approximately 25% of the original text volume, and 100%. Generally, the larger the total amount of text, the smaller the overhead, but many small records will use more overhead than fewer large records. Also, "clean" data (such as published text) will require less overhead than "dirty" data such as e-mails or discussion notes, since the "dirty" data is likely to include many unique words from misspellings, abbreviations, and so on.
Theme indexes are generally much smaller than text indexes. Creating a theme index only will generally require very little storage, but creating a text index only will not save you much space over a combined index, though it is likely to be significantly faster.
Looking at indexing overhead, you can expect much lower overheads for formatted documents (for Microsoft Word files) since such documents tend to be very large compared to the actual text held in them.
So 1GB of Word documents might only require 50MB of index space, whereas 1GB of plain text might require 500MB, since there is ten times as much "plain text" in the latter set.
Indexing time is harder to determine. Although the reduction in the amount of text to be indexed will have an obvious effect, we must balance this out against the cost of filtering the documents. In general, these will roughly cancel out, so the time to index 1GB of formatted docs will be about the same as to index 1GB of plain text, although it may be a little longer.
How often do you need to? The less often you run re-indexing then the less fragmented your indexes will be, and the less you will need to optimize them. However, this means that your data will become progressively more out of date, which may be unacceptable for your users.
Many systems can handle overnight indexing. This means data that is less than a day old is not searchable. Other systems use hourly, ten minute, or five minute updates.
To keep your indexes up to date, so you can search on recently added content, you will need to use the procedure wwv_context.sync(), which in turn calls the ctx_ddl.sync_index procedure to synchronize the six Oracle9iAS Portal indexes.
|
See also:
|
Synchronizing indexes can cause them to become fragmented. Heavily fragmented text indexes can cause the search query performance to deteriorate. To rectify this it is necessary to optimize the indexes. This is done by using the call procedure
wwv_context.optimize();
Which in turn calls the ctx_ddl.optimize_index procedure.
The wwv_context.optimize procedure uses the fragmentation estimation query to determine if the indexes are fragmented, before running the optimization. It will therefore only optimize the indexes if they are fragmented.
One method for checking whether the indexes are fragmented involves counting the number of rows for each term in the DR$xxx$K table:
SELECT AVG(COUNT(*)) FROM DR$index_name$I
   GROUP BY TOKEN_TEXT HAVING COUNT(*) > 1;
A value greater than 10 from this query may indicate the need to optimize the index, but experimentation should yield the best value in any particular circumstances. Very large tables will inevitably have a lot of rows where the TOKEN_INFO data overflows the 4K internal limit, so you would expect the average to be greater on large systems.
|
See also:
The Oracle Text Performance FAQ at: |
There are four main steps for setting up Oracle Text in Oracle9iAS Portal:
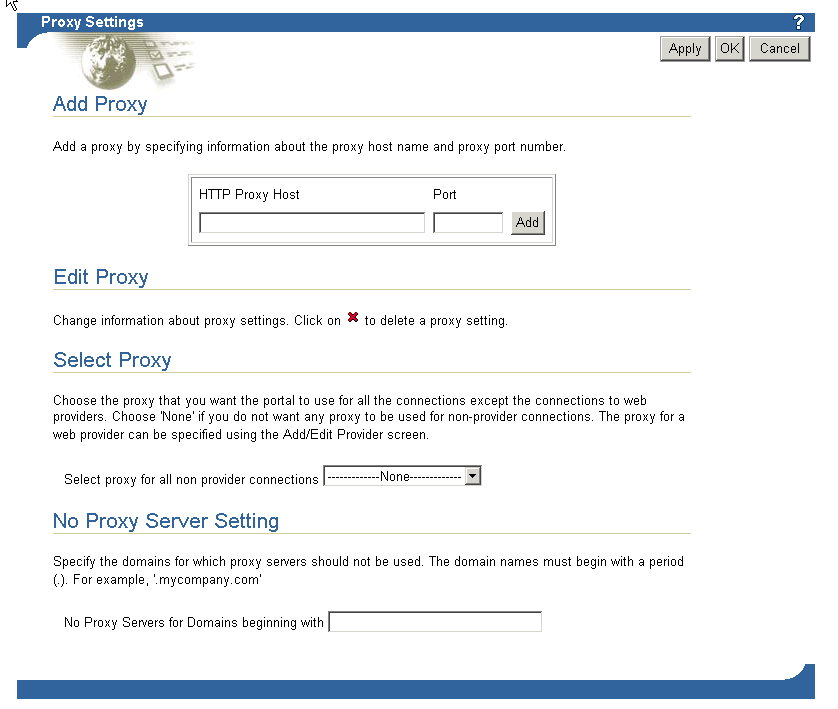
The first step requires you to configure the global page settings in the following way:
By default Oracle9iAS Portal text indexes are built at install time. You will only need to build a new index in case the index creation failed during installation or if the indexes have since been dropped. You can tell that indexes have been created by going to the Oracle9iAS Portal home page's Administer tab. In the Services portlet, click Search Settings. If the button caption in the Specify Oracle Text Search Properties. portlet reads 'Drop Index', it means that the index already exists and that it does not need to be created. Otherwise the button caption will read 'Create Index'.
You can create the Oracle Text indexes as follows:
ctxcrind.sql
Alternatively, you can go to the Oracle9iAS Portal home page's Administer tab. In the Services portlet, click Search Settings. In the Specify Oracle Text Search Properties section, click Create Index.
The following Oracle Text indexes are created:
|
Note: The time required for creating indexes varies depending on the number of items you have in your page group. |
In troubleshooting, you may need to reinstall Oracle Text, or you may need to recreate the ctxsys schema. In both of these cases, you need to run the following script in SQL*Plus to reset the Oracle9iAS Portal Oracle Text environment:
inctxgrn.sql
This file is located in the ORACLE_HOME/portal/src/wws directory.
Log on using the user name and password for the schema that owns the Oracle9iAS Portal page group. For example, if the schema name is "SCOTT", log on with the user name "SCOTT" and the appropriate password.
You can enable and configure the Oracle Text settings in Oracle9iAS Portal in the following way:
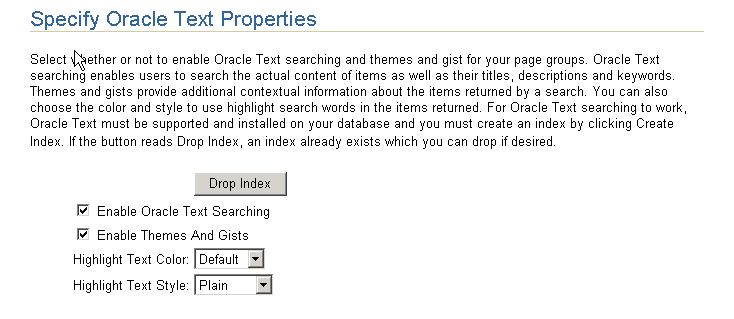
Oracle Text lets you create a text index (an inverted index) on documents stored in the database. Updating an inverted index requires heavy processing, so changes to a text column are queued and processed in batch. The process of updating the inverted index based on the queue is referred to as "synchronizing" the index.
The second aspect of maintaining your Oracle Text index is optimizing. As your index is synchronized, it grows in such a way as to consume more disk space than necessary and reduces the efficiency of queries.
Optimizing your index works differently depending on the mode you select. Optimizing in FAST MODE works on the entire index and compacts fragmented rows, but does not remove old data. FULL MODE permits optimization of the whole index or a portion of the index and both compacts fragmented rows and removes old data.
Oracle Text gives you full control over how often each text index is synchronized. You can choose to synchronize every five seconds, for example, if it is important for your application to reflect text changes quickly in the index. You can choose to synchronize once a day, for more efficient use of computing resources and a more optimal index.
After creating your Oracle Text index, you need to consider a strategy for maintaining the index. For example, if you have many inserts, updates, or deletes throughout the day, consider synchronizing the Oracle Text index on a daily basis.
Oracle9iAS Portal provides new procedures and scripts for updating and optimizing the six Oracle9iAS Portal Text indexes.
A new Oracle9iAS Portal procedure for Index synchronization has been added that can be called to synchronize all of the relevant indexes:
wwv_context.sync();
This call procedure uses the ctx_ddl.sync_index procedure and can be executed by the Portal schema owner from SQL*Plus, by using the command
exec wwv_context.sync();
This procedure will index those rows that are out of date. To keep the indexes synchronized a job can be set up to call this procedure. The script portal/src/wws/textjsub.sql is provided for this.
You can also index via the following command:
ALTER INDEX indexname REBUILD ONLINE PARAMETERS('SYNC')
Alternatively, you can still use the procedure:
ctx_ddl.sync_index
|
Note:
The Context Server (ctxsrv) and the use of Note also that this procedure needs to be run for all the indexes. |
The view ctx_user_pending can be used to see how many rows there are for each of the user's indexes that need indexing. Note that the script wws/textstat.sql gives a number of details about the state of the Portal Text indexes and associated synchronization jobs. One of these details is the number of rows from each of the Portal Text indexes that are pending.
It is more efficient to synchronize a larger number of rows on a single occasion than to repeatedly synchronize a smaller number of rows. However, indexing a larger number of rows at once places a heavier load on the server. Synchronizing more frequently will increase the total amount of work done will spread the load on the server.
Optimizing Indexes prevents fragmentation, which can cause performance loss. To optimize the Oracle Text indexes you can use the new Oracle9iAS Portal procedure:
wwv_context.optimize();
This procedure calls ctx_ddl.optimize_index for each of the Oracle9iAS Portal indexes and can be executed by the Portal schema owner from SQL*Plus, by using the command
exec wwv_context.optimize();
To keep the indexes optimized a job can be set up to call this procedure. The script portal/src/wws/optjsub.sql is provided for this.
Alternatively, you can call the ctx_ddl.optimize_index procedure directly from SQL*Plus.
|
Note: The Context Server (ctxsrv) and the use of ctx_schedule has been deprecated and should no longer be used. Note also that this procedure needs to be run for all the indexes. |
You can stop the text synchronization job by logging on as the Portal schema owner and running the script textjsub.sql pass in STOP as the first argument. The second two arguments are then ignored. This will stop the synchronization job.
Dropping an index is a very time-consuming and resource-intensive operation so plan this task during non-business hours.
You would drop an Oracle Text index in the following situations:
You can drop the Oracle Text indexes as follows:
ORACLE_HOME/portal/src/wws directory.
ctxdrind.sql
Alternatively, you can go to the Oracle9iAS Portal home page's Administer tab. In the Services portlet, click Search Settings. In the Specify Oracle Text Search Properties section, click Drop Index.
Multilexer allows you to use language-specific features on documents of different languages stored in the same table. Multilexer is a feature of the index and is configured during index creation. Multilexer requires an extra column in your table, which identifies the language of each document.
At query time, the Multilexer chooses a language-specific lexer to lex the query tokens. This is based on the NLS_LANG setting for the query session. Thus, a query session in the FRENCH language uses the lexer for FRENCH.
During installation of Oracle9iAS Portal, the sbrimtlx.sql script creates the language-specific lexer preferences and gathers them under a single multilexer preference.
The Oracle9iAS Portal installation creates the following procedures in the ctxsys schema. These procedures are created to support the user datastores that are used in page groups for Oracle Text indexing.
where n is the user_id of the Oracle9iAS Portal schema which may be different for each database. This value is the user_id column value from all_users.
This section provides information about Oracle Ultra Search and on how to perform the required database and middle tier configuration. Specific topics in this section include:
Configuring the Oracle9i Application Server Infrastructure
Configuring the Oracle9i database for Oracle Ultra Search
Configuring the Oracle Ultra Search Middle Tier Component
Configuring Remote Crawler Hosts
The Oracle Ultra Search Portlet Sample
In this Oracle Ultra Search overview section we will cover the following topics:
About the Oracle Ultra Search Sample Query Applications
About the Oracle Ultra Search Administration Tool
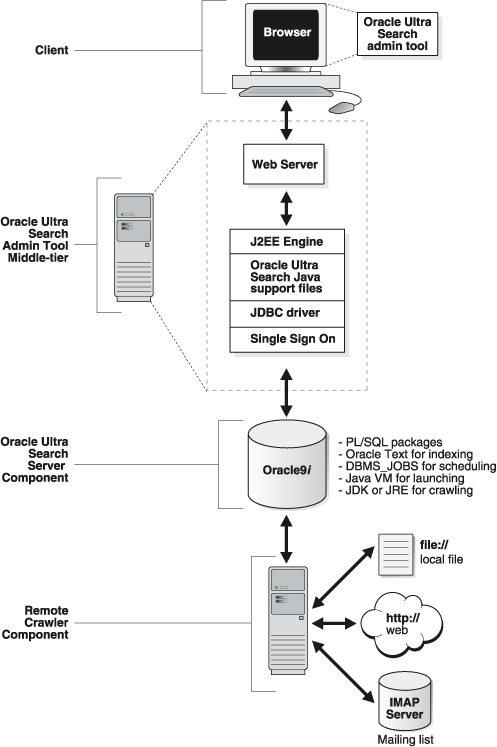
Oracle Ultra Search lets you index and search Web sites, database tables, files, mailing lists, Oracle9iAS Portal, user-defined data sources. As such, you can use Oracle Ultra Search to build different kinds of search applications. Oracle Ultra Search has the following components:
Oracle Ultra Search is integrated with Oracle9iAS Portal. This allows Oracle9iAS Portal users to add a powerful multi-repository search to their portal pages. It also has the capability to crawl Oracle9iAS Portal's own repository and make it searchable.
The following image shows an overview of the Oracle Ultra Search architecture:
|
See also:
For a complete overview and detailed information about Oracle Ultra Search, refer to the Oracle Ultra Search online Help. |
Oracle Ultra Search includes fully functional sample query applications to query and display search results. The query applications are written as JavaServer Page (JSP) applications.
The sample query applications also include a sample search portlet as shown in the following image.
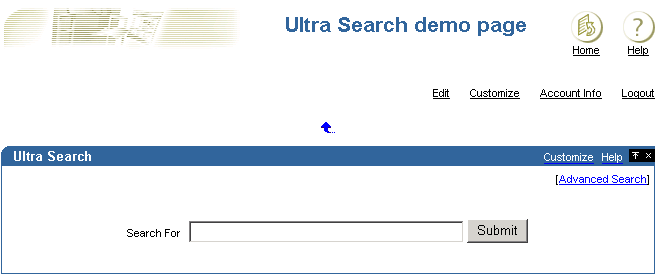
The sample Oracle Ultra Search portlet demonstrates how to write a search portlet for use in Oracle9iAS Portal.
When the user issues a query in any of the query applications, a hit list containing query results is returned. The user can select a document to view from the hit list. A hit list can include HTML documents, files, database table content, archived e-mails, or other items. The Oracle Ultra Search sample query applications also incorporate an email browser for reading and browsing e-mails.
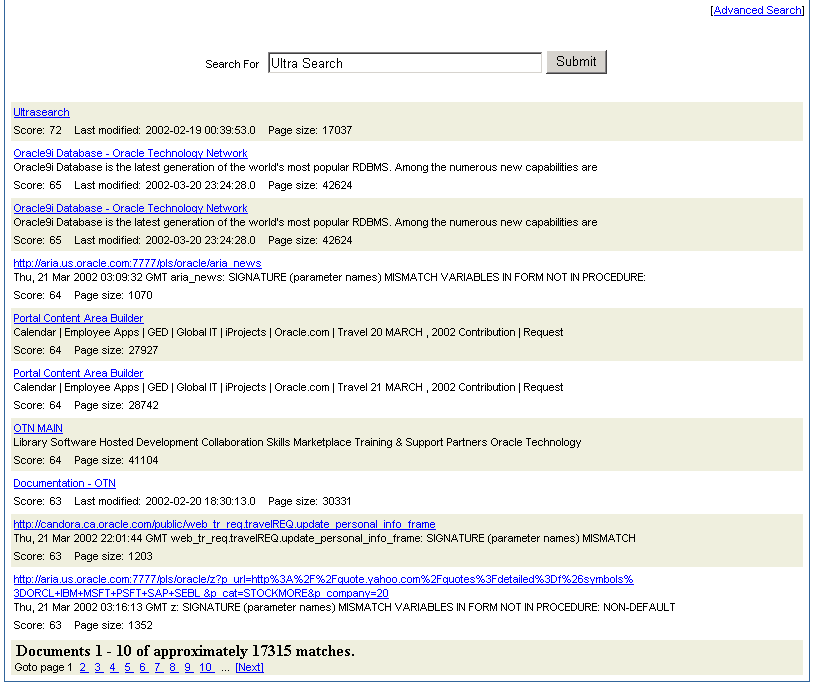
If you do not want to use the Oracle Ultra Search sample query applications, you can build your own query application by directly invoking the Oracle Ultra Search Java Query API . Because the API is coded in Java, you can invoke the API methods from any Java-based application, such as from a Java servlet or a JavaServer page (as in the case of the provided sample query applications). For rendering e-mails that have been crawled and indexed, you can also directly invoke the Oracle Ultra Search Java Email API methods.
The Oracle Ultra Search administration tool is a Web application for configuring and scheduling the Oracle Ultra Search crawler. It allows user management operations on either database users or SSO users. Authenticated SSO users never see the Oracle Ultra Search login screen. Instead, they can immediately choose an Oracle Ultra Search instance.
From the Oracle Ultra Search administration tool you can:
The Oracle Ultra Search administration tool and the Oracle Ultra Search sample query applications are part of the Oracle Ultra Search middle tier components module. However, the Oracle Ultra Search administration tool is independent from the Oracle Ultra Search sample query applications. Therefore, they can be hosted on different machines to enhance security or scalability.
You can access the Oracle Ultra Search administrative interface through Oracle9iAS Portal. In the Services portlet, go to the Ultra Search Administration page. By default, the Services portlet is located on the Oracle9iAS Portal home page's Administer tab (see Figure 7-7, "The Oracle Ultra Search administration portlet").
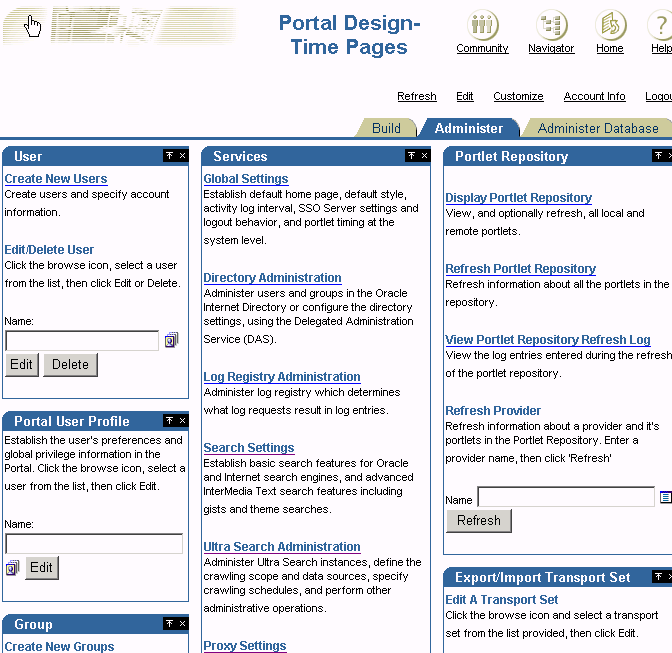
|
See also:
For more information about Oracle Ultra Search, or the Oracle Ultra Search administration tool, refer to the Oracle Ultra Search online Help. |
The Oracle Ultra Search server tier will be installed with the Oracle9i Application Server infrastructure by default.
During the installation of Oracle9i Application Server infrastructure or the Oracle database server, the Oracle Ultra Search server component is installed. The following activity occurs during this process:
Ensure that the following five environment variables are set whenever you operate on this Oracle instance. This is especially important when working on a host that contains multiple Oracle products (and hence multiple Oracle homes). The environment variables and their values are as follows:
ORACLE_HOME: The directory in which you have installed Oracle.
ORACLE_SID: The Oracle instance SID of the database that you specified during the installation process.
PATH: Must be extended to include the bin directory of the newly installed Oracle home (for example, ORACLE_HOME/bin:$PATH)
TNS_ADMIN: Must be set to the network/admin subdirectory in the newly installed Oracle home.
LD_LIBRARY_PATH: Must include all necessary system library directories.
Note: Your Oracle DBA can edit the oraenv script to ensure that all these environment variables are correctly set every time you begin a new shell. Alternatively, you can edit your shell startup script, such as the .cshrc or .bashrc file, in your home directory.
The operations described in this section are database administration operations. They can be performed using Oracle Enterprise Manager or SQL*Plus.
|
See also:
Oracle9i Application Server Administrator's Guide for more information on Oracle Enterprise Manager. |
This section lists the necessary steps for:
Step 1: Tune the Oracle Database
Tuning the Oracle Database for Oracle Ultra Search consists of checking and increasing the size of your log files and increasing the size of the undo space.
Every instance of an Oracle database has an associated online redo log, which is a set of two or more online log files that record all committed changes made to the database. Online redo logs protect the database in the event of an instance failure. The size of redo log files determines the frequency of redo log file switches. This, in turn, significantly impacts text indexing speed. To reduce the frequency of logfile switches, ensure that the redo log files are each 10Mb or more.
|
See also:
Oracle9i Designing and Tuning for Performance, or the Oracle9i Application Server Administrator's Guide for details on tuning your system. |
Every Oracle database must have a method of maintaining information that is used to roll back, or undo, changes to the database. Such information consists of records of the actions of transactions, primarily before they are committed. Oracle refers to these records collectively as undo. The undo space created by the Oracle Installer is likely to be too small.
Historically, Oracle has used rollback segments to store undo. Oracle now offers another method of storing undo that eliminates the complexities of managing rollback segment space, and enables DBAs to exert control over how long undo is retained before being overwritten. This method uses an undo tablespace.
Oracle Corporation recommends that you use automatic undo management and increase the undo space using an UNDO_TABLESPACE.
|
See also:
Oracle9i Application Server Administrator's Guide for details on using automatic undo management. |
Step 2: Create and Assign the Temporary Tablespace to the CTXSYS User
The starter database created by the Oracle Installer most likely creates a temporary tablespace that is too small. Oracle Ultra Search uses the Oracle Text engine intensively. Therefore, a large temporary tablespace must be created for the Oracle Text system user CTXSYS.
If you want greater read and write performance, create a raw tablespace.
When you have created the temporary tablespace, assign it as the temporary tablespace for the CTXSYS user. To do so, you must log on as the SYSTEM or SYS user. You can assign the temporary tablespace to the CTXSYS user with the following statement:
ALTER USER CTXSYS TEMPORARY TABLESPACE <NEW_TEMPORARY_TABLESPACE>
|
See also:
Oracle9i Application Server Administrator's Guide for information on how to create a temporary tablespace. |
Step 3: Create a Tablespace for Each Oracle Ultra Search Instance User
For each Oracle Ultra Search instance, you must create a tablespace large enough to contain all data obtained during the crawling and indexing processes. This amount is naturally subject to the amount of data you intend to crawl and index. However, it is often not possible to know in advance how much data you intend to collect. Try to obtain an estimate of the cumulative size of all data you want to crawl.
If you cannot estimate the size, then try to allocate as much space as possible. If you run out of disk space later, Oracle Ultra Search is able to resume crawling after you have added more datafiles to the instance tablespace.
Pay special attention to the STORAGE clause in your CREATE TABLESPACE statement. The amount of data to be stored in the tablespace can potentially be very large. This can cause the Oracle Server to progressively allocate many new extents when more storage space is needed. If the extent management clause specifies that each new extent is to be larger than the previous extent (that is, the PCTINCREASE setting is nonzero), then you could encounter the situation where the next extent that the Oracle Server wants to allocate is larger than what is available. In such a situation, indexing is halted until new extents can be added to the tablespace.
To help mitigate this problem, certain instance-specific tables have explicit storage parameter settings. The initial extent size, next extent size, and PCTINCREASE setting are defined for these tables. These tables are created when a new instance is created. The tables and their storage clause settings are as follows:
DR$WK$DOC_PATH_IDX$I
(initial extent size 5M, next extent size 50M, PCTINCEASE 1)
DR$WK$DOC_PATH_IDX$K
(initial extent size 5M, next extent size 50M, PCTINCEASE 1)
|
See also:
Oracle9i SQL Reference for information on creating tablespaces and managing storage settings. |
If you want greater read and write performance, create raw tablespaces.
Step 4: Create and Configure New Database Users for Each Oracle Ultra Search Instance
The Oracle Ultra Search system uses Oracle's Fine Grained Access Control feature to support multiple Oracle Ultra Search instances within one physical database. This feature is especially useful for large organizations or application service providers (ASPs) that want to host multiple disjoint search indexes within one physical installation of Oracle.
The Oracle Ultra Search system requires that each Oracle Ultra Search virtual instance belong to a unique database user. Therefore, as part of the installation process, you must create one or more new database users to own all data for your Oracle Ultra Search instance. (Note: If you intend to create more than one database instance, you should also create multiple user tablespaces - one for each user).
You need to grant certain roles and privileges to each Oracle Ultra Search user. For convenience, the WKUSER role has all the necessary privileges.
Enter the following statements to create and configure a new user. You can run these statements as the WKSYS, SYSTEM, or SYS database user.
CREATE USER <username> IDENTIFIED BY <password> DEFAULT TABLESPACE <default_tbs>
TEMPORARY TABLESPACE <temporary_tbs> QUOTA UNLIMITED ON <default_tbs>;
where:
GRANT WKUSER TO <username>;
After the above steps, WKSYS or an Oracle Ultra Search super-user, can create a Oracle Ultra Search instance on this user schema.
If you want this user to have the general administrative privilege or the super-user privilege of Oracle Ultra Search, you can log in as an Oracle Ultra Search super-user or WKSYS and click on the "Users" tab to grant the appropriate privilege.
Note: After the infrastructure database is installed, all the user schema passwords will be randomized. To login as user WKSYS, you can change the WKSYS schema password by running the following statement as the SYSTEM, or SYS database user.
ALTER USER WKSYS IDENTIFIED BY <password>;
Step 5: Gather Statistics for the Tables
If you notice performance degradation on the crawler, it might be because statistics have not been gathered for the tables. You should gather statistics for the following tables: wk$url, wk$doc, and dr$wk$doc_path_idx$i. Statistics for the wk$url table are the most important. You must regularly gather statistics, because statistics are used by the cost-based optimizer to generate the best execution plan. Make sure that the crawler is not running during the performance tuning period to avoid interference.
You can use the DBMS_STATS PL/SQL package or the ANALYZE procedure to gather statistics. The DBMS_STATS package can be run on either the table level or the schema level. Running on the schema level computes the statistics for the all the objects in the schema including the tables and indexes. Oracle Corporation recommends using the DBMS_STATS package.
Connect to the schema owning the Oracle Ultra Search instance. For example:
EXEC DBMS_STATS.GATHER_TABLE_STATS(`<schema_name>', `<table_name>', null, DBMS_
STATS.AUTO_SAMPLE_SIZE);
or
EXEC DBMS_STATS.GATHER_SCHEMA_STATS(`<schema_name>', DBMS_STATS.AUTO_SAMPLE_
SIZE);
or
ANALYZE TABLE <table_name> ESTIMATE STATISTICS SAMPLE 20 percent;
where schema_name is the owner of the Oracle Ultra Search instance and table_name is the table you want to gather statistics for (for example, wk$url).
Occasionally rebuilding the B-tree indexes can also improve performance by freeing up disk space. For example:
ALTER INDEX <index_name> REBUILD;
where index_name is the index that you want to rebuild.
To get a list of the indexes, run the following statement:
SELECT index_name FROM user_indexes WHEREindex_type='NORMAL';
Editing the data-sources.xml File
The Oracle Ultra Search administration tool middle tier component and the Oracle Ultra Search Oracle9i Application Server query API use the data source functionality of the J2EE container. In order to function properly, the data-sources.xml file needs to be edited.
In the ORACLE_HOME/j2ee/OC4J_Portal/config directory, edit the file data-sources.xml. Under the <data-sources> tag add the following:
<data-source
   class="oracle.jdbc.pool.OracleConnectionCacheImpl"
   name="UltraSearchDS"
   location="jdbc/UltraSearchPooledDS"
   username="<username>"
   password="<password>"
   url="jdbc:oracle:thin:@<database_host>:<oracle_port>:<oracle_sid>"
/>
where
username and password are the Oracle Ultra Search instance owner's database username and password, database_host is the host name of the back end database machine, oracle_port is the port to the user's Oracle database, and oracle_sid is the SID of the user's Oracle database.
In addition to configuring the username, password, and JDBC URL, data-sources.xml also allows configuration of the connection cache size, as well as the cache scheme. The following tag specifies the minimum and maximum limits of the cache size, the inactivity time-out interval, and the cache scheme.
<data-source
   class="oracle.jdbc.pool.OracleConnectionCacheImpl"
   name="UltraSearchDS"
   location="jdbc/UltraSearchPooledDS"
   username="wk_test"
   password="wk_test"
   url="jdbc:oracle:thin:@localhost:5521:isearch"
   min-connections="3"
   max-connections="30"
   inactivity-timeout="30" <property name="cacheScheme"
   value="DYNAMIC_SCHEME"/>
/>
There are three types of caching schemes:
Editing the ultrasearch.properties File
The ultrasearch.properties file specifies which database the Web application and JSP application connect to. This file is located in the following directory:
ORACLE_HOME/ultrasearch/webapp/config
You must specify the hostname, port, and SID of the Oracle instance and listener. To do this, edit the line that begins with "connection.url" to read:
connection.url=jdbc:oracle:thin:<hostname>:<port>:<SID>
For hostname, enter the full host name of the Oracle9i server instance running Oracle Ultra Search. For port, enter the listener port number for the Oracle9i server instance. For SID, enter the Oracle9i server instance ID.
Here is an example connection.url string:
connection.url=jdbc:oracle:thin:@ultrasearch.us.oracle.com:1521:myInstance
If you chose to configure the Oracle Ultra Search middle tier component with Oracle HTTP Server and OC4J, then you must also edit the line that begins with "admin.srchome" to read:
admin.srchome=<jsp_src_home>
On UNIX:
admin.srchome=ORACLE_HOME/ultrasearch/webapp/isearch_admin
On Windows NT/2000:
admin.srchome=ORACLE_HOME\ultrasearch\webapp\isearch_admin
This is the location of the Oracle Ultra Search administration tool JSP pages.
|
Note: You should not need to change the first line, because it is the name of the Oracle JDBC driver. |
Starting the Web Server
You should start the Web server using the Oracle Enterprise Manager console.
|
See also:
Oracle9i Application Server Administrator's Guide for more information on Oracle Enterprise Manager and using the Oracle Enterprise Manager console. |
To test if the Oracle HTTP server is started, visit the Oracle Ultra Search welcome page:
http://hostname.domainname:HTTPport/ultrasearch/index.html
This page provides general information about Oracle Ultra Search, and it also contains links to the Oracle Ultra Search administration tool, as well as Oracle Ultra Search sample query JSP page.
If you deploy the Oracle Ultra Search middle tier with OC4J, start OC4J by
invoking java -jar ORACLE_HOME/j2ee/home/oc4j.jar -config ORACLE_HOME/j2ee/OC4J_
Portal/config/server.xml
OC4J can be configured to start automatically when the Oracle HTTP server starts.
Testing the Oracle Ultra Search Administration Tool
You can test your changes by attempting to log on to the Oracle Ultra Search administration tool at:
http://hostname.domainname:HTTPport/ultrasearch/admin/index.jsp
Where hostname.domainname is the full name of the host where you have just installed the Oracle Ultra Search middle tier component, and HTTPport is the default Web server port. If you are running the Web browser on the same host, you can enter "localhost".
During the installation of the Oracle Ultra Search server component, you should have created a new Oracle Ultra Search instance owner. The instance owner is created in Step 4 of the Oracle Ultra Search server component installation process. Log on to the Oracle Ultra Search administration tool by entering the Oracle Ultra Search instance owner's database username and password.
If you log on to the Oracle Ultra Search administration tool successfully, then you have completed the Oracle Ultra Search administration tool configuration process.
You can also access the Oracle Ultra Search administrative interface through Oracle9iAS Portal. In the Services portlet, go to the Ultra Search Administration page. By default, the Services portlet is located on the Oracle9iAS Portal home page's Administer tab (see Figure 7-7, "The Oracle Ultra Search administration portlet").
Testing the Oracle Ultra Search JSP Sample Query Applications
After you verify that the Oracle Ultra Search administration tool is working, you should be able to run the Oracle Ultra Search JSP sample query applications. You can access the sample query source code by going to the directories list. You can also see a working demo of each sample query JSP page with the URL root, and you can append the correct JSP file name at the end of the URL root.
The following is a list of URLs and locations of various sample application related files:
The Oracle Ultra Search remote crawler functionality allows multiple crawlers to run in parallel on different hosts. All remote crawler hosts must share common resources, such as common directories and a common Oracle Ultra Search database.
|
See also:
Oracle Ultra Search online Help topic Installing the Oracle Ultra Search Server Tier Component on Remote Crawler Hosts. |
Oracle Ultra Search provides a search portlet that can be embedded in Oracle9iAS Portal pages. It is implemented as a JavaServer Page (JSP) application and called the Oracle Ultra Search Portlet Sample. The Oracle Ultra Search Portlet Sample is a web application that complies to the Oracle9iAS Portal portlet interface. By complying to the portlet interface, Oracle9iAS Portal users can create pages and embed Oracle Ultra Search portlets within those pages.
|
See also:
|
This portlet sample implements a provider that contains exactly one portlet. The provider name is simply "Ultra Search". The Oracle Ultra Search provider will belong to the "iAS Providers" provider group. The portlet contained within the Ultra Search provider is also called "Ultra Search".
Note that web providers are not registered as part of the Oracle9i Application Server install due to the fact that the provider must be up and running at the time that registration is performed. This is not possible, since the very last step performed during the installation is the starting of OC4J.
All web providers are, however, included in one of the following two provider groups:
The Ultra Search provider is included in the Oracle9iAS Providers provider group. These groups will show up under the "Providers" tab in the Navigator. To register a provider, you need to follow these steps:
Searching public data
The Oracle Ultra Search portlet enables Portal users to include Oracle Ultra Search's functionality in portal pages. However, it should be remembered that Oracle Ultra Search does not support any security model for search end-users. This means that all data crawled and indexed by Oracle Ultra Search is accessible to all users of a particular Oracle Ultra Search instance. There is no way to specify that a particular portal user has access to a subset of search results returned by Oracle Ultra Search.
Connecting to an Oracle Ultra Search instance
Oracle Ultra Search supports the creation of multiple Oracle Ultra Search instances. Each Oracle Ultra Search instance contains its own distinct index that can be queried against by the Oracle Ultra Search portlet. Each Oracle Ultra Search index requires its own database schema. The Oracle Ultra Search portlet must be configured to query against a specific Oracle Ultra Search instance schema. This is done by configuring the ORACLE_HOME/j2ee/home/config/data-sources.xml file as follows:
<data-source
               class="oracle.jdbc.pool.OracleConnectionCacheImpl"
               name="UltraSearchDS"
               location="jdbc/UltraSearchPooledDS"
               username="ultrasearch_instance_schema"
               password="ultrasearch_instance_schema_password"
               url="jdbc:oracle:thin:@hostname:port:sid"
/>
where:
Note that the Sample Portlet shares the same data source entry as the Complete Sample Application.
Restrictions
Oracle9iAS Portal users should only embed Oracle Ultra Search portlets that are hosted on the same OC4J instance as Oracle9iAS Portal.
If Oracle9iAS Portal is installed on host A, Oracle Ultra Search will also be installed on host A. The Oracle Ultra Search provider will therefore also be hosted as a Web application on host A.
It is possible that the Oracle Ultra Search provider running on host A could be registered with a second Oracle9iAS Portal instance running on host B. However, if the Oracle Ultra Search portlet hosted on A is embedded within pages created in Portal B, the pop-up list-of-values will not work correctly. This is because of an security bug inherent in Javascript.
Portal pages created within Portal A should only embed the Oracle Ultra Search portlet from the provider running on host A and not from host B or any other host.
Portlet Sample Files
The Portlet sample files are located in the file
ORACLE_HOME/ultrasearch/sample.ear
The contents of that file are expanded into the directory
ORACLE_HOME/ultrasearch/sample/query
when the sample.ear file is first deployed by the application server. You can directly view the source code using your preferred text editor.
|
|
 Copyright © 2002 Oracle Corporation. All Rights Reserved. |
|