Release 4.1 for UNIX
A90288-01
Library |
Solution Area |
Contents |
Index |
| Oracle9iAS Discoverer Plus and Viewer Configuration Guide Release 4.1 for UNIX A90288-01 |
|
Discoverer Plus and Discoverer Viewer are automatically installed to run with Oracle9i Application Server as a single machine installation. However Oracle9iAS Discoverer is designed to be deployed on multiple machines. The Discoverer Services can be replicated by specifying the machines available to Discoverer in a configuration file. Discoverer Services sessions are then started on alternate machines to balance the load.
In this way very large numbers of Discoverer users can be supported, since there is no single bottleneck. Multiple Discoverer sessions can run on a single machine, or can be spread across multiple machines as required.
The topics include:
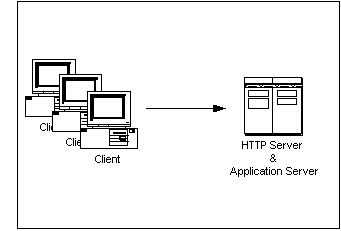
Oracle9iAS Discoverer is installed as part of Oracle9i Application Server. The default installation is a single machine installation (i.e. all the Discoverer components are installed on a single machine).

In this scenario, the Oracle9i Application Server installation has installed both of the following on the same machine:
The machine is therefore both an HTTP Server machine and an Application Server machine.
When a user launches a web browser on a client machine to start Oracle9iAS Discoverer, the web browser sends a request to the HTTP Server software on the server machine. That request is processed and a Discoverer session is started on the server machine.
Having a single machine acting as both the HTTP Server machine and the Application Server machine can be inefficient when supporting large numbers of Discoverer users.
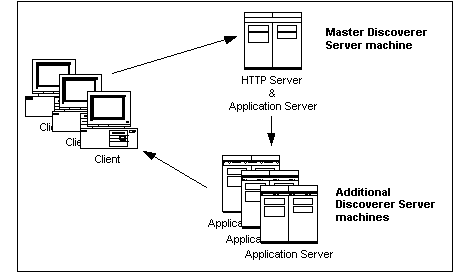
For this reason, the Discoverer Services components are designed to be deployed on multiple machines. By specifying the available machines in a configuration file, Discoverer Services sessions can be started on different machines to balance the load. Multiple Discoverer sessions can run on a single machine, or can be spread across multiple machines as required.

In this scenario (as with a default installation), the Oracle 9i Application Server installation has installed both of the following on the same machine:
The machine is therefore both an HTTP Server machine and an Application Server machine. This machine is referred to as the Master Discoverer Server machine.
As well as creating a Master Discoverer Server, you also install the Oracle 9i Application Server on additional machines. These machines are referred to as Additional Discoverer Server machines.
When a user launches a web browser on a client machine to start Oracle9iAS Discoverer, the web browser sends a request to the HTTP Server software on the Master Discoverer Server machine. That request is processed and a Discoverer session is started either on the Master Discoverer Server machine or on an Additional Discoverer Server machine.
Each Additional Discoverer Server machine can run multiple sessions; therefore, the number of machines you choose to use for sessions depends on how many concurrent sessions the users need, the amount of memory available, the speed of the hardware, and so forth.
Before you start altering the default installation, we recommend that you connect to the default Master Discoverer Server machine to confirm that the default installation is functioning correctly.
http://hostname.domain/discoverer4i/viewer
where hostname.domain is the fully qualified name of the machine on which Oracle9i Application Server has been installed.
The Discoverer Viewer login screen appears when the default installation is functioning correctly.
During installation, the machine name is used as the Master Discoverer Server instance name. Make a note of the name of the Master Discoverer Server machine now because you will need it when installing on the machines that will become Additional Discoverer Server machines.
If you are not sure of the Master Discoverer Server machine name, follow the instructions below:
<iSUITES_HOME>/Apache/Apache/htdocs/discwb4/scripts
The value of this string is the Master Discoverer Server machine name (and therefore the Master Discoverer Server instance name).
On every machine that you want to make an Additional Discoverer Server machine:
> unregistersession.sh

> unregistercollector.sh

> unregisterpreference.sh
> stopall.sh
Note that there are three occurrences of the Additional Discoverer Server machine name in the registersession.sh file:
Note that there is one occurrence of the Additional Discoverer Server machine name in the unregistersession.sh file (prepended to the string OracleDiscovererSession4).
> startoad.sh

> startosagent.sh

> registersession.sh
When you have installed Discoverer on every machine that you want to be an Additional Discoverer Server machine, you must:
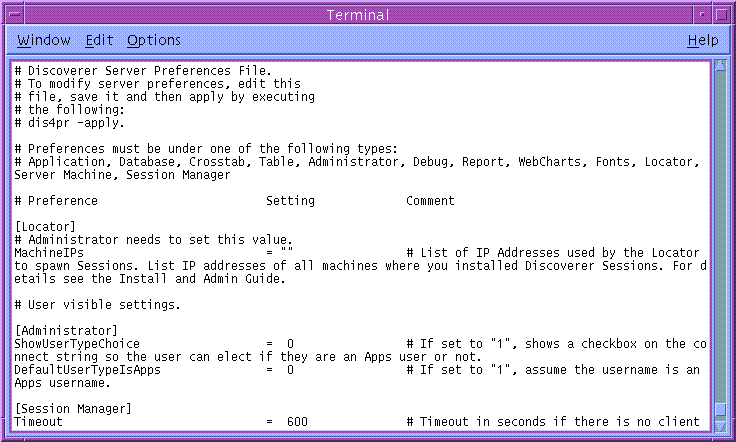
The pref.txt file located on the Master Discoverer Server machine contains a number of default settings that apply to all end users.
The only information required in the pref.txt file is the IP addresses (or machine names) of the machines used for Oracle9iAS Discoverer. The other items in the pref.txt file can be edited to suit your network or user requirements. See Section 3.2.4.5, "How to edit the pref.txt file" for more information.
A backup copy of pref.txt is located at <ORACLE_806_HOME>/discwb4/util/defaults.txt on the Master Discoverer Server machine. If you make a mistake when editing, lose, or corrupt the pref.txt file, you can restore the file to its default values from the backup copy.
In a distributed Discoverer installation, the pref.txt file located on the Master Discoverer Server must contain either the IP address or machine name of each Application Server machine that will run Oracle9iAS Discoverer sessions.
The order of the IP addresses listed in the pref.txt file determines the order in which sessions are started on each machine that has a Session component installed. Editing the pref.txt file enables you to add Additional Discoverer Server machines and to balance the load between them.
Entries in the pref.txt file are comma space delimited (i.e. entries are separated by a comma followed by a space). Enclose the entries in "double quotes."
Load balancing is a way to improve the performance of your Discoverer installation by distributing sessions amongst different machines to make the most efficient use of each machine. You specify the machines to use by including their IP addresses (or machine names) in the pref.txt file.
The Discoverer Services Locator component uses the list of machines in the pref.txt file to determine which machine starts the next requested session. Using a round-robin method, the Locator requests a session on each machine in order, until it reaches the end of the list of IP addresses. When the Locator reaches the end of the list, it returns to the beginning of the list and starts over.
This round-robin method enables you to balance the load placed on the machines by:
For example, you may want one machine to handle five sessions before the next machine is used. If so, include the first machine's IP address five times before including the next machine's address in the pref.txt file
Load balancing can greatly affect performance. We recommend that you plan a load balancing strategy before editing the pref.txt file. Consider the speed and performance of each server machine. For planning purposes, you can estimate that each session requires approximately 8 to 12 MB of memory.
Example 1: Load balancing - equal machines
You have Discoverer Session components installed on two Application Server machines. Each machine has the same processor speed and RAM. The IP addresses for these two machines are:
| Server | Machine Name | IP address |
|---|---|---|
|
App Server machine 1 |
disco1 |
123.456.789.1 |
|
App Server machine 2 |
disco2 |
123.456.789.2 |
You want App Server machine 1 to handle the first request, App Server machine 2 to handle the next, App Server machine 1 the next, and so on.
The pref.txt file entry would look like this:
Example 2: Load balancing - one fast machine plus two other machines
You have Discoverer Sessions installed on three Application Server machines. The first Application Server machine has faster processors and more RAM. The second and third Application server machines are equal to each other in processor speed and RAM.
The IP addresses for these three machines are:
| Server | Machine Name | IP address |
|---|---|---|
|
App Server machine 1 |
server1 |
123.456.789.1 |
|
App Server machine 2 |
server2 |
123.456.789.2 |
|
App Server machine 3 |
server3 |
123.456.789.3 |
You want App Server machine 1 to handle the first three requests, App Server machine 2 to handle next one, App Server machine 3 the next one, then back to App Server machine 1 for the next three requests.
The pref.txt file entry would look like this:
Machine IPs="server1, server1, server1, server2, server3"
or
Machine IPs="123.456.789.1, 123.456.789.1, 123.456.789.1, 123.456.789.2, 123.456.789.3"
You edit the pref.txt file on the machine where you installed the Preferences component (i.e. the Master Discoverer Server machine):
<ORACLE_806_HOME>/discwb4/util

For example: "server1, server2, server3".
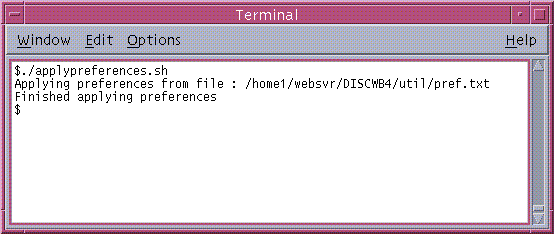
For the changes you have made to pref.txt to take effect, you must apply preferences.
> ./applypreferences.sh

If errors are detected in the pref.txt file, the confirmation window file includes an instruction to check the error.txt file. Correct any errors listed in the error.txt file and reapply preferences before continuing.
The preferences are updated and set for the Discoverer Server Instance.
The tnsnames.ora file contains the names and aliases of all the databases that users can access using Oracle9iAS Discoverer or any other Oracle product.
Each server machine in a distributed Discoverer installation must have an identical tnsnames.ora file.
If you have installed Discoverer on an Additional Discoverer Server machine, you must make sure the tnsnames.ora files on the different machines are identical by doing one of the following
Note that several versions of the tnsnames.ora file might exist on the same machine. It is very important that you copy or edit the correct file.
<ORACLE_806_HOME>/network/admin
where <ORACLE_806_HOME> is the location in which the Discoverer Components are installed.
You can copy the tnsnames.ora file in a number of different ways. For example, you could copy the file having mounted the Master Discoverer Server machine on the Additional Discoverer Server machine as a network drive (e.g using NFS). Alternatively, you could use FTP software to copy the file.
One way to edit the tnsnames.ora file:
> net8wiz.sh
A program runs, enabling you to edit the Net8 configuration.
To make sure that you edit the correct tnsnames.ora file, do not use the Net8 Configuration Assistant.
The disco4iv.xml file on the Master Discoverer Server machine provides Discoverer Viewer with configuration information. Among other things, Discoverer Viewer uses the disco4iv.xml file to identify the Master Discoverer Server machine.
When you install Discoverer Viewer on multiple machines, you need to modify the disco4iv.xml file to identify the Master Discoverer Server.
Before editing the disco4iv.xml file, we strongly recommend that you take a copy of the file for future reference.
<iSUITES_HOME>/Apache/Apache/htdocs/disco4iv/html
where <iSUITES_HOME> is the location in which Oracle9i Application Server components are installed.
session name="instance_nameOracleDiscovererSession4"
where instance_name is the Master Discoverer Server instance name.
locator name="instance_nameOracleDiscovererLocator4"
where instance_name is the Master Discoverer Server instance name.
<!-- REMOVE THIS COMMENT LINE (A) only if Discoverer 4i Viewer is installed on a different subnet
than the Discoverer Services, or you are performing a distributed Discoverer Services
installation

REMOVE THIS COMMENT LINE (B) only if Discoverer 4i Viewer is installed on a different subnet than
the Discoverer Services, or you are performing a distributed Discoverer Services installation-->
> apachectl configtest
If the `Syntax OK' message does not appear, review the changes you have made, correct any mistakes, and run the above command again.
When the changes you have made are syntactically correct, the message `Syntax OK' appears and you can go on to the next step.
> apachectl restart
The message `apachectl restart: httpd restarted' confirms that the Oracle HTTP Server has successfully restarted.
For the changes you have made to the disco4iv.xml file to take effect, you must restart the Discoverer Services components (for more information, refer to Section 2.7 "Restarting Discoverer 4i System").
To confirm that the creation of Additional Discoverer Server machines has been successful, we recommend that you connect to each Additional Discoverer Server machine as follows:
http://hostname.domain/discoverer4i/viewer
where hostname.domain is the fully qualified name of the Master Discoverer Server machine.
A process starts on the first Additional Discoverer Server machine specified in the pref.txt file and the Discoverer Viewer login screen appears.
> ps -A|grep dis4ws
|
|
 Copyright © 2001 Oracle Corporation. All Rights Reserved. |
|