Release 2 (9.2)
Part Number A96600-01
 Home |
 Book List |
 Contents |
 Index |
 Master Index |
 Feedback |
| Oracle9i Real Application Clusters Setup and Configuration Release 2 (9.2) Part Number A96600-01 |
|
This chapter describes how to use the Oracle Universal Installer (OUI) to install the Oracle9i Enterprise Edition and the Real Application Clusters software. The topics in this chapter include:
|
Note: If you are not using a cluster file system, then perform the procedures in this chapter only after configuring your disk subsystem as described in Chapter 2. You must complete the procedures in this chapter before continuing with the procedures for using the Database Configuration Assistant (DBCA) in Chapter 4. |
Follow these procedures to use the (OUI) to install the Oracle Enterprise Edition and the Real Application Clusters software.
| Operating System | Verification Method |
|---|---|
|
On UNIX |
Perform a remote copy ( |
|
On Windows NT and Windows 2000 |
Enter the following command for each node that will be part of the cluster database where node_name is the node name returned from the
Oracle Corporation recommends using the same user name and password on each node in a cluster or use a domain user name. If you use a domain user name, log on under a domain with a username and password that has administrative privileges on each node. |
Then for UNIX platforms only, set the environment variables as described in the following two steps. For all other platforms proceed to step 4.
ORACLE_HOME on your cluster for Real Application Clusters, then set the SRVM_SHARED_CONFIG environment variable to the name of the 100MB volume raw device or shared file that you set up for configuration storage by entering, for example:
setenv SRVM_SHARED_CONFIG shared_filename
If you are using a cluster file system, then make sure the partition on which this file resides has least 100MB of free space.
DBCA_RAW_CONFIG environment variable. Do this, for example, by executing the following where filename is the name of the ASCII file containing the configuration information:
setenv DBCA_RAW_CONFIG filename
For the Customized configuration type, if this is the first installation on your cluster and you have not set the environment variable, then the Installer prompts you for the name of the 100MB file by displaying the Shared Configuration File Name page.
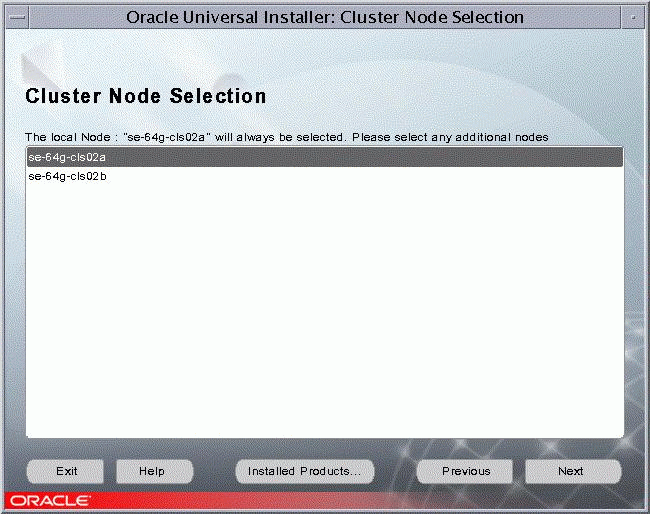
runInstaller command from the root directory of the first Oracle CD. The Installer displays the Welcome page.setup.exe command.The Installer displays the Welcome page. This page presents the OUI for Real Application Clusters. Click Next.
lsnodes -v command and analyzing its output according to the following platform-specific instructions.
For UNIX platforms, execute the lsnodes -v command from the /tmp/OraInstallYYYY-MM-DD_HH-MM-SSxx directory, where xx is AM or PM).
For these Windows platforms, execute the lsnodes -v command from the preinstall_rac directory.
For all platforms, refer to your vendor documentation if the output from the lsnodes -v command indicates that you have clusterware problems.
Path field under the Destination heading, enter the name of the Oracle home into which you are going to install the Oracle Enterprise Edition and Real Application Clusters software. Click Next. The Installer displays the Available Products page.Before continuing, read the following section under the heading, "Selecting a Database Configuration Type", which explains how the DBCA creates your database. This section also describes the configuration types and the underlying configuration that the DBCA creates.
However, if you are familiar with the DBCA and have already chosen a database configuration type, then:
Then proceed to one of the following sections:
When you run the OUI and select the Oracle9i Enterprise Edition, you can select the General Purpose, Transaction Processing, Data Warehouse, or Customized database configuration type for Real Application Clusters. For the first three configuration types, you must complete the procedures described later in this chapter. Then the Installer runs without further input.
If you select the Customized configuration in the Installer, then you can use the DBCA to create the database as described in Chapter 4 or create the database manually as described in Chapter 5. You can also select the Customized configuration and use the DBCA to create a database using a customized version of one of the preconfigured templates. These templates correspond to the Installer's configuration types of General Purpose, Transaction Processing, and Data Warehouse. The DBCA can also use the New Database template to create a database.
To manually configure your environment, you can select the Software Only database configuration option. However, Oracle Corporation strongly recommends that you use one of the preconfigured database options or use the New Database option and the DBCA.
The configuration type that you select determines how you proceed. Table 3-2 describes the installation types.
If you select one of the first three configuration types on the Installer's Database Configuration screen, then complete the procedures in this chapter under the heading "Using the Pre-Configured Database Configuration Types". These three configuration types use preconfigured templates. As mentioned, after you complete these procedures, the OracleNet Configuration Assistant and the DBCA run without further input and the Installer displays a progress indicator while it completes the installation.
The DBCA processing for these configuration types creates a starter database and configures the Oracle network services. As mentioned, if you do not use a cluster file system, then the DBCA verifies that you configured the raw devices for each tablespace.
|
Note: If you have not properly configured the raw devices as described in Chapter 2, the DBCA cannot create your database. |
If you select the Customized configuration, then you must enter specific information as described in the next section.
If you select the Customized configuration type, then the OUI runs the DBCA which offers you a choice of four database templates:
The first three templates create a database that is optimized for that environment. You also can customize these templates. The New Database type, however, creates a database without using preconfigured options. Therefore, if you are not using a cluster file system, then you must enter specific raw device information for the datafiles to complete a New Database installation as described in Chapter 4, "Creating Databases with the Database Configuration Assistant".
The following section provides more detail about DBCA processing when it creates a Real Application Clusters database.
The DBCA runs as part of the OUI installation process. When the Installer begins processing, the Oracle Net Configuration Assistant runs. If you configured directory access with the Oracle Net Configuration Assistant, then the DBCA will add an entry for the database service to the directory. Clients that you configured with directory access can also access the network information for the database service and connect to the database without a tnsnames.ora file.
After the Oracle Net Configuration Assistant completes its processing, the DBCA creates your database using the optimal flexible architecture (OFA). This means that the DBCA creates your database files, including the default server parameter file, using standard file naming and file placement practices. The primary phases of DBCA processing are:
You can also use the DBCA in standalone mode to create a database.
| See Also:
The Oracle9i Net Services Administrator's Guide if you experience problems, for example, with the listener configuration, and for further information about Lightweight Directory Access Protocol (LDAP)-compliant support |
Continuing from Step 10 , execute the following procedures to complete a General Purpose, Transaction Processing, or Data Warehouse configuration:
| See Also:
Oracle9i Database Migration for information about using the Database Upgrade Assistant in Real Application Clusters environments |
Each instance has a sid that comprises the common prefix you enter in this step and a thread ID that is automatically generated. For example, if you enter db for the sid, the first database instance is given a sid of db1, and the second instance is given a sid of db2. Click Next.
During installation, the installer displays progress indicators showing which components are installed.
When you complete these procedures, you are ready to administer and deploy your Real Application Clusters environment as described in Oracle9i Real Application Clusters Administration and Oracle9i Real Application Clusters Deployment and Performance.
Continuing from Step 10, execute the following procedures to complete a Customized configuration:
| See Also:
Oracle9i Database Migration for information about using the Database Upgrade Assistant in Real Application Clusters environments |
sid for each instance.
Each instance has a sid that comprises the common prefix that you enter in this step and a thread ID that is automatically generated. For example, if you enter db for the sid, the first database instance is given a sid of db1, and the second instance is given a sid of db2. Click Next.
The Installer displays the Database Character Set page on which you must select a character set and click Next.
During installation, the installer displays progress indicators showing which components are installed.
When you complete these procedures, proceed to Chapter 4, "Creating Databases with the Database Configuration Assistant".
Use the following procedures to deinstall the Oracle and Real Application Clusters software with the OUI:
Path field under the Destination heading, enter the name of the Oracle home from which you are going to deinstall the Oracle Enterprise Edition and Real Application Clusters software.The Installer displays progress indicators as it completes the deinstallation process. The deinstall process deletes the Oracle software from all nodes in your cluster that have an ORACLE_HOME matching the entry from the File Locations page.
|
 Copyright © 1998, 2002 Oracle Corporation. All Rights Reserved. |
|

