|
Siebel Business Process Designer Administration Guide > Workflow Policies > About Customizing Workflow Policies with Siebel Tools >
Modifying an Existing Workflow Policy Object
When defining the types of workflow policies you need to operate your business, you may find that the predefined workflow policy objects do not contain the policy components you need. Use the procedural steps in this section as a general guideline for modifying a workflow policy object. Before modifying a workflow policy object:
- Find out the name of its database table and column names. If you are going to add or modify a component, you need to know the relationship between the component and the primary workflow policy component.
- Make sure you do not have other records referencing this object that may be affected by your change. For example, before inactivating a component column, verify that no policy conditions are referencing the component column.
To determine a database table
- Start Siebel by entering the following from the command line:
C:\Siebel\bin\siebel.exe /x
- In Siebel Client, navigate to the appropriate workflow policy object view. This is the view that contains the business data you want to monitor.
For example, if you need to modify the workflow for an account activity, you would navigate to the Account > Activities view.
- Choose Help > About View.
About View identifies the Business object, Business components, and applets this view uses.
In the case of the Account Activities view, the dialog box identifies Action as the business component used by the Activities applet.
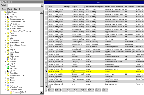
- In Siebel Tools, select Business Component in the Object Explorer and find the appropriate component name.
- Select the component (for example, Action) and find the table name. In the illustration above, the table name is S_EVT_ACT.
You use this table name when you create a workflow policy component.
To determine the relationship between a component and the primary workflow policy component
- In Siebel Client, navigate to the appropriate workflow policy object view.
- Choose Help > About View.
- Find the business component for the appropriate applet and the business object this view uses.
- In Siebel Tools, select Business Object in the Object Explorer and search for the business component object name you noted in Step 3.
- In Object Explorer, expand Business Object to Business Object Component and select the appropriate Business Object Component.
The attribute in the Link field identifies the link defining the relationship between the account and action business components.
- In Object Explorer, select Link and find the applet/object link. The illustration below shows the Account/Action Link selected.
This Link defines the relationship between the parent Business Component and the child Business Component through the Source field and Destination field.
A blank Source field indicates that the join is using the ROW_ID column of the parent business component.
The Destination field is the field within the child business component that is a foreign key to the Business Component.
- In Object Explorer, select Business Component, then select the appropriate component name.
- Expand the Business Component to Field. Select the appropriate field and find the Column attribute.
In the illustration below, Account ID is the field and TARGET_OU_ID is the Column attribute.
The column indicates which column within the table this field represents. You use this information when you define the workflow policy component.
|