| Bookshelf Home | Contents | Index | Search | PDF | |
Siebel Marketing Guide > Defining Filter and Segment Criteria > Creating and Editing Segment Criteria >
Using the Answers Screen
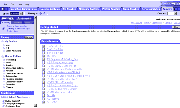
In the Answers screen, shown in Figure 5, you use the Catalogs and Columns tabs in the left pane to select and define report criteria. The Catalogs tab allows you to select a subject area to create a new report or to select a prebuilt report. The Columns tab allows you to select columns (fields) as report criteria.
This section only discusses creating a marketing segment in the Answers screen. For information about the Answers screen and Siebel Analytics, see Siebel Analytics User Guide or display online help by clicking Help or the Help hyperlink in any view of the Answers screen.
After selecting a subject area or a prebuilt report in the left pane, a blank report or the existing report columns appear in the right pane.
To add a column to the report, click a column in the Columns view tab in the left pane, and it appears in the right pane. To delete a column, click the column's delete icon. To add a filter for a column, click the column's filter icon. After selecting all desired columns, you create the segment.
Creating a Segment Using Visual Segmentation
This section describes the following tasks:
- Adding and deleting report columns.
- Creating a marketing segment.
To add and delete report columns
- From the application-level menu, choose View > Site Map > Answers.
- In the left pane, in the Catalog tab, perform one of the following steps:
- To define a new report, in the New Requests section, select a subject area.
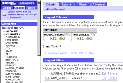
In the left pane, the Columns tab automatically appears. In the right pane, a blank report appears. Figure 6 shows a report containing columns and filters.
- To modify an existing report, select the report.
In the right pane, the report columns appear.
CAUTION: If you modify an existing report, you will no longer be able to use the old version of the report. Before modifying a report, see Editing Segment Criteria.
- In the left pane, in the selected subject area, expand the desired folder (table) and click a column that you want to add to the report.
In the right pane, in the Request Columns view tab, the column appears.
- To apply a filter to a column, click Filter By Column icon.
- In the Create/Edit Filter form, complete the following steps:
- In the Operator drop-down list select the operator.
- In the Value field, type the appropriate value or select a value from the All Choices list.
NOTE: To see a list of available values for the selected column, click the All Choices hyperlink at the right side of the screen.
- To delete a value, click the column's delete icon.
- Click Finished.
NOTE: Repeat Step 3 through Step 6 for each column you want to add.
- If you want to delete a column from the report, click the column's delete icon.
After adding columns and filters, you can create a marketing segment.
To create a marketing segment from a report
- From the application-level menu, choose View > Site Map > Answers.
- In the Answers screen, make sure the report you want to use appears in the right pane and click the Results view tab to test the report.
- In the Results view tab, click Customize View.
NOTE: In this view you can customize the appearance of the Results view such as adding the logical SQL expression.
- To add the Logical SQL expression, in the Create View list, select the Logical SQL hyperlink.
- To add the Create Segment hyperlink, in the Other View list, select the Create Segment hyperlink.
NOTE: Title bars appear for each element that you select.
- To rearrange the position of each section, use the arrow keys in each section's title bar.
- At the top of the Results tab, click Show Results to see your changes.
- When you are ready to create the segment, in the Results view tab, click the Create Segment hyperlink.
The Segments screen with a new record appears.
- In the new record, you type a name for the segment, select a customer hierarchy and a targeting level, and step off the record to save it.
- If you successfully create the segment, a confirmation message appears.
NOTE: You must complete every field listed in Step 7 or you will not create the segment.
| Bookshelf Home | Contents | Index | Search | PDF | |
Siebel Marketing Guide, Version 7.5, Rev. A Published: 18 April 2003 |