A role policy is essentially a collection of permissions that are granted to users and/or groups who are assigned to the role. It also defines how, when, and under what constraints the role is assigned.
Granting a role to a user or a group confers the defined access privileges as long as the user or group is assigned to the role. Roles are computed and granted to users or groups dynamically at runtime.
Roles can be managed in hierarchies so a user assigned to a parent role also inherits any child roles (so long as this is not prohibited by other policies).
Scenario
This section walks you through the steps of defining a role policy that assigns the HealthProviders role to the Doctors group for the purpose of granting view access to the Admissions System’s patient roster. All users in the Doctors group will have view access to the roster.
Create the Role Policy
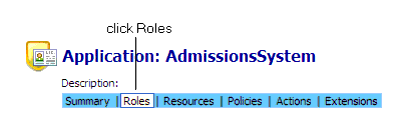
With the AdmissionsSystem application selected in the left pane, click the Roles tab as shown in Figure 6-1.
Figure 6-1 Selecting Role Tab
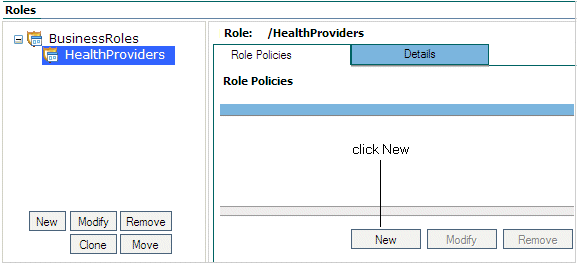
Click New at the bottom of the Role Policies tab as shown in figure
Figure 6-2 Role Policies Tab
On the New Role Policy dialog, select the Grant radio button and do the following:
On the Roles tab, select HealthProviders under Available Roles and transfer it to the Select Roles list.
On the Resources tab, clear the resources checkbox and expand the resources tree. Then select and transfer roster_index.jsp to the Selected Resources list.
On the Subjects tab, select the Group radio button and make sure Parker_Identities displays in the Identity Directories field. Then select Doctors in the Available Subjects list and transfer it to the Selected Subjects list.
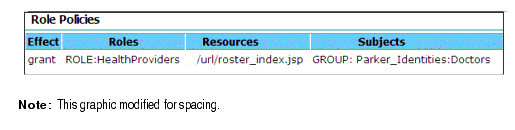
Click OK. The resulting policy will display in the policies list as shown in Figure 6-1.
Figure 6-3 Role Policy
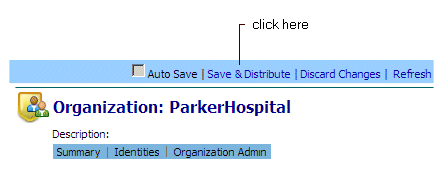
Save Your Work
If autosave is not enabled, save your work as follows:
On the Save and Distribute window, make sure No, just save changes is selected and click OK.
Note:
In an actual deployment, you could select the Yes, save changes and distribute option to both save the role policy and distribute it to the SSM for immediate enforcement in the secured application.
Summary
This tutorial showed how to assign a role to a group with the result that all users in the group receive the role.
The next tutorial shows how to build and generate policy reports.