

|
This chapter provides conceptual and reference information that you might find useful as you begin to develop portals.
This chapter contains the following sections:
When you use Workshop for WebLogic to develop a portal, the portal definition exists as a single XML file. Workshop for WebLogic creates the XML file automatically as you build a portal using the editor.
The portal file contains all the components that make up that particular instance of the portal, such as books, pages, portlets, and look and feel components.
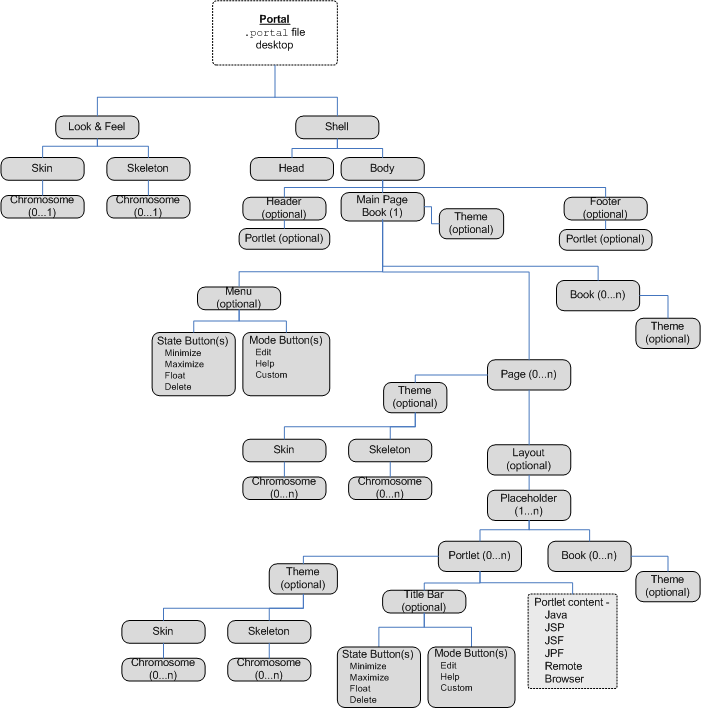
Many components have a hierarchical relationship to each other. For example, a book contains pages and pages contain portlets. Figure 3-1 shows the relationships among the components in a portal.
Whether you are building portal resources and templates in Workshop for WebLogic or creating and administering portals with the WebLogic Portal Administration Console, you work with individual components that are then unified by the portal framework.
Figure 3-1 illustrates the flexibility and extensibility of the WebLogic Portal architecture. In the figure, the indicator (0...1) means 0 or 1, (1...n) means one or more, and (0...n) means zero or more. For example, a portal can contain one or more desktops. For resources that occur only once, like look and feel and Shell, you can still develop multiple versions even though only one at a time is allowed.

Workshop for WebLogic is implemented as a plug-in to the Eclipse Platform, specifically including the Eclipse Workbench, Java Development Tools (JDT), a customized version of the Web Tools Platform Project (WTP), and a Workshop for WebLogic-specific plug-in. Specific instructions on using the Workshop for WebLogic are available in the Oracle Workshop for WebLogic documentation. WebLogic Portal provides additional features that facilitate portal and portlet development.
Before continuing, familiarize yourself with the features of Workshop for WebLogic by reviewing the tutorial “Getting Started with Workshop for WebLogic,” which is available in the help under Oracle Workshop for WebLogic User’s Guide or on e-docs.
| Tip: | If you edit or add files to your project outside of Workshop for WebLogic, you must refresh your project to avoid possible compile errors. For example, if a Jar file is added to your project after you synchronize to a source control repository, you must perform a refresh. To refresh, right-click the new or updated file and select Refresh. Workshop for WebLogic then performs the necessary build or update operations to process the changes. Workshop for WebLogic has an auto-refresh feature. Because this feature can be time consuming, it is disabled by default. Refer to the Workshop for WebLogic Help for information on auto-refresh. |
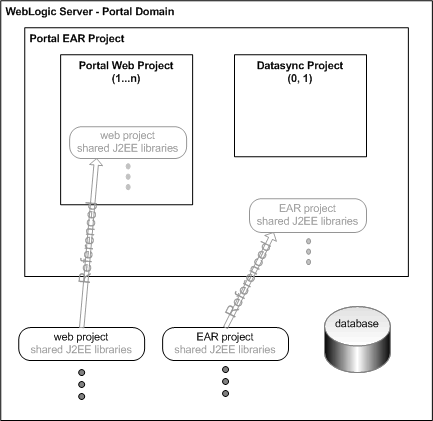
When you set up your portal development environment as described in Setting up Your Portal Development Environment, your application generally consists of the components shown in figure Figure 3-2:

These are the basic parts that are required to develop and test a portal application.
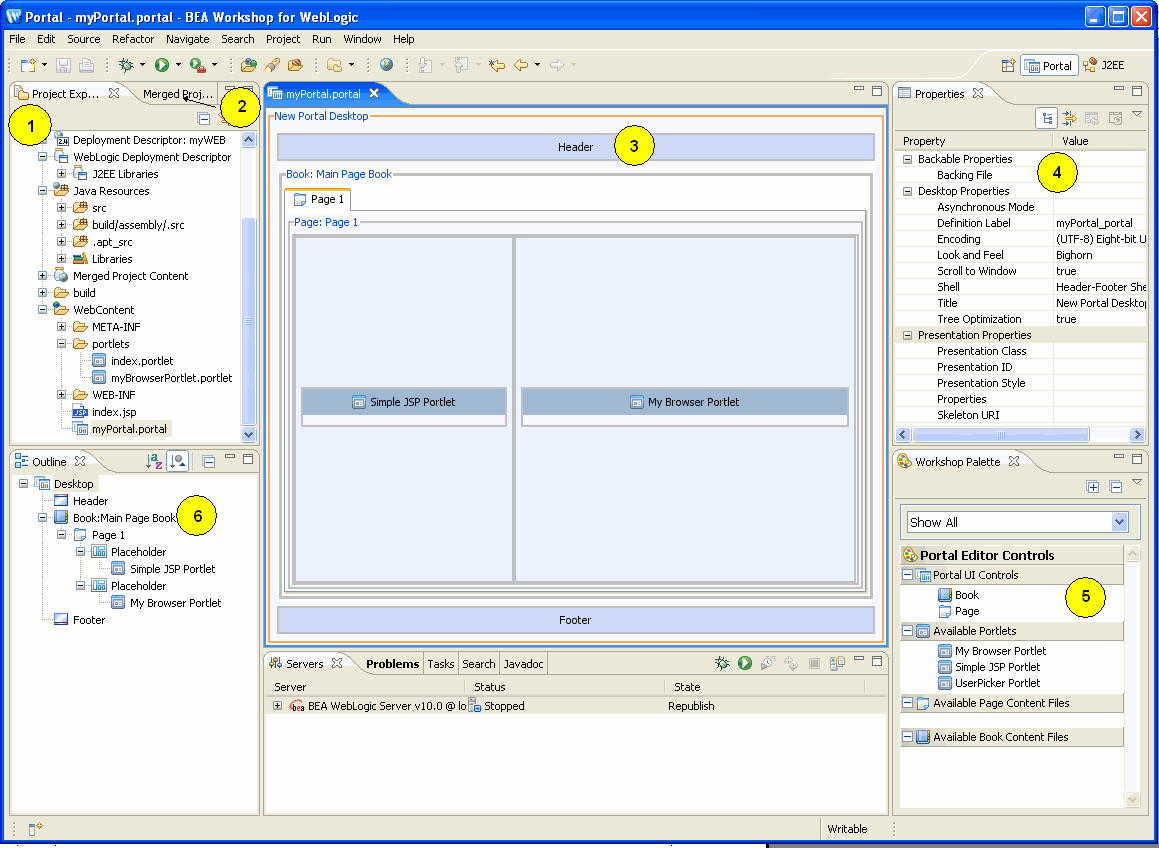
WebLogic Portal uses a combination of standard Eclipse and Workshop for WebLogic views, plus its own customized views, to simplify portal construction. Figure 3-3 shows an example of how your Workshop for WebLogic workbench might look during development of a portal.

| Note: | The Design Palette changed with the latest version of WebLogic Portal. If you prefer to use the previous palette, you can set your Workshop for WebLogic preferences. Select Window > Preferences > WebLogic Portal > Appearance > Palette View > Show classic palette view. |
You also use the Propagation perspective and Page Flow perspective during development. For more information about the Propagation perspective, refer to the Production Operations Guide. For more information about the Page Flow perspective, refer to the Workshop for WebLogic help.
Shared J2EE libraries (also referred to as library modules) let you deploy and use a single set of resources rather than having to duplicate those resources in every EAR project and portal web project. Oracle recommends that you use shared J2EE libraries because of their significant advantages in source control, file sharing, and patch application. WebLogic Portal supports only configurations that implement shared J2EE libraries. For detailed information about shared J2EE libraries, refer to “Creating Shared J2EE Libraries and Optional Packages” in the WebLogic Server documentation.
As illustrated in Figure 3-2, your EAR projects and web projects contain references to shared J2EE libraries that are actually stored at a domain level, and you can use those modules as if they were packaged as part of the referencing application itself.
You can override a resource in a J2EE library by copying it from the library into your portal web project and then customizing it. For example, if you want the default look and feel to look different in a particular portal web project, you can copy the default look and feel from the library into the portal web project and make your modifications.
When you copy a resource, WebLogic Portal puts that resource into the “matching” location within your portal web project. When you deploy the project, WebLogic Server sees the copied resource and uses that instance instead of the resource in the library.
| WARNING: | If you copy J2EE library resources into your project, keep in mind that with future updates to the WebLogic Portal product, you might have to perform manual steps in order to incorporate product changes that affect those resources. With any future patch installations, WebLogic Portal supports only configurations that do not have copied J2EE library resources in the project. |
For information on how to copy J2EE library resources into a project, refer to Copying J2EE Library Files into a Project. For more information about how shared J2EE libraries affect portal deployment, refer to Deploying Portals to Production.
The .portal file you create in Workshop for WebLogic is a template. In this template you create books, pages and portlets and define defaults for them. When you view the .portal file with your browser the portal is rendered in “single file mode,” meaning that you are viewing the portal from your file system as opposed to a database. The .portal file's XML is parsed and the rendered portal is returned to the browser. The creation and use of a .portal is intended for development purposes, but you can access a .portal file in production. Because there is no database involved you cannot take advantage of features such as user customization or entitlements.
Once you have created a .portal file you can use it to create desktops for a production environment, using the WebLogic Portal Administration Console.
A desktop is a particular view of a portal that visitors access. A portal can be made up of multiple desktops, making the portal a container for desktops. A desktop contains all the portlets, content, shells, layouts, and look and feel elements necessary to create individual user views of a portal.
When you create a desktop based on the .portal file in the WebLogic Portal Administration Console, the .portal and its resources are placed into the database. The settings in the .portal file, such as the look and feel, serve as defaults to the desktop. Once a new desktop is created from a .portal template, the desktop is decoupled from the template, and modifications to the .portal file do not affect the desktop, and vice versa. For example, when you change a desktop's look and feel in the WebLogic Portal Administration Console, the change is made only to the desktop, not to the original .portal file. When you view a desktop with a browser it is rendered in “streaming mode” (from the database). Now that a database is involved, desktop customizations can be saved and delegated administration and entitlements can be set on portal resources.
System performance is not significantly different between streamed portals and file-based portals. The advantages of each portal type depend more on how many portlets you plan to produce, the functionality you want to provide portal end users, and how you want to manage your portal.
Table 3-1 compares streamed and file-based portals in more detail:
| Note: | You cannot set entitlements on a file-based portal, but once you create a desktop that is based on that portal, and you set entitlements on those artifacts in the desktop, then the .portal file will also pick them up at runtime. A .portal file does not go to the database, but an entitlement check is still made at runtime; these entitlements are stored in LDAP. If you don't want a file-based portal to run entitlement checks at runtime, you can turn this off in the WEB-INF/netuix-config.xml file. |
For performance-related recommendations, refer to Use File-Based Portals for Simple Applications.
Java controls are visual components with events, methods, and properties that handle the implementation details for connecting to existing data, systems, applications, and business logic.
The controls provided with WebLogic Portal and Workshop for WebLogic fall into the following three categories:
A large set of Java controls is included with WebLogic Portal. In addition, you can create your own custom Java controls to encapsulate your business logic.
The custom Java controls provided within WebLogic Portal are development objects with a defined runtime interface and configurable properties that are used to render portal HTML at runtime. WebLogic Portal’s custom controls empower you to manipulate portal runtime behavior dynamically based on any available information the developer wishes to exploit. Upon each request, the control tree is created, and you have an opportunity to manipulate the behavior of each control in the tree, at the desktop, menu, page, or portlet level. WebLogic Portal’s custom controls are abstracted by “contexts” in the WebLogic Portal architecture. These contexts give you a well-defined set of APIs that can be used to achieve virtually any runtime behavior that you desire.
WebLogic Portal’s custom controls for portlets are governed by a well-defined life cycle. This life cycle provides plug-in points for desired control manipulation. For example, you might wish to dynamically set the “hidden” property to “true” for a portlet during the init() life cycle stage, to prevent the portlet from rendering.
WebLogic Portal’s custom controls for portals interoperate with page flow controls. The control architecture interoperates with the page flow control architecture, empowering you to define sophisticated interactions between page flow applications surfaced in portlets, and more general portal windowing management. The integration between WebLogic Portal’s custom controls and page flows is surfaced in Workshop for WebLogic workbench tools such as property sheets so that you do not need to write code to “hook up” page flows and portlets.
For information about how to access controls when developing a portal, refer to Custom Controls in Page Flows. For technical information about the controls and actions provided with WebLogic Portal, refer to the Javadoc.
WebLogic Portal provides JSP tags that you can use within JSPs. Portlets can use JSPs as their content nodes, enabling reuse and facilitating personalization and other programmatic functionality. You can create JSPs with Workshop for WebLogic to provide a structure for other elements to be added to a portlet.
To view the JSP tags available as you develop a portal, select Window > Show View > JSP Design Palette.
For information about the classes associated with WebLogic Portal’s JSP tags, see the Jsp Tag Javadoc.
You can choose to have your portal rendered asynchronously. When you set this property, each component of your portal renders when its life cycle is complete, instead of waiting for the entire page or book to be ready for display. You can set this property on a portal (see Setting Portal Component Properties) or on a per portlet basis (see the Portlet Development Guide).
A common means of influencing portal behavior within the portal framework control life cycle is to use a backing file. A backing file is a Java class that can contain methods corresponding to life cycle stages, such as init() and preRender(). A portal’s backing context, an abstraction of the portal framework control itself, can be used to query and alter the portlet’s characteristics. For example, in the init() life cycle method, a request parameter might be evaluated, and depending on the parameter’s value, the portlet backing context can be used to specify whether the portlet is visible or hidden. For more information about backing contexts, see Designing Portals for Optimal Performance.
Backing files can be attached to portals either by using Workshop for WebLogic or coding them directly into the XML file for the particular framework control.
Backing files are simple Java classes that implement the com.bea.netuix.servlets.controls.content.backing.JspBacking interface or extend the com.bea.netuix.servlets.controls.content.backing.AbstractJspBacking interface abstract class. The methods on the interface mimic the controls life cycle methods (refer to How Backing Files are Executed) and are invoked at the same time the controls life cycle methods are invoked.
The following portal controls support backing files:
The interportlet communication example in the Portlet Development Guide uses backing files.
This section contains the following topics:
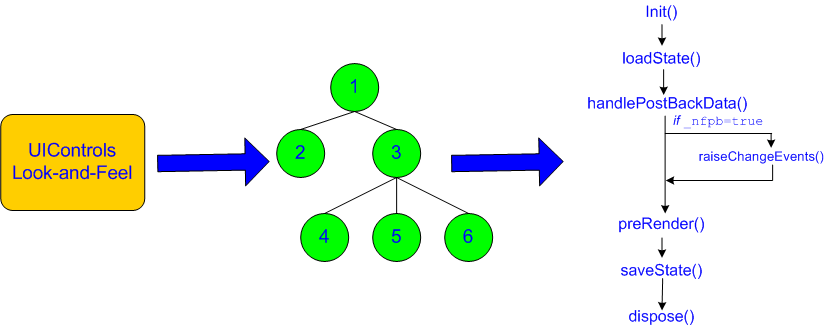
All backing files are executed before and after the JSP is called. In its life cycle, each backing file calls these methods:
Figure 3-4 illustrates the life cycle of a backing file.

On every request, the following sequence occurs:
| Note: | In the following steps, the methods are called unless items on inactive pages have been “optimized away” if tree optimization is enabled. For example, if tree optimization is enabled and items on an inactive page are not included on the resulting partial control tree, then the method is not called. |
init() methods are called on all backing files in depth-first order (that is, in the order they appear in the tree). This method is called whether or not the control (the portal, page, book, or desktop) is on an active page. _nfpb parameter is set to true, all handlePostbackData() methods are called. _nfpb parameter is set to true in the request parameter of any called handlePostbackData() methods, raiseChangeEvents() is called. This method causes events to fire, which is necessary if the backing file tries to make any state or mode changes. | Tip: | You can use the method AbstractJspBacking.isRequestTargeted(request) to determine if a request is for a particular portlet. |
handlePostbackData() method returns true, the raiseChangeEvents() method is called. preRender() methods are called for all portal framework controls on an active (visible) page.dispose() method is called on each backing file.
A new instance of a backing file is created per request, so you do not have to worry about thread safety issues. New Java VMs are specially tuned for short-lived objects, so this is not the performance issue it was in the past. Also, JspContent controls support a special type of backing file that allows you to specify whether or not the backing file is thread safe. If this value is set to true, only one instance of the backing file is created and shared across all requests.
You can cause different behaviors with backing files by varying their scope. For example, a backing file used at a framework control scope has a different behavior than one used at a JSP content scope.
If you have the backing file on the portlet itself using <netuix: portlet backingfile =some_value> you can actually stop the portlet from rendering. If you have the backing file as part of <netuix: jspContent backingfile=some_value>, the portlet portion of the control tree has already run; you would use this scope if you want to run processes that are specifically for the JSP in the portlet.
The HTTPRequest object is volatile. Oracle recommends that you pass data between life cycle methods using the session rather than the request object.
Follow these guidelines when creating a backing file:
Listing 3-1shows an example backing file. In this example, the AbstractJspBacking class is extended to provide the backing functionality required by the portlet. The example uses a session attribute because of the volativity of the HTTPRequest object; Oracle recommends that you pass data between life cycle methods using the session rather than the request object.
package backing;
import javax.servlet.http.HttpServletRequest;
import javax.servlet.http.HttpServletResponse;
import javax.servlet.http.HttpSession;
import com.bea.netuix.events.Event;
import com.bea.netuix.events.CustomEvent;
import com.bea.netuix.servlets.controls.content.backing.AbstractJspBacking;
public class ListenCustomerName extends AbstractJspBacking
{
   public void listenCustomerName(HttpServletRequest request,
   HttpServletResponse response, Event event)
   {
      CustomEvent customEvent = (CustomEvent) event;
      String message = (String) customEvent.getPayload();
      HttpSession mySession = request.getSession();
      mySession.setAttribute("customerName", message);
   }
}
You can add a backing file either from within Workshop for WebLogic by specifying the backing file in the Backing File field of the Properties view, as shown in Figure 3-5 or by coding it directly into the file with which you are associating it. You need to specify the backing directory and, following a dot-separator, only the backing file name. Do not include the backing file extension; for example enter this:
backing.ListenCustomerName.java
For the preceding example, if you include the file extension, the application interprets it as the file name—because the file path is specified by a dot-separator—and looks for a non-existent file called java in a non-existent directory called ListenCustomerName.

To add the backing file by coding it into an XML file for the portal framework control, you can use the backingFile parameter within the <netuix:jspContent> element, as shown in example Listing 3-2.
<netuix:content>
<netuix:jspContent
backingFile="portletToPortlet.pageFlowSelectionDisplayOnly.menu.contentUri="/portletToPortlet/pageFlowSelectionDisplayOnly/menu/
backing.MenuBacking"
menu.jsp"/>
</netuix:content>
Java Page Flow is a feature set built on a Struts-based web application programming model. Java Page Flow leverages the power and extensibility of Struts while also eliminating the difficulties and challenges of building Struts-based applications. Java Page Flow features include runtime support for the web application programming model and tools that enable developers to quickly and easily build applications based upon the model.
Basically, a page flow is a directory of web application files that work together to implement a user interface feature. For example, a page flow could implement a web application’s user registration wizard feature.
You can manage state, data and navigation flow between pages using Java Page Flow (JPF) files. Page flows use the same programming model as other Workshop for WebLogic applications, include one-click generation of Java Controls, and offer a standard Struts framework plug-in. JPFs also offer “WYSIWYG” development with a two-way JSP/HTML editor. JPFs can bind to data, web services using controls & data binding tags, drag and drop controls and data to create forms and data-bound web pages.
If you have a page flow, you can easily generate a page flow portlet to encapsulate it. For detailed instructions on this process, refer to the Portlet Development Guide.
For information on creating page flows using Workshop for WebLogic, refer to the Oracle Workshop for WebLogic User’s Guide or on e-docs.
WebLogic Portal provides multiple mechanisms for managing state, including the HTTP Session, HTTP Request and Sessions. WebLogic Portal’s Java Page Flow also provides flexible, powerful state management capabilities within a Struts-based framework. Page flow state management bridges the chasm between request and session state management. For many projects the request lifetime is too short and the session lifetime too long and heavy to meet the needs of the application. With page flow, state lifetime lasts only as long as necessary.
Shared HTTP sessions is an Oracle WebLogic Server feature that is not supported by WebLogic Portal. For example, using <wls:sharing-enabled>true</wls:sharing-enabled> in weblogic.xml is not supported for WebLogic Portal. Because of the way in which WLP session attributes are scoped, using this shared session feature with WebLogic Portal results in errors and unexpected behavior.


|