|
|
An Event Choice node group represents a point in a business process at which the business process waits to receive one of a possible number of events. Once it receives one of the possible events, the flow of the business process continues. You design other nodes within an Event Choice node group to handle the incoming events. The first node on each branch of an Event Choice node group handles the receipt of one event. The flow of execution proceeds along one branch in an Event Choice node; the branch containing the event that happens first.
If an Event Choice node is used to start a business process, it can contain Client Request, Client Request with Return, and Subscription nodes. An Event Choice node at a point other than the Start node in a business process can contain Client Request nodes and Control Receive nodes.
To learn about designing an Event Choice node at the Start of your business process, see Designing Start Nodes.
| Note: | The Timer branch of an Event Choice node is not available when the node group is used as the Starting Event of a business process. To do timed starts of a process, you have to use a Message Broker subscription in tandem with a Timer event generator. For more information about Message Broker subscriptions and Timer event generators, see Using Integration Controls. |
This section describes how to design Event Choice nodes at points in your business process other than the Start node. It contains the following topics:
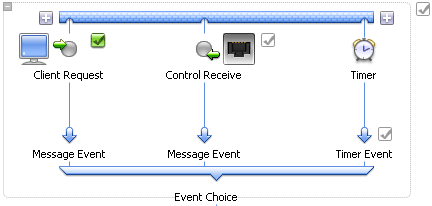
Create an Event Choice node at a point in a business process at which the business process should wait to receive multiple events. The events can include:
To support these types of events, the first node on a branch can be a Client Request, a Control Receive, or a Timer node. The flow of execution proceeds along one branch in an Event Choice node; the branch containing the event that happens first.
To create an Event Choice node:
 Event Choice in the Node Palette. Then drag and drop it onto the business process in the Design view, placing it on the business process at the point in your business process where you want to handle the receipt of multiple events.
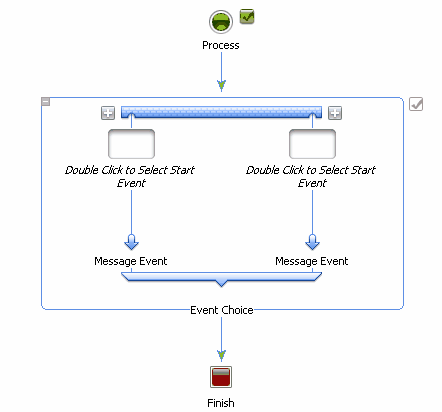
The Design view is updated to contain a representation of the Event Choice node as shown in Figure 6-1.
Note the following characteristics of the Event Choice node:
 to create additional branches. A new branch is added on the left or right of the existing branches.
 | Note: | The Timer branch of an Event Choice node is not available when the node group is used as the Start Event of a business process. To do timed starts of a process, you have to use a Message Broker subscription in tandem with a Timer event generator. For more information about Message Broker subsrciptions and Timer event generators, see Using Integration Controls. |
 indicates that the design of this node is incomplete. When you complete the design of the node, is replaced by
  . An Event Choice node is complete when all starting events have been specified.
 > Save.
Designing your Event Choice node includes specifying the type of events handled on each branch of the node, and then adding the activities you want executed on each branch when the associated event occurs.
The following sections describe how to complete the tasks necessary to design an Event Choice node:
To design a branch in an Event Choice node to receive messages from clients or resources, you must create Client Request or Control Receive nodes on the branch:
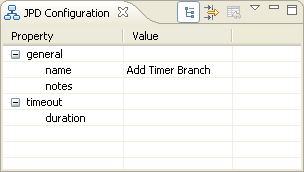
A Timer event in a Event Choice node is executed if one of the events on another branch (Control Receive or Client Request) does not execute before a specified time. To create a Timer branch, and specify the timer value, in your Event Choice node, complete the following tasks:
A Timer branch, similar to the one shown in Figure 6-2, is added to the Event Choice node:
>Show View>JPD Configuration from the BEA WorkSpace Studio menu.Note that you can change the name of the node, or any of its branches in the Property Editor.


|