Using WSRP with WebLogic Portal
|
|
Working with Producers
The main focus of this chapter is to explain how to use WSRP with applications running in a WebLogic Server or WebLogic Express domain. In addition, this chapter explains how to install a producer into a WebLogic Server domain using WebLogic Workshop and how to specify which portlets deployed in a producer application are available to consumers.
This chapter includes the following topics:
- Using WSRP in a Basic WebLogic Server Domain
- Using WSRP in a WebLogic Express Server Domain
- Enabling Portlets on the Producer
Using WSRP in a Basic WebLogic Server Domain
This section explains how to configure a basic WebLogic Server domain as a WSRP producer. The example in this section assumes that you have a functioning Struts module deployed in a WebLogic Server domain.
Note: To complete the steps outlined in this section, you must have access to certain JAR files that are part of a WebLogic Portal installation. If you do not have WebLogic Portal installed, we recommend that you obtain a freely available installer from the BEA Systems website and install WebLogic Portal in a separate, temporary area. You can then copy the required JAR files to your producer web application and delete the temporary installation area.
The goal of this procedure is to create a portlet in a producer that can be consumed remotely. To achieve this, you need to modify the configuration of your Struts application, copy appropriate JAR and TLD files to the application, and create a portlet that references the Struts module in which your application resides.
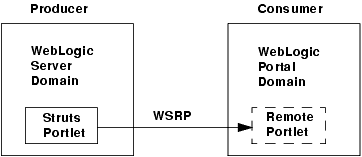
By following this procedure, you can expose a Struts application as a remote portlet that a WebLogic Portal application can consume, as illustrated in Figure 4-1.
Figure 4-1 WebLogic Portal consumer consumes Struts portlets from a WebLogic Server producer
This section contains the following sections:
- Getting Started — Describes the example environment configuration.
- Configuring the WSRP Producer — Explains how to configure the WebLogic Server domain as a WSRP producer. This manual procedure explains which library and configuration files are required and how to modify the configuration files to install the producer.
- Testing the Producer — Explains how to test the producer configuration.
Getting Started
Before you configure the producer, we assume you have taken the following steps:
- You have created a WebLogic Server Domain. You can create this domain using the BEA WebLogic Configuration Wizard. This domain does not contain any WebLogic Portal components. If you are using WLX, create a WLX Basic Domain.
- You have a working Struts application that is configured as a Struts module.
Note: We recommend that only experienced Struts and WebLogic Portal developers attempt this procedure. It is easy to make simple mistakes that can be difficult to troubleshoot. Whenever possible, we suggest ways to test your progress.
As noted previously, it is crucial that you have a Struts module that you can deploy and run successfully in the WebLogic Server environment before you configure the producer. Note that the Struts application must be configured as a Struts module. For detailed information on configuring Struts modules, refer to the Struts documentation. Basically, a module resides in a subdirectory of the web application and has its own struts-config.xml file, whose path is specified typically in the web.xml file.
Tip: Before trying to use your Struts application in a WSRP environment, try converting the application to a local portlet running in a WebLogic Portal domain. If you can convert the Struts application to a local, standalone portlet in a test environment, then your chances of running it successfully with WSRP are improved. To do this, you need WebLogic Workshop. You can download a free developer's version of WebLogic Workshop from the BEA website. For information on converting a Struts application to a portlet using WebLogic Workshop, see: Integrating Struts Applications into a Portal.
Configuring the WSRP Producer
This section explains how to configure a basic WebLogic Server domain as a WSRP producer. The goal of this procedure is to surface a Struts application as a remote portlet that can be consumed by a WebLogic Portal application.
Modify the CLASSPATH for the WebLogic Server Domain
Note: Before attempting to expose a Struts portlet with WSRP, be sure the underlying application is configured as a module and works properly before you attempt to configure the WSRP producer. We also recommend that you try to create a functioning local portlet using WebLogic Workshop. See Getting Started on page 4-2 for more information on this recommendation.
On Windows: DOMAIN_HOME\startWebLogic.cmd
On Linux: DOMAIN_HOME/startWebLogic.sh
Find the CLASSPATH definition, and add the following elements:
Note: Be sure there are no newlines within the CLASSPATH elements. Do not delete any of the elements that are already assigned to the CLASSPATH.
%JAVA_HOME%\jre\lib\rt.jar;
%WL_HOME%\server\lib\webservices.jar;
%WL_HOME%\portal\lib\wsrp\wsrp-common.jar;
%WL_HOME%\server\lib\xbean.jar;
%WL_HOME%\server\lib\wlxbean.jar;
%WL_HOME%\portal\lib\netuix\system\netuix_schemas.jar;
%WL_HOME%\portal\lib\netuix\system\netuix_system.jar;
%WL_HOME%\server\lib\knex.jar;
%WL_HOME%\javelin\lib\javelin.jar
%WL_HOME%\common\lib\log4j.jar
$JAVA_HOME/jre/lib/rt.jar;
$WL_HOME/server/lib/webservices.jar;
$WL_HOME/portal/lib/wsrp/wsrp-common.jar;
$WL_HOME/server/lib/xbean.jar;
$WL_HOME/server/lib/wlxbean.jar;
$WL_HOME/portal/lib/netuix/system/netuix_schemas.jar;
$WL_HOME/portal/lib/netuix/system/netuix_system.jar;
$WL_HOME/server/lib/knex.jar;
$WL_HOME/javelin/lib/javelin.jar
$WL_HOME/common/lib/log4j.jar
Listing 4-1 shows an example of the completed CLASSPATH for a Windows system.
Listing 4-1 CLASSPATH Example for Windows
CLASSPATH=%WEBLOGIC_CLASSPATH%;%POINTBASE_CLASSPATH%;%JAVA_HOME%\jre\lib\
rt.jar;%WL_HOME%\server\lib\webservices.jar;%WL_HOME%\portal\lib\wsrp\
wsrp-common.jar;%WL_HOME%\server\lib\xbean.jar;%WL_HOME%\server\lib\
wlxbean.jar;%WL_HOME%\portal\lib\netuix\system\netuix_schemas.jar;
%WL_HOME%\portal\lib\netuix\system\netuix_system.jar;%WL_HOME%\server\
lib\knex.jar;%WL_HOME%\javelin\lib\javelin.jar;%WL_HOME%\common\lib\
log4j.jar;%CLASSPATH%
- Create the portal-specific directories that you added to the
CLASSPATHand copy the appropriate JAR files into them. If you do not have a WebLogic Portal installation, you need to install WebLogic Portal in a temporary area and copy the JAR files from there. See the note at the beginning of this section for more information on obtaining an installer. For example, the JAR files wsrp-common.jar, netuix_schemas.jar, netuix_system.jar must be on your system in the location referenced by theCLASSPATH.
Modify the Struts Application
In this section, you will modify the Struts application. This process includes modifying configuration files and adding/replacing files within the application. The configuration files need to be updated to reference BEA-specific classes and tag library files. These components are required for the application to function within a WSRP environment. For instance, the BEA tag libraries ensure that URL rewriting for the portlet is handled properly.
Be sure that the following elements are in your Web application's web.xml file. If any of these elements are missing, you must add them:
<!-- WSRP Servlet configuration -->
<servlet>
   <servlet-name>com.bea.wsrp.producer.WsrpServer</servlet-name>
   <servlet-class>com.bea.wsrp.producer.WsrpServer</servlet-class>
   <load-on-startup>2</load-on-startup>
</servlet>
<servlet>
   <servlet-name>com.bea.wsrp.logging.MessageMonitor</servlet-name>
   <servlet-class>com.bea.wsrp.logging.MessageMonitor</servlet-class>
   <init-param>
      <param-name>enableSoapMessageLogging</param-name>
      <param-value>true</param-value>
   </init-param>
   <load-on-startup>1</load-on-startup>
</servlet>
<!-- WSRP Servlet mapping -->
<servlet-mapping>
   <servlet-name>com.bea.wsrp.producer.WsrpServer</servlet-name>
   <url-pattern>/producer/*</url-pattern>
</servlet-mapping>
<servlet-mapping>
   <servlet-name>com.bea.wsrp.logging.MessageMonitor</servlet-name>
   <url-pattern>/monitor</url-pattern>
</servlet-mapping>
<!-- Standard Action Servlet Configuration (with debugging) -->
<servlet>
...
   <init-param>
      <param-name>moduleConfigLocators</param-name>
      <param-value>com.bea.struts.adapter.util.ModuleConfigLocator</param-value>
   </init-param>
...
</servlet>
<!-- WSRP Struts Adapter Tag Library Descriptors -->
<taglib>
   <taglib-uri>/WEB-INF/struts-html.tld</taglib-uri>
   <taglib-location>/WEB-INF/lib/struts-adapter-html.tld</taglib-location>
</taglib>
<taglib>
   <taglib-uri>/WEB-INF/struts-nested.tld</taglib-uri>
   <taglib-location>/WEB-INF/lib/struts-adapter-nested.tld</taglib-location>
</taglib>
<!-- Struts Tag Library Descriptors -->
<taglib>
    <taglib-uri>/tags/struts-bean</taglib-uri>
    <taglib-location>/WEB-INF/struts-bean.tld</taglib-location>
</taglib>
<taglib>
    <taglib-uri>/tags/struts-logic</taglib-uri>
    <taglib-location>/WEB-INF/struts-logic.tld</taglib-location>
</taglib>
<!-- COMMENTED in favor of WSRP adapter Tag Libraries -->
<!--
<taglib>
    <taglib-uri>/tags/struts-html</taglib-uri>
    <taglib-location>/WEB-INF/struts-html.tld</taglib-location>
</taglib>
<taglib>
    <taglib-uri>/tags/struts-nested</taglib-uri>
    <taglib-location>/WEB-INF/struts-nested.tld</taglib-location>
</taglib>
-->
- Checkpoint: Start your server and redeploy the Struts application now to test that it still works. If the application does not work properly, you need to recheck the preceding steps.
- Copy the contents of Listing 4-2 and paste it into a file named
wsrp-producer-config.xmlin the Struts applications'sWEB-INFdirectory.
Listing 4-2 wsrp-producer-config.xml
<?xml version="1.0" encoding="UTF-8"?>
<wsrp-producer-config
xmlns="http://www.bea.com/servers/weblogic/wsrp-producer-config/8.0"
xmlns:xsi="http://www.w3.org/2001/XMLSchema-instance"
xsi:schemaLocation="http://www.bea.com/servers/weblogic/wsrp-producer-config/8.0 wsrp-producer-config.xsd">
<description>
This is a WSRP Producer
</description>
<!-- This element describes the capabilities of this producer. Set
the secure attribute to "true" if you require this producer offer
any port over SSL. If this webapp is portal-enabled, you may
enable registration and portlet management services by setting the
required attribute to "true". -->
<service-config>
<registration required="false" secure="false"/>
<service-description secure="false"/>
<!-- Set accepts-mime to true to more efficiently process uploaded files when the consumer is a WebLogic Portal. -->
        <markup secure="false" rewrite-urls="true"
         transport="string" accepts-mime="false"/>
<portlet-management required="false" secure="false"/>
</service-config>
<supported-locales>
<locale>en</locale>
<locale>en-US</locale>
</supported-locales>
</wsrp-producer-config>
Note: Be sure the registration required and portlet-management required parameters are set to false.
<controller processorClass=
"com.bea.struts.adapter.action.AdapterRequestProcessor"/>
<?xml version="1.0" encoding="UTF-8"?>
  <portal:root xmlns:html="http://www.w3.org/1999/xhtml-netuix-modified/1.0.0"
xmlns:netuix="http://www.bea.com/servers/netuix/xsd/controls/netuix/1.0.0"
xmlns:portal="http://www.bea.com/servers/netuix/xsd/portal/support/1.0.0"
    xmlns:xsi="http://www.w3.org/2001/XMLSchema-instance"
xsi:schemaLocation="http://www.bea.com/servers/netuix/xsd/portal/support/1.0.0 portal-support-1_0_0.xsd">
    <netuix:portlet definitionLabel="portlet_sayHello" title="WSRP Echo      Example">
        <netuix:titlebar>
            <netuix:minimize/>
            <netuix:maximize/>
        </netuix:titlebar>
        <netuix:content>
            <netuix:strutsContent action="welcome" module="/echo"/>
        </netuix:content>
    </netuix:portlet>
  </portal:root>
Testing the Producer
This section describes a procedure for testing your producer configuration.
- Open a web browser and test the Struts web module that you want to surface. The module should work normally.
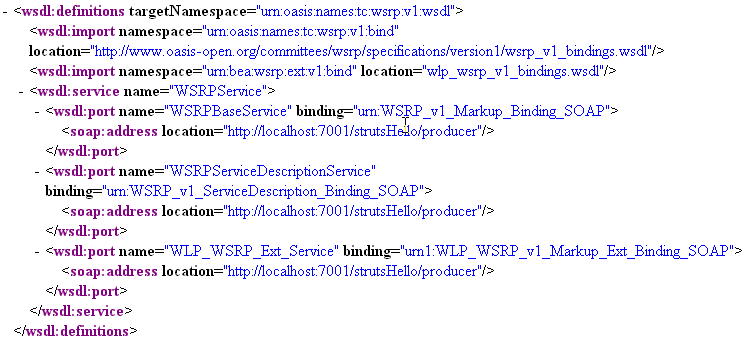
- Test the WSRP producer by entering its WSDL URL in a browser. For example, if your Struts application is called myStrutsApp, the WSDL URL is:
If this test is successful, an XML Webservice WSDL file is returned that looks similar to the file shown in Figure 4-2.
Figure 4-2 XML Webservice WSDL File
Consuming the Producer Portlet
- On another machine, create a WebLogic Portal Domain. You can use the WebLogic Configuration Wizard to do this. If you cannot use another machine, be sure the server's listen port does not conflict with the port used by the producer server. If necessary, you can obtain a free developer's version of WebLogic Portal by visiting the BEA website.
- Use WebLogic Workshop to create a Portal Application and associate the application with the new WebLogic Portal Domain. If necessary, you can obtain a free developer's version of WebLogic Workshop by visiting the BEA website.
- Create a remote portlet in the Portal Web Project you just created. Point the WSDL to the Struts application on the producer. For example:
http://producerHost:producerPort/StrutsApp/producer?WSDL
Using WSRP in a WebLogic Express Server Domain
You can configure a WebLogic Express (WLX) server domain as a WSRP producer. To do this, follow the same steps outlined in the previous section, Using WSRP in a Basic WebLogic Server Domain on page 4-1. The procedures for configuring a WLX domain and a WebLogic Server domain as a producer are the same.
Enabling Portlets on the Producer
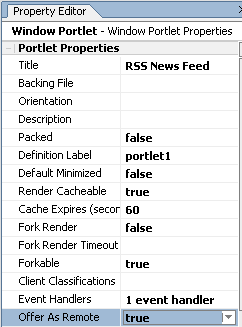
A Producer can have any number of portlets built on it, sometimes into the thousands. By default, all of these portlets are available to consumers as remote portlets. You can, however, specify which portlets are actually available to consumers by setting the offerPortlets property in the Portlet Property Editor.
Figure 4-3 Proxy Portlet Property Editor—Offer as Remote Property Selected
For instructions on how to set this property, please refer to Enabling/Disabling a Portlet for Remote Consumption in the WebLogic Workshop online help system at:
http://download.oracle.com/docs/cd/E13226_01/workshop/docs81/doc/en/portal/buildportlets/portletEnable.html


