


|
Before you can deploy a WebLogic Portal application to a clustered environment, you need to use the WebLogic Configuration Wizard to set up and configure a WebLogic Portal domain specifically for a clustered environment. This chapter explains the basic steps to configure a clustered environment for your portal application.
| Note: | WebLogic Portal does not currently support the WebLogic Server feature called production redeployment, also called side-by-side versioning. For information on this WebLogic Server feature, see the WebLogic Server document “Overview of Redeployment Strategies.” |
The topics discussed in this chapter include:
This chapter describes a set of prerequisite tasks you need to perform before you set up a clustered environment for WebLogic Portal applications. After the prerequisite tasks are complete, this chapter explains how to use the WebLogic Configuration Wizard to set up and configure the cluster, including JMS servers and Managed Server directories.
You need to perform several prerequisite tasks before you can configure a clustered production environment for your WebLogic Portal application. Detailed information on most of these prerequisite tasks is beyond the scope of this chapter, and is documented elsewhere (typically in WebLogic Server documentation). Where appropriate, cross-references to source and supplemental documentation are provided.
| Note: | You can perform these tasks in any order, but they must be addressed before you proceed to configure the cluster environment. |
The prerequisite tasks include:
To deploy a portal application into production, it is necessary to set up an enterprise-quality database. For detailed information on setting up an enterprise-quality database, see Managing Databases. For details on configuring your production database see the Database Administration Guide.
| Note: | An instance of PointBase database is installed when you install WebLogic Server, and is the default database. PointBase is supported only for the design, development, and verification of applications. It is not supported for production server deployment. |
Once you have configured your Enterprise database instance, it is possible to install the required database DDL and DML from the command line as described in the Database Administration Guide. You can also create the DDL and DML from the WebLogic Configuration Wizard when configuring your production environment.
JMS queues and JDBC names for WebLogic Portal are referenced in the DOMAIN_ROOT/config/config.xml file. JMS queues for WebLogic Portal are configured in DOMAIN_ROOT/config/jms/*.xml files. JDBC data sources are configured in DOMAIN_ROOT/config/jdbc/*.xml files.
| Tip: | For detailed information on JMS queue configuration, see the WebLogic Server document, “Configuring and Managing WebLogic JMS.” For detailed information on JDBC, see the WebLogic Server document, “Configuring and Managing WebLogic JDBC.” |
A cluster consists of multiple WebLogic Server instances running simultaneously and working together to provide increased scalability and reliability. A WebLogic Portal application deployed to a cluster appears to clients to be a single application instance.
| Note: | Multiple managed servers running a WLP application must be deployed to a cluster. Running a WLP application on multiple servers that are not configured as a cluster is not supported. |
By clustering a portal application, you can attain high availability and scalability for that application. Use this section to help you choose which cluster configuration you want to use.
This section includes the following topics:
| Tip: | For more detailed information on server clusters, see the WebLogic Server document Using WebLogic Server Clusters. |
When setting up an environment to support a production instance of a portal application, the recommended configuration is to deploy your portal application directly to the cluster. For detailed information on this configuration, refer to the WebLogic Server document, WebLogic Recommended Basic Architecture.
Figure 3-1 shows a WebLogic Portal-specific version of the recommended basic architecture.
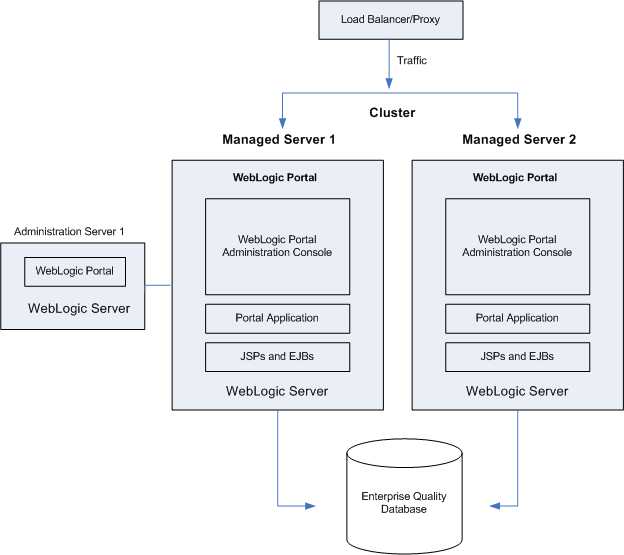
| Note: | WebLogic Portal does not support a split-configuration architecture where EJBs and JSPs are split onto different servers in a cluster. The basic architecture provides significant performance advantages over a split configuration for WebLogic Portal. |
Even if you are running a single server instance in your initial production deployment, this architecture allows you to easily configure new server instances if and when needed.
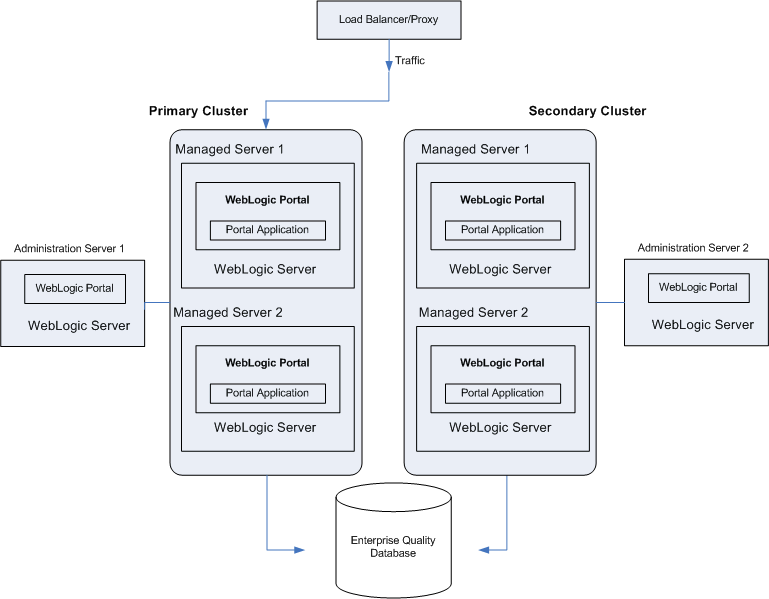
A multi-clustered architecture can be used to support a zero-downtime environment when your portal application needs to be accessible continually. While a portal application can run indefinitely in a single cluster environment, deploying new components to that cluster or server will result in some period of time when the portal is inaccessible. This is due to the fact that while a new EAR application is being deployed to a WebLogic Server, HTTP requests cannot be handled. Redeployment of a portal application also results in the loss of existing sessions.
For more detailed information on the multi-cluster configuration, refer to the WebLogic Server document, “ Recommended Multi-Tier Architecture.”
A multi-cluster environment involves setting up two clusters, typically a primary cluster and secondary cluster. During normal operations, all traffic is directed to the primary cluster. When some new components (such as portlets) need to be deployed, the secondary cluster is used to handle requests while the primary is updated. The process for managing and updating a multi-clustered environment is more complex than with a single cluster and is addressed in Zero-Downtime Architectures. If this environment is of interest, you may want to review that section now.
Before you build your domain with the WebLogic Configuration Wizard, you need to think about the network layout of the domain. Before configuring the domain, consider the total number of Managed Servers in the cluster, including:
In addition, decide if you will use WebLogic Node Manager to start the servers. For information on Node Manager, see Configuring and Managing WebLogic Server.
WebLogic Portal must be installed on all Managed Server machines and the Administration Server.
| Note: | The Administration Server must always be running when WebLogic Portal is running in a clustered environment. This ensures that the cluster’s policy data stays in sync with the references to that data that are stored by WebLogic Portal in the database. |
This section explains how to set up a clustered environment for a WebLogic Portal domain. This section steps you through the process of setting up a cluster using the WebLogic Configuration Wizard.
| Note: | To achieve greater scalability, it is common to run a WLP application on multiple managed servers. Multiple managed servers running a WLP application must be deployed to a cluster. Running a WLP application on multiple servers that are not configured as a cluster is not supported. |
For more information on clusters, see Choose a Cluster Architecture and the WebLogic Server document “Creating WebLogic Domains Using the Configuration Wizard.”
This section includes the following topics:
To run applications on WebLogic Server you must define and create a domain. To run WebLogic Portal applications, you must create a domain that includes the appropriate WebLogic Portal components.
A domain is the basic administration unit for WebLogic Server. It consists of one or more WebLogic Server instances, and logically related resources and services that are managed, collectively, as one unit. A basic domain infrastructure consists of one Administration Server and optional Managed Servers and clusters.
| Tip: | For a more detailed description of these components, as well as a thorough introduction to domains, see the WebLogic Server documents “Creating WebLogic Domains Using the Configuration Wizard and “Understanding WebLogic Server Domains.” |
The Configuration Wizard guides you through the process of creating or extending a WebLogic Portal domain for your target environment. This process is accomplished using predefined configuration and extension templates containing the main attributes and files required for building or extending a WebLogic Portal domain.
| Tip: | The Configuration Template Builder guides you through the process of creating custom configuration and extension templates from existing templates or domains. These templates can be used later for creating and updating domains using the Configuration Wizard. For detailed information on domain templates and instructions on using the Configuration Template Builder to create a domain template, see Creating Configuration Templates Using the WebLogic Configuration Template Builder. It is a recommended best practice to create a custom domain template for use in a team development environment. For more information, see Creating a WebLogic Portal Domain Template. |
You use the WebLogic Configuration Wizard to create a domain. The procedure for creating a customized domain includes these tasks:
| Note: | The following procedure reflects the scope of the WebLogic Configuration Wizard, which handles many complex configuration tasks. We strongly recommend that you review and refer to the document WebLogic Server document, “Creating WebLogic Domains Using the Configuration Wizard,” before and during this procedure. This document contains more detailed information than is presented here on each of the wizard options. |
This section explains how to get started configuring a WebLogic Portal domain using the WebLogic Configuration Wizard.
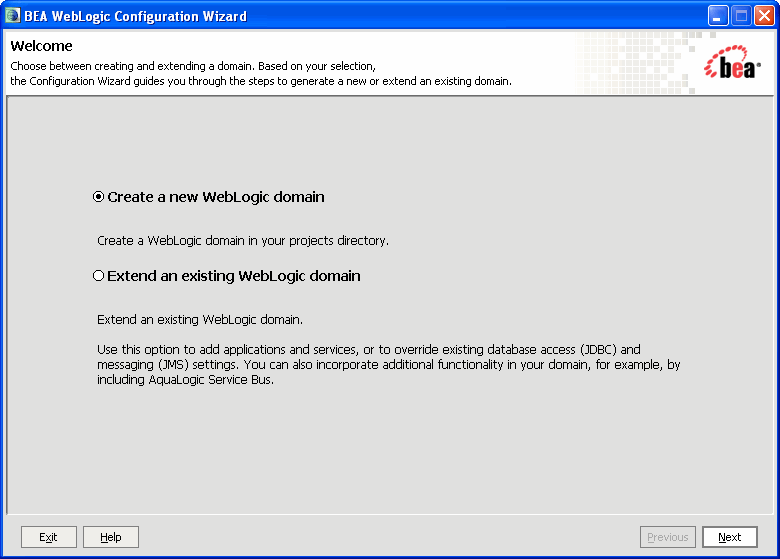
WEBLOGIC_HOME/common/bin/config.cmd (or config.sh). The Welcome dialog appears, as shown in Figure 3-3. | Tip: | You do not need to be running WebLogic Server to start the Configuration Wizard. |
In the next set of steps, the Wizard guides you through the process of customizing the domain by changing default settings.
| Tip: | For a more detailed description of each configuration setting, refer to the WebLogic Server document “Customizing the Environment.” |
After you have customized the environment, the Configuration Wizard guides you through the process of configuring database and JMS options.
For detailed information on each of the options in this section, see the WebLogic Server document “Customizing Existing JDBC and JMS Settings.” See also “Configuring JDBC Data Sources” in Configuring and Managing WebLogic JDBC.”
| Note: | For nonXA data sources, be sure to select a non-XA driver. For database setup requirements related to using the Asynchronous proliferation setting, refer to the Database Guide. |
After the database and JMS options are configured, the Configuration Wizard guides you through the final steps in your domain configuration.
| Tip: | If you need to change anything, click the Previous button to return to a previous window. |
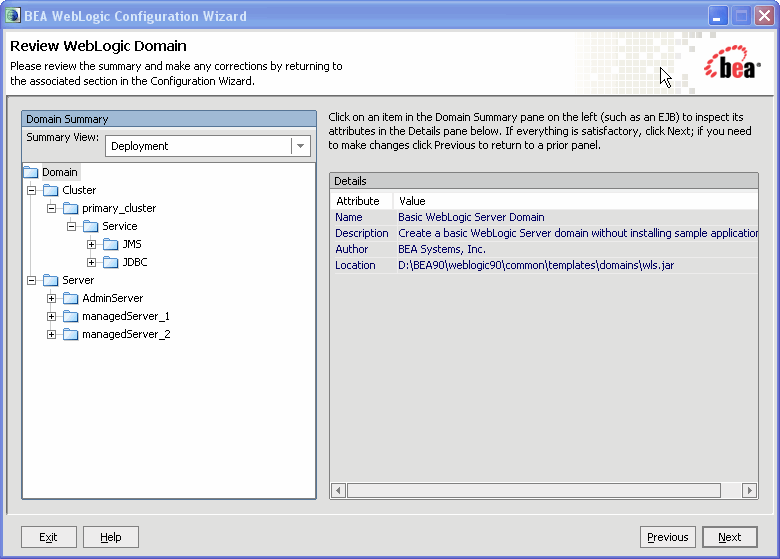
The Administration Server requires a WebLogic Portal installation; however, do not deploy your WebLogic Portal applications to the Administration Server.
| Note: | The Administration Server must always be running when WebLogic Portal is running in a clustered environment. This ensures that the cluster’s policy data stays in sync with the references to that data that are stored by WebLogic Portal in the database. |
For detailed information on configuring startup scripts for the Administration Server, see the WebLogic Server document “Managing Server Startup and Shutdown.”
For detailed information and procedures to configure and manage basic JMS system resources, such as JMS servers and JMS system modules, see the WebLogic Server document “Configuring and Managing WebLogic JMS.”
This section on creating Managed Server directories includes the following topics:
For more information on Managed Servers, see the WebLogic Server document “Understanding WebLogic Server Domains.”
Now that you have configured your domain, including defining your Managed Servers, you need to create a server root directory for each Managed Server. There are many options for this, depending on whether or not the Managed Server will reside on the same machine as the Administration Server and whether or not you will use the Node Manager.
config.xml in a Managed Server domain is not used. Instead, the config.xml file in the Administration Server is used. The only requirement for Managed Servers is to have the wsrpKeystore.jks file one directory above the server directory (in the equivalent of a domain-level directory). This file is required if you want to use WSRP with SAML security between WebLogic Portal 8.1x and 9.2 domains. | Note: | WebLogic Portal must be installed on all Managed Servers. |
This section lists the basic procedure for creating WebLogic Portal domains on the Managed Servers. For more information about Managed Servers, see the WebLogic Server document “Understanding WebLogic Server Domains.”
WEBLOGIC_HOME/common/bin/config.cmd (or config.sh). The Welcome dialog appears, as shown in Figure 3-3. | Tip: | You do not need to be running WebLogic Server to start the Configuration Wizard. |

| Note: | It is important you choose the same JDK across all instances in the cluster. |
| Tip: | For detailed information on configuring startup scripts for Managed Servers, see the WebLogic Server document “Managing Server Startup and Shutdown.” |
Once you have created a domain for a Managed Server, you can reuse the same domain for your other Managed Server on the same machine by specifying different servername parameters to your startManagedWebLogic script, or create new managed domains using the domain Configuration Wizard.
| Note: | If you decide not to use a full domain for your Managed Servers (that is, not include all files in the domain-level directory), be sure you keep or put a copy of wsrpKeystore.jks in the directory directly above the server directory (in the equivalent of the domain-level directory). This file is required if you want to use WSRP with SAML security between WebLogic Portal 8.1x and 9.2 domains. |
This section includes the following sections:
| Note: | WebLogic Portal does not currently support the WebLogic Server feature called production redeployment, also called side-by-side versioning. For information on this WebLogic Server feature, see “Overview of Redeployment Strategies.” |
One limitation of redeploying a portal application to a WebLogic Server cluster is that during redeployment, users cannot access the site. For Enterprise environments where it is not possible to schedule down time to update a portal application with new portlets and other components, a multi-cluster configuration lets you keep your portal application up and running during redeployment.
The basis for a multi-clustered environment is the notion that you have a secondary cluster to which user requests are routed while you update the portal application in your primary cluster.
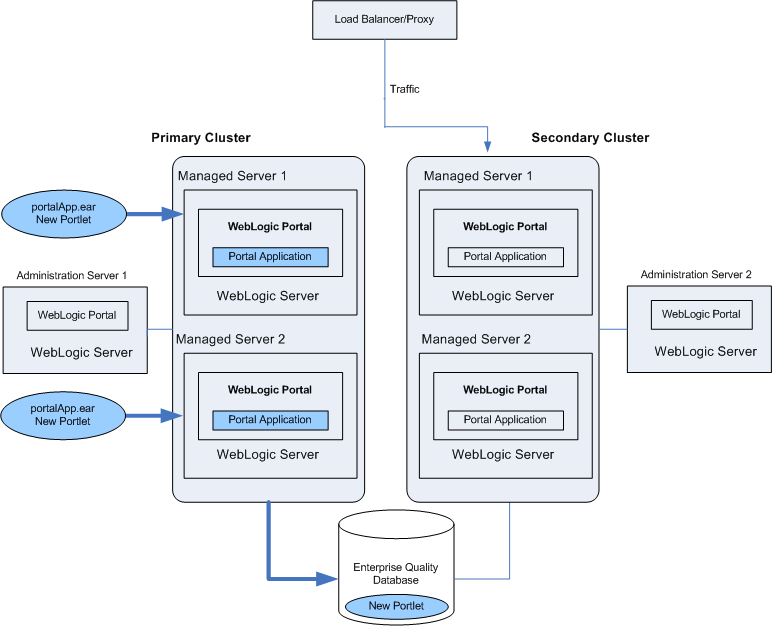
For normal operations, all traffic is sent to the primary cluster, as shown in Figure 3-8. Traffic is not sent to the secondary cluster under normal conditions because the two clusters cannot use the same session cache. If traffic was being sent to both clusters and one cluster failed, a user in the middle of a session on the failed cluster would be routed to the other cluster, and the user’s session cache would be lost.

When the primary cluster is being updated, all traffic is routed to the secondary cluster, then the primary cluster is updated with a new Portal EAR, as shown in Figure 3-9. This EAR has a new portlet, which is loaded into the database. Routing requests to the secondary cluster is a gradual process. Existing requests to the primary cluster must first end over a period of time until no more requests exist. At that point, you can update the primary cluster with the new portal application.
After the primary cluster is updated, all traffic is routed back to the primary cluster, and the secondary cluster is updated with the new EAR, as shown in Figure 3-10. Because the database was updated when the primary cluster was updated, the database is not updated when the secondary cluster is updated. After updating the secondary cluster, you will have to synchronize LDAP servers. For details on LDAP synchronization, see WebLogic Server documentation Exporting and Importing Information in the Embedded LDAP Server.
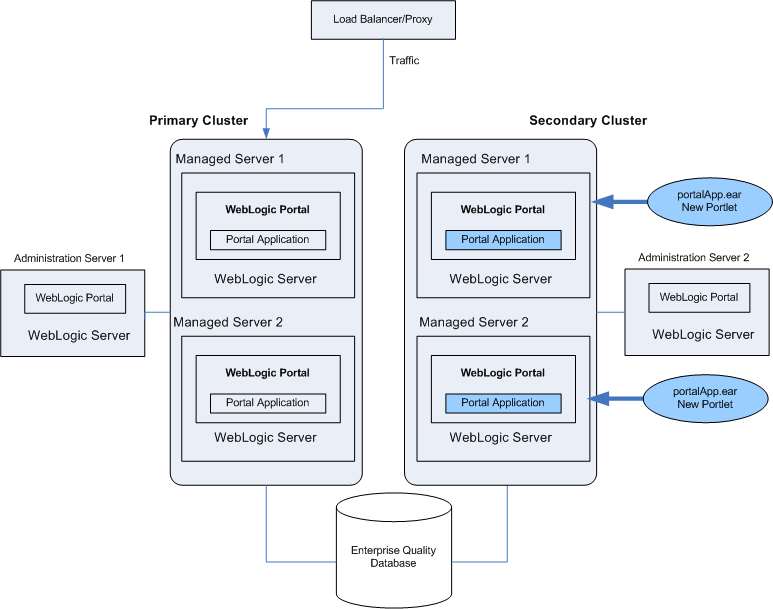
Even though the secondary cluster does not receive traffic under normal conditions, you must still update it with the current portal application. When you next update the portal application, the secondary cluster temporarily receives requests, and the current application must be available.
In summary, to upgrade a multi-clustered portal environment, you switch traffic away from your primary cluster to a secondary one that is pointed at the same portal database instance. You can then update the primary cluster and switch users back from the secondary. This switch can happen instantaneously, so the site experiences no down time. However, in this situation, any existing user sessions will be lost during the switches.
A more advanced scenario is a gradual switchover, where you switch new sessions to the secondary cluster, and after the primary cluster has no existing user sessions you upgrade it. Gradual switchovers can be managed using a variety of specialized hardware and software load balancers. For both scenarios, there are several general concepts that should be understood before deploying applications, including the portal cache and the impact of using a single database instance.
When you configure multiple clusters for your portal application, they will share the same database instance. This database instance stores configuration data for the portal. This can become an issue because when you upgrade the primary cluster it is common to make changes to portal configuration information in the database. These changes are then picked up by the secondary cluster where users are working.
For example, redeploying a portal application with a new portlet to the primary cluster will add that portlet configuration information to the database. This new portlet will in turn be picked up on the secondary cluster. However, the new content (JSP pages or Page Flows) that is referenced by the portlet is not deployed on the secondary cluster.
Portlets are invoked only when they are part of a desktop, so having them available to the secondary cluster has no immediate effect on the portal that users see. However, adding a new portlet to a desktop with the WebLogic Portal Administration Console will immediately affect the desktop that users see on the secondary cluster. In this case, that portlet would show up, but the contents of the portlet will not be found.
To handle this situation, you have several options:
| Tip: | It is possible to update an existing portlet’s content URI to a new location that is not yet deployed. For this reason, exercise caution when updating the content URI of a portlet. The best practice is to update the content URIs as part of a multi-phase update. |
When running two portal clusters simultaneously against the same database, you must also consider the portal cache, as described in the next section.
WebLogic Portal provides facilities for a sophisticated cluster-aware cache. This cache is used by a number of different portal frameworks to cache everything from markup definitions to portlet preferences. Additionally, developers can define their own caches using the portal cache framework.
For detailed information on setting the portal cache, see the WebLogic Portal Development Guide.
For any cache entry, the cache can be enabled or disabled, a time to live can be set, the cache maximum size can be set, the entire cache can be flushed, or you can invalidate a specific key.
When a portal framework asset that is cached is updated, it will typically write something to the database and automatically invalidate the cache across all machines in the cluster. This process keeps the cache in sync for users on any Managed Server.
When operating a multi-clustered environment for application redeployment, special care needs to be taken with regard to the cache. The cache invalidation mechanism does not span both clusters, so it is possible to make changes on one cluster that is written to the database but not picked up immediately on the other cluster. Because this situation could lead to system instability, it is recommended that during this user migration window the caches be disabled on both clusters. This is important when you have a gradual switchover between clusters versus a hard switch that drops existing user sessions.


|