


|
|
This chapter describes how to use the Oracle Communications Services Gatekeeper domain configuration tools to set up Oracle WebLogic Server for use with Oracle Communications Services Gatekeeper. It covers:
Before you run the domain tools, you should have:
In order to run Oracle Communications Services Gatekeeper, its container, Oracle WebLogic Server, must be given basic information about the various parts of the system. This is called configuring the domain. A domain is the basic administrative unit in Oracle WebLogic Server. It consists of an Administration Server and, usually, one or more Managed Servers, which may be associated into clusters.
The Administration Server provides a central point for managing the domain and providing access to the Oracle WebLogic Server administration tools.
| Note: | A single Oracle WebLogic Server instance can function as both the Administration Server and a Managed Server, depending on the needs of the installation. For example, developers creating communication service extensions using the Platform Development Studio commonly might run both the Administration Server and Managed Servers on a single machine. |
Managed Servers are often grouped together into clusters. Clusters are groups of server instances that work together to provide scalability and high availability. Clusters improve performance and provide failover should a server instance become unavailable. The servers within a cluster can run on the same machine, or they can reside on different machines. To the client, a cluster appears as a single Oracle WebLogic Server instance.
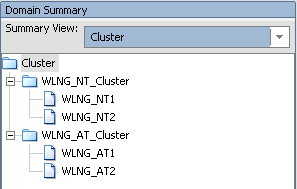
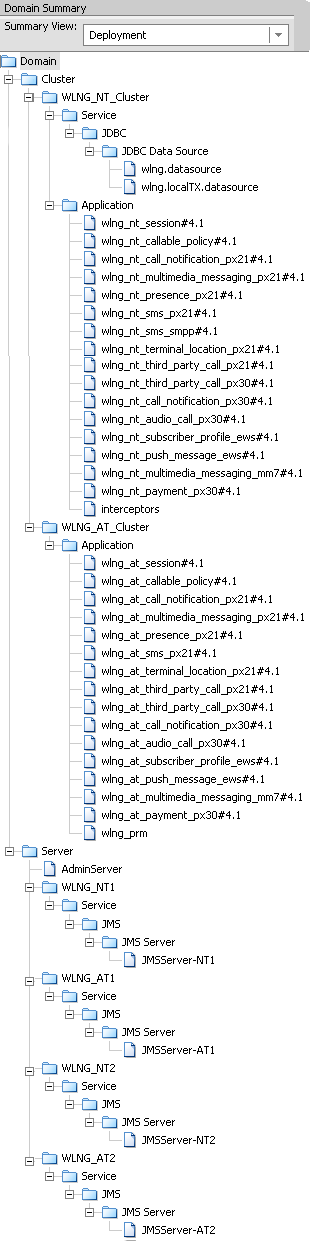
Managed Servers, or the clusters into which they are linked, host application components - in this case, the communication services - and resources, which are also deployed and managed as part of the domain. In Figure 7-3 below, the applications (wlng_nt_<communication-service-name#version> and wlng_at_<communication-service-name#version>) are assigned to the two clusters (WLNG_NT_Cluster and WLNG_AT_Cluster). But each Network Tier server must have its own JMS resources, so they are shown per server.
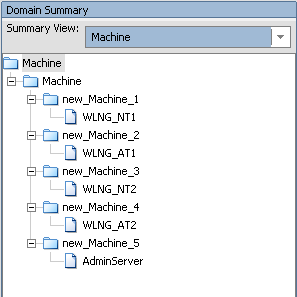
Each server instance is also assigned to a Machine, a logical representation of actual hardware. The Machine representation is used by the Administration Server to start and stop remote servers using the Node Manager. Multiple server instances can run in a single Machine.
For more information on Oracle WebLogic Server domains, see Oracle WebLogic Server Creating WebLogic Domains Using the Configuration Wizard at http://download.oracle.com/docs/cd/E12840_01/common/docs103/confgwiz/index.html.
| Note: | All servers must have their domains configured. You can either use one of the methods below to manually configure each server in your installation, or you can configure the domain on your Administration server and then use the pack and unpack commands provided by WLS to package the configuration data for copying to all the other servers. For more information on pack and unpack, see Oracle WebLogic Server Creating Templates and Domains Using the pack and unpack Commands at http://download.oracle.com/docs/cd/E12840_01/common/docs103/pack/. The scripts themselves are located in the <wlsserver>/common/bin directory. In the default installation, this would be <beahome>\wlserver_10.3\common\bin. |
Use the following instructions if you wish to use the GUI-based Configuration Wizard to configure Oracle WebLogic Server for Oracle Communications Services Gatekeeper.
| Note: | If you want to use the GUI-based Wizard, the console attached to the machine on which you are configuring the domain must support a Java-based GUI. All consoles for Windows systems support Java-based GUIs, but not all consoles for UNIX/Linux systems do. If you attempt to start the configuration program in graphical mode on a system that cannot support a graphical display, the configuration program automatically starts console-mode installation. |
You can start the Configuration Wizard in graphical mode from either the Windows Start menu or from the command line.
Start->Programs->Oracle Communications Services Gatekeeper<ver#>->OCSG 4.1->Tools->Configuration Wizard
| Note: | If you have used the GUI-based installer, and the Run Quickstart box is checked in the Installation Complete window, the Quickstart window opens automatically. Simply click Start Domain Configuration Wizard to launch the Wizard. |
\common\bin subdirectory. For example:cd c:\<beahome_dir>\wlserver_10.3\common\bin
config and Enter | Note: | You can also use Explorer to find the config.cmd file in c:\<beahome_dir>\wlserver_10.3\common\bin, and simply double-click it. |
To start the GUI Configuration Wizard:
/common/bin subdirectory. For example:cd c:/<beahome_dir>/wlserver_10.3/common/bin
sh config.sh | Note: | If you are configuring an HP-UX installation, you must modify the config.sh script before running it. |
config.sh in a text editor and scroll down to the following section: "${JAVA_HOME}/bin/java" -Dprod.props.file=${WL_HOME}/.product.properties -Dpython.cachedir=/tmp/cachedir ${MEM_ARGS} com.bea.plateng.wizard.WizardController ${ARGUMENTS} -Djava.security.egd flag, so that the section reads:'${JAVA_HOME}/bin/java' -Djava.security.egd=/dev/random -Dprod.props.file=${WL_HOME}/.product.properties -Dpython.cachedir=/tmp/cachedir ${MEM_ARGS}com.bea.plateng.wizard.WizardController ${ARGUMENTS}The GUI Configuration Wizard prompts you to enter specific information about your system and configuration. For instructions on responding to the prompts during installation, see the following table
| Note: | If you are going to be using any CORBA based functionality that in one way or another connects to a machine other than your own, you should not use the value “localhost” in any of your configuration choices.
|
Use the following instructions if you wish to use the Console-based Configuration Wizard to configure Oracle WebLogic Server for Oracle Communications Services Gatekeeper. Specific instructions on launching the Wizard by platform are found after the next section.
The Console Configuration Wizard is designed to mimic as closely as possible the choices available in the GUI version, but in a completely text-based form. The following images give you a sense of the way the Console Screen displays certain types of workflow choices.
In Figure 7-5 above, the top of the current screen is marked by the Oracle Communications Services Gatekeeper Wizard banner. The top part of the screen displays the set of configuration parameters that can be set - in this case, configuration information for Managed Servers. The center of the screen indicates the range of options - in this case, Add a server, Modify a server, or Delete a server. The bottom part of the screen prompts for the user input that is available in this screen - in this case
Enter option number to select or [Exit][Previous][Next]>
Here the user can either enter an option (indicated by number) or choose to use one of the standard navigation commands. In this case, option 1, Add a server, has been chosen. The entry is confirmed by pressing the Enter key:
In Figure 7-6, the bottom of the screen displays the user input prompt:
Enter name for a new OR [Exit][Previous][Next]>The name for the new Managed Server to be added, WLNG_NT3, has been filled in. Again the input is confirmed by pressing the Enter key.
In Figure 7-7 the new Managed Server, WLNG_NT3, has been added. Note the right arrow (->) next to the new Server’s name. This indicates that this is the selected item, and that any options chosen will affect that item. To finish with this server and select another item in the list, enter 5 - Done and the Enter key.
In Figure 7-8 the center section again presents you with work options. In this case, additional modifications need to be done. The user enters 2 for Modify and then Enter to confirm.
In Figure 7-9, the user input prompt asks which item needs modification. The row number of the Managed Server WLNG_NT1 is chosen. Once Enter is pressed, WLNG_NT1 will be the selected item.
There are a number of different options throughout the Wizard process, but in general they all follow this same pattern: the top of the screen indicates what is being configured; the center of the screen indicates the range of options; and the bottom of the screen prompts for user input.
To start the Console Configuration Wizard:
To start the Console Configuration Wizard:
/common/bin subdirectory. For example:cd c:/<beahome_dir>/wlserver_10.3/common/bin
sh config.sh | Note: | If you are configuring an HP-UX installation, you must modify the config.sh script before running it. |
config.sh in a text editor and scroll down to the following section: "${JAVA_HOME}/bin/java" -Dprod.props.file=${WL_HOME}/.product.properties -Dpython.cachedir=/tmp/cachedir ${MEM_ARGS} com.bea.plateng.wizard.WizardController ${ARGUMENTS} -Djava.security.egd flag, so that the section reads:'${JAVA_HOME}/bin/java' -Djava.security.egd=/dev/random -Dprod.props.file=${WL_HOME}/.product.properties -Dpython.cachedir=/tmp/cachedir ${MEM_ARGS}com.bea.plateng.wizard.WizardController ${ARGUMENTS}To create your domain, respond to the prompts in each section by entering the number associated with your choice, pressing Enter, or typing next (or n) to accept the current selection. For instructions on responding to the prompts during installation, see the following table.
| Note: | If you are going to be using any CORBA based functionality that in one way or another connects to a machine other than your own, you should not use the value “localhost” in any of your configuration choices. |
The right arrow (->) indicates the value currently selected. To quit the Configuration Wizard, enter Exit in response to any prompt. To review or change your selection, enter Previous at the prompt.
| Note: | Instead of typing complete words when you want to enter [Exit], [Previous], and [Next], you can use the following one-letter shortcuts: x, p, and n, respectively. |
There are five standard domain templates included with the console version of the Oracle Communications Services Gatekeeper Configuration Wizard. Select the number of the template you wish to use:
Creates a domain with two servers, each with an AT and an NT instance and a database. Replication of the database must be set up separately. This configuration can be expanded later in the process Creates a basic distributed domain, with a two instance Access cluster and a two instance Network cluster. This configuration can be expanded later in the process. Creates a basic distributed domain, with a two instance Access cluster and a two instance Network cluster. This configuration can be expanded later in the process.It also creates the additional datasources required for use with an Oracle RAC based installation Creates an all-in-one domain, with Access and Network Tier and Administration on a single machine. This configuration is common for development machines. Creates a domain for integration with Oracle Service Bus, using the SOA Facade. If you are using this template, you need additional special information. Please look in Installation of SOA Facades for this information.
|
|||
Specify the username of the main Administrative user. This name is used to boot the Administration Server and connect to it. For setup purposes, you should use “weblogic”. User names are case sensitive. Do not use commas or any characters in the following comma-separated list:
|
|||
|
|||
Select
1, Yes. For more information on the values you might enter in the following screens in the general context of WebLogic Server, see the description on customizing the environment in Oracle WebLogic Server Creating WebLogic Domains Using the Configuration Wizard at
http://download.oracle.com/docs/cd/E12840_01/common/docs103/confgwiz/index.html.
|
|||
Use this window to add or change connection information for Managed Servers. Each Managed Server is an instance of WebLogic Server. Some information may already be filled in. Modify the
Listen addresses of each of your instances. You can add more Managed Server instances you wish to include in your domain here, or you can use the Management Console later.
|
|||
Use this window to modify connection information for clusters. Clusters are logical representations that for reasons of scalability and high availability allow multiple Managed Servers to act as if they were a single host. The
WLNG Domain with Access and Network Clusters 10.3.0.0 template creates two clusters, with each cluster containing two Managed Server instances. Modify the Cluster address values to reflect the changes you made in the previous screen. Values should be comma-delimited, with no spaces. You can also change the Multicast adress if your installation requires it.
|
|||
Use this window to add any additional Managed Servers you created in the Configure Managed Servers window to clusters configured in the Configure Clusters window. Select the number of the appropriate cluster, then indicate which servers you would like to assign by selecting or unselecting them, using the appropriate number. When you have finished making your assignments, hit Enter to accept your choices.
|
|||
Use this window to add or change information about Machines. In the context of WebLogic Server, a Machine is the logical representation of the system that hosts one or more WebLogic Server instances, for the purposes of starting and stopping remote servers using the Node Manager. In a domain, machine definitions identify a particular, physical piece of hardware and are used to associate a computer with the Managed Servers it hosts.
For more information about the various fields, see the section on how to configure machines in Oracle WebLogic Server Creating WebLogic Domains Using the Configuration Wizard at
http://download.oracle.com/docs/cd/E12840_01/common/docs103/confgwiz/index.html.
|
|||
Use this window to add or change information about UNIX Machines. In the context of WebLogic Server, a Machine is the logical representation of the system that hosts one or more WebLogic Server instances. In a domain, machine definitions identify a particular, physical piece of hardware and are used to associate a computer with the Managed Servers it hosts. The Administration Server and the Node Manager application use this machine definition to start remote servers.
For more information about the various fields, see the section on how to configure UNIX machines in Oracle WebLogic Server Creating WebLogic Domains Using the Configuration Wizard at
http://download.oracle.com/docs/cd/E12840_01/common/docs103/confgwiz/index.html.
|
|||
Use this window to assign Servers (either Administration or Managed) to their appropriate Machines, if necessary. Select the number of the appropriate Machine, then indicate which servers you would like to choosing to change by selecting or unselecting them, using the appropriate number. When you have finished making your assignments, hit Enter to accept your choices.
|
|||
Use this window to make adjustments to the Oracle Communications Services Gatekeeper JDBC datasources if you are using a non-RAC database. A JDBC datasource contains a pool of database connections that are created when the data source instance is created—when it is deployed or targeted, or at server startup. Applications look up a datasource on the JNDI tree, and then request a connection.
You must modify the wlng.localTX.datasource, used for local transactions, and the wlng.datasource, used for transactionally-based database access.
|
|||
Use this window to make adjustments to the Oracle Communications Services Gatekeeper transactional JDBC data source. A JDBC data source contains a pool of database connections that are created when the data source instance is created—when it is deployed or targeted, or at server startup. Applications look up a data source on the JNDI tree, and then request a connection.
To edit the data source, enter
1 - Modify and then 1 -> wlng.datasource. Typically, fields you may need to edit include:
|
|||
Use this window to make adjustments in the data source for local transactions. The values should be the same as in wlng.datasource with these differences:
|
|||
Use this window to make adjustments to the Oracle Communications Services Gatekeeper JDBC datasources if you are using a RAC database. A JDBC datasource contains a pool of database connections that are created when the data source instance is created—when it is deployed or targeted, or at server startup. Applications look up a datasource on the JNDI tree, and then request a connection.
Use this window to modify each of the necessary datasources in order. The two wlng.localTX.datasources are used for local transactions. The two wlng.datasources are used for transactionally-based database access.
|
|||
Use this window to make adjustments to the first datasource for local transactions. A JDBC data source contains a pool of database connections that are created when the data source instance is created—when it is deployed or targeted, or at server startup. Applications look up a data source on the JNDI tree, and then request a connection.
Enter the option you would like to modify by number. Typically, fields you may need to edit include:
|
|||
Use this window to make adjustments to the second datasource for local transactions. You should enter the same values as in wlng.localTX.datasource-1 with the following exceptions:
|
|||
Use this window to make adjustments to the first transactional datasource. A JDBC data source contains a pool of database connections that are created when the data source instance is created—when it is deployed or targeted, or at server startup. Applications look up a data source on the JNDI tree, and then request a connection.
Enter the option you would like to modify by number. Typically, fields you may need to edit include:
|
|||
Use this window to make adjustments to the second transactional datasource. You should enter the same values as in wlng.datasource-1 with the following exceptions:
|
|||
Use the following instructions if you wish to use scripts and the Oracle WebLogic Scripting Tool to configure Oracle WebLogic Server for Oracle Communications Services Gatekeeper. The WebLogic Scripting Tool (WLST) is a command-line scripting interface that system administrators and operators can use to monitor and manage Oracle WebLogic Server instances and domains. The WLST scripting environment is based on the Java scripting interpreter, Jython. For more general information on WLST, see Oracle WebLogic Server WebLogic Scripting Tool at http://download.oracle.com/docs/cd/E12840_01/wls/docs103/config_scripting/.
| Caution: | WLST is a powerful, flexible tool, and has a significant learning curve associated with its effective use. If you do not know how to use WLST and do not wish to spend the time to become familiar with it, consider using one of the Configuration Wizards to set up your domains instead. |
You must set a number of environment variables for WLST to run properly. To simplify this, the Oracle Communications Services Gatekeeper installer provides shell/cmd scripts that must be run before WLST is invoked. The scripts are found at <beahome>/wlng400/server/bin. There are both setWLSEnv.sh and setWLSEnv.cmd versions available. It is usually enough simply to run the appropriate script, but some shells may require using source, as in:
source <beahome>/wlserver10.3/server/bin/setWLSEnv.sh
If this still does not work, you may need to change shells. There have been some issues reported with bash, particularly on HPUX machines. If you are having problems with your shell, change to an sh shell before running the script.
Oracle Communications Services Gatekeeper provides five possible WLST scripts from which you can select. The scripts are found in the <beahome>/wlserver10.3/common/templates/scripts/wlst/ directory:
basic-ocsg-ha.py uses the domain template basic-ocsg-ha-domain.jar for its basic setup. This creates a a domain with two servers, each with an AT and an NT instance and a database. Replication of the database must be set up separately.ocsg-cluster.py uses the domain template ocsg-domain.jar for its basic setup. This creates an all-in-one domain typical of development environments. .access-network-cluster.py uses the domain template ocsg-access-network-domain.jar for its basic setup. This creates a domain with separate Access and Network clusters.access-network-rac-cluster.py uses the domain template ocsg-access-network-rac-domain.jar for its basic setup. This creates a domain with separate Access and Network clusters with the additional datasources that a RAC installation requires.ocsg-osb-integ.py uses the domain template ocsg-osb-integ-domain.jar for its basic setup. This creates a domain for integration of Oracle Communications Services Gatekeeper with Oracle Service Bus.| Note: | If you are configuring an HP-UX installation, you must run the script using the -Djava.security.egd flag. For example, you would invoke the basic-ocsg-ha.py script by typing: |
java -Djava.security.egd=/dev/random weblogic.WLST basic-ocsg-ha.py
wlng-cluster.py to set up a development machine, you can use the script as is.| Note: | It is also possible to remove communication services after the initial deployment. See the System Administration Guide for information on accomplishing this. |
If you are setting up the standard version of one of the multi-cluster domains, only a few variables need to be set at the top of the script, in the section called Configuration (INPUT) Parameters.
#=========================================================================
# Configuration (INPUT) Parameters
#=========================================================================
# listen address input parameters
# example: hostname can be DNSName or IPAddress
AdminServerListenAddress = "host-admin.bea.com"
AdminServerListenPort = 7001
NT1ServerListenAddress = "host-nt1.bea.com"
NT1ListenPort = 8001
NT2ServerListenAddress = "host-nt2.bea.com"
NT2ListenPort = 8001
AT1ServerListenAddress = "host-at1.bea.com"
AT1ListenPort = 8001
AT2ServerListenAddress = "host-at2.bea.com"
AT2ListenPort = 8001
NTClusterAddress = "host-nt1.bea.com:8001,host-nt2.bea.com:8001"
ATClusterAddress = "host-at1.bea.com:8001,host-at2.bea.com:8001"
NTClusterMultiCastAddress = '237.0.0.101'
NTClusterMultiCastPort = 8050
ATClusterMultiCastAddress = '237.0.0.102'
ATClusterMultiCastPort = 8050
# DataSource Settings
# RAC Node-1 Settings
RACNode1URL = "SETME_URL"
# RAC Node-2 Settings
RACNode2URL = "SETME_URL"
# Database settings
OracleXADriver = "SETME_XADRIVER"
OracleNonXADriver = "SETME_nonXADRIVER"
DBUser = "SETME_USER"
DBPassword = "SETME_PASSWORD"
Set the appropriate values for the wlng.datasource (in non-RAC scripts)
wlng.localTX.datasource. The values should be non-XA (only in non-RAC scripts).The following change may also need to be made:
NodeManager ListenAddress values in the Configure Managed Servers section. To do so edit the following line for each managed serverset('ListenAddress','localhost') to change localhost to the correct ListenAddress.If you want to use the WLST script to set up a multi-cluster domain and, at the same time, to add additional servers, you must first make the same edits as in the Multi-cluster standard case. You must also make the following additional kinds of edits. Exactly which edits you need to make depends on how your particular installation is set up.
WLST in offline mode, which is the mode that Oracle Communications Services Gatekeeper scripts use, can access and update only those configuration objects that have been previously persisted to a configuration file. All the provided WLST scripts create this configuration file automatically as they run, but each adds only those objects that are specified in the domain templates. If you need to add more configuration objects, such as additional Managed Servers or Machines, you must add statements to the script to create them before you can configure them.
| Note: | You can also add servers and machines using the Administrative Console GUI after you set up your core domain. This is a simpler way of accomplishing the same goal. |
For example, if you need to add additional Machines, you must create them in the script before you assign Managed Servers to them.
After you create the Machine, you can assign Managed Servers to them. You can also add new Managed Servers. In the code below, the new Managed Server WLNG_NT3 is created and then assigned to new_Machine_5, created above.
You must also add a section to configure any new Machine (and its Node Manager) being added.:
You must assign any newly-created managed servers to their appropriate cluster by adding an “assign server” line
It is always possible to remove communication services after the initial deployment of Oracle Communications Services Gatekeeper. If you know that your installation is not using one or more communication services and you prefer that they not be deployed at all in your system, you can add the following information to your configuration script. Remember that all communication services consist of two .ear files, an Access Tier version and a Network Tier version. You will need to address both files to completely remove the communication service.
For example, to keep the PX 3.0 Third Party Call communication service from being deployed, add the following to your script:
#===================================================================
# Unassign applications to target
#===================================================================
unassign('Application', ‘wlng_at_third_party_call_px30#4.0 ', 'Target', 'WLNG_AT_Cluster')
unassign('Application', ‘wlng_nt_third_party_call_px30#4.0 ', 'Target', 'WLNG_NT_Cluster')
Once you have made all necessary changes to the script, run it using the following command:
java weblogic.WLST <appropriate-version>.py
See Completing Post-Installation for more information.


|