23 Working with the Mail Service
This chapter describes how to use the Send Mail feature and also the features provided through the Mail service. The Send Mail feature does not require the Mail service. That is, even if the Mail service has not been configured in your application, you can use the Send Mail feature with your local mail client.
This chapter includes the following sections:
This chapter is intended for WebCenter Spaces users interested in viewing, creating, and managing mail. Much of this information also applies to custom WebCenter applications, though it is written with WebCenter Spaces users in mind. (For information about custom WebCenter applications, see "Integrating the Mail Service" in Oracle Fusion Middleware Developer's Guide for Oracle WebCenter.)
For information about WebCenter Spaces seeded user roles, see Oracle Fusion Middleware Administrator's Guide for Oracle WebCenter.
Your application administrator has the authority to expose or hide task flows from a particular service. Tasks discussed in this chapter are not available to you if the relevant service is hidden.
23.1 What You Should Know About the Send Mail Feature
Throughout the WebCenter application, you can click the Send Mail icon to mail directly from that resource (Figure 23-1).
For example, from an announcement, click the Send Mail icon to open a mail window prepopulated with information including the announcement text, author, date created, and location. You can edit and add to the mail, as necessary.
The way the mail window is prepopulated depends on the resource sending it. For example, from your Buddies list, click the Send Mail icon to open a mail window prepopulated only with the address of that person.
With group spaces, the mail can be addressed to the individual members of the group space, and, if the group space is configured with a distribution list, then it can be addressed to the distribution list. Group space moderators (and anyone granted the Manage or Configure permission on the group space) set this on the Settings - Services - Mail page. For more information, see Section 14.3.2, "Configuring a Custom Group Space Mail Distribution List."
If the number of recipients is so large that the mail cannot be prepopulated with the addresses, then you must either enter the addresses manually or set up a distribution list for the group space.
Tips:
With the Microsoft Outlook local mail client, you must configure Outlook to support comma-delimited mail addresses; that is, select the Allow comma as address separator checkbox on the Tools - Options - Preferences - E-mail Options - Advanced E-mail Options page.23.1.1 Configuring the Send Mail Feature
The Send Mail feature does not require the WebCenter Mail service. That is, even if the Mail service has not been configured in your application, the Send Mail feature is available using your local mail client.
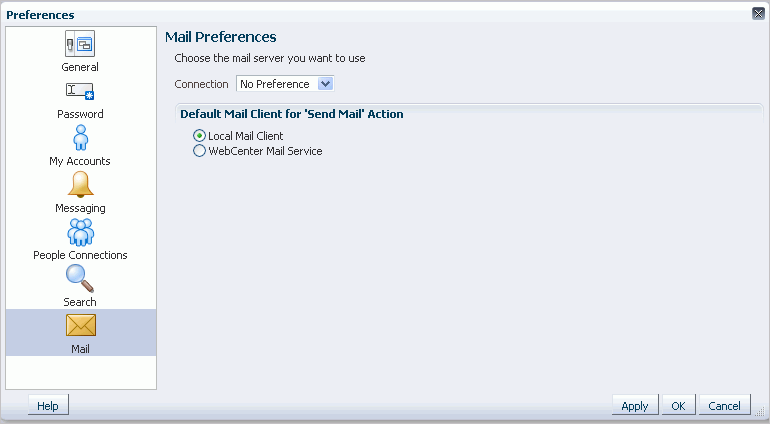
Your administrator determines the mail client that the Send Mail feature uses: either the WebCenter Mail service or a local mail client. The default value is a local mail client. If your administrator enabled users to override this mail client setting, then you can select to use a different mail client on the Mail Preferences page (Figure 23-2).
23.2 What You Should Know About the Mail Service
The Mail service conveniently exposes familiar mail functionality in your WebCenter application interface. The Mail service runs against the same mail server that provides your regular business mail, and the mail messages exposed in your WebCenter application are the same messages you would see in your mail inbox. Many of the same actions are also supported. For example, you can send messages with attachments, forward messages, and so on. The Mail service does not replace your company mail, but rather enhances it by making it accessible within WebCenter.
The Mail service enables users to perform simple mail functions, such as view, read, create and create with attachments, reply, forward, and delete. All mail is stored in your inbox and can be accessed from there through a link.
The Mail service fetches mails from the inbox folder only. It does not support fetching mails from other folders or moving messages.
The Mail service supports any mail server based on IMAP4 and SMTP protocol. A WebCenter Spaces application provides access to multiple mail connections. You can use a different mail connection by selecting it in the application's Preferences settings. For more information, see Section 3.10, "Selecting Your Preferred Mail Connection."
Note:
You can add a Mail task flow to your page from the Catalog dialog in Oracle Composer. For information about adding a task flow, see Section 10.1.4, "Adding Task Flows to a Page."However, all instances of the Mail task flow in an application run against the same mail server and it serves no purpose to add multiple Mail task flow instances. This is true for all service task flows that require connections to back-end servers, for example, task flows from Discussions, Announcements, and IMP services.
The Mail service exposes features from your mail server through the Mail task flow, which can be accessed in two ways:
-
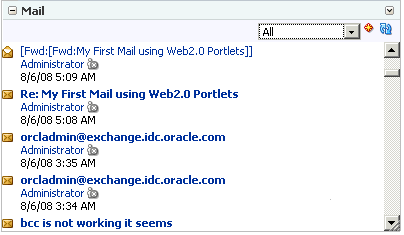
The Mail task flow, available to both custom WebCenter applications and WebCenter Spaces (Figure 23-3)
-
The Mail panel in the WebCenter Spaces Sidebar (WebCenter Spaces only) (Figure 23-4)
Figure 23-4 The Mail Panel in the WebCenter Spaces Sidebar
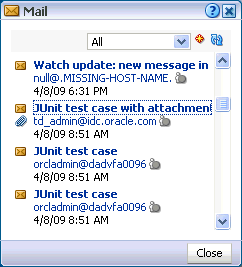
Description of "Figure 23-4 The Mail Panel in the WebCenter Spaces Sidebar"
The Mail panel is simply the Mail task flow provided in the fixed location of the WebCenter Spaces Sidebar.
The Mail task flow presents the following features:
-
A menu for specifying which messages to display
-
A Compose icon for starting the process of creating a new message
-
A Refresh icon for updating the task flow with new messages
Within WebCenter Spaces, a group space moderator can configure the Mail service to automatically create a mailing list of all group space members. Once configured, as members are added to or deleted from the group, the mailing list is updated automatically. For more information, see Section 14.3.2, "Configuring a Custom Group Space Mail Distribution List." All mails sent to a group space mailing list are also posted to the group space discussion forum.
Use the Mail service to mail other WebCenter application users or any user recognized by the back-end server that supports the Mail service.
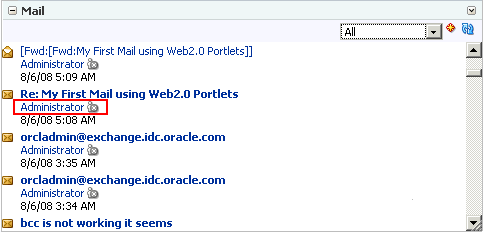
The Mail service is integrated with the Instant Messaging and Presence (IMP) service to provide additional options for contacting others. Each mail message includes the sender's user name and status icon (Figure 23-5), which you can click to open a context menu with options for starting a chat session, calling over VoIP, and so on.
Note:
If the IMP service is not configured in your application, the status icons are grayed out and do not provide context menus.For more information, see Chapter 20, "Working with the Instant Messaging and Presence Service (IMP)."
Users with page-edit privileges can access the task flow's region parameter through the Component Properties dialog in Oracle Composer. For information about accessing the Component Properties dialog and editing properties, see Section 10.4.2, "Setting Component Properties."
For more information about setting the Mail service task flow properties, see Section 23.4, "Setting Mail Service Task Flow Properties."
23.3 Working with the Mail Service Task Flow
The Mail task flow exposes your company's mail server features within the context of your application. Use the Mail task flow to view, respond to, and manage your personal mail.
This section provides information on how to use the Mail task flow. It contains the following subsections:
-
Section 23.3.1, "Adding the Mail Service Task Flow to a Page."
-
Section 23.3.3, "Personalizing Your View of the Mail Task Flow"
-
Section 23.3.8, "Removing Attachments from the Add Attachment Window"
23.3.1 Adding the Mail Service Task Flow to a Page
For the steps to add a Mail service task flow to a page, see Section 10.1.4, "Adding Task Flows to a Page."
23.3.2 Logging in to Mail
Before you can access your mail in a WebCenter application, you must provide your mail login credentials. The first time you access a Mail task flow, it displays the message depicted in Figure 23-6.
Figure 23-6 Login Message in a Mail Task Flow

Description of "Figure 23-6 Login Message in a Mail Task Flow"
To log in to a Mail task flow:
-
Go to a Mail task flow, and click the Login to Mail link (Figure 23-6) to open an External Application Login dialog (Figure 23-7).
Figure 23-7 External Application Login Dialog
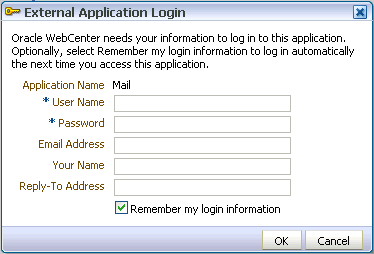
Description of "Figure 23-7 External Application Login Dialog"
Note:
The External Application Login dialog may include additional fields and information, depending on the requirements of the service that provides it. For more information about external applications and storing your login credentials in a WebCenter Spaces application, see Section 3.6, "Providing Login Information for External Applications." -
Enter your user name and password and any other login credentials that your mail application requires.
Required fields are marked with an asterisk (*).
-
Optionally, select Remember my login information to store your credentials.
The next time you log in to the application, your mail credentials are retrieved from storage and you are logged in.
-
Click OK, and the Mail task flow displays mails from your inbox.
23.3.3 Personalizing Your View of the Mail Task Flow
You can personalize your view of the Mail task flow by filtering the number of displayed messages. For example, you can select to display only the messages that were delivered Today, Since Yesterday, This Week, or This Month. Additionally, you can select to display All messages in your inbox.
Note:
By default, the Mail service displays the 50 most recent mail messages from your mail server inbox folder. However, if required, your Fusion Middleware administrator can configure this to a higher value, if your server supports the increase in memory cache that fetching additional mail requires. Care should be taken to have a value suitable to your environment. This value impacts all users. That is, if the Mail service is configured to read 200 recent mail messages, then the Mail service reads 200 recent mail messages for all users.Personalizations affect only your view of the Mail task flow. No other user's view is changed because of your selection.
To personalize your view of the Mail task flow:
-
Go to the Mail task flow.
-
Open the menu at the top of the task flow (Figure 23-8).
Figure 23-8 The Mail Personalization Menu
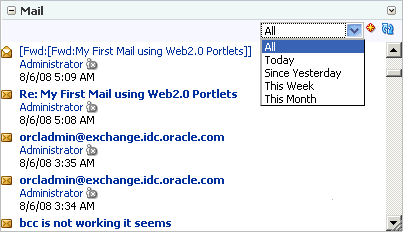
Description of "Figure 23-8 The Mail Personalization Menu"
-
Select a display option.
Choose from:
-
All—to show all messages
-
Today—to show all messages received today
-
Since Yesterday—to show all messages received yesterday and today
-
This Week—to show all messages received in this calendar week
-
This Month—to show all messages received in this calendar month
The Mail task flow redraws, displaying only those messages that match your selection.
-
23.3.4 Opening Mail Messages
The messages that display in your Mail task flow are the same messages that display in your regular mail application inbox. You open them in much the same way, too.
To open a mail message:
-
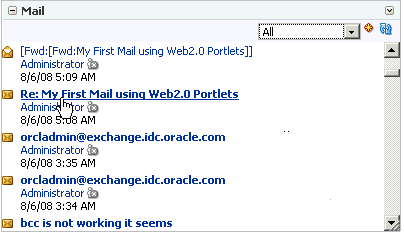
Go to a Mail task flow, and click the link to the message you want to open (Figure 23-9).
-
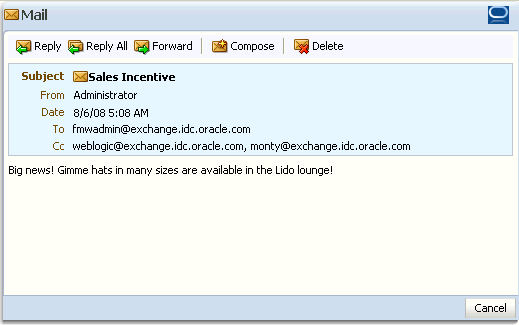
The message opens (Figure 23-10).
-
After reading the message click the Cancel button to close the message (Figure 23-11).
Figure 23-11 The Cancel Button on a Mail Message
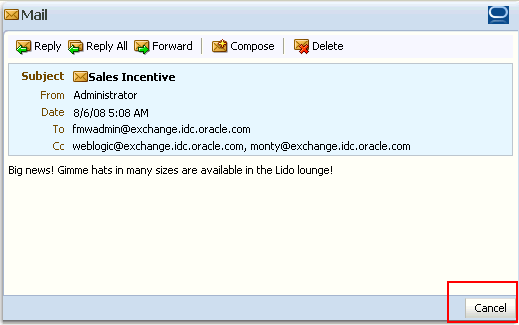
Description of "Figure 23-11 The Cancel Button on a Mail Message"
Note:
HTML reports, tables, images that are inlined (copy paste), and fonts viewed in a mail message may not render correctly. The Mail service requires HTML data to be well-formed to display as expected in a mail message.The mail should show everything that your browser supports. However, some tags, like <script>, are encoded and disabled from execution.
23.3.5 Downloading Mail Attachments
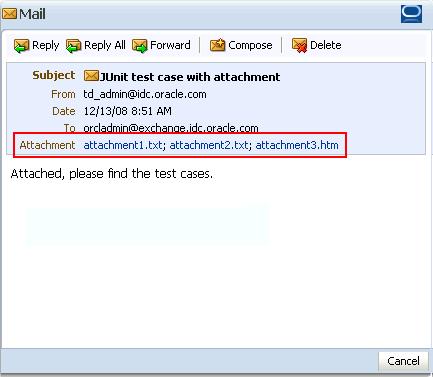
Attachments display in mail messages as links (Figure 23-12).
Accessing files associated with attachments is the same as accessing a file from any browser window: simply click the link. Clicking an attachment link opens a download dialog that gives you the option of viewing the file in its native application or saving the file to a local drive. This is browser behavior, so the way you follow through depends on the browser you use.
23.3.6 Composing and Sending Mail Messages
Composing and sending messages through the Mail service in a WebCenter application is very much like doing so in your regular mail.
To compose and send a mail message:
-
In a Mail task flow, click the Compose icon (Figure 23-13).
-
Figure 23-13 The Compose Icon on a Mail Task Flow
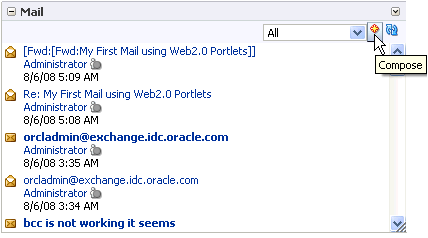
Description of "Figure 23-13 The Compose Icon on a Mail Task Flow"
-
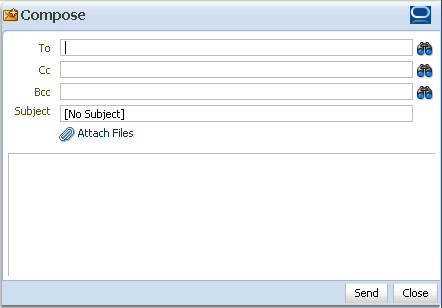
In the Compose window (Figure 23-14), enter recipients in the To, Cc, and Bcc fields as you require.
In a given field, separate multiple entries with a comma (,).
The Compose window is directly connected to your mail server, so you can use the Find User icons (Figure 23-15) to find mail addresses and contacts.
Figure 23-15 Find User Icons in a Compose Window
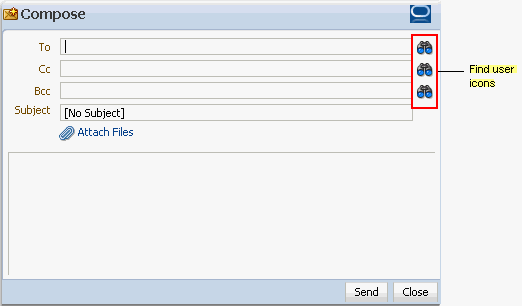
Description of "Figure 23-15 Find User Icons in a Compose Window"
Click the Find User icon and, in the resulting dialog, enter—minimally—the first two characters of the user name for which you are searching. Click the Search button, and all names matching your search criteria appear in the results area.
-
In the Subject field, enter a subject for your message.
Enter up to 255 characters.
-
Compose your message. The Mail service supports only plain text messages.
-
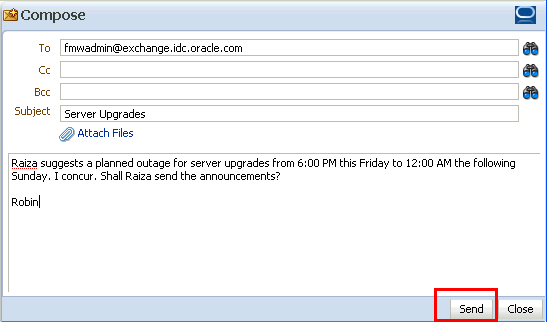
Click the Send button (Figure 23-16).
Figure 23-16 The Send Button in a Compose Window
Description of "Figure 23-16 The Send Button in a Compose Window"
23.3.7 Sending Mail with Attachments
Just like your regular mail, you can use the Mail task flow to send messages with attachments.
To send a mail with attachments:
-
Create a mail message as described in Section 23.3.6.
-
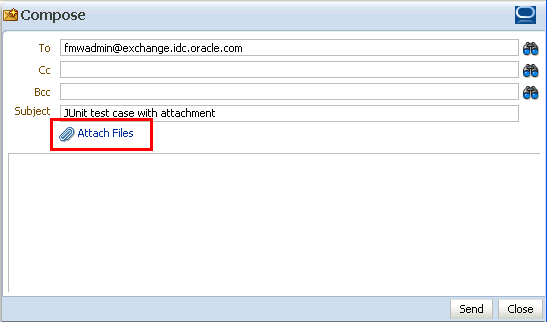
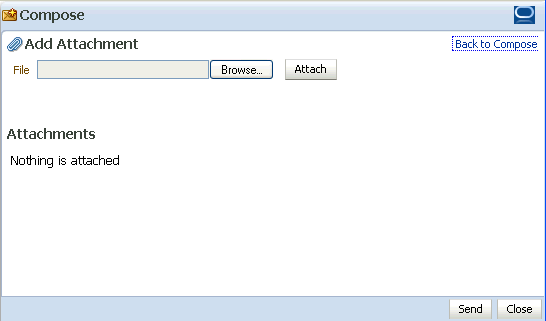
In the Compose window, click the Attach Files link (Figure 23-17).
The Add Attachment window opens (Figure 23-18).
-
Click the Browse button to locate and select an attachment.
-
Click the Attach button to attach the selected file.
The file size must be greater than zero bytes but less than 2 MB. Zero-byte files do not get attached.
Note:
It is recommended that you avoid attaching large files, as this causes the server to slow down or not respond. If you attach large files (greater than 2MB), then because of how the HTTP protocol handles attachments, the system reports an error only after reading all of the 2MB characters. -
Repeat steps 3 and 4 to add additional attachments.
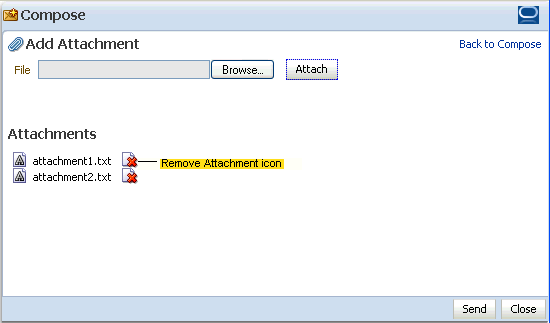
Attachments are listed under the Attachments heading in the Add Attachment window (Figure 23-19).
Figure 23-19 Attachments in the Add Attachment Window
Description of "Figure 23-19 Attachments in the Add Attachment Window"
A Remove Attachment icon appears next to each attachment (Figure 23-19). Click this to remove a selected attachment from the window.
-
Click the Back to Compose link to go back to the Compose window.
-
Click the Send button.
23.3.8 Removing Attachments from the Add Attachment Window
You can remove attachments from the Add Attachment window and from the Compose window:
-
To remove mail attachments from the Add Attachment window, click the Remove Attachment icon next to the attachment you want to remove (Figure 23-20).
Figure 23-20 Attachments in the Add Attachment Window

Description of "Figure 23-20 Attachments in the Add Attachment Window"
For information about accessing the Add Attachment window, see Section 23.3.7, "Sending Mail with Attachments."
-
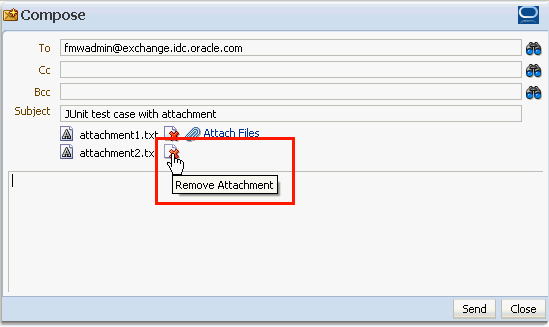
To remove mail attachments from the Compose window, click the Remove Attachment icon next to the attachment you want to remove (Figure 23-21).
Figure 23-21 Remove Attachment Icon in the Compose Window
Description of "Figure 23-21 Remove Attachment Icon in the Compose Window"
For information about accessing the Compose window, see Section 23.3.6, "Composing and Sending Mail Messages."
23.3.9 Replying to and Forwarding Mail
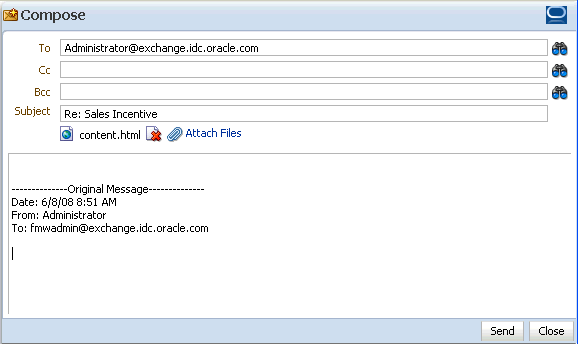
When you reply to or forward a mail, the mail content is sent as an attached HTML file instead of being displayed in the mail message window. Replying to and forwarding mail is as straightforward as in your regular mail application.
To reply to or forward a mail message:
-
Go to a Mail task flow.
-
Click the link to the message you want to reply to or forward (Figure 23-22).
The message opens (Figure 23-23).
-
Select one from the following options:
-
Click the Reply button to reply to the sender. Figure 23-24 shows the resulting Mail window.
-
Click the Reply All button to reply to all recipients (including users who received a blind copy).
-
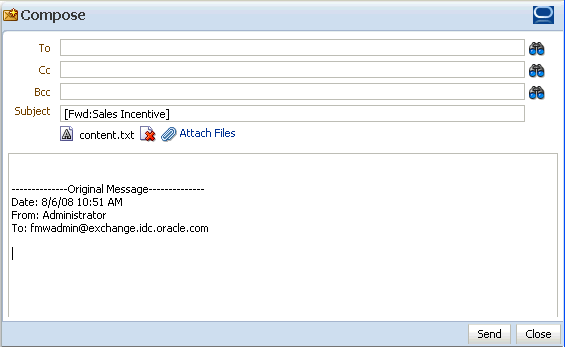
Click the Forward button to send the message on to a third party. Figure 23-25 shows the resulting window.
Figure 23-25 A Forwarded Mail Message Window
Description of "Figure 23-25 A Forwarded Mail Message Window"
-
-
In the resulting Compose window, enter recipients in the To, Cc, and Bcc fields as you require.
In a given field, separate multiple entries with a comma (,).
The Compose window is directly connected to your mail server, so you can use the Find User icons, next to the To, Cc, and Bcc fields, to find mail addresses and contacts.
Click the Find User icon and, in the resulting dialog, enter—minimally—the first two characters of the user name for which you are searching. Click the Search button, and all names matching your search criteria appear in the results area.
-
Optionally, revise the subject in the Subject field.
-
In the Mail's message area, enter your reply or any forwarding message before or after the original message.
-
Optionally, add attachments as described in Section 23.3.7, "Sending Mail with Attachments."
-
Click Send.
The message is sent, and the original message reappears.
-
Click the Cancel button at the bottom of the original message to close the window (Figure 23-26).
23.3.10 Refreshing Mail
You must perform a refresh to check for new mail messages. Because the refresh operation triggers an event to the server to check for new mails, it may take a while to get new messages. Therefore, you may have to refresh a couple of times to display new mails in the Mail task flow.
To refresh Mail:
-
Go to the Mail task flow.
-
Click the Refresh icon (Figure 23-27) on the task flow.
Figure 23-27 The Refresh Icon on the Mail Task Flow
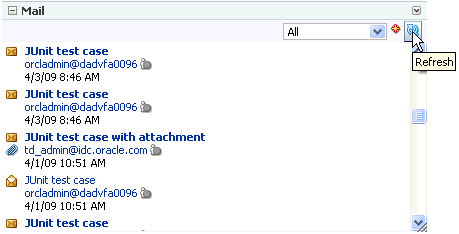
Description of "Figure 23-27 The Refresh Icon on the Mail Task Flow"
The Mail task flow displays the latest mails.
23.3.11 Deleting Mail
You can easily remove a message from your inbox.
To delete a Mail message:
-
Open the message you want to delete as described in Section 23.3.4, "Opening Mail Messages."
-
Click the Delete button at the top of the message.
23.4 Setting Mail Service Task Flow Properties
The Mail service task flow has associated properties, which users with sufficient privileges can access from the Component Properties dialog in Oracle Composer (Figure 23-28). Many properties are common to all task flows, and the method for accessing task flow properties is the same from task flow to task flow. Common task flow properties and how to access them are discussed in Section 10.4, "Setting Properties on Page Content."
Figure 23-28 Mail Task Flow Component Properties
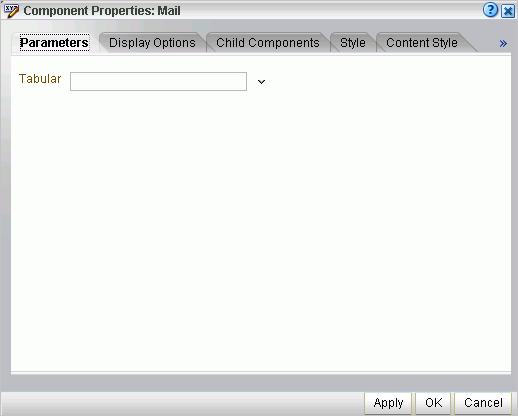
Description of "Figure 23-28 Mail Task Flow Component Properties"
The properties on the Parameters tab of the Component Properties dialog control the default task flow content and facilitate the wiring of the task flow to page parameters and page definition variables. These properties are unique to the task flow type. For more information, see Section 10.4.3, "Working with Component Parameters." For information about wiring pages and components, see Chapter 11, "Wiring Pages, Task Flows, Portlets, and UI Components."
Changes to the properties on the Display Options, Style, and Content Style tabs affect the appearance and behavior of the task flow for all users. These properties are common to all task flows. For more information, see Section 10.4.4, "Working with Component Display Options" and Section 10.4.7, "Working with Style and Content Style Properties."
The content of the Events tab depends on the events supported by the task flow. For more information, see Section 10.4.8, "Working with Component Contextual Events."
The Child Components tab displays all of the components contained within the current component. It provides controls for rearranging, showing, and hiding child components. Not all components contain children. So you may find this tab devoid of content. For more information, see Section 10.4.6, "Working with Child Components."
All properties on the Parameters and Display Options tabs provide access to an Expression Language (EL) editor, which you can use to select or specify a variable value instead of a constant value. Click the Edit icon next to a property field to open the editor. For more information about using the editor and for descriptions of common EL expressions, see Section 10.4.5, "Using Expression Language (EL) Expressions with Component Properties."
The Mail task flow has one associated region parameter: Tabular. Using the EL value type, enter a value of true to display the information associated with a mail message, such as its subject, sender, and, date sent, in a tabular format. Figure 23-29 illustrates a tabular format Mail task flow.
Figure 23-29 A Mail Task Flow where the Region Parameter Tabular Is Set to True

Description of "Figure 23-29 A Mail Task Flow where the Region Parameter Tabular Is Set to True"
